Showing posts with label CLI. Show all posts

Friday, March 31, 2017

A Python class like the Unix tee command


By Vasudev Ram


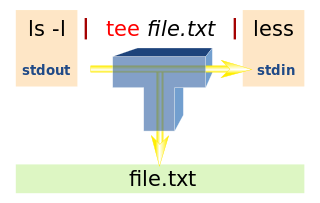
Tee image attribution

Hi readers,

A few days ago, while doing some work with Python and Unix (which I do a lot of), I got the idea of trying to implement something like the Unix tee command, but within Python code - i.e., not as a Python program but as a small Python class that Python programmers could use to get tee-like functionality in their code.

Today I wrote the class and a test program and tried it out. Here is the code, in file tee.py:
# tee.py
# Purpose: A Python class with a write() method which, when 
# used instead of print() or sys.stdout.write(), for writing 
# output, will cause output to go to both sys.stdout and 
# the filename passed to the class's constructor. The output 
# file is called the teefile in the below comments and code.

# The idea is to do something roughly like the Unix tee command, 
# but from within Python code, using this class in your program.

# The teefile will be overwritten if it exists.

# The class also has a writeln() method which is a convenience 
# method that adds a newline at the end of each string it writes, 
# so that the user does not have to.

# Python's string formatting language is supported (without any 
# effort needed in this class), since Python's strings support it, 
# not the print method.

# Author: Vasudev Ram
# Web site: https://vasudevram.github.io
# Blog: https://jugad2.blogspot.com
# Product store: https://gumroad.com/vasudevram

from __future__ import print_function
import sys
from error_exit import error_exit

class Tee(object):
    def __init__(self, tee_filename):
        try:
            self.tee_fil = open(tee_filename, "w")
        except IOError as ioe:
            error_exit("Caught IOError: {}".format(repr(ioe)))
        except Exception as e:
            error_exit("Caught Exception: {}".format(repr(e)))

    def write(self, s):
        sys.stdout.write(s)
        self.tee_fil.write(s)

    def writeln(self, s):
        self.write(s + '\n')

    def close(self):
        try:
            self.tee_fil.close()
        except IOError as ioe:
            error_exit("Caught IOError: {}".format(repr(ioe)))
        except Exception as e:
            error_exit("Caught Exception: {}".format(repr(e)))

def main():
    if len(sys.argv) != 2:
        error_exit("Usage: python {} teefile".format(sys.argv[0]))
    tee = Tee(sys.argv[1])
    tee.write("This is a test of the Tee Python class.\n")
    tee.writeln("It is inspired by the Unix tee command,")
    tee.write("which can send output to both a file and stdout.\n")
    i = 1
    s = "apple"
    tee.writeln("This line has interpolated values like {} and '{}'.".format(i, s))
    tee.close()

if __name__ == '__main__':
    main()
And when I ran it, I got this output:
$ python tee.py test_tee.out
This is a test of the Tee Python class.
It is inspired by the Unix tee command,
which can send output to both a file and stdout.
This line has interpolated values like 1 and 'apple'.

$ type test_tee.out
This is a test of the Tee Python class.
It is inspired by the Unix tee command,
which can send output to both a file and stdout.
This line has interpolated values like 1 and 'apple'.

$ python tee.py test_tee.out > main.out

$ fc /l main.out test_tee.out
Comparing files main.out and TEST_TEE.OUT
FC: no differences encountered
As you can see, I compared the teefile with the redirected stdout output, and they are the same.

I have not implemented the exact same features as the Unix tee. E.g. I did not implement the -a option (to append to a teefile if it exists, instead of overwriting it), and did not implement the option of multiple teefiles. Both are straightforward.

Ideas for the use of this Tee class and programs using it:

- the obvious one - use it like the Unix tee, to both make a copy of some program's output in a file, and show the same output on the screen. We could even pipe the screen (i.e. stdout) output to a Python (or other) text file pager :-)

- to capture intermediate output of some of the commands in a pipeline, before the later commands change it. For another way of doing that, see:

Using PipeController to run a pipe incrementally

- use it to make multiple copies of a file, by implementing the Unix tee command's multiple output file option in the Tee class.

Then we can even use it like this, so we don't get any screen output, and also copy some data to multiple files in a single step:

program_using_tee_class.py >/dev/null # or >NUL if on Windows.

Assuming that multiple teefiles were specified when creating the Tee object that the program will use, this will cause multiple copies of the program's output to be made in different specified teefiles, while the screen output will be thrown away. IOW, it will act like a command to copy some data (the output of the Python program) to multiple locations at the same time, e.g. one could be on a directory on your hard disk, another could be on a USB thumb/pen drive, a third could be on a network share, etc. The advantage here is that by copying from the source only once, to multiple destinations, we avoid reading or generating data multiple times, one for the copy to each destination. This can be more efficient, particularly for large outputs / copies.

For more fun Unixy / Pythonic stdin / stdout / pipe stuff, check out:

[xtopdf] PDFWriter can create PDF from standard input

and a follow-up post, that shows how to use the StdinToPDF program in that post, along with my selpg Unix C utility, to print only selected pages of text to PDF:

Print selected text pages to PDF with Python, selpg and xtopdf on Linux

Enjoy your tea :)

- Vasudev Ram - Online Python training and consulting

Get updates (via Gumroad) on my forthcoming apps and content.

Jump to posts: Python * DLang * xtopdf

Subscribe to my blog by email

My ActiveState Code recipes

Follow me on: LinkedIn * Twitter

Are you a blogger with some traffic? Get Convertkit:

Email marketing for professional bloggers


Thursday, January 5, 2017

Give your Python function a {web,CLI} hug!

By Vasudev Ram


I came across this interesting Python framework called hug recently:

www.hug.rest

Hug is interesting because it allows you to create a function in Python and then expose it via both the web and the command-line. It also does some data type validation using Python 3's annotations (not shown in my example, but see the hug quickstart below). Hug is for Python 3 only, and builds upon on the Falcon web framework (which is "a low-level high performance framework" for, among other things, "building other frameworks" :).

Here is the hug quickstart.

The hug site says it is "compiled with Cython" for better performance. It makes some claims about being one of the faster Python frameworks. Haven't checked that out.

Here is an HN thread about hug from about a year ago, with some interesting comments, in which the author of hug also participated, replying to questions by readers, explaining some of his claims, etc. Some benchmark results for hug vs. other tools are also linked to in that thread:

I tried out some of the features of hug, using Python 3.5.2, with a small program I wrote.

Below is the test program I wrote, hug_pdp.py. The pdp in the filename stands for psutil disk partitions, because it uses the psutil disk_partitions() function that I blogged about here recently:

Using psutil to get disk partition information with Python

Here is hug_pdp.py:
"""
hug_pdp.py
Use hug with psutil to show disk partition info 
via Python, CLI or Web interfaces.
Copyright 2017 Vasudev Ram
Web site: https://vasudevram.github.io
Blog: http://jugad2.blogspot.com
Product store: https://gumroad.com/vasudevram
"""

import sys
import psutil
import hug

def get_disk_partition_data():
    dps = psutil.disk_partitions()
    fmt_str = "{:<8} {:<7} {:<7}"

    result = {}
    result['header'] = fmt_str.format("Drive", "Type", "Opts")
    result['detail'] = {}
    for i in (0, 2):
        dp = dps[i]
        result['detail'][str(i)] = fmt_str.format(dp.device, dp.fstype, dp.opts)
    return result

@hug.cli()
@hug.get(examples='drives=0,1')
@hug.local()
def pdp():
    """Get disk partition data"""
    result = get_disk_partition_data()
    return result

@hug.cli()
@hug.get(examples='')
@hug.local()
def pyver():
    """Get Python version"""
    pyver = sys.version[:6]
    return pyver

if __name__ == '__main__':
    pdp.interface.cli()
Note the use of hug decorators in the code to enable different kinds of user interfaces and HTTP methods.

Here are some different ways of running this hug-enabled program, with their outputs:

As a regular Python command-line program, using the python command:
$ python  hug_pdp.py
{'detail': {'0': 'C:\\      NTFS    rw,fixed', '2': 'E:\\      CDFS    ro,cdrom'
}, 'header': 'Drive    Type    Opts   '}

As a command-line program, using the hug command:
$ hug -f hug_pdp.py -c pdp
{'detail': {'2': 'E:\\      CDFS    ro,cdrom', '0': 'C:\\      NTFS    rw,fixed'}, 
'header': 'Drive    Type    Opts   '}
You can see that this command gives the same output as the previous one.
But you can also run the above command with the "-c pyver" argument instead of "-c pdp", giving:
$ hug -f hug_pdp.py -c pyver
3.5.2
(I added the pyver() function to the program later, after the initial runs with just the pdp() function, to figure out how using the hug command to run the program was different from using the python command to run it. The answer can be seen from the above output, though there is another difference too, shown below (the web interface). Next, I ran it this way:
$ hug -f hug_pdp.py
which started a web server (running on port 8000), giving this output on the console:
/#######################################################################\
          `.----``..-------..``.----.
         :/:::::--:---------:--::::://.
        .+::::----##/-/oo+:-##----:::://
        `//::-------/oosoo-------::://.       ##    ##  ##    ##    #####
          .-:------./++o/o-.------::-`   ```  ##    ##  ##    ##  ##
             `----.-./+o+:..----.     `.:///. ########  ##    ## ##
   ```        `----.-::::::------  `.-:::://. ##    ##  ##    ## ##   ####
  ://::--.``` -:``...-----...` `:--::::::-.`  ##    ##  ##   ##   ##    ##
  :/:::::::::-:-     `````      .:::::-.`     ##    ##    ####     ######
   ``.--:::::::.                .:::.`
         ``..::.                .::         EMBRACE THE APIs OF THE FUTURE
             ::-                .:-
             -::`               ::-                   VERSION 2.2.0
             `::-              -::`
              -::-`           -::-
\########################################################################/

 Copyright (C) 2016 Timothy Edmund Crosley
 Under the MIT License


Serving on port 8000...
Then I went to this URL in my browser:
http://localhost:8000/pdp
which gave me this browser output:
{"detail": {"0": "C:\\      NTFS    rw,fixed", "2": "E:\\      CDFS    ro,cdrom"}, 
"header": "Drive    Type    Opts   "}
which is basically the same as the earlier command-line interface output I got.
Next I went to this URL:
http://localhost:8000/pyver
which gave me this:
"3.5.2 "
which again is the same as the earlier corresponding command-line output of the hug command.

Of course, the output from both the web and CLI interfaces is either JSON or a dict, so in a real life app, we would have to get that output and use it in some way, such as (process it further before we) format it better for human consumption. If using a JavaScript front-end, it can easily be done; if using the code as is with the command-line mode, we need to figure out a way to do it. The hug module may have some support for that.

What is also interesting is that when I run it this way:
http://localhost:8000/
I get this browser output:
{
    "404": "The API call you tried to make was not defined. Here's a definition 
of the API to help you get going :)",
    "documentation": {
        "overview": "\nhug_pdp.py\nUse hug with psutil to show disk partition 
info \nvia Python, CLI or Web interfaces.\nCopyright 2017 Vasudev Ram\nWeb site: 
https://vasudevram.github.io\nBlog: http://jugad2.blogspot.com\nProduct store: 
https://gumroad.com/vasudevram\n",
        "handlers": {
            "/pdp": {
                "GET": {
                    "usage": "Get disk partition data",
                    "examples": [
                        "http://localhost:8000/pdp?drives=0,1"
                    ],
                    "outputs": {
                        "format": "JSON (Javascript Serialized Object Notation)",
                        "content_type": "application/json"
                    }
                }
            },
            "/pyver": {
                "GET": {
                    "usage": "Get Python version",
                    "examples": [
                        "http://localhost:8000/pyver"
                    ],
                    "outputs": {
                        "format": "JSON (Javascript Serialized Object Notation)",
                        "content_type": "application/json"
                    }
                }
            }
        }
    }
}
which shows that trying to access an unsupported route, gives as output, this:

an overview, supported URLs/routes, HTTP methods, and documentation about how to use it and the output formats - almost none of which code was written for, mind.

Go give your Python code a hug!

- Vasudev Ram - Online Python training and consulting

Get updates (via Gumroad) on my forthcoming apps and content.

Jump to posts: Python * DLang * xtopdf

Subscribe to my blog by email

My ActiveState Code recipes

Follow me on: LinkedIn * Twitter

Managed WordPress Hosting by FlyWheel


Thursday, September 5, 2013

Amazon Web Services CLI rewritten in Python


By Vasudev Ram

The Amazon Web Services Command Line Interface (AWS CLI) has been rewritten, in Python.

Saw this news in a thread on the Python Reddit.

According to the thread, it (the AWS CLI) was earlier written in Java, and now uses Python, and either boto or boto-core.

I had blogged about boto here, earlier. boto is a Python library to enable access to Amazon Web Services, written by Mitch Garnaat.

The Google command line tool gsutil also uses boto.

If you are interested in creating command line tools for Unix or Linux systems, you may like to read my tutorial article on the topic, published on IBM developerWorks:

Developing a Linux command-line utility

Though the tutorial uses the C language, many of the concepts discussed in the article are applicable to writing command line tools in Python as well, because, when writing such tools, you will basically be using the C library and Unix features such as standard input, standard output, pipes and I/O redirection, but via Python.


O'Reilly Velocity Conference


- Vasudev Ram - Dancing Bison Enterprises

Contact me