
Welcome to Sewing With Numbers, a newsletter about sewing, math, design and how to draft your own sewing patterns. Through simple pattern drafting exercises, I’ll show you how fun, useful and empowering math can be. ✂️ Posts older than 3 months are archived for paid subscribers. But if subscriptions aren’t your thing, I also have PDF Booklets for older projects in my shop.
Hello my mathy-sewing friends! Today, we will be finishing the draft of our knit tank top. Last week, we drafted the Front and Back body block and today we’ll add style lines, construction elements and draft the bands of fabric that will finish the neckline and armholes.
You can catch up on previous posts in this series here:
Our approach to today’s lesson (continuing from where we left off last week):
Gather (more) information
Part 3 Draw in the neckline
Part 4 Add waist shaping
Part 5 Adjust shoulder width
Part 6 True the pattern, add seam and hem allowance
Draft the armhole and neck bands
Like last time, I'm referencing two texts, Designing and Patternmaking for Stretch Fabrics by Keith Richardson and Plus-size Patternmaking for Womenswear by Gabby Brown and Leila Kelleher (Bookshop affiliate link).
For this tutorial, we’ll be using a few measurements from last time and adding a few new ones. Below is a recap of the numbers you will need to use today.
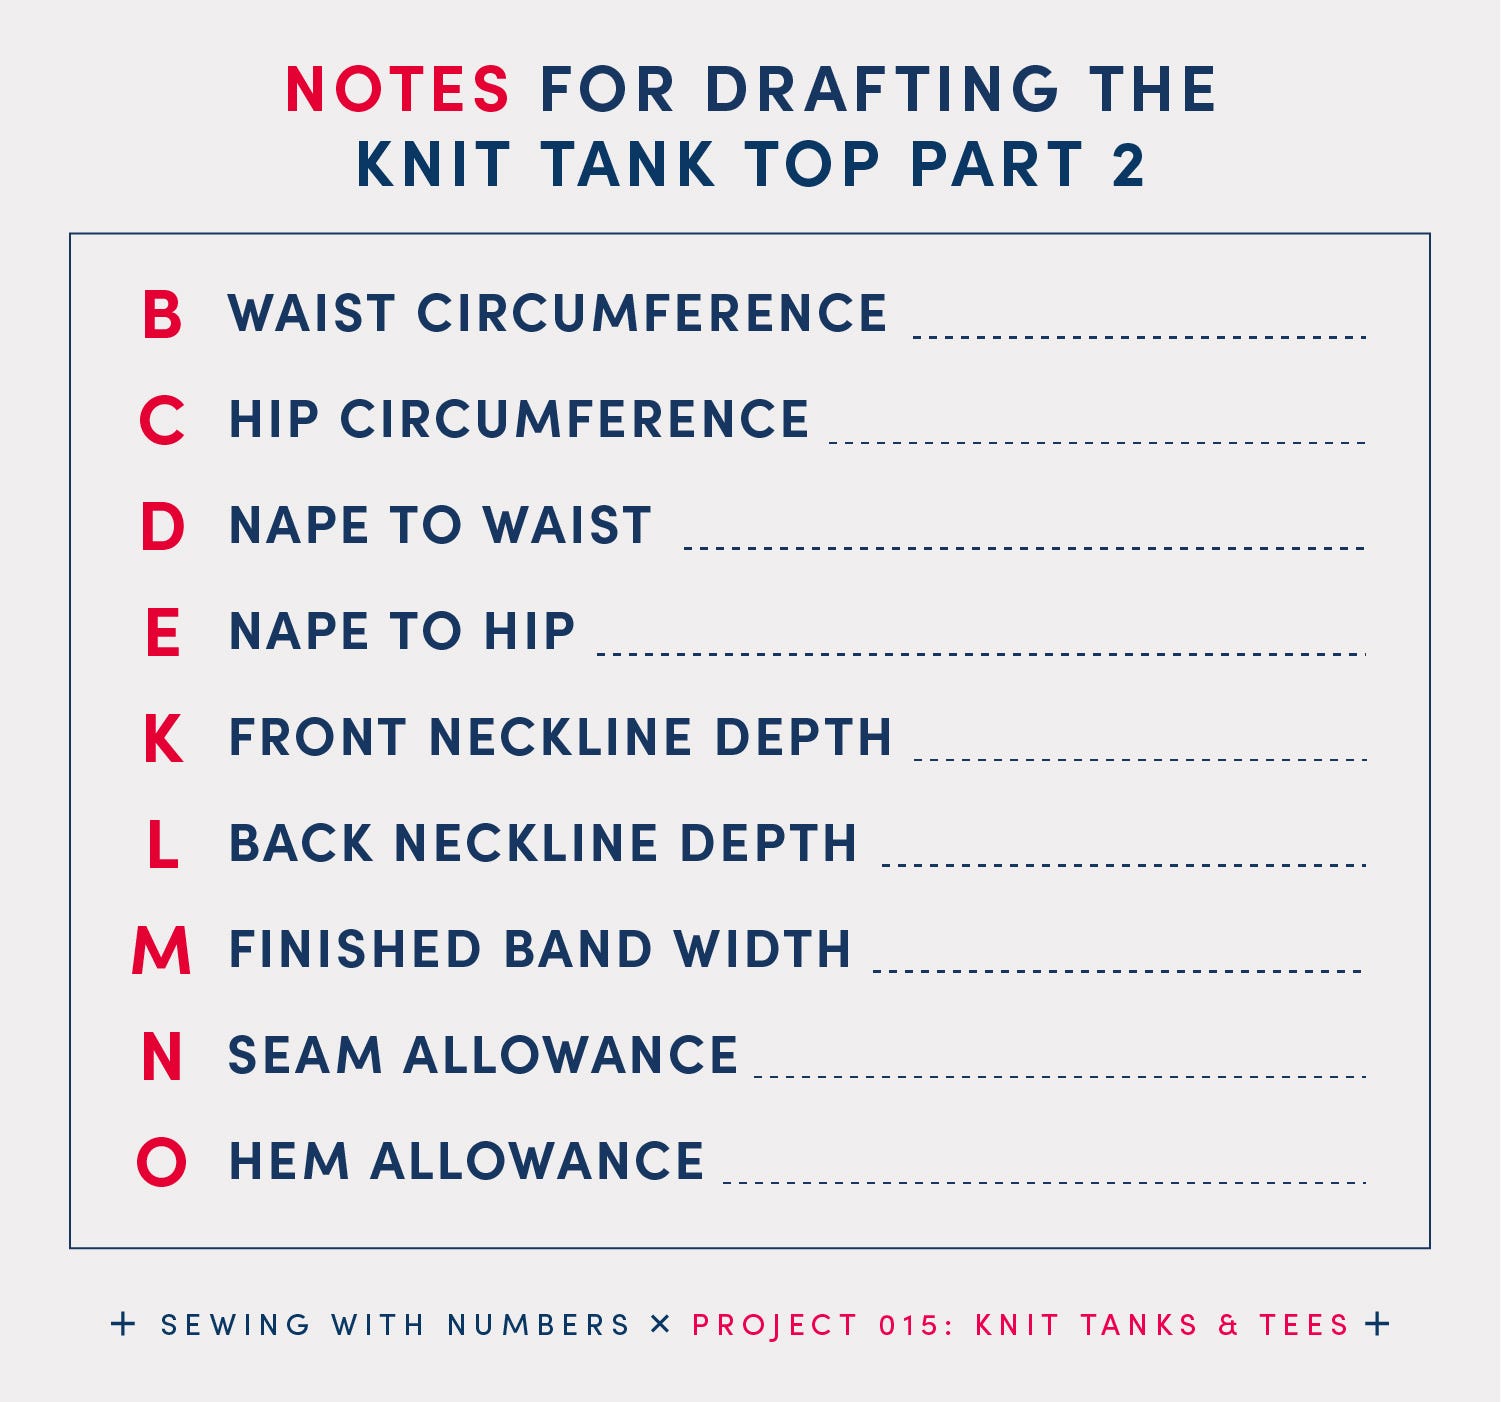
B Waist Circumference Measure the circumference of the waist. This will be used, if you want to make a tank or tee that is more fitted at the waist. You can decide if you want a tank that is fitted with zero ease or semi-fitted with some positive ease.
C Hip Circumference Measure the circumference of the largest part of the hips. If you are drafting a very fitted tank, I also recommend measuring your High Hip circumference and the length from the nape (or waist) to the high hip. These measurements are also helpful if you want the bottom of the tank to sit at the high hip.
K Front Neckline Depth Designer’s choice! This is how low you want the front neckline at the center front.
L Back Neckline Depth Designer’s choice! Likewise, this is how low you want the back neckline at the center back. This is usually about .75-1” for sizes XS-XXL (per the Richardson text). In the Brown/Kelleher text, this is called “back neck drop” and is given as 1.75” for a 1X size. I tried to find a chart for other sizes in the text but couldn’t find one.
M Finished Band Width Designer’s choice! This is the finished width of the folded piece of fabric that finishes the neckline and armholes. I like a finished band of 3/8” to 1/2” wide. If you want a much wider band, you may want to subtract more from the armhole and neckline to compensate.
N Seam Allowance Designer’s choice! When sewing knits, 1/4” is common. I like to use 3/8” to give myself more fabric to work with.
O Hem Allowance Designer’s choice! I would allow at least 1” for the hem.
For this example, I’m drawing a standard jewel neckline. Btw, at this stage, this block can still be used for a t-shirt pattern. We’ll adjust the shoulder seam to make a tank style in part 5.
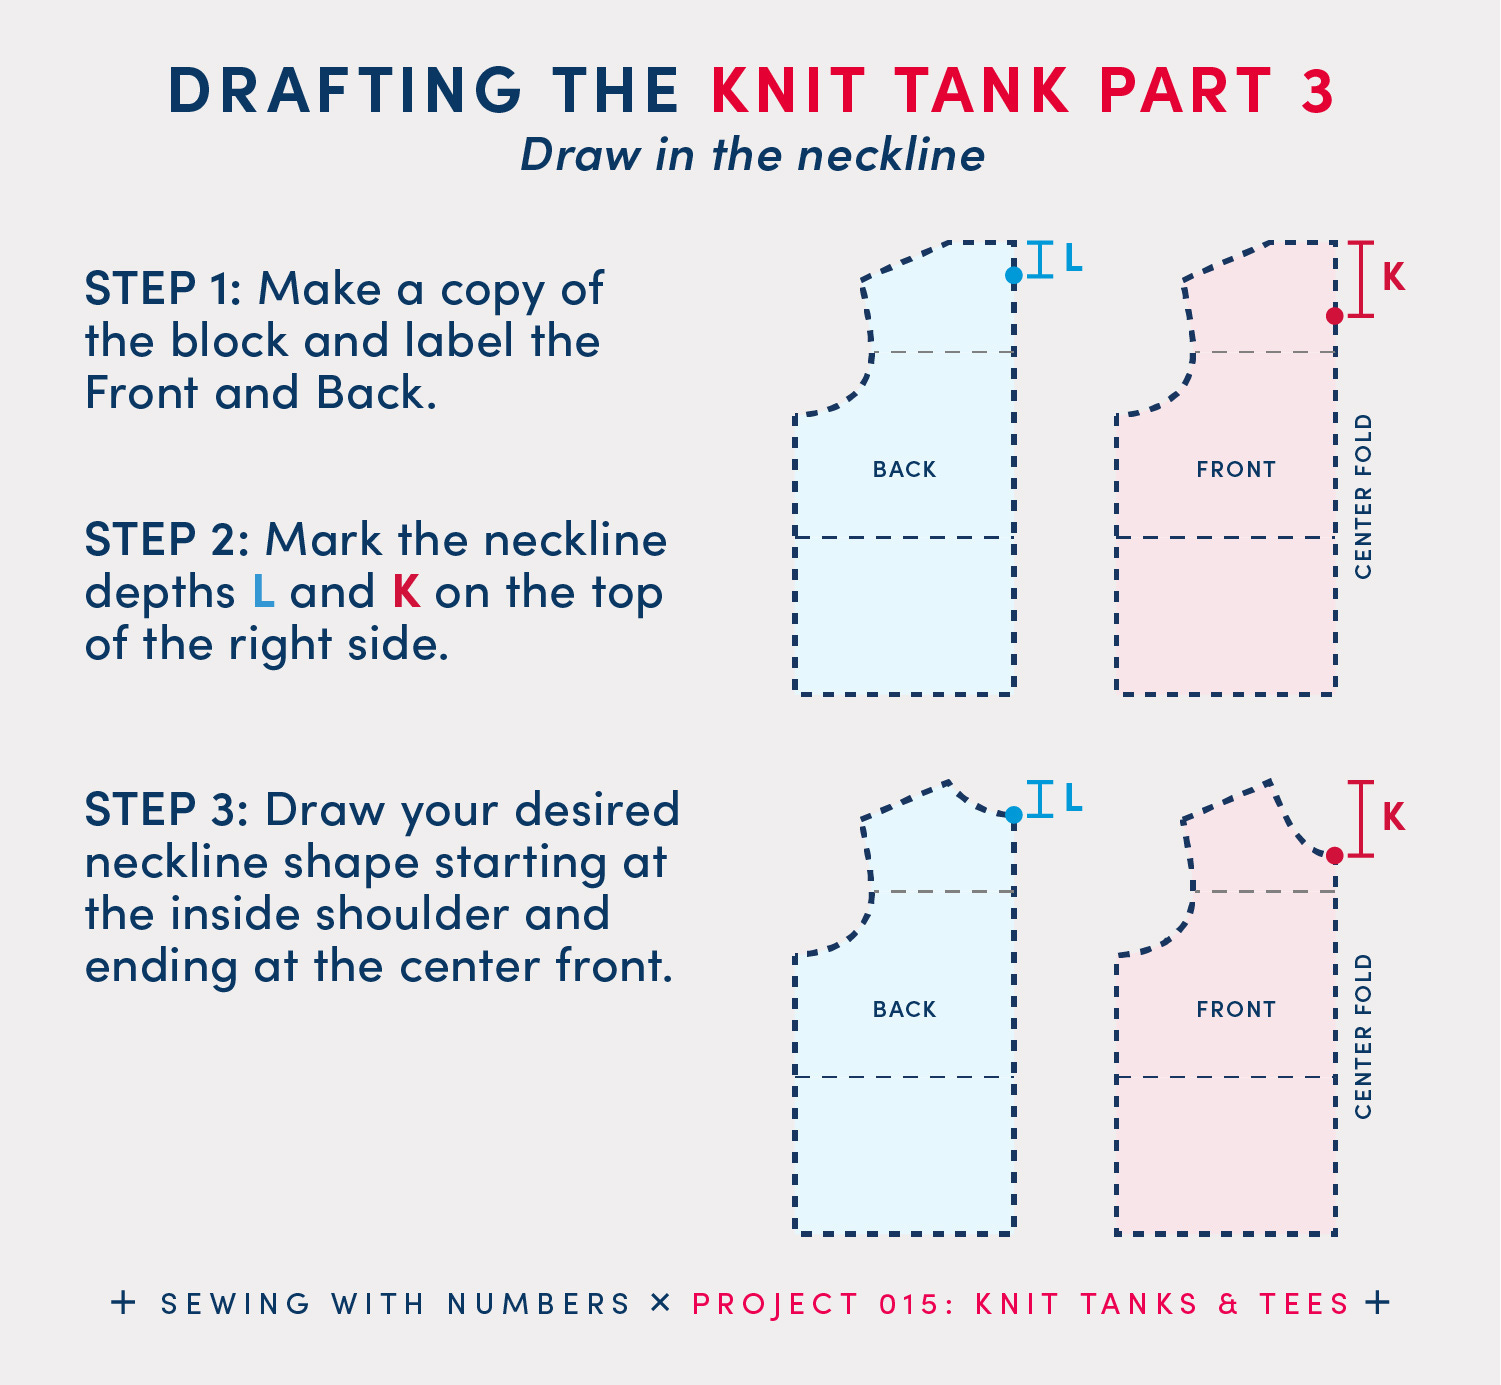
STEP 1: Make a second copy of the block and label one the Front and the other the Back.
STEP 2: Starting at the top right corner of each block, mark the neckline depth on the center fold line. For the Front Body, mark K Front Neckline Depth. For the Back Body, mark L Back Neckline Depth.
STEP 3: Draw your desired neckline shape starting at the inside shoulder and ending at the center front. This line is part art and part math. You want to have an attractive curved shape (the art) and you also want the pattern pieces to fit together nicely (the math).
For a smooth transition between pattern pieces, the curved lines should begin and end at 90 degree angles to the shoulder and center fold. (We’ll double check this when we true the pattern.)
TIP: To check that you like the curve of the neckline, reflect the pattern across the center fold so that you can see the entire curve as it appears when the garment is sewn.
If you want a boxy tank top that falls straight from the underarm to the hip, you can skip this step. If you want shaping at the waist, this part is for you. If your hips are larger than your bust and/or you don’t want the hem tight around the hips, I recommend making this adjustment.
This is really fairly simple, as we are just redrawing the side seam to match the curves of the bottom. For a tight (fitted) garment, use zero ease. For a semi-fitted garment, use some positive ease.
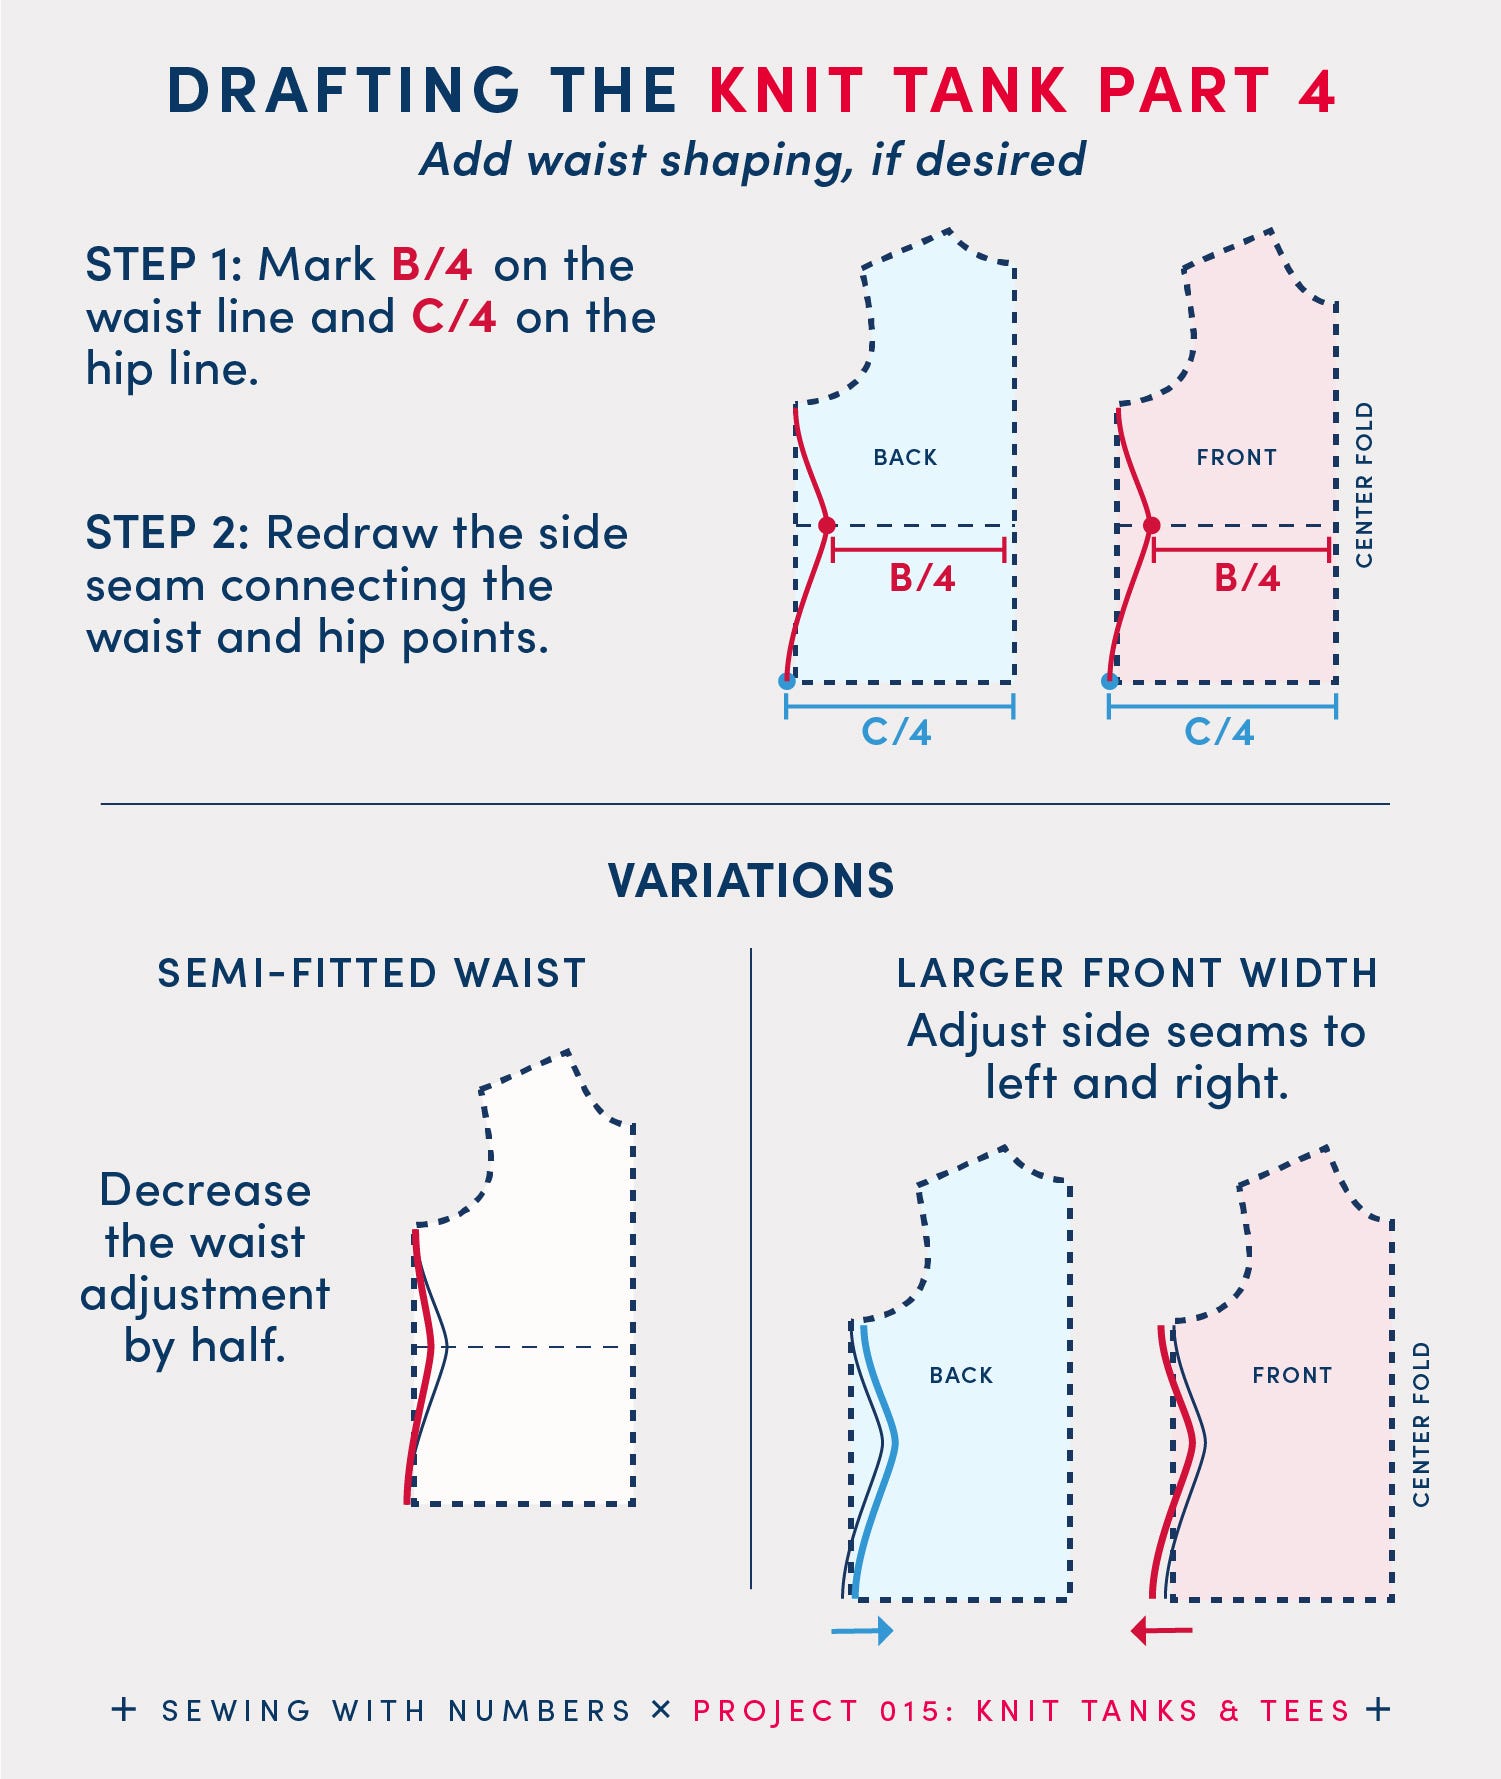
STEP 1: On the waist guideline of both pattern pieces, mark one quarter B Waist Circumference, or B/4, away from the center fold. On the hip guideline of both pattern pieces, mark one quarter C Hip Circumference, or C/4, on the hip line.
Note: You may want to adjust the position of the hip line to the High Hip and use the High Hip Circumference for your measurement C.
STEP 2: Redraw the side seam connecting the waist and hip points. This gives you a FITTED style.
VARIATIONS
For a semi-fitted waist point, decrease the waist adjustment by half. In the illustration above, you can see that the red line for the side seam is drawn in between the straight block and the fitted line.
Larger Front Width If you are curvier and/or have a larger bust or tummy, you may want to move the side seams so that the Front is larger than the Back. In the Brown/Kelleher text, they recommend moving the Front side seam 1/4” away from the center fold and the Back side seam 1/4” closer to the center fold. Overall, this keep the finished circumference the same and makes the front pattern piece 1/2” bigger.
From my personal experience, I have found that this approach works well as a “cheaters” FBA for sewing knits. I sometimes use a smaller size for the back and shoulders and a larger size at the front side seam.
To make a more custom adjustment, you can take measurements of your Front and Back hip and waist and use those measurements as guidelines.
Now, we’re going to make the block into a tank top style. I recommend making a copy of the block before adjusting the shoulder width so that you can use it again for a t-shirt design.
Now, we need to adjust the length of the shoulder seam. If you are going for a muscle tee style and want the shoulder seam to hang over a little bit, you can skip this. But, if you want a more classic tank, keep on going.
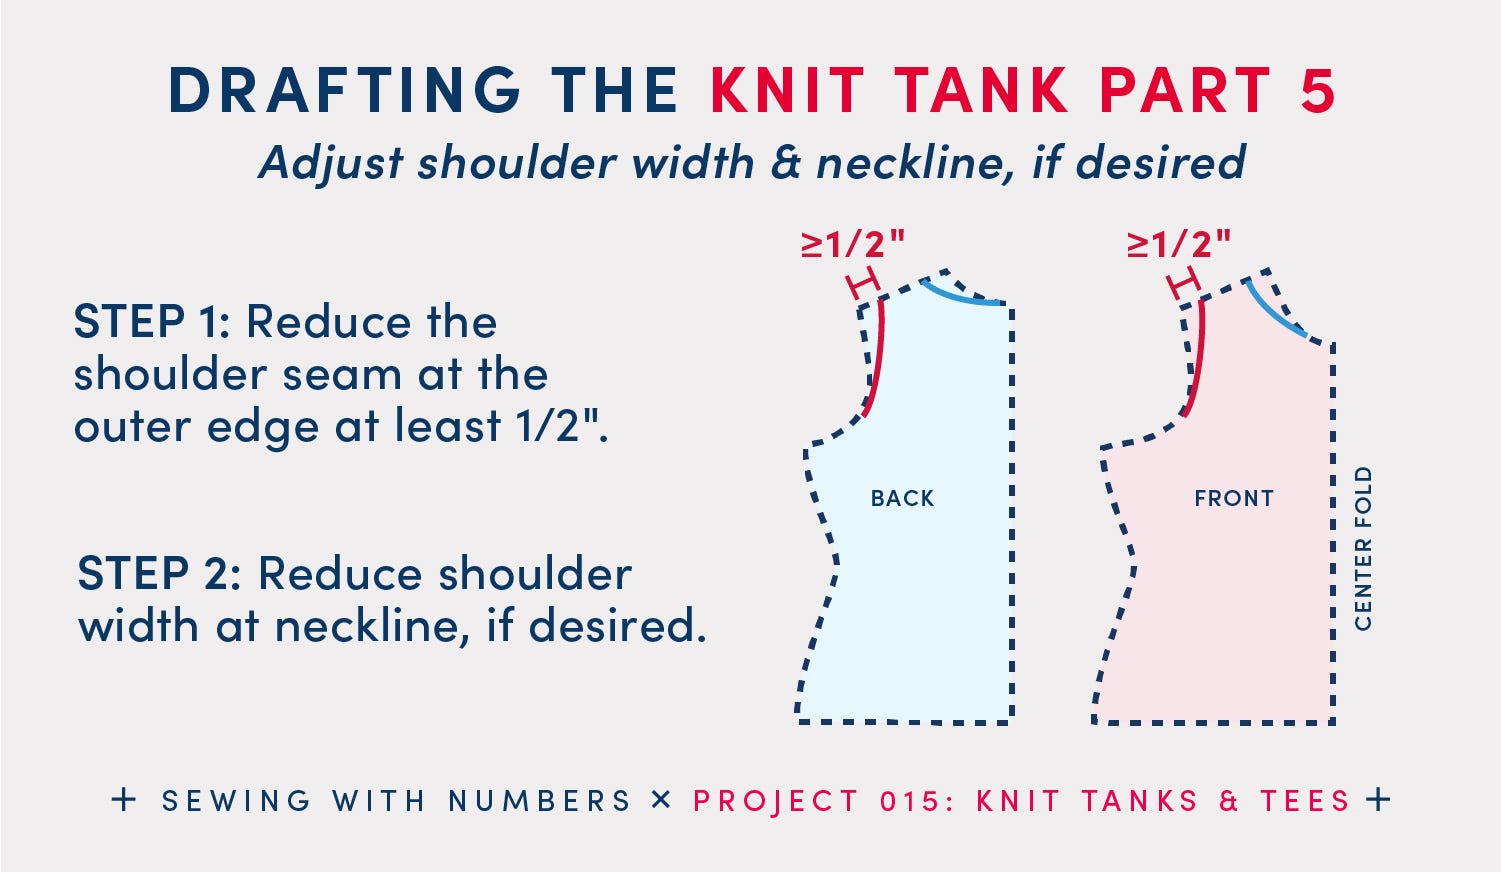
STEP 1: Reduce the shoulder seam at the outer edge at least 1/2” so that the end of the tank top is not hanging off the shoulder. Make the same adjustment to the back and front pieces. (This is the amount the Richardson text recommends, the Brown/Kelleher text doesn’t address a sleeveless design.) Personally, I’d measure where my bra strap falls on my shoulder and try to the tank top to cover the bra neatly.
STEP 2: If desired, you can also reduce the shoulder width at the neckline. This is a style adjustment so you can adjust as much as you wish. Just be careful to make the same adjustment to the front and back. You could design a wider boat neck style, thinner straps or a shoulder seam that sits closer to the neck.
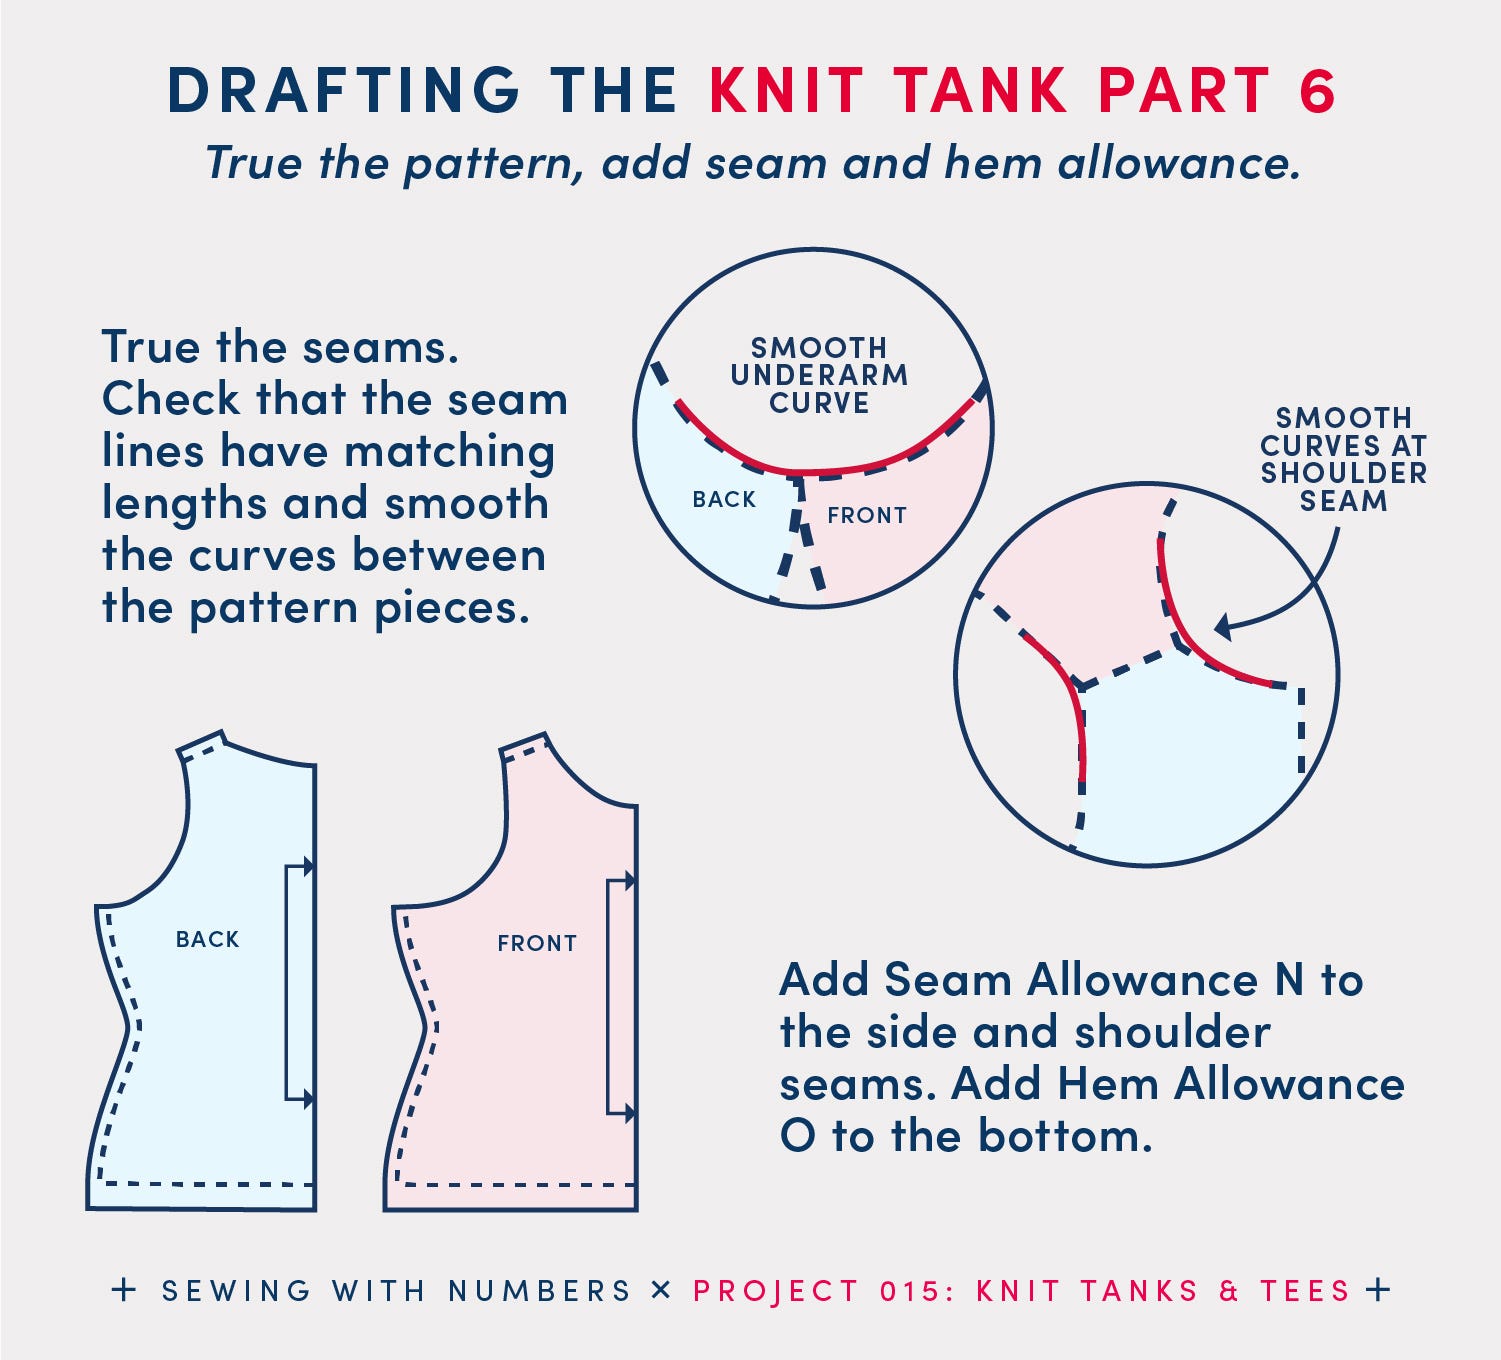
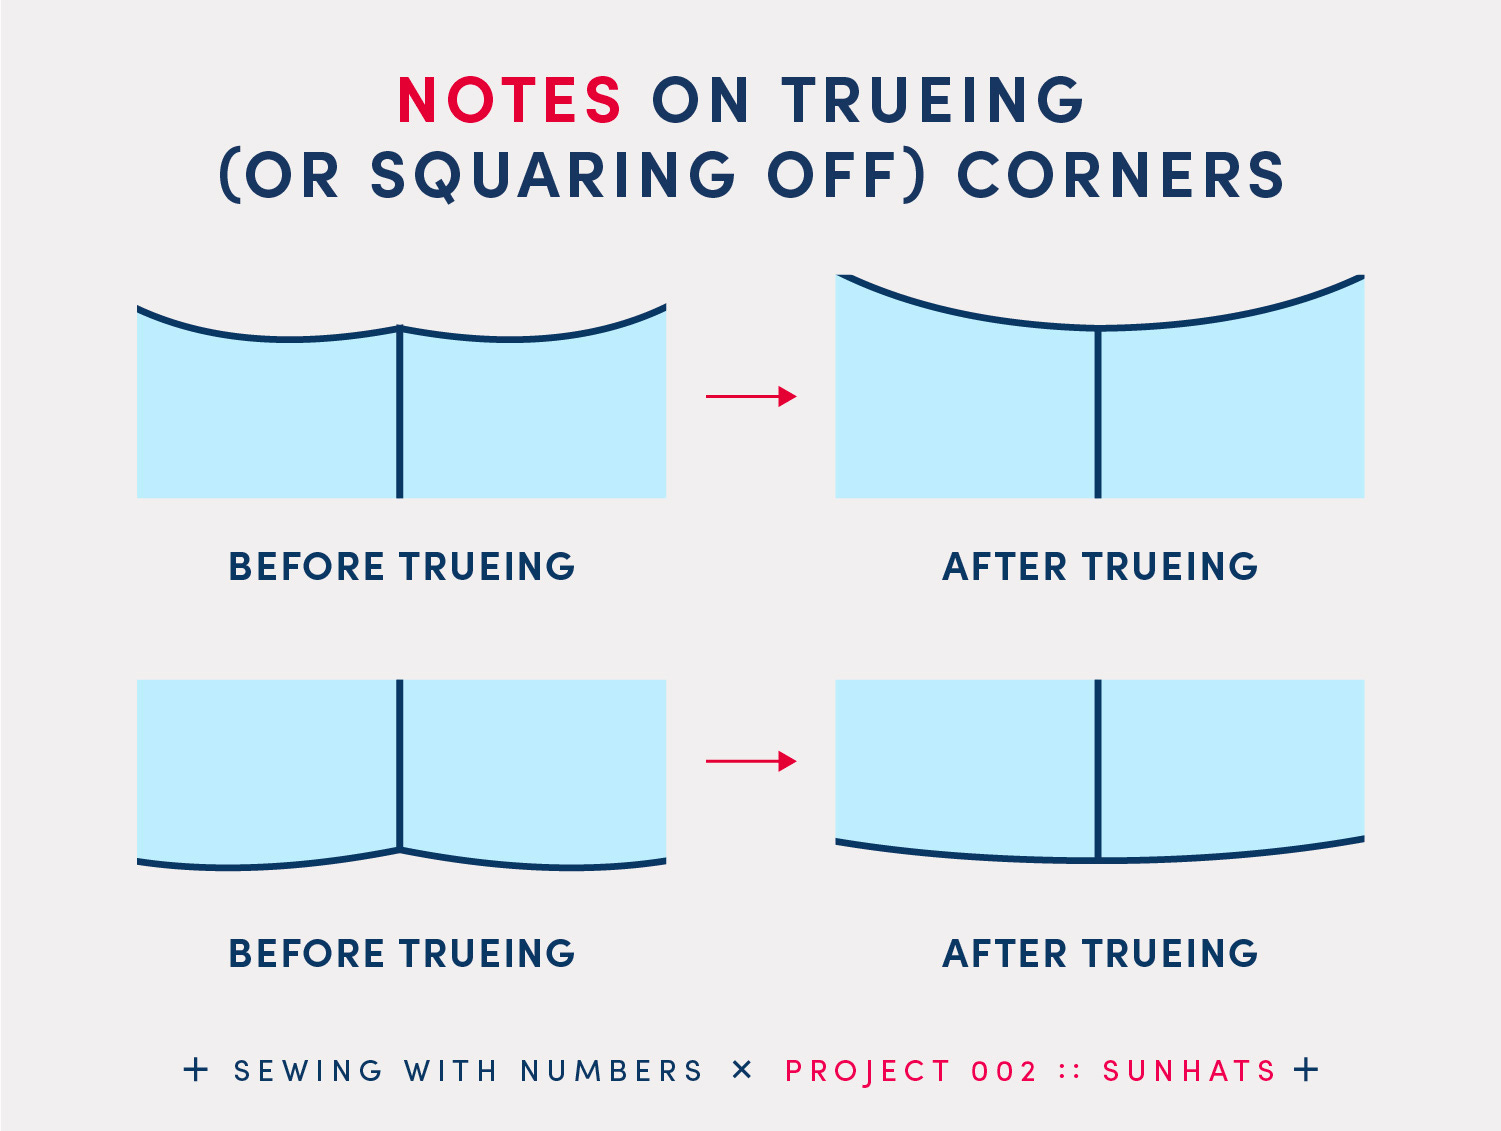
Next, we want to true the seams. Trueing means that we check that the seam lines have matching lengths and smooth the curves between the pattern pieces. For this pattern, you’ll want to compare the shoulder seams and side seams of the front and back pattern pieces. To check that the curves are smooth where the seams connect, position/rotate the pattern piece and align the seam lines. If the curves are not smooth, redraw the curve (shown in red above). See the graphic below for a before and after.
Finally, we need to add Seam Allowance N to the side and shoulder seams and Hem Allowance O to the bottom edge.
Finally, we’re going to draft rectangular pattern pieces to finish the neckline and armholes. This narrow piece of fabric should be cut along the greatest amount of stretch. It will be folded in half and stitched right sides together to the openings. The raw edges are then pressed away from the opening on the wrong side. I have a video for how to sew this type of finish on my other blog.
These bands are cut slightly smaller than the opening and are stretched to fit. Ideally, the interior curve of the band will lay flat against the body without any waviness. In my experience, cutting the bands 82% to 88% the length of the opening works for most fabrics. That said, it’s a good idea to test your fabric to find the best percentage for that fabric. (In the beginning of the video linked above, I show examples of bands cut at different percentages and stitched to a curve.) Knit fabrics with less stretch will need to be cut longer and vice versa.
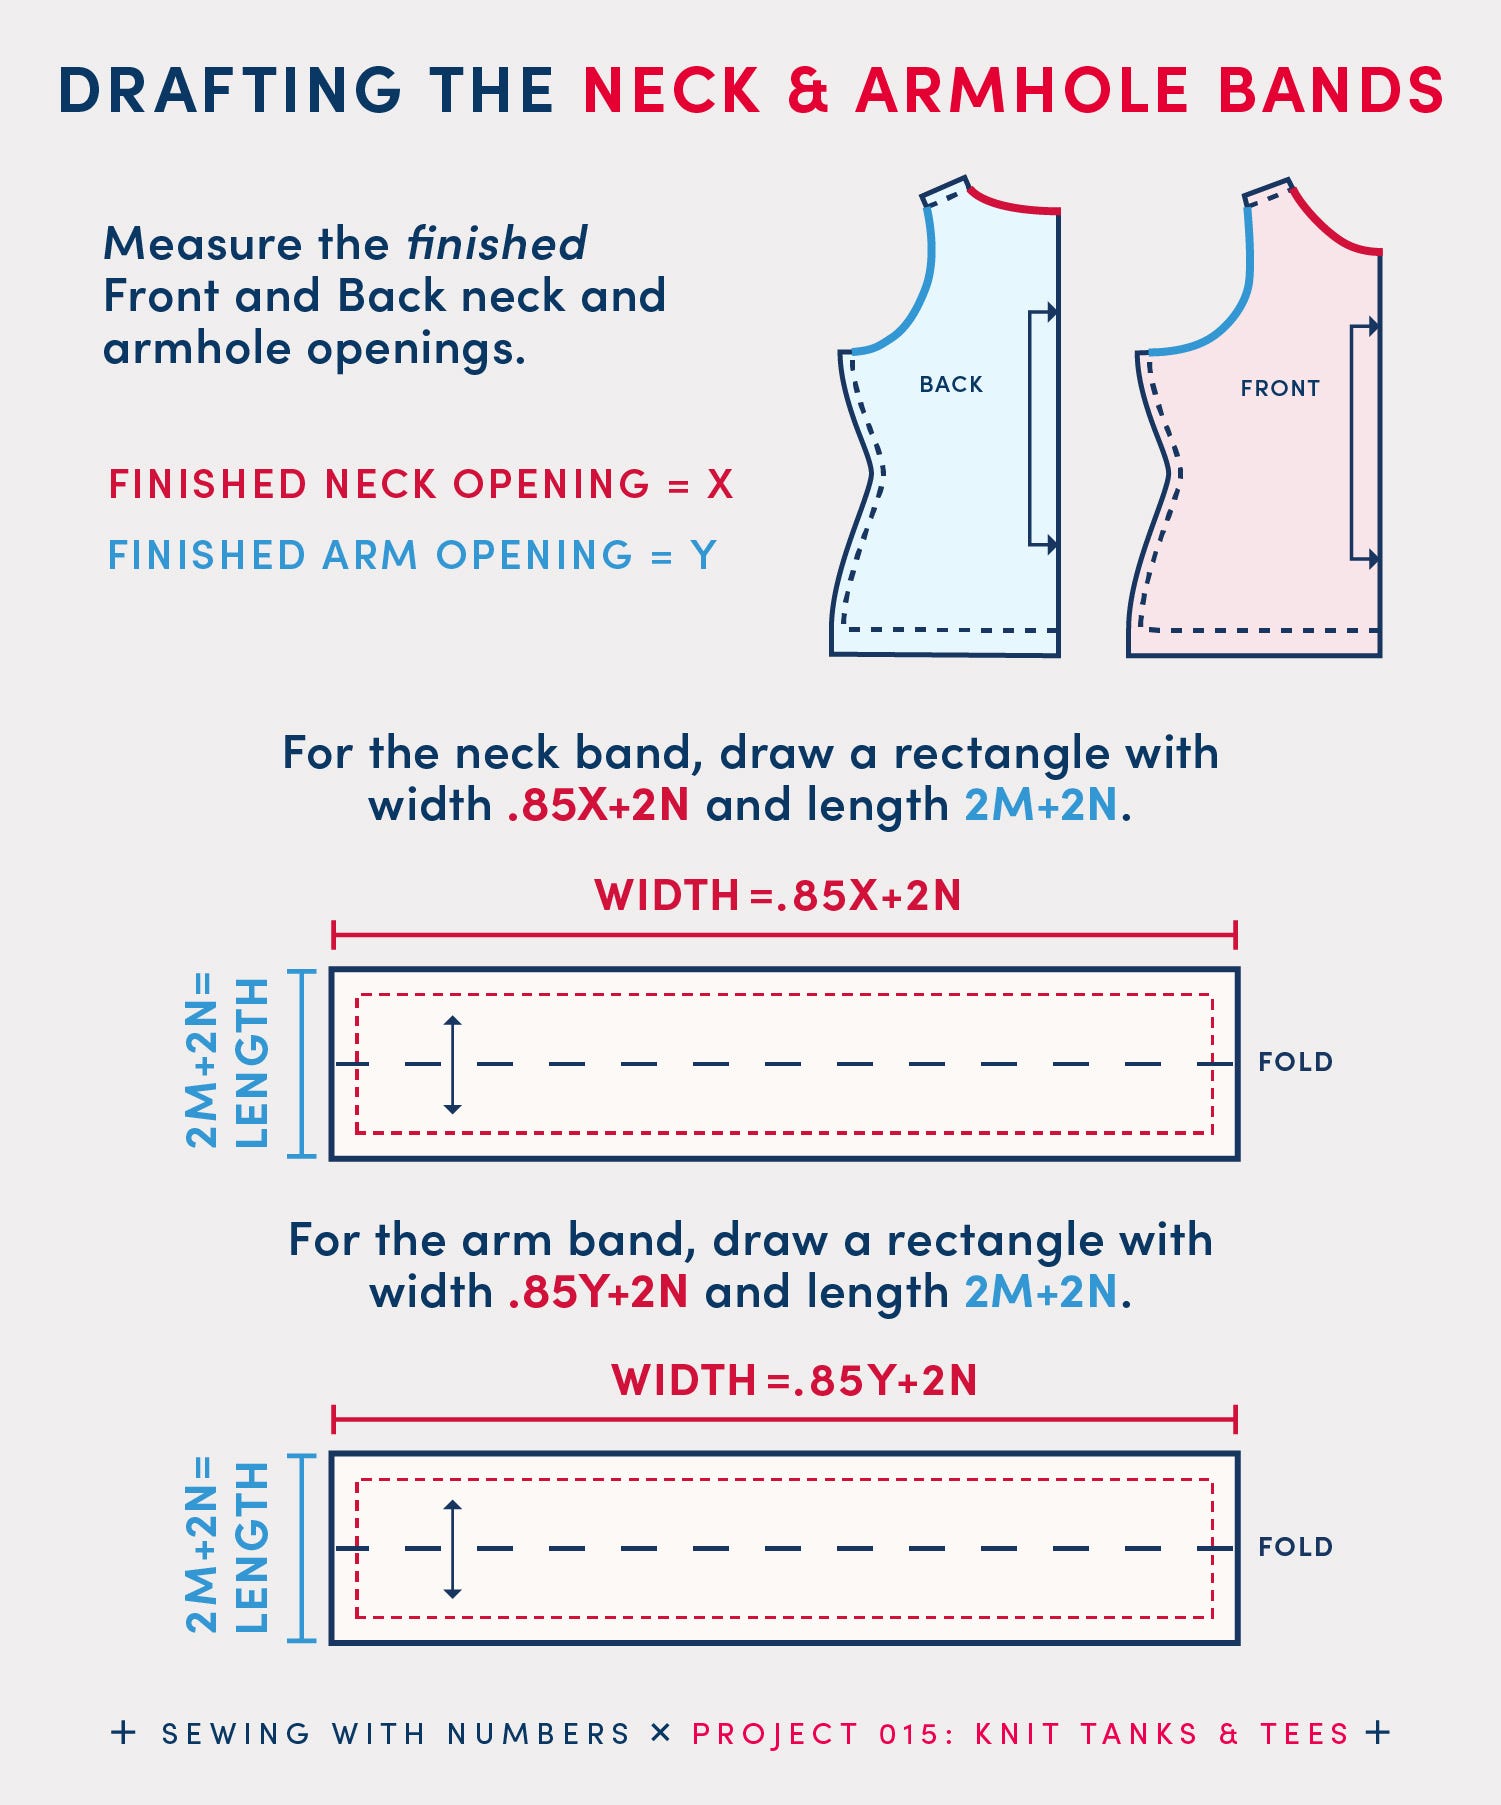
The first step when drafting these bands is to measure the seam line of the neck and armhole openings. In the diagram above, the neckline opening is shown in red and the armhole is shown in blue.
To calculate the Finished Neck Opening, X, measure the red lines on both the front and back then add them together and multiply by 2. We want to work with the TOTAL. Make sure not to include the seam allowance at the shoulder.
To calculate the Finished Arm Opening, Y, measure the blue lines on both the front and back then add them together and multiply by 2. Make sure not to include the seam allowance at the side seam and shoulder.
For this example, I’m drafting the bands 85% the width of the opening. You may want to adjust this depending on how much your fabric stretches.
To draft the neck band, draw a rectangle with width .85X+2N and length 2M+2N. The width is 85% of the Finished Neck Opening X plus 2 times Seam Allowance N. The length is 2 times the Finished Band Width M plus 2 times Seam Allowance N. We want to multiply the Band Width by 2 because we’ll be folding it in half.
Drafting the armhole bands is very similar. Draw a rectangle with width .85Y+2N and length 2M+2N. The width is 85% of the Finished Arm Opening Y plus 2 times Seam Allowance N. The length is 2 times the Finished Band Width M plus 2 times Seam Allowance N.
If you have a bigger bust or are curvier, you may want to try additional adjustments to your block. Here are a few ideas:
In the Brown/Kelleher text, they add a center back seam and taper the seam at the top for a rounded back. You could also add some waist shaping at the center back.
A larger bust will often lift the hem of the top up, making it look uneven. In lieu of a full bust adjustment, you can lengthen the front hem at the center front, tapering it to the side seam.
You can add a dart to a knit top, or make a full bust adjustment without a dart. I have a tutorial on my other blog and here on Substack:
I hope you found this tutorial helpful! Let me know if you have any questions in the comments.
There are lots of ways to support this free content. You can tap the “heart” at the top or bottom, share or “restack” the post to help other people find it. Become a paid subscriber or, visit one of the links below.
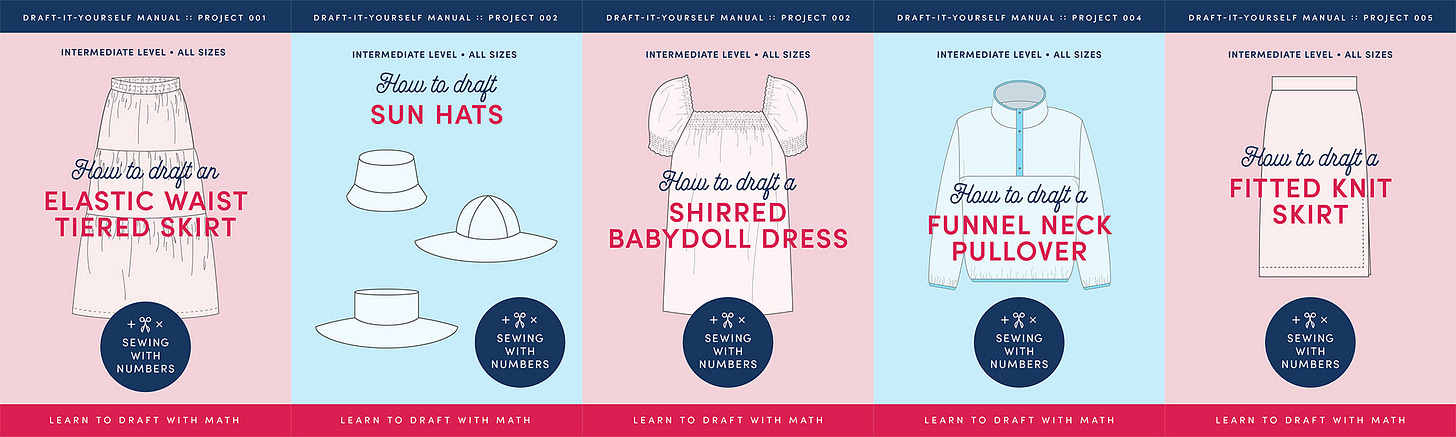
Sewing With Numbers Drafting Manuals are available for purchase.
Pattern Shop | Improv Quilting E-Course | Ko-Fi | YouTube
Happy mathing!
Beth
Comments
Nothing yet. Say the first thing.
Sign in to join the conversation.