
Welcome to Sewing With Numbers, a newsletter about sewing, math, design and how to draft your own sewing patterns. Through simple pattern drafting exercises, I’ll show you how fun, useful and empowering math can be. ✂️ Posts older than 3 months are archived for paid subscribers. But if subscriptions aren’t your thing, I also have PDF Booklets for older projects in my shop.
Hello my mathy-sewing friends! Today, we will be drafting the first part of our knit t-shirt block. In this section, we’ll draft the shoulder, and armhole of the front and back pattern pieces. In the next post, we’ll take this basic block, add style elements and create a full tank top pattern. If you missed the introduction post, click below.
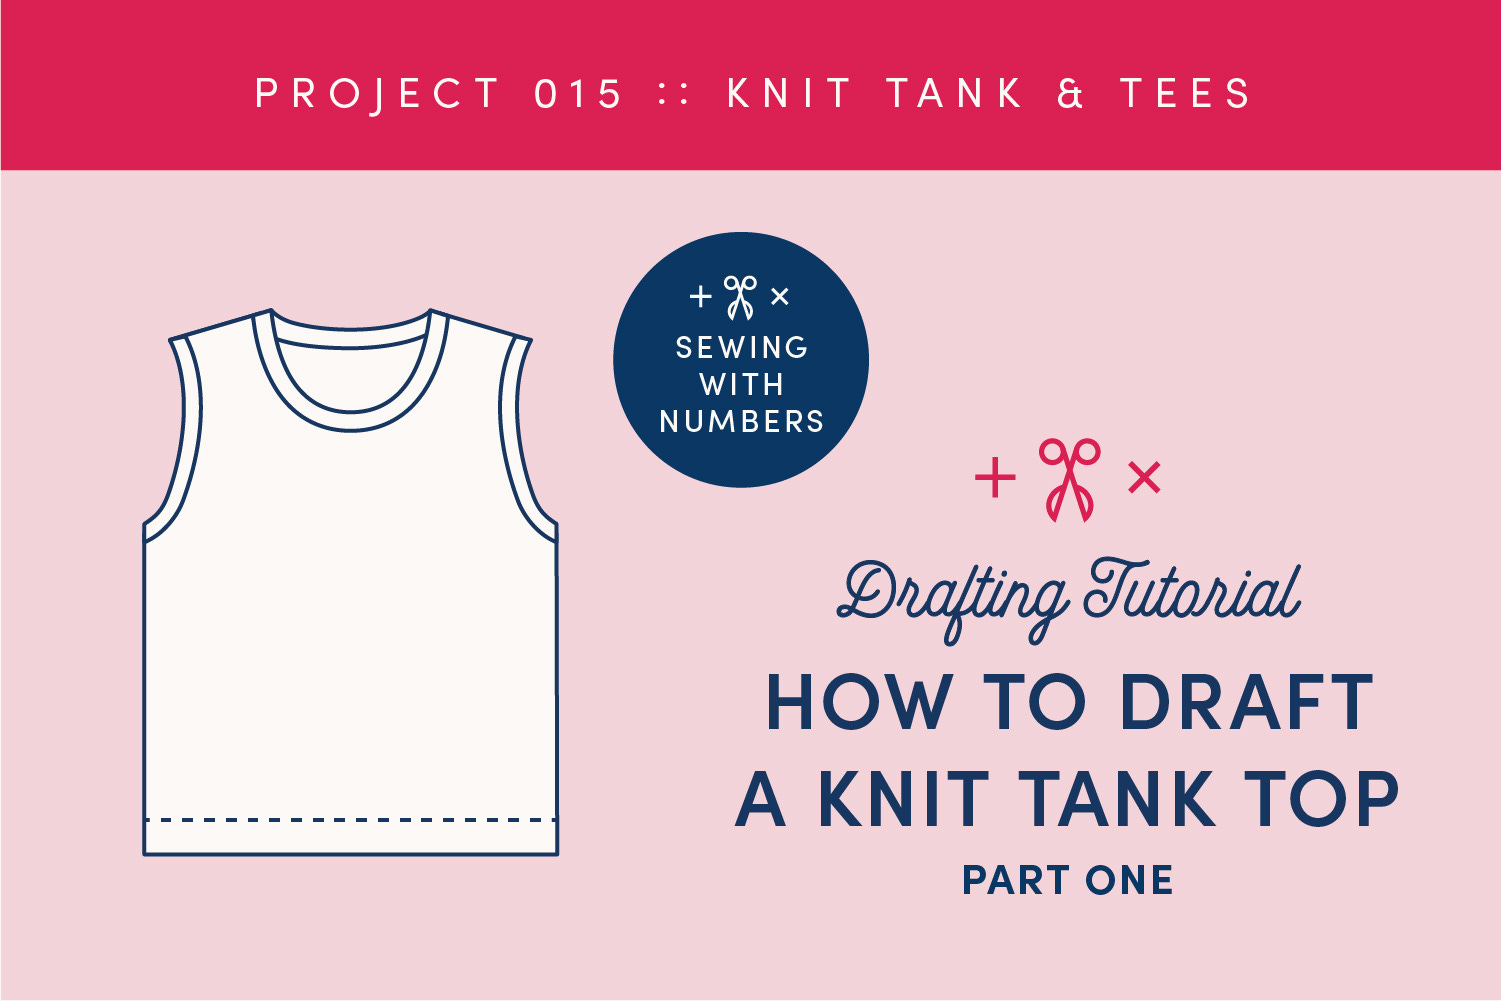
I’ve been wanting to draft T-shirts and tanks for a while because they are very satisfying to sew and useful for any wardrobe. But many drafting books don’t address drafting with knits, or they start with a woven bodice block and adapt it. It’s such a simple garment, it feels like it should be easier.
I’m using two texts for this tutorial, both of which draft the knit t-shirt block from scratch but with slightly different methods. My goal here is to take the best parts of both and simplify the process. Both of these books are text books and feel dense to read and comprehend. Hopefully, this tutorial will be much friendlier and more visually accessible!
The first text I’m referencing is the Designing and Patternmaking for Stretch Fabrics by Keith Richardson. I like that he clearly addresses different types of fabric but some of the drafting is created with percentages of measurements and not a direct body measurement. For these tutorials, I like to use personal body measurements as much as possible.
The second text is Plus-size Patternmaking for Womenswear by Gabby Brown and Leila Kelleher (Bookshop affiliate link). This is my first time using this book and there are things I like and things I’ve struggled with (mostly the graphic design). That said, I really appreciate the use of direct measurements for most parts of the drafting and the perspective on drafting for a plus-size figure.
There are just two sections today, in part because there are a lot of measurements to gather.
Part 1: Gather information
Part 2: Draft the Body Block
Below I describe the various body measurements we’ll be using to draft the knit top block. Some are straightforward and some a little tricky. Where applicable, I share how the texts handle these measurements differently. You can decide which approach works for you.
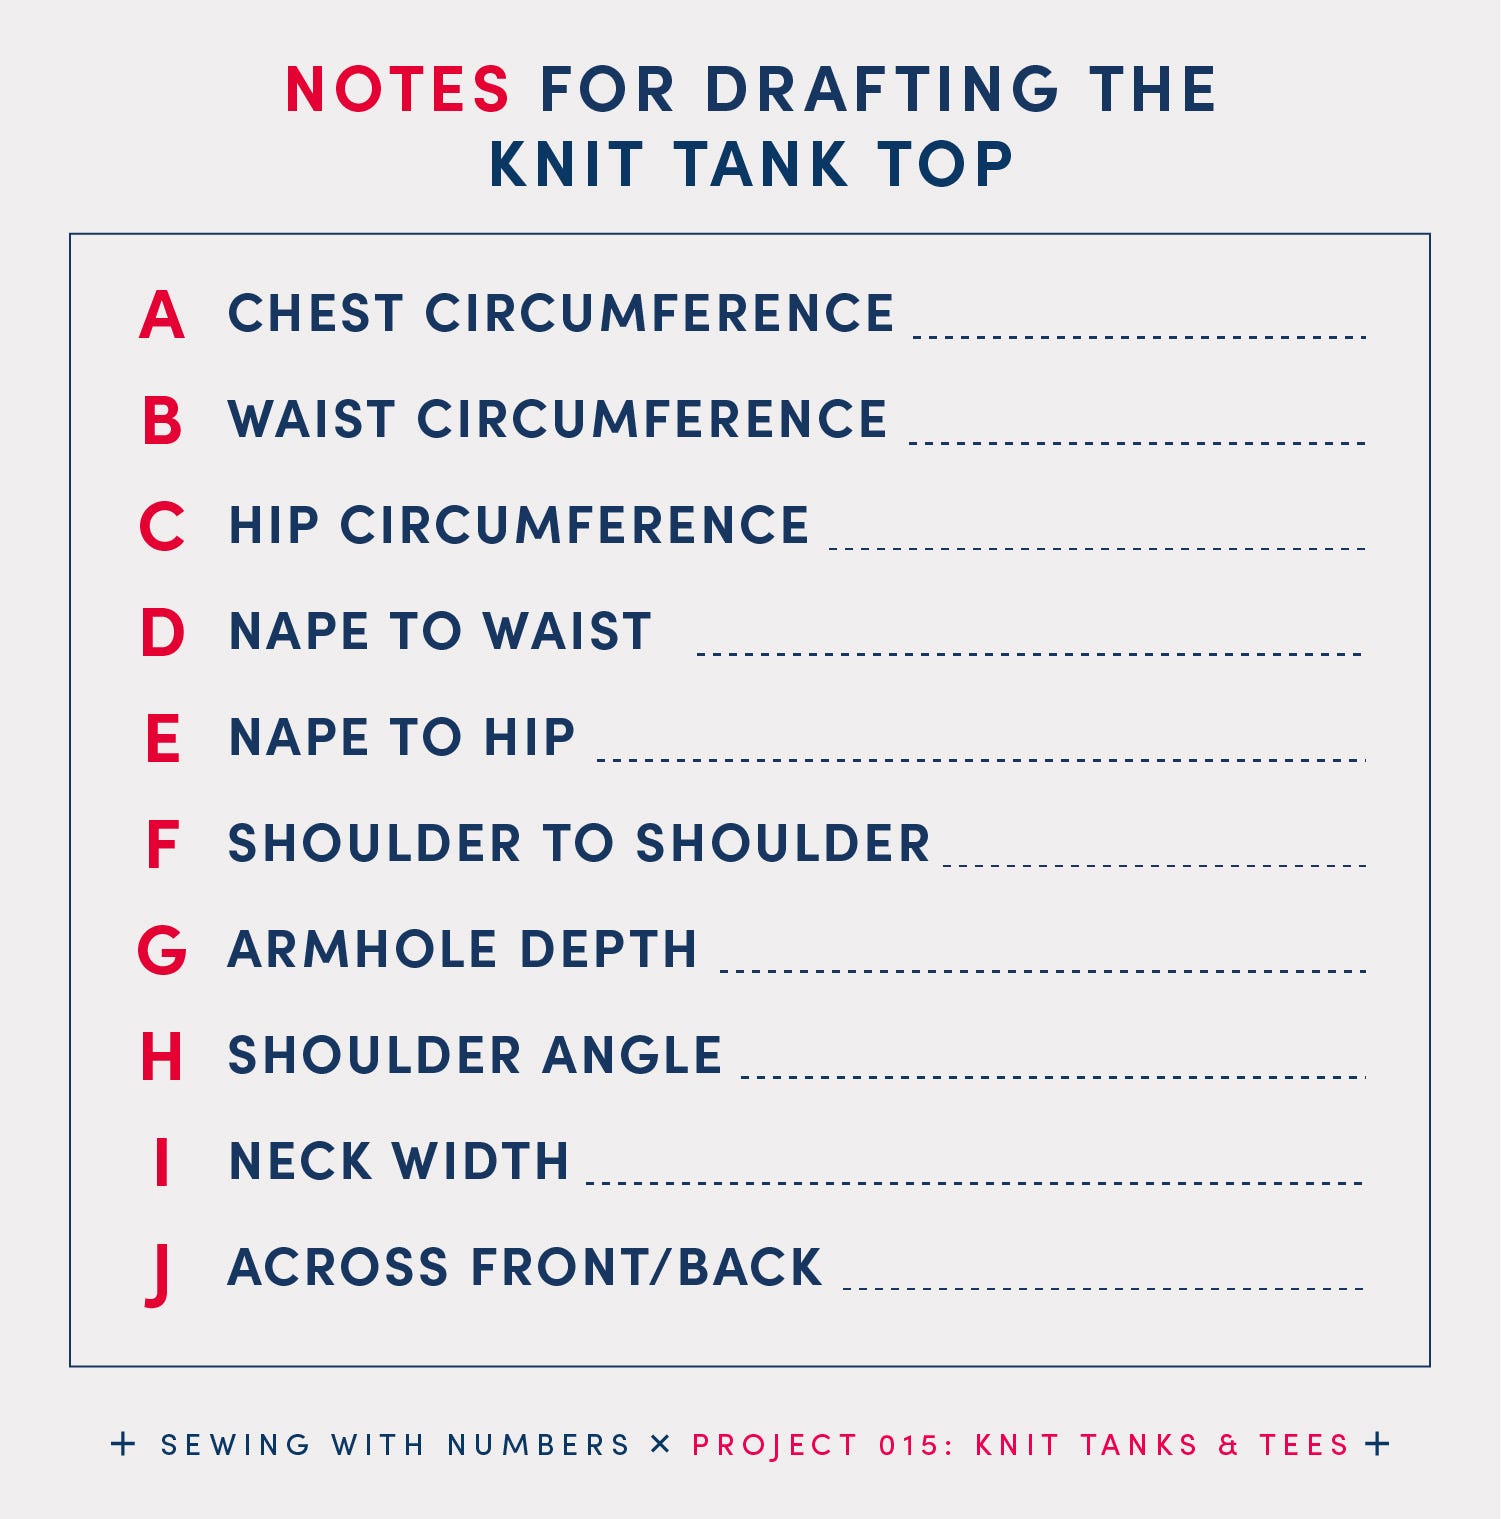
A Chest Circumference Measure the circumference of the largest part of the bust or chest. There’s no bust shaping in this block so it should be adaptable for all body types.
B Waist Circumference Measure the circumference of the waist. This will be used in the next lesson, if you want to make a tank or tee that is more fitted at the waist.
C Hip Circumference Measure the circumference of the largest part of the hips. This will also be used for shaping in the next lesson.
D Nape To Waist The vertical length from the base of the back neck to the waist.
E Nape To Hip The vertical length from the back neck to the hip. We’re using this measurement as the finished length of the block. You’ll be able to adjust the length as desired.
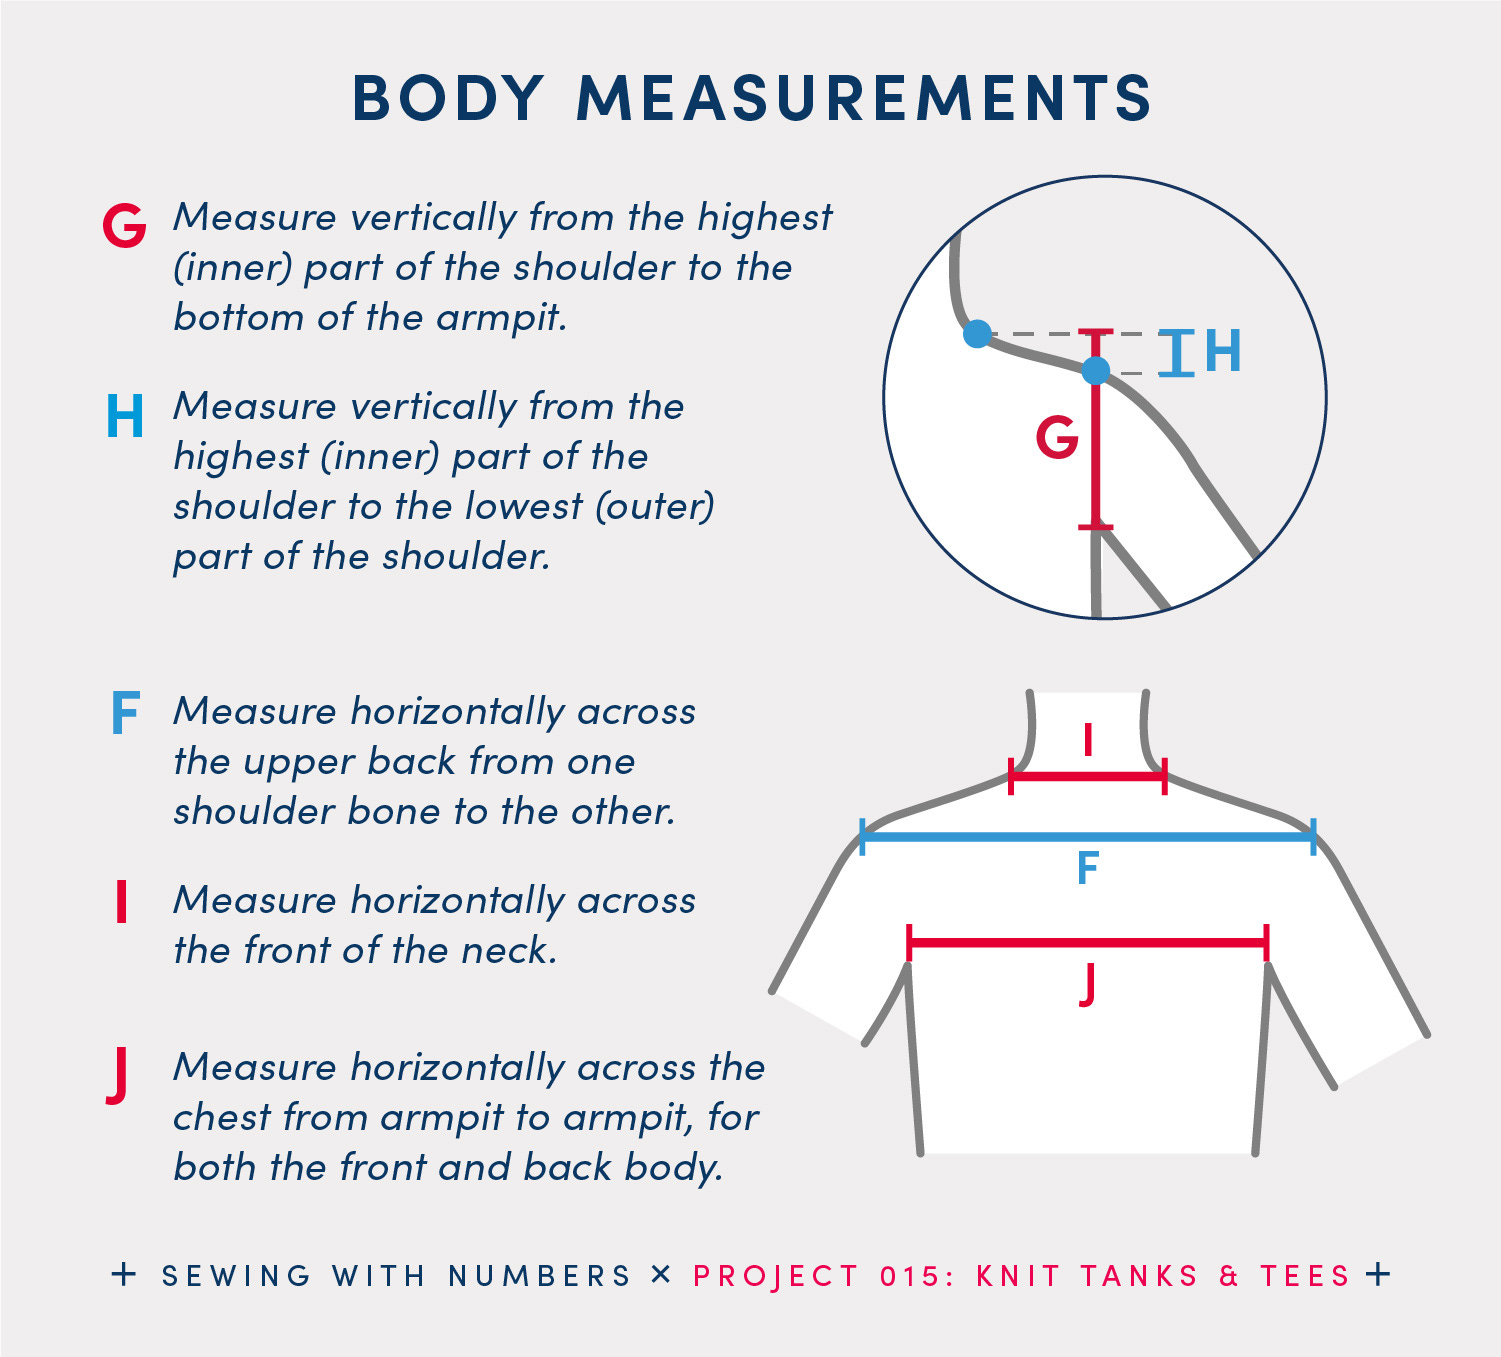
F Shoulder To Shoulder Measure horizontally across the upper back from one shoulder bone to the other. See illustration in bottom right of above graphic.
For the Armhole Depth and Shoulder Angle, I’m using the approach from the Brown/Kelleher text. To take the G and H measurements, you’ll need to use a few straight rulers. An L-shaped ruler placed under the arm would be the easiest way to measure these lengths.
G Armhole Depth Measure vertically from the highest (inner) part of the shoulder to the bottom of the armpit. You can do this with two rulers, one held horizontally from the inner neck and a second held vertically at the armpit. Make sure to measure straight down and to include the vertical length above the end of the shoulder, shown with a red line above.
In the Richardson text, the Armhole Depth is calculated as half the distance from the nape to the waist. This estimate is a lot quicker to calculate than the measurement.
H Shoulder Drop Measure vertically from the highest (inner) part of the shoulder to the lowest (outer) part of the shoulder. (This measurement is called the Shoulder Angle or Slope in the texts but that’s a bit of a misnomer. Instead, I’m referring to it as “shoulder drop” because we are actually measuring how much lower the end of the shoulder is compared to the inner (higher) point.)
In previous tutorials, I’ve used the actual angle of the shoulder but this might be easier to measure. I don’t think it’s as precise as using the angle measurement but should be close enough. In the Richardson text, this number is given in a chart and is 1.375” to 1.625”.
I Neck Width Measure horizontally across the front of the neck. See the graphic above. In the Richardson text, this is calculated as 1/6 of the total neck circumference.
J Across Front/Back Measure horizontally across the chest from armpit to armpit, for both the front and back body. This will be used to help draw the armhole curve. If the front and back measurements are very different, you may want to draft the front and back armholes separately. Note, this number should be less than the Shoulder to Shoulder measurement.
The Across Back/Front/Body measurement is poorly explained or not explained at all in many texts (see this thread on Pattern Review). This measurement is used in the Brown/Kelleher text but I could not find a diagram or explanation and I searched for quite a while. In the Richardson text, only the Across Back measurement is used and is described as the length between the two bones at the top of the armhole. For reference, the size chart gives a range of about 14-20” for sizes XS-XL.
Additional optional measurements:
Shoulder length Measure from the inner neck to the end of the shoulder (where the sleeve seam would start). Interestingly, Richardson uses this measurement and Brown/Kelleher does not. It seems pretty important to me, so we’ll use this measurement to double check our pattern.
Neck circumference You can use this to check that the opening of your neckline is large enough, or if you want to calculate the neck width as a fraction (see I Neck Width above).
In this first installment of drafting our knit tank/t-shirt block, we’ll draft the basic body, shoulder and armhole. We’re drafting the body as half of the pattern with the center fold on the right side.
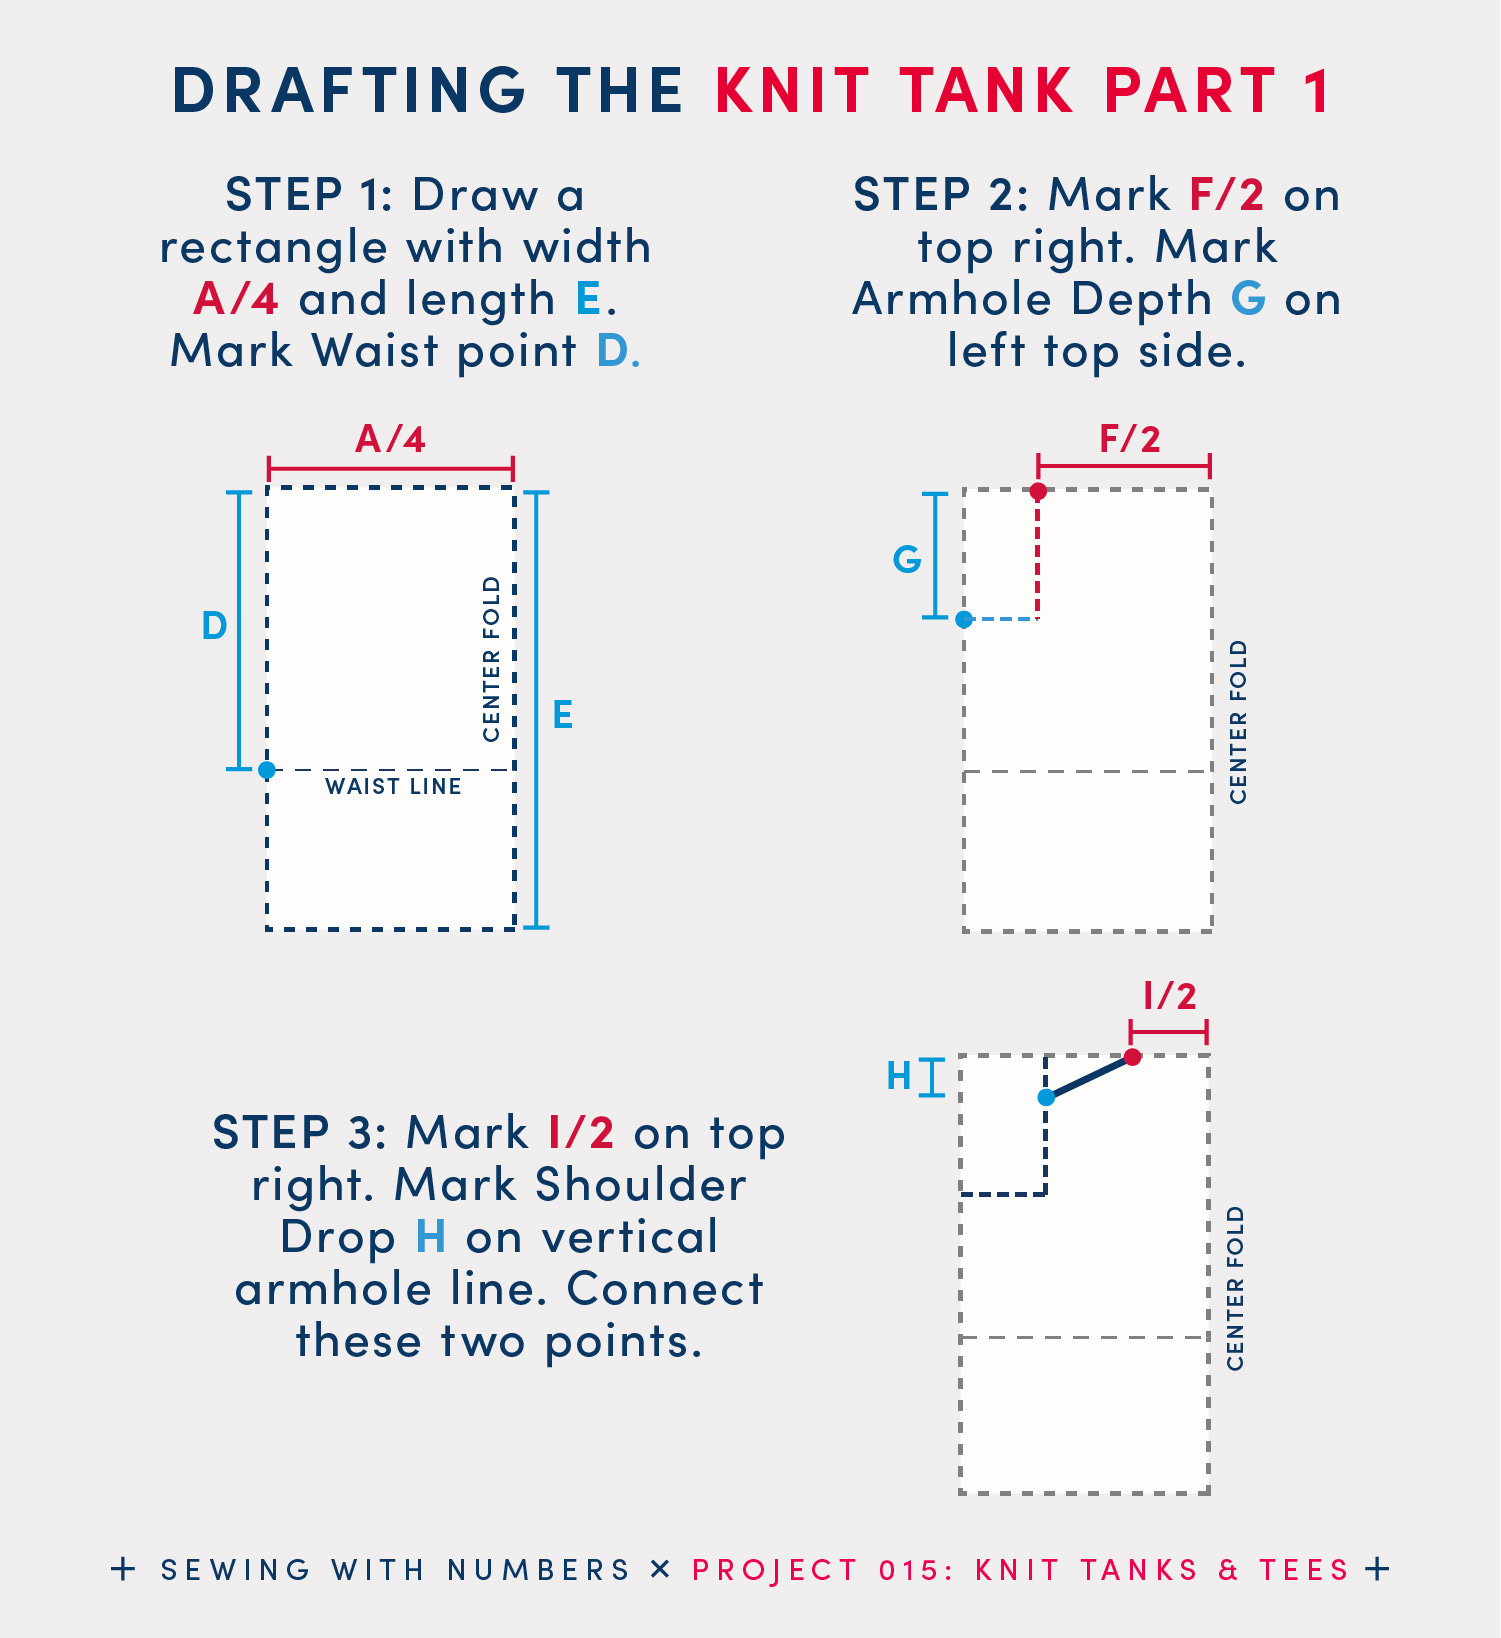
STEP 1: Draw a rectangle with width one quarter of A Chest Circumference and length E Nape To Hip. In short, the width is A/4 and length is E.
Next, draw a guideline for the waist line. This will be used later on, if you want to add shaping to the pattern. Mark D Nape To Waist down from the top corner. At this point, draw a straight horizontal line across the rectangle.
STEP 2: Starting at the top right corner, measure half of F Shoulder To Shoulder along the top horizontal edge. In short, on the top edge mark F/2 away from the right corner. This is half the width of the top of the shirt (because the pattern is cut on the fold). Draw a vertical guideline straight down from this point.
Next, mark the Armhole Depth on the left top side. Starting at the top left corner, measure G Armhole Depth down along the left side. Draw a horizontal guideline to meet the Shoulder guideline. These two lines are the guidelines for drawing the armhole.
STEP 3: Starting at the top right corner, mark one half I Neck Width, or I/2, along the top horizontal edge. This point is shown in red above and is the inner shoulder and the neck edge of the neckline. (In our next lesson, we’ll draw the neckline in to the top right corner.)
Next, mark the Shoulder Drop H on the vertical armhole line, shown in blue above. Connect these two points to create the shoulder seam.
If desired, you can use your Shoulder Length measurement to double check this. Adjust as needed by extending or shortening the line. This will change the Shoulder Drop. Use your judgement and knowledge of your own shoulder angle to decide if you need to adjust the angle of this line as well.
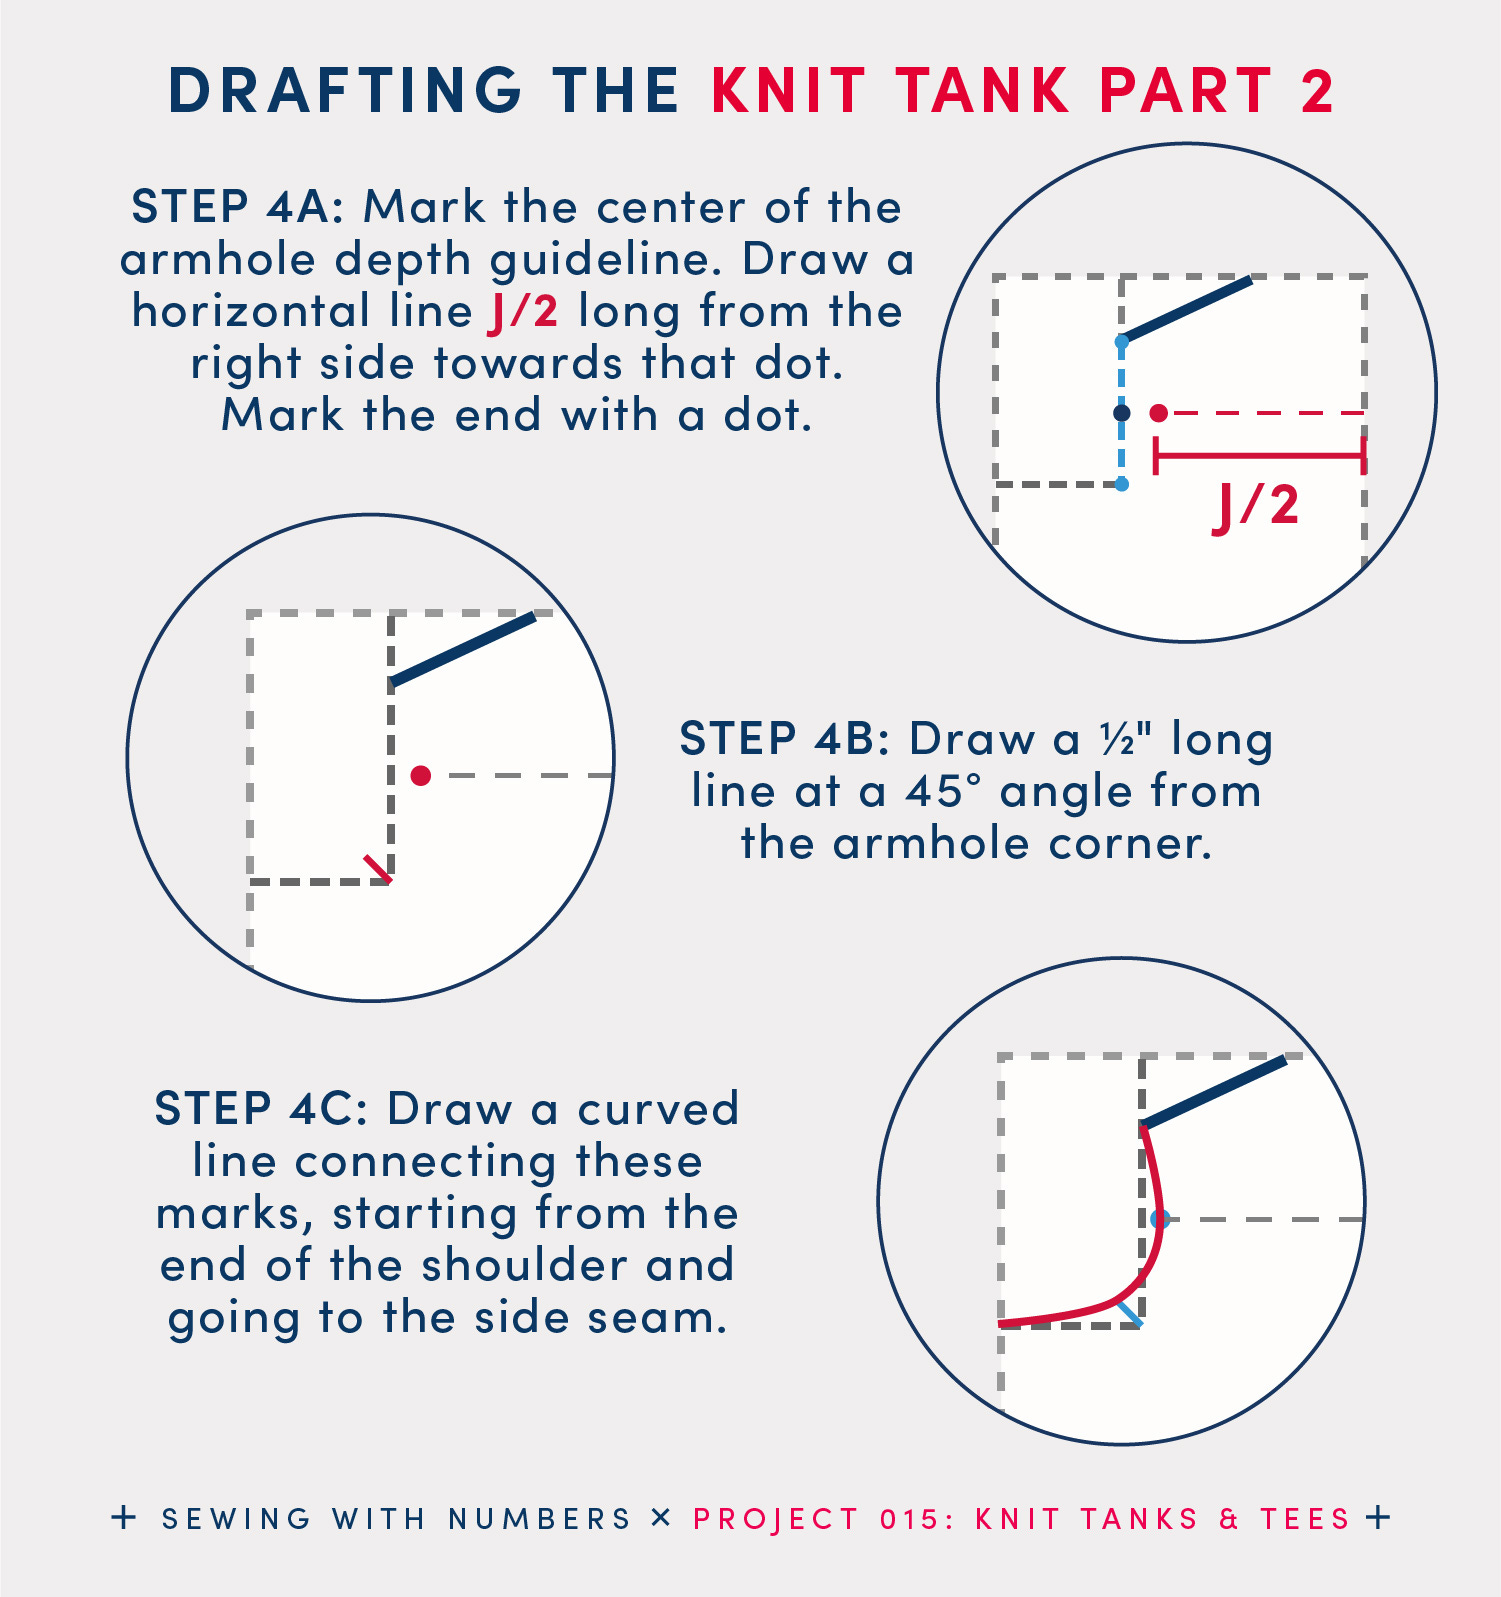
Next we’re going to draw the curve of the armhole. The dashed lines inside the top left corner of the pattern piece are the Armhole Guidelines. If your Across Front and Across Back measurements are very different, you may want to make separate pattern pieces starting now. Alternately, just use the Across Back measurement.
STEP 4A: Find the center point of the armhole depth guideline (vertical line in light blue above). Draw a horizontal line one half Across Back J long from the right side towards the center point you just marked. Mark the end of the new line with a dot. Shown in red above. Note, this line should be shorter than the shoulder line and won’t meet the guideline.
STEP 4B: Starting at the bottom of the armhole guidelines, draw a line that is one-half inch long and at a 45° angle, pointing to the top left.
STEP 4C: Draw a curved line connecting these marks. Starting from the end of the shoulder draw a curve that touches the red dot, the end of the angled blue line and ends at the left side of the pattern piece.
Drawing this curve is a bit of art and a bit of science. If it’s not exactly meeting the angled line from step 4B, don’t worry too much. Just try to make a smooth curve.
I hope you found this tutorial helpful! Let me know if you have any questions or if any parts could be clearer.
There are lots of ways to support this free content. You can tap the “heart” at the top or bottom, share or “restack” the post to help other people find it. Become a paid subscriber or, visit one of the links below.
Sewing With Numbers Drafting Manuals are available for purchase.
Pattern Shop | Improv Quilting E-Course | Ko-Fi | YouTube
Happy mathing!
Beth
Comments
Nothing yet. Say the first thing.
Sign in to join the conversation.