
Yappcalc is a Pico-based calculator. It’s not very pocketable, but it’s fun to put togehter, and it introduces a lot of useful techniques that you can adapt and adopt in your own project.
I’d originally hoped to describe the whole project in a single article, but there’s too much to cover. You’ll read abut it in three posts. You’ll get a brief overview in each, and you’ll find the full detail in three linked pdfs.
Here’s a diagram of the breadboard layout for the first part of the project.
So what will the calculator do, and what components does it use?
You can enter numbers. They can be whole numbers or decimal numbers with a decimal point.
You can do addition, subtraction, multiplication and division on the numbers that you've entered.
You can see the inputs that you provide and the result of calculations.
You can clear the display.
Here’s a diagram of the breadboard layout for the first part of the project.
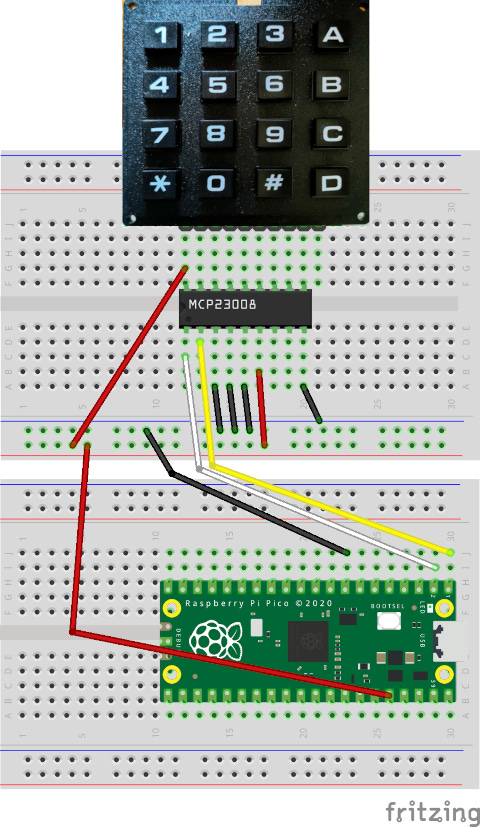
It contains
A Raspberry Pi Pico, Pico W, Pico 2 or Pico W 2.
A 4x4 numeric keypad
An mcp23008 port expander chip
A coupe of breadboards
An OLED display
and some connectors.
In this first part of the project, you’ll connect the mcp23008 chip to the Pico, connect the keyboard to the chip, and run a program to verify that the keyboard works.
The illustrated pdf covers the wiring and code in full detail. It also gives some background about I2C, the protocol that connects the Pico to the chip.
If you have questions about this project, spot any errors, or find it useful, please let my know. Your feedback will help me to create the content that readers like you want to see.
If you've been visiting and like what you saw, subscribe!
RAREblog subscriptions are free. You'll get the newsletter when it comes out. Short notes are more frequent, but you won't get notes by email unless you ask for them.
Comments
Nothing yet. Say the first thing.
Sign in to join the conversation.