
Overview
In a previous post, we discussed how to save money on a home lab. One section was cloud utilization. Let’s expand on that section and have a more in-depth conversation about how to create dynamic resources in Azure. This article will focus on creating a VPN dynamically.
Azure networking is not the most noticeable part of an enterprise bill. In the homelab scenario, it can be a running cost that adds up when not needed. Remember the entire purpose of a homelab is to run most, if not all, items… well in your home, at least. To alleviate this running cost, the components needed in an Azure Site-to-Site VPN can instead be created dynamically to utilize whenever it is required.
Due to the time involved in creating a VPN Gateway in Azure, this won’t be something that can be created and destroyed the same way a virtual machine or container could be. For the VPN Gateway, there should be at least one hour to guarantee that the VPN Gateway and other components can be created in time to meet demand load.
Let’s imagine a scenario where ad-hoc processing power is needed for an upcoming marketing campaign where traffic is expected to exceed our current capacity. In this scenario, our servers will be replicated in Azure Virtual Machines and allow for increased traffic. (This is a basic setup; in later posts, we’ll discuss more advanced scenarios.) To accomplish this, we need to set up a Site-to-Site VPN in Azure from our homelab.
Diagram showing an on-premises network on the left which consists of three computer screens and a gateway. A double sided arrow connecting the on-premises to a cloud labeled internet with “Site-to-site VPN tunnel” above the double sided arrow. Another double sided arrow connects the internet cloud to its right through a dotted rectangle labeled “Azure Virtual Network”. The arrow connects to an item labeled VPN gateway. That gateway has a single arrow leaving it to the right pointing to a load balancer which is pointing to three identical virtual machines.
The steps to accomplish this are:
- Supported Routers
- Creating a Site-to-Site Connection
- Replicating Virtual Machines / Containers
- Tear Down
Supported Routers (official docs)
A VPN device is required to configure a Site-to-Site (S2S) cross-premises VPN connection using a VPN gateway. Site-to-Site connections can be used to create a hybrid solution, or whenever you want secure connections between your on-premises networks and your virtual networks.
Important - if you are experiencing connectivity issues between your on-premises VPN devices and VPN gateways, refer to Known device compatibility issues.
Microsoft maintains the list of validated devices and configuration guides in its documentation, and that list stays current as vendors ship firmware; rather than reproduce it here (and watch it rot), check Validated VPN devices and device configuration guides for your device. For reference, a few rows that matter for a home lab, with the minimum versions noted when this post was written in 2021:
| Vendor | Device family | Minimum OS version | RouteBased configuration instructions |
|---|---|---|---|
| Sentrium (Developer) | VyOS | VyOS 1.2.2 | Configuration guide |
| Ubiquiti | EdgeRouter | EdgeOS v1.10 | BGP over IKEv2/IPsec VTI over IKEv2/IPsec |
| Synology | MR2200ac RT2600ac RT1900ac | SRM1.1.5/VpnPlusServer-1.2.0 | Configuration guide |
Other common homelab gear, such as MikroTik routers running RouterOS, speaks standard IPsec/IKEv2 and can usually terminate the tunnel; look for Azure-specific samples in the vendor documentation. If your device is not on the validated list at all, it may still work with a Site-to-Site connection - contact the manufacturer for guidance.
For certain devices, you can also download configuration scripts directly from Azure; see Download VPN device configuration scripts. After downloading a sample, replace the placeholder values with the settings for your environment.
For the default IPsec/IKE parameters Azure VPN gateways use, see About VPN devices and IPsec/IKE parameters for Site-to-Site VPN gateway connections. One requirement worth knowing up front: you must clamp TCP MSS at 1350, or set the MTU on the tunnel interface to 1400 bytes if your device does not support MSS clamping.
Creating a VPN Gateway (official docs)
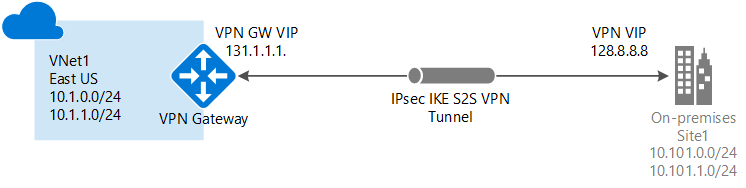
A Site-to-Site VPN gateway connection is used to connect your on-premises network to an Azure virtual network over an IPsec/IKE (IKEv1 or IKEv2) VPN tunnel. This type of connection requires a VPN device located on-premises that has an externally facing public IP address assigned to it. For more information about VPN gateways, see About VPN gateway.
Before you begin
Verify that you have met the following criteria before beginning configuration:
- Make sure you have a compatible VPN device and someone who is able to configure it. For more information about compatible VPN devices and device configuration, see About VPN Devices.
- Verify that you have an externally facing public IPv4 address for your VPN device.
-
If you are unfamiliar with the IP address ranges located in your on-premises network configuration, you need to coordinate with someone who can provide those details for you. When you create this configuration, you must specify the IP address range prefixes that Azure will route to your on-premises location. None of the subnets of your on-premises network can over lap with the virtual network subnets that you want to connect to.
- Use the Bash environment in Azure Cloud Shell.
- If you prefer, install the Azure CLI to run CLI reference commands.
- If you’re using a local installation, sign in to the Azure CLI by using the az login command. To finish the authentication process, follow the steps displayed in your terminal. For additional sign-in options, see Sign in with the Azure CLI.
- When you’re prompted, install Azure CLI extensions on first use. For more information about extensions, see Use extensions with the Azure CLI.
- Run az version to find the version and dependent libraries that are installed. To upgrade to the latest version, run az upgrade.
- This article requires version 2.0 or later of the Azure CLI. If using Azure Cloud Shell, the latest version is already installed.
Example values
You can use the following values to create a test environment, or refer to these values to better understand the examples in this article:
#Example values
VnetName                = TestVNet1?
ResourceGroup           = TestRG1?
Location                = eastus?
AddressSpace            = 10.11.0.0/16?
SubnetName              = Subnet1?
Subnet                  = 10.11.0.0/24?
GatewaySubnet           = 10.11.255.0/27?
LocalNetworkGatewayName = Site2?
LNG Public IP           = <VPN device IP address>
LocalAddrPrefix1        = 10.0.0.0/24
LocalAddrPrefix2        = 20.0.0.0/24  ?
GatewayName             = VNet1GW?
PublicIP                = VNet1GWIP?
VPNType                 = RouteBased?
GatewayType             = Vpn?
ConnectionName          = VNet1toSite2
1. Connect to your subscription
If you choose to run CLI locally, connect to your subscription. If you are using Azure Cloud Shell in the browser, you don’t need to connect to your subscription. You will connect automatically in Azure Cloud Shell. However, you may want to verify that you are using the correct subscription after you connect.
Sign in to your Azure subscription with the az login command and follow the on-screen directions. For more information about signing in, see Get Started with Azure CLI.
az login
If you have more than one Azure subscription, list the subscriptions for the account.
az account list --all
Specify the subscription that you want to use.
az account set --subscription <replace_with_your_subscription_id>
2. Create a resource group
The following example creates a resource group named ‘TestRG1’ in the ‘eastus’ location. If you already have a resource group in the region that you want to create your VNet, you can use that one instead.
az group create --name TestRG1 --location eastus
3. Create a virtual network
If you don’t already have a virtual network, create one using the az network vnet create command. When creating a virtual network, make sure that the address spaces you specify don’t overlap any of the address spaces that you have on your on-premises network.
Note - In order for this VNet to connect to an on-premises location, you need to coordinate with your on-premises network administrator to carve out an IP address range that you can use specifically for this virtual network. If a duplicate address range exists on both sides of the VPN connection, traffic does not route the way you may expect it to. Additionally, if you want to connect this VNet to another VNet, the address space cannot overlap with other VNet. Take care to plan your network configuration accordingly.
The following example creates a virtual network named ‘TestVNet1’ and a subnet, ‘Subnet1’.
az network vnet create --name TestVNet1 --resource-group TestRG1 --address-prefix 10.11.0.0/16 --location eastus --subnet-name Subnet1 --subnet-prefix 10.11.0.0/24
4. Create the gateway subnet
The virtual network gateway uses specific subnet called the gateway subnet. The gateway subnet is part of the virtual network IP address range that you specify when configuring your virtual network. It contains the IP addresses that the virtual network gateway resources and services use. The subnet must be named ‘GatewaySubnet’ in order for Azure to deploy the gateway resources. You can’t specify a different subnet to deploy the gateway resources to. If you don’t have a subnet named ‘GatewaySubnet’, when you create your VPN gateway, it will fail.
When you create the gateway subnet, you specify the number of IP addresses that the subnet contains. The number of IP addresses needed depends on the VPN gateway configuration that you want to create. Some configurations require more IP addresses than others. We recommend that you create a gateway subnet that uses a /27 or /28.
If you see an error that specifies that the address space overlaps with a subnet, or that the subnet is not contained within the address space for your virtual network, check your VNet address range. You may not have enough IP addresses available in the address range you created for your virtual network. For example, if your default subnet encompasses the entire address range, there are no IP addresses left to create additional subnets. You can either adjust your subnets within the existing address space to free up IP addresses, or specify an additional address range and create the gateway subnet there.
Use the az network vnet subnet create command to create the gateway subnet.
az network vnet subnet create --address-prefix 10.11.255.0/27 --name GatewaySubnet --resource-group TestRG1 --vnet-name TestVNet1
Important - When working with gateway subnets, avoid associating a network security group (NSG) to the gateway subnet. Associating a network security group to this subnet may cause your virtual network gateway (VPN and Express Route gateways) to stop functioning as expected. For more information about network security groups, see What is a network security group?.
5. Create the local network gateway
The local network gateway typically refers to your on-premises location. You give the site a name by which Azure can refer to it, then specify the IP address of the on-premises VPN device to which you will create a connection. You also specify the IP address prefixes that will be routed through the VPN gateway to the VPN device. The address prefixes you specify are the prefixes located on your on-premises network. If your on-premises network changes, you can easily update the prefixes.
Use the following values:
- The –gateway-ip-address is the IP address of your on-premises VPN device.
- The –local-address-prefixes are your on-premises address spaces.
Use the az network local-gateway create command to add a local network gateway with multiple address prefixes:
az network local-gateway create --gateway-ip-address 23.99.221.164 --name Site2 --resource-group TestRG1 --local-address-prefixes 10.0.0.0/24 20.0.0.0/24
6. Request a Public IP address
A VPN gateway must have a Public IP address. You first request the IP address resource, and then refer to it when creating your virtual network gateway. The IP address is dynamically assigned to the resource when the VPN gateway is created. VPN Gateway currently only supports Dynamic Public IP address allocation. You cannot request a Static Public IP address assignment. However, this does not mean that the IP address changes after it has been assigned to your VPN gateway. The only time the Public IP address changes is when the gateway is deleted and re-created. It doesn’t change across resizing, resetting, or other internal maintenance/upgrades of your VPN gateway.
Use the az network public-ip create command to request a Dynamic Public IP address.
az network public-ip create --name VNet1GWIP --resource-group TestRG1 --allocation-method Dynamic
7. Create the VPN gateway
Create the virtual network VPN gateway. Creating a gateway can often take 45 minutes or more, depending on the selected gateway SKU.
Use the following values:
- The –gateway-type for a Site-to-Site configuration is Vpn. The gateway type is always specific to the configuration that you are implementing. For more information, see Gateway types.
- The –vpn-type can be RouteBased (referred to as a Dynamic Gateway in some documentation), or PolicyBased (referred to as a Static Gateway in some documentation). The setting is specific to requirements of the device that you are connecting to. For more information about VPN gateway types, see About VPN Gateway configuration settings.
- Select the Gateway SKU that you want to use. There are configuration limitations for certain SKUs. For more information, see Gateway SKUs.
Create the VPN gateway using the az network vnet-gateway create command. If you run this command using the ‘–no-wait’ parameter, you don’t see any feedback or output. This parameter allows the gateway to create in the background. It takes 45 minutes or more to create a gateway.
az network vnet-gateway create --name VNet1GW --public-ip-address VNet1GWIP --resource-group TestRG1 --vnet TestVNet1 --gateway-type Vpn --vpn-type RouteBased --sku VpnGw1 --no-wait?
8. Configure your VPN device
Site-to-Site connections to an on-premises network require a VPN device. In this step, you configure your VPN device. When configuring your VPN device, you need the following:
- A shared key. This is the same shared key that you specify when creating your Site-to-Site VPN connection. In our examples, we use a basic shared key. We recommend that you generate a more complex key to use.
- The Public IP address of your virtual network gateway. You can view the public IP address by using the Azure portal, PowerShell, or CLI. To find the public IP address of your virtual network gateway, use the az network public-ip list command. For easy reading, the output is formatted to display the list of public IPs in table format.
az network public-ip list --resource-group TestRG1 --output table
To download VPN device configuration scripts:
Depending on the VPN device that you have, you may be able to download a VPN device configuration script. For more information, see Download VPN device configuration scripts.
See the following links for additional configuration information:
- For information about compatible VPN devices, see VPN Devices.
- Before configuring your VPN device, check for any Known device compatibility issues for the VPN device that you want to use.
- For links to device configuration settings, see Validated VPN Devices. The device configuration links are provided on a best-effort basis. It’s always best to check with your device manufacturer for the latest configuration information. The list shows the versions we have tested. If your OS is not on that list, it is still possible that the version is compatible. Check with your device manufacturer to verify that OS version for your VPN device is compatible.
- For an overview of VPN device configuration, see VPN device configuration overview.
- For information about editing device configuration samples, see Editing samples.
- For cryptographic requirements, see About cryptographic requirements and Azure VPN gateways.
- For information about IPsec/IKE parameters, see About VPN devices and IPsec/IKE parameters for Site-to-Site VPN gateway connections. This link shows information about IKE version, Diffie-Hellman Group, Authentication method, encryption and hashing algorithms, SA lifetime, PFS, and DPD, in addition to other parameter information that you need to complete your configuration.
- For IPsec/IKE policy configuration steps, see Configure IPsec/IKE policy for S2S VPN or VNet-to-VNet connections.
- To connect multiple policy-based VPN devices, see Connect Azure VPN gateways to multiple on-premises policy-based VPN devices using PowerShell.
9. Create the VPN connection
Create the Site-to-Site VPN connection between your virtual network gateway and your on-premises VPN device. Pay particular attention to the shared key value, which must match the configured shared key value for your VPN device.
Create the connection using the az network vpn-connection create command.
az network vpn-connection create --name VNet1toSite2 --resource-group TestRG1 --vnet-gateway1 VNet1GW -l eastus --shared-key abc123 --local-gateway2 Site2
After a short while, the connection will be established.
10. Verify the VPN connection
You can verify that your connection succeeded by using the az network vpn-connection show command. In the example, ‘–name’ refers to the name of the connection that you want to test. When the connection is in the process of being established, its connection status shows ‘Connecting’. Once the connection is established, the status changes to ‘Connected’.
az network vpn-connection show --name VNet1toSite2 --resource-group TestRG1
If you want to use another method to verify your connection, see Verify a VPN Gateway connection.
To connect to a virtual machine
You can connect to a VM that is deployed to your VNet by creating a Remote Desktop Connection to your VM. The best way to initially verify that you can connect to your VM is to connect by using its private IP address, rather than computer name. That way, you are testing to see if you can connect, not whether name resolution is configured properly.
- Locate the private IP address. You can find the private IP address of a VM by either looking at the properties for the VM in the Azure portal, or by using PowerShell.
- Azure portal - Locate your virtual machine in the Azure portal. View the properties for the VM. The private IP address is listed.
- PowerShell - Use the following example to view a list of VMs and private IP addresses from your resource groups:
$VMs = Get-AzVM
$Nics = Get-AzNetworkInterface | Where VirtualMachine -ne $null
foreach($Nic in $Nics) {
  $VM = $VMs | Where-Object -Property Id -eq $Nic.VirtualMachine.Id
  $Prv = $Nic.IpConfigurations | Select-Object -ExpandProperty PrivateIpAddress
  $Alloc = $Nic.IpConfigurations | Select-Object -ExpandProperty PrivateIpAllocationMethod
  Write-Output "$($VM.Name): $Prv,$Alloc"
}
- Verify that you are connected to your VNet using the Point-to-Site VPN connection.
- Open Remote Desktop Connection by typing “RDP” or “Remote Desktop Connection” in the search box on the taskbar, then select Remote Desktop Connection. You can also open Remote Desktop Connection using the ‘mstsc’ command in PowerShell.
- In Remote Desktop Connection, enter the private IP address of the VM. You can click “Show Options” to adjust additional settings, then connect.
Troubleshoot a connection
If you are having trouble connecting to a virtual machine over your VPN connection, check the following:
- Verify that your VPN connection is successful.
- Verify that you are connecting to the private IP address for the VM.
- If you can connect to the VM using the private IP address, but not the computer name, verify that you have configured DNS properly. For more information about how name resolution works for VMs, see Name Resolution for VMs.
- For more information about RDP connections, see Troubleshoot Remote Desktop connections to a VM.
Common tasks
This section contains common commands that are helpful when working with site-to-site configurations. For the full list of CLI networking commands, see Azure CLI - Networking.
To view local network gateways
To view a list of the local network gateways, use the az network local-gateway list command.
az network local-gateway list --resource-group TestRG1
To modify local network gateway IP address prefixes - no gateway connection
If you don’t have a gateway connection and you want to add or remove IP address prefixes, you use the same command that you use to create the local network gateway, az network local-gateway create. You can also use this command to update the gateway IP address for the VPN device. To overwrite the current settings, use the existing name of your local network gateway. If you use a different name, you create a new local network gateway, instead of overwriting the existing one.
Each time you make a change, the entire list of prefixes must be specified, not just the prefixes that you want to change. Specify only the prefixes that you want to keep. In this case, 10.0.0.0/24 and 20.0.0.0/24
az network local-gateway create --gateway-ip-address 23.99.221.164 --name Site2 -g TestRG1 --local-address-prefixes 10.0.0.0/24 20.0.0.0/24
To modify local network gateway IP address prefixes - existing gateway connection
If you have a gateway connection and want to add or remove IP address prefixes, you can update the prefixes using az network local-gateway update. This results in some downtime for your VPN connection. When modifying the IP address prefixes, you don’t need to delete the VPN gateway.
Each time you make a change, the entire list of prefixes must be specified, not just the prefixes that you want to change. In this example, 10.0.0.0/24 and 20.0.0.0/24 are already present. We add the prefixes 30.0.0.0/24 and 40.0.0.0/24 and specify all 4 of the prefixes when updating.
az network local-gateway update --local-address-prefixes 10.0.0.0/24 20.0.0.0/24 30.0.0.0/24 40.0.0.0/24 --name VNet1toSite2 -g TestRG1
To modify the local network gateway ‘gatewayIpAddress’
If the VPN device that you want to connect to has changed its public IP address, you need to modify the local network gateway to reflect that change. The gateway IP address can be changed without removing an existing VPN gateway connection (if you have one). To modify the gateway IP address, replace the values ‘Site2’ and ‘TestRG1’ with your own using the az network local-gateway update command.
az network local-gateway update --gateway-ip-address 23.99.222.170 --name Site2 --resource-group TestRG1
Verify that the IP address is correct in the output:
"gatewayIpAddress": "23.99.222.170",
To verify the shared key values
Verify that the shared key value is the same value that you used for your VPN device configuration. If it is not, either run the connection again using the value from the device, or update the device with the value from the return. The values must match. To view the shared key, use the az network vpn-connection-list.
az network vpn-connection shared-key show --connection-name VNet1toSite2 --resource-group TestRG1
To view the VPN gateway Public IP address
To find the public IP address of your virtual network gateway, use the az network public-ip list command. For easy reading, the output for this example is formatted to display the list of public IPs in table format.
az network public-ip list --resource-group TestRG1 --output table
With the gateway and router setup complete, the next step is replicating the virtual machines
Replicating Virtual Machines / Containers
Due to the number of different ways to migrate Virtual Machines into Azure from the private cloud, we will not cover migration in depth this time. How much applies depends on the source platform: Microsoft’s migration guides cover established paths for VMware, Hyper-V, and physical machines, while KVM or Proxmox hosts, Docker deployments, and Kubernetes clusters generally need a different route, such as exporting disks, converting formats, or rebuilding the workload on Azure services. Leave questions on this article, if there is information you can’t find.
There are a few items to keep in mind when migrating Virtual Machines / Containers from a homelab to Azure. A major one is that the migration is likely not permanent and likely not one way. Azure has a number of tools and technologies for migrating infrastructure into Azure; it does not, however, have many tools for migrating instances out of Azure. This means that your migration strategy will need to be able to synchronize back to the homelab. Prepare for a bi-directional migration process, if migration is required for entire machines.
Bi-Directional Migrations
Virtual Machines
Bi-directional migration options will differ depending on the hosting technology you use for your homelab. The most basic case, Virtual Machines (KVM, VMWare, Hyper-V, Xen, etc.), has two options based on deployment type:
- Immutable - Due to the stateless nature of immutable instances, the synchronization mechanism would target the underlying state storage mechanism if there is one. In the case of a blob or file store, the data can be easily copied between Azure and homelab using any number of tools.
- Mutable - Mutable instances will most likely need to have the (virtual) machine disks copied between each host. Use appropriate disk conversion technology so that the disk type is appropriate the host (Azure VHD vs KVM qcow2, etc).
It should be noted that migrations of certain products, like SQL Server, have more advanced migration and synchronization methods. These products are outside the scope of this discussion. For an example, a PostgreSQL cluster has the option to migrate via replication.
Containers
Container workloads are the easiest to move because the image is the artifact. On the Proxmox side that means LXC templates and any registry-backed deployments (Docker Compose files, Kubernetes manifests); on the Azure side the landing zones are Azure Container Instances for single containers and AKS when the workload already assumes Kubernetes.
The mechanics per source:
- LXC containers - rebuild rather than migrate. Export the container’s filesystem if you must (
vzdumpworks for LXC too), but the cleaner path is to capture the package list and volumes, thendocker build/recreate against a supported base image. LXC is not a Docker image format, so there is no direct lift-and-shift. - Docker hosts - push images to a registry (Docker Hub or Azure Container Registry), then redeploy with the same Compose file or manifest pointed at the new registry. Volumes ride along as Azure Files shares or managed disks.
- Kubernetes clusters -
kubectl applyyour manifests against AKS after retargeting image references and storage classes. StatefulSets need their persistent volumes recreated or migrated first; see the disk-copy notes above.
Data Sync
Azure has a number of different options to sync blobs between the home lab and Azure:
- AzCopy
- Azure Data Factory
- Mount storage by using NFS
- Mount storage from Linux using blobfuse
- Transfer data with the Data Movement library
Ingress
Direct Entry
Another item to consider is ingress: what will be the front door into your homelab. The usage of front door here describes how the applications are accessed over the internet - it is not a reference to the Azure Front Door product specifically. If the homelab will still use its internet as the front door for application access, then will the available bandwidth be enough for the migration increase? If Azure is to be the front door, then how do you simultaneously handle having two front doors as the DNS update propagates?
Diagram showing an on-premises network on the left, which consists of three computer screens and a gateway. A double-sided arrow connecting the on-premises to a cloud labeled internet with “Site-to-site VPN tunnel” above the double-sided arrow. Another double-sided arrow connects the internet cloud to its right, through a dotted rectangle labeled “Azure Virtual Network”. The arrow connects to an item labeled VPN gateway. That gateway has a single-arrow leaving it to the right pointing to a load balancer which is pointing to three identical virtual machines. At the bottom, there is a computer monitor labeled user. Between the computer monitor labeled user and the cloud labeled internet is two doors. The left door is labeled on-premises front door. The right door is labeled Azure Front Door. There is a blue arrow for each door pointing from the computer labeled user. There is a blue arrow from each door pointing to the cloud labeled internet.
If you wish to use both as a front door, make sure you have an ingress option available that can properly route between the different subnets and servers. In the case of a basic web server, use something like Nginx or HA Proxy for ingress and basic routing, so that it can be mirrored between homelab and Azure.
Once our event is complete, it’s time to synchronize our systems and tear down our gateway.
Tear Down (official docs)
A note on tooling before this section: the creation half above uses the Azure CLI, while the teardown walkthrough below is written for Azure PowerShell. Either install the Az PowerShell module and follow along as written, or translate the same deletion order into az CLI commands - the sequence of resources to remove is identical either way.
There are a couple of different approaches you can take when you want to delete a virtual network gateway for a VPN gateway configuration.
- If you want to delete everything and start over, as in the case of a test environment, you can delete the resource group. When you delete a resource group, it deletes all the resources within the group. This method is only recommended if you don’t want to keep any of the resources in the resource group. You can’t selectively delete only a few resources using this approach.
- If you want to keep some of the resources in your resource group, deleting a virtual network gateway becomes slightly more complicated. Before you can delete the virtual network gateway, you must first delete any resources that are dependent on the gateway. The steps you follow depend on the type of connections that you created and the dependent resources for each connection.
Before beginning
1. Download the latest Azure Resource Manager PowerShell cmdlets.
Download and install the latest version of the Azure Resource Manager PowerShell cmdlets. For more information about downloading and installing PowerShell cmdlets, see How to install and configure Azure PowerShell.
2. Connect to your Azure account.
Open your PowerShell console and connect to your account. Use the following example to help you connect:
Connect-AzAccount
Check the subscriptions for the account.
Get-AzSubscription
If you have more than one subscription, specify the subscription that you want to use.
Select-AzSubscription -SubscriptionName "Replace_with_your_subscription_name"
Delete a Site-to-Site VPN gateway
To delete a virtual network gateway for a S2S configuration, you must first delete each resource that pertains to the virtual network gateway. Resources must be deleted in a certain order due to dependencies. When working with the examples below, some of the values must be specified, while other values are an output result. We use the following specific values in the examples for demonstration purposes:
VNet name: VNet1 Resource Group name: RG1 Virtual network gateway name: GW1
The following steps apply to the Resource Manager deployment model.
1. Get the virtual network gateway that you want to delete.
$GW=get-Azvirtualnetworkgateway -Name "GW1" -ResourceGroupName "RG1"
2. Check to see if the virtual network gateway has any connections.
get-Azvirtualnetworkgatewayconnection -ResourceGroupName "RG1" | where-object {$_.VirtualNetworkGateway1.Id -eq $GW.Id}
$Conns=get-Azvirtualnetworkgatewayconnection -ResourceGroupName "RG1" | where-object {$_.VirtualNetworkGateway1.Id -eq $GW.Id}
3. Delete all connections.
You may be prompted to confirm the deletion of each of the connections.
$Conns | ForEach-Object {Remove-AzVirtualNetworkGatewayConnection -Name $_.name -ResourceGroupName $_.ResourceGroupName}
4. Delete the virtual network gateway.
You may be prompted to confirm the deletion of the gateway. If you have a P2S configuration to this VNet in addition to your S2S configuration, deleting the virtual network gateway will automatically disconnect all P2S clients without warning.
Remove-AzVirtualNetworkGateway -Name "GW1" -ResourceGroupName "RG1"
At this point, your virtual network gateway has been deleted. You can use the next steps to delete any resources that are no longer being used.
5 Delete the local network gateways.
Get the list of the corresponding local network gateways.
$LNG=Get-AzLocalNetworkGateway -ResourceGroupName "RG1" | where-object {$_.Id -In $Conns.LocalNetworkGateway2.Id}
Delete the local network gateways. You may be prompted to confirm the deletion of each of the local network gateway.
$LNG | ForEach-Object {Remove-AzLocalNetworkGateway -Name $_.Name -ResourceGroupName $_.ResourceGroupName}
6. Delete the Public IP address resources.
Get the IP configurations of the virtual network gateway.
$GWIpConfigs = $Gateway.IpConfigurations
Get the list of Public IP address resources used for this virtual network gateway. If the virtual network gateway was active-active, you will see two Public IP addresses.
$PubIP=Get-AzPublicIpAddress | where-object {$_.Id -In $GWIpConfigs.PublicIpAddress.Id}
Delete the Public IP resources.
$PubIP | foreach-object {remove-AzpublicIpAddress -Name $_.Name -ResourceGroupName "RG1"}
7. Delete the gateway subnet and set the configuration.
$GWSub = Get-AzVirtualNetwork -ResourceGroupName "RG1" -Name "VNet1" | Remove-AzVirtualNetworkSubnetConfig -Name "GatewaySubnet"
Set-AzVirtualNetwork -VirtualNetwork $GWSub
Delete a VPN gateway by deleting the resource group
If you are not concerned about keeping any of your resources in the resource group and you just want to start over, you can delete an entire resource group. This is a quick way to remove everything. The following steps apply only to the Resource Manager deployment model.
1. Get a list of all the resource groups in your subscription.
Get-AzResourceGroup
2. Locate the resource group that you want to delete.
Locate the resource group that you want to delete and view the list of resources in that resource group. In the example, the name of the resource group is RG1. Modify the example to retrieve a list of all the resources.
Find-AzResource -ResourceGroupNameContains RG1
3. Verify the resources in the list.
When the list is returned, review it to verify that you want to delete all the resources in the resource group, as well as the resource group itself. If you want to keep some of the resources in the resource group, use the steps in the earlier sections of this article to delete your gateway.
4. Delete the resource group and resources.
To delete the resource group and all the resource contained in the resource group, modify the example and run.
Remove-AzResourceGroup -Name RG1
5. Check the status.
It takes some time for Azure to delete all the resources. You can check the status of your resource group by using this cmdlet.
Get-AzResourceGroup -ResourceGroupName RG1
The result that is returned shows ‘Succeeded’.
ResourceGroupName : RG1
Location          : eastus
ProvisioningState : Succeeded
Comments
Nothing yet. Say the first thing.
Sign in to join the conversation.