
I’ve been an orthopedic surgeon for 30 years. I’ve seen thousands of patients with back pain, and I’ve dealt with back pain myself, on and off. So this post comes from both extensive professional experience and deep personal experience.
When we review spinal imaging findings, almost everyone has been told about the status of their discs. They know which ones are bulging, protruding, herniated, or degenerative. Yet almost no one has ever been told or knows about the condition of the muscles surrounding and supporting their spine.
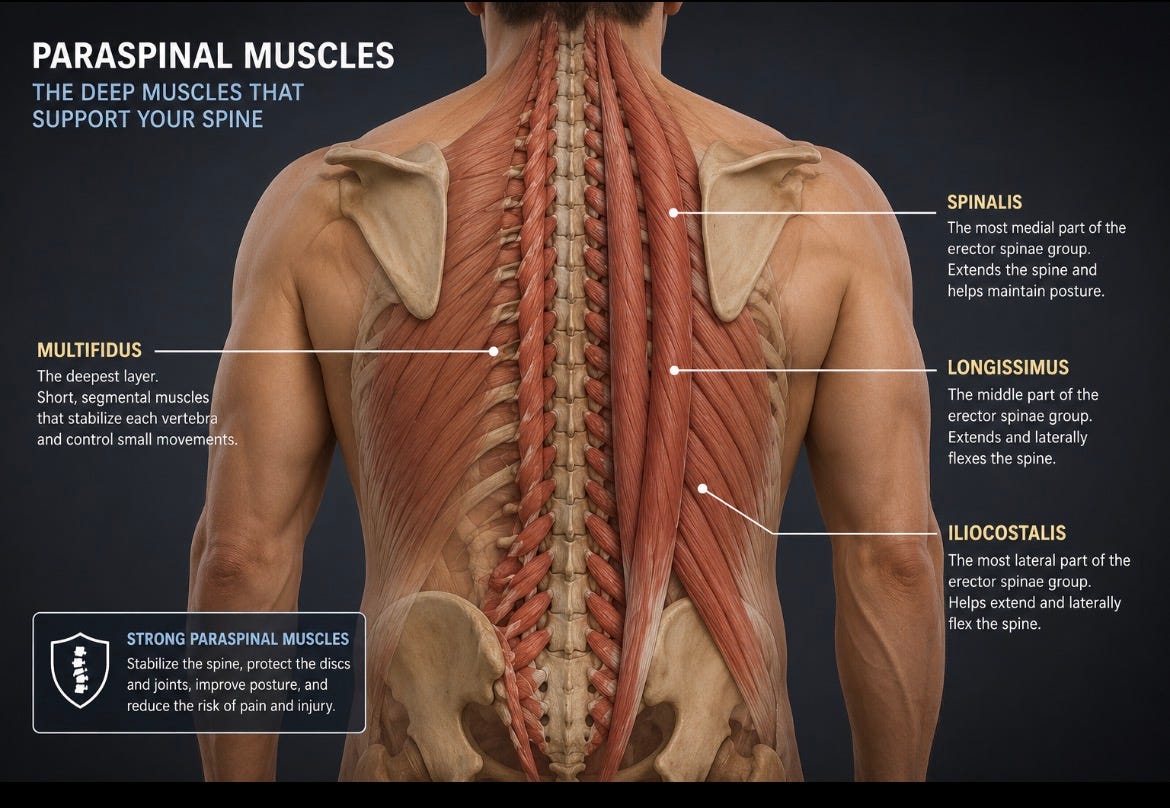
That’s remarkable, because on many of the MRIs I review, the paraspinal muscles (spinal support muscles) are atrophied, infiltrated with fat, and poorly conditioned. Meanwhile, disc bulges, protrusions, and other degenerative changes become extraordinarily common as we age and frequently exist in people without any pain. I have multiple disc issues and arthritis myself, and keeping my back quiet is a very active process. So today, I am sharing some of my favorite low back strengthening and conditioning exercises. The same ones I perform each week to keep my back functioning and feeling well.
For many of us, the condition of our discs matters less than we have been led to believe, while the quality, strength, and function of the muscles supporting the lumbar and thoracic spine matter far more than most people have been told.
Let’s do this…
We’ve done a lot of training across many Saturdays over the last year. While glancing through the workout list, I noticed a clear absence of lower-back training.
You’d like to expect your low back to hold up over the decades… well, you won’t build that by avoiding movement… rest is rarely the answer for episodes of low back pain. Similarly, starting a program to build a stronger and more capable lumbar spine shouldn’t be done by loading a ton of weight before you’ve built the foundation.
This program will show you how to build a low back program in stages. Stability is first. This is where we train your trunk to resist unwanted movement. Then we train controlled movement through your spine and hips. Then we load the posterior chain, the glutes, hamstrings, and erectors (paraspinal muscles) that hold you upright.
Ready? Let’s go…
Disclaimer: This Action Plan is for informational and educational purposes only. It is not intended as a substitute for professional medical advice, diagnosis, or treatment. It does not replace an individualized evaluation or program from a physician, physical therapist, or other qualified healthcare provider who knows your history and can examine you directly.
Always consult your physician or other qualified healthcare provider before beginning any new exercise program, especially if you have any underlying medical conditions, injuries, or concerns. Participation is voluntary and at your own risk.
Before your low back can handle load, it needs to handle forces placed on your spine —but not generated by the spine. Examples include the pull of an uneven weight, the torque of reaching to grab something, and preventing a heavy door from pulling you with it as it closes. This block trains your trunk to resist those forces rather than give in.
Hold a single dumbbell or kettlebell at your side, stand tall, and march in place, or walk, without letting your torso lean toward the loaded side. This mimics carrying a suitcase, a grocery bag, or a toddler on one hip, and it trains your obliques and deep spinal stabilizers to keep you upright when a load isn't evenly distributed.
Enough: Light load, marching in place, 2 sets of 20 total steps per side.
Better: Moderate load, march for 20-30 seconds, switch hands and repeat 2 to 3 sets per side.
Optimal: Heavier load, march for 30-60 seconds, 3 sets per side.
Stand perpendicular to a cable or band anchored at chest height. Press the handle straight out from your chest and hold it there, resisting the anchor’s pull to rotate you. This is the isometric cousin of the Pallof press, and holding the position, rather than pressing and returning, builds the endurance your trunk actually needs to brace for minutes at a time during real activity, not just for a single rep.
Enough: Light resistance, hold 15 to 20 seconds, 2 sets per side.
Better: Moderate resistance, hold 20 to 30 seconds, 2 to 3 sets per side
Optimal: Heavier resistance, hold 30 to 45 seconds, 3 sets per side
Lie on your back with your knees bent to 90 degrees. Instead of the usual deadbug pattern, opposite arm and opposite leg extending together, extend the same-side arm and leg at once, right arm and right leg together, then the left. This removes the natural counterbalance the standard version gives you; it will make your trunk work harder to keep your low back gently pressed into the floor and your ribs from flaring. Keep the range small enough that you don’t lose that contact.
Enough: Small range, ribs and low back stay on the floor, 2 sets of 6 per side.
Better: Fuller range, arms and legs closer to fully extended, 2 to 3 sets of 8 per side.
Optimal: Full range with a slow 3-second lowering phase, 3 sets of 10 per side.
Spine and hip mobility improve lumbar spine function. If the hips lose motion, they transfer the stress proximally to the spine. This block trains the controlled, deliberate rotation and hip-spine coordination your body needs to reach, twist, and get up off the floor. In this block, we also start our active strengthening exercises.
Kneel with one leg forward, with the cable set to chest height and out to the side. Rotate your trunk to pull the handle across your body, keeping the cable at that same height throughout. The half-kneeling position builds hip stability in the kneeling leg, so you train two things at once.
Enough: Light resistance, 2 sets of 8 per side, controlled and slow.
Better: Moderate resistance, 2 to 3 sets of 10 per side, brief pause at full rotation.
Optimal: Heavier resistance, 3 sets of 12 per side, faster controlled rotation with a full return.
Standing, cable at chest height, rotate through your trunk while pressing the handle away from your chest, letting the power start in your hips and travel out through your arms. This is the highly useful pattern behind pushing a heavy door open while turning.
The keys to doing this right.
Keep your elbows up; don’t drop them to push the weight.
Start your turn at the hips, then follow with the arms.
Continue the turn until your upper torso is 90 degrees rotated from the hips.
Enough: Light resistance, 2 sets of 8 per side, moderate tempo.
Better: Moderate resistance, 2 to 3 sets of 10 per side, full hip rotation into the press.
Optimal: Heavier resistance, 3 sets of 12 per side, faster press with controlled return.
For Members, we will go through 7 progressively more challenging and varied lumbar spine strengthening exercises, including my favorite routine. I credit these with keeping my cranky back calm, and enabling me to return to the golf course with my father and son.
Comments
Nothing yet. Say the first thing.
Sign in to join the conversation.