
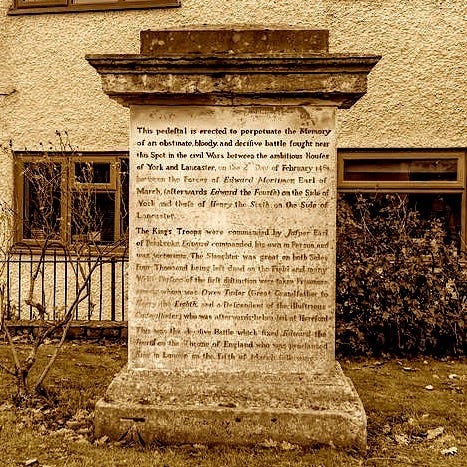
In most history books, the popular memory of the battle of Mortimer’s Cross is often portrayed in broad, romantic strokes: a young Edward of York sees a miraculous vision in the sky, explains it to his troops as divine approval of his cause, and then soundly beats Jasper Tudor’s army in a set-piece battle typical of the Wars of the Roses. But a few surviving chronicles – and the landscape itself – tell a different story.
As mentioned in Part 1 of this article, most of the chroniclers who recorded the battle (and some modern historians) offer similar accounts. However, one contemporary provides evidence not found elsewhere, and an equally coeval foreign source describes the battle of Mortimer’s Cross as a particularly one-sided slaughter.
Although the traditional overview of this interesting battle appears clear-cut and historically convincing, it is worth noting that contradictions abound in the sources, and a comprehensive explanation is far from complete; otherwise, I would not be writing a book on the subject. What is apparent, however, is that current military history is wrong about Mortimer’s Cross and the parhelion that preceded it – and I hope to explain why in this article without going into too much detail.
So, what do the three suns have to do with the battle?
Gregory’s Chronicle offers one of the best indications that the celebrated parhelion, or ‘three suns’, was not witnessed at Mortimer’s Cross at all, but in the open fields, just outside Hereford, the day before the battle. According to the author, the phenomenon was witnessed on Monday, 2 February 1460/1 – Candlemas Day – and if we take another look at the contemporary depiction of the parhelion in Harley MS 7353, we can see Edward and his army, under his banner of the Black Bull of Clarence, witnessing the scene outside a walled town (Hereford), and not at Mortimer’s Cross as historians have previously thought.
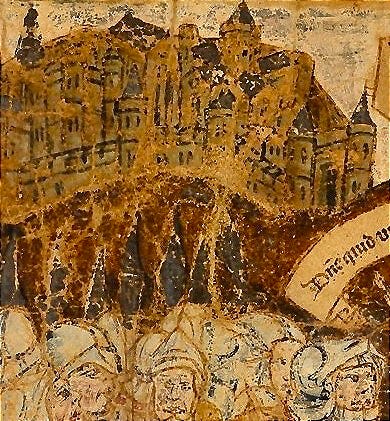
Below is how the author of Gregory’s Chronicle understood the Yorkist preliminaries before the battle, and that the Lancastrians did not witness the parhelion at all:
Also, the same day that the Earl of March should take his journey towards Mortimer his Cross from Hereford east, he mustered his army without the town walls in a marsh that is called Wig marsh. And over him, men say [they saw] three suns shining.1
Therefore, we can be reasonably certain Edward’s army was not embattled near Mortimer’s Cross, facing the Lancastrians, when the parhelion appeared. Following the contemporary evidence of Gregory’s Chronicle (1452-69), the Yorkists were still encamped outside Hereford when the three suns were seen ‘in the firmament’, and this had a marked effect on those who witnessed the phenomenon.
It is also interesting to note that the author of Gregory’s Chronicle uses the phrase ‘Mortymer ys Crosse’ in the above extract, as does The Great Chronicle of London, which fails to name the actual settlement as we know it today. John Paston in The Paston Letters even called the battle ‘the field of Ludlow’; the crossroads being so unimportant in the fifteenth century that it was not worth mentioning. However, given that an actual stone cross once existed beside the Roman road opposite the famous Battle Oak, this is hardly surprising.2
The position of a stone plinth is marked on the first OS maps of the area, indicating that Mortimer’s Cross is not an old place name. In fact, the crossroads was not marked on maps until at least the 1750s. All of which provides clear proof that the cross, named after the local Mortimer family of Wigmore, was a more important landmark in Herefordshire during the fifteenth century than the modern crossroads of today. Therefore, if the battle is to be remembered at all, the stone cross and the Battle Oak (both now disappeared) may be the true markers where the battle took place on that cold February day.
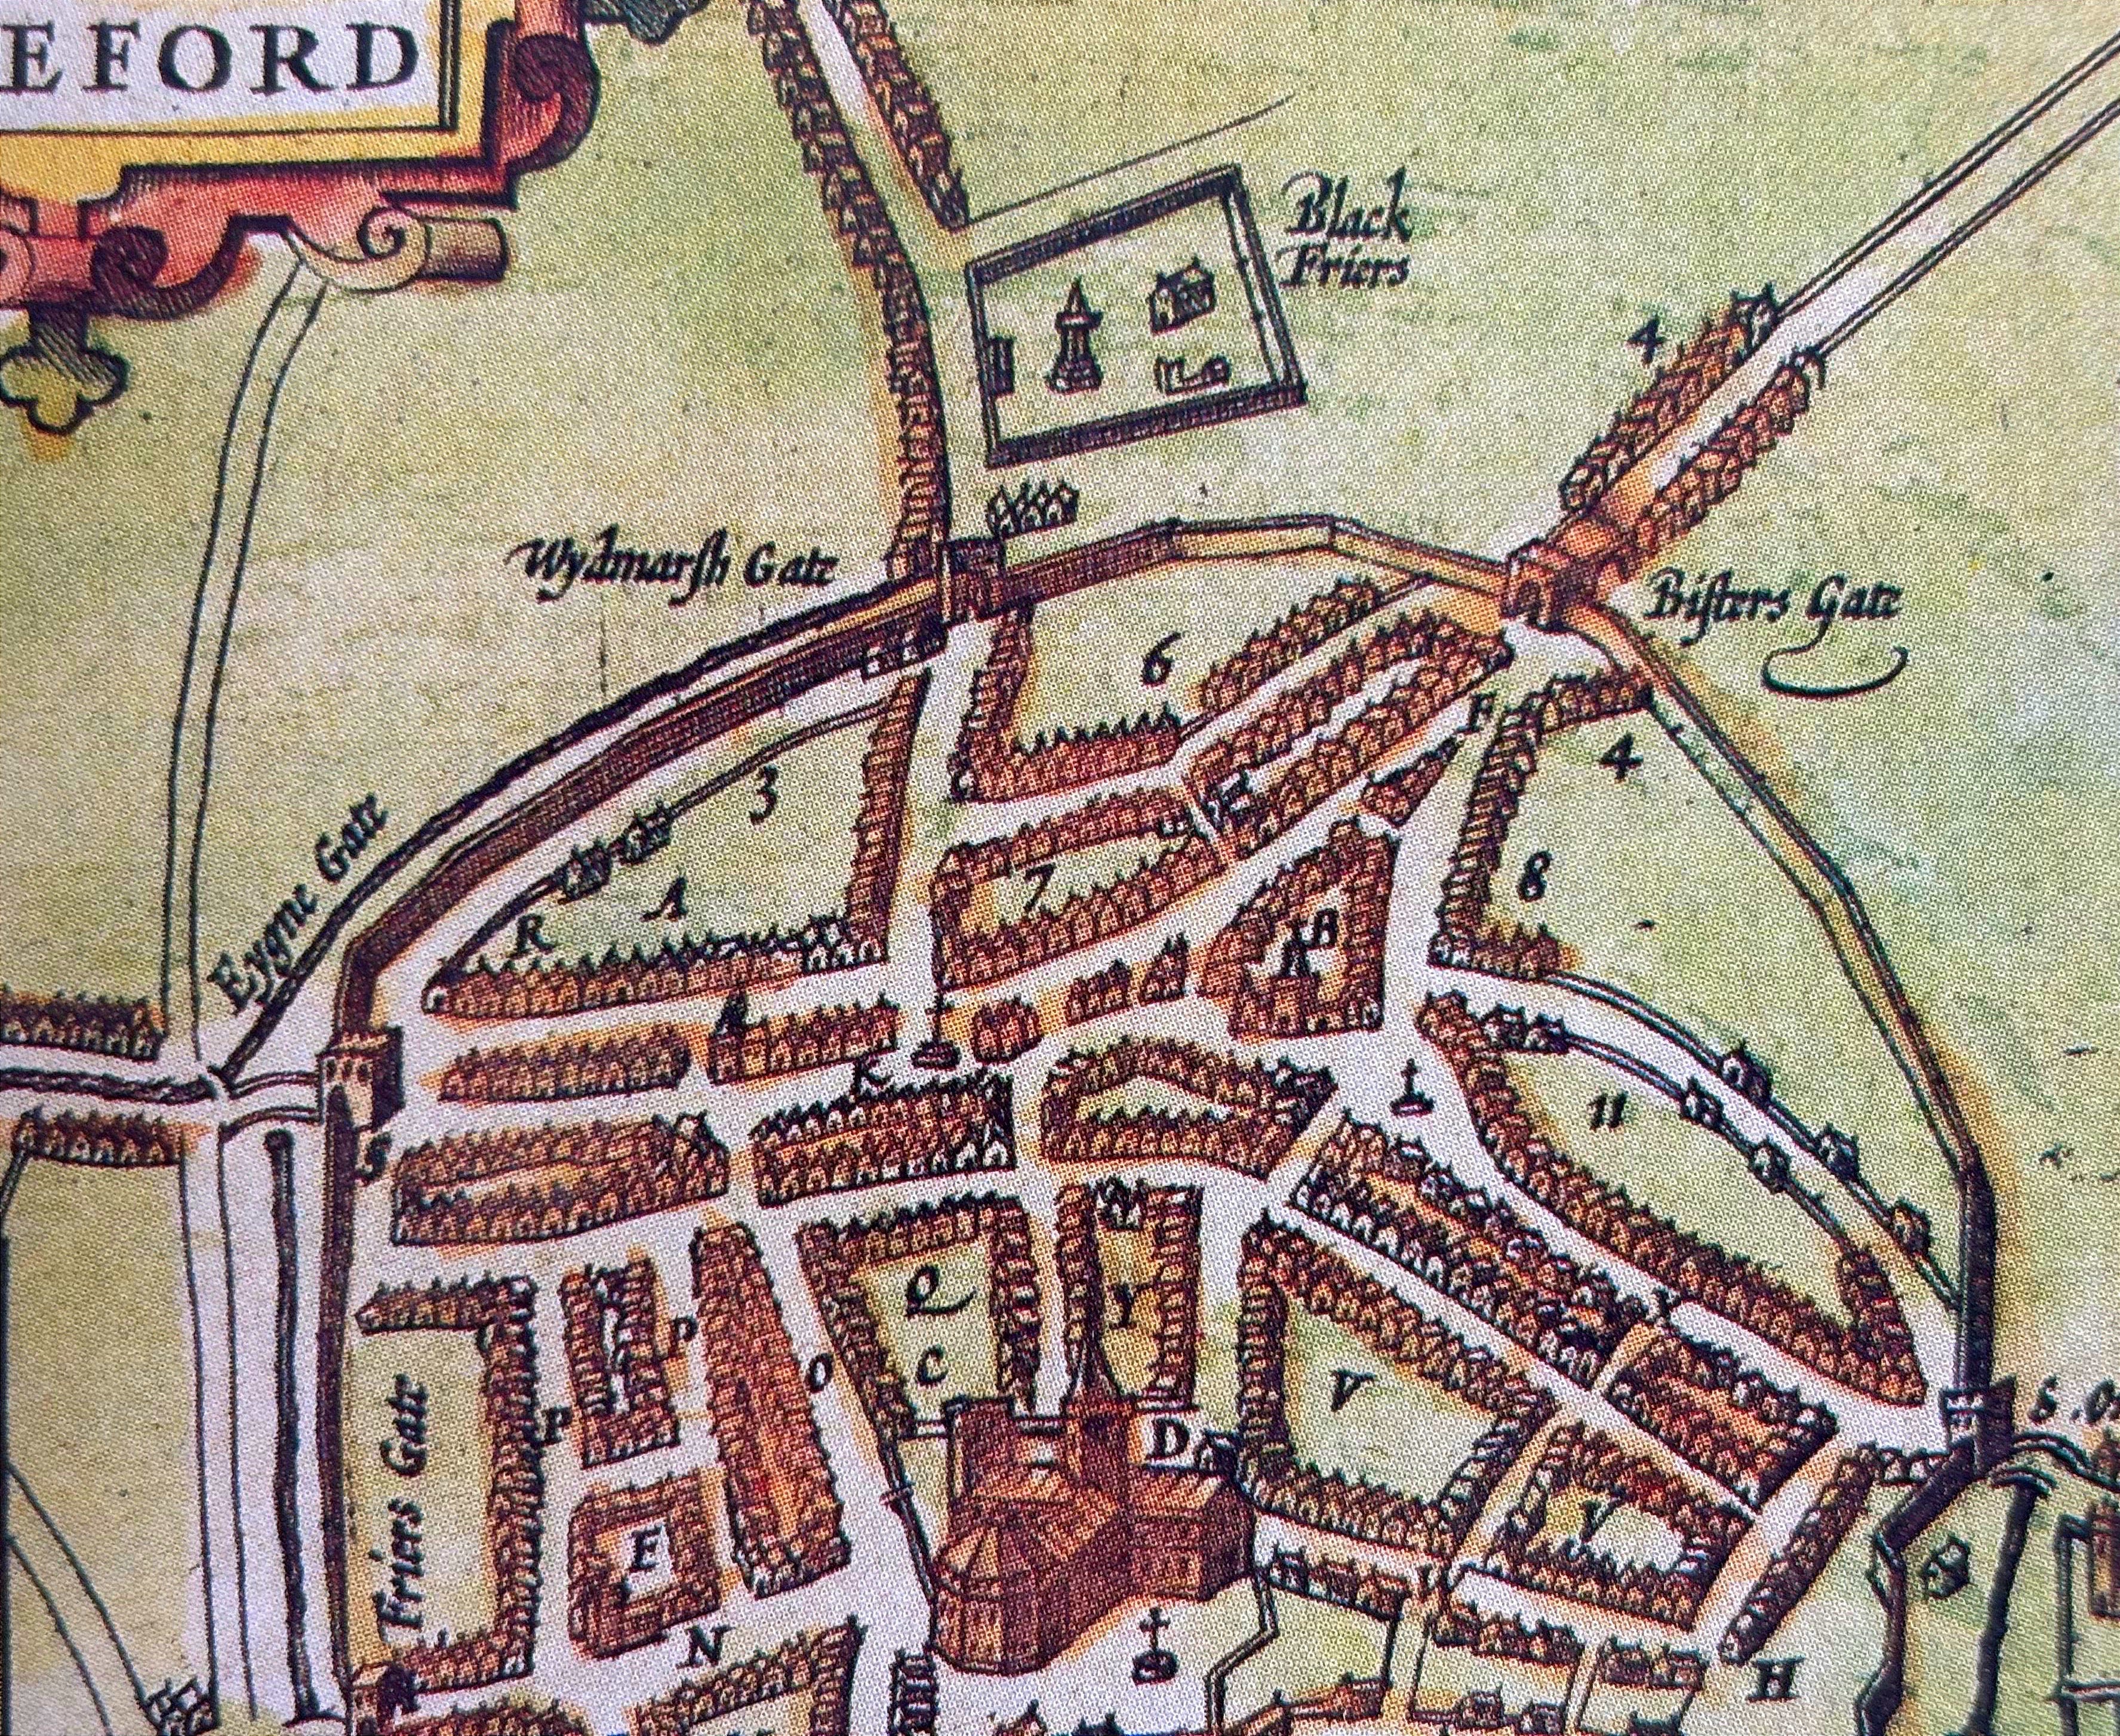
In addition, Gregory’s Chronicle mentions Wyg mersche (or Widemarsh as it is known today), which is clearly depicted on early maps of Herefordshire as a large open space adjacent to Black Friars Priory. The Widemarsh Gate was at Hereford’s northern extremity, and beyond this is where Edward chose to concentrate his forces rather than at Shrewsbury, Ludlow or Wigmore Castle as some historians have suggested. Edward doubtless recruited his army from various towns in the Marches, as sources tell us he spent Christmas at Shrewsbury, where he learned of his father's death at Wakefield. But Edward was clearly waiting for the Lancastrians to show themselves in England using well-established medieval roads out of Wales, and he was not elsewhere, as some writers would have us believe.
As for the effect of the parhelion, Edward used this as a perfect morale booster on the eve of an uncertain march north to intercept the Lancastrians. Knowing ‘God was on your side’ has always been a well-worn principle in warfare since ancient times. Therefore, the appearance of the three suns and its religious significance was not regarded as a bad omen by anyone who saw it, as the curiosity was seen on the day before the battle (which was fought on 3 February) and was not witnessed by the Lancastrians, who were still marching northeast into England from Wales at this time.
So, if the Yorkists marched from Hereford, where were the Lancastrians?
The ancient Roman road from Hereford (known as Watling Street) to Mortimer’s Cross is still traceable in many places today, and this was Edward’s chosen line of march north from his camp at Hereford. The road offered speed and directness — essential if the Yorkists hoped to intercept Jasper Tudor before he could link up with Margaret of Anjou’s northern army advancing south on London.
The French chronicler, Jean de Wavrin (d. 1474), becomes our primary source from this point on, as he may have had firsthand knowledge of what happened at Mortimer’s Cross from Edward or the Earl of Warwick, whom he met between 1461 and 1471. However, first it is worth analysing one of the best contemporary English reports of the battle, written before 1471, which also confirms that the battle occurred on Tuesday, 3 February, and that the parhelion was seen the day before Edward marched north:
The third day of February the same year, Edward, the noble Earl of March, fought with the Welshmen beside Wigmore in Wales, whose captains were the Earl of Pembroke and the Earl of Wiltshire, that would have finally destroyed the said Earl of March. And [on] the Monday before the day of battle, that is to say, on the feast of Purification of our blessed Lady, about ten o’clock before noon, were seen three suns in the firmament shining full clear, whereof the people had great marvel.3
There are similar accounts in many other English and foreign chronicles of the period (too numerous to document here). Proof, if any were needed, that the timeline has confused writers over the years, resulting in a distortion of the truth and a centuries-old smokescreen that has obscured the date and details of the battle.
As for the Lancastrians, Pembroke and Wiltshire were still following a line of march northeast of Hereford at this time. Using Roman roads to Clyro (such as Stone Street) and other ancient trackways that led east into England. It is possible they bypassed Hereford, but when Edward received news of this, he followed in pursuit, aiming to stop the Lancastrians at a river crossing, or somewhere where they might become disorganised. Some sources suggest that Edward had to adjust his march north to meet the Lancastrians, and this may be true, given that two roads led from Hereford. However, according to Wavrin, the Yorkists caught up with the Lancastrians before dawn on 3 February, indicating that the Yorkists must have encamped the night before somewhere between Hereford and Mortimer’s Cross.
Jean de Wavrin explains what happened next, giving the Yorkist strength and crucially, how the Lancastrians were surprised that morning:
How the Earl of March charged straight at the Earl of Wiltshire with around seven thousand men accompanying him.
While the queen was assembling her army [in England], the Earl of March was in Wales, greatly displeased by the death of the Duke of York, his father, his brother of Rutland and the other lords, so much so that he said he would take revenge, as he did, harshly … And the Earl of March knew well that the Earl of Wiltshire had gathered great people to join the queen's army, for which reason the young Earl of March put men in the field and went to the place where the Earl of Wiltshire was, who he killed, and six to seven thousand men died in the camp, which displeased the queen greatly, for she greatly loved the Earl of Wiltshire.4
Given then that the battle was not a set-piece engagement, but a dawn raid with the Yorkists charging ‘straight at’ the Lancastrian army in camp, the result was never in doubt. According to Wavrin, the fighting was particularly bloody and one-sided, but the Earl of Wiltshire was not killed, as he reports. He escaped with the Earl of Pembroke. However, such a strategy by Edward required stealth, discipline and confidence, as it appears the Lancastrians were completely surprised and quickly dealt with. Jean de Wavrin provides the main details of this, but other contemporaries fix the date as 3 February 1460/1 – the medieval Feast of St Blaise – and relate that there was ‘a sharp battle’ with heavy casualties.
Therefore, the ‘battle’ of Mortimer’s Cross was not a traditional battle at all – it was a dawn raid on Jasper Tudor’s camp, which clearly had not taken proper precautions against attack.
When the Yorkists descended on their enemies, they were not facing an embattled force deployed on chosen ground, but an army still in its ‘lodgings’ waiting to cross the River Lugg. Wavrin tells us ‘et morurent de six à sept mille hommes sur la place, dont la royne fut fort désplaisante’, which describes a severe loss of life and that Pembroke’s encampment was a ‘fort’ or ‘square’. The site for this camp was likely a mile north of Kingsland village, bordered by the River Lugg; a dangerous place for the Lancastrians to halt the night before and aim to cross the bridge the next morning.
So, are all previous interpretations of the battle wrong?
Indeed, there has been no shortage of disagreement within the historical community over the centuries, but I believe this is due to confusion, rather than a lack of contemporary evidence.
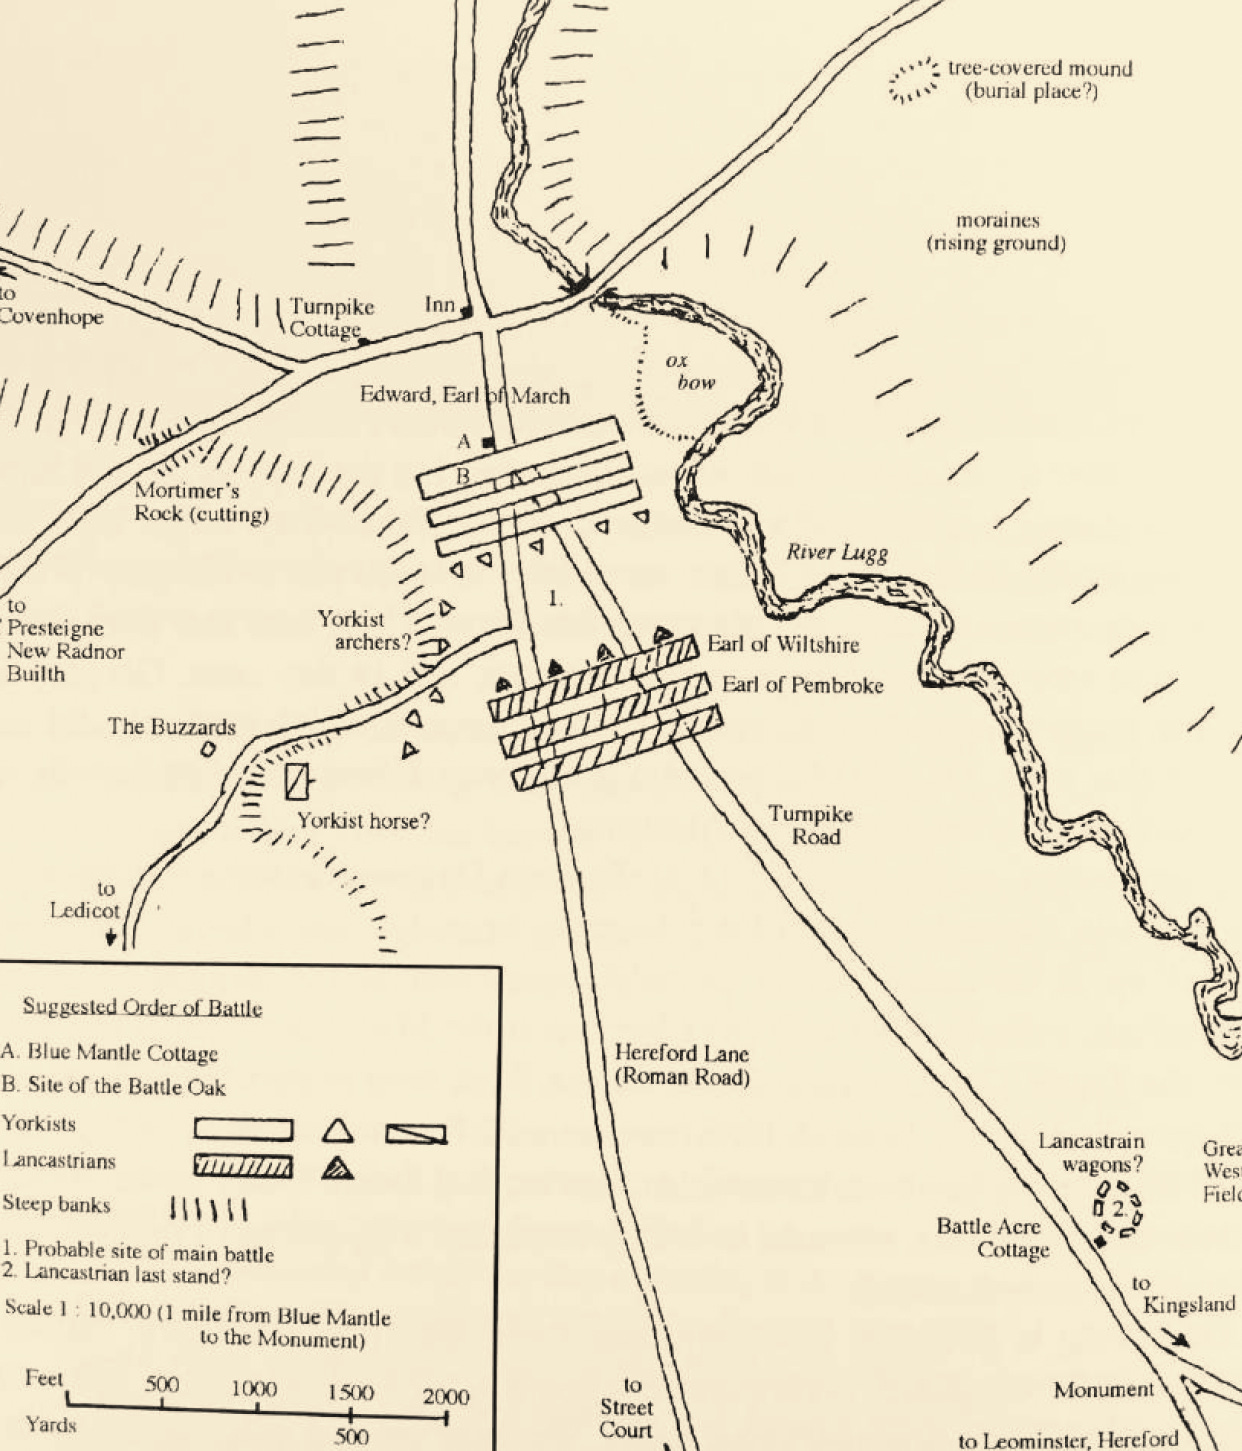
The long-accepted battlefield orientations — lines facing east-west near the modern Mortimer’s Cross Inn or north-south with Edward occupying the crossroads, are almost certainly wrong following the above evidence. The way Wavrin describes events, the constraints of medieval logistics before the battle, and the direction of the Yorkist march north up the Roman road all suggest a surprise attack on Jasper’s camp, likely using cavalry or ‘prickers’ to create maximum effect. Most chroniclers estimate there were significant deaths (3-4000), with few escaping the slaughter – but of course, this and Wavrin’s figures cannot be proved, as no mass graves have ever been found in the area, and chroniclers were notorious alarmists.
Between 2018 and 2022, metal-detecting and survey work identified late-medieval artefacts in the fields north of Kingsland. Over the years, local knowledge has indicated that this area, located to the west of the River Lugg, near Mortimer’s Cross, was a significant hotspot likely to yield relics of the fight. While not conclusive until more evidence is found, this adds weight to the idea that the rout and pursuit were followed in all directions, towards the bridge over the River Lugg, perhaps westward into Wales, north toward Wigmore and south to Kingsland, with Jasper Tudor and Wiltshire escaping mounted with only a few followers.
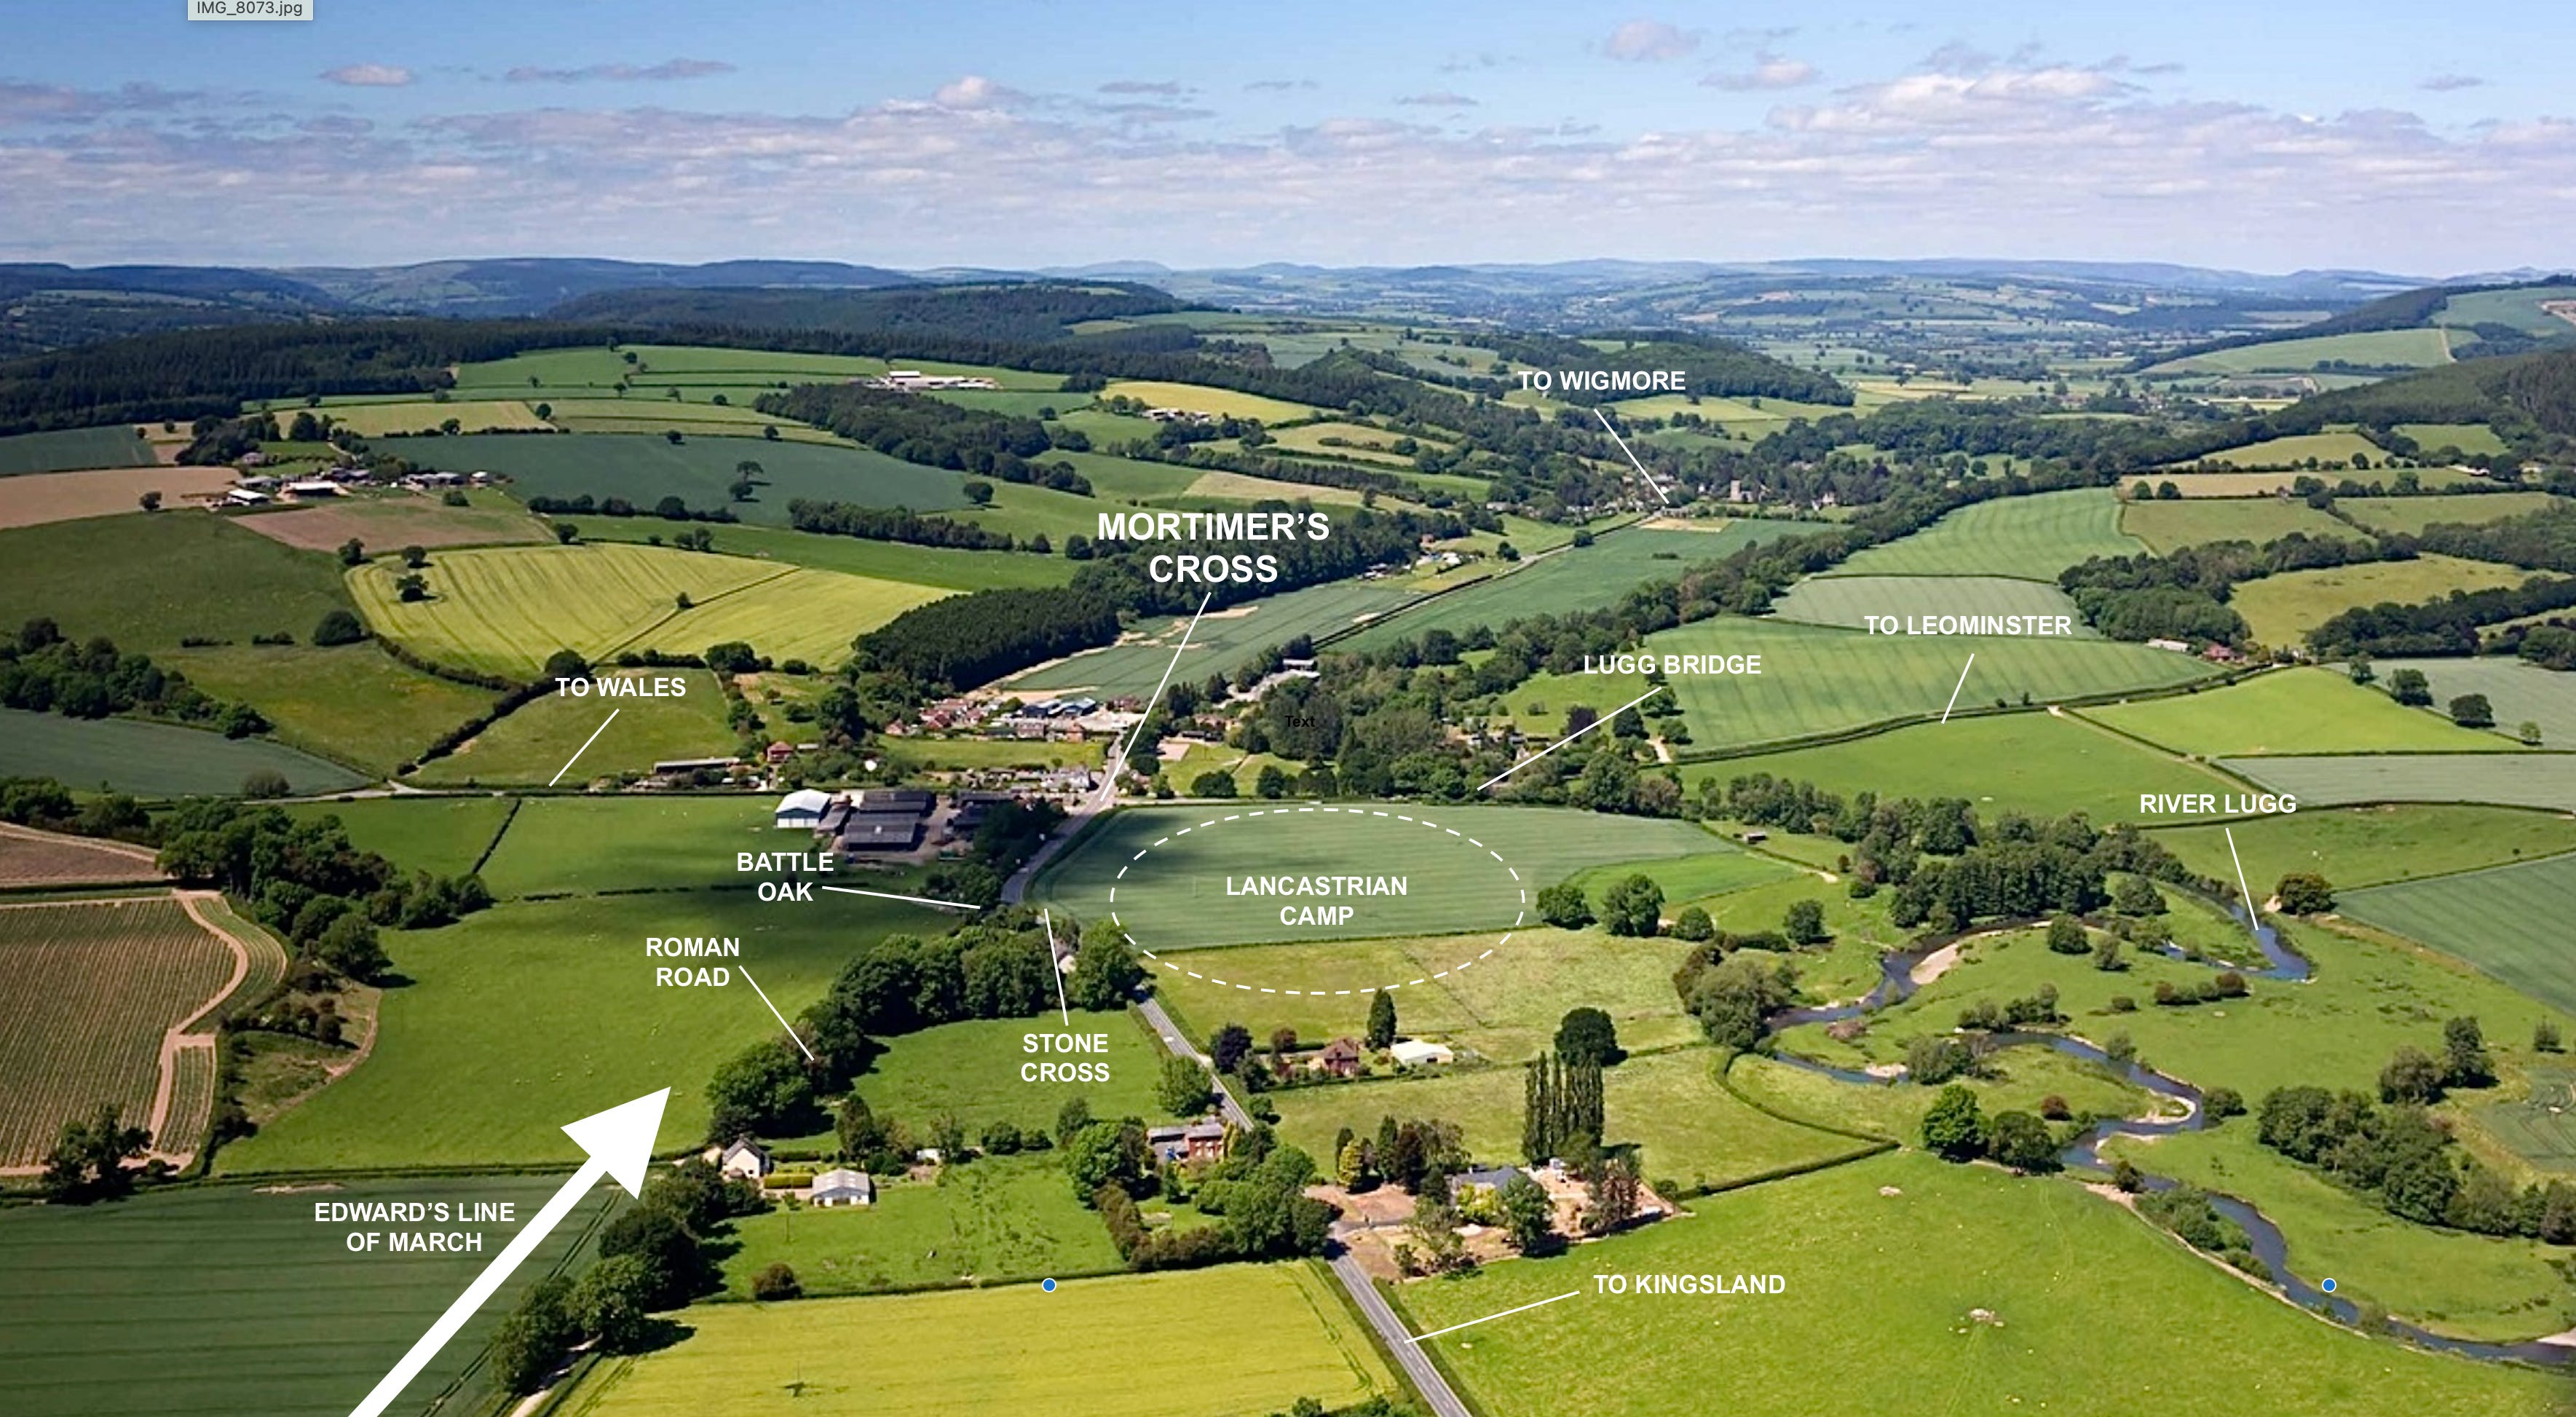
As for Jasper Tudor’s strategy from his position on the morning of 3 February, he doubtless planned to march to Leominster and then swing northeast to link up with Margaret of Anjou’s victorious northern army advancing on London. Such a junction of forces would have placed Yorkist troops in grave danger, potentially undoing Edward’s cause in a single coordinated blow. Edward’s rapid march and dawn assault rendered that plan ineffective. And as a result, Pembroke’s largely inexperienced army collapsed, Wiltshire fled in ‘disguise out of the country’, and Jasper escaped back to Tenby in Wales. The Lancastrians had not merely failed to win against Edward; they had lost their only chance to aid Queen Margaret and free Henry VI from captivity.
Therefore, was Edward’s victory a result of precision or chance?
As explained, through the lens of contemporary chronicles, the engagement at Mortimer’s Cross was not a typical chivalric trial by combat or pitched battle preceded by divine signs from God, but a carefully timed military interception at dawn on an unprepared foe.
For clarity, the timeline can be summarised thus:
A concentration of Yorkist forces at Hereford on Monday, 2 February, which witnessed the morale-boosting parhelion.
A same-day Yorkist pursuit of the Lancastrians north up the Roman road towards Mortimer’s Cross.
A Yorkist march of 15 miles to camp out of sight of the Lancastrians, who were aiming to cross the River Lugg the next day.
A dawn strike by the Yorkists on Tuesday, 3 February, while the Lancastrians are still encamped at Mortimer’s Cross.
Followed by a disorganised Lancastrian rout in all directions and a spate of Lancastrian executions at Hereford.
Edward’s reward for his decisive campaign was more than just victory. By eliminating the western prong of the Lancastrian advance toward London, he cleared his road to fame — and, ultimately, the English throne.
All battles involve spurious elements, but Lancastrian casualties at Mortimer’s Cross may have been particularly heavy, surprise being the key cause of such slaughter. The Yorkist attack may have resulted in thousands of casualties, given the effects of panic. Losses were likely exaggerated in the chronicles, but the result was brutally decisive. In addition, Edward’s punishments after the battle were notably bloodthirsty and included Jasper’s father, Owen Tudor, and others, who were captured and beheaded at Hereford, to avenge the Yorkist executions at Wakefield.
Gregory’s Chronicle delighted in recording Owen Tudor’s beheading in detail, and his apparent blazé attitude to his fate, which I will not go into here. Suffice to say, it is striking that this was another event that took precedence over more strategic aspects of Edward’s victory. However, by following contemporary sources and local topography, we can now come quite close to what might have happened near Mortimer’s Cross on the Feast of St Blaise.
As discussed, I hope to expand this discussion in my forthcoming book and, with help, gather more evidence on the ground to firmly place Edward’s campaign in the Marches within the context of the Wars of the Roses, and by extension, the broader history of England and Wales.
If you enjoyed my post, please leave a comment and share my work. In the meantime, if you are a fan of the Wars of the Roses, here are some of my latest books set in the period, along with two historical novels to read at bedtime! Reviews on Amazon are always appreciated.
J. Gairdner, ed., The Historical Collections of a London Citizen in the Fifteenth Century, 1876, p. 211.
See A. Watkins, The Old Standing Crosses of Herefordshire, 1929, p. 65.
J.S. Davies, ed., An English Chronicle of the reigns of Richard II, Henry IV, Henry V, and Henry VI, 1856, p. 110. Note: The Feast of the Purification and Candlemas Day were celebrated on the same day, 2 February.
W. Hardy and E.L.C.P. Hardy, ed., Recueil des Croniques et Anchiennes Istories de la Grant Bretaigne, Vol. 6, Book 3, 1864-1891, p. 328 et al.
No posts
Comments
Nothing yet. Say the first thing.
Sign in to join the conversation.