DIY — UniFi Security Surveillance System Setup
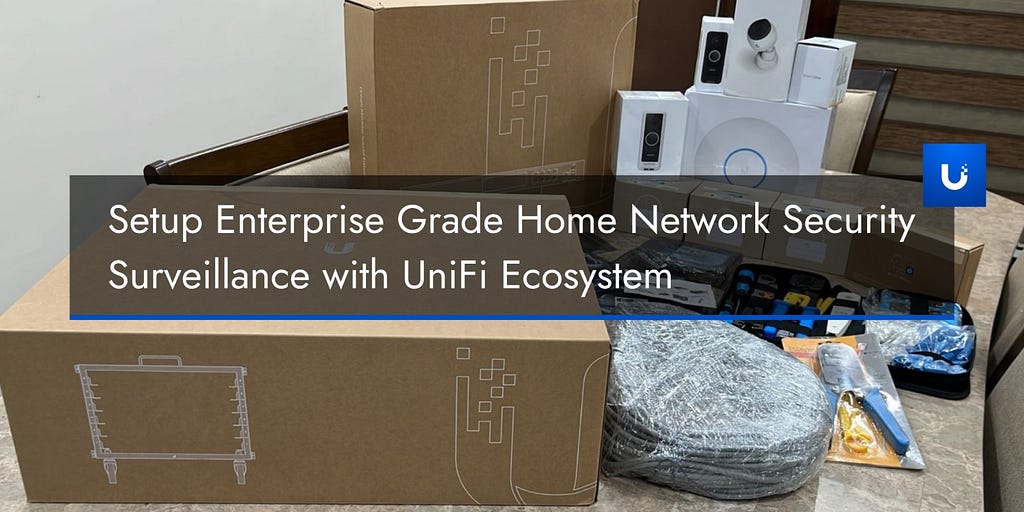
In this article, I’ll discuss setting up an enterprise-grade network security surveillance system with UniFi (Ubiquiti), which has enhanced our home security and privacy. Over the past few months, my brother Anshuman and I have worked on this project to set up a smart home security system that can be managed from one console and accessed globally.
Ubiquiti: UniFi
Ubiquiti Inc. is a New York City-based network company known for manufacturing robust enterprise-grade networking equipment. Their product suite covers Networking Gateways, AI Cameras, Doorbells, Talk Phones, and many other security devices. These devices provide a unified security ecosystem that can be easily managed with their UniFi software control panel, a user-friendly interface that allows you to monitor and configure your network with ease.
Websites:
How to choose the correct list of UniFi devices to set up a home network?
When setting up a home Mesh network, it’s crucial to understand how the devices will communicate over the internet. This knowledge is key to ensuring that any devices connected to your home network are accessible anywhere and that the network security configurations have firewall rules to restrict traffic from one device to another. We will discuss different factors regarding connectivity, security & privacy when choosing UniFi devices for home network setup.
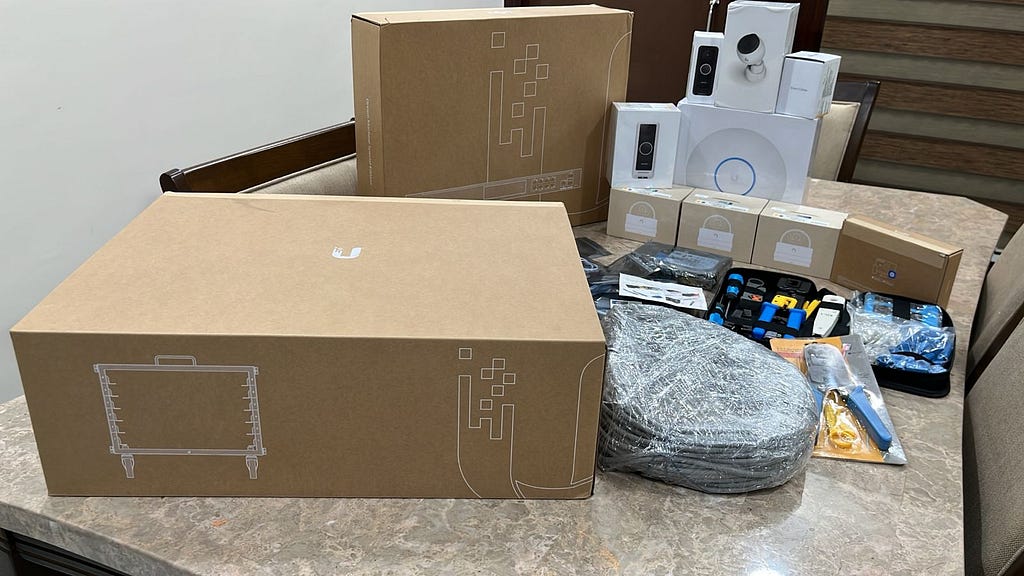
Camera Connectivity
PoE (power over Ethernet) and Wireless cameras are two forms of camera connection setup configured in a network. The camera system installation should be 24/7 reliable and provide seamless video surveillance on your home premises. The wired connection devices, such as PoE cameras, are more resilient than wireless connections, providing a sense of security and reliability.
PoE Camera
The data transmission is much faster with low latency response in a cable connection because the end device is always connected to the network port. The PoE form factor doesn’t need any power supply or auxiliary connection. The DC power flows over the ethernet cable connected to the network switch, and because of this, network video feed transmissions are instant at a rate of more than 5/10 Gbps. The PoE cameras are easily pluggable with RJ45 connectors and Cat5 Cat6 cables, and as the cable technology matures, the transmission rate also improves in the network.
The network security of PoE cameras is configured with Firewall rules and static IPs to remain hidden from external networks. Additionally, Virtual Local Area Network (VLAN) segmentation can isolate the camera system from the rest of the network. This means that even if an attacker gains access to your network, they cannot reach the camera system, adding a hardened firewall rule and making it almost impossible to access.
We have installed 4 PoE cameras for our home network, and they work seamlessly without any interruptions.
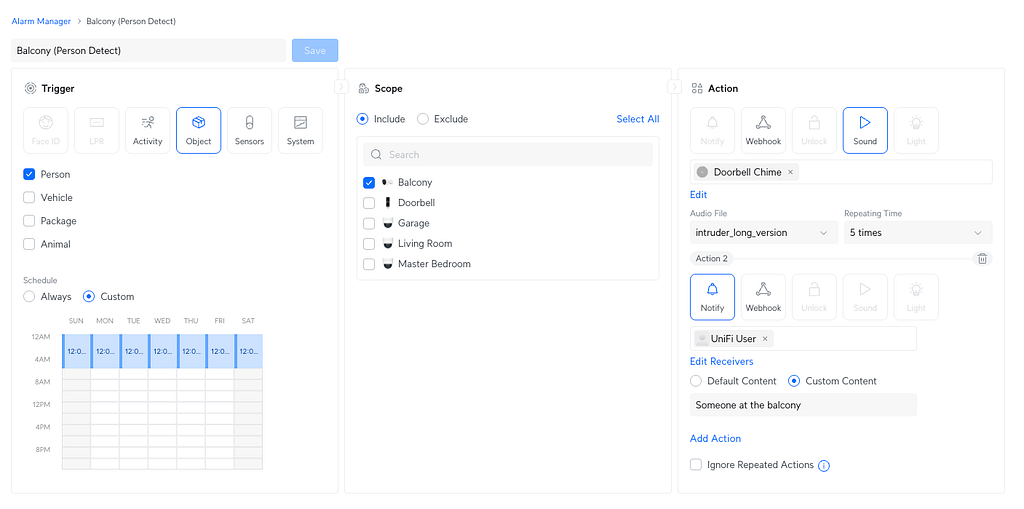
G4 Bullet: This Power over Ethernet (PoE) camera is designed for indoor or outdoor installation. It is weatherproof, which means it can withstand outside temperatures and rain. Also, the camera supports AI detection events (Persons, Animals, Vehicles) in real-time Video footage. This detection system can be used to trigger an Alarm if any of these predefined objects are identified within a specified timeframe.
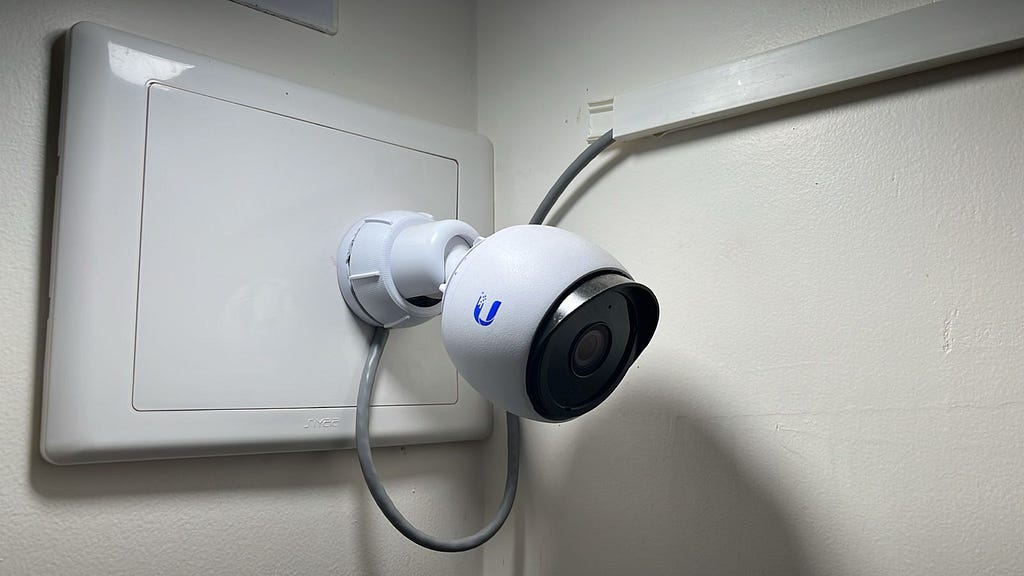

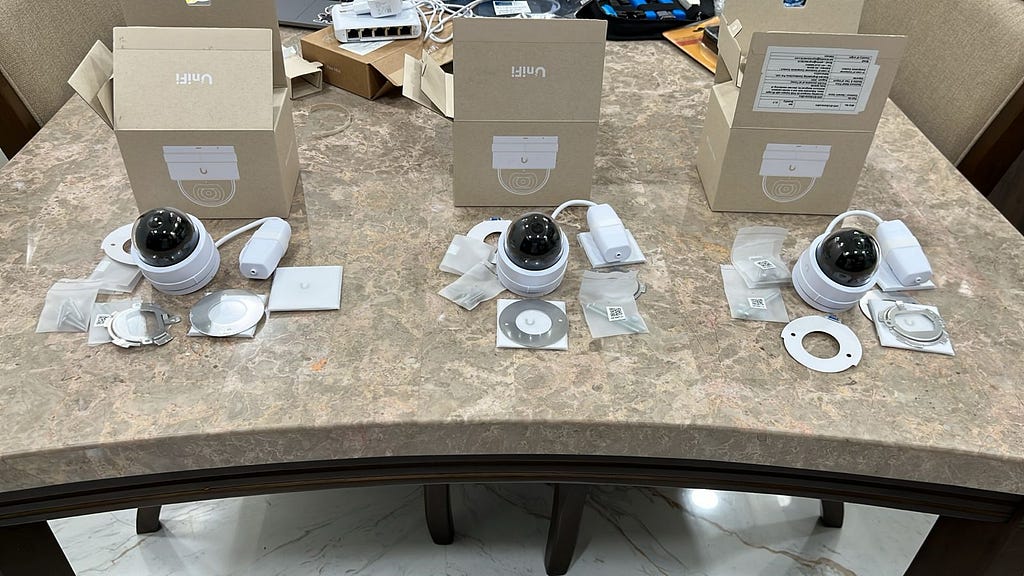
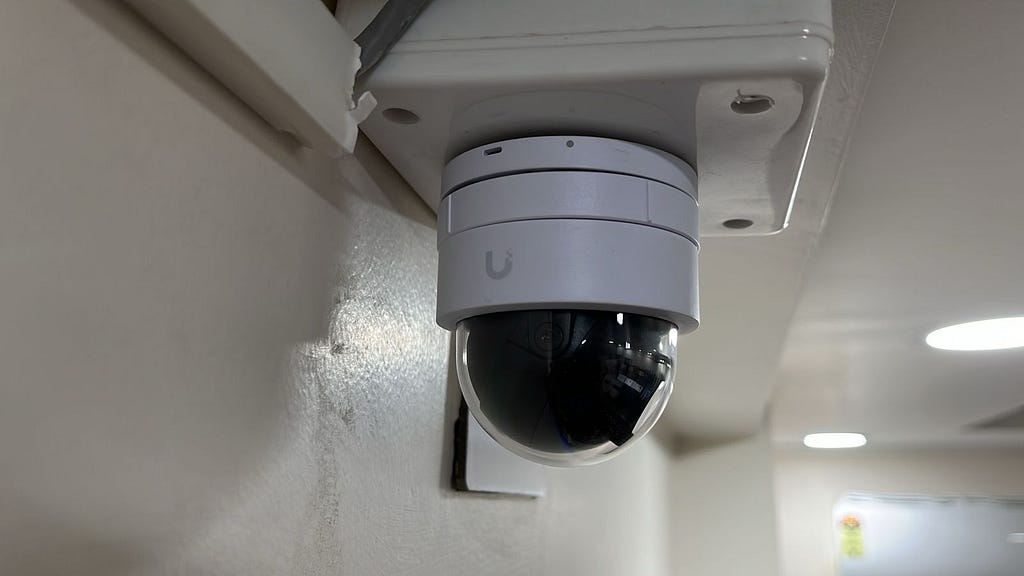
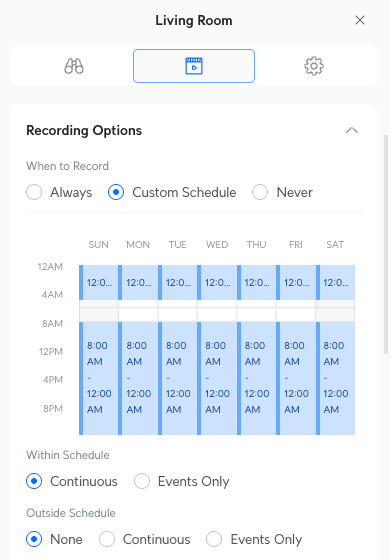
G5 Dome Ultra: This Power over Ethernet (PoE) camera is designed for indoor use. Its technical specifications are similar to the G4 Bullet, except that this camera doesn’t record audio, making it perfect for indoor environments. We have set up three different locations inside the house for scheduled surveillance.
WiFi Camera
The problem with WiFi cameras is that they are prone to connection failure when enough devices are already connected to the same wireless network. Also, the WiFi camera cannot be powered on without a DC power supply.
It’s correct. With a WiFi camera, we can easily access the network video feed on mobile devices or with a public IP. But we can also do the same network streaming with a PoE camera to the internet with the help of network gateways’ uplink/downlink mechanism. WiFi cameras are open to the internet, and without proper network firewall rules and encryption, they are always vulnerable to any attacker gaining access to video feeds.
More Info on Firewall Rules please read on Setup Security measures on your UniFi Networks Section.
Doorbell Camera
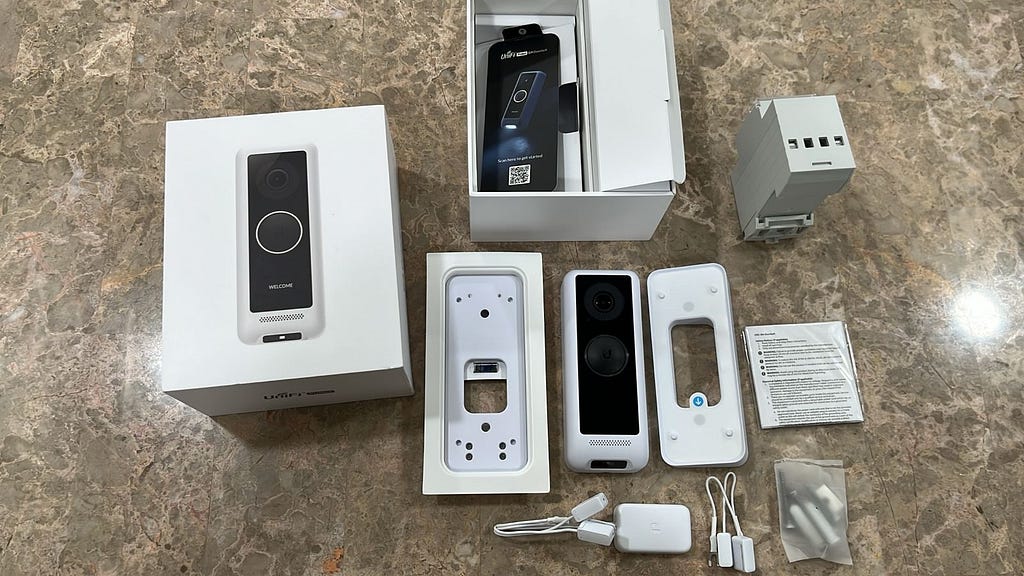
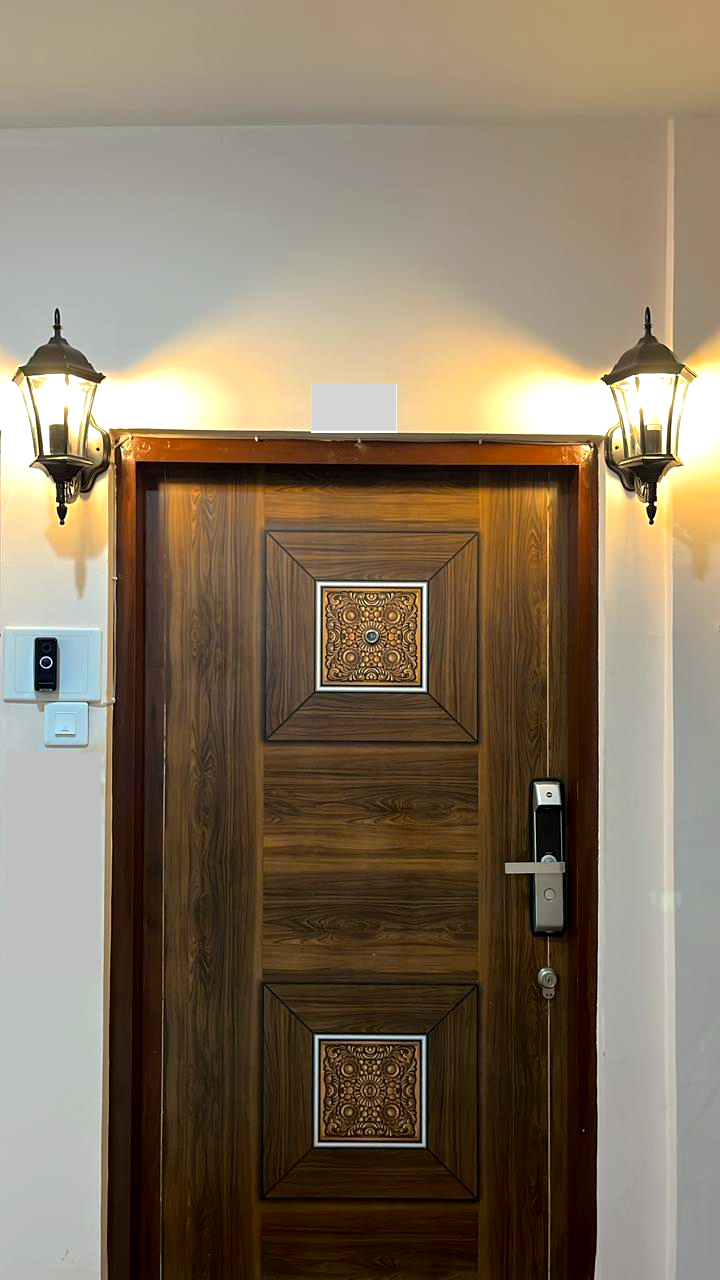
Doorbell Cameras are essential for monitoring the front door of your house. We need to capture every event when someone knocks at your doorstep. UniFi provides G4 Doorbell with a High-Definition (HD) camera that captures video at 30fps, making it suitable for front-door security. The Doorbell has a system-wide notification feature that can be used whenever anyone presses it. This means every mobile device logged in with the UniFi Protect App will receive a notification anywhere in the world.
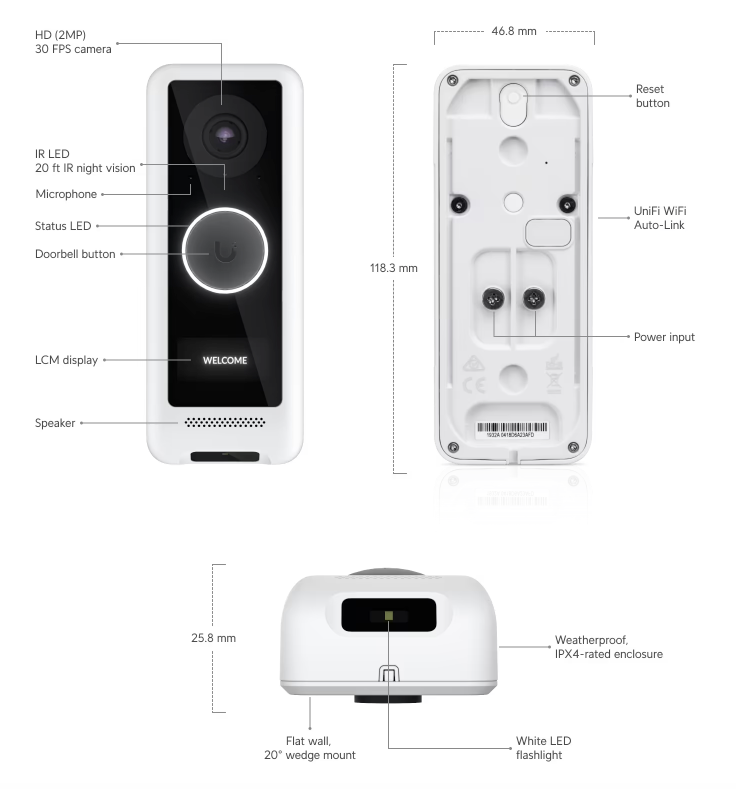
How to install G4 Doorbell?
- The installation process requires a professional electrician to replace the existing DC doorbell connected to the circuit breaker with G4 Doorbell wire adapters.
- Two wire adapters can be connected to the Positive and Negative wires from the circuit breaker. UniFi technical specifications suggest that the Doorbell is smart enough to switch the positive and negative wires between wire adapters.
- Installing the UniFi-provided Transformer to convert the voltage to DC; otherwise, it’ll damage the doorbell PCB.
- After power was supplied from the circuit breaker, the system started to boot up. Next, you need the UniFi Protect App and Bluetooth to pair with the Doorbell.
- After the Doorbell is paired with your mobile device, choose the WiFi network that you want to configure with the Doorbell.
- Then that’s it. You MUST see yourself on the App camera interface streaming directly from the G4 Doorbell.
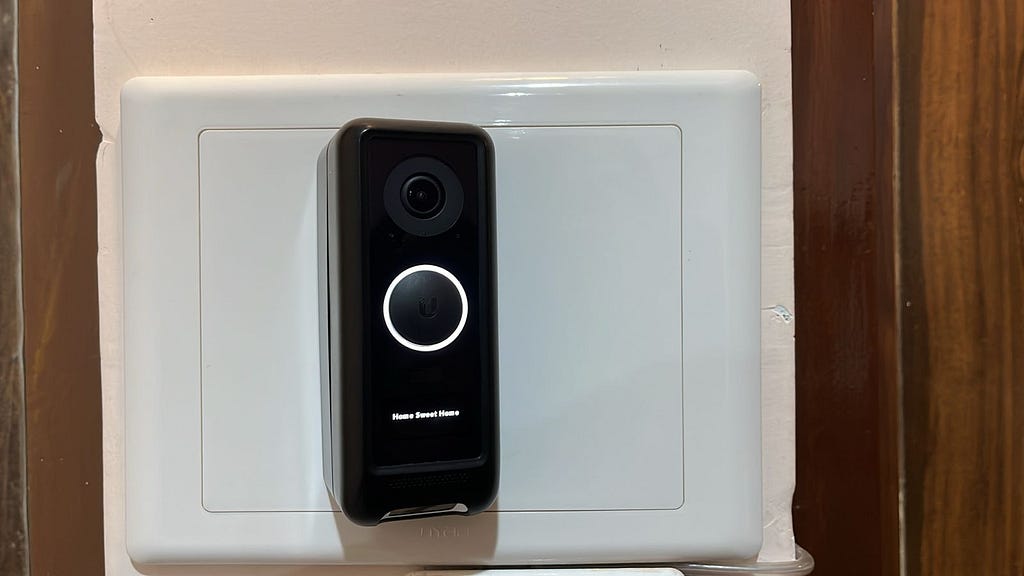
Official G4 Doorbell installation video
https://in.store.ui.com/in/en/products/uvc-g4-doorbell
Doorbell WiFi Smart Chime
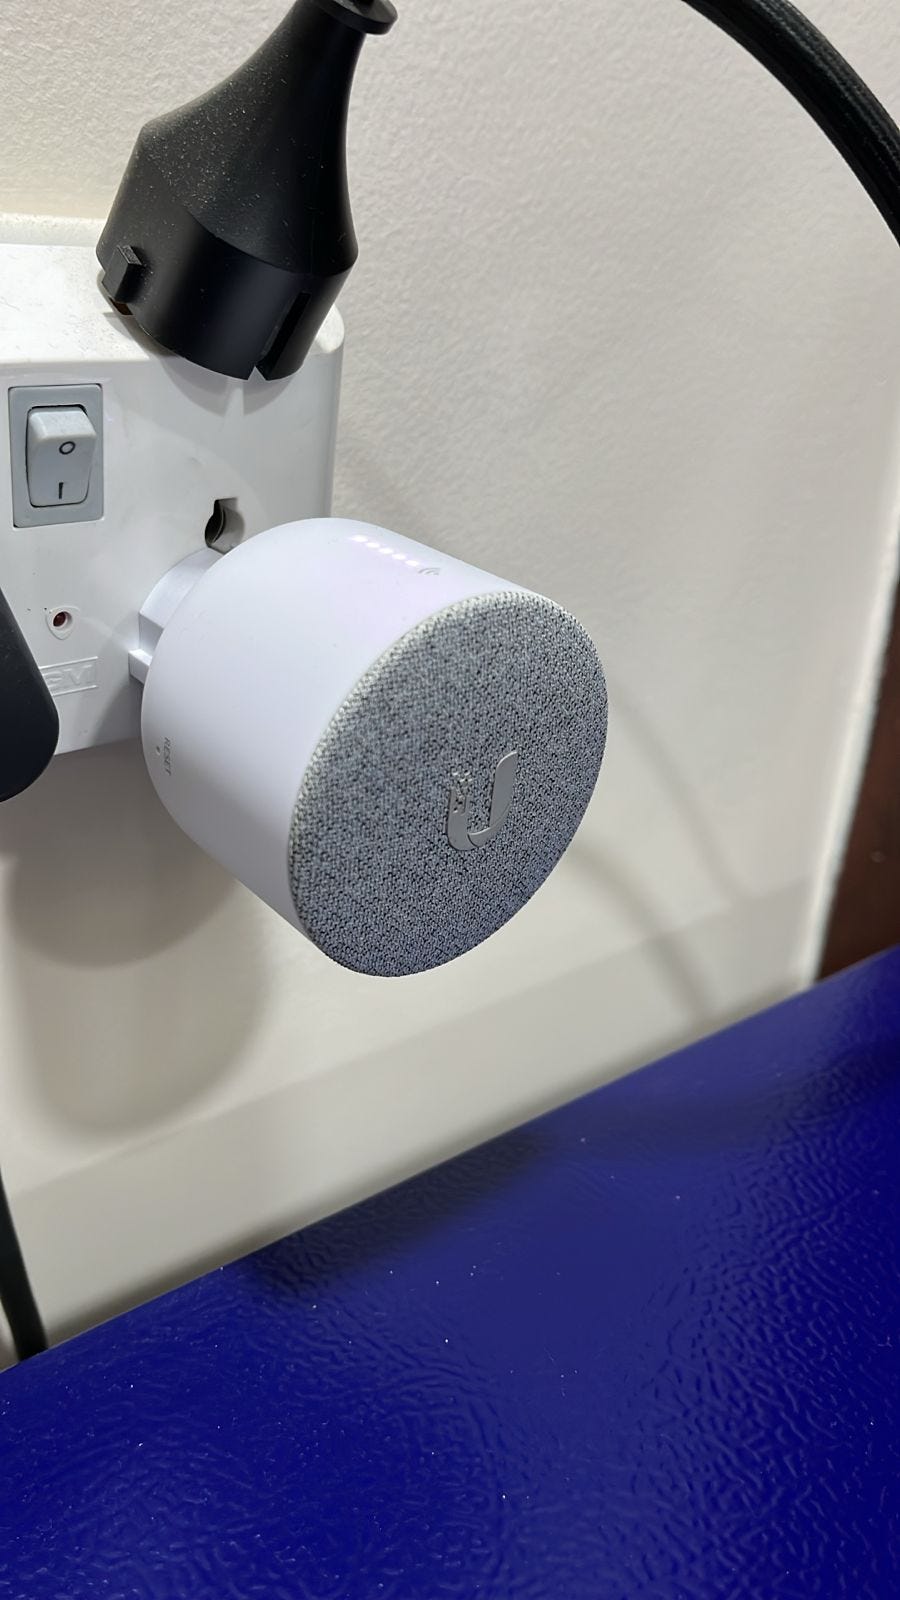
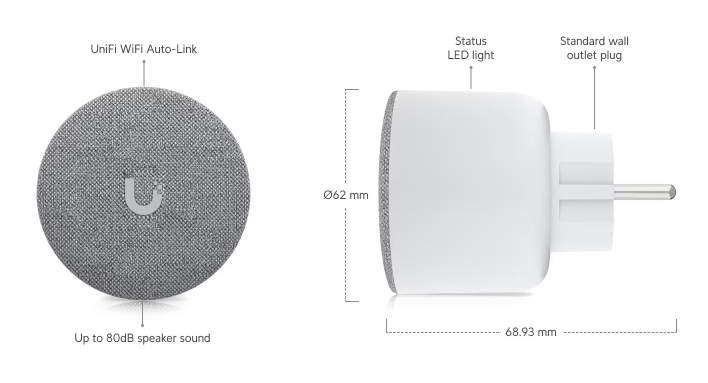
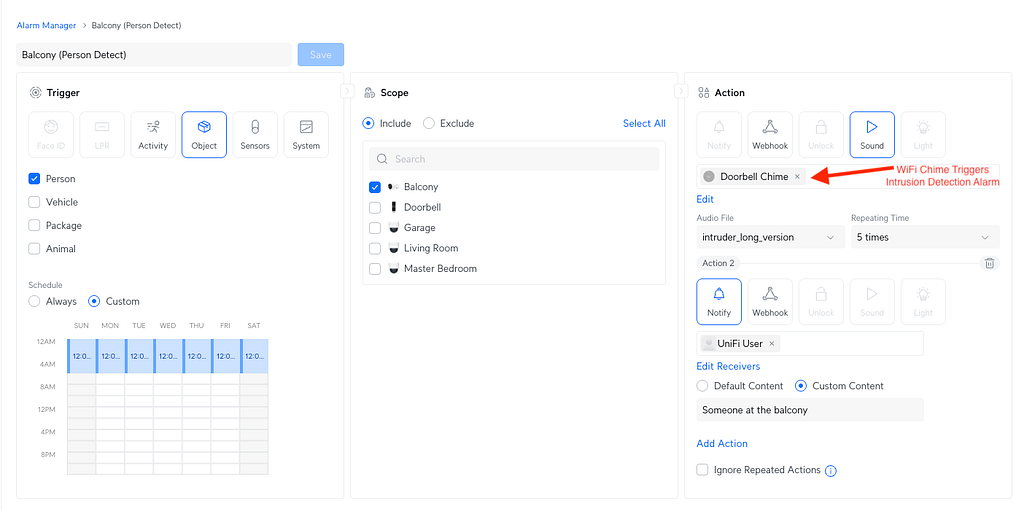
The G4 Doorbell can be configured with an optional WiFi chime, which is a great addition if you’re looking to enhance your home security. Although the doorbell has a built-in chime, integrating the WiFi chime can provide more flexibility, especially when setting up an alarm system.
Connecting the WiFi chime to the network lets you activate it whenever the G4 Doorbell or other camera detects an intrusion. This feature allows for immediate alerts, making it an effective security system component. Adding the WiFi chime can significantly enhance your security measures if you want to create a responsive home surveillance setup.
Camera Security
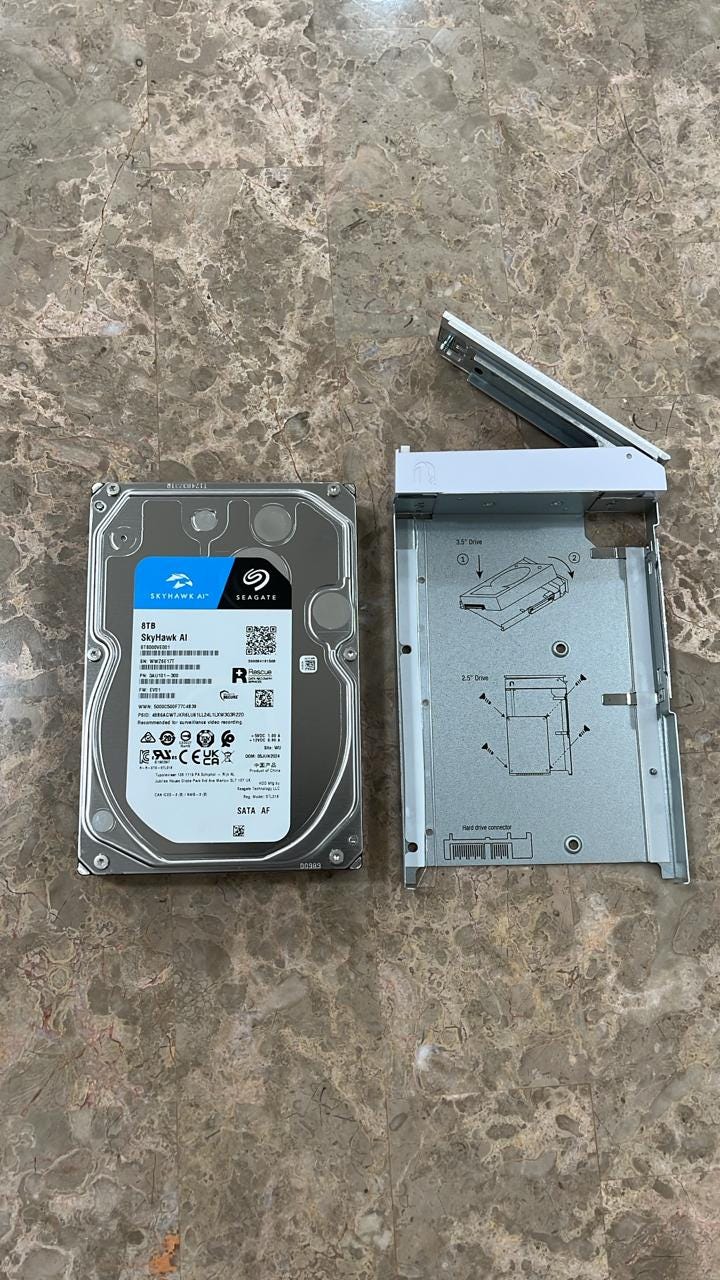
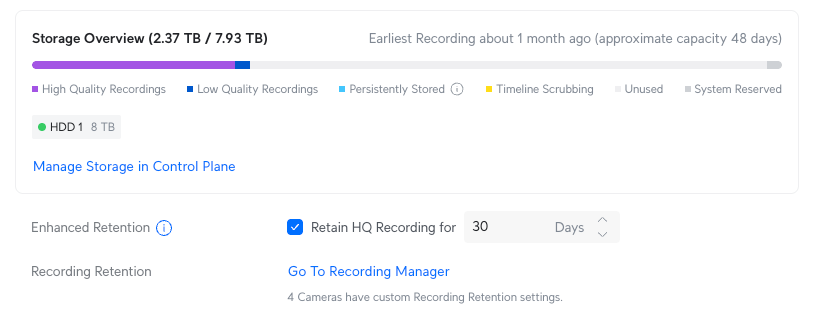
When it comes to camera security, the video footage of your home property should be stored within your local area network. This means an extended storage capacity network hard drive will capture footage with a defined retention period. Storing camera footage within our network storage gives us privacy and security, as highly sensitive information is under our control, rather than relying on a subscription model to store videos in the Cloud where data breach is a major concern. No matter how strong Cloud storage providers’ security practices are, they are always vulnerable to security flaws and access control attacks. Also, there are no licensing costs to claim ownership over the video surveillance footage.
Any surveillance-grade hard drive will work with UniFi Network Video Recorder (NVR) to record high-quality videos and images.
Wireless Access Points (WAP)
While wired connections offer numerous advantages, there are instances when a wireless connection becomes essential, particularly for configuring devices like doorbells, IoT gadgets, and various mobile equipment crucial for your smart home. UniFi’s Wireless Access Points, supporting WiFi-4, WiFi-5, and WiFi-6 (2.4/5 GHz), provide improved performance and stronger encryption standards for wireless security. These access points help ensure that your network remains secure while allowing the necessary flexibility for various devices to connect wirelessly.
A long-range UniFi Access Point with 2,000 ft² coverage is typically sufficient to broadcast WiFi for all wireless devices in your home.
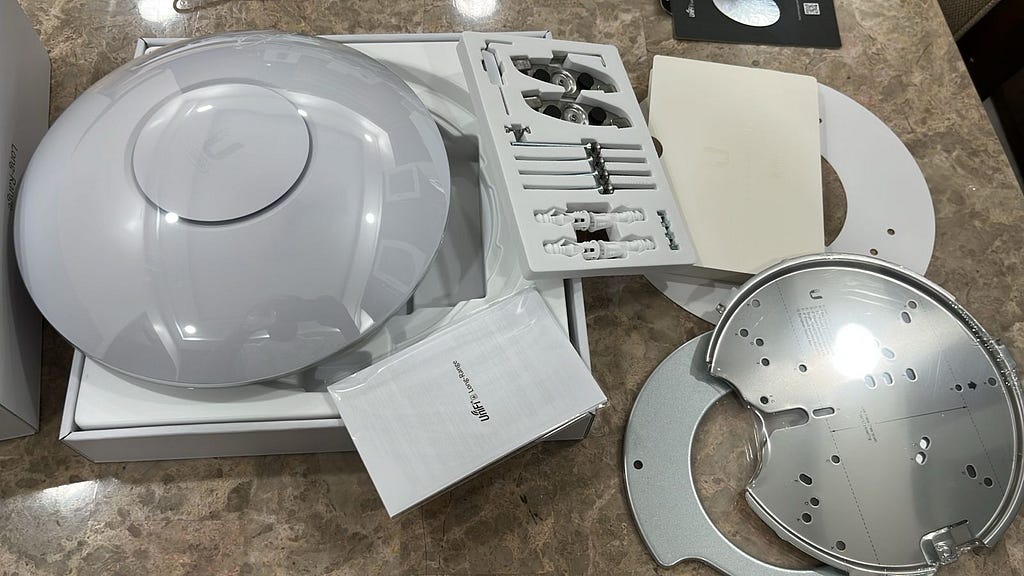
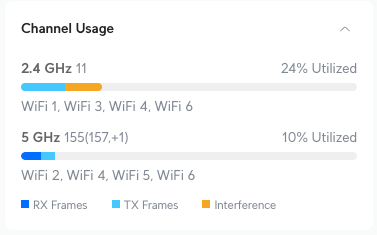
We have installed U6 Long-Range Access Point for our home network, which works perfectly with seamless high network bandwidth. The connection modem uses PoE+ to power the U6 LR Access Point. This Access Point can broadcast WiFi-6 (2.4/5 GHz) radio waves to transmit signals to multiple channels to reach each edge device in the network. A broader spectrum of WiFi 6 utilizes both the 2.4 GHz band and 5 GHz band, which solves the connection congestion in a network with larger concurrent client devices.
What is PoE+?
A PoE+ (Power over Ethernet) port works with a device that needs a power supply of at least 30 watts. The average PoE standard port requires 12–13 watts of current and easily fits with network cameras. Network switches, IP Phones, and Access Points are PoE+ powered ports.
MIMO form-factor
MIMO (Multiple Input, Multiple Output) is a modern wireless communication technology that allows multiple spatial data streams to be transmitted and received. The advantage of MIMO is that the antennas can open multiple upload and download stream channels to talk to client devices concurrently.
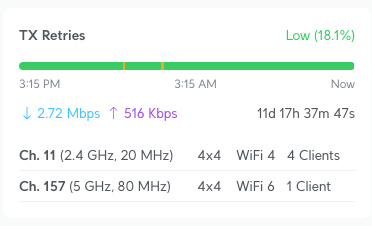
The technology behind MIMO transmission is called Beamforming. It works if multiple antennae transmit radio signals to multiple devices; each device will receive its own radio beam. It improves the WiFi connection in the network by reducing interference with multiple devices. The beam formation of the radio signal is calculated based on the channel configuration supported by end devices.
The U6-LR model Access Point has MIMO specifications as
2.4 GHz — 4 x 4 (SU-MIMO)
5 GHz — 4 x 4 (DL/UL MU-MIMO)
SU-MIMO (4x4):
Single User — MIMO can create a transmission stream with only one antenna, the same as with the client device. In 4 x 4 MIMO, there will be four antennae to transmit and receive four devices simultaneously. However, in most cases, client devices support 1x1 MIMO, which means only one antenna on the AP is utilized for the transmission, and the other three antennae remain unused.
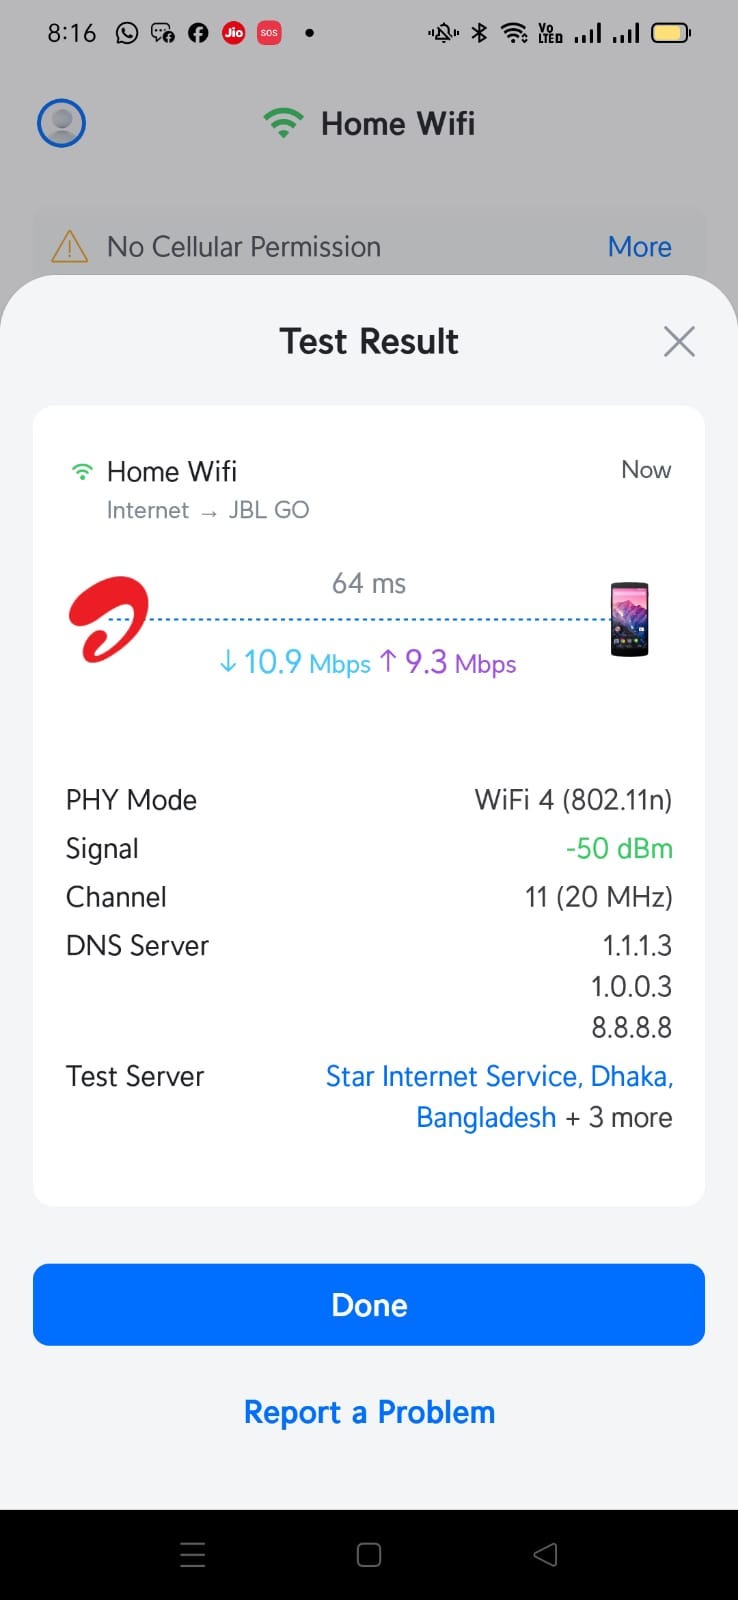
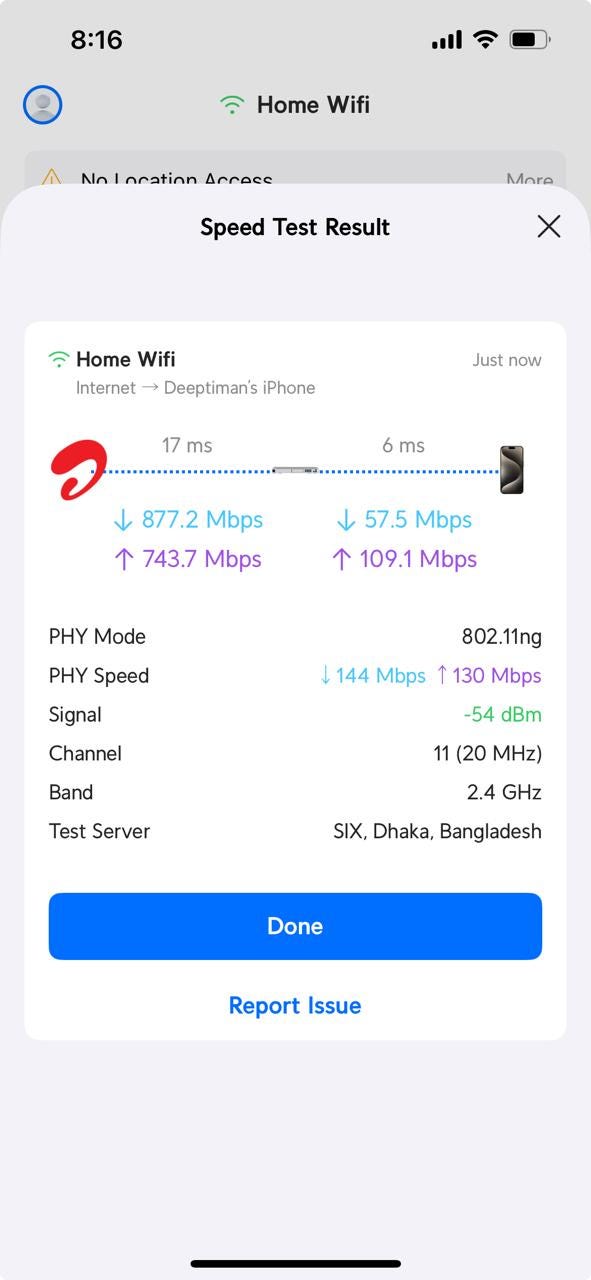
UniFi specifies a maximum data rate of up to 600 Mbps for the 2.4 GHz (SU-MIMO 4x4) band in the U6 LR Access Point.
We have tested multiple mobile devices by creating a 2.4 GHz band WiFi network, and mobile devices with 1x1 and 2x2 antennas can reach up to 57 Mbps. The 600 Mbps theoretical limit requires four antennae on the client device (4Tx4R) to utilize the Access Point resources to do four spatial streams.
MU-MIMO (4x4):
Multi-user MIMO is designed to support multiple antennae that connect with multiple clients simultaneously. For U6 LR Access Points (5 GHz band), UniFi specifies 4x4 MU-MIMO with both uplink and downlink spatial transmissions. With WiFi 6 (802.11ax) configured with a 160 MHz channel width, the theoretical speed limit could reach up to 2.4 Gbps. We haven’t tested the 2 Gbps network speed with U6 LR, but as our Internet Service Provider (ISP) maximum speed is 1 Gbps, the expected range could vary from 800mbps to 900mbps. Also, there are no devices that could support 4x4 MIMO spatial transmission.
It’s important to note that both the AP and the client device MUST support MU-MIMO; otherwise, the AP will transmit the data with SU-MIMO.
We have tested the same iPhone 13 with WiFi 6 (5 GHz, 160 MHz), which could reach up to 400 Mbps speed. This is expected because, for 2x2 MIMO, only two spatial streams will be possible for the client device with the U6 LR WiFi network.
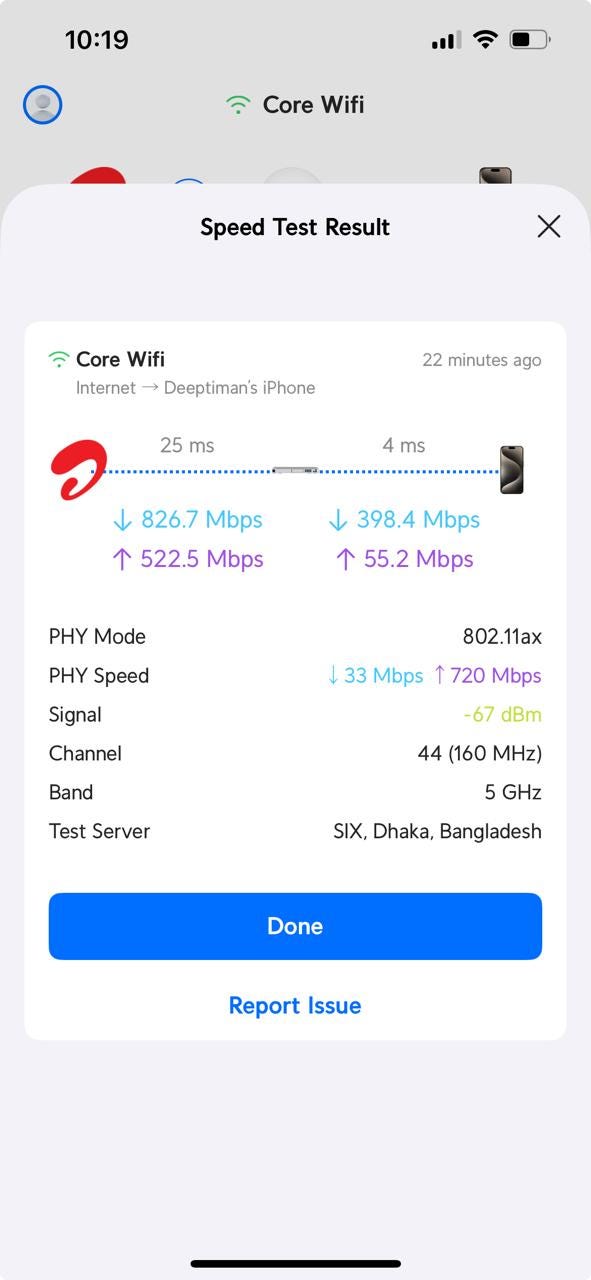
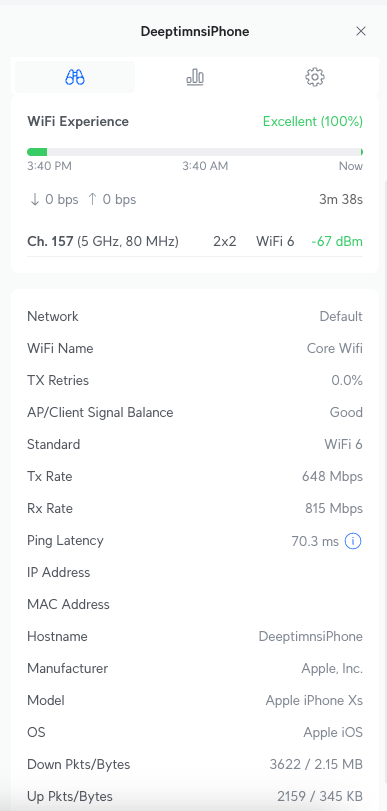
MU-MIMO is a newer technology and, with a higher processing chip, will deliver faster data rate to the client devices. Devices that support WiFi 6 and the 802.11ax protocol can experience maximum data rate speed from the U6 LR Access Point. Also, MU-MIMO works its spatial tranmission magic in more dense environments where 100s of client devices are working within the same WiFi network.
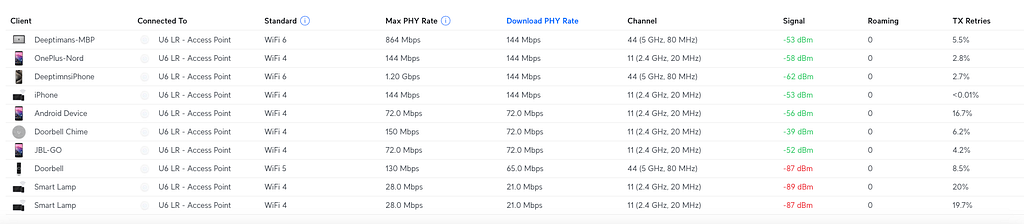
However, even in home settings, where multiple devices might use WiFi 4, WiFi 5, and WiFi 6 standards, U6 LR Access Points deliver excellent bandwidth and low latency, ensuring a reliable and efficient network experience for all connected devices.
Cloud Gateways
A Cloud Gateway is a standalone device that runs UniFi OS. It provides an intuitive interface for configuring a network and running UniFi applications (Network, Protect, Access, and many others). The Cloud Gateway works as a router, switch, and network video recorder (NVR) that is all in one and built into one console. The Wide Area Network (WAN) port MUST be connected with your Internet Service Provider (ISP) router to reach the Internet.
UniFi guarantees the network speed will be the same in the Gateway console as the ISP promised.
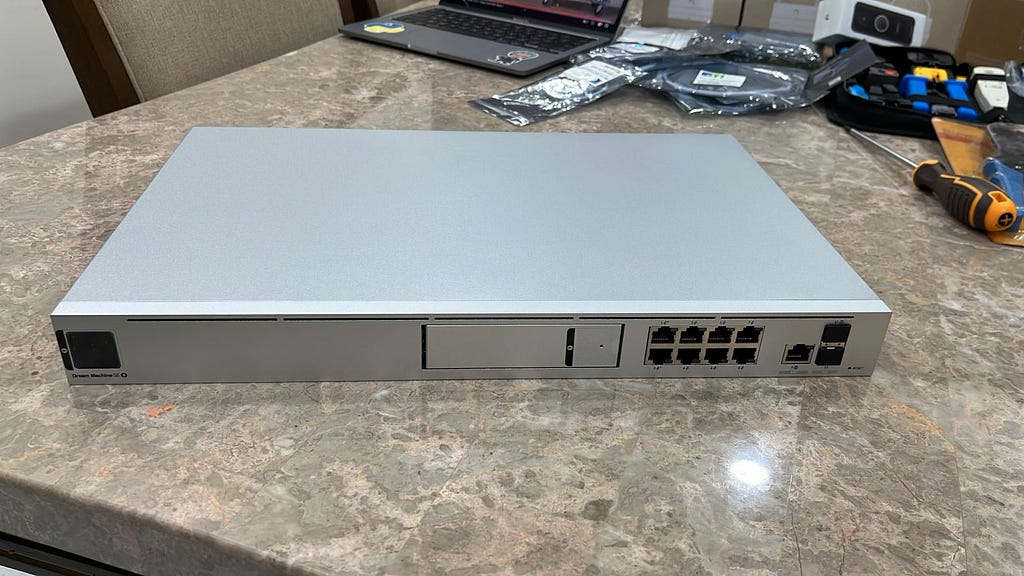
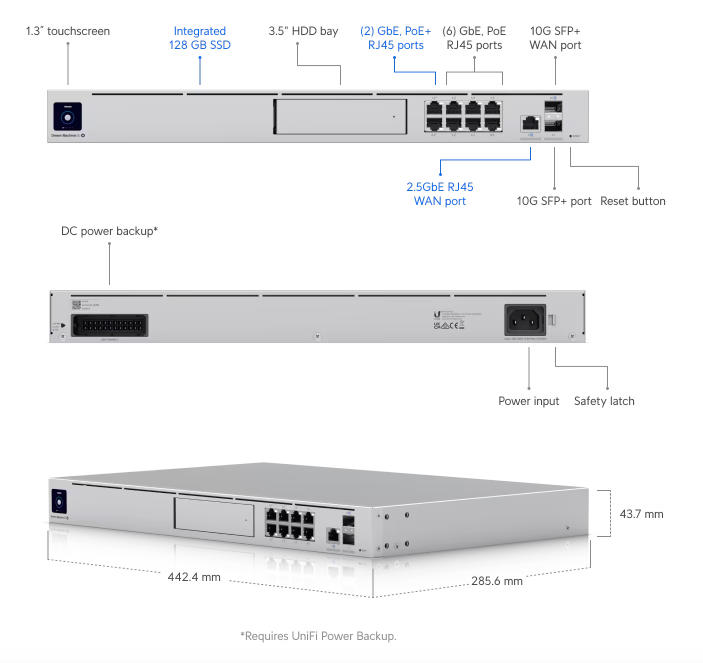
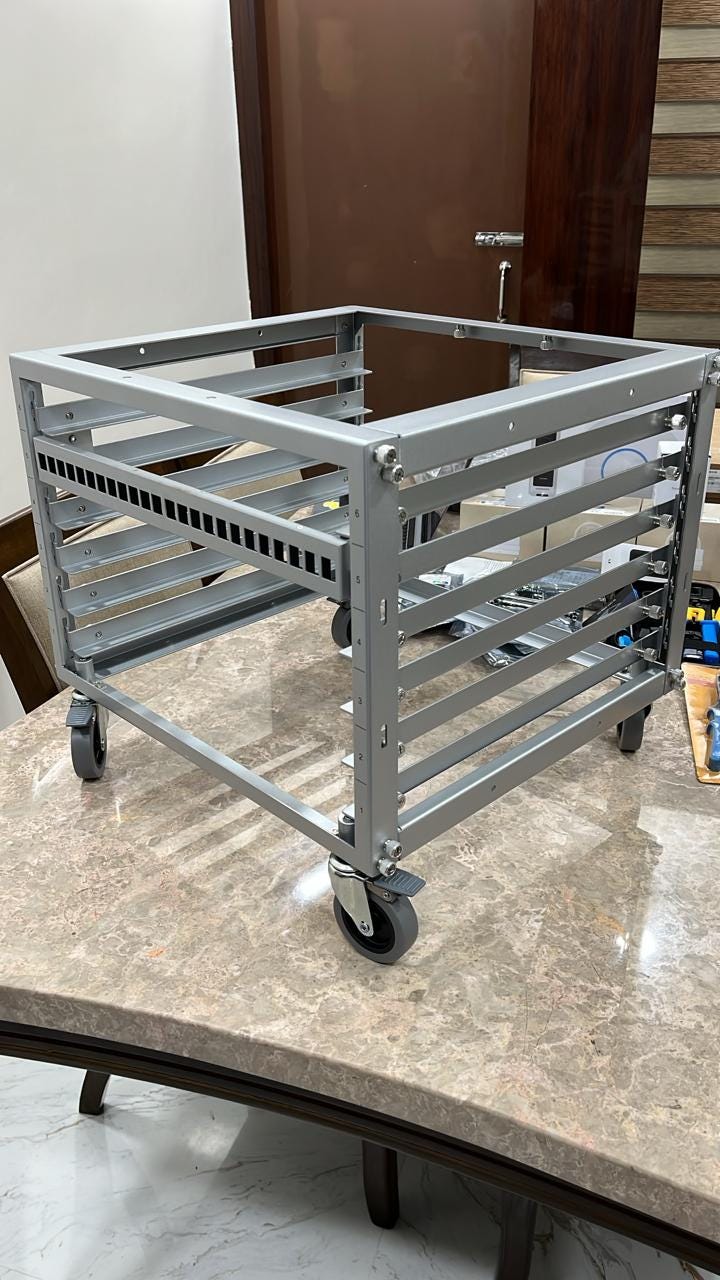
We have installed the Dream Machine Special Edition (SE) as our home cloud gateway console. This device features 8 PoE ports, including 2 PoE+ ports, allowing for scalability with up to 200+ UniFi devices. Each UniFi device can be powered directly from the PoE ports, streamlining the setup and enhancing overall efficiency in managing our home network security. The gateway console provides full network security management of the UniFi devices and protect applications running within the UniFi OS.
Add-ons
Etherlighting
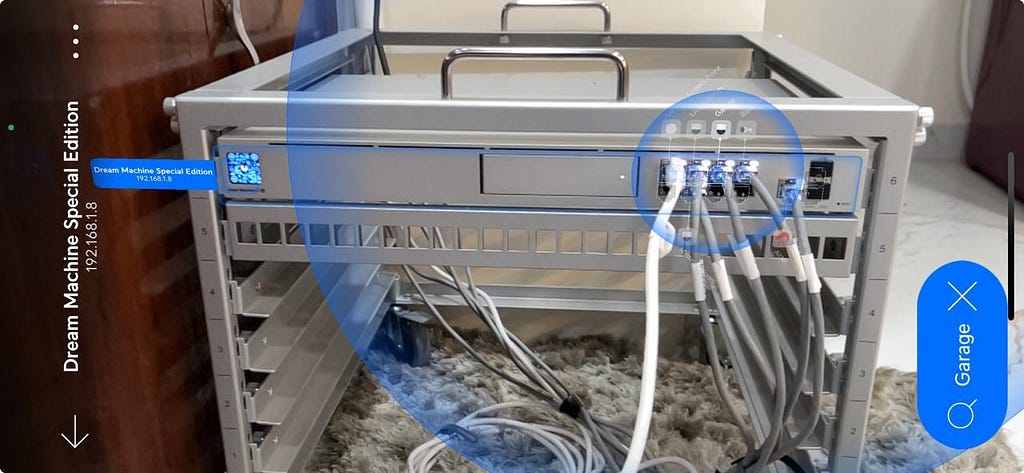
Dream Machine SE has a unique Port identification feature called Etherlighting. A simple LED light blinks on each port to indicate which device is actively running. Etherlighting has a major use case in locating devices on a large-scale deployment where 100s or 1000s of PoE/PoE+ ports are running on a switch. The UniFi mobile app has an Augmented Reality (AR) interface that creates a visual layout on the screen to show which device is running on which Port.
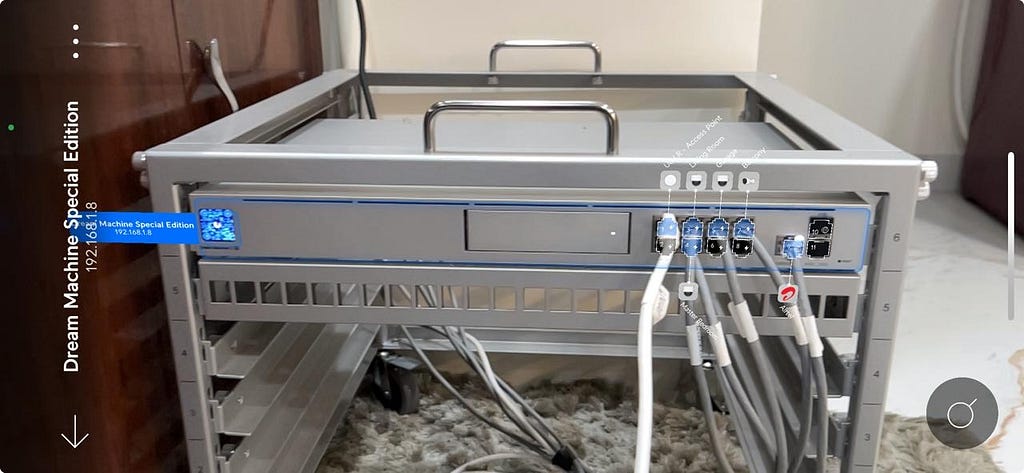
I found where the Garage Camera was located on which Port and Etherlighting indicated with a blue light flashing animation to show that the 5th port has the Garage camera plugged in.
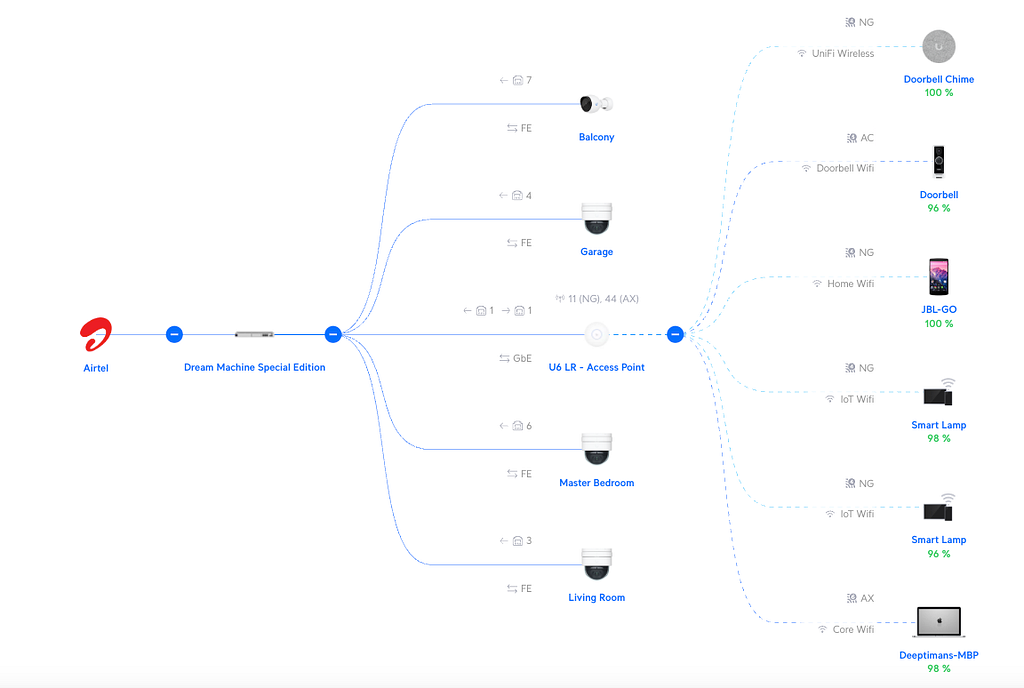
Setup Virtual Local Area Network (VLAN) with Dream Machine SE
Dream Machine SE is a great networking console that allows us to create network segmentation within our private home network. In a network, many devices are connected with the same switch and share traffic to communicate. It’s essential to note that if any devices get compromised, the whole network will be exposed to the public internet. To run all networking equipment with highly secure security rules, there is always good practice to segregate the network into Virtual Local Area Networks (VLAN). The network segmentation will classify the network into subnetworks and determine traffic flows with firewall rules.
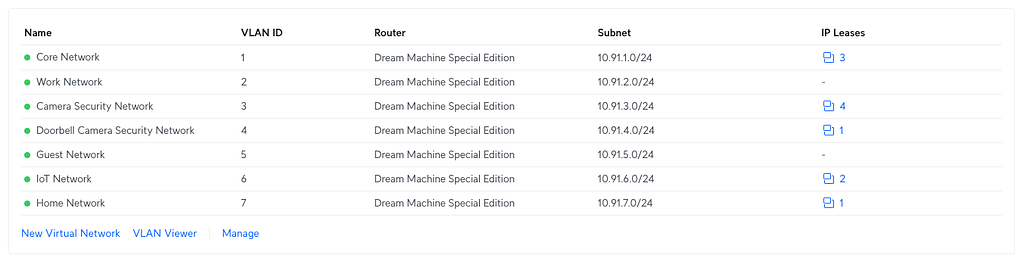
For creating a private network, a Class A IP address (10.0.0.0 to 10.255.255.255) with a /24 subnet is enough to add as many client devices as needed. We choose to start the network IP schemes from 10.91.x.x/24
Let’s create the first network as a “Core Network (10.91.1.0/24),” which will work as the main network and manage network traffic coming to the Dream Machine SE from the ISP via Gigabit Port.
- Open https://unifi.ui.com/ and choose Dream Machine SE control panel.
- Go to Settings > Networks > New Virtual Network
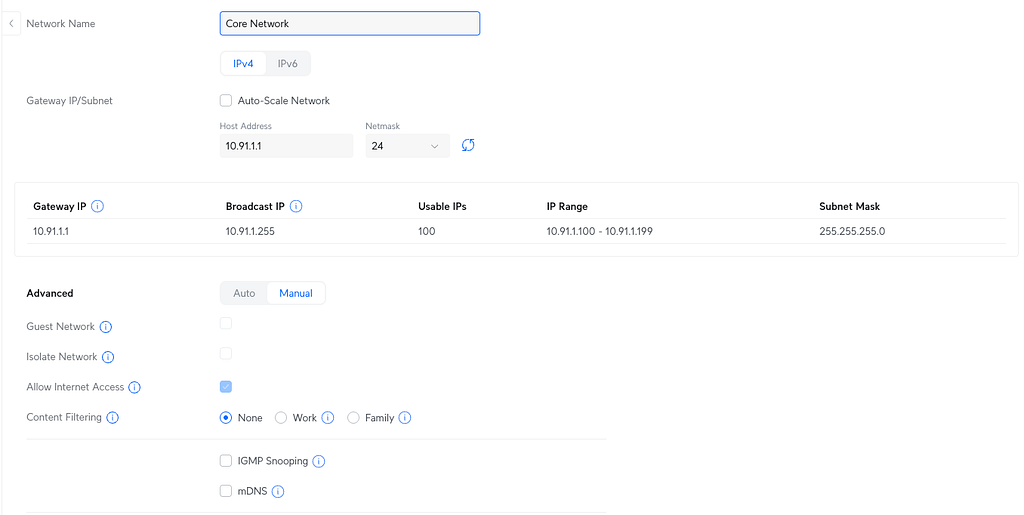
The host address starts from 10.91.1.1 as the starting address of the IP scheme, and any new devices connected to the network may assigned to 10.91.1.x (ex: 10.91.1.127).
DHCP Range:
- 10.91.1.1 to 10.91.1.99 (for routing and switching equipment)
- 10.91.1.100 to 10.91.1.199 (to allocate any new devices joining the network)
- 10.91.1.199 to 10.91.1.255 (for access point traffic)
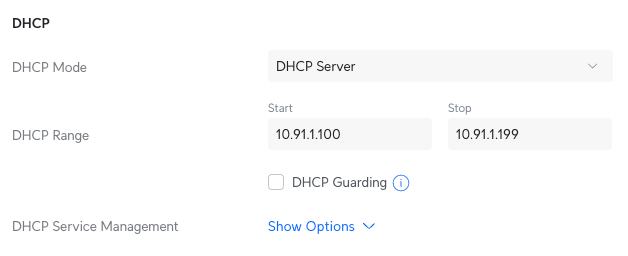
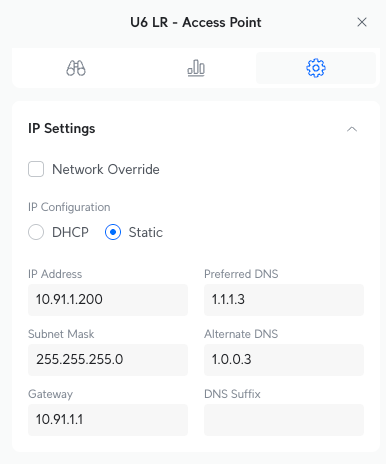
After the Core network was provisioned, we changed the IP scheme of the U6 LR Access Point to a Static IP (10.91.1.200).

Content Filtering:
This option will block all traffic from malicious sources (e.g., phishing and adult sites) to the network. It depends on your need, and you can choose options:
None: Allow all kinds of traffic
Work: Blocks explicit, pornographic and malicious domains; Search engines and Youtube set to safe mode.
Family: Blocks VPN’s, explicit, pornographic and malicious domains; Search engines and Youtube set to safe mode.
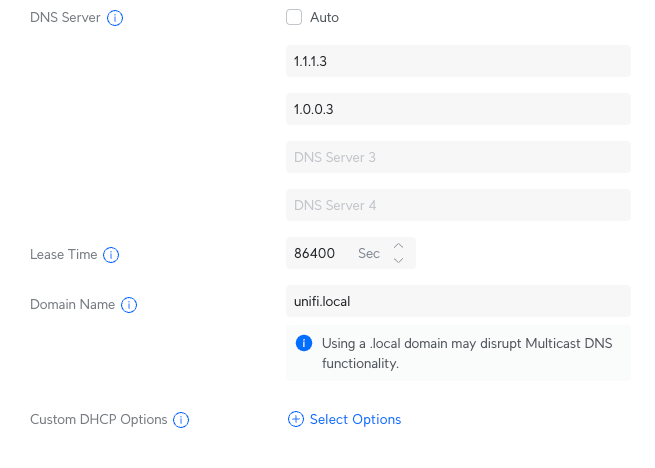
For additional DNS content filtering, we will use Cloudflare DNS servers to block malware traffic.
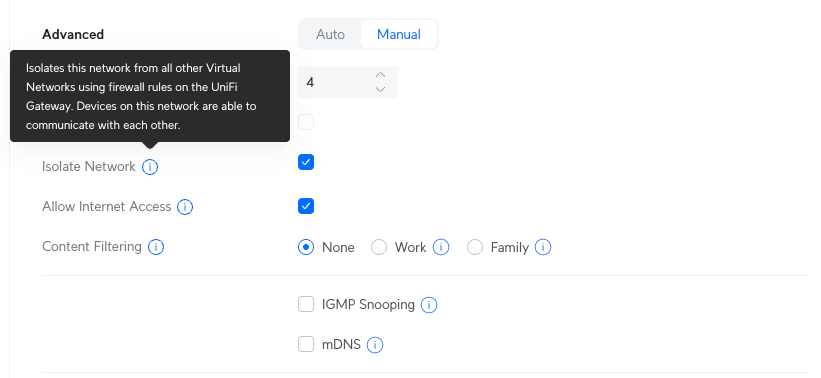
Isolate Network
By choosing this option while creating a VLAN, we can isolate the network (VLAN) from the rest of the VLANs. This is another layer of security, as we don’t want the devices connected to a network to be discovered by another network.
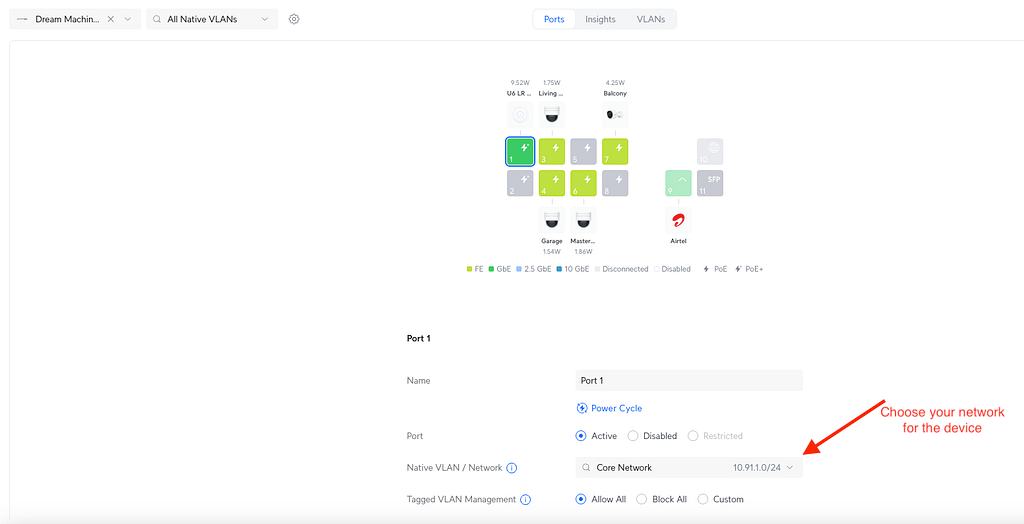
Port Manager
Once all the VLANs are set up, you can go to Port Manager and assign the appropriate network to connected devices running on the PoE/PoE+ port.
List of VLANs for the home network:
Work Network (10.91.2.0/24): This office network connects laptops and mobile devices to the authorized WiFi running within the network.
Camera Security Network (10.91.3.0/24): This network is set up only for PoE Cameras running within it.
Doorbell Camera Security Network (10.91.4.0/24): This network is specifically set up for G4 Doorbell and isolated from other network traffic to avoid congestion and interference.
Guest Network (10.91.5.0/24): If visitors want to use your WiFi, this network runs for all external users.
IoT Network (10.91.6.0/24): This network is for devices outside the UniFi ecosystem. For example, you can get a smart lamp running with your WiFi from other vendors. The IoT network will provide the device with WiFi.
Home Network (10.91.7.0/24): This network connects Home devices like TVs and mobile phones to WiFi.
Setup WiFi network for all the Virtual Local Area Networks (VLANs)
As all our VLANs are now set up, we can create a WiFi network for each VLAN with 2.4 GHz & 5 GHz bands.
- Open https://unifi.ui.com/ and choose Dream Machine SE control panel.
- Go to Settings > Networks > WiFi.
Let’s create a “Core WiFi” connected to “Core Network.” Since only one Access Point is running, choose the U6 LR Access Point as the Broadcast AP.
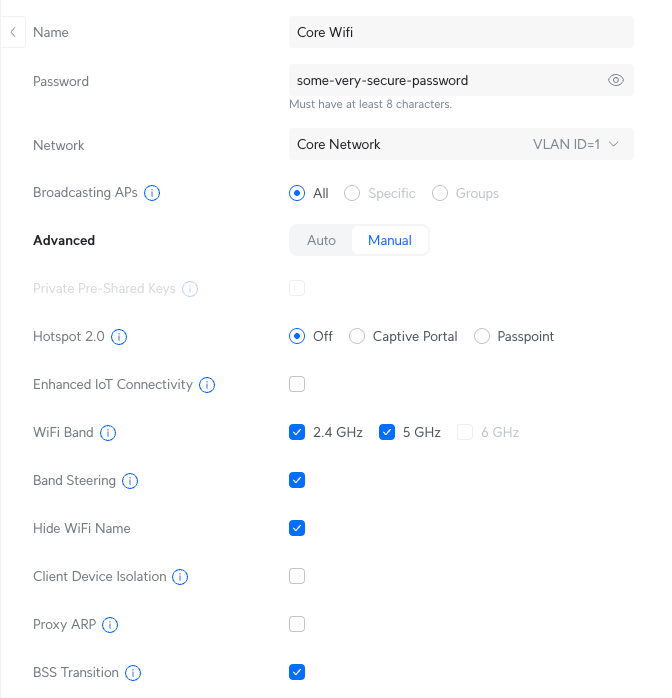
Client Device Isolation
This option helps devices remain hidden when connected to the same WiFi network. It prevents the port scanner from listing devices running on the same network.
Hide WiFi Name
This option is great for hiding the WiFi SSID from the list of WiFi discovered within a range. Users must manually enter the WiFi SSID into the client device to connect.
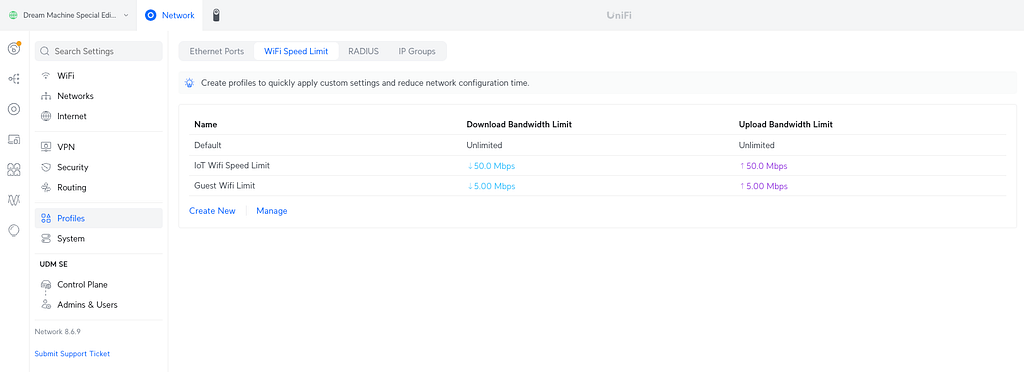
WiFi Speed Limit
We can also create a profile to set up the maximum WiFi speed limit. Let’s suppose a Guest connects to your Guest’s WiFi. Then, you can limit their bandwidth usage.

Setup Security measures on your UniFi Networks
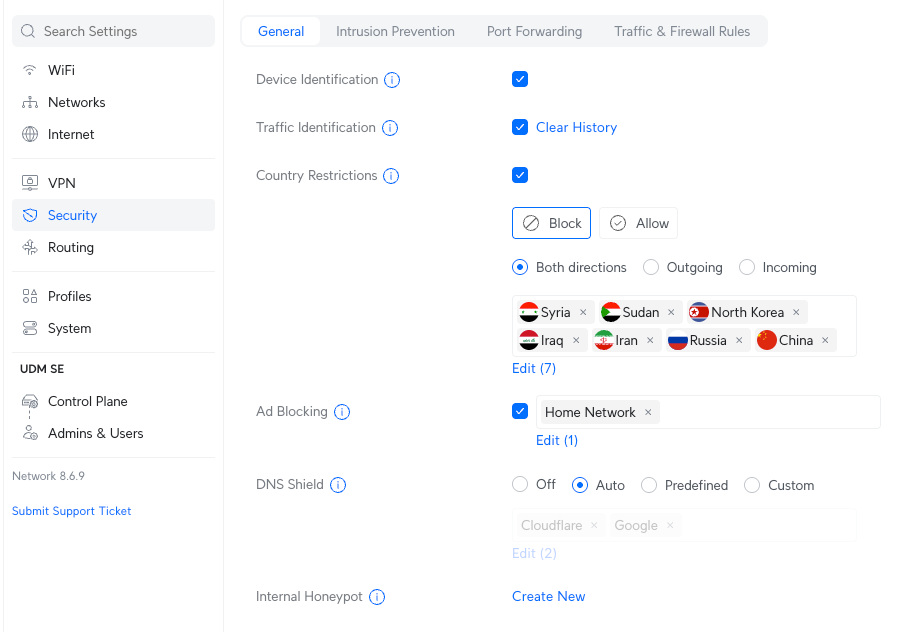
Under the “Security” section, UniFi offers a range of valuable options for knowing the Device Identification that joins your network. You can also block traffic from specific countries and regions.
These features allow you to monitor all the devices connecting to your network, ensuring that only authorized devices have access. Blocking traffic from certain geographic locations adds another layer of protection, safeguarding your home network against threats from specific regions known for cyber incidents. This allows you to maintain a safer and more secure network environment.
Device Identification
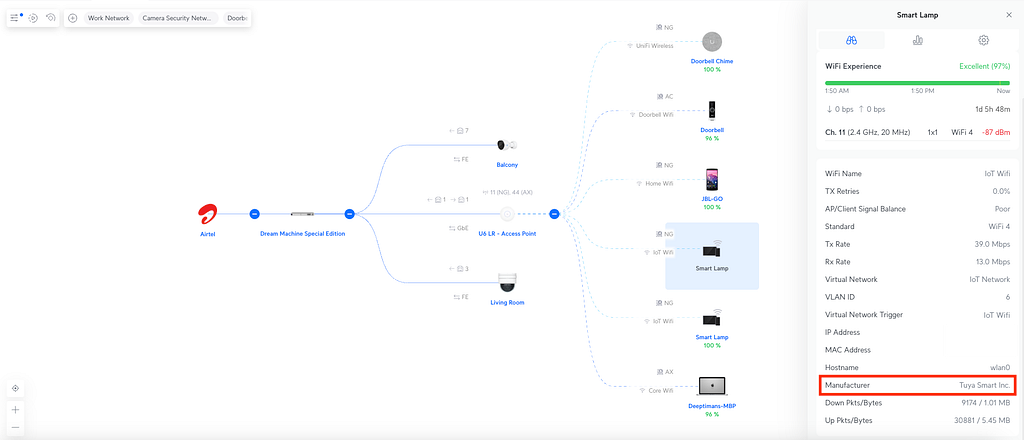
We can easily know if UniFi devices are connected to the network, but what if other IoT devices join the network from a different vendor? This option adds the capability to know the manufacturer's details and other critical information on the device. It may be useful to understand if any malicious attempts are being performed on the network.
For example, we installed a smart lamp on the IoT network, and the product is from a vendor originating in China. It’s very useful to know the name of the company, and it helps gather more information from other sources.
Firewall Rules
We created several VLANs to connect many devices and checked network isolation options to hide devices from other networks. However, when we set firewall rules between various networks, we gain better control over network traffic flow and can see system logs when any intrusion is detected with the rules.
Let’s create a firewall rule to drop all traffic from the Camera Security Network to the Doorbell Camera Security Network.
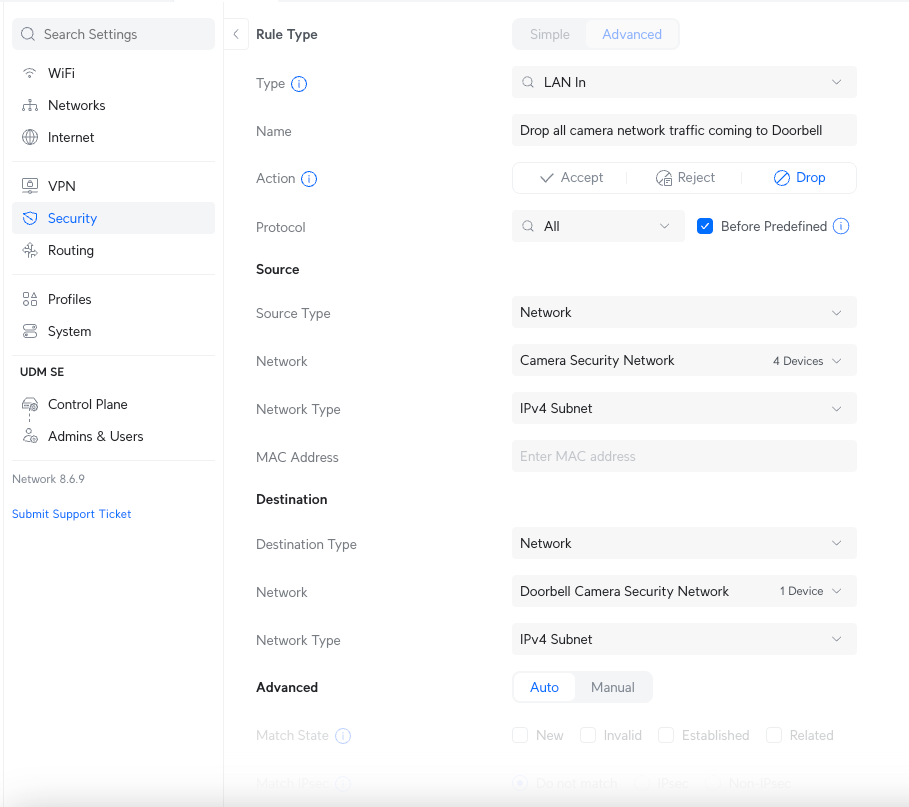
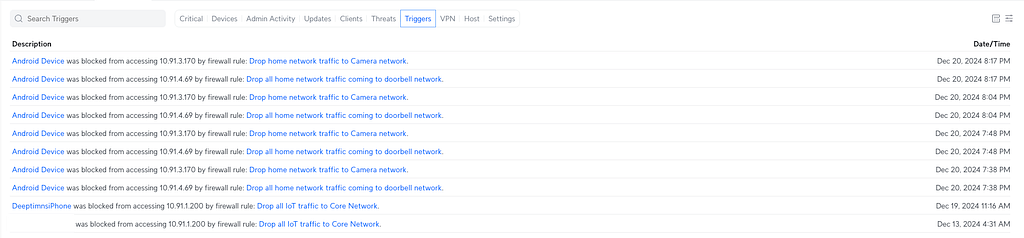
Whenever a device tries to access a network, it gets immediately blocked with a firewall rule and logs into the system.
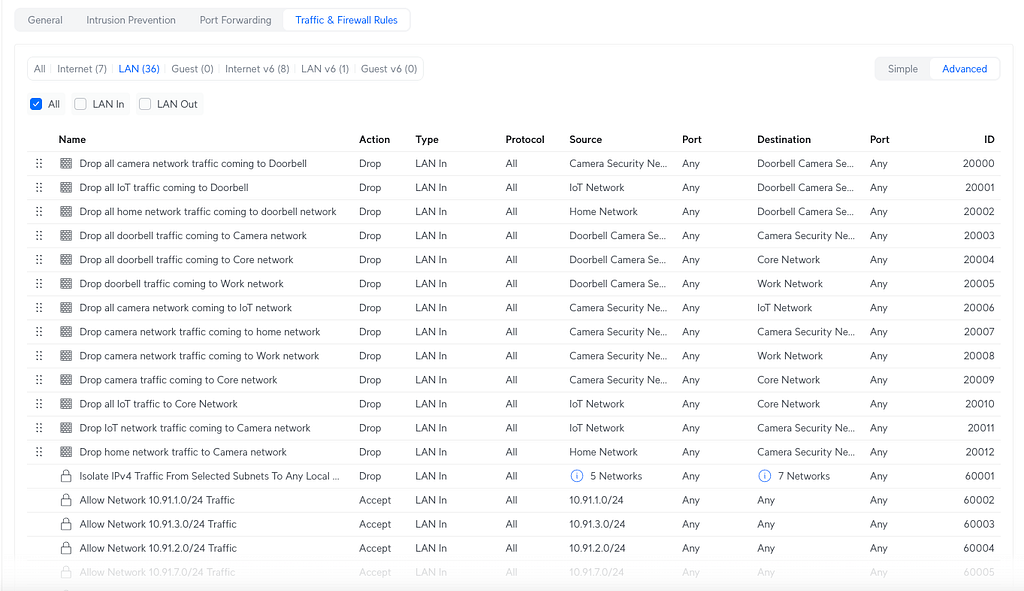
We can create as many firewall rules on a network as possible, depending on the incoming/outgoing traffic we allow/block on the device.
Intrusion Detection and Prevention
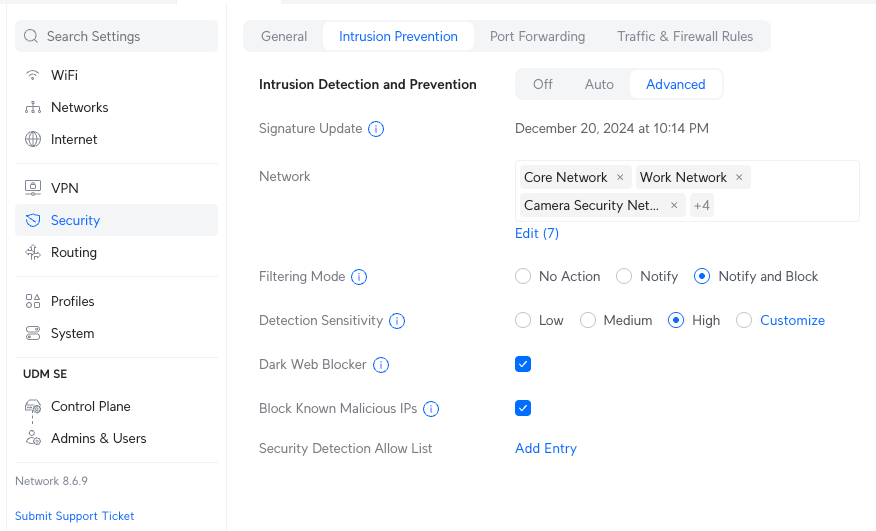
UniFi security measures also offer Intrusion Detection and Prevention. We need to specify the list of networks that require the IPS/IDS enablement. UniFi OS has an internal dictionary containing a list of malicious IPs, and when we enable the “Block Known Malicious IPs” options, those IPs get whitelisted from the traffic. Also, it’s good practice to check the “Dark Web Blocker” option to prevent Tor traffic from coming to our network.
Conclusion
That’s It. This is an overview of our UniFi deployment in our home network. We haven’t explored all the options in the UniFi OS console but shared the most common configurations to get started with the UniFi ecosystem. UniFi stores offer many categories of devices to customers based on their deployment needs, and many exciting new products are coming on the horizon. To highlight one, the new UniFi Access Point offers WiFi 7 with a 6 GHz band, better connectivity, a wider range of coverage, and larger client capacity (1500+). We learned many things about network security while setting up the UniFi in our home.
References
- https://youtu.be/yWlvuwq5AXE?si=UWYMqSjOlwf-HSPx
- https://youtu.be/uUeUZTesj3M?si=tXJ6v-lly-eE0urT
- https://info.support.huawei.com/info-finder/encyclopedia/en/MU-MIMO.html
- https://info.support.huawei.com/info-finder/encyclopedia/en/Beamforming.html
We hope this article will give you a good get-started overview of the UniFi configuration and other network setup. Please feel free to reach out in the comment section if anything needs clarification.
Thanks
Comments
Nothing yet. Say the first thing.
Sign in to join the conversation.