
Welcome to another post where I share what I have been learning within the realms of Android development. If you find this helpful and want to stay updated, feel free to subscribe.
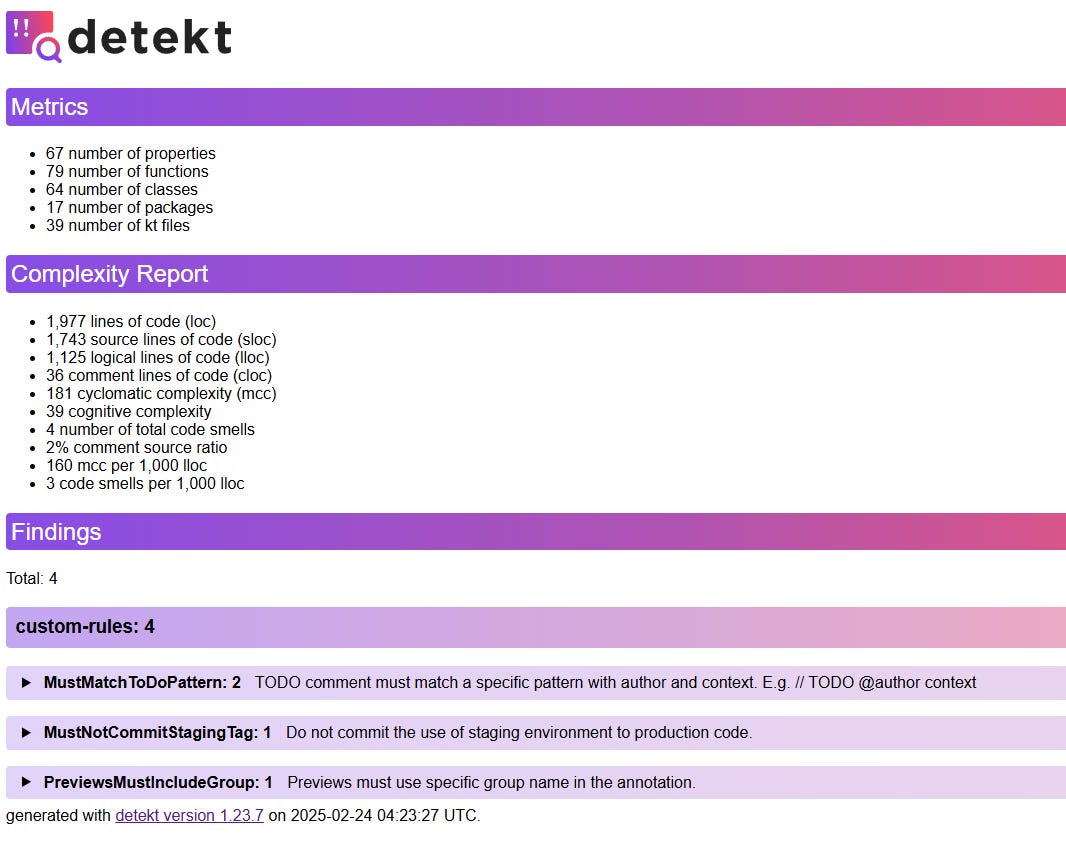
In the last post, I shared my experience with integrating Detekt to an Android project. During that process I found numerous lint issues, some relating to styling issues and others revealing performance oddities that could lead to potential bugs in the future. Detekt is a useful tool for catching these issues before the code gets merged, ensuring a standardized codebase for all the developers that are working on the project. That got me thinking though. What if I wanted to create my own set of rules that checks for specific code formatting that is unique to my project. So in this post, I will walk you through how I created custom lint rules using Detekt.
I found the process of writing custom lint rules to be a tricky one. The official documentation could have been clearer, but once everything was up and running, the process turned out to be relatively straightforward. To follow along, you will need to have some basic understanding of Detekt. If you are unfamiliar, check out my previous post.
Overview and Requirements
In short, Detekt is an open-source static code analysis tool for Kotlin. It scans the codebase for potential code smells, styling issues or anything that could harm the maintainability and reliability of the code. I personally enjoy using linters with my team to quickly gather feedback during the implementation and code review stages, helping us catch issues early and potentially saving time in the development process.
By default, Detekt scans the codebase using its own built-in lint rules which can be managed through the Detekt configuration file. As a developer, you have the flexibility to enable or disable individual rules, as well as adjust their thresholds. Detekt also offers a marketplace where you can integrate other third-party lint rules that others have open-sourced. My favorite one is Detekt for Compose. In our case, our lint rules will live inside our project as a separate module. They will be referenced in the configuration file and can be shared within a larger organization or different teams.
The lint rules I have chosen to implement are areas that I often interact with when I am developing a new feature. By creating these rules, I can ensure I am consistently following best practices, while also having a helpful reminder along the way. The specific requirements are as follows:
All Preview annotations (for Compose) must include the group parameter.
All TODO comments must follow a specific pattern which includes the author and additional context.
A specific “useStaging” variable must not be set to True when the linter is running on the CI pipeline.
Getting Started
Before we can start writing our rules, we need to make some changes to the project’s file structure and add the required libraries. I struggled a bit on this step. Where is what I did to start off.
Create a new Kotlin-only module.
We need a space to add our Detekt specific implementation. As advised by the official guide, we are required to use a Kotlin-specific module without any Android dependencies. I accidently created an Android module and for some reason, I could not get the rules to work. Continue to create a new module and feel free to name it to your liking, I went with “rules”.
Your project might look something like below.
| Project
  | app/
  | rules/
    | src/
      | main/
      | test/ (I added a test folder to test our lint rules)
    | build.gradle.kts
Add the required dependencies
One of the advantages of using a Kotlin-only module is that it allows us to keep our module as lean as possible. For dependencies, you will need to add the Detekt plugin along with the Detekt API and Detekt Test library. Make sure to reference the Kotlin plugin as well.
You can add any other testing or utility libraries based on your preferences. As of now, your build.gradle file (in the newly created module) might look something like below.
plugins {
    id("kotlin")
    alias(libs.plugins.detekt.plugin)
}
dependencies {
    compileOnly(libs.detekt.api)                 // detekt-api:1.23.7
    testImplementation(libs.detekt.test)         // detekt-test:1.23.7
    testImplementation(libs.junit)
}
Create the following files
Now we can start constructing the files we need for our custom lint rules. Do not worry too much about each file, we will go over them in more detail later. Create the following set of files.
CustomDetektRuleSetProvider.kt (you can choose any provider name)
Place it in the `src/main/java` folder
This will reference all of your rules you are going to create
MustMatchToDoPattern.kt, MustNotCommitStagingTag.kt and PreviewsMustIncludeGroup.kt
Create a new folder called “issues” and place each file in that folder
Each rule will have its own file
io.gitlab.arturbosch.detekt.api.RuleSetProvider (name must match the spelling)
You will need to create a new resource folder
Then place the file as is in the `META-INF/services/` folder (this consists of two folders)
Your project structure might look like something below.
| src/main/
  | java/com/company/rules/
    | issues/
      | MustMatchToDoPattern.kt
      | MustNotCommitStagingTag.kt
      | PreviewsMustIncludeGroup.kt
    | CustomDetektRuleSetProvider.kt
  | resources
    | META-INF
      | services/
        | io.gitlab.arturbosch.detekt.api.RuleSetProvider
Understanding the structure
The rules module will contain all the setup and implementation details for our custom rules. The first step is to configure the service. Detekt uses a ServiceLoader pattern which collects all the instances of our rule implementation and references it during runtime. In our module, we created a services folder with a file named io.gitlab.arturbosch.detekt.api.RuleSetProvider. In that file, we map it to our provider, which in this case should be our CustomDetektRuleSetProvider.kt file. So the content of the service will be.
io.gitlab.arturbosch.detekt.api.RuleSetProvider
<package>.CustomDetektRuleSetProviderReplace the package with your project’s package. Ensure it is the correct package path to your provider class. Next we will implement the RuleSetProvider.
Open the CustomDetektRuleSetProvider.kt class and implement the RuleSetProvider. We will need to define the ruleSetId with a unique String id. Each rule set requires an ID, which Detekt determines whether to apply it during a particular analysis. The instance method provides the implementation class for each of the following rules in our rule set. Configuration arguments can be passed to make the rules more flexible, allowing them to adapt to different parameters.
class CustomDetektRuleSetProvider : RuleSetProvider {
    override val ruleSetId: String = "custom-rules"
    override fun instance(config: Config): RuleSet {
        return RuleSet(
            id = ruleSetId,
            rules = listOf(
                MustMatchToDoPattern(config),
                PreviewsMustIncludeGroup(config),
                MustNotCommitStagingTag(config),
            )
        )
    }
}
Note: the ruleSetId is an ID we will reference in the Detekt configuration file later on. So ensure it has a clear and descriptive name.
Each custom rule will implement the Rule class, which defines the nature of the issue we are creating as well as the logic to determine whether a code format violates any of our requirements. Rules are implemented using the visitor pattern, so we can override the visit comment or class methods (along with many other methods to scan the codebase).
In the short example below, the rule first defines the issue object, specifying its severity, description and debt metric. This will be useful for the console output and reports. As for our implementation, we are overriding the visitComment method. Every time Detekt visits a class, it will then visit the comment which will further trigger the function below along with the logic to determine whether the code format matches our requirements. If it does not, we can report the issue.
class MustMatchToDoPattern(config: Config) : Rule(config) {
    override val issue = Issue(
        id = javaClass.simpleName,
        severity = Severity.Maintainability,
        description = "Some description",
        debt = Debt.FIVE_MINS,
    )
    override fun visitComment(comment: PsiComment) {
        super.visitComment(comment)
        // TODO yet to implement
    }
}
Writing rules
Everything is now in place for us to start writing our rules. I have already implemented the three rules and will walk through them in more detail below. While this would not cover every possible scenario when creating custom rules, I believe it is a good starting point for exploring this path.
MustMatchToDoPattern.kt
All TODO comments must include the author along with a message explaining the context (e.g. // TODO `@john` Need to add a clear content description for this image)
The MustMatchToDoPattern must validate every comment in the codebase so we override the visitComment method. On every instance of it, we simply check the contents of the comment and whether it matches our formatting styling. I used a regex pattern for this check. One thing to note is that we could possibly introduce performance issues with our implementation, hence making our lint tasks slower during the build process. So always be mindful of performance and regularly benchmark the rules as the project grows.
/**
 * All TODO comments must include important information as who is assigned to fix the TODO along with
 * some information context to continue the development.
 *
 * All comment must follow the following formatting:
 * // TODO @author some context
 *
 * Good
 * // TODO @john Need to add a clear content description for this image
 *
 * Bad
 * // todo
 *
 */
class MustMatchToDoPattern(config: Config) : Rule(config) {
    companion object {
        private const val DESCRIPTION =
            "TODO comment must match a specific pattern with author and context. E.g. // TODO @author context"
        private const val TODO_PREFIX = "// todo"
        private const val DESIRED_TODO_PATTERN = "(?i)^//\\s*TODO\\s+@\\w+\\s+(\\S.*\\S|\\S)"
    }
    override val issue = Issue(
        id = javaClass.simpleName,
        severity = Severity.Maintainability,
        description = DESCRIPTION,
        debt = Debt.FIVE_MINS,
    )
    // Visit every comment and validate whether they meet our criteria for a valid TODO comment.
    override fun visitComment(comment: PsiComment) {
        super.visitComment(comment)
        val text = comment.text
        if (!text.startsWithIgnoreCase(prefix = TODO_PREFIX)) return
        if (!text.matches(Regex(DESIRED_TODO_PATTERN))) {
            report(
                CodeSmell(
                    entity = Entity.from(comment),
                    message = issue.description,
                    issue = issue
                )
            )
        }
    }
}
MustNotCommitStagingTag.kt
The useStaging in the MainApplication class must not be set to true (e.g. val useStaging = true).
The MustNotCommitStagingTag is a specific example which may not be useful for most people. It checks whether the `useStaging` variable is set to true in the MainApplication class. The reason why I choose to include this is to ensure we are not accidently checking in a flag which is used to control the environment variable that we often turn on during implementation or testing phases. To tackle this, I used the visitNamedDeclaration method and validated the name and value of that variable. This could become a good example of using the Config property where we can dynamically ask which variables to monitor and not let it be hard-coded to just useStaging or the MainApplication class.
/**
 * The project should not use the staging environment when pushing changes to the code repository
 * which would build the production build.
 *
 * useStaging in MainApplication should always remain false when pushing code
 *
 * Good
 * val useStaging = false
 *
 * Bad
 * val useStaging = true
 *
 */
class MustNotCommitStagingTag(config: Config) : Rule(config) {
    companion object {
        private const val DESCRIPTION =
            "Do not commit the use of staging environment to production code."
        private const val CLASS_TAG = "mainapplication"
        private const val VARIABLE_TAG = "usestaging"
    }
    override val issue = Issue(
        id = javaClass.simpleName,
        severity = Severity.Defect,
        description = DESCRIPTION,
        debt = Debt.FIVE_MINS,
    )
    // Visit every variable that is declared to check if it uses the tag of usestaging
    override fun visitNamedDeclaration(declaration: KtNamedDeclaration) {
        super.visitNamedDeclaration(declaration)
        val fileName = declaration.containingKtFile.fileNameWithoutSuffix()
        if (!fileName.startsWithIgnoreCase(prefix = CLASS_TAG)) return
        val variableName = declaration.name
        val variableValue = declaration.lastChild.text.toBoolean()
        variableName?.let { name ->
            if (name.startsWithIgnoreCase(prefix = VARIABLE_TAG) && variableValue) {
                report(
                    CodeSmell(
                        entity = Entity.from(declaration),
                        issue = issue,
                        message = issue.description,
                    )
                )
            }
        }
    }
}
PreviewsMustIncludeGroup.kt
All `@Preview` must include a group (e.g. `@Preview` ( group = someGroup, showBackground = true).
The PreviewsMustIncludeGroup is a helpful one for me when developing UI using compose. I often use the Preview annotation to view the Composable in action along with a third-party catalog library which renders all of the Composable functions. Remembering to add the group can be a challenge. To avoid going back and forth during the code review process, the lint check could signal all the places I am missing the group from. I have used the visitAnnotationEntry method to gather the information of the annotations.
/**
 * Composable Preview should contain group to keep the UI organized when referencing specific features
 * later. It will come in handy when we are showcasing different screens in a catalog.
 *
 * @Preview( group = someGroup), along with other arguments, the Preview Annotation must include group
 *
 * Good
 * @Preview ( group = someGroup, showBackground = true)
 *
 * Bad
 * @Preview
 */
class PreviewsMustIncludeGroup(config: Config) : Rule(config) {
    companion object {
        private const val DESCRIPTION = "Previews must use specific group name in the annotation."
        private const val PREVIEW_TAG = "preview"
        private const val GROUP_TAG = "group"
    }
    override val issue = Issue(
        id = javaClass.simpleName,
        severity = Severity.Warning,
        description = DESCRIPTION,
        debt = Debt.FIVE_MINS,
    )
    // Visit every annotation to see if it is a Preview and whether it contains the group argument
    override fun visitAnnotationEntry(annotationEntry: KtAnnotationEntry) {
        super.visitAnnotationEntry(annotationEntry)
        val annotationName = annotationEntry.shortName.toString()
        // If the annotation is not a preview, skip it.
        if (!annotationName.startsWithIgnoreCase(prefix = PREVIEW_TAG)) return
        var doesContainGroup = false
        for (arguments in annotationEntry.valueArguments) {
            val element = arguments.asElement().firstChild.text
            if (element.startsWithIgnoreCase(prefix = GROUP_TAG)) {
                doesContainGroup = true
            }
        }
        if (!doesContainGroup) {
            report(
                CodeSmell(
                    entity = Entity.from(annotationEntry),
                    issue = issue,
                    message = issue.description,
                )
            )
        }
    }
}
Once our rules are ready, we simply need to reference them in the Detekt configuration file. We will append our rule set (ruleSetId of “custom-rules”) to the default rules. For now, we can activate them but in the future we can pass custom arguments to our implementation class. It is important that the rule name matches exactly with the ID defined in both the provider and rule class.
custom-rules:
  active: true
  MustMatchToDoPattern:
    active: true
  PreviewsMustIncludeGroup:
    active: true
  MustNotCommitStagingTag:
    active: true
Go ahead and run the Detekt Gradle task.
Debugging rules
Debugging is a crucial part for ensuring that the rules are working as expected. To do this, I ran the Detekt Gradle task from Android Studio, which then configured the task within the IDE itself. Then I ran it in Debug mode (the bug icon in Android Studio) with my breakpoints attached. Through this, I was able to determine the information available with each of the override methods.
If for any reason the rules are not being updated, you may have to stop Gradle by running the following command `./gradlew --stop` and run Detekt again.
Testing rules
As with any implementation, writing tests are essential. We need to ensure our lint rules are functioning properly to avoid frustration in any false-positive lint results. Writing tests is straightforward. In your rules module, create a test folder (similar to our package structure of the app module) and test file for each rule. Make sure you have the correct set of Detekt Test and unit testing libraries defined in the build.gradle file.
A test class could look something like below.
import io.gitlab.arturbosch.detekt.api.Config
import io.gitlab.arturbosch.detekt.test.lint
import org.junit.Assert
import org.junit.Before
import org.junit.Test
class PreviewsMustIncludeGroupTest {
    private lateinit var rule: PreviewsMustIncludeGroup
    @Before
    fun setUp() {
        rule = PreviewsMustIncludeGroup(Config.empty)
    }
}
Once our rule is initialized, we can pass a code block using the lint command and run assertions. We want to ensure we test a passing and failing class.
@Test
fun `Preview with group and other arguments returns no issues`() {
    val findings = rule.lint(
        """
            @Preview( group = someGroup, showBackground = true )
            fun someFunction() {}
        """.trimIndent(),
    )
    Assert.assertTrue(findings.isEmpty())
}
Conclusion
And that includes our little investigation on how to create custom lint rules for Detekt. As of now, I just have these three rules running in my project. Hopefully I will get a chance to update these and grow my ruleset in the future. If you enjoyed this post and want to follow my Android development journey, consider subscribing and sharing this newsletter. Till next time, thank you.
Comments
Nothing yet. Say the first thing.
Sign in to join the conversation.