Develop a Deep Learning Model to Automatically
Describe Photographs in Python with Keras, Step-by-Step.
Caption generation is a challenging artificial intelligence problem where a textual description must be generated for a given photograph.
It requires both methods from computer vision to understand the content of the image and a language model from the field of natural language processing to turn the understanding of the image into words in the right order. Recently, deep learning methods have achieved state-of-the-art results on examples of this problem.
Deep learning methods have demonstrated state-of-the-art results on caption generation problems. What is most impressive about these methods is a single end-to-end model can be defined to predict a caption, given a photo, instead of requiring sophisticated data preparation or a pipeline of specifically designed models.
In this tutorial, you will discover how to develop a photo captioning deep learning model from scratch.
After completing this tutorial, you will know:
How to prepare photo and text data for training a deep learning model.
How to design and train a deep learning caption generation model.
How to evaluate a train caption generation model and use it to caption entirely new photographs.
We introduce a new benchmark collection for sentence-based image description and search, consisting of 8,000 images that are each paired with five different captions which provide clear descriptions of the salient entities and events.
…
The images were chosen from six different Flickr groups, and tend not to contain any well-known people or locations, but were manually selected to depict a variety of scenes and situations.
The dataset is available for free. You must complete a request form and the links to the dataset will be emailed to you. I would love to link to them for you, but the email address expressly requests: “Please do not redistribute the dataset“.
You can use the link below to request the dataset (note, this may not work any more, see below):
Within a short time, you will receive an email that contains links to two files:
Flickr8k_Dataset.zip (1 Gigabyte) An archive of all photographs.
Flickr8k_text.zip (2.2 Megabytes) An archive of all text descriptions for photographs.
UPDATE (Feb/2019): The official site seems to have been taken down (although the form still works). Here are some direct download links from my datasets GitHub repository:
Download the datasets and unzip them into your current working directory. You will have two directories:
Flickr8k_Dataset: Contains 8092 photographs in JPEG format.
Flickr8k_text: Contains a number of files containing different sources of descriptions for the photographs.
The dataset has a pre-defined training dataset (6,000 images), development dataset (1,000 images), and test dataset (1,000 images).
One measure that can be used to evaluate the skill of the model are BLEU scores. For reference, below are some ball-park BLEU scores for skillful models when evaluated on the test dataset (taken from the 2017 paper “Where to put the Image in an Image Caption Generator“):
BLEU-1: 0.401 to 0.578.
BLEU-2: 0.176 to 0.390.
BLEU-3: 0.099 to 0.260.
BLEU-4: 0.059 to 0.170.
We describe the BLEU metric more later when we work on evaluating our model.
Next, let’s look at how to load the images.
Prepare Photo Data
We will use a pre-trained model to interpret the content of the photos.
There are many models to choose from. In this case, we will use the Oxford Visual Geometry Group, or VGG, model that won the ImageNet competition in 2014. Learn more about the model here:
Keras provides this pre-trained model directly. Note, the first time you use this model, Keras will download the model weights from the Internet, which are about 500 Megabytes. This may take a few minutes depending on your internet connection.
We could use this model as part of a broader image caption model. The problem is, it is a large model and running each photo through the network every time we want to test a new language model configuration (downstream) is redundant.
Instead, we can pre-compute the “photo features” using the pre-trained model and save them to file. We can then load these features later and feed them into our model as the interpretation of a given photo in the dataset. It is no different to running the photo through the full VGG model; it is just we will have done it once in advance.
This is an optimization that will make training our models faster and consume less memory.
We can load the VGG model in Keras using the VGG class. We will remove the last layer from the loaded model, as this is the model used to predict a classification for a photo. We are not interested in classifying images, but we are interested in the internal representation of the photo right before a classification is made. These are the “features” that the model has extracted from the photo.
Keras also provides tools for reshaping the loaded photo into the preferred size for the model (e.g. 3 channel 224 x 224 pixel image).
Below is a function named extract_features() that, given a directory name, will load each photo, prepare it for VGG, and collect the predicted features from the VGG model. The image features are a 1-dimensional 4,096 element vector.
The function returns a dictionary of image identifier to image features.
1
2
3
4
5
6
7
8
9
10
11
12
13
14
15
16
17
18
19
20
21
22
23
24
25
26
27
28
# extract features from each photo in the directory
First, we will load the file containing all of the descriptions.
1
2
3
4
5
6
7
8
9
10
11
12
13
# load doc into memory
def load_doc(filename):
# open the file as read only
file=open(filename,'r')
# read all text
text=file.read()
# close the file
file.close()
returntext
filename='Flickr8k_text/Flickr8k.token.txt'
# load descriptions
doc=load_doc(filename)
Each photo has a unique identifier. This identifier is used on the photo filename and in the text file of descriptions.
Next, we will step through the list of photo descriptions. Below defines a function load_descriptions() that, given the loaded document text, will return a dictionary of photo identifiers to descriptions. Each photo identifier maps to a list of one or more textual descriptions.
1
2
3
4
5
6
7
8
9
10
11
12
13
14
15
16
17
18
19
20
21
22
23
24
25
# extract descriptions for images
def load_descriptions(doc):
mapping=dict()
# process lines
forline indoc.split('\n'):
# split line by white space
tokens=line.split()
iflen(line)<2:
continue
# take the first token as the image id, the rest as the description
image_id,image_desc=tokens[0],tokens[1:]
# remove filename from image id
image_id=image_id.split('.')[0]
# convert description tokens back to string
image_desc=' '.join(image_desc)
# create the list if needed
ifimage_id notinmapping:
mapping[image_id]=list()
# store description
mapping[image_id].append(image_desc)
returnmapping
# parse descriptions
descriptions=load_descriptions(doc)
print('Loaded: %d '%len(descriptions))
Next, we need to clean the description text. The descriptions are already tokenized and easy to work with.
We will clean the text in the following ways in order to reduce the size of the vocabulary of words we will need to work with:
Convert all words to lowercase.
Remove all punctuation.
Remove all words that are one character or less in length (e.g. ‘a’).
Remove all words with numbers in them.
Below defines the clean_descriptions() function that, given the dictionary of image identifiers to descriptions, steps through each description and cleans the text.
1
2
3
4
5
6
7
8
9
10
11
12
13
14
15
16
17
18
19
20
21
22
23
import string
def clean_descriptions(descriptions):
# prepare translation table for removing punctuation
table=str.maketrans('','',string.punctuation)
forkey,desc_list indescriptions.items():
foriinrange(len(desc_list)):
desc=desc_list[i]
# tokenize
desc=desc.split()
# convert to lower case
desc=[word.lower()forwordindesc]
# remove punctuation from each token
desc=[w.translate(table)forwindesc]
# remove hanging 's' and 'a'
desc=[wordforwordindesc iflen(word)>1]
# remove tokens with numbers in them
desc=[wordforwordindesc ifword.isalpha()]
# store as string
desc_list[i]=' '.join(desc)
# clean descriptions
clean_descriptions(descriptions)
Once cleaned, we can summarize the size of the vocabulary.
Ideally, we want a vocabulary that is both expressive and as small as possible. A smaller vocabulary will result in a smaller model that will train faster.
For reference, we can transform the clean descriptions into a set and print its size to get an idea of the size of our dataset vocabulary.
1
2
3
4
5
6
7
8
9
10
11
# convert the loaded descriptions into a vocabulary of words
Finally, we can save the dictionary of image identifiers and descriptions to a new file named descriptions.txt, with one image identifier and description per line.
Below defines the save_descriptions() function that, given a dictionary containing the mapping of identifiers to descriptions and a filename, saves the mapping to file.
Running the example first prints the number of loaded photo descriptions (8,092) and the size of the clean vocabulary (8,763 words).
1
2
Loaded: 8,092
Vocabulary Size: 8,763
Finally, the clean descriptions are written to ‘descriptions.txt‘.
Taking a look at the file, we can see that the descriptions are ready for modeling. The order of descriptions in your file may vary.
1
2
3
4
5
6
2252123185_487f21e336 bunch on people are seated in stadium
2252123185_487f21e336 crowded stadium is full of people watching an event
2252123185_487f21e336 crowd of people fill up packed stadium
2252123185_487f21e336 crowd sitting in an indoor stadium
2252123185_487f21e336 stadium full of people watch game
...
Develop Deep Learning Model
In this section, we will define the deep learning model and fit it on the training dataset.
This section is divided into the following parts:
Loading Data.
Defining the Model.
Fitting the Model.
Complete Example.
Loading Data
First, we must load the prepared photo and text data so that we can use it to fit the model.
We are going to train the data on all of the photos and captions in the training dataset. While training, we are going to monitor the performance of the model on the development dataset and use that performance to decide when to save models to file.
The train and development dataset have been predefined in the Flickr_8k.trainImages.txt and Flickr_8k.devImages.txt files respectively, that both contain lists of photo file names. From these file names, we can extract the photo identifiers and use these identifiers to filter photos and descriptions for each set.
The function load_set() below will load a pre-defined set of identifiers given the train or development sets filename.
1
2
3
4
5
6
7
8
9
10
11
12
13
14
15
16
17
18
19
20
21
22
23
# load doc into memory
def load_doc(filename):
# open the file as read only
file=open(filename,'r')
# read all text
text=file.read()
# close the file
file.close()
returntext
# load a pre-defined list of photo identifiers
def load_set(filename):
doc=load_doc(filename)
dataset=list()
# process line by line
forline indoc.split('\n'):
# skip empty lines
iflen(line)<1:
continue
# get the image identifier
identifier=line.split('.')[0]
dataset.append(identifier)
returnset(dataset)
Now, we can load the photos and descriptions using the pre-defined set of train or development identifiers.
Below is the function load_clean_descriptions() that loads the cleaned text descriptions from ‘descriptions.txt‘ for a given set of identifiers and returns a dictionary of identifiers to lists of text descriptions.
The model we will develop will generate a caption given a photo, and the caption will be generated one word at a time. The sequence of previously generated words will be provided as input. Therefore, we will need a ‘first word’ to kick-off the generation process and a ‘last word‘ to signal the end of the caption.
We will use the strings ‘startseq‘ and ‘endseq‘ for this purpose. These tokens are added to the loaded descriptions as they are loaded. It is important to do this now before we encode the text so that the tokens are also encoded correctly.
1
2
3
4
5
6
7
8
9
10
11
12
13
14
15
16
17
18
19
20
# load clean descriptions into memory
def load_clean_descriptions(filename,dataset):
# load document
doc=load_doc(filename)
descriptions=dict()
forline indoc.split('\n'):
# split line by white space
tokens=line.split()
# split id from description
image_id,image_desc=tokens[0],tokens[1:]
# skip images not in the set
ifimage_id indataset:
# create list
ifimage_id notindescriptions:
descriptions[image_id]=list()
# wrap description in tokens
desc='startseq '+' '.join(image_desc)+' endseq'
# store
descriptions[image_id].append(desc)
returndescriptions
Next, we can load the photo features for a given dataset.
Below defines a function named load_photo_features() that loads the entire set of photo descriptions, then returns the subset of interest for a given set of photo identifiers.
This is not very efficient; nevertheless, this will get us up and running quickly.
1
2
3
4
5
6
7
# load photo features
def load_photo_features(filename,dataset):
# load all features
all_features=load(open(filename,'rb'))
# filter features
features={k:all_features[k]forkindataset}
returnfeatures
We can pause here and test everything developed so far.
Running this example first loads the 6,000 photo identifiers in the training dataset. These features are then used to filter and load the cleaned description text and the pre-computed photo features.
We are nearly there.
1
2
3
Dataset: 6,000
Descriptions: train=6,000
Photos: train=6,000
The description text will need to be encoded to numbers before it can be presented to the model as in input or compared to the model’s predictions.
The first step in encoding the data is to create a consistent mapping from words to unique integer values. Keras provides the Tokenizer class that can learn this mapping from the loaded description data.
Below defines the to_lines() to convert the dictionary of descriptions into a list of strings and the create_tokenizer() function that will fit a Tokenizer given the loaded photo description text.
1
2
3
4
5
6
7
8
9
10
11
12
13
14
15
16
17
18
# convert a dictionary of clean descriptions to a list of descriptions
def to_lines(descriptions):
all_desc=list()
forkey indescriptions.keys():
[all_desc.append(d)fordindescriptions[key]]
returnall_desc
# fit a tokenizer given caption descriptions
def create_tokenizer(descriptions):
lines=to_lines(descriptions)
tokenizer=Tokenizer()
tokenizer.fit_on_texts(lines)
returntokenizer
# prepare tokenizer
tokenizer=create_tokenizer(train_descriptions)
vocab_size=len(tokenizer.word_index)+1
print('Vocabulary Size: %d'%vocab_size)
We can now encode the text.
Each description will be split into words. The model will be provided one word and the photo and generate the next word. Then the first two words of the description will be provided to the model as input with the image to generate the next word. This is how the model will be trained.
For example, the input sequence “little girl running in field” would be split into 6 input-output pairs to train the model:
1
2
3
4
5
6
7
X1, X2 (text sequence), y (word)
photo startseq, little
photo startseq, little, girl
photo startseq, little, girl, running
photo startseq, little, girl, running, in
photo startseq, little, girl, running, in, field
photo startseq, little, girl, running, in, field, endseq
Later, when the model is used to generate descriptions, the generated words will be concatenated and recursively provided as input to generate a caption for an image.
The function below named create_sequences(), given the tokenizer, a maximum sequence length, and the dictionary of all descriptions and photos, will transform the data into input-output pairs of data for training the model. There are two input arrays to the model: one for photo features and one for the encoded text. There is one output for the model which is the encoded next word in the text sequence.
The input text is encoded as integers, which will be fed to a word embedding layer. The photo features will be fed directly to another part of the model. The model will output a prediction, which will be a probability distribution over all words in the vocabulary.
The output data will therefore be a one-hot encoded version of each word, representing an idealized probability distribution with 0 values at all word positions except the actual word position, which has a value of 1.
1
2
3
4
5
6
7
8
9
10
11
12
13
14
15
16
17
18
19
20
21
22
# create sequences of images, input sequences and output words for an image
We will need to calculate the maximum number of words in the longest description. A short helper function named max_length() is defined below.
1
2
3
4
# calculate the length of the description with the most words
def max_length(descriptions):
lines=to_lines(descriptions)
returnmax(len(d.split())fordinlines)
We now have enough to load the data for the training and development datasets and transform the loaded data into input-output pairs for fitting a deep learning model.
Defining the Model
We will define a deep learning based on the “merge-model” described by Marc Tanti, et al. in their 2017 papers:
The authors provide a nice schematic of the model, reproduced below.
Schematic of the Merge Model For Image Captioning
We will describe the model in three parts:
Photo Feature Extractor. This is a 16-layer VGG model pre-trained on the ImageNet dataset. We have pre-processed the photos with the VGG model (without the output layer) and will use the extracted features predicted by this model as input.
Sequence Processor. This is a word embedding layer for handling the text input, followed by a Long Short-Term Memory (LSTM) recurrent neural network layer.
Decoder (for lack of a better name). Both the feature extractor and sequence processor output a fixed-length vector. These are merged together and processed by a Dense layer to make a final prediction.
The Photo Feature Extractor model expects input photo features to be a vector of 4,096 elements. These are processed by a Dense layer to produce a 256 element representation of the photo.
The Sequence Processor model expects input sequences with a pre-defined length (34 words) which are fed into an Embedding layer that uses a mask to ignore padded values. This is followed by an LSTM layer with 256 memory units.
Both the input models produce a 256 element vector. Further, both input models use regularization in the form of 50% dropout. This is to reduce overfitting the training dataset, as this model configuration learns very fast.
The Decoder model merges the vectors from both input models using an addition operation. This is then fed to a Dense 256 neuron layer and then to a final output Dense layer that makes a softmax prediction over the entire output vocabulary for the next word in the sequence.
The function below named define_model() defines and returns the model ready to be fit.
We also create a plot to visualize the structure of the network that better helps understand the two streams of input.
Plot of the Caption Generation Deep Learning Model
Fitting the Model
Now that we know how to define the model, we can fit it on the training dataset.
The model learns fast and quickly overfits the training dataset. For this reason, we will monitor the skill of the trained model on the holdout development dataset. When the skill of the model on the development dataset improves at the end of an epoch, we will save the whole model to file.
At the end of the run, we can then use the saved model with the best skill on the training dataset as our final model.
We can do this by defining a ModelCheckpoint in Keras and specifying it to monitor the minimum loss on the validation dataset and save the model to a file that has both the training and validation loss in the filename.
We can then specify the checkpoint in the call to fit() via the callbacks argument. We must also specify the development dataset in fit() via the validation_data argument.
We will only fit the model for 20 epochs, but given the amount of training data, each epoch may take 30 minutes on modern hardware.
Running the example first prints a summary of the loaded training and development datasets.
1
2
3
4
5
6
7
8
Dataset: 6,000
Descriptions: train=6,000
Photos: train=6,000
Vocabulary Size: 7,579
Description Length: 34
Dataset: 1,000
Descriptions: test=1,000
Photos: test=1,000
After the summary of the model, we can get an idea of the total number of training and validation (development) input-output pairs.
1
Train on 306,404 samples, validate on 50,903 samples
The model then runs, saving the best model to .h5 files along the way.
On my run, the best validation results were saved to the file:
model-ep002-loss3.245-val_loss3.612.h5
This model was saved at the end of epoch 2 with a loss of 3.245 on the training dataset and a loss of 3.612 on the development dataset
Note: Your results may vary given the stochastic nature of the algorithm or evaluation procedure, or differences in numerical precision. Consider running the example a few times and compare the average outcome.
Let me know what you get in the comments below.
If you ran the example on AWS, copy the model file back to your current working directory. If you need help with commands on AWS, see the post:
Note: If you had no problems in the previous section, please skip this section. This section is for those who do not have enough memory to train the model as described in the previous section (e.g. cannot use AWS EC2 for whatever reason).
The training of the caption model does assume you have a lot of RAM.
The code in the previous section is not memory efficient and assumes you are running on a large EC2 instance with 32GB or 64GB of RAM. If you are running the code on a workstation of 8GB of RAM, you cannot train the model.
A workaround is to use progressive loading. This was discussed in detail in the second-last section titled “Progressive Loading” in the post:
I recommend reading that section before continuing.
If you want to use progressive loading, to train this model, this section will show you how.
The first step is we must define a function that we can use as the data generator.
We will keep things very simple and have the data generator yield one photo’s worth of data per batch. This will be all of the sequences generated for a photo and its set of descriptions.
The function below data_generator() will be the data generator and will take the loaded textual descriptions, photo features, tokenizer and max length. Here, I assume that you can fit this training data in memory, which I believe 8GB of RAM should be more than capable.
How does this work? Read the post I just mentioned above that introduces data generators.
1
2
3
4
5
6
7
8
9
# data generator, intended to be used in a call to model.fit_generator()
You can see that we are calling the create_sequence() function to create a batch worth of data for a single photo rather than an entire dataset. This means that we must update the create_sequences() function to delete the “iterate over all descriptions” for-loop.
The updated function is as follows:
1
2
3
4
5
6
7
8
9
10
11
12
13
14
15
16
17
18
19
20
# create sequences of images, input sequences and output words for an image
Note, this is a very basic data generator. The big memory saving it offers is to not have the unrolled sequences of train and test data in memory prior to fitting the model, that these samples (e.g. results from create_sequences()) are created as needed per photo.
Some off-the-cuff ideas for further improving this data generator include:
Randomize the order of photos each epoch.
Work with a list of photo ids and load text and photo data as needed to cut even further back on memory.
Yield more than one photo’s worth of samples per batch.
I have experienced with these variations myself in the past. Let me know if you do and how you go in the comments.
You can sanity check a data generator by calling it directly, as follows:
Running this sanity check will show what one batch worth of sequences looks like, in this case 47 samples to train on for the first photo.
1
2
3
(47, 4096)
(47, 34)
(47, 7579)
Finally, we can use the fit_generator() function on the model to train the model with this data generator.
In this simple example we will discard the loading of the development dataset and model checkpointing and simply save the model after each training epoch. You can then go back and load/evaluate each saved model after training to find the one we the lowest loss that you can then use in the next section.
The code to train the model with the data generator is as follows:
1
2
3
4
5
6
7
8
9
10
# train the model, run epochs manually and save after each epoch
Perhaps evaluate each saved model and choose the one final model with the lowest loss on a holdout dataset. The next section may help with this.
Did you use this new addition to the tutorial?
How did you go?
Evaluate Model
Once the model is fit, we can evaluate the skill of its predictions on the holdout test dataset.
We will evaluate a model by generating descriptions for all photos in the test dataset and evaluating those predictions with a standard cost function.
First, we need to be able to generate a description for a photo using a trained model.
This involves passing in the start description token ‘startseq‘, generating one word, then calling the model recursively with generated words as input until the end of sequence token is reached ‘endseq‘ or the maximum description length is reached.
The function below named generate_desc() implements this behavior and generates a textual description given a trained model, and a given prepared photo as input. It calls the function word_for_id() in order to map an integer prediction back to a word.
We will generate predictions for all photos in the test dataset and in the train dataset.
The function below named evaluate_model() will evaluate a trained model against a given dataset of photo descriptions and photo features. The actual and predicted descriptions are collected and evaluated collectively using the corpus BLEU score that summarizes how close the generated text is to the expected text.
BLEU scores are used in text translation for evaluating translated text against one or more reference translations.
Here, we compare each generated description against all of the reference descriptions for the photograph. We then calculate BLEU scores for 1, 2, 3 and 4 cumulative n-grams.
We can put all of this together with the functions from the previous section for loading the data. We first need to load the training dataset in order to prepare a Tokenizer so that we can encode generated words as input sequences for the model. It is critical that we encode the generated words using exactly the same encoding scheme as was used when training the model.
We then use these functions for loading the test dataset.
The complete example is listed below.
1
2
3
4
5
6
7
8
9
10
11
12
13
14
15
16
17
18
19
20
21
22
23
24
25
26
27
28
29
30
31
32
33
34
35
36
37
38
39
40
41
42
43
44
45
46
47
48
49
50
51
52
53
54
55
56
57
58
59
60
61
62
63
64
65
66
67
68
69
70
71
72
73
74
75
76
77
78
79
80
81
82
83
84
85
86
87
88
89
90
91
92
93
94
95
96
97
98
99
100
101
102
103
104
105
106
107
108
109
110
111
112
113
114
115
116
117
118
119
120
121
122
123
124
125
126
127
128
129
130
131
132
133
134
135
136
137
138
139
140
141
142
143
144
145
146
147
148
149
150
151
152
153
154
155
156
157
158
159
160
161
162
163
164
from numpy import argmax
from pickle import load
from keras.preprocessing.text import Tokenizer
from keras.preprocessing.sequence import pad_sequences
from keras.models import load_model
from nltk.translate.bleu_score import corpus_bleu
# load doc into memory
def load_doc(filename):
# open the file as read only
file=open(filename,'r')
# read all text
text=file.read()
# close the file
file.close()
returntext
# load a pre-defined list of photo identifiers
def load_set(filename):
doc=load_doc(filename)
dataset=list()
# process line by line
forline indoc.split('\n'):
# skip empty lines
iflen(line)<1:
continue
# get the image identifier
identifier=line.split('.')[0]
dataset.append(identifier)
returnset(dataset)
# load clean descriptions into memory
def load_clean_descriptions(filename,dataset):
# load document
doc=load_doc(filename)
descriptions=dict()
forline indoc.split('\n'):
# split line by white space
tokens=line.split()
# split id from description
image_id,image_desc=tokens[0],tokens[1:]
# skip images not in the set
ifimage_id indataset:
# create list
ifimage_id notindescriptions:
descriptions[image_id]=list()
# wrap description in tokens
desc='startseq '+' '.join(image_desc)+' endseq'
# store
descriptions[image_id].append(desc)
returndescriptions
# load photo features
def load_photo_features(filename,dataset):
# load all features
all_features=load(open(filename,'rb'))
# filter features
features={k:all_features[k]forkindataset}
returnfeatures
# covert a dictionary of clean descriptions to a list of descriptions
def to_lines(descriptions):
all_desc=list()
forkey indescriptions.keys():
[all_desc.append(d)fordindescriptions[key]]
returnall_desc
# fit a tokenizer given caption descriptions
def create_tokenizer(descriptions):
lines=to_lines(descriptions)
tokenizer=Tokenizer()
tokenizer.fit_on_texts(lines)
returntokenizer
# calculate the length of the description with the most words
Note: Your results may vary given the stochastic nature of the algorithm or evaluation procedure, or differences in numerical precision. Consider running the example a few times and compare the average outcome.
We can see that the scores fit within and close to the top of the expected range of a skillful model on the problem. The chosen model configuration is by no means optimized.
1
2
3
4
BLEU-1: 0.579114
BLEU-2: 0.344856
BLEU-3: 0.252154
BLEU-4: 0.131446
Generate New Captions
Now that we know how to develop and evaluate a caption generation model, how can we use it?
Almost everything we need to generate captions for entirely new photographs is in the model file.
We also need the Tokenizer for encoding generated words for the model while generating a sequence, and the maximum length of input sequences, used when we defined the model (e.g. 34).
We can hard code the maximum sequence length. With the encoding of text, we can create the tokenizer and save it to a file so that we can load it quickly whenever we need it without needing the entire Flickr8K dataset. An alternative would be to use our own vocabulary file and mapping to integers function during training.
We can create the Tokenizer as before and save it as a pickle file tokenizer.pkl. The complete example is listed below.
1
2
3
4
5
6
7
8
9
10
11
12
13
14
15
16
17
18
19
20
21
22
23
24
25
26
27
28
29
30
31
32
33
34
35
36
37
38
39
40
41
42
43
44
45
46
47
48
49
50
51
52
53
54
55
56
57
58
59
60
61
62
63
64
65
66
67
68
69
70
71
72
73
from keras.preprocessing.text import Tokenizer
from pickle import dump
# load doc into memory
def load_doc(filename):
# open the file as read only
file=open(filename,'r')
# read all text
text=file.read()
# close the file
file.close()
returntext
# load a pre-defined list of photo identifiers
def load_set(filename):
doc=load_doc(filename)
dataset=list()
# process line by line
forline indoc.split('\n'):
# skip empty lines
iflen(line)<1:
continue
# get the image identifier
identifier=line.split('.')[0]
dataset.append(identifier)
returnset(dataset)
# load clean descriptions into memory
def load_clean_descriptions(filename,dataset):
# load document
doc=load_doc(filename)
descriptions=dict()
forline indoc.split('\n'):
# split line by white space
tokens=line.split()
# split id from description
image_id,image_desc=tokens[0],tokens[1:]
# skip images not in the set
ifimage_id indataset:
# create list
ifimage_id notindescriptions:
descriptions[image_id]=list()
# wrap description in tokens
desc='startseq '+' '.join(image_desc)+' endseq'
# store
descriptions[image_id].append(desc)
returndescriptions
# covert a dictionary of clean descriptions to a list of descriptions
Next, we must load the photo we which to describe and extract the features.
We could do this by re-defining the model and adding the VGG-16 model to it, or we can use the VGG model to predict the features and use them as inputs to our existing model. We will do the latter and use a modified version of the extract_features() function used during data preparation, but adapted to work on a single photo.
1
2
3
4
5
6
7
8
9
10
11
12
13
14
15
16
17
18
19
20
# extract features from each photo in the directory
Note: Your results may vary given the stochastic nature of the algorithm or evaluation procedure, or differences in numerical precision. Consider running the example a few times and compare the average outcome.
In this case, the description generated was as follows:
1
startseq dog is running across the beach endseq
You could remove the start and end tokens and you would have the basis for a nice automatic photo captioning model.
It’s like living in the future guys!
It still completely blows my mind that we can do this. Wow.
Extensions
This section lists some ideas for extending the tutorial that you may wish to explore.
Alternate Pre-Trained Photo Models. A small 16-layer VGG model was used for feature extraction. Consider exploring larger models that offer better performance on the ImageNet dataset, such as Inception.
Smaller Vocabulary. A larger vocabulary of nearly eight thousand words was used in the development of the model. Many of the words supported may be misspellings or only used once in the entire dataset. Refine the vocabulary and reduce the size, perhaps by half.
Pre-trained Word Vectors. The model learned the word vectors as part of fitting the model. Better performance may be achieved by using word vectors either pre-trained on the training dataset or trained on a much larger corpus of text, such as news articles or Wikipedia.
Tune Model. The configuration of the model was not tuned on the problem. Explore alternate configurations and see if you can achieve better performance.
Did you try any of these extensions? Share your results in the comments below.
Further Reading
This section provides more resources on the topic if you are looking go deeper.
thanks for this great article about image caption!
My results after training were a bit worse (loss 3.566 – val_loss 3.859, then started to overfit) so i decided to try keras.applications.inception_v3.InceptionV3 for the base model. Currently it is still running and i am curious to see if it will do better.
5 frames
in create_sequence(caption, max_length_of_caption, vocab_size, image_input)
1 def create_sequence(caption,max_length_of_caption,vocab_size,image_input):
—-> 2 input_sequence=[],image_sequence=[],output_sequence=[]
3 for caption in captions:
4 caption=caption.split(‘ ‘)
5 caption=[wordtoindex[w] for w in caption if w in vocab]
ValueError: not enough values to unpack (expected 2, got 0)
hey ben!!!Can you please share the code and results of the inception model?so that we can also try and know more about the inception model.Thanks in advance
Hi,
i have tried using the inception v3 but the bleu scores are even than that of vgg16 model.
BLEU-1: 0.514655
BLEU-2: 0.266434
BLEU-3: 0.179374
BLEU-4: 0.078146
Hi Jason,
Once again great Article.
I ran into some error while executing the code under “Complete example ” section.
The error I got was
ValueError: Error when checking target: expected dense_3 to have shape (None, 7579) but got array with shape (306404, 1)
Any idea how to fix this?
Thanks
The fault appears to have been introduced in a recent version of Keras in the to_categorical() function. I can confirm the fault occurs with Keras 2.1.1.
This looks like he did change the network for feature extraction. When using include_top=False and wheigts=’imagenet” you get this type of data structure.
In the prepare data section, if using Python 2.7 there is no str.maketrans method.
To make this work just comment that line and in line 46 do this:
desc = [w.translate(None, string.punctuation) for w in desc]
after using the function to_vocabulary()
I am getting a vocabulary of size 24 which is too less though I have followed the code line by line.
Can u help?
Hi Jason,
I met some trouble running your code. I got a MemoryError on the instruction :
return array(X1), array(X2), array(y)
I am using a virtual machine with Linux (Debian), Python3, with 32Giga of memory.
Could you tell me what was the size of the memory on the computer you used to check your program ?
Please slightly explain that. I am not getting why did you do [0] in tokenizer.texts_to_sequences([desc])[0] . I have also read array indexing. How it become 2D array from that? Please explain it
It’s throwing a Value error for input_1 after sometime. I tried everything i can but i am not able to understand. Can you paste the link of your project so i can compare ?
Thanks for such a great work. I found an error message when running a code
FileNotFoundError: [Errno 2] No such file or directory: ‘descriptions.txt’
Please help
Any chance you could show what that would look like functioning with this example? 🙂 I’m struggling a bit to bring a similar generator from the other example to this script.
And thanks for the blog, it is really wonderful 🙂 For now I just cut down the training set a lot to work around the memory error and understand.the code better.
Thank you for this amazing article about image captioning.
Currently I am trying to re-implement the whole code, except that I am doing it in pure Tensorflow. I’m curious to see if my re-implementation is working as smooth as yours.
Also a shower thought, it might be better to get a better vector representations for words if using the pretrained word2vec embeddings, for example Glove 6B or GoogleNews. Learning embeddings from scratch with only 8k words might have some performance loss.
Again thank you for putting everything together, it will take quite some time to implement from scratch without your tutorial.
Hi Jason! Thanks for your amazing tutorial! I have a question. I don’t understand the meaning of the number 1 on this line (extract_features):
image = image.reshape((1, image.shape[0], image.shape[1], image.shape[2]))
Can you explain me what reshape does and the meaning of the arguments?
Hi Jason,
Can you provide a link for the tokenizer as well as the model file.
I Cannot train this model in my system but would like to see if I can use it to create an Android app
Hi Jason, thanks for the tutorial! I want to ask you if you could explain (or send me some links), to better understand, how exactly the fitting works.
Example description: the girl is …
The LSTM network during fitting takes the beginning of the sequence of my description (startseq) and it produces a vector with all possible subsequent words. This vector is combined with the vector of the input image features and it is passed within an FF layer where we then take the most probable word (with softmax). it’s right?
At this point how does the fitting go on? Is the new sequence (e.g startseq – the) passed into the LSTM network, predicts all possible next words, etc.? Continuing this way up to endseq?
If the network incorrectly generates the next word, what happens? How are the weights arranged? The fitting continues by taking in input “startseq – wrong_word” or continues with the correct one (eg startseq – the)?
Hi Jason great article on caption generator i think the best till now available online.. i am a newbee in ML(AI). i extracted the features and stored it to features.pkl file but getting an error on create sequence functions memory error and i can see you have suggested progressive loading i do not get that properly could you suggest my how to use the current code modified for progressive loading::
[2/13/2018 12:34 PM] Sanchawat, Hardik:
Using TensorFlow backend.
Dataset: 6000
Descriptions: train=6000
Photos: train=6000
Vocabulary Size: 7579
Description Length: 34
Traceback (most recent call last):
File “C:\Users\hardik.sanchawat\Documents\Scripts\flickr\test.py”, line 154, in
X1train, X2train, ytrain = create_sequences(tokenizer, max_length, train_descriptions, train_features)
File “C:\Users\hardik.sanchawat\Documents\Scripts\flickr\test.py”, line 109, in create_sequences
return array(X1), array(X2), array(y)
MemoryError
And i got the error
ValueError: Error when checking target: expected dense_3 to have 4 dimensions, but got array with shape (13, 4485)
Then i updated to_categorical function as you mentioned and the error changed to this
ValueError: Error when checking target: expected dense_3 to have 4 dimensions, but got array with shape (13, 1, 4485)
Been trying to figure out the exact input shapes of the model since 2 days please help 🙁
I just wanted to know that when you are loading the training data, you are tokenizing the train descriptions. But when you are working with test data, you are not tokenizing the test descriptions, instead working with the previous tokens. Shouldn’t the test descriptions be tokenized too before passing to create_sequence for test ?
This tutorial is of great help to us all, I think. I have a question: Does the model eventually learn to predict captions not present in the corpus? I mean, is it possible for the model to output sentences that are never seen before? In the example you give, the model predicted “startseq dog is running across the beach endseq”. Is this sentence found in the training corpus, or did the model make it up based on previous observations? And also, If it is possible for the model to combine sentences, how much training data do you think it needs to do that?
Hi Jeson, I have a question. What exactly is the LSTM used for? During fitting it takes an input (eg startseq – girl) and outputs a vector of 256 elements that contain the most probable words after the prefix? Is it trained through backpropagation? The purpose of the fitting is to make sure that given a prefix / input the LSTM gives me back a vector that represents “better” the possible following words (which are then merge with the features, etc …)
the new model doesn’t contain any fully connected layer because I read that we can extract the features from the fc2 layers of the pre-trained model also
Yes all my libraries are upto date, have checked.
I solved the problem i posted before….my problem was in the data generator.
I am using progressive loading.After fixing the problem i checked my inputs using this code:
but now it’s showing this error:
ValueError: Error when checking input: expected input_1 to have 2 dimensions, but got array with shape (8, 224, 224, 3)
do i have to change the model architecture for progressive loading??
I am stock with the same issue. The example above runs me into memory problems even when I tried it using AWS EC2 g2.2xlarge instance or a laptop with 16 GB RAM. So I tried the progressive loading example you referred to frequently but I have the same trouble with the input of the model. I tried to use inputs[0] as inputs1 for the define_model function but that returned the error ‘Error when checking input: expected input_13 to have 5 dimensions, but got array with shape (13, 224, 224, 3)’. Do I have to reshape input[0], or is the problem in inputs2?
getting the same error for me
File “fittingmodel.py”, line 189, in
model.fit([X1train, X2train], ytrain, epochs=20, verbose=2, callbacks=[checkpoint], validation_data=([X1test, X2test], ytest))
File “C:\Users\pranyaram\Anaconda3\envs\tensorflow\lib\site-packages\keras\engine\training.py”, line 1630, in fit
batch_size=batch_size)
File “C:\Users\pranyaram\Anaconda3\envs\tensorflow\lib\site-packages\keras\engine\training.py”, line 1476, in _standardize_user_data
exception_prefix=’input’)
File “C:\Users\pranyaram\Anaconda3\envs\tensorflow\lib\site-packages\keras\engine\training.py”, line 123, in _standardize_input_data
str(data_shape))
ValueError: Error when checking input: expected input_1 to have shape (4096,) but got array with shape (1,)
Due to lack of resources I tried running this in small amount of data.Everything worked fine but the generating new description part is giving this error.
C:\Users\Tanisha\AppData\Local\conda\conda\envs\tensorflow\lib\site-packages\h5py\__init__.py:36: FutureWarning: Conversion of the second argument of issubdtype from float to np.floating is deprecated. In future, it will be treated as np.float64 == np.dtype(float).type.
from ._conv import register_converters as _register_converters
Using TensorFlow backend.
2018-03-31 12:07:43.176707: I C:\tf_jenkins\workspace\rel-win\M\windows-gpu\PY\35\tensorflow\core\platform\cpu_feature_guard.cc:140] Your CPU supports instructions that this TensorFlow binary was not compiled to use: AVX2
2018-03-31 12:07:43.574792: I C:\tf_jenkins\workspace\rel-win\M\windows-gpu\PY\35\tensorflow\core\common_runtime\gpu\gpu_device.cc:1212] Found device 0 with properties:
name: GeForce 820M major: 2 minor: 1 memoryClockRate(GHz): 1.25
pciBusID: 0000:08:00.0
totalMemory: 2.00GiB freeMemory: 1.65GiB
2018-03-31 12:07:43.584220: I C:\tf_jenkins\workspace\rel-win\M\windows-gpu\PY\35\tensorflow\core\common_runtime\gpu\gpu_device.cc:1283] Ignoring visible gpu device (device: 0, name: GeForce 820M, pci bus id: 0000:08:00.0, compute capability: 2.1) with Cuda compute capability 2.1. The minimum required Cuda capability is 3.0.
Traceback (most recent call last):
File “7_generate_discription.py”, line 72, in
description = generate_desc(model, tokenizer, photo, max_length)
File “7_generate_discription.py”, line 48, in generate_desc
yhat = model.predict([photo,sequence], verbose=0)
File “C:\Users\Tanisha\AppData\Local\conda\conda\envs\tensorflow\lib\site-packages\keras\engine\training.py”, line 1817, in predict
check_batch_axis=False)
File “C:\Users\Tanisha\AppData\Local\conda\conda\envs\tensorflow\lib\site-packages\keras\engine\training.py”, line 123, in _standardize_input_data
str(data_shape))
ValueError: Error when checking : expected input_2 to have shape (25,) but got array with shape (34,)
i am getting this error
X1train, X2train, ytrain = create_sequences(tokenizer, max_length, train_descriptions, train_features)
File “fittingmodel.py”, line 109, in create_sequences
return array(X1), array(X2), array(y)
MemoryError
ile “fittingmodel.py”, line 189, in
model.fit([X1train, X2train], ytrain, epochs=20, verbose=2, callbacks=[checkpoint], validation_data=([X1test, X2test], ytest))
File “C:\Users\pranyaram\Anaconda3\envs\tensorflow\lib\site-packages\keras\engine\training.py”, line 1522, in fit
batch_size=batch_size)
File “C:\Users\pranyaram\Anaconda3\envs\tensorflow\lib\site-packages\keras\engine\training.py”, line 1378, in _standardize_user_data
exception_prefix=’input’)
File “C:\Users\pranyaram\Anaconda3\envs\tensorflow\lib\site-packages\keras\engine\training.py”, line 144, in _standardize_input_data
str(array.shape))
ValueError: Error when checking input: expected input_1 to have shape (None, 4096) but got array with shape (0, 1)
I tried to use pre-trained model and copy-paste the code above to my Anaconda python 3.6 and Keras version of 2.1.5. First, it will run smoothly without any problem, and it begins to crawl on several image files. Unfortunately, after a while, I get this kind of error:
Hi, can you provide me the weights file. My laptop is having 12GB RAM, NVIDIA GeForce 820M Graphics, all supported drivers. But Iam getting the memory error issue.
I have tried progressive loading also.. But it is not working.. It is not saving the weights file even after steps per epoch=70000 is completed even. I cant afford for the AWS.
So, I request you to give me the weights file.
Thanks in advance.
Traceback (most recent call last):
File “generate_captions5.py”, line 64, in
tokenizer = load(open(‘descriptions.txt’, ‘rb’))
_pickle.UnpicklingError: could not find MARK
I am having the same issue as well. I first did it will the MS COCO dataset because it has many more images and captions, but when I ran into the issue, I followed the tutorial with the Flicker Dataset and I am running into the same issue again. Has anyone figured out the solution?
I had copied the code correctly, but I had been using the data generator because the COCO dataset has so much data. When I tried again with the Flicker dataset, I used the data generator as well, because I wasn’t sure if my 16 gigs of RAM would be enough to load all the data in at once. I am trying again, but without the data generator. I hope it works
It is not generating the exact same caption for each image, but it does place “a man in a red shirt is” at the beginning of each caption and the captions do not seem to be accurate.
File “”, line 1, in
runfile(‘C:/Users/Owner/.spyder-py3/ML/4.py’, wdir=’C:/Users/Owner/.spyder-py3/ML’)
File “C:\Users\Owner\Anaconda_3\lib\site-packages\spyder\utils\site\sitecustomize.py”, line 705, in runfile
execfile(filename, namespace)
File “C:\Users\Owner\Anaconda_3\lib\site-packages\spyder\utils\site\sitecustomize.py”, line 102, in execfile
exec(compile(f.read(), filename, ‘exec’), namespace)
File “C:/Users/Owner/.spyder-py3/ML/4.py”, line 161, in
model = define_model(vocab_size, max_length)
File “C:/Users/Owner/.spyder-py3/ML/4.py”, line 129, in define_model
plot_model(model, to_file=’model.png’, show_shapes=True)
File “C:\Users\Owner\Anaconda_3\lib\site-packages\keras\utils\vis_utils.py”, line 135, in plot_model
dot = model_to_dot(model, show_shapes, show_layer_names, rankdir)
File “C:\Users\Owner\Anaconda_3\lib\site-packages\keras\utils\vis_utils.py”, line 56, in model_to_dot
_check_pydot()
File “C:\Users\Owner\Anaconda_3\lib\site-packages\keras\utils\vis_utils.py”, line 31, in _check_pydot
raise ImportError(‘Failed to import pydot. You must install pydot’
ImportError: Failed to import pydot. You must install pydot and graphviz for pydotprint to work.
getting this even if i installed pydot and graphviz
I have trained the data using progressive loading and I stopped after 4 iterations, with a loss of 3.4952.
I am unable to understand this part,
In this simple example we will discard the loading of the development dataset and model checkpointing and simply save the model after each training epoch. You can then go back and load/evaluate each saved model after training to find the one we the lowest loss that you can then use in the next section.
Do you mean we have to load test set in the same way using progressive loading ?
Please help me understanding how to load the test set.
Error by runing “The complete code example is listed below.” in the Loading Data section:
Message Body:
Dataset: 6000
Descriptions: train=6000
Traceback (most recent call last):
File “task2.py”, line 64, in
train_features = load_photo_features(‘features.pkl’, train)
File “task2.py”, line 53, in load_photo_features
features = {k: all_features[k] for k in dataset}
File “task2.py”, line 53, in
features = {k: all_features[k] for k in dataset}
KeyError: ‘878758390_dd2cdc42f6’
Hello sir I’m learning from your articles that I find very informative and educational, I’ve been trying to compile this code :
# extract features from all images
directory = ‘Flicker8k_Dataset’
features = extract_features(directory)
print(‘Extracted Features: %d’ % len(features))
# save to file
dump(features, open(‘features.pkl’, ‘wb’))
but an error occurred and I don’t understand it can you help me fix it and thanks for all of you
here’s the mistake I made:
PermissionError Traceback (most recent call last)
in ()
1 # extract features from all images
2 directory = ‘Flicker8k_Dataset’
—-> 3 features = extract_features(directory)
4 print(‘Extracted Features: %d’ % len(features))
5 # save to file
in extract_features(directory)
13 # load an image from file
14 filename = directory + ‘/’ + name
—> 15 image = load_img(filename, target_size=(224, 224))
16 # convert the image pixels to a numpy array
17 image = img_to_array(image)
~\Anaconda3\envs\envir1\lib\site-packages\keras\preprocessing\image.py in load_img(path, grayscale, target_size, interpolation)
360 raise ImportError(‘Could not import PIL.Image. ‘
361 ‘The use of array_to_img requires PIL.’)
–> 362 img = pil_image.open(path)
363 if grayscale:
364 if img.mode != ‘L’:
~\Anaconda3\envs\envir1\lib\site-packages\PIL\Image.py in open(fp, mode)
2546
2547 if filename:
-> 2548 fp = builtins.open(filename, “rb”)
2549 exclusive_fp = True
2550
Hi Jason,
when I try to compile code related to the extracted features from all images I get this error that is “Permission denied” you told me earlier that Looks like the dataset is missing or is not available on my workstation I tried to fix the trick but in vain.
Do you have any idea how I could do that?
Do I need a user right or something like that?
or maybe I need to reload the database?
You appear to have a problem loading the data from your hard drive. Perhaps you stored the data in a location where you/your code does not have permission to read?
Perhaps you are using a notebook or an IDE as another user?
Try running from the command line and check file permissions.
Thank you very much mr.jason but I have some problems after download the pretrained model when make the model prediction
‘
—————————————————————————
FailedPreconditionError Traceback (most recent call last)
~/.local/lib/python3.6/site-packages/tensorflow/python/client/session.py in _do_call(self, fn, *args)
1349 try:
-> 1350 return fn(*args)
1351 except errors.OpError as e:
~/.local/lib/python3.6/site-packages/tensorflow/python/framework/errors_impl.py in __exit__(self, type_arg, value_arg, traceback_arg)
472 compat.as_text(c_api.TF_Message(self.status.status)),
–> 473 c_api.TF_GetCode(self.status.status))
474 # Delete the underlying status object from memory otherwise it stays alive
FailedPreconditionError: Attempting to use uninitialized value block1_conv2_5/kernel
[[Node: block1_conv2_5/kernel/read = Identity[T=DT_FLOAT, _class=[“loc:@block1_conv2_5/kernel”], _device=”/job:localhost/replica:0/task:0/device:CPU:0″](block1_conv2_5/kernel)]]
During handling of the above exception, another exception occurred:
FailedPreconditionError Traceback (most recent call last)
in ()
24 return features
25 directory = ‘../ProjectPattern/Flickr8k_Dataset/Flicker8k_Dataset’
—> 26 features =extract_feature(directory)
27 dump(features,open(“feature.pkl”,”wb”))
in extract_feature(directory)
17 img =preprocess_input(img)
18 #extract feature by make prediction use the pretrained model
—> 19 feature = model.predict(img,verbose=0)
20 #extract img_id
21 img_id = name.split(‘.’)[0]
~/.local/lib/python3.6/site-packages/tensorflow/python/keras/_impl/keras/engine/training.py in predict(self, x, batch_size, verbose, steps)
1811 f = self.predict_function
1812 return self._predict_loop(
-> 1813 f, ins, batch_size=batch_size, verbose=verbose, steps=steps)
1814
1815 def train_on_batch(self, x, y, sample_weight=None, class_weight=None):
~/.local/lib/python3.6/site-packages/tensorflow/python/keras/_impl/keras/engine/training.py in _predict_loop(self, f, ins, batch_size, verbose, steps)
1306 else:
1307 ins_batch = _slice_arrays(ins, batch_ids)
-> 1308 batch_outs = f(ins_batch)
1309 if not isinstance(batch_outs, list):
1310 batch_outs = [batch_outs]
FailedPreconditionError: Attempting to use uninitialized value block1_conv2_5/kernel
[[Node: block1_conv2_5/kernel/read = Identity[T=DT_FLOAT, _class=[“loc:@block1_conv2_5/kernel”], _device=”/job:localhost/replica:0/task:0/device:CPU:0″](block1_conv2_5/kernel)]]
Caused by op ‘block1_conv2_5/kernel/read’, defined at:
File “/usr/lib/python3.6/runpy.py”, line 193, in _run_module_as_main
“__main__”, mod_spec)
File “/usr/lib/python3.6/runpy.py”, line 85, in _run_code
exec(code, run_globals)
File “/home/abdo96/.local/lib/python3.6/site-packages/ipykernel_launcher.py”, line 16, in
app.launch_new_instance()
File “/home/abdo96/.local/lib/python3.6/site-packages/traitlets/config/application.py”, line 658, in launch_instance
app.start()
File “/home/abdo96/.local/lib/python3.6/site-packages/ipykernel/kernelapp.py”, line 478, in start
self.io_loop.start()
File “/home/abdo96/.local/lib/python3.6/site-packages/zmq/eventloop/ioloop.py”, line 177, in start
super(ZMQIOLoop, self).start()
File “/home/abdo96/.local/lib/python3.6/site-packages/tornado/ioloop.py”, line 888, in start
handler_func(fd_obj, events)
File “/home/abdo96/.local/lib/python3.6/site-packages/tornado/stack_context.py”, line 277, in null_wrapper
return fn(*args, **kwargs)
File “/home/abdo96/.local/lib/python3.6/site-packages/zmq/eventloop/zmqstream.py”, line 440, in _handle_events
self._handle_recv()
File “/home/abdo96/.local/lib/python3.6/site-packages/zmq/eventloop/zmqstream.py”, line 472, in _handle_recv
self._run_callback(callback, msg)
File “/home/abdo96/.local/lib/python3.6/site-packages/zmq/eventloop/zmqstream.py”, line 414, in _run_callback
callback(*args, **kwargs)
File “/home/abdo96/.local/lib/python3.6/site-packages/tornado/stack_context.py”, line 277, in null_wrapper
return fn(*args, **kwargs)
File “/home/abdo96/.local/lib/python3.6/site-packages/ipykernel/kernelbase.py”, line 283, in dispatcher
return self.dispatch_shell(stream, msg)
File “/home/abdo96/.local/lib/python3.6/site-packages/ipykernel/kernelbase.py”, line 233, in dispatch_shell
handler(stream, idents, msg)
File “/home/abdo96/.local/lib/python3.6/site-packages/ipykernel/kernelbase.py”, line 399, in execute_request
user_expressions, allow_stdin)
File “/home/abdo96/.local/lib/python3.6/site-packages/ipykernel/ipkernel.py”, line 208, in do_execute
res = shell.run_cell(code, store_history=store_history, silent=silent)
File “/home/abdo96/.local/lib/python3.6/site-packages/ipykernel/zmqshell.py”, line 537, in run_cell
return super(ZMQInteractiveShell, self).run_cell(*args, **kwargs)
File “/home/abdo96/.local/lib/python3.6/site-packages/IPython/core/interactiveshell.py”, line 2728, in run_cell
interactivity=interactivity, compiler=compiler, result=result)
File “/home/abdo96/.local/lib/python3.6/site-packages/IPython/core/interactiveshell.py”, line 2850, in run_ast_nodes
if self.run_code(code, result):
File “/home/abdo96/.local/lib/python3.6/site-packages/IPython/core/interactiveshell.py”, line 2910, in run_code
exec(code_obj, self.user_global_ns, self.user_ns)
File “”, line 26, in
features =extract_feature(directory)
File “”, line 2, in extract_feature
model = VGG19()
File “/home/abdo96/.local/lib/python3.6/site-packages/keras/applications/vgg19.py”, line 117, in VGG19
x = Conv2D(64, (3, 3), activation=’relu’, padding=’same’, name=’block1_conv2′)(x)
File “/home/abdo96/.local/lib/python3.6/site-packages/keras/engine/topology.py”, line 590, in __call__
self.build(input_shapes[0])
File “/home/abdo96/.local/lib/python3.6/site-packages/keras/layers/convolutional.py”, line 138, in build
constraint=self.kernel_constraint)
File “/home/abdo96/.local/lib/python3.6/site-packages/keras/legacy/interfaces.py”, line 91, in wrapper
return func(*args, **kwargs)
File “/home/abdo96/.local/lib/python3.6/site-packages/keras/engine/topology.py”, line 414, in add_weight
constraint=constraint)
File “/home/abdo96/.local/lib/python3.6/site-packages/keras/backend/tensorflow_backend.py”, line 392, in variable
v = tf.Variable(value, dtype=tf.as_dtype(dtype), name=name)
File “/home/abdo96/.local/lib/python3.6/site-packages/tensorflow/python/ops/variables.py”, line 229, in __init__
constraint=constraint)
File “/home/abdo96/.local/lib/python3.6/site-packages/tensorflow/python/ops/variables.py”, line 376, in _init_from_args
self._snapshot = array_ops.identity(self._variable, name=”read”)
File “/home/abdo96/.local/lib/python3.6/site-packages/tensorflow/python/ops/array_ops.py”, line 127, in identity
return gen_array_ops.identity(input, name=name)
File “/home/abdo96/.local/lib/python3.6/site-packages/tensorflow/python/ops/gen_array_ops.py”, line 2134, in identity
“Identity”, input=input, name=name)
File “/home/abdo96/.local/lib/python3.6/site-packages/tensorflow/python/framework/op_def_library.py”, line 787, in _apply_op_helper
op_def=op_def)
File “/home/abdo96/.local/lib/python3.6/site-packages/tensorflow/python/framework/ops.py”, line 3160, in create_op
op_def=op_def)
File “/home/abdo96/.local/lib/python3.6/site-packages/tensorflow/python/framework/ops.py”, line 1625, in __init__
self._traceback = self._graph._extract_stack() # pylint: disable=protected-access
FailedPreconditionError (see above for traceback): Attempting to use uninitialized value block1_conv2_5/kernel
[[Node: block1_conv2_5/kernel/read = Identity[T=DT_FLOAT, _class=[“loc:@block1_conv2_5/kernel”], _device=”/job:localhost/replica:0/task:0/device:CPU:0″](block1_conv2_5/kernel)]]
‘
so the problem solved by specifying which weights used not None(random initialization)
but used pretraining on ‘imagenet’ and specify the include_top argument to be True
~/.local/lib/python3.6/site-packages/tensorflow/python/layers/network.py in _run_internal_graph(self, inputs, masks)
896
897 # Apply activity regularizer if any:
–> 898 if layer.activity_regularizer is not None:
899 regularization_losses = [
900 layer.activity_regularizer(x) for x in computed_tensors
AttributeError: ‘InputLayer’ object has no attribute ‘activity_regularizer’
I used verison 2.1.5
the another question No, I didn’t copy all the code exactly but I understand the idea and imitate it in some parts and in other parts are written in my own
Hi, jason brownlee thanks for this fatanstic article.
I am curios to know that how he while loop is getting stopped in progressive training data genertor function ?
Please explain this to me
Sir,
Great article indeed! But I’m facing problems downloading the model. Every time I try to download the model with the code you provided, after sometimes the connection gets lost and shows this message: “ConnectionResetError: [WinError 10054] An existing connection was forcibly closed by the remote host”
Can you give any alternate solution to this problem? I have tried several times but failed.
– Perhaps you can review the code in Keras that downloads the model and download it manually?
– Perhaps you can use an alternate internet connection to download the model?
– Perhaps you can setup an EC2 instance and download the model there to work with?
– Perhaps you can ask a friend or peer to download the model for you?
Hello Sir,
Your article is very interesting and easy to understand.
For the above code I am getting a very accurate caption if I use the same image as you have shown in the figure. But if I use some other image I am getting some description but not a correct one. So could you please tell me what is the problem here?
Thanks in advance.
I have trained the data using progressive loading untill 19 iterations.
Caption for your provided test image is generated. However, for new one( image of rabbit and other animals) i got the caption “dog is running …”.
Is there a way to train the models more than 19 iterations to get a better result or how to solve this issue?
Hey , Jason the post is really amazing , but can you help to load me this especially the first step (Keras) which will probably take 1hour in CPU , I wanna test that I’m in GPU , how shall I be able to get that , Keras (GPU) so as to save time tho.
Thanks Jason.
Hey Jason wassup , can you please explain what is meant by these lines :-
filepath = ‘model-ep{epoch:03d}-loss{loss:.3f}-val_loss{val_loss:.3f}.h5′
checkpoint = ModelCheckpoint(filepath, monitor=’val_loss’, verbose=1, save_best_only=True, mode=’min’)
1. The line in filepath especially this – epoch:03d}-loss{loss:.3f}-val_loss{val_loss:.3f} ?
hey jason!! I ran the code that returns a dictionary of image identifier to image features. but did nt work and gave the following error. Please Guide me how to fix this bug.
FileNotFoundError Traceback (most recent call last)
in ()
39 # extract features from all images
40 directory = ‘Flicker8k_Dataset’
—> 41 features = extract_features(directory)
42 print(‘Extracted Features: %d’ % len(features))
43 # save to file
in extract_features(directory)
18 # extract features from each photo
19 features = dict()
—> 20 for name in listdir(directory):
21 # load an image from file
22 filename = directory + ‘/’ + name
FileNotFoundError: [WinError 3] The system cannot find the path specified: ‘Flicker8k_Dataset’
jason i have code and dataset in the same directory.I can access a test png image from the same directory but i am unable to access the dataset images..I don’t know whats wrong with it.Please help me solving the issue because i can also access the flick_text dataset.The only issue i have with images dataset.
1) I have installed the latest environment except tensorflow 1.5 becuase higher versions not working for me.
2) I have dataset and code in the same directory
3) I ran the code from command line but still found no luck.
4) I have exactly copied the code.
5) I searched the error on stackoverflow but never found any authentic solution yet.
Now i am facing an error while running the code “# define the model
model = define_model(vocab_size, max_length)” in the progressive training section.I have installed pydot and graphviz libraries but still come up with the following error.
C:\anaconda3\lib\site-packages\keras\utils\vis_utils.py in _check_pydot()
24 # Attempt to create an image of a blank graph
25 # to check the pydot/graphviz installation.
—> 26 pydot.Dot.create(pydot.Dot())
27 except OSError:
28 raise OSError(
C:\anaconda3\lib\site-packages\pydot.py in create(self, prog, format)
1881 raise Exception(
1882 ‘”{prog}” not found in path.’.format(
-> 1883 prog=prog))
1884 else:
1885 raise
In model evaluation section when i come to run the code
” filename = ‘model-ep002-loss3.245-val_loss3.612.h5’
model = load_model(filename)”
I come up with the error
“OSError: Unable to open file (unable to open file: name = ‘model-ep002-loss3.245-val_loss3.612.h5’, errno = 2, error message = ‘No such file or directory’, flags = 0, o_flags = 0)”
i want to ask where is the file ‘model-ep002-loss3.245-val_loss3.612.h5’??and how to select the file??should i pick up the file with least loss value???
Jason i trained the model upto 20 epochs.Now please explain which model i should use for prediction? and if i should select from 1-5 then why i am running it for 20 epochs?
I just want to understand the the whole pipeline.The CNN-VGG16 extracts the the features of image to a fixed length 256 vector.The text is cleaned and preprocesed , the RNN-LSTM predicts the next words of the sequence.
What is the strategy and intuition of the encoder/decoder?
how these two modalities (image and text) are merged by FF?
What alternative algorithms i can used for photo feature extraction or what extra modifications in the model is likely to perform better results?? or what extra building blocks needs to be added to the current tutorial for getting even refined results?
Dropout layer usually used to get rid of over-fitting.While Dense layer is usually used to change the dimensions.
Why Dropout_1 and dropout_2 are not changing the dimensions while we set some of the connections to 0 ??What is the the intuition behind Dropout_1 and Dropout_2 Layer??Please suggest some links or explaination
Hi Jason!
I implemented the above mentioned tutorial using VGG16 CNN architecture.Please let me know the code or tutorial that implements Inceptin model for image captioning.
Dear abbas,
kindly how did you solve your problem? I have the same problem :
PermissionError : [Errno 13] Permission Denied: Flickr8k_Dataset/Flicker8k_Dataset’
Hi Jason Brownlee! Good tutorial. I doubt how model guarantee to generate semantically correct sentences. Please share your intuition or any available resource. For example, there is three word in vocabulary “is, dog, running”, so how could we guarantee model will generate a sentence with correct grammar structure like ‘dog is running’. Thank you
I am trying to train my model using inception model.While training i come with the following error.How do i change the Shape of the input?
CODE:
# train the model, run epochs manually and save after each epoch
epochs = 5
steps = len(train_descriptions)
for i in range(epochs):
# create the data generator
generator = data_generator(train_descriptions, train_features, tokenizer, max_length)
# fit for one epoch
model.fit_generator(generator, epochs=1, steps_per_epoch=steps, verbose=1)
# save model
model.save(‘inception-model_’ + str(i) + ‘.h5’)
ERROR:
Error when checking input: expected input_3 to have shape (4096,) but got array with shape (2048,)
jason my model is not loading even the print command is not giving me the output..
the following block of code is not giving the output..where is the error?
# load the model
filename = ‘xraysmodel_8.h5’
print(‘abbas’)
model = load_model(filename)
# evaluate model
evaluate_model(model, test_descriptions, test_features, tokenizer, max_length)
I trained the model when I save the image from “http://media.einfachtierisch.de/thumbnail/600/0/media.einfachtierisch.de/images/2017/07/glueckliche-freigaenger-katze-Shutterstock-Olga-Visav_504063007.jpg” then I am still getting the text
startseq dog is running through the grass endseq
what do I make wrong?
The test image appears as intended.
Hi Jason
It was a nice article.
I trained the model for 12 epochs in my gpu.
But the prediction was not so accurate.
Most of the times I got the prediction with “man in blue shirt is riding his bohemian on the street” . with the keywords in this sentence.
Finally someone who understands the importance of separating mathematics from ‘implementation’. The drawback most tutorials have is that they try to discuss both simultaneously and hence making things quite confusing. ‘Implementation’ requires a completely different approach from understanding the theory.
Another wonderful thing about this tutorial is that you actually go through the preprocessing steps. This is where I usually get stuck because most university and online courses and tutorials do not discuss them at all.
Traceback (most recent call last):
File “C:\Users\hp\AppData\Local\Programs\Python\Python36\lib\site-packages\pydot.py”, line 1861, in create
stderr=subprocess.PIPE, stdout=subprocess.PIPE)
File “C:\Users\hp\AppData\Local\Programs\Python\Python36\lib\subprocess.py”, line 709, in __init__
restore_signals, start_new_session)
File “C:\Users\hp\AppData\Local\Programs\Python\Python36\lib\subprocess.py”, line 997, in _execute_child
startupinfo)
FileNotFoundError: [WinError 2] The system cannot find the file specified
During handling of the above exception, another exception occurred:
Traceback (most recent call last):
File “C:\Users\hp\AppData\Local\Programs\Python\Python36\lib\site-packages\keras\utils\vis_utils.py”, line 26, in _check_pydot
pydot.Dot.create(pydot.Dot())
File “C:\Users\hp\AppData\Local\Programs\Python\Python36\lib\site-packages\pydot.py”, line 1867, in create
raise OSError(*args)
FileNotFoundError: [WinError 2] “dot.exe” not found in path.
During handling of the above exception, another exception occurred:
Traceback (most recent call last):
File “C:\Users\hp\Desktop\iitp\caption_new\5.py”, line 163, in
model = define_model(vocab_size, max_length)
File “C:\Users\hp\Desktop\iitp\caption_new\5.py”, line 131, in define_model
plot_model(model, to_file=’model.png’, show_shapes=True)
File “C:\Users\hp\AppData\Local\Programs\Python\Python36\lib\site-packages\keras\utils\vis_utils.py”, line 133, in plot_model
dot = model_to_dot(model, show_shapes, show_layer_names, rankdir)
File “C:\Users\hp\AppData\Local\Programs\Python\Python36\lib\site-packages\keras\utils\vis_utils.py”, line 55, in model_to_dot
_check_pydot()
File “C:\Users\hp\AppData\Local\Programs\Python\Python36\lib\site-packages\keras\utils\vis_utils.py”, line 29, in _check_pydot
‘pydot failed to call GraphViz.’
OSError: pydot failed to call GraphViz.Please install GraphViz (https://www.graphviz.org/) and ensure that its executables are in the $PATH.
So,I followed exactly all the steps as shown above and after progressive loading,when the model is getting compiled,it keeps on running epoch 1/1 over and over again and keeps saving different .h5 files. So,I stopped the process after 5 iterations and got a loss of ~3.38 and when I am generating captions,it is not giving even close captions. What should I do to improve my results? Should I let the model to be trained for more iterations or will it cause over-fitting?
Hi Jason,
I am trying to create image caption for my own datasets. Like I have 4k images with single caption. I am able to run and create model for Flickr8K dataset.Its work properly. But when I use my dataset I am able to generate all required files except model. When I try to train the model it gives error –
__________________________________________________________________________________________________
Layer (type) Output Shape Param # Connected to
==================================================================================================
input_2 (InputLayer) (None, 27) 0
__________________________________________________________________________________________________
input_1 (InputLayer) (None, 4096) 0
__________________________________________________________________________________________________
embedding_1 (Embedding) (None, 27, 256) 1058048 input_2[0][0]
__________________________________________________________________________________________________
dropout_1 (Dropout) (None, 4096) 0 input_1[0][0]
__________________________________________________________________________________________________
dropout_2 (Dropout) (None, 27, 256) 0 embedding_1[0][0]
__________________________________________________________________________________________________
dense_1 (Dense) (None, 256) 1048832 dropout_1[0][0]
__________________________________________________________________________________________________
lstm_1 (LSTM) (None, 256) 525312 dropout_2[0][0]
__________________________________________________________________________________________________
add_1 (Add) (None, 256) 0 dense_1[0][0]
lstm_1[0][0]
__________________________________________________________________________________________________
dense_2 (Dense) (None, 256) 65792 add_1[0][0]
__________________________________________________________________________________________________
dense_3 (Dense) (None, 4133) 1062181 dense_2[0][0]
==================================================================================================
Total params: 3,760,165
Trainable params: 3,760,165
Non-trainable params: 0
__________________________________________________________________________________________________
None
Traceback (most recent call last):
File “train2.py”, line 179, in
model.fit([X1train, X2train], ytrain, epochs=20, verbose=2, callbacks=[checkpoint], validation_data=([X1test, X2test], ytest))
ValueError: Error when checking input: expected input_1 to have 2 dimensions, but got array with shape (10931, 7, 7, 512)
Great article. I just wanted to ask where to do you start developing code for such implementations. Do you refer papers and code from scratch or refer material that explains implementation code in detail and translate it to keras ?
Great tutorial. I am wondering what the best way to limit the vocabulary size. As num_words does not influence tokenizer.fit_on_text, are these changes correct:
Create a list of the n most frequent words you want to work with from the dataset, save them to file, then use them to filter the dataset prior to modeling.
One more question. For Progressive Loading it seems that the batch size is 1 from the data_generator. If I would like to create a batch i run into the problem of size defining as the “create_sequences” output is variable in size from:
How can I create a batch of “in_img, in_seq, out_word” (if each sequence will be a different length)? Is there an easy way to make a larger batch size? Again thank you for your help.
Sorry I didn’t explain well. From my understanding your “data_generator” releases data for 1 image into “model.fit_generator” at a time. I would like to change this to a batch of images.
The problem I am having is if I try to use a code structure like below, I am not able to create the empty arrays (unless I pad each line to “max_length”, and make “batch_features = np.zeros((batch_size, max_length, NN_input_shape))”).
#code structure
def generator(features, labels, batch_size):
# Create empty arrays to contain batch of features and labels#
batch_features = np.zeros((batch_size, 64, 64, 3))
batch_labels = np.zeros((batch_size,1))
while True:
for i in range(batch_size):
# choose random index in features
index= random.choice(len(features),1)
batch_features[i] = some_processing(features[index])
batch_labels[i] = labels[index]
yield batch_features, batch_labels
Also, is there somewhere I can donate money to your site?
Error message:
ayer time_distributed_11 was called with an input that isn’t a symbolic tensor. Received type: . Full input: []. All inputs to the layer should be tensors.
I’m looking to find the output X1 by using (img1) as an input but I get this error message.
I am trying to use the model you presented above for recognizing handwritten documents. In literature the feature extraction stage for OCR produces another 2-D matrix for each image (a feature vector is found for each column vector in the image). How can I then convert this 2-D matrix into a 1-D vector?
Firstly I would like to thank you for sharing your knowledge and helping everyone. I am new to this field now. Could you please explain, why are removing all single letter words?
Yes, removing words having numbers and removing punctuation does make sense. Even removing single letter word also makes sense, but by removing “a”, wont it affect formation of new sentences?
ModuleNotFoundError: No module named ‘_pywrap_tensorflow_internal’
During handling of the above exception, another exception occurred:
ImportError Traceback (most recent call last)
in ()
1 from numpy import array
2 from pickle import load
—-> 3 from keras.preprocessing.text import Tokenizer
4 from keras.preprocessing.sequence import pad_sequences
5 from keras.utils import to_categorical
~\AppData\Local\Continuum\anaconda3\envs\tensorflow\lib\site-packages\keras\__init__.py in ()
1 from __future__ import absolute_import
2
—-> 3 from . import utils
4 from . import activations
5 from . import applications
~\AppData\Local\Continuum\anaconda3\envs\tensorflow\lib\site-packages\keras\utils\__init__.py in ()
4 from . import data_utils
5 from . import io_utils
—-> 6 from . import conv_utils
7
8 # Globally-importable utils.
~\AppData\Local\Continuum\anaconda3\envs\tensorflow\lib\site-packages\keras\utils\conv_utils.py in ()
7 from six.moves import range
8 import numpy as np
—-> 9 from .. import backend as K
10
11
~\AppData\Local\Continuum\anaconda3\envs\tensorflow\lib\site-packages\keras\backend\__init__.py in ()
85 elif _BACKEND == ‘tensorflow’:
86 sys.stderr.write(‘Using TensorFlow backend.\n’)
—> 87 from .tensorflow_backend import *
88 else:
89 # Try and load external backend.
~\AppData\Local\Continuum\anaconda3\envs\tensorflow\lib\site-packages\keras\backend\tensorflow_backend.py in ()
4
5 import tensorflow as tf
—-> 6 from tensorflow.python.framework import ops as tf_ops
7 from tensorflow.python.training import moving_averages
8 from tensorflow.python.ops import tensor_array_ops
~\AppData\Local\Continuum\anaconda3\envs\tensorflow\lib\site-packages\tensorflow\python\__init__.py in ()
47 import numpy as np
48
—> 49 from tensorflow.python import pywrap_tensorflow
50
51 # Protocol buffers
~\AppData\Local\Continuum\anaconda3\envs\tensorflow\lib\site-packages\tensorflow\python\pywrap_tensorflow.py in ()
72 for some common reasons and solutions. Include the entire stack trace
73 above this error message when asking for help.””” % traceback.format_exc()
—> 74 raise ImportError(msg)
75
76 # pylint: enable=wildcard-import,g-import-not-at-top,unused-import,line-too-long
ImportError: Traceback (most recent call last):
File “C:\Users\gaurav.anand\AppData\Local\Continuum\anaconda3\envs\tensorflow\lib\site-packages\tensorflow\python\pywrap_tensorflow_internal.py”, line 14, in swig_import_helper
return importlib.import_module(mname)
File “C:\Users\gaurav.anand\AppData\Local\Continuum\anaconda3\envs\tensorflow\lib\importlib\__init__.py”, line 126, in import_module
return _bootstrap._gcd_import(name[level:], package, level)
File “”, line 994, in _gcd_import
File “”, line 971, in _find_and_load
File “”, line 955, in _find_and_load_unlocked
File “”, line 658, in _load_unlocked
File “”, line 571, in module_from_spec
File “”, line 922, in create_module
File “”, line 219, in _call_with_frames_removed
ImportError: DLL load failed: The specified module could not be found.
During handling of the above exception, another exception occurred:
Traceback (most recent call last):
File “C:\Users\gaurav.anand\AppData\Local\Continuum\anaconda3\envs\tensorflow\lib\site-packages\tensorflow\python\pywrap_tensorflow.py”, line 58, in
from tensorflow.python.pywrap_tensorflow_internal import *
File “C:\Users\gaurav.anand\AppData\Local\Continuum\anaconda3\envs\tensorflow\lib\site-packages\tensorflow\python\pywrap_tensorflow_internal.py”, line 17, in
_pywrap_tensorflow_internal = swig_import_helper()
File “C:\Users\gaurav.anand\AppData\Local\Continuum\anaconda3\envs\tensorflow\lib\site-packages\tensorflow\python\pywrap_tensorflow_internal.py”, line 16, in swig_import_helper
return importlib.import_module(‘_pywrap_tensorflow_internal’)
File “C:\Users\gaurav.anand\AppData\Local\Continuum\anaconda3\envs\tensorflow\lib\importlib\__init__.py”, line 126, in import_module
return _bootstrap._gcd_import(name[level:], package, level)
ModuleNotFoundError: No module named ‘_pywrap_tensorflow_internal’
Yes, it has now worked somehow after creating new environment with latest tensorflow version. However, it is giving me another possibly known error. Please have a look once.
c:\users\gaurav.anand\appdata\local\continuum\anaconda3\envs\tensorflow1.7\lib\site-packages\keras\engine\training.py in train_on_batch(self, x, y, sample_weight, class_weight)
1207 x, y,
1208 sample_weight=sample_weight,
-> 1209 class_weight=class_weight)
1210 if self._uses_dynamic_learning_phase():
1211 ins = x + y + sample_weights + [1.]
c:\users\gaurav.anand\appdata\local\continuum\anaconda3\envs\tensorflow1.7\lib\site-packages\keras\engine\training.py in _standardize_user_data(self, x, y, sample_weight, class_weight, check_array_lengths, batch_size)
785 feed_output_shapes,
786 check_batch_axis=False, # Don’t enforce the batch size.
–> 787 exception_prefix=’target’)
788
789 # Generate sample-wise weight values given the sample_weight and
c:\users\gaurav.anand\appdata\local\continuum\anaconda3\envs\tensorflow1.7\lib\site-packages\keras\engine\training_utils.py in standardize_input_data(data, names, shapes, check_batch_axis, exception_prefix)
125 ‘: expected ‘ + names[i] + ‘ to have ‘ +
126 str(len(shape)) + ‘ dimensions, but got array ‘
–> 127 ‘with shape ‘ + str(data_shape))
128 if not check_batch_axis:
129 data_shape = data_shape[1:]
ValueError: Error when checking target: expected dense_6 to have 4 dimensions, but got array with shape (11, 1, 3857)
I have made an only change in line 114:
inputs1 = Input(shape=(4096,)) >> inputs1 = Input(shape=(7, 7, 512,))
Because, it was earlier giving error for Data structure mismatch for inputs1 but now it is giving same error in 3rd dense layer.
As I read other comments, it is a common issue.
Could you please share your opinion how to get rid of this ?
Any external guide to data structure mismatch would be much appreciated.
I guess the problem is that I am defining model’s inputs1 with shape
inputs1 = Input(shape=(4096,))
but data_generator() method is generating in_img of shape (11,7,7,512).
Probably there is a need to change format of features.pkl file’s data.
Some image captioning libraries (such as Im2txt) are able to provide a confidence score for their generated captions. This helps us when we have a caption that is wrong, so that we can at least tell whether or not by the confidence if the model was ‘unsure’ about the text it generated. How would we go about adding something like that to this?
Thank you for your response, Dr. Bronwlee. Okay, but does ‘accuracy’ mean anything? I mean Keras is doing some calculations to get these numbers, right? Even if it does not help us to learn about the model’s performance, does the accuracy metric represent anything?
5,5 million parameters… and 8000 examples? Clearly, the old rule doesn’t apply that the training data should be at least as many as the # parameters. Is there a way to think about this? Clearly, I shouldn’t use my intuition from a linear system of equations?
Many thanks for your kind help. When we use model.fit for training, we are using training data as well as validation data. But When we use mode.fit_generator (Progressive Loading), in that case why we are not using validation data?
I added that progressive loading much later, as a simpler version for those that were having trouble. You can update it to use validation data if you wish.
Due to internet connectivity, my download when i run feature_extraction.py code.
later i tried to run the code again and it is not downloading and not showing error also.
without features.pkl file i cant proceed furthur.
is there any other way to make it download
Is the feature order directly tied to the caption? How much does the model rely on input’s order?
Imagine if the extracted features of an image are [‘dog’, ‘water’, ‘blue’, ‘sand’] and the caption is “dog at the beach”, now this is correct and expected caption.
Now the same image, but the features are [‘sand’, ‘water’, ‘dog’, ‘blue’], how different might the new caption be?
Can we achieve the same caption with differently ordered features vector?
I am new to deep learning implementation.I dont know where to insert the required techniques inside the code written by you.? Can you suggest a tutorial or some sourse for it
1. The training vocab and the testing vocab are different, that I can see. Why would a trained model ever encounter a word only in the test set? Wouldn’t test set captions (and hence the words in the test) only be used when calculating BLEU scores?
2. Could this ‘unknown word’ token ever be generated by the model?
3. When adding new data with new words to the training data, why would you stick with the older vocabulary and not ‘evaluate’ the newer one?
Thank you for this clear and thorough tutorial. I have two questions to make sure I understand things correctly:
1. By removing single letters from the descriptions, the generated descriptions will never include/generate descriptions with ‘a’ or ‘I’. Is that correct?
2. Because load_clean_descriptions filters by testing/training the tokenizer may be missing words that are in the test set but not the training set. Is this correct? And for fitting I understand you want to keep test/training data separate, but for the vocabulary ideally you would include the entire vocabulary from both the test and training set. Is this correct?
3. If I understand correctly one could use an even larger vocabulary (would be a bigger model) but in principle there is no reason not to include a larger vocabulary?
Hello
I wanted to know what should be the target validation loss.
Right now, I am getting the best validation loss of 3.86 after 5 epochs. However, you have a lower validation as well as training loss than mine just after two epochs.
Is my model trained enough or should I train again?
I want to test the model with more images.
Can you tell me the source from which i can get images which will run efficiently using the code.Itried some randon images from google but they were unsatisfactory.Also tell me steps to add new image along with model to train it?
Another question is that if feature.pkl file has been created the first time I ran the code and I have it in my directory
do I have to run these commands if I ran the code another time
# extract features from all images
directory = ‘Flicker8k_Dataset’
features = extract_features(directory)
print(‘Extracted Features: %d’ % len(features))
# save to file
dump(features, open(‘features.pkl’, ‘wb’))
Hey Jason, thanks for the tutorial. The model trained fine for me but when I tried to generate caption for a single new image I encountered the following error:
ValueError: Error when checking input: expected input_8 to have shape (110,) but got array with shape (34,)
Hi Jason,
I come back tonight with the question regarding the VGG16.layers.pop() method which seems not to work with Keras 2.2.2…
Before and after pop() and reshaping the model, the light one has exactly the same architecture as the original one…
Features extracted has dim = 1000 which cause me trouble with my Input = (4096,)…
If I change the input to (1000,) the performance is low…
Thanks for the help
Best regards
Jerome
Prasanna Kumar BeheraOctober 15, 2018 at 12:35 am#
Hi Jason,
My question is, are we retraining all the parameters of the VGG16 models in this example?
If yes, why should we train since we are using already trained model?
If no, then what part of the above coding is doing since we have not set layer.trainable = False for any layer?
Please let me when we should train all the layers or when we should not when using a pretrained model like VGG16?
Hy Jason. I am new to ML and you are the source which rise my interest in ML. I am following your above tutorial. I am confuse to get some concept, where you are applying tokenization to the text. You mentioned that ” The model will be provided one word and the photo and generate the next word. After that it recursively run to generate new sentence”.I am just confuse here that what are you doing here? What is the purpose of doing that? Please explain in detail that point or suggest me a source to get help from somewhere else.
Second question is that when we will done with that, the model will generate captions, which are in the data-set (I mean to say exact some captions will be suggested for new unseen images or it can be new captions based on image )..plz explain it in details..
Hi Jason,
Thank you for an amazing tutorial. I learnt many things here. esp. progressive loading. So here I have one query as you explain in “progressive loading” section:
“Finally, we can use the fit_generator() function on the model to train the model with this data generator.
In this simple example we will discard the loading of the development dataset and model checkpointing and simply save the model after each training epoch. You can then go back and load/evaluate each saved model after training to find the one we the lowest loss that you can then use in the next section.”
I have already got all 20 models from 20 epochs by training the “training” dataset. Now how do I check which model is best using the development set?? Because we have not included development set in the fit_generator(). So how to choose the best model from 20 saved models ? Should I apply evaluate() function on development set for each model?? It would be great if you could give me some idea/hint further on this!! Thanks.
HI Jason, Can you tell me what do you mean by 3-4 epochs? I hope that evaluating the model will just go though all the images once and generate descriptions for them and then calculate the BLEU score from that. So, what 3-4 epochs are you speaking about?
OSError: Unable to open file (unable to open file: name = ‘model-ep001-loss3.245-val_loss3.612.h5’, errno = 2, error message = ‘No such file or directory’, flags = 0, o_flags = 0)
I am a computer science and engineering student. Me and team mates are doing the same project. Reply me,
1.Can we develop this using MATLab?
2.Can we use the same code to our project for reference purpose using python?
3.In how many months we can complete it?
4.Suggest me what to use either python or matlab?
Hi Jason. Thank you for this tutorial. I want to develop text-to-image model. Does it work if I change input and output elements? or What would you suggest ?
As, we know that data_generator is yielding one example at a time and each time the function is called, the function execution starts where it previously left off. So, since the “for ids, descs in train_descs.items():” loop is still not complete in the mid-way, it should loop and yield more sequences until it ends.
So, my quesiton is if the loop can continue till all the “train_descs.items()” are encountered, then why do we need the “while 1:” loop there?
I want to know where am I going wrong, kindly let me know.
Can you explain what is 47 in the dimension? I mean, data_generator is outputting one example at a time then instead of 47, shouldn’t it be 1? Can you explain me the dimension?
Hi Jason, You have set steps_per_epoch=len(descriptions) and passed it into model.fit_generator(). As far as I’ve read, steps_per_epoch signify the total no. of batches before a epoch to finish. See this :
I want to clarify how data_generator is feeding the data to fit_generator. I mean, is it giving it one training example at a time or some batch of training examples at a time.
epochs = 20
steps = len(train_descriptions)
for i in range(epochs):
# create the data generator
generator = data_generator(train_descriptions, train_features, tokenizer, max_length)
# fit for one epoch
model.fit_generator(generator, epochs=1, steps_per_epoch=steps, verbose=1)
# save model
model.save(‘model_’ + str(i) + ‘.h5’)
steps_per_epoch represents the no. of batches that will be trained in one epoch.
As you have said before that data_generator is feeding a batch of examples to fit_generator so that should mean that that in one batch, let’s say x examples are being sent for training process. This should mean that no. of batches for 1 epoch training should be (total no. of training examples)/(1 batch size). On running below snippet, total no. of training examples comes out to be 6000.
print(len(train_descriptions))
6000
So,steps_per_epoch should be 6000/(1 batch size), but in your code steps_per_epoch = len(train_descriptions)
Why have you set it so large?
Are you forcing fit_generator to train over one example at a time even though data_generator is generating a batch of training example at a time?
in evaluate_model(mapping, tokenizer, maxlen, model, feature_vector)
33 for ids,descs in mapping.items():#1
34 count += 1
—> 35 pred_caption = generate_desc(feature_vector[ids],tokenizer,model,maxlen)#caption string returned
36 for desc in descs:#2
37 reference.append(desc.split())
KeyError: ‘2258277193_586949ec62’
When I search for this image in my pc, I found that its id and its descriptions are present in the
Flickr8k.lemma.token.txt
cleanedcaptions.txt
However, the image is not present in Flicker8k_Dataset.
I resolved the problem by putting an appropriate image that relates well to its description in Flickr8k.lemma.token.txt. The above image was really missing from the image directory. I reckon that anyone must have faced the same problem as mine.
ValueError: Error when checking input: expected input_3 to have shape (34,) but got array with shape (30,)
Sir,while evaluating the model,I’m getting such an error how should I get rid of it?I exactly typed the code and I’m also using the same dataset as mentioned above.
I am a student. My model is taking an hour or more to train. After training, I’m not getting the desired results. So, I don’t want to retrain it and sit back and see. There could be a high change that it may not work well again. I think AWS requires some bucks for this.
I’m using MacBook Air.
8 GB RAM
i5 5th gen processor
Is there any “free” source to train the model which will take lesser time.
Like many mentioned, it is a very comprehensive tutorial on caption generation. Progressive loading is a big plus.
Do you plan to cover or have some ideas on the topic of using image and description to search for similar images? Example of what I am trying to do: I already implemented CNN CBIR model that extracts features clusters them and when new image comes in, its features are extracted and nearest neighbors are given as similar images suggestions. This works fine, but I would like to enhance it by adding image description in the mix, so that when I give a picture of the steering wheel and specify “car part”, I will be given list of images of the steering wheels, and not all circular options like bike wheels for example.
I thought to use lucene to help with image description search first and then use CNN to find similar images, but not sure if it is the best approach to take as lucene search might throw out images that are relevant, but not well described.
I dont think that trying to come up with a model that would combine the text along with image features will be straight forward or would perform well as oppose to having elasticsearch in the mix where I can take advantage of text search that elastic provides out of the box, but elastic falls short of image search (tried LIRE before and the results were really bad compared to ConvNet approach)
if you have any other ideas or suggestions, I am all ears 🙂
Hey Jason!
Amazing tutorial. Great Learning experience from start till end.
I wanted to ask you what do you mean exactly in the last section of the article under ‘Extensions’ section by,
‘Pre-trained Word Vectors. The model learned the word vectors as part of fitting the model. Better performance may be achieved by using word vectors either pre-trained on the training dataset or trained on a much larger corpus of text, such as news articles or Wikipedia.’
respected sir,
I am not able to download the datasheet from the link that is provided by flickr 8k.
It is showing
The requested URL /HockenmaierGroup/Framing_Image_Description/Flickr8k_Dataset.zip was not found on this server.
Additionally, a 404 Not Found error was encountered while trying to use an ErrorDocument to handle the request.
In the function, create_sequences(), the pad_sequences was generating a list so big that the 17 GB Kaggle RAM was crashing. So I tried appending directly to numpy arrays instead of creating it as a list first. However, now it is taking infinite time to execute. Is there any alternative to this function or any way to increase the rate. Please help
P.S Thanks for uploading the dataset, I spent days searching for it on the internet.
i used progressive loading and after execution there were 20 models one for each epoch.
but further sections are using one single file for model . but i have 20 models.how to proceed?
i have developed a deep learning model with a .csv file as training data.
file contains a column with text data and during execution of the code
could not convert string to float: ‘Moong(Green Gram)’
this error is being displayed.
what should i do?
Jason…..we tried to complete the model generation using progressive loading…total 19 epochs ……And now we are getting outputs but the accuracy is very worse..is there any suggestions to improve the accuracy…..pls help
Great article!
Comprehensive, well-written and well-explained. I used the progressive loading approach and ran the scripts in Google Colab. Everything worked fine (got some errors along the process every now and then, but managed to solve them all). I am currently extracting features using VGG16, VGG19, ResNet50 and Inception and hopefully will make a comparison between them. Thanks for this great post!
I wanted to get your opinion on this. Since I used progressive loading, I do not have a measure for the loss function on the validation dataset, so I took the models and evaluated the BLEU scores directly. However, it’s not straightforward to decide which models gives the best performance and when exactly the model starts to overfit.
I calculated the mean squared error between some “ideal” BLEU scores taken from Marc Tanti et al. (BLEU-1 = 0.6, BLEU-2 = 0.413, BLEU-3 = 0.273, BLEU-4 = 0.178) and the BLEU scores I’ve obtained for my models. The best performing one was actually model_0.h, which was the model calculated after the first epoch. However, I don’t know if the mean squared error is actually very indicative or relevant in this case, but I didn’t know what else to use. From the limited amount of research I’ve done online, I tend to believe that BLEU-4 is a bit more important than the rest of the BLEU scores, but I am not sure. Do you have any suggestions?
Hy Jason!
Thanks for great article.
I tried to run the model through progressive loading. My code is running perfectly. But my model generates generates just 3,4 type of captions for every image. It seems model is being trained on just 3,4 captions. I follow exact your code.
Any suggestion to improve my results.
(PS: I am testing on the same images, on which model has been trained . . .but still result is worse)
~\Anaconda3\lib\site-packages\keras\utils\vis_utils.py in _check_pydot()
18 if pydot is None:
19 raise ImportError(
—> 20 ‘Failed to import pydot. ‘
21 ‘Please install pydot. ‘
22 ‘For example with pip install pydot.’)
ImportError: Failed to import pydot. Please install pydot. For example with pip install pydot.
/usr/local/lib/python3.6/dist-packages/keras/engine/training.py in train_on_batch(self, x, y, sample_weight, class_weight)
1209 x, y,
1210 sample_weight=sample_weight,
-> 1211 class_weight=class_weight)
1212 if self._uses_dynamic_learning_phase():
1213 ins = x + y + sample_weights + [1.]
/usr/local/lib/python3.6/dist-packages/keras/engine/training.py in _standardize_user_data(self, x, y, sample_weight, class_weight, check_array_lengths, batch_size)
749 feed_input_shapes,
750 check_batch_axis=False, # Don’t enforce the batch size.
–> 751 exception_prefix=’input’)
752
753 if y is not None:
/usr/local/lib/python3.6/dist-packages/keras/engine/training_utils.py in standardize_input_data(data, names, shapes, check_batch_ax

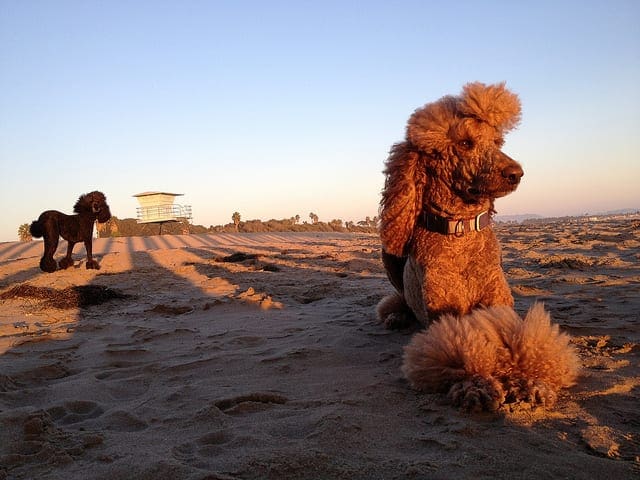
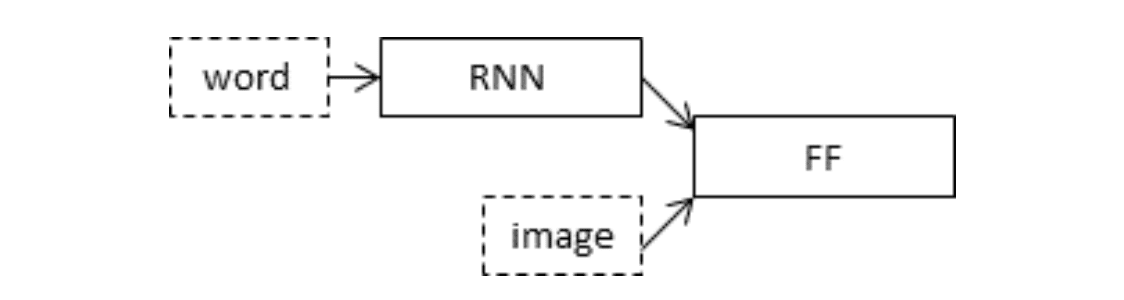
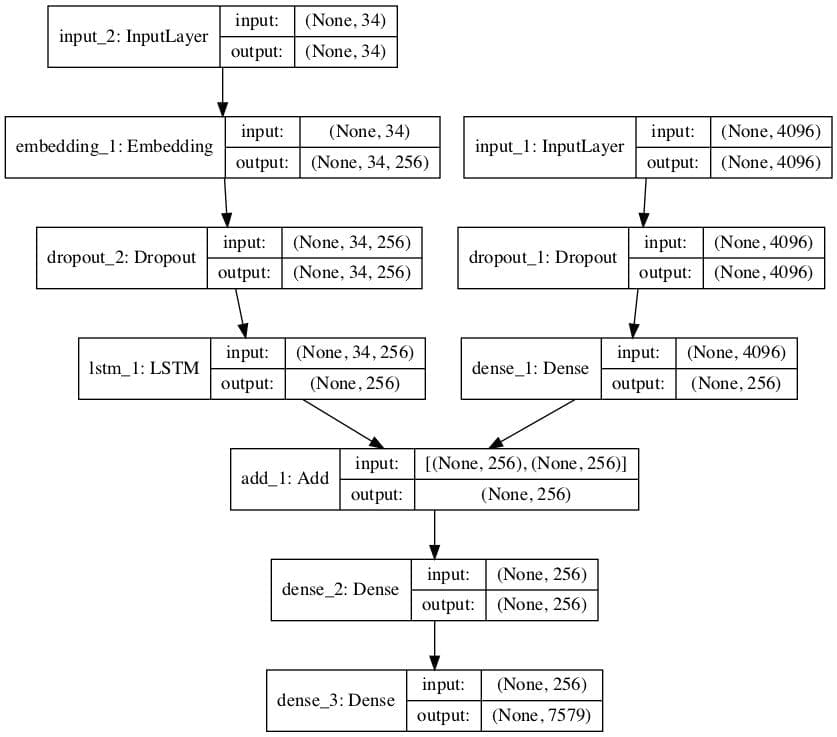
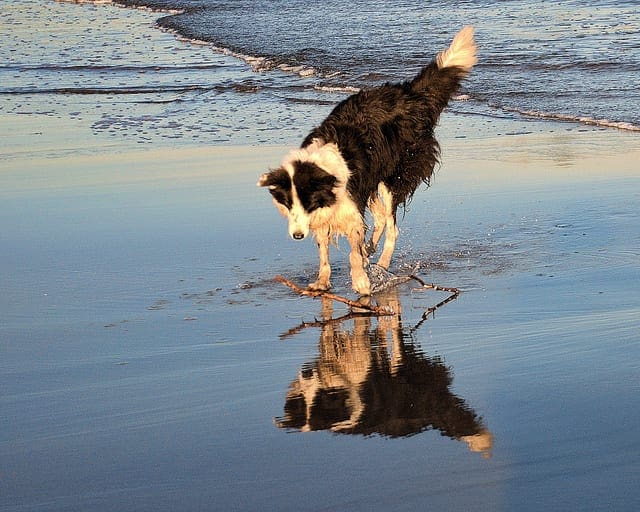


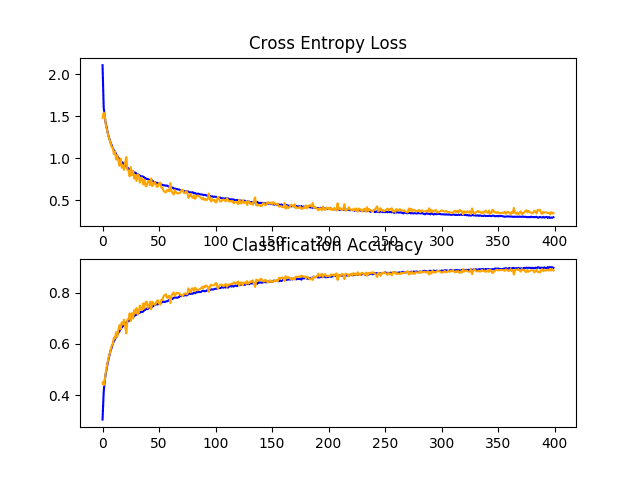
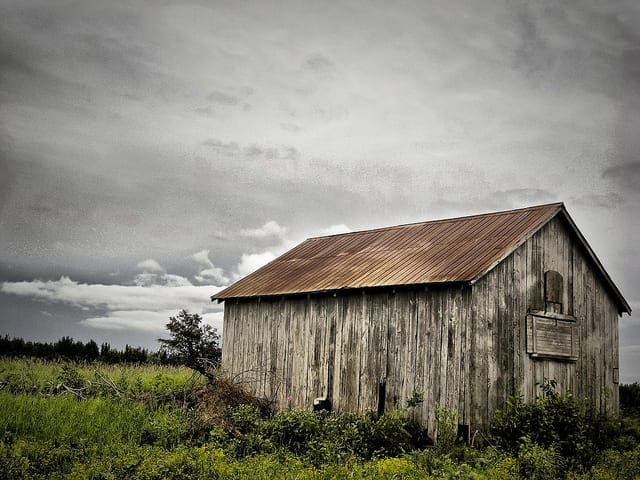
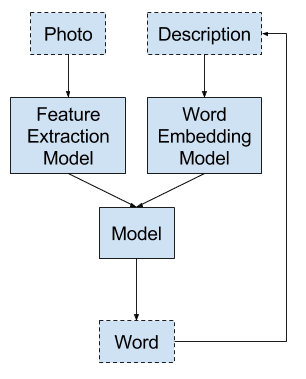


Hi Jason,
thanks for this great article about image caption!
My results after training were a bit worse (loss 3.566 – val_loss 3.859, then started to overfit) so i decided to try keras.applications.inception_v3.InceptionV3 for the base model. Currently it is still running and i am curious to see if it will do better.
Let me know how you go Christian.
hi jason m recieving this error can u please help me in this
NameError: name ‘Flickr8k_Dataset’ is not defined
You may have missed a line of code or the dataset is not in the same directory as the python file.
Can you provide complete source code link without split code parts?
please 🙂
Hello Bhagyashree…The tutorial contains full code listing that you may utilize.
how to solve this , error happen
ValueError
6 generator = data_generator(train_descriptions, train_features, tokenizer, max_length, vocab_size)
7 # fit for one epoch
—-> 8 model.fit_generator( generator,epochs=1, steps_per_epoch=steps, verbose=1)
I don’t have enough context to comment, sorry.
Perhaps these tips will help:
https://machinelearningmastery.com/faq/single-faq/why-does-the-code-in-the-tutorial-not-work-for-me
Hello Jason
I,m facing a value error could u help
ValueError Traceback (most recent call last)
in ()
6 image_input=image_input.reshape(2048,)
7 gen=generate(desc_dict,photo,max_length_of_caption,vocab_size,image_input)
—-> 8 model.fit(gen,epochs=1,steps_per_epoch=6000,verbose=1)
9
10
5 frames
in create_sequence(caption, max_length_of_caption, vocab_size, image_input)
1 def create_sequence(caption,max_length_of_caption,vocab_size,image_input):
—-> 2 input_sequence=[],image_sequence=[],output_sequence=[]
3 for caption in captions:
4 caption=caption.split(‘ ‘)
5 caption=[wordtoindex[w] for w in caption if w in vocab]
ValueError: not enough values to unpack (expected 2, got 0)
These tips may help:
https://machinelearningmastery.com/faq/single-faq/why-does-the-code-in-the-tutorial-not-work-for-me
Hey, did a find a solution? I’m facing the same error.
What accuracy are you getting in your NLP scores?
Hello Jason can you help me with the frontend part I tried using the flask app but failed
Perhaps this will help:
https://machinelearningmastery.com/faq/single-faq/how-do-i-deploy-my-python-file-as-an-application
Christian / Jason – instead would Batch normalization help us here. am facing the same issue, over fitting.
BN should also speed up the training and should also give us more accurate results. any inputs ?
The model usually does fit in 3-5 epochs.
You can try batchnorm if you like. Not sure if it will help.
yep, i agree… not required..thanks..
am also trying inceptionV3, let you know the results..
Great.
Hey did anyone try the Inception model? What were the results?
hey ben!!!Can you please share the code and results of the inception model?so that we can also try and know more about the inception model.Thanks in advance
can you plz send me the code at shauryaprataps261@gmail.com
did you find code ?
I am getting the same
Hi,
i have tried using the inception v3 but the bleu scores are even than that of vgg16 model.
BLEU-1: 0.514655
BLEU-2: 0.266434
BLEU-3: 0.179374
BLEU-4: 0.078146
Nice work!
i also tried Inception i got BLEU-1 0.571
Well done!
@vishal, can you share the inception v3 code ?
Hello Christian Sir,
To avoid overfit, you used keras.application.inceptionV3, m geeting some error in this line:
print(‘Extracted Features: %d’ % len(features))
—————————————————————————
TypeError Traceback (most recent call last)
in ()
—-> 1 print(‘Extracted Features: %d’ % len(features))
TypeError: object of type ‘NoneType’ has no len()
Please help in resolving this
HI Christian, Please can you share working Inception V3 code, I am not able to make InceptionV3 model working, I am getting following error.
Incompatible shapes: [47,8,8,256] vs. [47,256]
[[{{node gradient_tape/model_10/add_7/add/BroadcastGradientArgs}}]] [Op:__inference_train_function_1153371]
Hi Jason,
Once again great Article.
I ran into some error while executing the code under “Complete example ” section.
The error I got was
ValueError: Error when checking target: expected dense_3 to have shape (None, 7579) but got array with shape (306404, 1)
Any idea how to fix this?
Thanks
Hi Akash, nice catch.
The fault appears to have been introduced in a recent version of Keras in the to_categorical() function. I can confirm the fault occurs with Keras 2.1.1.
You can learn more about the fault here:
https://github.com/fchollet/keras/issues/8519
There are two options:
1. Downgrade Keras to 2.0.8
or
2. Modify the code, change line 104 in the training code example from:
to
I hope that helps.
Thanks Jason. It’s working now.
Can you suggest the changes to be made to use Inception model and word embedding like word2vec.
I’m glad to hear that.
Yes, simply load the inception model and prepare the images.
https://keras.io/applications/
Hi Akash
Could you please tell how did you git rid of this problem?
I am facing
ValueError: Error when checking input: expected input_1 to have 2 dimensions, but got array with shape (11, 7, 7, 512)
and after changing input structure to inputs1 = Input(shape=(7, 7, 512,)) I am facing
ValueError: Error when checking target: expected dense_3 to have 4 dimensions, but got array with shape (11, 3857)
I have tried with Keras 2.0.8 and latest 2.2.2 versions.
Any help would be much appreciated.
Thanks
Did you used different input shape?.If you changed the input shape then you have to flatten it and add fully connected dense layer of 4096 neurons.
Should I avoid using “include_top = false” while feature extraction ?
or keep it as true ?
Anesh how to fix this error?
Error when checking input: expected input_3 to have shape (4096,) but got array with shape (2048,)
Change the data to meet the model or change the model to meet the data.
Hi Jason,
Big thumbs up, nicely written, really informative article. I especially like the step by step approach.
But when I tried to go through it, I got an error in load_poto_features saying that “name ‘load’ not defined”. Which is kinda odd.
Otherwise everything seems fine.
Thanks.
Perhaps double check you have the load function imported from pickle?
Hi Jason
I am a regular follower of your tutorials. They are great. I got to learn a lot. Thank you so much. Please keep up the good work
You’re welcome!
____________________________________________________________________________________________________
Layer (type) Output Shape Param # Connected to
====================================================================================================
input_2 (InputLayer) (None, 34) 0
____________________________________________________________________________________________________
input_1 (InputLayer) (None, 4096) 0
____________________________________________________________________________________________________
embedding_1 (Embedding) (None, 34, 256) 1940224 input_2[0][0]
____________________________________________________________________________________________________
dropout_1 (Dropout) (None, 4096) 0 input_1[0][0]
____________________________________________________________________________________________________
dropout_2 (Dropout) (None, 34, 256) 0 embedding_1[0][0]
____________________________________________________________________________________________________
dense_1 (Dense) (None, 256) 1048832 dropout_1[0][0]
____________________________________________________________________________________________________
lstm_1 (LSTM) (None, 256) 525312 dropout_2[0][0]
____________________________________________________________________________________________________
add_1 (Add) (None, 256) 0 dense_1[0][0]
lstm_1[0][0]
____________________________________________________________________________________________________
dense_2 (Dense) (None, 256) 65792 add_1[0][0]
____________________________________________________________________________________________________
dense_3 (Dense) (None, 7579) 1947803 dense_2[0][0]
====================================================================================================
Total params: 5,527,963
Trainable params: 5,527,963
Non-trainable params: 0
_________________________
ValueError: Error when checking input: expected input_1 to have 2 dimensions, but got array with shape (306404, 7, 7, 512)
Getting error during mode.fit
model.fit([X1train, X2train], ytrain, epochs=20, verbose=2, callbacks=[checkpoint], validation_data=([X1test, X2test], ytest))
Keras 2.0.8 with tensorflow
what is wrong ?
Not sure, did you copy all of the code exactly?
Is your numpy and tensorflow also up to date?
This looks like he did change the network for feature extraction. When using include_top=False and wheigts=’imagenet” you get this type of data structure.
Nice.
@maibam did you find the solution?
I am getting similar error –
ValueError: Error when checking input: expected input_1 to have 2 dimensions, but got array with shape (17952, 7, 7, 512)
Please help me out.
Thanks!!
Ensure your version of Keras is up to date. v2.1.6 or better.
__________________________________________________________________________________________________
Layer (type) Output Shape Param # Connected to
==================================================================================================
input_2 (InputLayer) (None, 27) 0
__________________________________________________________________________________________________
input_1 (InputLayer) (None, 4096) 0
__________________________________________________________________________________________________
embedding_1 (Embedding) (None, 27, 256) 1058048 input_2[0][0]
__________________________________________________________________________________________________
dropout_1 (Dropout) (None, 4096) 0 input_1[0][0]
__________________________________________________________________________________________________
dropout_2 (Dropout) (None, 27, 256) 0 embedding_1[0][0]
__________________________________________________________________________________________________
dense_1 (Dense) (None, 256) 1048832 dropout_1[0][0]
__________________________________________________________________________________________________
lstm_1 (LSTM) (None, 256) 525312 dropout_2[0][0]
__________________________________________________________________________________________________
add_1 (Add) (None, 256) 0 dense_1[0][0]
lstm_1[0][0]
__________________________________________________________________________________________________
dense_2 (Dense) (None, 256) 65792 add_1[0][0]
__________________________________________________________________________________________________
dense_3 (Dense) (None, 4133) 1062181 dense_2[0][0]
==================================================================================================
Total params: 3,760,165
Trainable params: 3,760,165
Non-trainable params: 0
__________________________________________________________________________________________________
None
Traceback (most recent call last):
File “train2.py”, line 179, in
model.fit([X1train, X2train], ytrain, epochs=20, verbose=2, callbacks=[checkpoint], validation_data=([X1test, X2test], ytest))
ValueError: Error when checking input: expected input_1 to have 2 dimensions, but got array with shape (10931, 7, 7, 512)
keras version is – 2.2.0
Please help me out.
Looks like the dimensions of your data do not match the expectations of the model.
You can change the data or change the model.
If you changed the input shape by include_top=False then you have to flatten it and add two FC dense layer of 4096 neurons.
Thank you for the article. It is great to see full pipeline.
Always following your articles with admiration
Thanks!
In the prepare data section, if using Python 2.7 there is no str.maketrans method.
To make this work just comment that line and in line 46 do this:
desc = [w.translate(None, string.punctuation) for w in desc]
Thanks Gonzalo!
after using the function to_vocabulary()
I am getting a vocabulary of size 24 which is too less though I have followed the code line by line.
Can u help?
Are you able to confirm that your Python is version 3.5+ and that you have the latest version of all libraries installed?
Hi Jason,
I am using your code step by step. There is a light mistake :
you wrote
# save descriptions
save_doc(descriptions, ‘descriptions.txt’)
in fact the right intruction is
# save descriptions
save_descriptions(descriptions, ‘descriptions.txt’)
as you wrote in the final example
best
Thanks Minel, fixed.
Hi jason
Another small detail. I had to write
from pickle import load
to run the instruction
all_features = load(open(filename, ‘rb’))
Best
Nice catch, fixed. Thanks!
Hi Jason,
I met some trouble running your code. I got a MemoryError on the instruction :
return array(X1), array(X2), array(y)
I am using a virtual machine with Linux (Debian), Python3, with 32Giga of memory.
Could you tell me what was the size of the memory on the computer you used to check your program ?
Best
I expect 8GB of RAM would be enough.
Perhaps try and use progressive loading instead, as described in this post:
https://machinelearningmastery.com/prepare-photo-caption-dataset-training-deep-learning-model/
thanks, Jason for a great tutorial!
from line 96 to 104 in the main complete code.
seq = tokenizer.texts_to_sequences([desc])[0]
out_seq = to_categorical([out_seq], num_classes=vocab_size)[0]
seq = tokenizer.texts_to_sequences([desc])[0]
i did not understand why did you do [0] in tokenizer.texts_to_sequences([desc])[0], and moreover why did you passed a 2d list?
what does texts_to_sequences do??
You can learn more about the function here:
https://keras.io/preprocessing/text/#text_to_word_sequence
It takes a 2D array, here we provide our 1d array as a 2d array and retrieve the result.
You can learn more about Python array indexing here:
https://machinelearningmastery.com/index-slice-reshape-numpy-arrays-machine-learning-python/
Please slightly explain that. I am not getting why did you do [0] in tokenizer.texts_to_sequences([desc])[0] . I have also read array indexing. How it become 2D array from that? Please explain it
Because the function returns a 2D array and we only need the first dimension.
Thank for the advice.In fact, I upgraded the VM (64Go, 16 cores) and it worked fine (using 45Go of memory)
Best
Nice! Glad to hear it.
I get the same error even with 64GB VM :/ What to do
I’m sorry to hear that, perhaps there is something else going on with your workstation?
I can confirm the example works on workstations and on EC2 instances with and without GPUs.
It’s throwing a Value error for input_1 after sometime. I tried everything i can but i am not able to understand. Can you paste the link of your project so i can compare ?
Are you able to confirm that your Python environment is up to date?
And sir, You said the pickle size must be about 127Mb but mine turns out to be above 700MB what did i do wrong ?
The size may be different on different platforms (macos/linux/windows).
Hi Jason – hello from Queensland 🙂
Your tutorials on applied ML in Python are the best on the net hands down, thanks for putting them together!
Thanks Josh!
hai Jason.. When i run the train.py script my lap freeze…I don’t know whether its training or not.Did anyone face this issue ?
Thanks..!
Sorry to hear that.
Perhaps try running it on AWS for a few dollars:
https://machinelearningmastery.com/develop-evaluate-large-deep-learning-models-keras-amazon-web-services/
Thanks for such a great work. I found an error message when running a code
FileNotFoundError: [Errno 2] No such file or directory: ‘descriptions.txt’
Please help
Ensure you generate the descriptions file before running the prior model – check the tutorial steps again and ensure you execute each in turn.
Hi Jason,
I’m getting a MemoryError when I try to prepare the training sequences:
Traceback (most recent call last):
File “C:\Users\Daniel\Desktop\project\deeplearningmodel.py”, line 154, in
X1train, X2train, ytrain = create_sequences(tokenizer, max_length, train_descriptions, train_features)
File “C:\Users\Daniel\Desktop\project\deeplearningmodel.py”, line 104, in create_sequences
out_seq = to_categorical([out_seq], num_classes=vocab_size)[0]
File “C:\Program Files\Anaconda3\lib\site-packages\keras\utils\np_utils.py”, line 24, in to_categorical
categorical = np.zeros((n, num_classes))
MemoryError
any advice? I have 8GB of RAM.
Perhaps try using progressive loading described in this post:
https://machinelearningmastery.com/develop-a-caption-generation-model-in-keras/
Any chance you could show what that would look like functioning with this example? 🙂 I’m struggling a bit to bring a similar generator from the other example to this script.
Thanks for the suggestion, I’ll schedule time to update the example.
Great! Thanks so much
And thanks for the blog, it is really wonderful 🙂 For now I just cut down the training set a lot to work around the memory error and understand.the code better.
Thanks Daniel.
I’m having the same problem. Can you please show the example with progressive generator please ?
I provide an example here:
https://machinelearningmastery.com/prepare-photo-caption-dataset-training-deep-learning-model/
Update: I have updated the tutorial to include an example of training using progressive loading (a data generator).
Hi Jason,
Thank you for this amazing article about image captioning.
Currently I am trying to re-implement the whole code, except that I am doing it in pure Tensorflow. I’m curious to see if my re-implementation is working as smooth as yours.
Also a shower thought, it might be better to get a better vector representations for words if using the pretrained word2vec embeddings, for example Glove 6B or GoogleNews. Learning embeddings from scratch with only 8k words might have some performance loss.
Again thank you for putting everything together, it will take quite some time to implement from scratch without your tutorial.
Try it and see if it lifts model skill. Let me know how you go.
Hello Jason,
Is there a R package to perform modeling of images?
regards
sasikanth
I don’t know, sorry.
Hi Jason! Thanks for your amazing tutorial! I have a question. I don’t understand the meaning of the number 1 on this line (extract_features):
image = image.reshape((1, image.shape[0], image.shape[1], image.shape[2]))
Can you explain me what reshape does and the meaning of the arguments?
Thanks in advance.
Great question, see this post to learn more about numpy arrays:
https://machinelearningmastery.com/index-slice-reshape-numpy-arrays-machine-learning-python/
Hi Jason! thank you for your great code.
but i have one question.
How long does it take to execute under code?
# define the model
model = define_model(vocab_size, max_length)
This code does not run during the third day.
I think that “se3 = LSTM(256)(se2)” code in define_model function is causing the problem.
My computer configuration is like this.
Intel(R) Core(TM) i7-5820K CPU @ 3.30GHz – 6 core
Ram 62G
GeForce GTX TITAN X – 2core
please help me~~
Ouch, something is wrong.
Perhaps try running on AWS?
Perhaps try other models and test your rig/setup?
Perhaps try fewer epochs or a smaller model to see if your setup can train the model at all?
1. No. i try running on my indicvdual linux server and using jupyter notebook
2. No i am using only your code , no other model, no modify
3.
model.fit([X1train, X2train], ytrain, epochs=20, verbose=1, callbacks=[checkpoint], validation_data=([X1test, X2test], ytest))
This code has not yet been executed
so I do not think epoch is a problem.
Perhaps run from the command line as a background process without notebook?
Perhaps check memory usage and cpu/gpu utilization?
ConnectionResetError: [WinError 10054] An existing connection was forcibly closed by the remote host
hi sir… I am getting this error above when i run feature extract code.
Sorry, I have not seen that error.
Hi Krishna,
I’m also getting this error time to time. Were you able to solve this issue?
You have to connect to the internet to download the vgg network.
Hi Jason!
Is it possible to run this neural network on a 8GB RAM laptop with 2GB Graphics card with Intel core i5 processor?
Perhaps.
You might need to adjust it to use progressive loading so that it does not try to hold the entire dataset in RAM.
Hi jason
Is it possible to run on cpu with progressive loading without any issues??
Yes!
Hi Jason,
Can you provide a link for the tokenizer as well as the model file.
I Cannot train this model in my system but would like to see if I can use it to create an Android app
Sorry, I cannot share the models.
When I am running
tokenizer = Tokenizer()
I am getting error,
Traceback (most recent call last):
File “”, line 1, in
NameError: name ‘Tokenizer’ is not defined
How to solve this. Any idea please.
Ensure you import the Tokenizer.
Hi Jason, thanks for the tutorial! I want to ask you if you could explain (or send me some links), to better understand, how exactly the fitting works.
Example description: the girl is …
The LSTM network during fitting takes the beginning of the sequence of my description (startseq) and it produces a vector with all possible subsequent words. This vector is combined with the vector of the input image features and it is passed within an FF layer where we then take the most probable word (with softmax). it’s right?
At this point how does the fitting go on? Is the new sequence (e.g startseq – the) passed into the LSTM network, predicts all possible next words, etc.? Continuing this way up to endseq?
If the network incorrectly generates the next word, what happens? How are the weights arranged? The fitting continues by taking in input “startseq – wrong_word” or continues with the correct one (eg startseq – the)?
Thanks for your help
Marco
This is not fitting, it is inference.
Generating the “wrong” word might not matter, the network could correct.
Also, we can sample the probability distribution of the generated sequence to pull out multiple possible descriptions:
https://machinelearningmastery.com/beam-search-decoder-natural-language-processing/
To learn more see this post and the referenced papers:
https://machinelearningmastery.com/caption-generation-inject-merge-architectures-encoder-decoder-model/
Hi Jason great article on caption generator i think the best till now available online.. i am a newbee in ML(AI). i extracted the features and stored it to features.pkl file but getting an error on create sequence functions memory error and i can see you have suggested progressive loading i do not get that properly could you suggest my how to use the current code modified for progressive loading::
[2/13/2018 12:34 PM] Sanchawat, Hardik:
Using TensorFlow backend.
Dataset: 6000
Descriptions: train=6000
Photos: train=6000
Vocabulary Size: 7579
Description Length: 34
Traceback (most recent call last):
File “C:\Users\hardik.sanchawat\Documents\Scripts\flickr\test.py”, line 154, in
X1train, X2train, ytrain = create_sequences(tokenizer, max_length, train_descriptions, train_features)
File “C:\Users\hardik.sanchawat\Documents\Scripts\flickr\test.py”, line 109, in create_sequences
return array(X1), array(X2), array(y)
MemoryError
My system configuration is :
OS: Windows 10
Processor: AMD A8 PRO-7150B R5, 10 Compute Cores 4C+6G 1.90 GHz
Memory(RAM): 16 GB (14.9GB Usable)
System type: 64-bit OS, x64-based processor
I have an example of progressive loading here:
https://machinelearningmastery.com/prepare-photo-caption-dataset-training-deep-learning-model/
Update: I have updated the tutorial to include an example of training using progressive loading (a data generator).
Hi Jason,
I am trying to using plot _model . but I getting error
raise ImportError(‘Failed to import pydot. You must install pydot’
ImportError: Failed to import pydot. You must install pydot and graphviz for
pydotprintto work.I tried
conda install graphviz
conda install pydotplus
to install pydot.
my python version is3.x
eras vesion is 2.1.3
Could you please help me , to solve this problem
I’m sorry to hear that.
Perhaps the installed libraries are not available in your current Python environment?
Perhaps try posting the error to stackoverflow? I’m not an expert at debugging workstations.
If you are on windows go here and install this, https://graphviz.gitlab.io/_pages/Download/Download_windows.html 2.38 stable msi file.
after that, add the graphviz’s bin onto your system PATH variables. Restart your computer and the path should be picked up.
Then you won’t have that error again.
Thanks Vinneth,
I am using Mac. I tried toes pydotplus, but still its giving same error.
HI
I am getting the same error, how did you fix it?
Regards
Precious Angrish
Hey Kavya i assume this will surely resolve your error , as it also worked for me as well, https://stackoverflow.com/questions/36869258/how-to-use-graphviz-with-anaconda-spyder.
Thanks
I used Progressive Loading from https://machinelearningmastery.com/prepare-photo-caption-dataset-training-deep-learning-model/#comment-429470 This tutorial and updated the input layer to inputs1 = Input(shape=(224, 224, 3))
And i got the error
ValueError: Error when checking target: expected dense_3 to have 4 dimensions, but got array with shape (13, 4485)
Then i updated to_categorical function as you mentioned and the error changed to this
ValueError: Error when checking target: expected dense_3 to have 4 dimensions, but got array with shape (13, 1, 4485)
Been trying to figure out the exact input shapes of the model since 2 days please help 🙁
Hey Vineeth!
Were you able to solve this issue? I am stuck on this for a few days too.
Are you able to confirm your Python and Keras versions?
Hi Jason, why do you apply dropout to the input instead to applying it to the dense layer?
I used a little experimentation to come up with the model.
Try changing it up and see if you can lift skill or reduce training time or model complexity Alex. I’m eager to hear how you go.
Hi Jason,
I just wanted to know that when you are loading the training data, you are tokenizing the train descriptions. But when you are working with test data, you are not tokenizing the test descriptions, instead working with the previous tokens. Shouldn’t the test descriptions be tokenized too before passing to create_sequence for test ?
The train and test data are tokenized.
Hi Jason,
This tutorial is of great help to us all, I think. I have a question: Does the model eventually learn to predict captions not present in the corpus? I mean, is it possible for the model to output sentences that are never seen before? In the example you give, the model predicted “startseq dog is running across the beach endseq”. Is this sentence found in the training corpus, or did the model make it up based on previous observations? And also, If it is possible for the model to combine sentences, how much training data do you think it needs to do that?
The model attempts to generalize beyond what it has seen during training.
In fact, this is the goal with a machine learning model.
Nevertheless, the model will be bounded by the types of text and images seen during training, just not the specific combinations.
Hi Jeson, I have a question. What exactly is the LSTM used for? During fitting it takes an input (eg startseq – girl) and outputs a vector of 256 elements that contain the most probable words after the prefix? Is it trained through backpropagation? The purpose of the fitting is to make sure that given a prefix / input the LSTM gives me back a vector that represents “better” the possible following words (which are then merge with the features, etc …)
It is used for interpreting the text generated so far, needed to generate the next word.
Hi Jason,
for the line:
features = dict()
I got syntaxerror: invalid syntax
How can I fix this error?
Perhaps double check that you have copied the code while maintaining white space?
Perhaps confirm Python 3?
Hi Jason,
is the following line:
model = Model(inputs=model.inputs, outputs=model.layers[-1].output)
means we will save the features of fc2 layer of the vgg16 model?
We are creating a new model without the last layer.
the new model doesn’t contain any fully connected layer because I read that we can extract the features from the fc2 layers of the pre-trained model also
when I run the line model.summary() I got the last layer is :
block5_conv4 (Conv2D) (None, 14, 14, 512) 2359808
but according to the VGG16 it should be
fc2 (Dense) (None, 4096) 16781312 fc1[0][0]
I don’t know where is the problem?
That is because you must have specified include_top = False in VGG. This will not include the fully connected part of the network.
Hi Jason,
how we can feed the saved features in the pickle file (features.pkl) to a linear regression model
That would be a lot of input features! Sorry, I don’t have a worked example.
ValueError: Error when checking input: expected input_1 to have shape (None, 4096) but got array with shape (0, 1)
I am getting this error..can anyone help me understand and fix it?
Are you able to confirm that you have Python3 and all libs up to date?
Yes all my libraries are upto date, have checked.
I solved the problem i posted before….my problem was in the data generator.
I am using progressive loading.After fixing the problem i checked my inputs using this code:
generator = data_generator(descriptions, tokenizer, max_length)
inputs, outputs = next(generator)
print(inputs[0].shape)
print(inputs[1].shape)
print(outputs.shape)
and it’s giving me an output like this:
(13, 224, 224, 3)
(13, 28)
(13, 4485)
but now it’s showing this error:
ValueError: Error when checking input: expected input_1 to have 2 dimensions, but got array with shape (8, 224, 224, 3)
do i have to change the model architecture for progressive loading??
NOTE:for progressive loading have used this code:https://machinelearningmastery.com/prepare-photo-caption-dataset-training-deep-learning-model/
I am stock with the same issue. The example above runs me into memory problems even when I tried it using AWS EC2 g2.2xlarge instance or a laptop with 16 GB RAM. So I tried the progressive loading example you referred to frequently but I have the same trouble with the input of the model. I tried to use inputs[0] as inputs1 for the define_model function but that returned the error ‘Error when checking input: expected input_13 to have 5 dimensions, but got array with shape (13, 224, 224, 3)’. Do I have to reshape input[0], or is the problem in inputs2?
I think the model architecture needs to be changed for the progressive loading example particularly the input shapes.
getting the same error for me
File “fittingmodel.py”, line 189, in
model.fit([X1train, X2train], ytrain, epochs=20, verbose=2, callbacks=[checkpoint], validation_data=([X1test, X2test], ytest))
File “C:\Users\pranyaram\Anaconda3\envs\tensorflow\lib\site-packages\keras\engine\training.py”, line 1630, in fit
batch_size=batch_size)
File “C:\Users\pranyaram\Anaconda3\envs\tensorflow\lib\site-packages\keras\engine\training.py”, line 1476, in _standardize_user_data
exception_prefix=’input’)
File “C:\Users\pranyaram\Anaconda3\envs\tensorflow\lib\site-packages\keras\engine\training.py”, line 123, in _standardize_input_data
str(data_shape))
ValueError: Error when checking input: expected input_1 to have shape (4096,) but got array with shape (1,)
What version of libs are you using?
Here’s what I’m running:
Hi Jason,
Thanks for the article.
Due to lack of resources I tried running this in small amount of data.Everything worked fine but the generating new description part is giving this error.
C:\Users\Tanisha\AppData\Local\conda\conda\envs\tensorflow\lib\site-packages\h5py\__init__.py:36: FutureWarning: Conversion of the second argument of issubdtype from
floattonp.floatingis deprecated. In future, it will be treated asnp.float64 == np.dtype(float).type.from ._conv import register_converters as _register_converters
Using TensorFlow backend.
2018-03-31 12:07:43.176707: I C:\tf_jenkins\workspace\rel-win\M\windows-gpu\PY\35\tensorflow\core\platform\cpu_feature_guard.cc:140] Your CPU supports instructions that this TensorFlow binary was not compiled to use: AVX2
2018-03-31 12:07:43.574792: I C:\tf_jenkins\workspace\rel-win\M\windows-gpu\PY\35\tensorflow\core\common_runtime\gpu\gpu_device.cc:1212] Found device 0 with properties:
name: GeForce 820M major: 2 minor: 1 memoryClockRate(GHz): 1.25
pciBusID: 0000:08:00.0
totalMemory: 2.00GiB freeMemory: 1.65GiB
2018-03-31 12:07:43.584220: I C:\tf_jenkins\workspace\rel-win\M\windows-gpu\PY\35\tensorflow\core\common_runtime\gpu\gpu_device.cc:1283] Ignoring visible gpu device (device: 0, name: GeForce 820M, pci bus id: 0000:08:00.0, compute capability: 2.1) with Cuda compute capability 2.1. The minimum required Cuda capability is 3.0.
Traceback (most recent call last):
File “7_generate_discription.py”, line 72, in
description = generate_desc(model, tokenizer, photo, max_length)
File “7_generate_discription.py”, line 48, in generate_desc
yhat = model.predict([photo,sequence], verbose=0)
File “C:\Users\Tanisha\AppData\Local\conda\conda\envs\tensorflow\lib\site-packages\keras\engine\training.py”, line 1817, in predict
check_batch_axis=False)
File “C:\Users\Tanisha\AppData\Local\conda\conda\envs\tensorflow\lib\site-packages\keras\engine\training.py”, line 123, in _standardize_input_data
str(data_shape))
ValueError: Error when checking : expected input_2 to have shape (25,) but got array with shape (34,)
Any idea how can i fix this ?
Thanks.
Are you able to confirm that your Keras version and TF are up to date?
Did you copy all of the code as is?
Yeah those two are updated i just changed “max_length = 34” to “max_length = 25” in the code and now its working.
I’m glad to hear you worked it out.
Changing max_length did not give any error to you?
i am getting this error
X1train, X2train, ytrain = create_sequences(tokenizer, max_length, train_descriptions, train_features)
File “fittingmodel.py”, line 109, in create_sequences
return array(X1), array(X2), array(y)
MemoryError
Perhaps try running the example on a machine with more RAM, or update the example to use progressive loading described in this post:
https://machinelearningmastery.com/prepare-photo-caption-dataset-training-deep-learning-model/
what backend are you using??
TensorFlow.
can some one give me this file “model-ep{epoch:03d}-loss{loss:.3f}-val_loss{val_loss:.3f}.h5”
my pc don’t have enough processing power .
Perhaps you could train the model on an EC2 instance:
https://machinelearningmastery.com/develop-evaluate-large-deep-learning-models-keras-amazon-web-services/
ile “fittingmodel.py”, line 189, in
model.fit([X1train, X2train], ytrain, epochs=20, verbose=2, callbacks=[checkpoint], validation_data=([X1test, X2test], ytest))
File “C:\Users\pranyaram\Anaconda3\envs\tensorflow\lib\site-packages\keras\engine\training.py”, line 1522, in fit
batch_size=batch_size)
File “C:\Users\pranyaram\Anaconda3\envs\tensorflow\lib\site-packages\keras\engine\training.py”, line 1378, in _standardize_user_data
exception_prefix=’input’)
File “C:\Users\pranyaram\Anaconda3\envs\tensorflow\lib\site-packages\keras\engine\training.py”, line 144, in _standardize_input_data
str(array.shape))
ValueError: Error when checking input: expected input_1 to have shape (None, 4096) but got array with shape (0, 1)
Are you able to confirm that you are using Python 3 and that your version of Keras is up to date?
which keras version should i use
The most recent.
even still i am getting the same error once check the model training file how to reduce the training size to avoid memory error.
You can use progressive loading to reduce the memory requirements for the model.
Update: I have updated the tutorial to include an example of training using progressive loading (a data generator).
Hello, Jason! Thank you for your tutorial.
I tried to use pre-trained model and copy-paste the code above to my Anaconda python 3.6 and Keras version of 2.1.5. First, it will run smoothly without any problem, and it begins to crawl on several image files. Unfortunately, after a while, I get this kind of error:
“OSError: cannot identify image file ‘Flicker8k_Dataset/find.py”
Any idea what is wrong? I am running it on my laptop with GPU NVIDIA GeForce 1050 Ti with Intel Core i7-7700HQ with Windows 10 OS.
Thank you in advance!
Looks like something very strange is going on.
I have not seen this error. Perhaps try running from the commandline, often notebooks and IDEs introduce new and crazy faults of their own.
Using TensorFlow backend.
Dataset: 6000
Descriptions: train=6000
Photos: train=6000
Vocabulary Size: 7579
Description Length: 34
Traceback (most recent call last):
File “model_fit.py”, line 154, in
X1train, X2train, ytrain = create_sequences(tokenizer, max_length, train_descriptions, train_features)
File “model_fit.py”, line 109, in create_sequences
return array(X1), array(X2), array(y)
MemoryError
how to reduce the training size to avoid this error.
You can use progressive loading to reduce the memory requirements for the model.
I got the same error “OSError: cannot identify image file ‘Flicker8k_Dataset/desktop.ini'” did you fix it?
Looks like you have a windows file called desktop.ini in the directory for some reason. Delete it.
Hi, can you provide me the weights file. My laptop is having 12GB RAM, NVIDIA GeForce 820M Graphics, all supported drivers. But Iam getting the memory error issue.
I have tried progressive loading also.. But it is not working.. It is not saving the weights file even after steps per epoch=70000 is completed even. I cant afford for the AWS.
So, I request you to give me the weights file.
Thanks in advance.
Sorry, I cannot share the weights file.
I will schedule time into updating the tutorial to add a progressive loading example.
Update: I have updated the tutorial to include an example of training using progressive loading (a data generator).
Hi,
I got an error while generating the captions.
Here is the error:
Traceback (most recent call last):
File “generate_captions5.py”, line 64, in
tokenizer = load(open(‘descriptions.txt’, ‘rb’))
_pickle.UnpicklingError: could not find MARK
I have not seen this error before, sorry. Perhaps try running the code again?
startseq man in red shirt is standing on the street endseq
caption is generating but it is giving same caption for different images.
Perhaps your model requires further training?
Hi I am also facing the same issue. Can you tell what you did to overcome the problem @harsha
Same issue I am facing as well.
Hey, have you figured out the problem?
I am having the same issue as well. I first did it will the MS COCO dataset because it has many more images and captions, but when I ran into the issue, I followed the tutorial with the Flicker Dataset and I am running into the same issue again. Has anyone figured out the solution?
Are you able to confirm your tensorflow and keras versions?
My TensorFlow version is 2.3.1 and my Keras version is 2.4.3. However, I am using the keras built into tensorflow.
The versions look good.
Perhaps these instructions will help you copy the code without error:
https://machinelearningmastery.com/faq/single-faq/how-do-i-copy-code-from-a-tutorial
I had copied the code correctly, but I had been using the data generator because the COCO dataset has so much data. When I tried again with the Flicker dataset, I used the data generator as well, because I wasn’t sure if my 16 gigs of RAM would be enough to load all the data in at once. I am trying again, but without the data generator. I hope it works
It is not generating the exact same caption for each image, but it does place “a man in a red shirt is” at the beginning of each caption and the captions do not seem to be accurate.
Perhaps try training the model again?
Perhaps select a different final model?
Perhaps tune the learning parameters?
val-loss is improving up to 3 epoches only, there’s no any improvement in further epoches.
model-ep003-loss3.662-val_loss3.824.h5. This is the last epoche that has improved till now.
File “”, line 1, in
runfile(‘C:/Users/Owner/.spyder-py3/ML/4.py’, wdir=’C:/Users/Owner/.spyder-py3/ML’)
File “C:\Users\Owner\Anaconda_3\lib\site-packages\spyder\utils\site\sitecustomize.py”, line 705, in runfile
execfile(filename, namespace)
File “C:\Users\Owner\Anaconda_3\lib\site-packages\spyder\utils\site\sitecustomize.py”, line 102, in execfile
exec(compile(f.read(), filename, ‘exec’), namespace)
File “C:/Users/Owner/.spyder-py3/ML/4.py”, line 161, in
model = define_model(vocab_size, max_length)
File “C:/Users/Owner/.spyder-py3/ML/4.py”, line 129, in define_model
plot_model(model, to_file=’model.png’, show_shapes=True)
File “C:\Users\Owner\Anaconda_3\lib\site-packages\keras\utils\vis_utils.py”, line 135, in plot_model
dot = model_to_dot(model, show_shapes, show_layer_names, rankdir)
File “C:\Users\Owner\Anaconda_3\lib\site-packages\keras\utils\vis_utils.py”, line 56, in model_to_dot
_check_pydot()
File “C:\Users\Owner\Anaconda_3\lib\site-packages\keras\utils\vis_utils.py”, line 31, in _check_pydot
raise ImportError(‘Failed to import pydot. You must install pydot’
ImportError: Failed to import pydot. You must install pydot and graphviz for
pydotprintto work.getting this even if i installed pydot and graphviz
Perhaps restart your machine?
Perhaps comment out the part where you visualize the model?
getting same error!
Tried using solution from stackoverflow, upgraded packages..but it ain’t working..
No problem, just skip that part and proceed. Comment out the plotting of the model.
I have trained the data using progressive loading and I stopped after 4 iterations, with a loss of 3.4952.
I am unable to understand this part,
In this simple example we will discard the loading of the development dataset and model checkpointing and simply save the model after each training epoch. You can then go back and load/evaluate each saved model after training to find the one we the lowest loss that you can then use in the next section.
Do you mean we have to load test set in the same way using progressive loading ?
Please help me understanding how to load the test set.
I am suggesting that you may want to load the test data in the existing way and evaluate your model (next section).
Error by runing “The complete code example is listed below.” in the Loading Data section:
Message Body:
Dataset: 6000
Descriptions: train=6000
Traceback (most recent call last):
File “task2.py”, line 64, in
train_features = load_photo_features(‘features.pkl’, train)
File “task2.py”, line 53, in load_photo_features
features = {k: all_features[k] for k in dataset}
File “task2.py”, line 53, in
features = {k: all_features[k] for k in dataset}
KeyError: ‘878758390_dd2cdc42f6’
Perhaps confirm that you have the full dataset in place?
Yes, some images were missed.
Thank you
Hello sir I’m learning from your articles that I find very informative and educational, I’ve been trying to compile this code :
# extract features from all images
directory = ‘Flicker8k_Dataset’
features = extract_features(directory)
print(‘Extracted Features: %d’ % len(features))
# save to file
dump(features, open(‘features.pkl’, ‘wb’))
but an error occurred and I don’t understand it can you help me fix it and thanks for all of you
here’s the mistake I made:
PermissionError Traceback (most recent call last)
in ()
1 # extract features from all images
2 directory = ‘Flicker8k_Dataset’
—-> 3 features = extract_features(directory)
4 print(‘Extracted Features: %d’ % len(features))
5 # save to file
in extract_features(directory)
13 # load an image from file
14 filename = directory + ‘/’ + name
—> 15 image = load_img(filename, target_size=(224, 224))
16 # convert the image pixels to a numpy array
17 image = img_to_array(image)
~\Anaconda3\envs\envir1\lib\site-packages\keras\preprocessing\image.py in load_img(path, grayscale, target_size, interpolation)
360 raise ImportError(‘Could not import PIL.Image. ‘
361 ‘The use of
array_to_imgrequires PIL.’)–> 362 img = pil_image.open(path)
363 if grayscale:
364 if img.mode != ‘L’:
~\Anaconda3\envs\envir1\lib\site-packages\PIL\Image.py in open(fp, mode)
2546
2547 if filename:
-> 2548 fp = builtins.open(filename, “rb”)
2549 exclusive_fp = True
2550
PermissionError: [Errno 13] Permission denied: ‘Flicker8k_Dataset/Flicker8k_Dataset’
Looks like the dataset is missing or is not available on your workstation.
Hello sir, Thanks for your effort
I have trained the data using progressive loading and my machine restarted after 11 iterations,
how can i continue training from that checkpoint ?
Load the last saved model, then continue training. As simple as that.
I doubt more than a handful of epochs is required on this problem.
thank you !
i have loaded the last model (‘model_11.h5’) that has 3.445 loss, now it continue training with 5.4461 loss, is that normal ?
Interesting, that is a little surprising. I wonder if there is a fault or if indeed the model loss has gotten worse.
Some careful experiments may be required.
Thank you, I think so too….
I already downloaded Flicker8k_Datasets and extracted it in the same file where I work with jupyter notebook.
I consulted Google and Youtube to try to fix this error but in vain…
I don’t know but could you be so kind as to direct me and help me fix the problem.
Thank you very much for your efforts…
What problem?
Hi Jason,
when I try to compile code related to the extracted features from all images I get this error that is “Permission denied” you told me earlier that Looks like the dataset is missing or is not available on my workstation I tried to fix the trick but in vain.
Do you have any idea how I could do that?
Do I need a user right or something like that?
or maybe I need to reload the database?
*the error :
~\Anaconda3\envs\envir1\lib\site-packages\PIL\Image.py in open(fp, mode)2546
2547 if filename:
-> 2548 fp = builtins.open(filename, “rb”)
2549 exclusive_fp = True
2550
PermissionError: [Errno 13] Permission denied: ‘Flicker8k_Dataset/Flicker8k_Dataset’
thanks a lot 🙂 🙂
You appear to have a problem loading the data from your hard drive. Perhaps you stored the data in a location where you/your code does not have permission to read?
Perhaps you are using a notebook or an IDE as another user?
Try running from the command line and check file permissions.
Thanks Jason. I really appreciate your knowledge and the way you express it to us through your articles, it’s amazing.
Thanks, I’m glad the tutorials help!
Thank you very much mr.jason but I have some problems after download the pretrained model when make the model prediction
‘
—————————————————————————
FailedPreconditionError Traceback (most recent call last)
~/.local/lib/python3.6/site-packages/tensorflow/python/client/session.py in _do_call(self, fn, *args)
1349 try:
-> 1350 return fn(*args)
1351 except errors.OpError as e:
~/.local/lib/python3.6/site-packages/tensorflow/python/client/session.py in _run_fn(session, feed_dict, fetch_list, target_list, options, run_metadata)
1328 feed_dict, fetch_list, target_list,
-> 1329 status, run_metadata)
1330
~/.local/lib/python3.6/site-packages/tensorflow/python/framework/errors_impl.py in __exit__(self, type_arg, value_arg, traceback_arg)
472 compat.as_text(c_api.TF_Message(self.status.status)),
–> 473 c_api.TF_GetCode(self.status.status))
474 # Delete the underlying status object from memory otherwise it stays alive
FailedPreconditionError: Attempting to use uninitialized value block1_conv2_5/kernel
[[Node: block1_conv2_5/kernel/read = Identity[T=DT_FLOAT, _class=[“loc:@block1_conv2_5/kernel”], _device=”/job:localhost/replica:0/task:0/device:CPU:0″](block1_conv2_5/kernel)]]
During handling of the above exception, another exception occurred:
FailedPreconditionError Traceback (most recent call last)
in ()
24 return features
25 directory = ‘../ProjectPattern/Flickr8k_Dataset/Flicker8k_Dataset’
—> 26 features =extract_feature(directory)
27 dump(features,open(“feature.pkl”,”wb”))
in extract_feature(directory)
17 img =preprocess_input(img)
18 #extract feature by make prediction use the pretrained model
—> 19 feature = model.predict(img,verbose=0)
20 #extract img_id
21 img_id = name.split(‘.’)[0]
~/.local/lib/python3.6/site-packages/tensorflow/python/keras/_impl/keras/engine/training.py in predict(self, x, batch_size, verbose, steps)
1811 f = self.predict_function
1812 return self._predict_loop(
-> 1813 f, ins, batch_size=batch_size, verbose=verbose, steps=steps)
1814
1815 def train_on_batch(self, x, y, sample_weight=None, class_weight=None):
~/.local/lib/python3.6/site-packages/tensorflow/python/keras/_impl/keras/engine/training.py in _predict_loop(self, f, ins, batch_size, verbose, steps)
1306 else:
1307 ins_batch = _slice_arrays(ins, batch_ids)
-> 1308 batch_outs = f(ins_batch)
1309 if not isinstance(batch_outs, list):
1310 batch_outs = [batch_outs]
~/.local/lib/python3.6/site-packages/tensorflow/python/keras/_impl/keras/backend.py in __call__(self, inputs)
2551 session = get_session()
2552 updated = session.run(
-> 2553 fetches=fetches, feed_dict=feed_dict, **self.session_kwargs)
2554 return updated[:len(self.outputs)]
2555
~/.local/lib/python3.6/site-packages/tensorflow/python/client/session.py in run(self, fetches, feed_dict, options, run_metadata)
893 try:
894 result = self._run(None, fetches, feed_dict, options_ptr,
–> 895 run_metadata_ptr)
896 if run_metadata:
897 proto_data = tf_session.TF_GetBuffer(run_metadata_ptr)
~/.local/lib/python3.6/site-packages/tensorflow/python/client/session.py in _run(self, handle, fetches, feed_dict, options, run_metadata)
1126 if final_fetches or final_targets or (handle and feed_dict_tensor):
1127 results = self._do_run(handle, final_targets, final_fetches,
-> 1128 feed_dict_tensor, options, run_metadata)
1129 else:
1130 results = []
~/.local/lib/python3.6/site-packages/tensorflow/python/client/session.py in _do_run(self, handle, target_list, fetch_list, feed_dict, options, run_metadata)
1342 if handle is None:
1343 return self._do_call(_run_fn, self._session, feeds, fetches, targets,
-> 1344 options, run_metadata)
1345 else:
1346 return self._do_call(_prun_fn, self._session, handle, feeds, fetches)
~/.local/lib/python3.6/site-packages/tensorflow/python/client/session.py in _do_call(self, fn, *args)
1361 except KeyError:
1362 pass
-> 1363 raise type(e)(node_def, op, message)
1364
1365 def _extend_graph(self):
FailedPreconditionError: Attempting to use uninitialized value block1_conv2_5/kernel
[[Node: block1_conv2_5/kernel/read = Identity[T=DT_FLOAT, _class=[“loc:@block1_conv2_5/kernel”], _device=”/job:localhost/replica:0/task:0/device:CPU:0″](block1_conv2_5/kernel)]]
Caused by op ‘block1_conv2_5/kernel/read’, defined at:
File “/usr/lib/python3.6/runpy.py”, line 193, in _run_module_as_main
“__main__”, mod_spec)
File “/usr/lib/python3.6/runpy.py”, line 85, in _run_code
exec(code, run_globals)
File “/home/abdo96/.local/lib/python3.6/site-packages/ipykernel_launcher.py”, line 16, in
app.launch_new_instance()
File “/home/abdo96/.local/lib/python3.6/site-packages/traitlets/config/application.py”, line 658, in launch_instance
app.start()
File “/home/abdo96/.local/lib/python3.6/site-packages/ipykernel/kernelapp.py”, line 478, in start
self.io_loop.start()
File “/home/abdo96/.local/lib/python3.6/site-packages/zmq/eventloop/ioloop.py”, line 177, in start
super(ZMQIOLoop, self).start()
File “/home/abdo96/.local/lib/python3.6/site-packages/tornado/ioloop.py”, line 888, in start
handler_func(fd_obj, events)
File “/home/abdo96/.local/lib/python3.6/site-packages/tornado/stack_context.py”, line 277, in null_wrapper
return fn(*args, **kwargs)
File “/home/abdo96/.local/lib/python3.6/site-packages/zmq/eventloop/zmqstream.py”, line 440, in _handle_events
self._handle_recv()
File “/home/abdo96/.local/lib/python3.6/site-packages/zmq/eventloop/zmqstream.py”, line 472, in _handle_recv
self._run_callback(callback, msg)
File “/home/abdo96/.local/lib/python3.6/site-packages/zmq/eventloop/zmqstream.py”, line 414, in _run_callback
callback(*args, **kwargs)
File “/home/abdo96/.local/lib/python3.6/site-packages/tornado/stack_context.py”, line 277, in null_wrapper
return fn(*args, **kwargs)
File “/home/abdo96/.local/lib/python3.6/site-packages/ipykernel/kernelbase.py”, line 283, in dispatcher
return self.dispatch_shell(stream, msg)
File “/home/abdo96/.local/lib/python3.6/site-packages/ipykernel/kernelbase.py”, line 233, in dispatch_shell
handler(stream, idents, msg)
File “/home/abdo96/.local/lib/python3.6/site-packages/ipykernel/kernelbase.py”, line 399, in execute_request
user_expressions, allow_stdin)
File “/home/abdo96/.local/lib/python3.6/site-packages/ipykernel/ipkernel.py”, line 208, in do_execute
res = shell.run_cell(code, store_history=store_history, silent=silent)
File “/home/abdo96/.local/lib/python3.6/site-packages/ipykernel/zmqshell.py”, line 537, in run_cell
return super(ZMQInteractiveShell, self).run_cell(*args, **kwargs)
File “/home/abdo96/.local/lib/python3.6/site-packages/IPython/core/interactiveshell.py”, line 2728, in run_cell
interactivity=interactivity, compiler=compiler, result=result)
File “/home/abdo96/.local/lib/python3.6/site-packages/IPython/core/interactiveshell.py”, line 2850, in run_ast_nodes
if self.run_code(code, result):
File “/home/abdo96/.local/lib/python3.6/site-packages/IPython/core/interactiveshell.py”, line 2910, in run_code
exec(code_obj, self.user_global_ns, self.user_ns)
File “”, line 26, in
features =extract_feature(directory)
File “”, line 2, in extract_feature
model = VGG19()
File “/home/abdo96/.local/lib/python3.6/site-packages/keras/applications/vgg19.py”, line 117, in VGG19
x = Conv2D(64, (3, 3), activation=’relu’, padding=’same’, name=’block1_conv2′)(x)
File “/home/abdo96/.local/lib/python3.6/site-packages/keras/engine/topology.py”, line 590, in __call__
self.build(input_shapes[0])
File “/home/abdo96/.local/lib/python3.6/site-packages/keras/layers/convolutional.py”, line 138, in build
constraint=self.kernel_constraint)
File “/home/abdo96/.local/lib/python3.6/site-packages/keras/legacy/interfaces.py”, line 91, in wrapper
return func(*args, **kwargs)
File “/home/abdo96/.local/lib/python3.6/site-packages/keras/engine/topology.py”, line 414, in add_weight
constraint=constraint)
File “/home/abdo96/.local/lib/python3.6/site-packages/keras/backend/tensorflow_backend.py”, line 392, in variable
v = tf.Variable(value, dtype=tf.as_dtype(dtype), name=name)
File “/home/abdo96/.local/lib/python3.6/site-packages/tensorflow/python/ops/variables.py”, line 229, in __init__
constraint=constraint)
File “/home/abdo96/.local/lib/python3.6/site-packages/tensorflow/python/ops/variables.py”, line 376, in _init_from_args
self._snapshot = array_ops.identity(self._variable, name=”read”)
File “/home/abdo96/.local/lib/python3.6/site-packages/tensorflow/python/ops/array_ops.py”, line 127, in identity
return gen_array_ops.identity(input, name=name)
File “/home/abdo96/.local/lib/python3.6/site-packages/tensorflow/python/ops/gen_array_ops.py”, line 2134, in identity
“Identity”, input=input, name=name)
File “/home/abdo96/.local/lib/python3.6/site-packages/tensorflow/python/framework/op_def_library.py”, line 787, in _apply_op_helper
op_def=op_def)
File “/home/abdo96/.local/lib/python3.6/site-packages/tensorflow/python/framework/ops.py”, line 3160, in create_op
op_def=op_def)
File “/home/abdo96/.local/lib/python3.6/site-packages/tensorflow/python/framework/ops.py”, line 1625, in __init__
self._traceback = self._graph._extract_stack() # pylint: disable=protected-access
FailedPreconditionError (see above for traceback): Attempting to use uninitialized value block1_conv2_5/kernel
[[Node: block1_conv2_5/kernel/read = Identity[T=DT_FLOAT, _class=[“loc:@block1_conv2_5/kernel”], _device=”/job:localhost/replica:0/task:0/device:CPU:0″](block1_conv2_5/kernel)]]
‘
Wow. I have not seen this before, sorry.
Perhaps try searching or posting on stackoverflow?
so the problem solved by specifying which weights used not None(random initialization)
but used pretraining on ‘imagenet’ and specify the include_top argument to be True
Well done, I’m glad to hear that.
When using Merged input in model the error below showed
Thanks in advance
in ()
29 plot_model(model,to_file=’model.png’,show_shapes=True,show_layer_names=True)
30 return model
—> 31 define_model(vocab_size,max_len)
in define_model(vocab_size, max_length)
26 model = Model(inputs=[input1,input2],outputs=output)
27
—> 28 model.compile(loss=’categorical_crossentropy’,optimizer=’Adam’)(mask)
29 plot_model(model,to_file=’model.png’,show_shapes=True,show_layer_names=True)
30 return model
~/.local/lib/python3.6/site-packages/tensorflow/python/keras/_impl/keras/engine/training.py in compile(self, optimizer, loss, metrics, loss_weights, sample_weight_mode, weighted_metrics, target_tensors, **kwargs)
679
680 # Prepare output masks.
–> 681 masks = self.compute_mask(self.inputs, mask=None)
682 if masks is None:
683 masks = [None for _ in self.outputs]
~/.local/lib/python3.6/site-packages/tensorflow/python/keras/_impl/keras/engine/topology.py in compute_mask(self, inputs, mask)
785 return self._output_mask_cache[cache_key]
786 else:
–> 787 _, output_masks = self._run_internal_graph(inputs, masks)
788 return output_masks
789
~/.local/lib/python3.6/site-packages/tensorflow/python/layers/network.py in _run_internal_graph(self, inputs, masks)
896
897 # Apply activity regularizer if any:
–> 898 if layer.activity_regularizer is not None:
899 regularization_losses = [
900 layer.activity_regularizer(x) for x in computed_tensors
AttributeError: ‘InputLayer’ object has no attribute ‘activity_regularizer’
What version of Keras are you using?
Did you copy all of the code exactly?
I used verison 2.1.5
the another question No, I didn’t copy all the code exactly but I understand the idea and imitate it in some parts and in other parts are written in my own
Sorry, I cannot help you debug your own modifications.
I wrote this problem in the stack overflow but no one answer so I will try to fix this problem in my own Thank you for your answers
Hang in there.
Hi, jason brownlee thanks for this fatanstic article.
I am curios to know that how he while loop is getting stopped in progressive training data genertor function ?
Please explain this to me
def data_generator(descriptions, photos, tokenizer, max_length):
# loop for ever over images
while 1:
for key, desc_list in descriptions.items():
# retrieve the photo feature
photo = photos[key][0]
in_img, in_seq, out_word = create_sequences(tokenizer, max_length, desc_list, photo)
yield [[in_img, in_seq], out_word]
Note the yield.
The number of epochs will decide how many times the yeild to the caller will be performed.
Hi jason Brownlee,
Can you please tell me what is the heighest BLEU Scores you got from this approach on standard dataset like flickr 8k, 30k etc.
Please guide me how u you mananged to acheive this much Blue scores.
What is the architecutre You used.
Is there any result comparable to “show and tell model” ?
All details of the model are in the post.
You can learn more about the chosen architecture here:
https://machinelearningmastery.com/caption-generation-inject-merge-architectures-encoder-decoder-model/
Sir,
Great article indeed! But I’m facing problems downloading the model. Every time I try to download the model with the code you provided, after sometimes the connection gets lost and shows this message: “ConnectionResetError: [WinError 10054] An existing connection was forcibly closed by the remote host”
Can you give any alternate solution to this problem? I have tried several times but failed.
I’m sorry to hear that, I have some ideas:
– Perhaps you can review the code in Keras that downloads the model and download it manually?
– Perhaps you can use an alternate internet connection to download the model?
– Perhaps you can setup an EC2 instance and download the model there to work with?
– Perhaps you can ask a friend or peer to download the model for you?
Hello Sir,
Your article is very interesting and easy to understand.
For the above code I am getting a very accurate caption if I use the same image as you have shown in the figure. But if I use some other image I am getting some description but not a correct one. So could you please tell me what is the problem here?
Thanks in advance.
Perhaps try a suite of images to see how the model performs on average?
I have trained the data using progressive loading untill 19 iterations.
Caption for your provided test image is generated. However, for new one( image of rabbit and other animals) i got the caption “dog is running …”.
Is there a way to train the models more than 19 iterations to get a better result or how to solve this issue?
thank you
The model may only need 2-5 training iterations.
Hi Jason,
Can you please share me full github repository of image captioning?
No need, all of the code is listed above.
Hey , Jason the post is really amazing , but can you help to load me this especially the first step (Keras) which will probably take 1hour in CPU , I wanna test that I’m in GPU , how shall I be able to get that , Keras (GPU) so as to save time tho.
Thanks Jason.
There are some commands on this post to check if you are using the GPU:
https://machinelearningmastery.com/command-line-recipes-deep-learning-amazon-web-services/
Thanks Jason , one more thing i wanna ask is that in the FILENAME i must put the complete path to working directory right?
If the data is in the current working directory, then the path can be relative.
Hey Jason wassup , can you please explain what is meant by these lines :-
filepath = ‘model-ep{epoch:03d}-loss{loss:.3f}-val_loss{val_loss:.3f}.h5′
checkpoint = ModelCheckpoint(filepath, monitor=’val_loss’, verbose=1, save_best_only=True, mode=’min’)
1. The line in filepath especially this – epoch:03d}-loss{loss:.3f}-val_loss{val_loss:.3f} ?
It is the name of the file that will be saved with placeholders for specific values of the model at the time of saving.
hey jason!! I ran the code that returns a dictionary of image identifier to image features. but did nt work and gave the following error. Please Guide me how to fix this bug.
FileNotFoundError Traceback (most recent call last)
in ()
39 # extract features from all images
40 directory = ‘Flicker8k_Dataset’
—> 41 features = extract_features(directory)
42 print(‘Extracted Features: %d’ % len(features))
43 # save to file
in extract_features(directory)
18 # extract features from each photo
19 features = dict()
—> 20 for name in listdir(directory):
21 # load an image from file
22 filename = directory + ‘/’ + name
FileNotFoundError: [WinError 3] The system cannot find the path specified: ‘Flicker8k_Dataset’
It looks like you do not have the dataset in the same directory as the code.
jason i have code and dataset in the same directory.I can access a test png image from the same directory but i am unable to access the dataset images..I don’t know whats wrong with it.Please help me solving the issue because i can also access the flick_text dataset.The only issue i have with images dataset.
I have list of things to try here:
https://machinelearningmastery.com/faq/single-faq/why-does-the-code-in-the-tutorial-not-work-for-me
1) I have installed the latest environment except tensorflow 1.5 becuase higher versions not working for me.
2) I have dataset and code in the same directory
3) I ran the code from command line but still found no luck.
4) I have exactly copied the code.
5) I searched the error on stackoverflow but never found any authentic solution yet.
If you type “ls” is the “Flicker8k_Dataset” directory in the current directory beside the code file/s?
I replaced the relative path(as in the tutorial) with absolute full path and it worked for me
Glad to hear it.
Now i am facing an error while running the code “# define the model
model = define_model(vocab_size, max_length)” in the progressive training section.I have installed pydot and graphviz libraries but still come up with the following error.
—————————————————————————
FileNotFoundError Traceback (most recent call last)
C:\anaconda3\lib\site-packages\pydot.py in create(self, prog, format)
1877 shell=False,
-> 1878 stderr=subprocess.PIPE, stdout=subprocess.PIPE)
1879 except OSError as e:
C:\anaconda3\lib\subprocess.py in __init__(self, args, bufsize, executable, stdin, stdout, stderr, preexec_fn, close_fds, shell, cwd, env, universal_newlines, startupinfo, creationflags, restore_signals, start_new_session, pass_fds, encoding, errors)
708 errread, errwrite,
–> 709 restore_signals, start_new_session)
710 except:
C:\anaconda3\lib\subprocess.py in _execute_child(self, args, executable, preexec_fn, close_fds, pass_fds, cwd, env, startupinfo, creationflags, shell, p2cread, p2cwrite, c2pread, c2pwrite, errread, errwrite, unused_restore_signals, unused_start_new_session)
996 os.fspath(cwd) if cwd is not None else None,
–> 997 startupinfo)
998 finally:
FileNotFoundError: [WinError 2] The system cannot find the file specified
During handling of the above exception, another exception occurred:
Exception Traceback (most recent call last)
in ()
1 # define the model
—-> 2 model = define_model(vocab_size, max_length)
in define_model(vocab_size, max_length)
20 # summarize model
21 model.summary()
—> 22 plot_model(model, to_file=’model.png’, show_shapes=True)
23 return model
C:\anaconda3\lib\site-packages\keras\utils\vis_utils.py in plot_model(model, to_file, show_shapes, show_layer_names, rankdir)
131 ‘LR’ creates a horizontal plot.
132 “””
–> 133 dot = model_to_dot(model, show_shapes, show_layer_names, rankdir)
134 _, extension = os.path.splitext(to_file)
135 if not extension:
C:\anaconda3\lib\site-packages\keras\utils\vis_utils.py in model_to_dot(model, show_shapes, show_layer_names, rankdir)
53 from ..models import Sequential
54
—> 55 _check_pydot()
56 dot = pydot.Dot()
57 dot.set(‘rankdir’, rankdir)
C:\anaconda3\lib\site-packages\keras\utils\vis_utils.py in _check_pydot()
24 # Attempt to create an image of a blank graph
25 # to check the pydot/graphviz installation.
—> 26 pydot.Dot.create(pydot.Dot())
27 except OSError:
28 raise OSError(
C:\anaconda3\lib\site-packages\pydot.py in create(self, prog, format)
1881 raise Exception(
1882 ‘”{prog}” not found in path.’.format(
-> 1883 prog=prog))
1884 else:
1885 raise
Exception: “dot.exe” not found in path.
Try commenting out the call to plot_model().
thanks jason! my training is in progress.
Glad to hear it.
In model evaluation section when i come to run the code
” filename = ‘model-ep002-loss3.245-val_loss3.612.h5’
model = load_model(filename)”
I come up with the error
“OSError: Unable to open file (unable to open file: name = ‘model-ep002-loss3.245-val_loss3.612.h5’, errno = 2, error message = ‘No such file or directory’, flags = 0, o_flags = 0)”
i want to ask where is the file ‘model-ep002-loss3.245-val_loss3.612.h5’??and how to select the file??should i pick up the file with least loss value???
You must change the filename to the model that you saved while training.
Jason i trained the model upto 20 epochs.Now please explain which model i should use for prediction? and if i should select from 1-5 then why i am running it for 20 epochs?
The one with the lowest error on a validation set.
I just want to understand the the whole pipeline.The CNN-VGG16 extracts the the features of image to a fixed length 256 vector.The text is cleaned and preprocesed , the RNN-LSTM predicts the next words of the sequence.
What is the strategy and intuition of the encoder/decoder?
how these two modalities (image and text) are merged by FF?
More on the model architecture here:
https://machinelearningmastery.com/caption-generation-inject-merge-architectures-encoder-decoder-model/
What alternative algorithms i can used for photo feature extraction or what extra modifications in the model is likely to perform better results?? or what extra building blocks needs to be added to the current tutorial for getting even refined results?
I have some suggestions here:
https://machinelearningmastery.com/improve-deep-learning-performance/
Dropout layer usually used to get rid of over-fitting.While Dense layer is usually used to change the dimensions.
Why Dropout_1 and dropout_2 are not changing the dimensions while we set some of the connections to 0 ??What is the the intuition behind Dropout_1 and Dropout_2 Layer??Please suggest some links or explaination
Not get rid of, but reduce the likelihood of overfitting.
You can learn more about the intuitions for dropout here:
https://machinelearningmastery.com/dropout-regularization-deep-learning-models-keras/
Hi Jason!
I implemented the above mentioned tutorial using VGG16 CNN architecture.Please let me know the code or tutorial that implements Inceptin model for image captioning.
You can change the example to use inception if you wish.
Dear abbas,
kindly how did you solve your problem? I have the same problem :
PermissionError : [Errno 13] Permission Denied: Flickr8k_Dataset/Flicker8k_Dataset’
Use the alternate download for the dataset listed in the tutorial.
Hi Jason Brownlee! Good tutorial. I doubt how model guarantee to generate semantically correct sentences. Please share your intuition or any available resource. For example, there is three word in vocabulary “is, dog, running”, so how could we guarantee model will generate a sentence with correct grammar structure like ‘dog is running’. Thank you
Perhaps you can run the generated sentences through another process that corrects grammar.
Sir where can i find the implemented tutorial for extracting features from images using inception v3?
You can remove the VGG and add the Inception model yourself.
I am trying to train my model using inception model.While training i come with the following error.How do i change the Shape of the input?
CODE:
# train the model, run epochs manually and save after each epoch
epochs = 5
steps = len(train_descriptions)
for i in range(epochs):
# create the data generator
generator = data_generator(train_descriptions, train_features, tokenizer, max_length)
# fit for one epoch
model.fit_generator(generator, epochs=1, steps_per_epoch=steps, verbose=1)
# save model
model.save(‘inception-model_’ + str(i) + ‘.h5’)
ERROR:
Error when checking input: expected input_3 to have shape (4096,) but got array with shape (2048,)
It looks like you model and data have differing shapes, perhaps change the model or change the data.
do you have any working example for changing data dimensions?
You can learn about the reshape() function here:
https://machinelearningmastery.com/index-slice-reshape-numpy-arrays-machine-learning-python/
my input has dimension of 4096 while its giving error that its 2048.
__________________________________________________________________________________________________
Layer (type) Output Shape Param # Connected to
==================================================================================================
input_4 (InputLayer) (None, 34) 0
__________________________________________________________________________________________________
input_3 (InputLayer) (None, 4096) 0
__________________________________________________________________________________________________
embedding_2 (Embedding) (None, 34, 256) 1940224 input_4[0][0]
__________________________________________________________________________________________________
dropout_3 (Dropout) (None, 4096) 0 input_3[0][0]
__________________________________________________________________________________________________
dropout_4 (Dropout) (None, 34, 256) 0 embedding_2[0][0]
__________________________________________________________________________________________________
dense_4 (Dense) (None, 256) 1048832 dropout_3[0][0]
__________________________________________________________________________________________________
lstm_2 (LSTM) (None, 256) 525312 dropout_4[0][0]
__________________________________________________________________________________________________
add_2 (Add) (None, 256) 0 dense_4[0][0]
lstm_2[0][0]
__________________________________________________________________________________________________
dense_5 (Dense) (None, 256) 65792 add_2[0][0]
__________________________________________________________________________________________________
dense_6 (Dense) (None, 7579) 1947803 dense_5[0][0]
==================================================================================================
Total params: 5,527,963
Trainable params: 5,527,963
Non-trainable params: 0
ERROR:
Error when checking input: expected input_3 to have shape (4096,) but got array with shape (2048,)
Looks like there is a mismatch between your data and the model.
so then how to make data and model inter harmony?
Sorry, I don’t understand, can you elaborate?
jason my model is not loading even the print command is not giving me the output..
the following block of code is not giving the output..where is the error?
# load the model
filename = ‘xraysmodel_8.h5’
print(‘abbas’)
model = load_model(filename)
# evaluate model
evaluate_model(model, test_descriptions, test_features, tokenizer, max_length)
Are you running from the command line? If so, it will report something.
no i am using jupyter notebook
I recommend not using a notebook. Instead, run from the command line, here’s how:
https://machinelearningmastery.com/faq/single-faq/how-do-i-run-a-script-from-the-command-line
Thanks for the great post.
I trained the model when I save the image from “http://media.einfachtierisch.de/thumbnail/600/0/media.einfachtierisch.de/images/2017/07/glueckliche-freigaenger-katze-Shutterstock-Olga-Visav_504063007.jpg” then I am still getting the text
startseq dog is running through the grass endseq
what do I make wrong?
The test image appears as intended.
Perhaps a bug in your check?
Perhaps try other images?
Perhaps the model is overfit?
Hi, I have tried other images and the same result. Even after only 2 or 3 iterations I mostly get the same text. As Paul described below.
That is surprising.
How can i change my data or my model accordingly to match it??
jason! please let me know how can i change learning rate,momentum and number of neurons in this tutorial? can i do it or not?
Learn how to change the learning rate here:
https://machinelearningmastery.com/understand-the-dynamics-of-learning-rate-on-deep-learning-neural-networks/
can i change learning rate and optimizer for this tutorial. if yes then how
Yes, here are some examples:
https://machinelearningmastery.com/understand-the-dynamics-of-learning-rate-on-deep-learning-neural-networks/
Hi Jason
It was a nice article.
I trained the model for 12 epochs in my gpu.
But the prediction was not so accurate.
Most of the times I got the prediction with “man in blue shirt is riding his bohemian on the street” . with the keywords in this sentence.
Help me out .
It needs far fewer epochs, try early stopping against a validation set.
HI Paul, have you found a solution to this? I have a similiar issue.
Hi jason,
While progressive loading, we will get 20 models. Which model is choosen for prediction?
The one with the best skill on the hold out set, likely within epoch 1-5.
Hi jason,
I got the following error when i ran the extract_features function.
can you please help me fix it?
field_value = self._fields.get(field)
TypeError: descriptor ‘_fields’ for ‘OpDef’ objects doesn’t apply to ‘OpDef’ object
This might give you some ideas:
https://machinelearningmastery.com/faq/single-faq/why-does-the-code-in-the-tutorial-not-work-for-me
Hello Jason! I just wanted to know why aren’t we validating the trained model in progressive loading…
You can, as I note in the tutorial. The progressive loading is just a small example to help those who don’t have enough RAM to run the main example.
I meant to ask, ‘Why cant we simultaneously validate, as in the previous code wherein no progressive loading is used?”
Finally someone who understands the importance of separating mathematics from ‘implementation’. The drawback most tutorials have is that they try to discuss both simultaneously and hence making things quite confusing. ‘Implementation’ requires a completely different approach from understanding the theory.
Another wonderful thing about this tutorial is that you actually go through the preprocessing steps. This is where I usually get stuck because most university and online courses and tutorials do not discuss them at all.
I’m glad the tutorial helps Malik.
Traceback (most recent call last):
File “C:\Users\hp\AppData\Local\Programs\Python\Python36\lib\site-packages\pydot.py”, line 1861, in create
stderr=subprocess.PIPE, stdout=subprocess.PIPE)
File “C:\Users\hp\AppData\Local\Programs\Python\Python36\lib\subprocess.py”, line 709, in __init__
restore_signals, start_new_session)
File “C:\Users\hp\AppData\Local\Programs\Python\Python36\lib\subprocess.py”, line 997, in _execute_child
startupinfo)
FileNotFoundError: [WinError 2] The system cannot find the file specified
During handling of the above exception, another exception occurred:
Traceback (most recent call last):
File “C:\Users\hp\AppData\Local\Programs\Python\Python36\lib\site-packages\keras\utils\vis_utils.py”, line 26, in _check_pydot
pydot.Dot.create(pydot.Dot())
File “C:\Users\hp\AppData\Local\Programs\Python\Python36\lib\site-packages\pydot.py”, line 1867, in create
raise OSError(*args)
FileNotFoundError: [WinError 2] “dot.exe” not found in path.
During handling of the above exception, another exception occurred:
Traceback (most recent call last):
File “C:\Users\hp\Desktop\iitp\caption_new\5.py”, line 163, in
model = define_model(vocab_size, max_length)
File “C:\Users\hp\Desktop\iitp\caption_new\5.py”, line 131, in define_model
plot_model(model, to_file=’model.png’, show_shapes=True)
File “C:\Users\hp\AppData\Local\Programs\Python\Python36\lib\site-packages\keras\utils\vis_utils.py”, line 133, in plot_model
dot = model_to_dot(model, show_shapes, show_layer_names, rankdir)
File “C:\Users\hp\AppData\Local\Programs\Python\Python36\lib\site-packages\keras\utils\vis_utils.py”, line 55, in model_to_dot
_check_pydot()
File “C:\Users\hp\AppData\Local\Programs\Python\Python36\lib\site-packages\keras\utils\vis_utils.py”, line 29, in _check_pydot
‘
pydotfailed to call GraphViz.’OSError:
pydotfailed to call GraphViz.Please install GraphViz (https://www.graphviz.org/) and ensure that its executables are in the $PATH.Looks like you need to install pygraphviz, or comment out the plotting of the model.
—-> 1 description = generate_desc(model, tokenizer, photo, max_length)
2 print(description)
in generate_desc(model, tokenizer, photo, max_length)
10 sequence = tokenizer.texts_to_sequences([in_text])[0]
11 sequence = pad_sequences([sequence], maxlen=max_length)
—> 12 yhat = model.predict([photo,sequence], verbose=0)
13 yhat = argmax(yhat)
14 word = word_for_id(yhat, tokenizer)
AttributeError: ‘dict’ object has no attribute ‘ndim’
Ensure that you copy all code for the example.
@Shantanu Singh have you resolved your problem, cause I am facing the exact same problem
Are all of your libraries up to date?
When i am training, i am getting an vocab length of 8359. It is less than what you are getting.
Will it be a problem?
Maybe.
Hello, i am stuck into this..’startseq’ and ‘endseq’ are not added in the Description.txt file but there is no error when i am running that module
We add them in the load_clean_descriptions() function after loading the data.
So,I followed exactly all the steps as shown above and after progressive loading,when the model is getting compiled,it keeps on running epoch 1/1 over and over again and keeps saving different .h5 files. So,I stopped the process after 5 iterations and got a loss of ~3.38 and when I am generating captions,it is not giving even close captions. What should I do to improve my results? Should I let the model to be trained for more iterations or will it cause over-fitting?
The progressive loading example runs epochs manually, not the same epoch again and again.
Perhaps test each saved model and use the one with the lowest loss to generate captions.
Hi Jason,
I am trying to create image caption for my own datasets. Like I have 4k images with single caption. I am able to run and create model for Flickr8K dataset.Its work properly. But when I use my dataset I am able to generate all required files except model. When I try to train the model it gives error –
__________________________________________________________________________________________________
Layer (type) Output Shape Param # Connected to
==================================================================================================
input_2 (InputLayer) (None, 27) 0
__________________________________________________________________________________________________
input_1 (InputLayer) (None, 4096) 0
__________________________________________________________________________________________________
embedding_1 (Embedding) (None, 27, 256) 1058048 input_2[0][0]
__________________________________________________________________________________________________
dropout_1 (Dropout) (None, 4096) 0 input_1[0][0]
__________________________________________________________________________________________________
dropout_2 (Dropout) (None, 27, 256) 0 embedding_1[0][0]
__________________________________________________________________________________________________
dense_1 (Dense) (None, 256) 1048832 dropout_1[0][0]
__________________________________________________________________________________________________
lstm_1 (LSTM) (None, 256) 525312 dropout_2[0][0]
__________________________________________________________________________________________________
add_1 (Add) (None, 256) 0 dense_1[0][0]
lstm_1[0][0]
__________________________________________________________________________________________________
dense_2 (Dense) (None, 256) 65792 add_1[0][0]
__________________________________________________________________________________________________
dense_3 (Dense) (None, 4133) 1062181 dense_2[0][0]
==================================================================================================
Total params: 3,760,165
Trainable params: 3,760,165
Non-trainable params: 0
__________________________________________________________________________________________________
None
Traceback (most recent call last):
File “train2.py”, line 179, in
model.fit([X1train, X2train], ytrain, epochs=20, verbose=2, callbacks=[checkpoint], validation_data=([X1test, X2test], ytest))
ValueError: Error when checking input: expected input_1 to have 2 dimensions, but got array with shape (10931, 7, 7, 512)
keras version is – 2.2.0
How I can solve this error?
Please help me out.
Looks like the dimensions of your data do not match the expected dimensions of the model. You can change the data or the model.
Ok thanks Jason,
I will try to change the model.
Hi Kingson
Were you able to get rid of the above problem? Since I am also getting the same error while training the model.
Thanks in advance
Hey ….Did u solve this error?
I m also stuck here…Please help
Hey Jason,
Great article. I just wanted to ask where to do you start developing code for such implementations. Do you refer papers and code from scratch or refer material that explains implementation code in detail and translate it to keras ?
Thanks,
Satendra
Start by understanding the principle of the approach (from multiple papers), then implement it using whatever tools, e.g. keras.
Hi Jason,
Great tutorial. I am wondering what the best way to limit the vocabulary size. As num_words does not influence tokenizer.fit_on_text, are these changes correct:
def create_tokenizer(descriptions):
lines = to_lines(descriptions)
tokenizer = Tokenizer(num_words = VOCAB_NUM_WORDS)
tokenizer.fit_on_texts(lines)
tokenizer.texts_to_sequences(lines)
return tokenizer
and
vocab_size = VOCAB_NUM_WORDS
Create a list of the n most frequent words you want to work with from the dataset, save them to file, then use them to filter the dataset prior to modeling.
I have many examples of this on the blog, for example:
https://machinelearningmastery.com/develop-word-embedding-model-predicting-movie-review-sentiment/
Thank you!
One more question. For Progressive Loading it seems that the batch size is 1 from the data_generator. If I would like to create a batch i run into the problem of size defining as the “create_sequences” output is variable in size from:
in_img, in_seq, out_word = create_sequences(tokenizer, max_length, desc_list, photo)
For example i can’t size define to something like:
batch_features = np.zeros((batch_size, 17, 1280))
batch_labels = np.zeros((batch_size, 17, 40000))
How can I create a batch of “in_img, in_seq, out_word” (if each sequence will be a different length)? Is there an easy way to make a larger batch size? Again thank you for your help.
Not sure I follow.
In progressive loading, the generator will release a batch of data. You can change the code to make this as few or as many samples as you wish.
Sorry I didn’t explain well. From my understanding your “data_generator” releases data for 1 image into “model.fit_generator” at a time. I would like to change this to a batch of images.
The problem I am having is if I try to use a code structure like below, I am not able to create the empty arrays (unless I pad each line to “max_length”, and make “batch_features = np.zeros((batch_size, max_length, NN_input_shape))”).
#code structure
def generator(features, labels, batch_size):
# Create empty arrays to contain batch of features and labels#
batch_features = np.zeros((batch_size, 64, 64, 3))
batch_labels = np.zeros((batch_size,1))
while True:
for i in range(batch_size):
# choose random index in features
index= random.choice(len(features),1)
batch_features[i] = some_processing(features[index])
batch_labels[i] = labels[index]
yield batch_features, batch_labels
Also, is there somewhere I can donate money to your site?
Correct.
Yes, you can build up data as Python lists then covert the lists to numpy arrays before you return them. It is a strategy I use all the time.
Here the part of my code where I have a problem :
size = 64
img1 = load_img(‘00598546-9.jpg’, target_size=(1, size, size))
imshow(img1)
X1 = (TimeDistributed(Conv2D(32, (3,3), activation=’relu’), input_shape=(None, size, size, 3)))(img1)
Error message:
ayer time_distributed_11 was called with an input that isn’t a symbolic tensor. Received type: . Full input: []. All inputs to the layer should be tensors.
I’m looking to find the output X1 by using (img1) as an input but I get this error message.
How can I use (img1) to find the output ?
Are you able to confirm that your libraries are up to date?
How can I make sure it’s up to date ?
Thank you.
It depends on the method you used to install the libraries.
Perhaps this post will help:
https://machinelearningmastery.com/setup-python-environment-machine-learning-deep-learning-anaconda/
Hi Jason,
I am trying to use the model you presented above for recognizing handwritten documents. In literature the feature extraction stage for OCR produces another 2-D matrix for each image (a feature vector is found for each column vector in the image). How can I then convert this 2-D matrix into a 1-D vector?
The vector output will be a the probability of an image belonging to each output class.
After training it for two epoch it gives caption as “man in red shirt standing on Street” for every other image i put
Sounds like it got stuck, try training it again?
After training again for 6 epoch and loss of 3.3 its showing captions for girls as boys and calling a bird as a dog, should I train it for 20 epoch?
No, the model does not need very much training.
For new Images it is not working, can you send me a trained model? because I tried up to 10 epoch and it is not working
What do you mean it is not working?
Same problem with me. I’ve trained the model several times now but it is giving same captions to all other images when i test it.
Is the sequence length the number of words in a sequence?
Yes. Or rather, the maximum number of words that may appear in a sequence.
Hi Jason,
Firstly I would like to thank you for sharing your knowledge and helping everyone. I am new to this field now. Could you please explain, why are removing all single letter words?
Yes, removing words having numbers and removing punctuation does make sense. Even removing single letter word also makes sense, but by removing “a”, wont it affect formation of new sentences?
It does, but it makes the problem simpler to model with little effect on meaning.
Hello Jason
I am facing the following error while training the model with progressive loading.
Could you please help to fix this?
ImportError Traceback (most recent call last)
~\AppData\Local\Continuum\anaconda3\envs\tensorflow\lib\site-packages\tensorflow\python\pywrap_tensorflow_internal.py in swig_import_helper()
13 try:
—> 14 return importlib.import_module(mname)
15 except ImportError:
~\AppData\Local\Continuum\anaconda3\envs\tensorflow\lib\importlib\__init__.py in import_module(name, package)
125 level += 1
–> 126 return _bootstrap._gcd_import(name[level:], package, level)
127
~\AppData\Local\Continuum\anaconda3\envs\tensorflow\lib\importlib\_bootstrap.py in _gcd_import(name, package, level)
~\AppData\Local\Continuum\anaconda3\envs\tensorflow\lib\importlib\_bootstrap.py in _find_and_load(name, import_)
~\AppData\Local\Continuum\anaconda3\envs\tensorflow\lib\importlib\_bootstrap.py in _find_and_load_unlocked(name, import_)
~\AppData\Local\Continuum\anaconda3\envs\tensorflow\lib\importlib\_bootstrap.py in _load_unlocked(spec)
~\AppData\Local\Continuum\anaconda3\envs\tensorflow\lib\importlib\_bootstrap.py in module_from_spec(spec)
~\AppData\Local\Continuum\anaconda3\envs\tensorflow\lib\importlib\_bootstrap_external.py in create_module(self, spec)
~\AppData\Local\Continuum\anaconda3\envs\tensorflow\lib\importlib\_bootstrap.py in _call_with_frames_removed(f, *args, **kwds)
ImportError: DLL load failed: The specified module could not be found.
During handling of the above exception, another exception occurred:
ModuleNotFoundError Traceback (most recent call last)
~\AppData\Local\Continuum\anaconda3\envs\tensorflow\lib\site-packages\tensorflow\python\pywrap_tensorflow.py in ()
57
—> 58 from tensorflow.python.pywrap_tensorflow_internal import *
59 from tensorflow.python.pywrap_tensorflow_internal import __version__
~\AppData\Local\Continuum\anaconda3\envs\tensorflow\lib\site-packages\tensorflow\python\pywrap_tensorflow_internal.py in ()
16 return importlib.import_module(‘_pywrap_tensorflow_internal’)
—> 17 _pywrap_tensorflow_internal = swig_import_helper()
18 del swig_import_helper
~\AppData\Local\Continuum\anaconda3\envs\tensorflow\lib\site-packages\tensorflow\python\pywrap_tensorflow_internal.py in swig_import_helper()
15 except ImportError:
—> 16 return importlib.import_module(‘_pywrap_tensorflow_internal’)
17 _pywrap_tensorflow_internal = swig_import_helper()
~\AppData\Local\Continuum\anaconda3\envs\tensorflow\lib\importlib\__init__.py in import_module(name, package)
125 level += 1
–> 126 return _bootstrap._gcd_import(name[level:], package, level)
127
ModuleNotFoundError: No module named ‘_pywrap_tensorflow_internal’
During handling of the above exception, another exception occurred:
ImportError Traceback (most recent call last)
in ()
1 from numpy import array
2 from pickle import load
—-> 3 from keras.preprocessing.text import Tokenizer
4 from keras.preprocessing.sequence import pad_sequences
5 from keras.utils import to_categorical
~\AppData\Local\Continuum\anaconda3\envs\tensorflow\lib\site-packages\keras\__init__.py in ()
1 from __future__ import absolute_import
2
—-> 3 from . import utils
4 from . import activations
5 from . import applications
~\AppData\Local\Continuum\anaconda3\envs\tensorflow\lib\site-packages\keras\utils\__init__.py in ()
4 from . import data_utils
5 from . import io_utils
—-> 6 from . import conv_utils
7
8 # Globally-importable utils.
~\AppData\Local\Continuum\anaconda3\envs\tensorflow\lib\site-packages\keras\utils\conv_utils.py in ()
7 from six.moves import range
8 import numpy as np
—-> 9 from .. import backend as K
10
11
~\AppData\Local\Continuum\anaconda3\envs\tensorflow\lib\site-packages\keras\backend\__init__.py in ()
85 elif _BACKEND == ‘tensorflow’:
86 sys.stderr.write(‘Using TensorFlow backend.\n’)
—> 87 from .tensorflow_backend import *
88 else:
89 # Try and load external backend.
~\AppData\Local\Continuum\anaconda3\envs\tensorflow\lib\site-packages\keras\backend\tensorflow_backend.py in ()
4
5 import tensorflow as tf
—-> 6 from tensorflow.python.framework import ops as tf_ops
7 from tensorflow.python.training import moving_averages
8 from tensorflow.python.ops import tensor_array_ops
~\AppData\Local\Continuum\anaconda3\envs\tensorflow\lib\site-packages\tensorflow\python\__init__.py in ()
47 import numpy as np
48
—> 49 from tensorflow.python import pywrap_tensorflow
50
51 # Protocol buffers
~\AppData\Local\Continuum\anaconda3\envs\tensorflow\lib\site-packages\tensorflow\python\pywrap_tensorflow.py in ()
72 for some common reasons and solutions. Include the entire stack trace
73 above this error message when asking for help.””” % traceback.format_exc()
—> 74 raise ImportError(msg)
75
76 # pylint: enable=wildcard-import,g-import-not-at-top,unused-import,line-too-long
ImportError: Traceback (most recent call last):
File “C:\Users\gaurav.anand\AppData\Local\Continuum\anaconda3\envs\tensorflow\lib\site-packages\tensorflow\python\pywrap_tensorflow_internal.py”, line 14, in swig_import_helper
return importlib.import_module(mname)
File “C:\Users\gaurav.anand\AppData\Local\Continuum\anaconda3\envs\tensorflow\lib\importlib\__init__.py”, line 126, in import_module
return _bootstrap._gcd_import(name[level:], package, level)
File “”, line 994, in _gcd_import
File “”, line 971, in _find_and_load
File “”, line 955, in _find_and_load_unlocked
File “”, line 658, in _load_unlocked
File “”, line 571, in module_from_spec
File “”, line 922, in create_module
File “”, line 219, in _call_with_frames_removed
ImportError: DLL load failed: The specified module could not be found.
During handling of the above exception, another exception occurred:
Traceback (most recent call last):
File “C:\Users\gaurav.anand\AppData\Local\Continuum\anaconda3\envs\tensorflow\lib\site-packages\tensorflow\python\pywrap_tensorflow.py”, line 58, in
from tensorflow.python.pywrap_tensorflow_internal import *
File “C:\Users\gaurav.anand\AppData\Local\Continuum\anaconda3\envs\tensorflow\lib\site-packages\tensorflow\python\pywrap_tensorflow_internal.py”, line 17, in
_pywrap_tensorflow_internal = swig_import_helper()
File “C:\Users\gaurav.anand\AppData\Local\Continuum\anaconda3\envs\tensorflow\lib\site-packages\tensorflow\python\pywrap_tensorflow_internal.py”, line 16, in swig_import_helper
return importlib.import_module(‘_pywrap_tensorflow_internal’)
File “C:\Users\gaurav.anand\AppData\Local\Continuum\anaconda3\envs\tensorflow\lib\importlib\__init__.py”, line 126, in import_module
return _bootstrap._gcd_import(name[level:], package, level)
ModuleNotFoundError: No module named ‘_pywrap_tensorflow_internal’
Failed to load the native TensorFlow runtime.
See https://www.tensorflow.org/install/install_sources#common_installation_problems
for some common reasons and solutions. Include the entire stack trace
above this error message when asking for help.
Sorry to hear that.
Perhaps post your error to stackoverflow?
downgrade your tensorflow to version 1.5, i hope it will work for you.
Yes, it has now worked somehow after creating new environment with latest tensorflow version. However, it is giving me another possibly known error. Please have a look once.
Model:
__________________________________________________________________________________________________
Layer (type) Output Shape Param # Connected to
==================================================================================================
input_4 (InputLayer) (None, 30) 0
__________________________________________________________________________________________________
input_3 (InputLayer) (None, 7, 7, 512) 0
__________________________________________________________________________________________________
embedding_2 (Embedding) (None, 30, 256) 987392 input_4[0][0]
__________________________________________________________________________________________________
dropout_3 (Dropout) (None, 7, 7, 512) 0 input_3[0][0]
__________________________________________________________________________________________________
dropout_4 (Dropout) (None, 30, 256) 0 embedding_2[0][0]
__________________________________________________________________________________________________
dense_4 (Dense) (None, 7, 7, 256) 131328 dropout_3[0][0]
__________________________________________________________________________________________________
lstm_2 (LSTM) (None, 256) 525312 dropout_4[0][0]
__________________________________________________________________________________________________
add_2 (Add) (None, 7, 7, 256) 0 dense_4[0][0]
lstm_2[0][0]
__________________________________________________________________________________________________
dense_5 (Dense) (None, 7, 7, 256) 65792 add_2[0][0]
__________________________________________________________________________________________________
dense_6 (Dense) (None, 7, 7, 3857) 991249 dense_5[0][0]
==================================================================================================
—————————————————————————
ValueError Traceback (most recent call last)
in ()
178 generator = data_generator(train_descriptions, train_features, tokenizer, max_length)
179 # fit for one epoch
–> 180 model.fit_generator(generator, epochs=1, steps_per_epoch=steps, verbose=1)
181 # save model
182 model.save(‘model_’ + str(i) + ‘.h5’)
c:\users\gaurav.anand\appdata\local\continuum\anaconda3\envs\tensorflow1.7\lib\site-packages\keras\legacy\interfaces.py in wrapper(*args, **kwargs)
89 warnings.warn(‘Update your
' + object_name +call to the Keras 2 API: ‘ + signature, stacklevel=2)90 '
—> 91 return func(*args, **kwargs)
92 wrapper._original_function = func
93 return wrapper
c:\users\gaurav.anand\appdata\local\continuum\anaconda3\envs\tensorflow1.7\lib\site-packages\keras\engine\training.py in fit_generator(self, generator, steps_per_epoch, epochs, verbose, callbacks, validation_data, validation_steps, class_weight, max_queue_size, workers, use_multiprocessing, shuffle, initial_epoch)
1413 use_multiprocessing=use_multiprocessing,
1414 shuffle=shuffle,
-> 1415 initial_epoch=initial_epoch)
1416
1417 @interfaces.legacy_generator_methods_support
c:\users\gaurav.anand\appdata\local\continuum\anaconda3\envs\tensorflow1.7\lib\site-packages\keras\engine\training_generator.py in fit_generator(model, generator, steps_per_epoch, epochs, verbose, callbacks, validation_data, validation_steps, class_weight, max_queue_size, workers, use_multiprocessing, shuffle, initial_epoch)
211 outs = model.train_on_batch(x, y,
212 sample_weight=sample_weight,
–> 213 class_weight=class_weight)
214
215 outs = to_list(outs)
c:\users\gaurav.anand\appdata\local\continuum\anaconda3\envs\tensorflow1.7\lib\site-packages\keras\engine\training.py in train_on_batch(self, x, y, sample_weight, class_weight)
1207 x, y,
1208 sample_weight=sample_weight,
-> 1209 class_weight=class_weight)
1210 if self._uses_dynamic_learning_phase():
1211 ins = x + y + sample_weights + [1.]
c:\users\gaurav.anand\appdata\local\continuum\anaconda3\envs\tensorflow1.7\lib\site-packages\keras\engine\training.py in _standardize_user_data(self, x, y, sample_weight, class_weight, check_array_lengths, batch_size)
785 feed_output_shapes,
786 check_batch_axis=False, # Don’t enforce the batch size.
–> 787 exception_prefix=’target’)
788
789 # Generate sample-wise weight values given the
sample_weightandc:\users\gaurav.anand\appdata\local\continuum\anaconda3\envs\tensorflow1.7\lib\site-packages\keras\engine\training_utils.py in standardize_input_data(data, names, shapes, check_batch_axis, exception_prefix)
125 ‘: expected ‘ + names[i] + ‘ to have ‘ +
126 str(len(shape)) + ‘ dimensions, but got array ‘
–> 127 ‘with shape ‘ + str(data_shape))
128 if not check_batch_axis:
129 data_shape = data_shape[1:]
ValueError: Error when checking target: expected dense_6 to have 4 dimensions, but got array with shape (11, 1, 3857)
I have made an only change in line 114:
inputs1 = Input(shape=(4096,)) >> inputs1 = Input(shape=(7, 7, 512,))
Because, it was earlier giving error for Data structure mismatch for inputs1 but now it is giving same error in 3rd dense layer.
As I read other comments, it is a common issue.
Could you please share your opinion how to get rid of this ?
Any external guide to data structure mismatch would be much appreciated.
I have some suggestions here:
https://machinelearningmastery.com/faq/single-faq/why-does-the-code-in-the-tutorial-not-work-for-me
Thanks for FAQ page.
I guess the problem is that I am defining model’s inputs1 with shape
inputs1 = Input(shape=(4096,))
but data_generator() method is generating in_img of shape (11,7,7,512).
Probably there is a need to change format of features.pkl file’s data.
Is it right to move in this direction?
Some image captioning libraries (such as Im2txt) are able to provide a confidence score for their generated captions. This helps us when we have a caption that is wrong, so that we can at least tell whether or not by the confidence if the model was ‘unsure’ about the text it generated. How would we go about adding something like that to this?
Good question. Perhaps contact the developers and ask their approach?
I have got to say. This is the best image captioning tutorial I have found online. Thank you for helping me understand it better.
Thanks, I’m glad it helped.
Would it make sense to monitor the accuracy and validation accuracy for image captioning?
That is what I added to model.compile:
model.compile(loss=’categorical_crossentropy’, optimizer=’adam’, metrics=[‘accuracy’])
That gave for the first epoch an accuracy of 0.9463.
And a validation accuracy of 0.9903.
Doesn’t that seem too high though for the 1st epoch?
No accuracy does not tell us much about the performance of the model. We must use a score like BLEU.
Thank you for your response, Dr. Bronwlee. Okay, but does ‘accuracy’ mean anything? I mean Keras is doing some calculations to get these numbers, right? Even if it does not help us to learn about the model’s performance, does the accuracy metric represent anything?
No. You can monitor loss though.
I am Unable to make Progressive Loading, After first epoch I am getting error like
5995/6000 [============================>.] – ETA: 2s – loss: 4.6600
5996/6000 [============================>.] – ETA: 2s – loss: 4.6597
5997/6000 [============================>.] – ETA: 1s – loss: 4.6597
5998/6000 [============================>.] – ETA: 1s – loss: 4.6595
5999/6000 [============================>.] – ETA: 0s – loss: 4.6595
6000/6000 [==============================] – 3329s 555ms/step – loss: 4.6598
Process finished with exit code -1073741819 (0xC0000005)
I am running on Lenovo Laptop with 16 GB RAM., Intel i5, Pychram IDE
First, confirm your environment is up to date:
https://machinelearningmastery.com/setup-python-environment-machine-learning-deep-learning-anaconda/
Then, I have some suggestions here:
https://machinelearningmastery.com/faq/single-faq/why-does-the-code-in-the-tutorial-not-work-for-me
C:\Users\navee\Anaconda3\python.exe “D:/Image Caption/versions.py”
Using TensorFlow backend.
Anaconda Version3.6.6 |Anaconda 4.3.1 (64-bit)| (default, Jun 28 2018, 11:27:44) [MSC v.1900 64 bit (AMD64)]
Keras Version2.1.5
Tensorflow Version1.9.0
Matplotlib Version2.2.2
Numpy Version1.15.0
Process finished with exit code 0
Well done!
5,5 million parameters… and 8000 examples? Clearly, the old rule doesn’t apply that the training data should be at least as many as the # parameters. Is there a way to think about this? Clearly, I shouldn’t use my intuition from a linear system of equations?
Yes, the old ways of thinking do not apply.
I have not seen a good conceptual model for thinking about highly over-specified models.
Nevertheless, they are skillful and do generalize.
Hi Jason,
Many thanks for your kind help. When we use model.fit for training, we are using training data as well as validation data. But When we use mode.fit_generator (Progressive Loading), in that case why we are not using validation data?
I added that progressive loading much later, as a simpler version for those that were having trouble. You can update it to use validation data if you wish.
hi Jason
Due to internet connectivity, my download when i run feature_extraction.py code.
later i tried to run the code again and it is not downloading and not showing error also.
without features.pkl file i cant proceed furthur.
is there any other way to make it download
No, sorry. You require the dataset to work through the example.
thank you jason
i got the dataset
but due to memory error , i am doing with progressive loading
I am getting value error
valueError: Error when checking input : expected input_1 to have 4 dimensions but got array with shape (28,4096)
thank you Jason in advance
Perhaps ensure that you have copied the data exactly and that your libraries are up to date?
Hi Jason,
thank you for this super tutorial.
But I have a question :):
My generated caption is for the sample picture:
“startseq dog is running through the snow endseq”
and not
“startseq dog is running across the beach endseq”
My BLUE Score is also lower as in your tutorial.
BLEU-1: 0.553073
BLEU-2: 0.293371
BLEU-3: 0.200420
BLEU-4: 0.090321
Do have any idea why, or better how can I improve my result?
TIA
Michael
Perhaps try fitting the model again?
Hi!
Is the feature order directly tied to the caption? How much does the model rely on input’s order?
Imagine if the extracted features of an image are [‘dog’, ‘water’, ‘blue’, ‘sand’] and the caption is “dog at the beach”, now this is correct and expected caption.
Now the same image, but the features are [‘sand’, ‘water’, ‘dog’, ‘blue’], how different might the new caption be?
Can we achieve the same caption with differently ordered features vector?
Yes, the order of the generated words is important for the design of this specific model.
Jason – given the model architecture, if I use my own data, with only 1 caption per image, would it impact the quality of the outcome?
It will, perhaps some changes to the model configuration or training will be required. Experiment.
hiii Jason
your tutorial is super and its working fine
but
i have a doubt !!
in generating new caption , will it generate captions to only images in Flickr data set or general to normal images (downloaded in google)?
thank you very much Jason
It will generate captions for any photo you provide.
Remember, it is just an experiment, not an application.
hii Jason
yeah , just to test how it is generaing captions for images other than present in flickr dataset
but it is giving appropriate captions only for images in dataset . For all the other images , generating some caption which no way related to image
Perhaps your model has overfit. You could try adding some regularization.
what should i do to add regularization
Try Dropout, weight noise, weight regularization, activation regularization, early stopping, etc.
On which part of the program should i apply the given techniques.
And how to apply all of them?
I cannot know, I recommend testing a number of different approaches and discover what works.
If this is a challenge, then I am currently writing a series of tutorials on this exact topic (e.g. how to improve model performance).
I am new to deep learning implementation.I dont know where to insert the required techniques inside the code written by you.? Can you suggest a tutorial or some sourse for it
Hello Jason,
Why is there ” + 1 ” every time you find the vocabulary size from the tokenizer?
To start numbering of tokenized words at “1” rather than “0”. We need room for the “0” value for “unknown word”.
When would we encounter an unknown word if the vocabulary consists of all the words in the training data?
There may be words in the test set not in the training set.
There may be works in new data not in the training set.
Does that help?
I am still a bit confused to be honest.
1. The training vocab and the testing vocab are different, that I can see. Why would a trained model ever encounter a word only in the test set? Wouldn’t test set captions (and hence the words in the test) only be used when calculating BLEU scores?
2. Could this ‘unknown word’ token ever be generated by the model?
3. When adding new data with new words to the training data, why would you stick with the older vocabulary and not ‘evaluate’ the newer one?
Yes, it is an artefact of evaluating the model.
In the future, you would finalize the model by training it on all available data and use it to generate captions.
The model may still generate unknown word tokens if it gets confused.
Jason,
Thank you for this clear and thorough tutorial. I have two questions to make sure I understand things correctly:
1. By removing single letters from the descriptions, the generated descriptions will never include/generate descriptions with ‘a’ or ‘I’. Is that correct?
2. Because load_clean_descriptions filters by testing/training the tokenizer may be missing words that are in the test set but not the training set. Is this correct? And for fitting I understand you want to keep test/training data separate, but for the vocabulary ideally you would include the entire vocabulary from both the test and training set. Is this correct?
3. If I understand correctly one could use an even larger vocabulary (would be a bigger model) but in principle there is no reason not to include a larger vocabulary?
Yes, you can add them back if you like. It just makes the vocab larger/model slower to train.
Yes, train defines the vocab. Ideally you want your model to have all the words that may be seen.
Yes, there is good reason to use a larger vocab, it will be more expressive, but I was trying to keep the example fast/simple.
Hello
I wanted to know what should be the target validation loss.
Right now, I am getting the best validation loss of 3.86 after 5 epochs. However, you have a lower validation as well as training loss than mine just after two epochs.
Is my model trained enough or should I train again?
Lower is better.
I want to test the model with more images.
Can you tell me the source from which i can get images which will run efficiently using the code.Itried some randon images from google but they were unsatisfactory.Also tell me steps to add new image along with model to train it?
I expect there are other image captioning datasets you can use.
Sorry, I cannot point you to them off the cuff.
Hi Jason
I really like this post, it helped a lot
your post is better than my daily DL learning class
I have a question
I ran the code until fitting the model, actually till this line
“Train on 306404 samples, validate on 50903 samples
Epoch 1/20”
until now it took 20 mins but nothing has appeared
Does it take so much of time to run each epoch?
Or am I doing something wrong?
I really hope this code work properly with me so I can optimize it and see different results
Thanks
It can take a while.
Another question is that if feature.pkl file has been created the first time I ran the code and I have it in my directory
do I have to run these commands if I ran the code another time
# extract features from all images
directory = ‘Flicker8k_Dataset’
features = extract_features(directory)
print(‘Extracted Features: %d’ % len(features))
# save to file
dump(features, open(‘features.pkl’, ‘wb’))
Thanks again
Once you have created the features, you don’t need to create them again.
Thanks a lot
now it’s working properly
will let you know what I will get at the end
Thanks again, really appreciate your hard work, so happy that I understand your code very well
Well done!
Hey Jason, thanks for the tutorial. The model trained fine for me but when I tried to generate caption for a single new image I encountered the following error:
ValueError: Error when checking input: expected input_8 to have shape (110,) but got array with shape (34,)
Sorry to hear that, I have some suggestions here:
https://machinelearningmastery.com/faq/single-faq/why-does-the-code-in-the-tutorial-not-work-for-me
Hi Jason! Thanks a lot for this!
I tried your model with ResNet50 and got model-ep005-loss3.417-val_loss3.767.h5, so yours works a little bit better even when it comes to BLEU.
I’m gonna try to reduce the vocabulary size and see what happens.
Nice work!
I cannot clearly see how to ‘correct’ misspelling. I have already gone through the vocabulary and there are about 1000 misspelled words.
Any thoughts on how I could go over that?
Perhaps remove or correct all captions with misspellings?
Getting the following error when calling train_features = load_photo_features(‘features.pkl’, train)
The error occurs when trying to run all_features = load(open(filename, ‘rb’))
UnpicklingError: pickle data was truncated
Has anybody a solution to this?
I have some suggestions here:
https://machinelearningmastery.com/faq/single-faq/why-does-the-code-in-the-tutorial-not-work-for-me
Hi Jason,
I come back tonight with the question regarding the VGG16.layers.pop() method which seems not to work with Keras 2.2.2…
Before and after pop() and reshaping the model, the light one has exactly the same architecture as the original one…
Features extracted has dim = 1000 which cause me trouble with my Input = (4096,)…
If I change the input to (1000,) the performance is low…
Thanks for the help
Best regards
Jerome
Thanks, I’ll investigate.
I found the same. 1,000 dims.
Hi Jason,
My question is, are we retraining all the parameters of the VGG16 models in this example?
If yes, why should we train since we are using already trained model?
If no, then what part of the above coding is doing since we have not set layer.trainable = False for any layer?
Please let me when we should train all the layers or when we should not when using a pretrained model like VGG16?
No, we are not re-training the vgg, we are using the vgg to output features that are fed into the captioning model.
My BLEU scores with progressive loading
BLEU-1: 0.547871
BLEU-2: 0.293608
BLEU-3: 0.196752
BLEU-4: 0.086692
Nice work.
Hy Jason. I am new to ML and you are the source which rise my interest in ML. I am following your above tutorial. I am confuse to get some concept, where you are applying tokenization to the text. You mentioned that ” The model will be provided one word and the photo and generate the next word. After that it recursively run to generate new sentence”.I am just confuse here that what are you doing here? What is the purpose of doing that? Please explain in detail that point or suggest me a source to get help from somewhere else.
Second question is that when we will done with that, the model will generate captions, which are in the data-set (I mean to say exact some captions will be suggested for new unseen images or it can be new captions based on image )..plz explain it in details..
Perhaps it will be helpful to learn more about this type of model:
https://machinelearningmastery.com/caption-generation-inject-merge-architectures-encoder-decoder-model/
Yes, the model can be used to generate captions for new unseen photos, we do this at the end of the tutorial.
valueError: Error when checking input: expected input_2 to have shape (40,) but got array with shape (34,)
I am getting that error, I am unable to figure it out. Can you please help me to get that?
I have some suggestions here:
https://machinelearningmastery.com/faq/single-faq/why-does-the-code-in-the-tutorial-not-work-for-me
I am just confused about the max_length method.
What is the purpose of that method. Why we are trying to find that. Please slightly explain ti
To find the number of words in the longest description.
We need this so we can pad all other descriptions to that length (in terms of numbers of words).
hi Jason
my BLEU scores are like this
BLEU-1: 0.528302
BLEU-2: 0.277568
BLEU-3: 0.227300
BLEU-4: 0.117189
and here is my validation loss
Train on 306404 samples, validate on 50903 samples
Epoch 1/20
306404/306404 [==============================] – 9983s 33ms/step – loss: 4.5003 – val_loss: 4.0387
Epoch 00001: val_loss improved from inf to 4.03874, saving model to model-ep001-loss4.500-val_loss4.039.h5
Epoch 2/20
306404/306404 [==============================] – 9512s 31ms/step – loss: 3.8575 – val_loss: 3.8717
Epoch 00002: val_loss improved from 4.03874 to 3.87171, saving model to model-ep002-loss3.857-val_loss3.872.h5
Epoch 3/20
306404/306404 [==============================] – 7866s 26ms/step – loss: 3.6712 – val_loss: 3.8360
Epoch 00003: val_loss improved from 3.87171 to 3.83603, saving model to model-ep003-loss3.671-val_loss3.836.h5
Epoch 4/20
306404/306404 [==============================] – 10109s 33ms/step – loss: 3.5803 – val_loss: 3.8296
Epoch 00004: val_loss improved from 3.83603 to 3.82960, saving model to model-ep004-loss3.580-val_loss3.830.h5
Epoch 5/20
306404/306404 [==============================] – 5384s 18ms/step – loss: 3.5246 – val_loss: 3.8364
Though, when I try to generate a description for a random image from the intern the model seems not working properly
it gives me the same sentence for different kind of images
any suggestion?
It suggests the model may be overfit, perhaps try re-fitting the model or using a model it over fewer epochs or using some regularization.
I see
Thanks
I will try and post my experiment
Hi Omnia,
I am interested in your model’s result. May I know how to change the model.
Hi Jason,
Thanks for such nice work.
I want to know how I print actual caption for the test image. If I am using a new image from the test set.
I show how to print a caption for a new image in the tutorial.
Hi Jason,
in fitting the model, I’m not sure if my thought of input and output is correct
here is the command
model.fit([X1train, X2train], ytrain, epochs=20, verbose=2, validation_data=([X1test, X2test], ytest)
I understand that X1train contains the photo which should be the feature of the photo as integers, correct me if I’m wrong
X2train is sequence text which is the ground truth captions corresponding to the photo
I didn’t understand what is ytrain
would you please explain it briefly
another question is that how does the output penalize if it generates a wrong caption?
Thanks
Correct.
ytrain is the next word to be predicted by the model for each sample.
Dear Dr. Brownlee.
The create_sequences() function that returns for us input-output pairs of training data makes teacher forcing possible in this example, right?
I guess so, or more accurately, the way we use the sequences during training.
Hi Jason
Thanks a lot for your advice
I’m using Pycharm
I tried different types of regularization until I picked the best one, also different optimizers
I got pretty good bleu scores and predictions, the model was predicting everything in details for flicker image
and good enough for some images from the internet
Though for images from the internet, the model couldn’t clearly recognize cat from dog face, I’m still working on that
These are my blue score
BLEU-1: 0.601031
BLEU-2: 0.380297
BLEU-3: 0.279632
BLEU-4: 0.151589
Thanks again
Well done!
Omnia! Please can you share the code using inception model?IF yes then let me know..also i would like to check your results
Hi Omnia ! Can you tell me which regularization technique you used and helped impove the BLEU score.
Hi Omnia, can you share the approach you used for regularization at saurabh18@somaiya.edu?
Thanks!
Hi Jason,
Thank you for an amazing tutorial. I learnt many things here. esp. progressive loading. So here I have one query as you explain in “progressive loading” section:
“Finally, we can use the fit_generator() function on the model to train the model with this data generator.
In this simple example we will discard the loading of the development dataset and model checkpointing and simply save the model after each training epoch. You can then go back and load/evaluate each saved model after training to find the one we the lowest loss that you can then use in the next section.”
I have already got all 20 models from 20 epochs by training the “training” dataset. Now how do I check which model is best using the development set?? Because we have not included development set in the fit_generator(). So how to choose the best model from 20 saved models ? Should I apply evaluate() function on development set for each model?? It would be great if you could give me some idea/hint further on this!! Thanks.
Good question.
Evaluate each of the saved mode on a validation dataset and use the one with the best performance. Probably around epoch 3-4.
HI Jason, Can you tell me what do you mean by 3-4 epochs? I hope that evaluating the model will just go though all the images once and generate descriptions for them and then calculate the BLEU score from that. So, what 3-4 epochs are you speaking about?
I meant that the best performing model was found after the completion of 3 or 4 epochs.
Hi Jason
If I want to generate descriptions for the test images, how do I pass the photo features
(which we already have extracted) to the generate_desc model?
As in the following command, we are passing a single extracted feature for a given image
photo = extract_features(cat.jpg)
description = generate_desc(model, tokenizer, photo, max_length)
I want to generate a description for the test image using test features without using the
function extract feature again, could you please suggest any way to do it?
Thanks
The example at the end of the tutorial shows you how to generate a description for one photo.
Correct
That’s what I meant to say
in the example, it shows how to generate for one photo but with using the extract feature function,
If we already extracted features for the test images
why do we need to use extract_features again to generate a description
can’t we use our saved features in the test?
Yes, if you have already extracted the feature, then you can pass the extracted feature directly to generate_desc().
Hello,
This is a very good work.
What Machine learning techniques do you use in this work?
Thank you.
LSTMs.
Anyone received this problem during test phase?
OSError: Unable to open file (unable to open file: name = ‘model-ep001-loss3.245-val_loss3.612.h5’, errno = 2, error message = ‘No such file or directory’, flags = 0, o_flags = 0)
You must change the code to load the file that you saved.
Hi Mr.Jason,
I am a computer science and engineering student. Me and team mates are doing the same project. Reply me,
1.Can we develop this using MATLab?
2.Can we use the same code to our project for reference purpose using python?
3.In how many months we can complete it?
4.Suggest me what to use either python or matlab?
Sorry, I don’t have examples in matlab, I can’t give you good advice.
Hi I am also facing the same issue. Can you tell what you did to overcome the problem @harsha
Hi Jason. Thank you for this tutorial. I want to develop text-to-image model. Does it work if I change input and output elements? or What would you suggest ?
I don’t have a tutorial on text to image at this stage, I hope to cover it in the future – then I can give you good advice.
Hi Jason, Why have you taken the maximum size of the sentence to be 34, when the maximum length of a sentence is 33?
Is there any reason for selection of this particular RNN architecture? Is it giving any benefit?
Yes, I cover this architecture more here:
https://machinelearningmastery.com/caption-generation-inject-merge-architectures-encoder-decoder-model/
Hello Jason, Can you explain what is the role of mask_zero inside the embedding layer?
We zero pad inputs to the same length, the zero mask ignores those inputs. E.g. it is an efficiency.
Can you elaborate on your answer, I didn’t get anything.
Hi Jason! I’m waiting for you to elaborate on zero mask. Didn’t get anything from your comment.
Hi Jason, Inside the
data_generator()function why have you used thewhile 1:loop?Can you email all the previous answers that I’ve asked?
Because it is a generator that will yield each loop when called.
You can learn more about python generators here:
https://wiki.python.org/moin/Generators
I learned that on the repetitive calling of the generator function, the execution starts where it previously left off.
So, in
Shouldn’t this be :
Where am I getting wrong?
Shouldn’t this be :
def data_generator(tokenizer,train_descs,train_features,maxlen):
for ids, descs in train_descs.items():
feature = train_features[ids][0]
feature_vector, inseq, outseq = create_sequence(tokenizer,descs,feature,maxlen)
yield[[feature_vector,inseq],outseq]
generator = data_generator(tokenizer,train_descs,train_features,maxlen)
Where am I getting wrong?
It looks like you are calling the generator from within the data_generator function.
Sorry the last line in the second code snippet is outside the function.
def data_generator(tokenizer,train_descs,train_features,maxlen):
for ids, descs in train_descs.items():
feature = train_features[ids][0]
feature_vector, inseq, outseq = create_sequence(tokenizer,descs,feature,maxlen)
yield[[feature_vector,inseq],outseq]
generator = data_generator(tokenizer,train_descs,train_features,maxlen)
As, we know that data_generator is yielding one example at a time and each time the function is called, the function execution starts where it previously left off. So, since the “for ids, descs in train_descs.items():” loop is still not complete in the mid-way, it should loop and yield more sequences until it ends.
So, my quesiton is if the loop can continue till all the “train_descs.items()” are encountered, then why do we need the “while 1:” loop there?
I want to know where am I going wrong, kindly let me know.
Good question. To loop over the entire dataset as many times as we need (e.g. number of epochs is exhausted).
On running this:
# test the data generator
generator = data_generator(train_descriptions, train_features, tokenizer, max_length)
inputs, outputs = next(generator)
print(inputs[0].shape)
print(inputs[1].shape)
print(outputs.shape)
I’m getting :
(5, 4096)
(47, 33)
(7266,)
whereas your output is
(47, 4096)
(47, 34)
(47, 7579)
Am I getting wrong somewhere?
Also, can you explain these dimensions?
Perhaps ensure that you copied all of the code and that your Keras and Tensorflow are up to date.
Can you explain what is 47 in the dimension? I mean, data_generator is outputting one example at a time then instead of 47, shouldn’t it be 1? Can you explain me the dimension?
I believe I explain this in the post:
I am coding the stuff myself and rectified something and now the output is :
(47, 4096)
(47, 33)
(7266,)
Even now, print(outputs.shape) is giving me (7266,).
Stll, I want to ask that if data_generator is outputting 1 example at a time then why is 47 the first dimension?
Aah!! Finally, I got it right. Thanks. It was a small glitch.
Well done!
Perhaps confirm that you are using Keras 2.2.4 or better, the output should have 47 samples worth of output as well.
Hi Jason, You have set steps_per_epoch=len(descriptions) and passed it into model.fit_generator(). As far as I’ve read, steps_per_epoch signify the total no. of batches before a epoch to finish. See this :
https://stackoverflow.com/questions/48604149/keras-fit-generator-and-steps-per-epoch
and also this :
https://datascience.stackexchange.com/questions/29719/how-to-set-batch-size-steps-per-epoch-and-validation-steps
Correct.
I want to clarify how data_generator is feeding the data to fit_generator. I mean, is it giving it one training example at a time or some batch of training examples at a time.
It releases one batch of samples per loop.
epochs = 20
steps = len(train_descriptions)
for i in range(epochs):
# create the data generator
generator = data_generator(train_descriptions, train_features, tokenizer, max_length)
# fit for one epoch
model.fit_generator(generator, epochs=1, steps_per_epoch=steps, verbose=1)
# save model
model.save(‘model_’ + str(i) + ‘.h5’)
steps_per_epoch represents the no. of batches that will be trained in one epoch.
As you have said before that data_generator is feeding a batch of examples to fit_generator so that should mean that that in one batch, let’s say x examples are being sent for training process. This should mean that no. of batches for 1 epoch training should be (total no. of training examples)/(1 batch size). On running below snippet, total no. of training examples comes out to be 6000.
print(len(train_descriptions))
6000
So,steps_per_epoch should be 6000/(1 batch size), but in your code steps_per_epoch = len(train_descriptions)
Why have you set it so large?
Are you forcing fit_generator to train over one example at a time even though data_generator is generating a batch of training example at a time?
Feel free to change it.
Hi Jason, does max_length = 34 or any other bigger value have any effect on model performing well?
Try it and see.
Hi Jason, I’m running
evaluate_model(mapping,tokenizer,maxlen,model,features)
and getting this error.
—————————————————————————
KeyError Traceback (most recent call last)
in
—-> 1 evaluate_model(mapping,tokenizer,maxlen,model,features)
in evaluate_model(mapping, tokenizer, maxlen, model, feature_vector)
33 for ids,descs in mapping.items():#1
34 count += 1
—> 35 pred_caption = generate_desc(feature_vector[ids],tokenizer,model,maxlen)#caption string returned
36 for desc in descs:#2
37 reference.append(desc.split())
KeyError: ‘2258277193_586949ec62’
When I search for this image in my pc, I found that its id and its descriptions are present in the
Flickr8k.lemma.token.txt
cleanedcaptions.txt
However, the image is not present in Flicker8k_Dataset.
Why isn’t there any image Flicker8k_Dataset.
I redownloaded the dataset and searched the above-mentioned image in it and guess what, It was NOT present in that too !!
Also, when I loaded
featuresfrom features.pkl and then ranprint(features[‘2258277193_586949ec62’]) then it gave me
KeyError Traceback (most recent call last)
in
—-> 1 features[‘2258277193_586949ec62’]
KeyError: ‘2258277193_586949ec62’
From this, It seems like
2258277193_586949ec62.jpgwas never present in the dataset.But, its description is present in Flickr8k.lemma.token.txt.
Can you share the dataset?
Perhaps ignore that token then?
I am also getting KeyError: ‘2258277193_586949ec62’
how to resolve this. and how to get this image?
Hello Geeta…Please specify which code listing you are working with so that we can better assist you.
Perhaps you skipped a step, are you able to confirm that you have all of the steps/code?
Are you able to confirm that your Python and libraries are up to date?
I resolved the problem by putting an appropriate image that relates well to its description in Flickr8k.lemma.token.txt. The above image was really missing from the image directory. I reckon that anyone must have faced the same problem as mine.
Can you check this on your system? Also check that it is present in Flickr8k.lemma.token.txt.
The example in the blog post works perfectly for me and tens of thousands of readers, I suspect there is something going on with your local version.
Hi Jason!! Can you have a look at my model image
https://drive.google.com/open?id=1anAmPPIi0pfoe_3ISQ2AzaSuibI1KRqo
I cannot understand that there is an “input_3” and an “input_2” layer. Is there any problem if there is no “input_1” present in it?
Sorry, I don’t have the capacity to debug your model or model diagrams.
Just see and tell if missing of input_1 signify anything bad?
ValueError: Error when checking input: expected input_3 to have shape (34,) but got array with shape (30,)
Sir,while evaluating the model,I’m getting such an error how should I get rid of it?I exactly typed the code and I’m also using the same dataset as mentioned above.
Sorry to hear that, I have some suggestions here:
https://machinelearningmastery.com/faq/single-faq/why-does-the-code-in-the-tutorial-not-work-for-me
Hi Jason !! Can you tell me about other regularization techniques to improve the model?
Can you suggest adding anything to improve accuracy?
Yes, I list regularization methods here:
https://machinelearningmastery.com/introduction-to-regularization-to-reduce-overfitting-and-improve-generalization-error/
Are there any other regularisation techniques specific to the caption generation task that can be helpful?
Not really.
I tried my model using my MacBook Air Webcam and it gave pretty bad results and the captions that it generated were from the training dataset.
Where am I going? I am ready to try all the possibilities to improve my model. What can I do?
I am a student. My model is taking an hour or more to train. After training, I’m not getting the desired results. So, I don’t want to retrain it and sit back and see. There could be a high change that it may not work well again. I think AWS requires some bucks for this.
I’m using MacBook Air.
8 GB RAM
i5 5th gen processor
Is there any “free” source to train the model which will take lesser time.
Yes, fit a smaller model on less data as a prototype, then scale up once you find a good config.
Hi Jason,
Like many mentioned, it is a very comprehensive tutorial on caption generation. Progressive loading is a big plus.
Do you plan to cover or have some ideas on the topic of using image and description to search for similar images? Example of what I am trying to do: I already implemented CNN CBIR model that extracts features clusters them and when new image comes in, its features are extracted and nearest neighbors are given as similar images suggestions. This works fine, but I would like to enhance it by adding image description in the mix, so that when I give a picture of the steering wheel and specify “car part”, I will be given list of images of the steering wheels, and not all circular options like bike wheels for example.
I thought to use lucene to help with image description search first and then use CNN to find similar images, but not sure if it is the best approach to take as lucene search might throw out images that are relevant, but not well described.
Very cool idea. I have not tried this but I believe it would be straight-forward to implement.
Let me know how you go.
I dont think that trying to come up with a model that would combine the text along with image features will be straight forward or would perform well as oppose to having elasticsearch in the mix where I can take advantage of text search that elastic provides out of the box, but elastic falls short of image search (tried LIRE before and the results were really bad compared to ConvNet approach)
if you have any other ideas or suggestions, I am all ears 🙂
Thanks for the nice tutorial.
It is interesting to see that even though the LSTM and CNN have no connection, the decoder may produce proper caption words.
How does the LSTM choose words without any information about the image? What is the implicit mechanism in this architecture?
Any comment is welcome.
It has the extracted features from the image as input. They are abstract, but it finds meaning in them.
Hey Jason!
Amazing tutorial. Great Learning experience from start till end.
I wanted to ask you what do you mean exactly in the last section of the article under ‘Extensions’ section by,
‘Pre-trained Word Vectors. The model learned the word vectors as part of fitting the model. Better performance may be achieved by using word vectors either pre-trained on the training dataset or trained on a much larger corpus of text, such as news articles or Wikipedia.’
Thank You!
You can use word vectors learned on another dataset, more here:
https://machinelearningmastery.com/develop-word-embeddings-python-gensim/
hey Jason , thank you for this amazing article .
i wanted to ask you about an issue i ve faced in the generate_desc function , i am getting in the model.predict line this error :
ValueError: Error when checking input: expected input_2 to have shape (74,) but got array with shape (34,).
any solutions please!
thank you !!
Sorry to hear that, I have some suggestions here:
https://machinelearningmastery.com/faq/single-faq/why-does-the-code-in-the-tutorial-not-work-for-me
sir i couldn’t download the datasets after filling the form .please let me know if there is another way
You should be sent an email with the link after completing the form, I believe.
sir, i am also unable to download neither the dataset nor the text files. I am getting a 404 error.
You must fill out this form in order to download the dataset:
https://forms.illinois.edu/sec/1713398
respected sir,
I am not able to download the datasheet from the link that is provided by flickr 8k.
It is showing
The requested URL /HockenmaierGroup/Framing_Image_Description/Flickr8k_Dataset.zip was not found on this server.
Additionally, a 404 Not Found error was encountered while trying to use an ErrorDocument to handle the request.
It looks like they have taken the site down, it says: “Proper NLP home page coming soon.”
I will prepare a workaround ASAP.
UPDATE:
I have added direct download links to the post.
In the function, create_sequences(), the pad_sequences was generating a list so big that the 17 GB Kaggle RAM was crashing. So I tried appending directly to numpy arrays instead of creating it as a list first. However, now it is taking infinite time to execute. Is there any alternative to this function or any way to increase the rate. Please help
P.S Thanks for uploading the dataset, I spent days searching for it on the internet.
Perhaps try the progressive loading section?
i used progressive loading and after execution there were 20 models one for each epoch.
but further sections are using one single file for model . but i have 20 models.how to proceed?
Choose the model with the lowest validation error, you might need to evaluate each.
If that is a pain, use any model, e.g. from epoch 4.
Thank you very much.
i have developed a deep learning model with a .csv file as training data.
file contains a column with text data and during execution of the code
could not convert string to float: ‘Moong(Green Gram)’
this error is being displayed.
what should i do?
I’m not sure what the cause might be, sorry. Perhaps try debugging the data loading/transforming part of your code?
Hi Jason, I am unable to have access to the Flickr 8k dataset after filling the form. The link shows this:
Please help me with it. Thank you!
Not Found
The requested URL /HockenmaierGroup/Framing_Image_Description/Flickr8k_Dataset.zip was not found on this server.
Additionally, a 404 Not Found error was encountered while trying to use an ErrorDocument to handle the request.
Yes, they have recently removed it.
I have added direct download links above in the dataset section.
Jason…..we tried to complete the model generation using progressive loading…total 19 epochs ……And now we are getting outputs but the accuracy is very worse..is there any suggestions to improve the accuracy…..pls help
Please don’t use accuracy, instead use BLEU scores – perhaps re-read the post!
How to train this model using mscoco dataset?
Sorry, I don’t have an example of training with MSCOCO. Thanks for the suggestion.
Great article!
Comprehensive, well-written and well-explained. I used the progressive loading approach and ran the scripts in Google Colab. Everything worked fine (got some errors along the process every now and then, but managed to solve them all). I am currently extracting features using VGG16, VGG19, ResNet50 and Inception and hopefully will make a comparison between them. Thanks for this great post!
I wanted to get your opinion on this. Since I used progressive loading, I do not have a measure for the loss function on the validation dataset, so I took the models and evaluated the BLEU scores directly. However, it’s not straightforward to decide which models gives the best performance and when exactly the model starts to overfit.
I calculated the mean squared error between some “ideal” BLEU scores taken from Marc Tanti et al. (BLEU-1 = 0.6, BLEU-2 = 0.413, BLEU-3 = 0.273, BLEU-4 = 0.178) and the BLEU scores I’ve obtained for my models. The best performing one was actually model_0.h, which was the model calculated after the first epoch. However, I don’t know if the mean squared error is actually very indicative or relevant in this case, but I didn’t know what else to use. From the limited amount of research I’ve done online, I tend to believe that BLEU-4 is a bit more important than the rest of the BLEU scores, but I am not sure. Do you have any suggestions?
Thank you for your time!
Perhaps look at the loss or the learning curve of loss across all saved models?
Thanks.
Well done! Let me know what works well/best.
Why did you increment vocab_size by 1 ??
To start words at index 1 and make room for 0 == unknown word.
Hy Jason!
Thanks for great article.
I tried to run the model through progressive loading. My code is running perfectly. But my model generates generates just 3,4 type of captions for every image. It seems model is being trained on just 3,4 captions. I follow exact your code.
Any suggestion to improve my results.
(PS: I am testing on the same images, on which model has been trained . . .but still result is worse)
Sorry to hear that, some ideas:
Perhaps try re-fitting the model?
Perhaps try using a different final model?
Perhaps there was a typo in your code or you skipped a line?
Hy Jason !
I am not getting that why you reshaped image in the 4 dimensions .
image = image.reshape((1, image.shape[0], image.shape[1], image.shape[2]))
What is the purpose of reshaping the input images in that dimension. Please help me out . . .
The model expects an array of samples as input, e.g. 1 sample, and each image has rows, cols and channels.
Hi Jason, how can I continue your code with beam search algorithm? Because I want to show all the captions per image. Thanks!
This might help:
https://machinelearningmastery.com/beam-search-decoder-natural-language-processing/
Where should I put the beam search algorithm in your code? Can you explain this to me because I want it to try. Thanks!
Sorry, I don’t have a worked example.
I have problems in this section
The complete updated example with progressive loading (use of the data generator) for training the caption generation model is listed below.
my output is shown below :
Requirement already satisfied: pydot in c:\users\rijoanrabbi\anaconda3\lib\site-packages (1.4.1)
Requirement already satisfied: pyparsing>=2.1.4 in c:\users\rijoanrabbi\anaconda3\lib\site-packages (from pydot) (2.2.0)
Dataset: 6000
Descriptions: train=6000
Photos: train=6000
Vocabulary Size: 7579
Description Length: 34
__________________________________________________________________________________________________
Layer (type) Output Shape Param # Connected to
==================================================================================================
input_9 (InputLayer) (None, 34) 0
__________________________________________________________________________________________________
input_8 (InputLayer) (None, 4096) 0
__________________________________________________________________________________________________
embedding_3 (Embedding) (None, 34, 256) 1940224 input_9[0][0]
__________________________________________________________________________________________________
dropout_5 (Dropout) (None, 4096) 0 input_8[0][0]
__________________________________________________________________________________________________
dropout_6 (Dropout) (None, 34, 256) 0 embedding_3[0][0]
__________________________________________________________________________________________________
dense_7 (Dense) (None, 256) 1048832 dropout_5[0][0]
__________________________________________________________________________________________________
lstm_3 (LSTM) (None, 256) 525312 dropout_6[0][0]
__________________________________________________________________________________________________
add_3 (Add) (None, 256) 0 dense_7[0][0]
lstm_3[0][0]
__________________________________________________________________________________________________
dense_8 (Dense) (None, 256) 65792 add_3[0][0]
__________________________________________________________________________________________________
dense_9 (Dense) (None, 7579) 1947803 dense_8[0][0]
==================================================================================================
Total params: 5,527,963
Trainable params: 5,527,963
Non-trainable params: 0
__________________________________________________________________________________________________
—————————————————————————
ImportError Traceback (most recent call last)
in ()
162
163 # define the model
–> 164 model = define_model(vocab_size, max_length)
165 # train the model, run epochs manually and save after each epoch
166 epochs = 20
in define_model(vocab_size, max_length)
130 # summarize model
131 model.summary()
–> 132 plot_model(model, to_file=’model.png’, show_shapes=True)
133 return model
134
~\Anaconda3\lib\site-packages\keras\utils\vis_utils.py in plot_model(model, to_file, show_shapes, show_layer_names, rankdir)
130 ‘LR’ creates a horizontal plot.
131 “””
–> 132 dot = model_to_dot(model, show_shapes, show_layer_names, rankdir)
133 _, extension = os.path.splitext(to_file)
134 if not extension:
~\Anaconda3\lib\site-packages\keras\utils\vis_utils.py in model_to_dot(model, show_shapes, show_layer_names, rankdir)
53 from ..models import Sequential
54
—> 55 _check_pydot()
56 dot = pydot.Dot()
57 dot.set(‘rankdir’, rankdir)
~\Anaconda3\lib\site-packages\keras\utils\vis_utils.py in _check_pydot()
18 if pydot is None:
19 raise ImportError(
—> 20 ‘Failed to import
pydot. ‘21 ‘Please install
pydot. ‘22 ‘For example with
pip install pydot.’)ImportError: Failed to import
pydot. Please installpydot. For example withpip install pydot.You can comment out the plot_model() call if you like.
Hii…..How did u solve this error?
I m also stuck here….I need ur help
how many epoches takes for this training ? it took’s 6 hours per epoces ,now i am concerning how much time it will be taken ?
my laptop configuration
cpu:2.2GHz
Ram: 4Gb
graphics: 2Gb
another thanks for your previous reply 🙂
Typically good results (low loss) can be seen in the first few epochs.
jason plz tell How many epochs takes for this training plzz tell us…Beacuse Evary Epoch take 3hour….5 Epoch enough or Not…plz tell me
..
Typically just 2-3 epochs is sufficient.
Hi Jason
Awesome tutorial
Can you please guide me on how to call fit_generator like the same way we call model.fit(….)
filepath = ‘model-ep{epoch:03d}-loss{loss:.3f}-val_loss{val_loss:.3f}.h5′
checkpoint = ModelCheckpoint(filepath, monitor=’val_loss’, verbose=1,save_best_only=True, mode=’min’)
model.fit([X1train, X2train], ytrain, epochs=20, verbose=2, callbacks=[checkpoint], validation_data=([X1test, X2test], ytest))
i.e. along with callbacks , save best only and include a tensorboard callback to it too!
It’d be of great help.
Thank you!
You can fall fit_generator() in an identical way to calling fit().
What problem are you having exactly?
In Including a tensorboard callback
generator_train=data_generator(train_descriptions,train_features,tokenizer,max_len)
generator_test=data_generator(test_descriptions,test_features,tokenizer,max_len)
generator_validtn=data_generator(validtn_descriptions,validtn_features,tokenizer,max_len)
model.fit_generator(generator_train,steps_per_epoch=32,epochs=20,verbose=2,callbacks=[checkpoint],validation_data=generator_test,validation_steps=32)
———————————————————————————————————————————————-
ValueError Traceback (most recent call last)
in ()
14 #model.fit_generator(generator_train,steps_per_epoch=64,epochs=20,verbose=2,validation_data=next(generator_validtn),validation_steps=64,callbacks=[checkpoint])#tf.keras.callbacks.TensorBoard()
15
—> 16 model.fit_generator(generator_train,steps_per_epoch=32,epochs=20,verbose=2,callbacks=[checkpoint],validation_data=generator_test,validation_steps=32)
/usr/local/lib/python3.6/dist-packages/keras/legacy/interfaces.py in wrapper(*args, **kwargs)
89 warnings.warn(‘Update your
' + object_name + 'call to the ‘ +90 ‘Keras 2 API: ‘ + signature, stacklevel=2)
—> 91 return func(*args, **kwargs)
92 wrapper._original_function = func
93 return wrapper
/usr/local/lib/python3.6/dist-packages/keras/engine/training.py in fit_generator(self, generator, steps_per_epoch, epochs, verbose, callbacks, validation_data, validation_steps, class_weight, max_queue_size, workers, use_multiprocessing, shuffle, initial_epoch)
1416 use_multiprocessing=use_multiprocessing,
1417 shuffle=shuffle,
-> 1418 initial_epoch=initial_epoch)
1419
1420 @interfaces.legacy_generator_methods_support
/usr/local/lib/python3.6/dist-packages/keras/engine/training_generator.py in fit_generator(model, generator, steps_per_epoch, epochs, verbose, callbacks, validation_data, validation_steps, class_weight, max_queue_size, workers, use_multiprocessing, shuffle, initial_epoch)
215 outs = model.train_on_batch(x, y,
216 sample_weight=sample_weight,
–> 217 class_weight=class_weight)
218
219 outs = to_list(outs)
/usr/local/lib/python3.6/dist-packages/keras/engine/training.py in train_on_batch(self, x, y, sample_weight, class_weight)
1209 x, y,
1210 sample_weight=sample_weight,
-> 1211 class_weight=class_weight)
1212 if self._uses_dynamic_learning_phase():
1213 ins = x + y + sample_weights + [1.]
/usr/local/lib/python3.6/dist-packages/keras/engine/training.py in _standardize_user_data(self, x, y, sample_weight, class_weight, check_array_lengths, batch_size)
749 feed_input_shapes,
750 check_batch_axis=False, # Don’t enforce the batch size.
–> 751 exception_prefix=’input’)
752
753 if y is not None:
/usr/local/lib/python3.6/dist-packages/keras/engine/training_utils.py in standardize_input_data(data, names, shapes, check_batch_ax