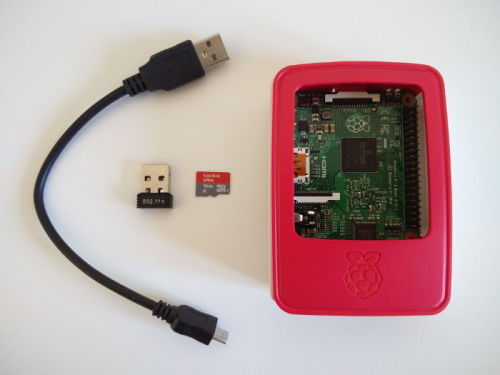
Today I want to show you how to set up a headless Raspberry Pi 2 without any extra cables (HDMI or ethernet), screens, keyboards etc. You might have it all lying around, but you might as well be on the go with only your laptop and usb cable powering your Raspberry Pi.
You can still follow this guide in case you connect your RPi directly to the router, skipping step 3, where I set up wifi card.

I’ll assume you already have:
- Raspberry Pi 2
- SD card (8GB+)
- power source (charger for your mobile phone will usually do)
- compatible usb wifi adapter
New Bonus PDF: Get access to a free PDF version of this tutorial. Click here to download the PDF.
1. Getting Raspbian
The first step is to download Raspbian image that we’ll be working with. You can get it from here (I’m using version 2015-11-21). Extract it, it should be around 3.9GB.
2. Writing it to SD card
Instead of trying to describe every possible way of writing the image on the SD card, I’m going to point you to an excellent resource on this topic - elinux.org article. Once you’re done with it, we can move to the next step.
I personally use the Disks utility on Ubuntu. You can select your card from the list on the left, choose “Restore Disk Image” from the cog menu on the right, and select your img file.
3. Wifi settings
Mac users: Looks like you can’t access EXT4 partitions without fiddling with 3rd party software. The easiest way to go about it is to temporarily connect RPi to router with ethernet cable, ssh in (see below) and continue setting things up in /etc/wpa_supplicant/wpa_supplicant.conf to get the wifi running. Another option is to create a VirtualBox VM using Ubuntu, and mount the image there.
Don’t remove SD card from the reader on your computer. We’re going to set up the wifi interface, so that you can ssh into the box via wireless connection.
Open terminal and edit /etc/wpa_supplicant/wpa_supplicant.conf on the SD card (not on your machine).
Here’s how to open it with nano:
cd /path/to/your/sd/card/
sudo nano etc/wpa_supplicant/wpa_supplicant.conf
and add the following to the bottom of the file:
network={
    ssid="your-network-ssid-name"
    psk="your-network-password"
}
You can save file with “ctrl+x” followed by “y”.
Now, put the SD card into the RPi, plug the wifi in and power it up.
4. Test ssh access
The easiest way to find your Raspberry Pi’s IP address is to check your router’s admin panel. In my TP-LINK router admin panel I have to go to “DHCP” and then “DHCP Clients List”:

Another way to find the IP address is to use nmap tool. One of the following commands should display Raspberry Pi’s IP address if your IP address is 192.168.1.XXX or 192.168.0.XXX:
sudo nmap -sP 192.168.1.0/24
sudo nmap -sP 192.168.0.0/24
nmap -p 22 --open -sV 192.168.1.*
nmap -p 22 --open -sV 192.168.0.*
Now that you know your Pi’s IP address, you should be able to ssh into it with:
ssh pi@[pi-ip-address]
Default password for user “pi” is “raspberry”.
5. raspi-config
Run:
sudo raspi-config
to expand filesystem, change user password and set timezone (in internationalisation options).
6. Password-less login
It’s time to secure it a bit. Log out executing:
exit
and copy your public ssh key into RPi with:
ssh-copy-id pi@[pi-ip-address]
Now you should be able to ssh into RPi without password:
ssh pi@[pi-ip-address]
Don’t have SSH key? No problem. Follow this guide from GitHub to create it.
7. sshd configuration
Now that we can ssh into RPi without password, it would be a good idea to disable password login.
sudo nano /etc/ssh/sshd_config
And change the following values:
#change it to no
PermitRootLogin yes

#uncomment and change it to no
#PasswordAuthentication yes
From now on you will be able to ssh into your RPi only with your private SSH key. Nice!
8. Update
Let’s update RPi:
sudo apt-get update && sudo apt-get upgrade
It might take a while.
9. Watchdog
Now we’re going to install watchdog. Its purpose is to automatically restart RPi if it becomes unresponsive.
sudo apt-get install watchdog

sudo modprobe bcm2708_wdog

sudo nano /etc/modules
And at the bottom add:
bcm2708_wdog
Now let’s add watchdog to startup applications:
sudo update-rc.d watchdog defaults
and edit its config:
sudo nano /etc/watchdog.conf

#uncomment the following:
max-load-1
watchdog-device
Start watchdog with:
sudo service watchdog start
10. Firewall
We’re going to use UFW (Uncomplicated FireWall) to restrict access to our RPi:
sudo apt-get install ufw
sudo ufw allow 22
sudo ufw enable
And we can see its status with:
sudo ufw status verbose
As you can see, we’re accepting incoming connections only on port 22.
11. fail2ban
Now we’re going to install fail2ban which will automatically ban IP addresses that are failing to get into our RPi too many times:
sudo apt-get install fail2ban

sudo cp /etc/fail2ban/jail.conf /etc/fail2ban/jail.local
Restart fail2ban:
sudo service fail2ban restart
and check current bans with:
sudo iptables -L
Done!
That’s it, our RPi is set up and much more secure.
New Bonus PDF: Get access to a free PDF version of this tutorial. Click here to download the PDF.
Other parts in this series
- Part 1: Basic setup without any cables
- Part 2: External drives, Samba and SFTP
- Part 3: Amazon Glacier