
Scheduled timers often come in handy. They are useful when you need to show a countdown, refresh some value every second, or make a periodic poll request.
But CADisplayLink has always stood on higher ground.
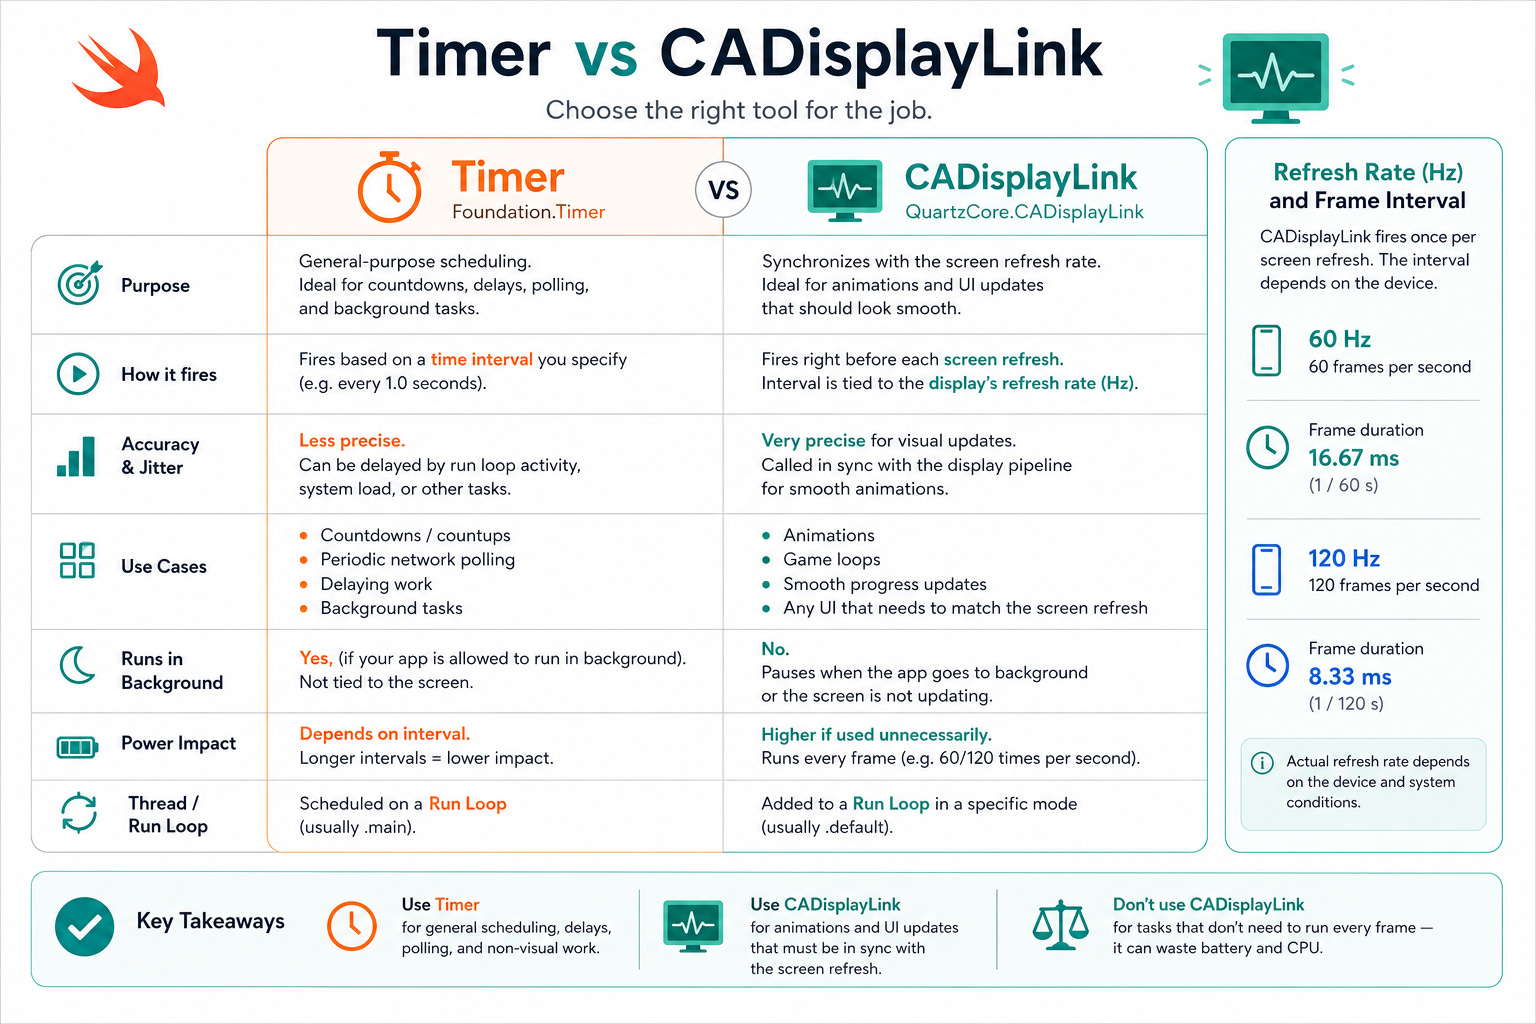
That is because Timer is time-based, while CADisplayLink is frame-based. A timer fires according to a run loop schedule. A display link fires in sync with the display refresh cycle. When the work you are doing is visual, that difference matters a lot.
During years I’ve faced
CADisplayLinkonly a few times and it’s time to learn about it!
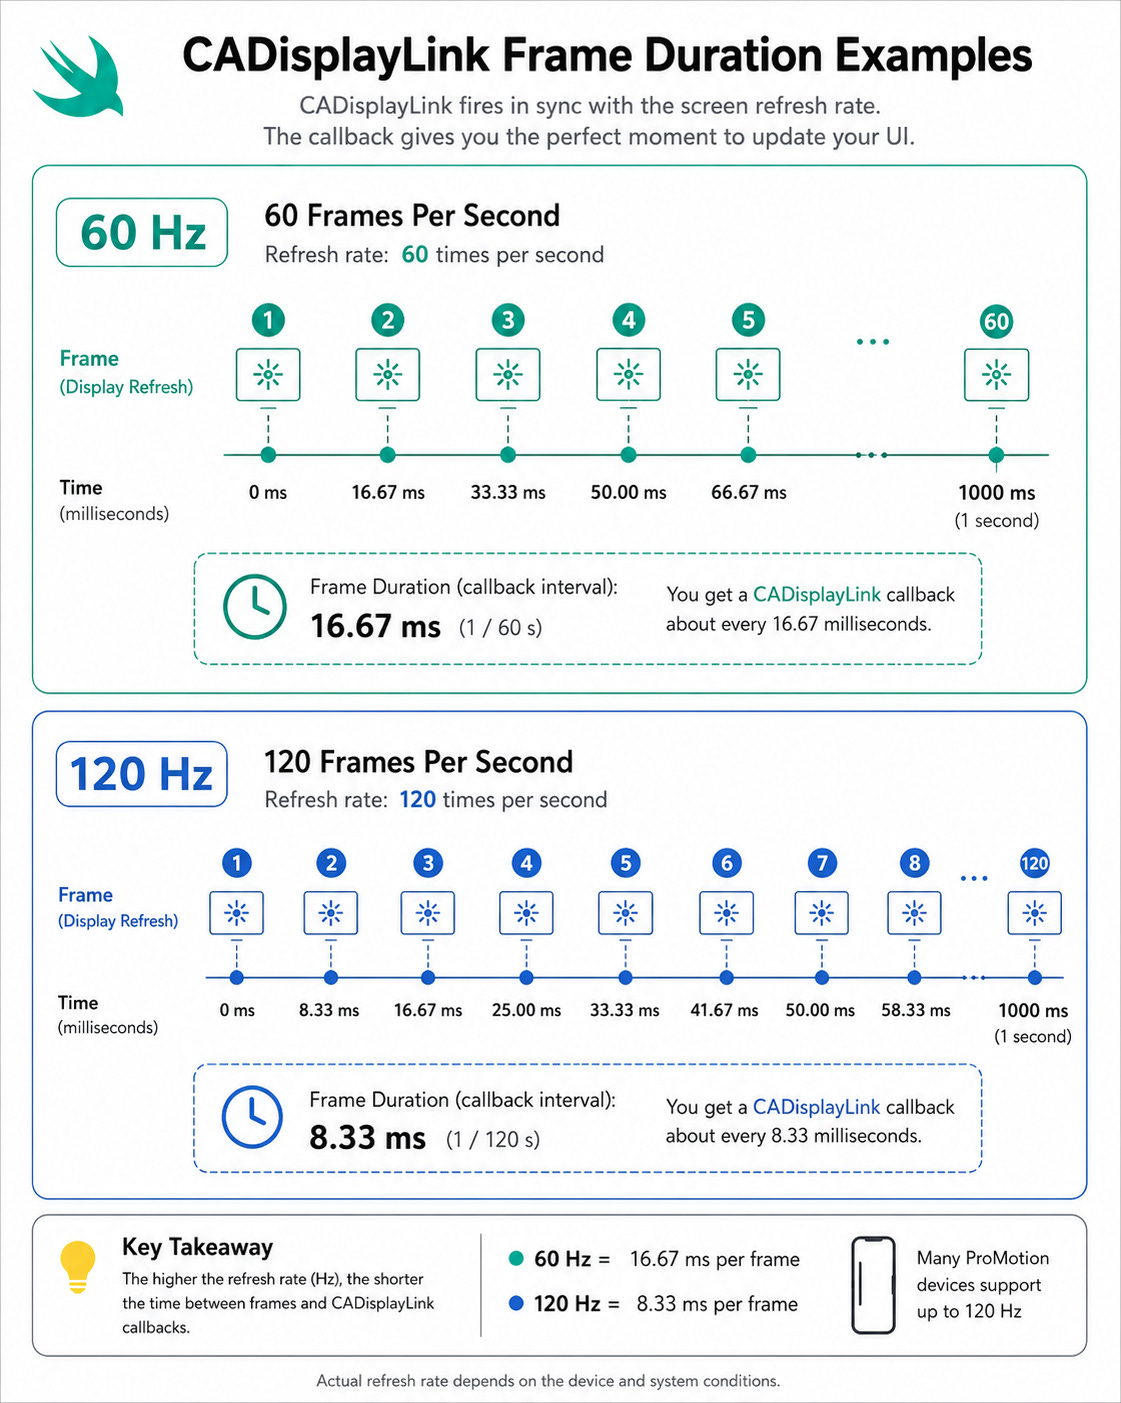
Another useful way to frame it is in Hz. A standard 60 Hz display can present up to 60 frames per second, while higher-refresh displays can go beyond that. CADisplayLink follows that rendering cadence, which is exactly why it feels more natural for animation and frame-driven UI work than a regular timer.
CADisplayLink is a QuartzCore object that lets your code run in step with screen updates.
That makes it a natural fit for:
smooth custom animations
progress that needs to track frames precisely
rendering loops
physics-like visual updates
UI that should advance only when a new frame is about to be displayed
This is the key mental model: CADisplayLink is not just “a timer that fires fast.” It is display-synchronized work.
A Timer is about time intervals.
A CADisplayLink is about frame boundaries.
That one difference changes how they behave in practice.
Use Timer when you care about elapsed time more than visual smoothness.
Examples:
a countdown label
a polling request every few seconds
refreshing cached data periodically
lightweight background scheduling tied to a run loop
Use CADisplayLink when your update is visually tied to the screen.
Examples:
moving or redrawing something every frame
tracking animation progress manually
synchronizing custom rendering with the display
driving a game-like loop in UIKit
If you try to drive visual motion with a regular timer, it can work, but it is usually less precise and less naturally aligned with what the display is doing.
A common setup looks like this:
import QuartzCore
import UIKit
final class DisplayLinkViewController: UIViewController {
    private var displayLink: CADisplayLink?
    override func viewDidAppear(_ animated: Bool) {
        super.viewDidAppear(animated)
        startDisplayLink()
    }
    override func viewDidDisappear(_ animated: Bool) {
        super.viewDidDisappear(animated)
        stopDisplayLink()
    }
    private func startDisplayLink() {
        let link = CADisplayLink(target: self, selector: #selector(step))
        link.add(to: .main, forMode: .common)
        displayLink = link
    }
    private func stopDisplayLink() {
        displayLink?.invalidate()
        displayLink = nil
    }
    @objc private func step(_ link: CADisplayLink) {
        print("Frame timestamp: \(link.timestamp)")
    }
}
This already shows one important difference from Timer: you usually treat display link lifetime much more carefully, because it is easy to keep doing work every frame when you no longer need to.
Even in SwiftUI, CADisplayLink can still make sense when you need frame-driven updates rather than interval-based ones.
One practical way is to keep the display link inside a small helper object and push the visible value back into SwiftUI state.
import SwiftUI
import QuartzCore
final class DisplayLinkDriver {
    var onFrame: ((CFTimeInterval) -> Void)?
    private var displayLink: CADisplayLink?
    func start() {
        guard displayLink == nil else { return }
        let link = CADisplayLink(target: self, selector: #selector(step))
        link.add(to: .main, forMode: .common)
        displayLink = link
    }
    func stop() {
        displayLink?.invalidate()
        displayLink = nil
    }
    @objc private func step(_ link: CADisplayLink) {
        onFrame?(link.targetTimestamp)
    }
    deinit {
        stop()
    }
}
struct DisplayLinkDemoView: View {
    @State private var progress: CGFloat = 0
    @State private var direction: CGFloat = 1
    private let driver = DisplayLinkDriver()
    var body: some View {
        VStack(spacing: 24) {
            Text("Frame-driven progress")
            Capsule()
                .fill(.gray.opacity(0.2))
                .frame(height: 12)
                .overlay(alignment: .leading) {
                    Capsule()
                        .fill(.blue)
                        .frame(width: max(12, progress * 240), height: 12)
                }
                .frame(width: 240)
        }
        .onAppear {
            driver.onFrame = { _ in
                let next = progress + (0.01 * direction)
                if next >= 1 {
                    progress = 1
                    direction = -1
                } else if next <= 0 {
                    progress = 0
                    direction = 1
                } else {
                    progress = next
                }
            }
            driver.start()
        }
        .onDisappear {
            driver.stop()
        }
    }
}
The idea is the same as in UIKit: use CADisplayLink when the update should move with frames, not just with elapsed time.
A few CADisplayLink properties are especially useful.
This is the timestamp of the last displayed frame.
This gives you the timestamp for the next frame. It is often more useful when calculating frame progress.
This is the interval between screen refreshes as reported by the link.
This gives you more control over the cadence you want, instead of always blindly running at the highest possible rate.
That matters more now, because “every frame” is not always the same thing across devices and refresh rates. On a 60 Hz display, one frame is typically about 16.67 ms. On a 120 Hz display, it is about 8.33 ms. That is a meaningful difference when you are calculating motion, progress, or per-frame work.
CADisplayLink is powerful, but it is also easy to misuse.
If you only need to refresh a countdown every second, Timer is usually the simpler and cheaper tool.
Using CADisplayLink for that would mean waking up every frame just to update something that only changes once a second.
A display link can fire very often. If your callback is heavy, you will feel it quickly in dropped frames, CPU usage, or battery cost.
Invalidate it when you are done.
Forgetting to stop a display link is one of the easiest ways to keep a controller alive longer than expected or keep doing frame work off-screen.
Adding it with .common is often the practical choice in UI code, because default run loop mode alone may not behave the way you expect during interactions.
This is the big one.
CADisplayLink shines when your logic is tied to drawing or visible animation. For networking, clocks, or ordinary periodic tasks, Timer is often still the better fit.
Here is a simple rule of thumb.
If you are building:
a countdown to an event → use
Timera polling request every 30 seconds → use
Timera custom animation progress loop → use
CADisplayLinka frame-by-frame canvas update → use
CADisplayLink
That keeps the tools aligned with the kind of work they were meant to do.
The interesting part in iOS 27 is that Apple is pushing CADisplayLink in a more scene-aware direction.
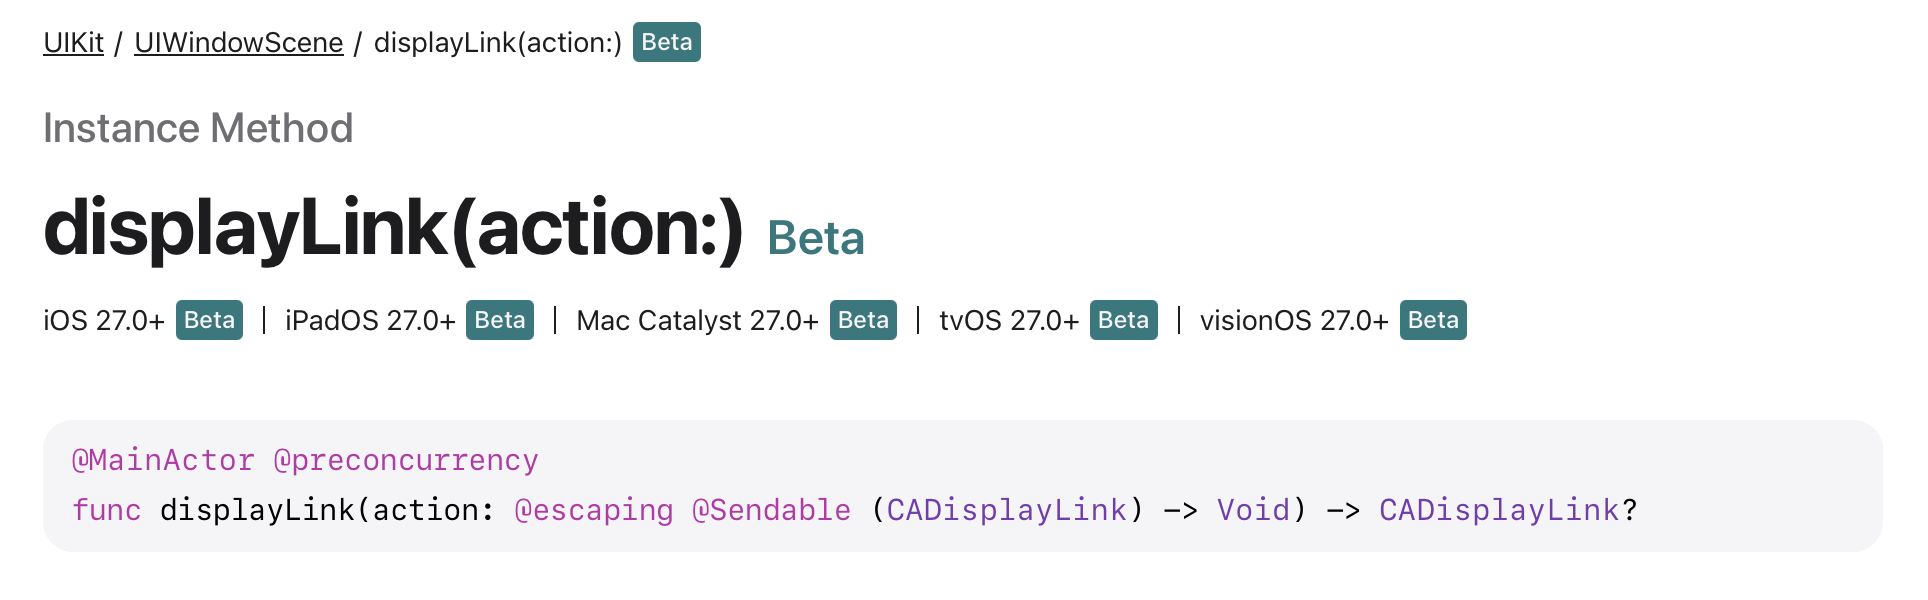
It is also worth calling out that iOS 27 is still in beta, so the exact API shape and naming may still change before final release.
That is a meaningful shift.
Until now, display link setup was usually thought about in terms of a screen or a run loop, but not as explicitly in terms of a specific window scene. With the new API direction, you can now create it in a way that is linked to a UIWindowScene.
That is a better fit for modern UIKit apps, especially on iPad and other environments where scenes matter more.
Why does that matter?
Because visual work is often not just “device-wide.” It belongs to a particular window, a particular scene, and a particular visible UI context. As UIKit becomes more scene-oriented, display-driven work benefits from becoming scene-aware too.
A scene-linked display link fits modern app architecture better in a few ways.
If rendering or animation belongs to one window scene, it makes sense for the display link to belong there too.
On iPad or multiwindow environments, scene ownership is much clearer than treating display updates as one global concern.
This is probably the biggest improvement.
Instead of thinking:
“Here is a display link somewhere in the app.”
you can think:
“Here is display-synchronized work attached to this scene.”
That is simply easier to reason about.
You still should not reach for CADisplayLink automatically.
Use it when:
the work is visual
smoothness matters
frame alignment matters
the update naturally belongs to visible rendering
Use Timer when:
the work is interval-based
exact frame boundaries do not matter
you are scheduling ordinary periodic tasks
And if you are targeting iOS 27 and newer, the new scene-linked creation path is worth paying attention to, because it makes display-driven code feel much more aligned with UIKit’s scene model.
Timers are useful because they are simple and practical.
But CADisplayLink has always been the more specialized tool for UI work that needs to move with the display itself. That is why it has always stood on higher ground.
The new scene-aware direction in iOS 27 makes that story even stronger. It suggests Apple wants frame-driven work to be modeled closer to where it actually belongs: not just on a run loop, but inside the lifetime and ownership of a scene.
That is a small API direction change, but a meaningful architectural one.
Apple Developer Documentation: CADisplayLink
Apple Developer Documentation: UIWindowScene.displayLink(action:)
No posts
Comments
Nothing yet. Say the first thing.
Sign in to join the conversation.