

Hey, AI Ready Seeker! 👋🙂
Imagine a client calling your business and an AI receptionist answers every question and books the appointment.
In a previous article, we explored how to build your own AI voice agent using Vapi. If you missed it, here it is.
In this article, we’re going to take it a step further.
By the end, your AI voice agent will be able to answer questions from your knowledge base, connect to other applications using tools, and receive phone calls through its own phone number.
For now, we’ll cover:
📖 Adding A Knowledge Base
⚒️ Adding Tools To Your Agent
📞 Connecting A Phone Number
🧪 Testing Before Going Live
⚠️ Common Mistakes To Avoid
A knowledge base gives your AI voice agent the information it needs to answer customer questions accurately.
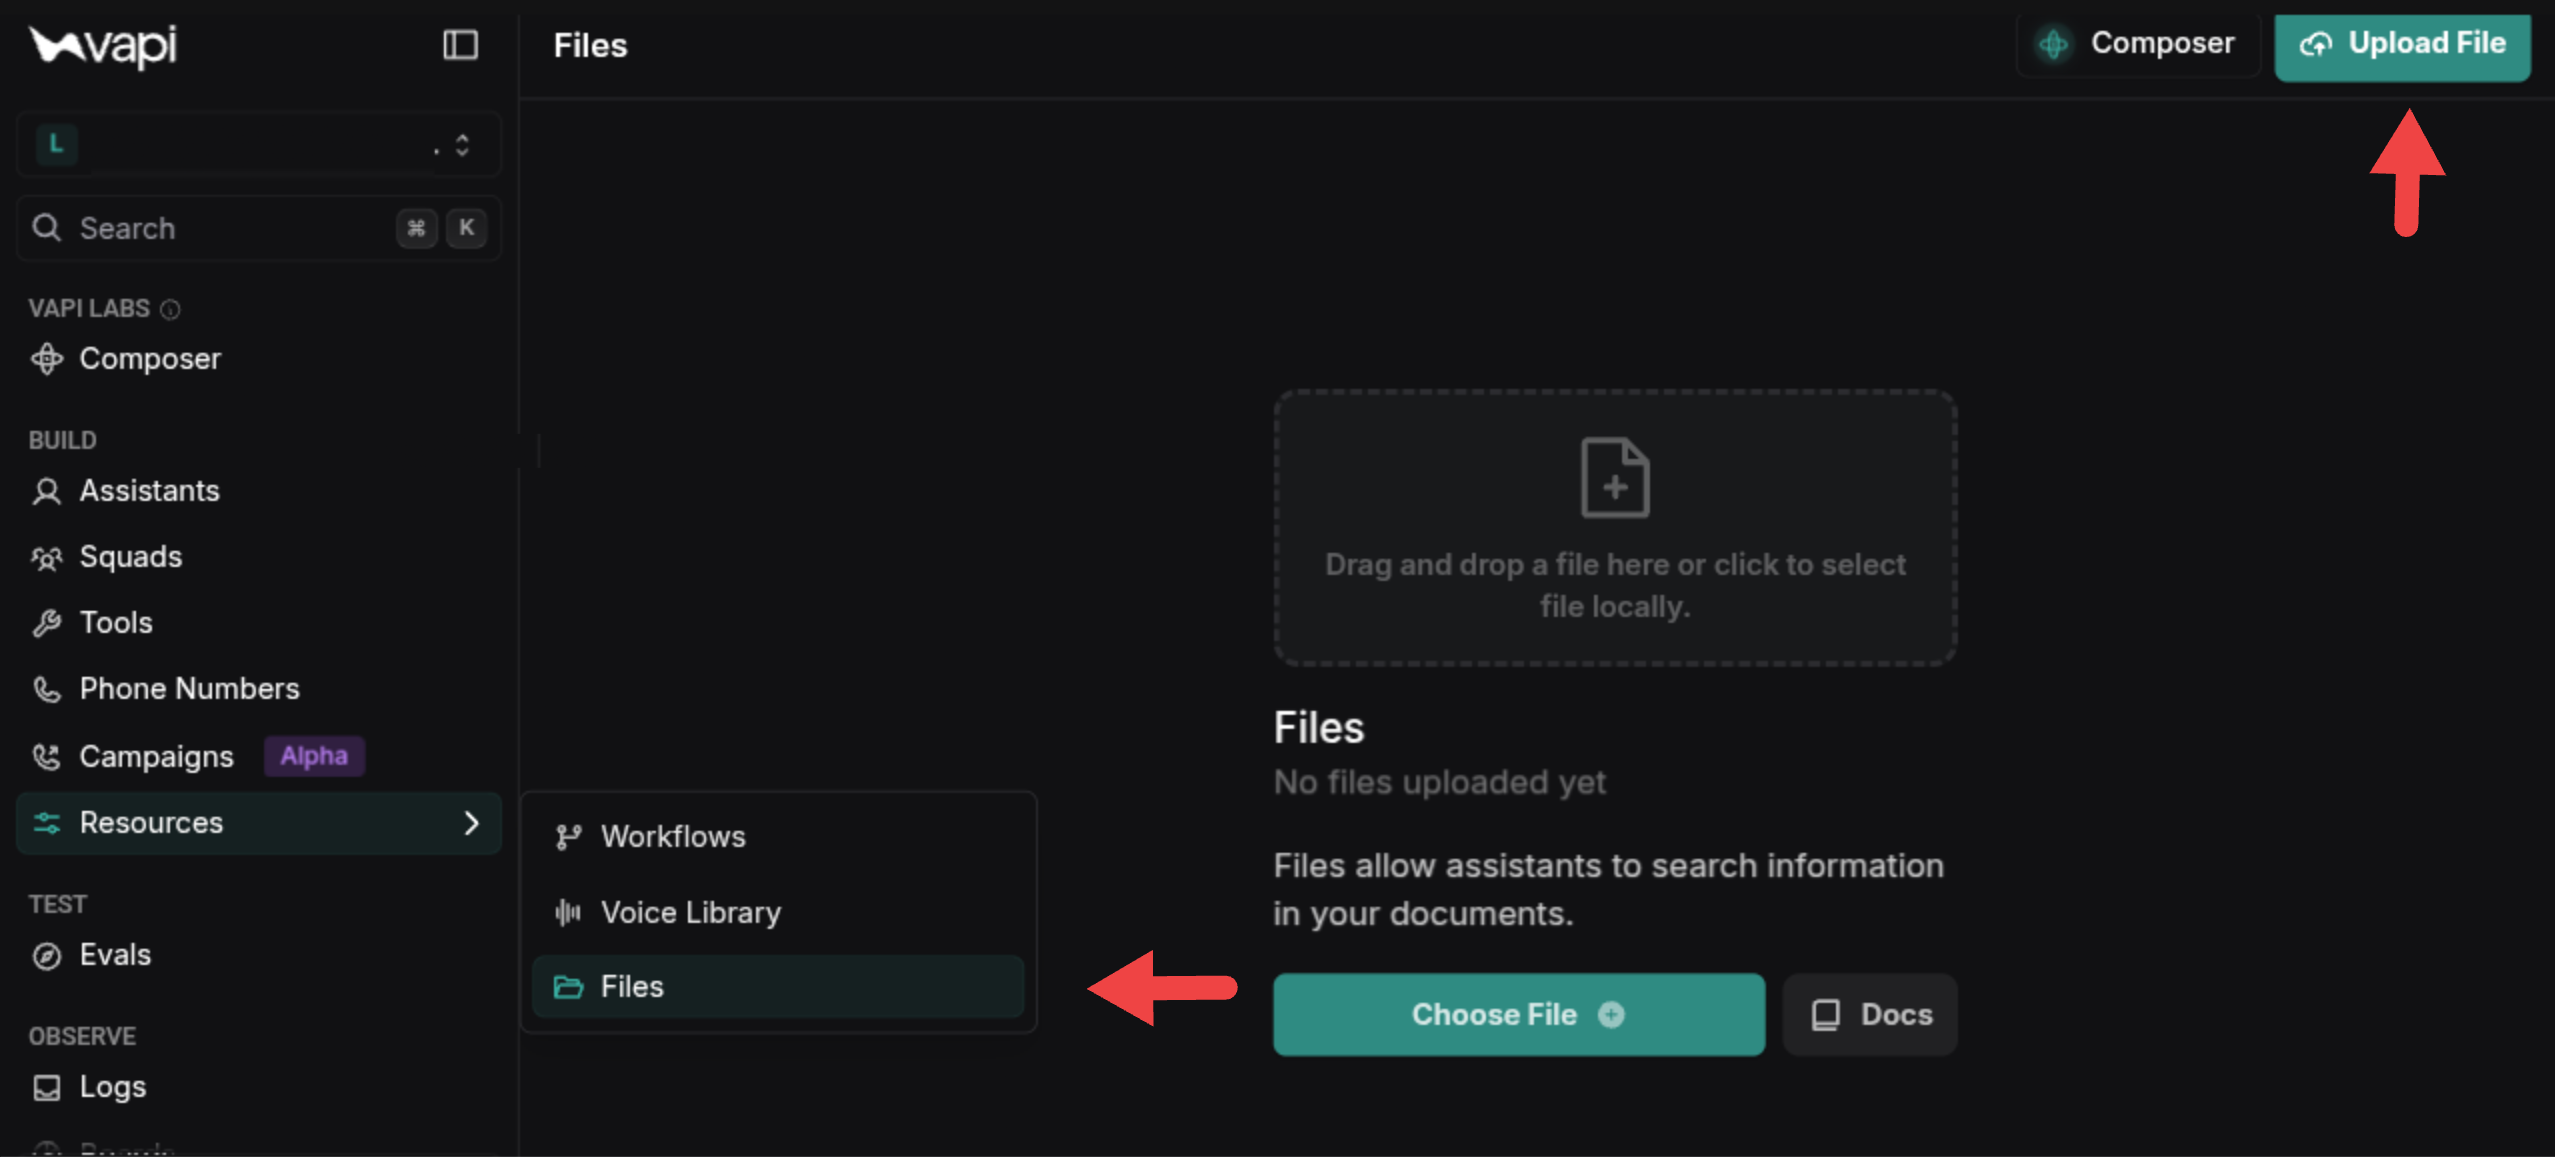
In the left side menu, click Resources, then select Files.
In the top right corner, click Upload File.
Upload your documents, such as PDF, DOCX, TXT, CSV, JSON, Markdown, XML, and other supported file types.
In the left side menu, click Assistants and select the assistant you want to update.
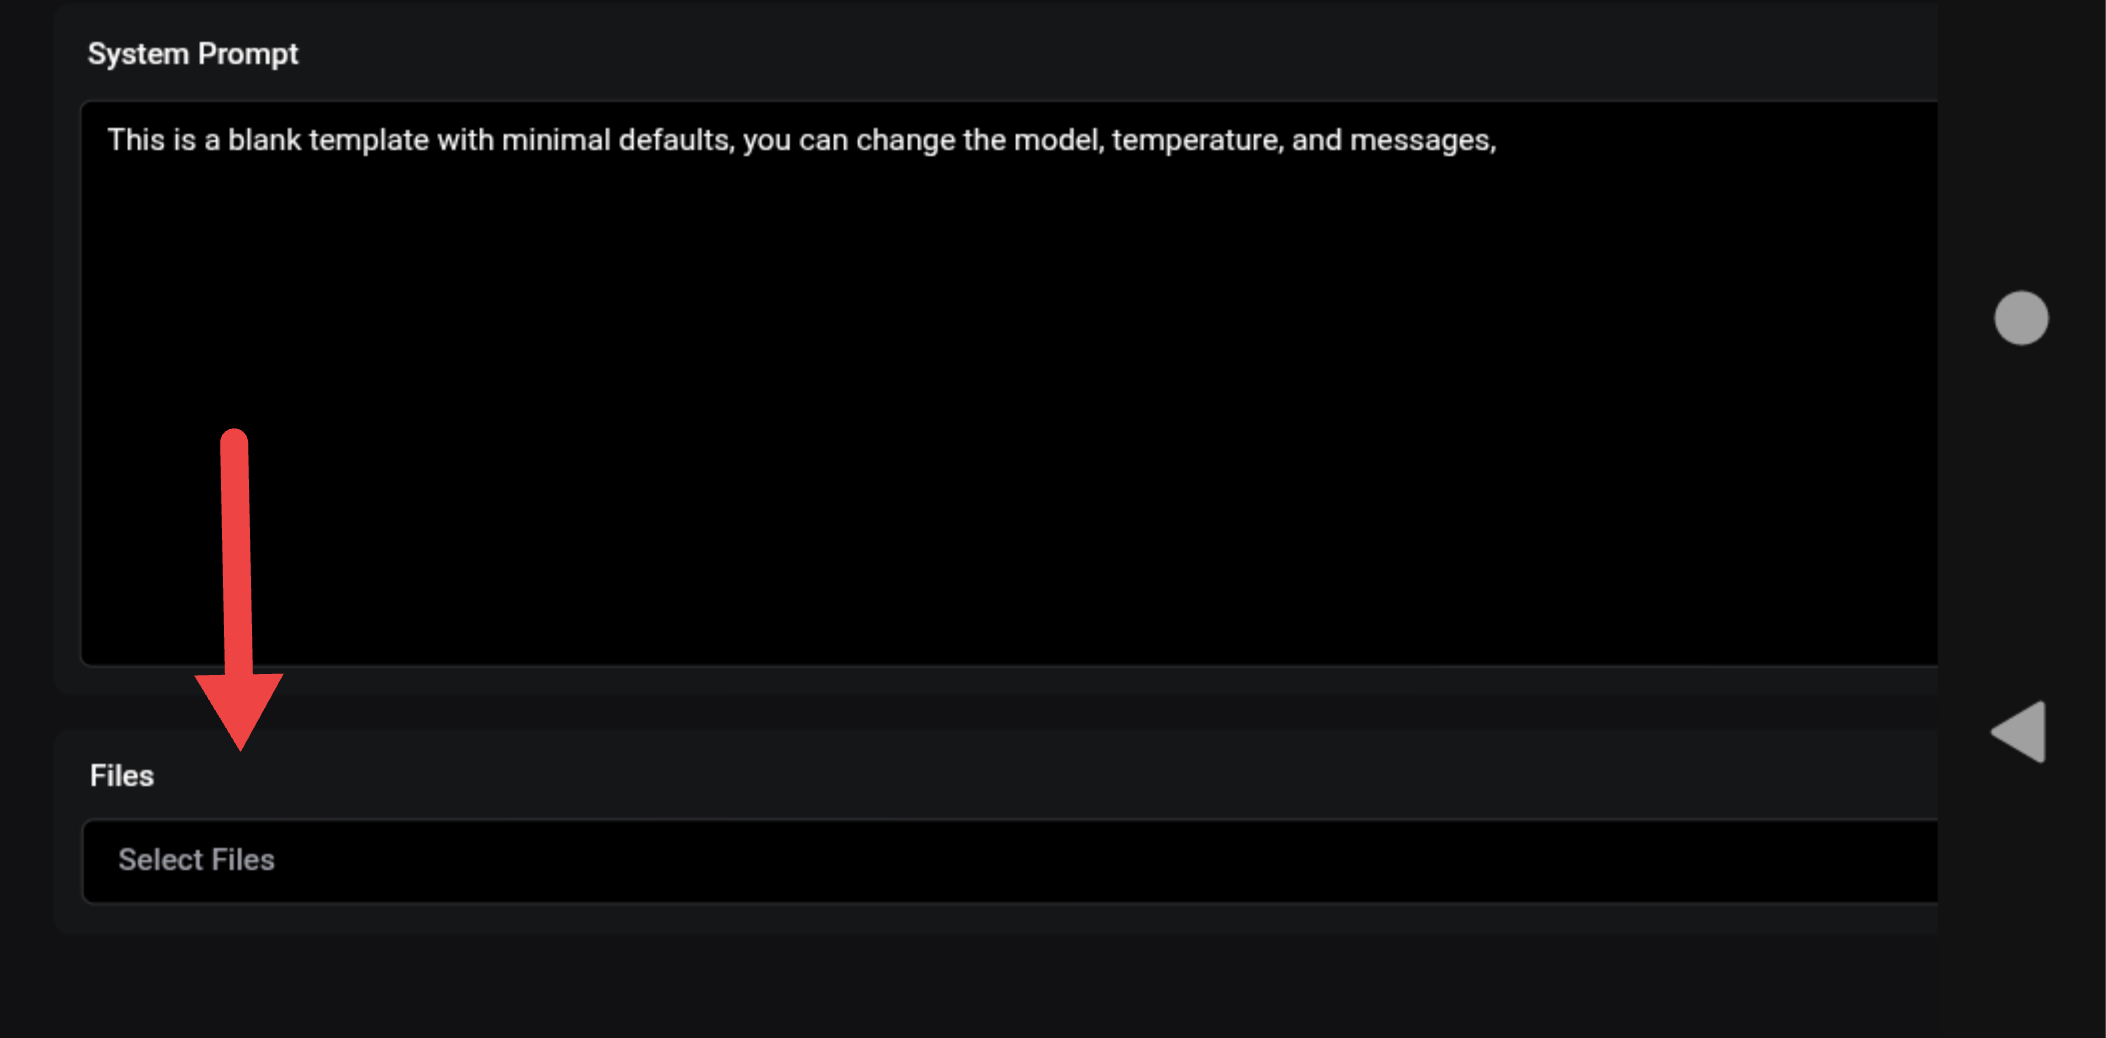
Scroll to the Files section and select the documents you’ve uploaded.
Click Publish in the top right corner to save your assistant.
💡 Keep your documents accurate and up to date. Your AI voice agent can only answer questions using the information you provide.
Tools allow your AI voice agent to do much more than answer questions. They enable your assistant to interact with other apps and services so it can complete tasks during a conversation.
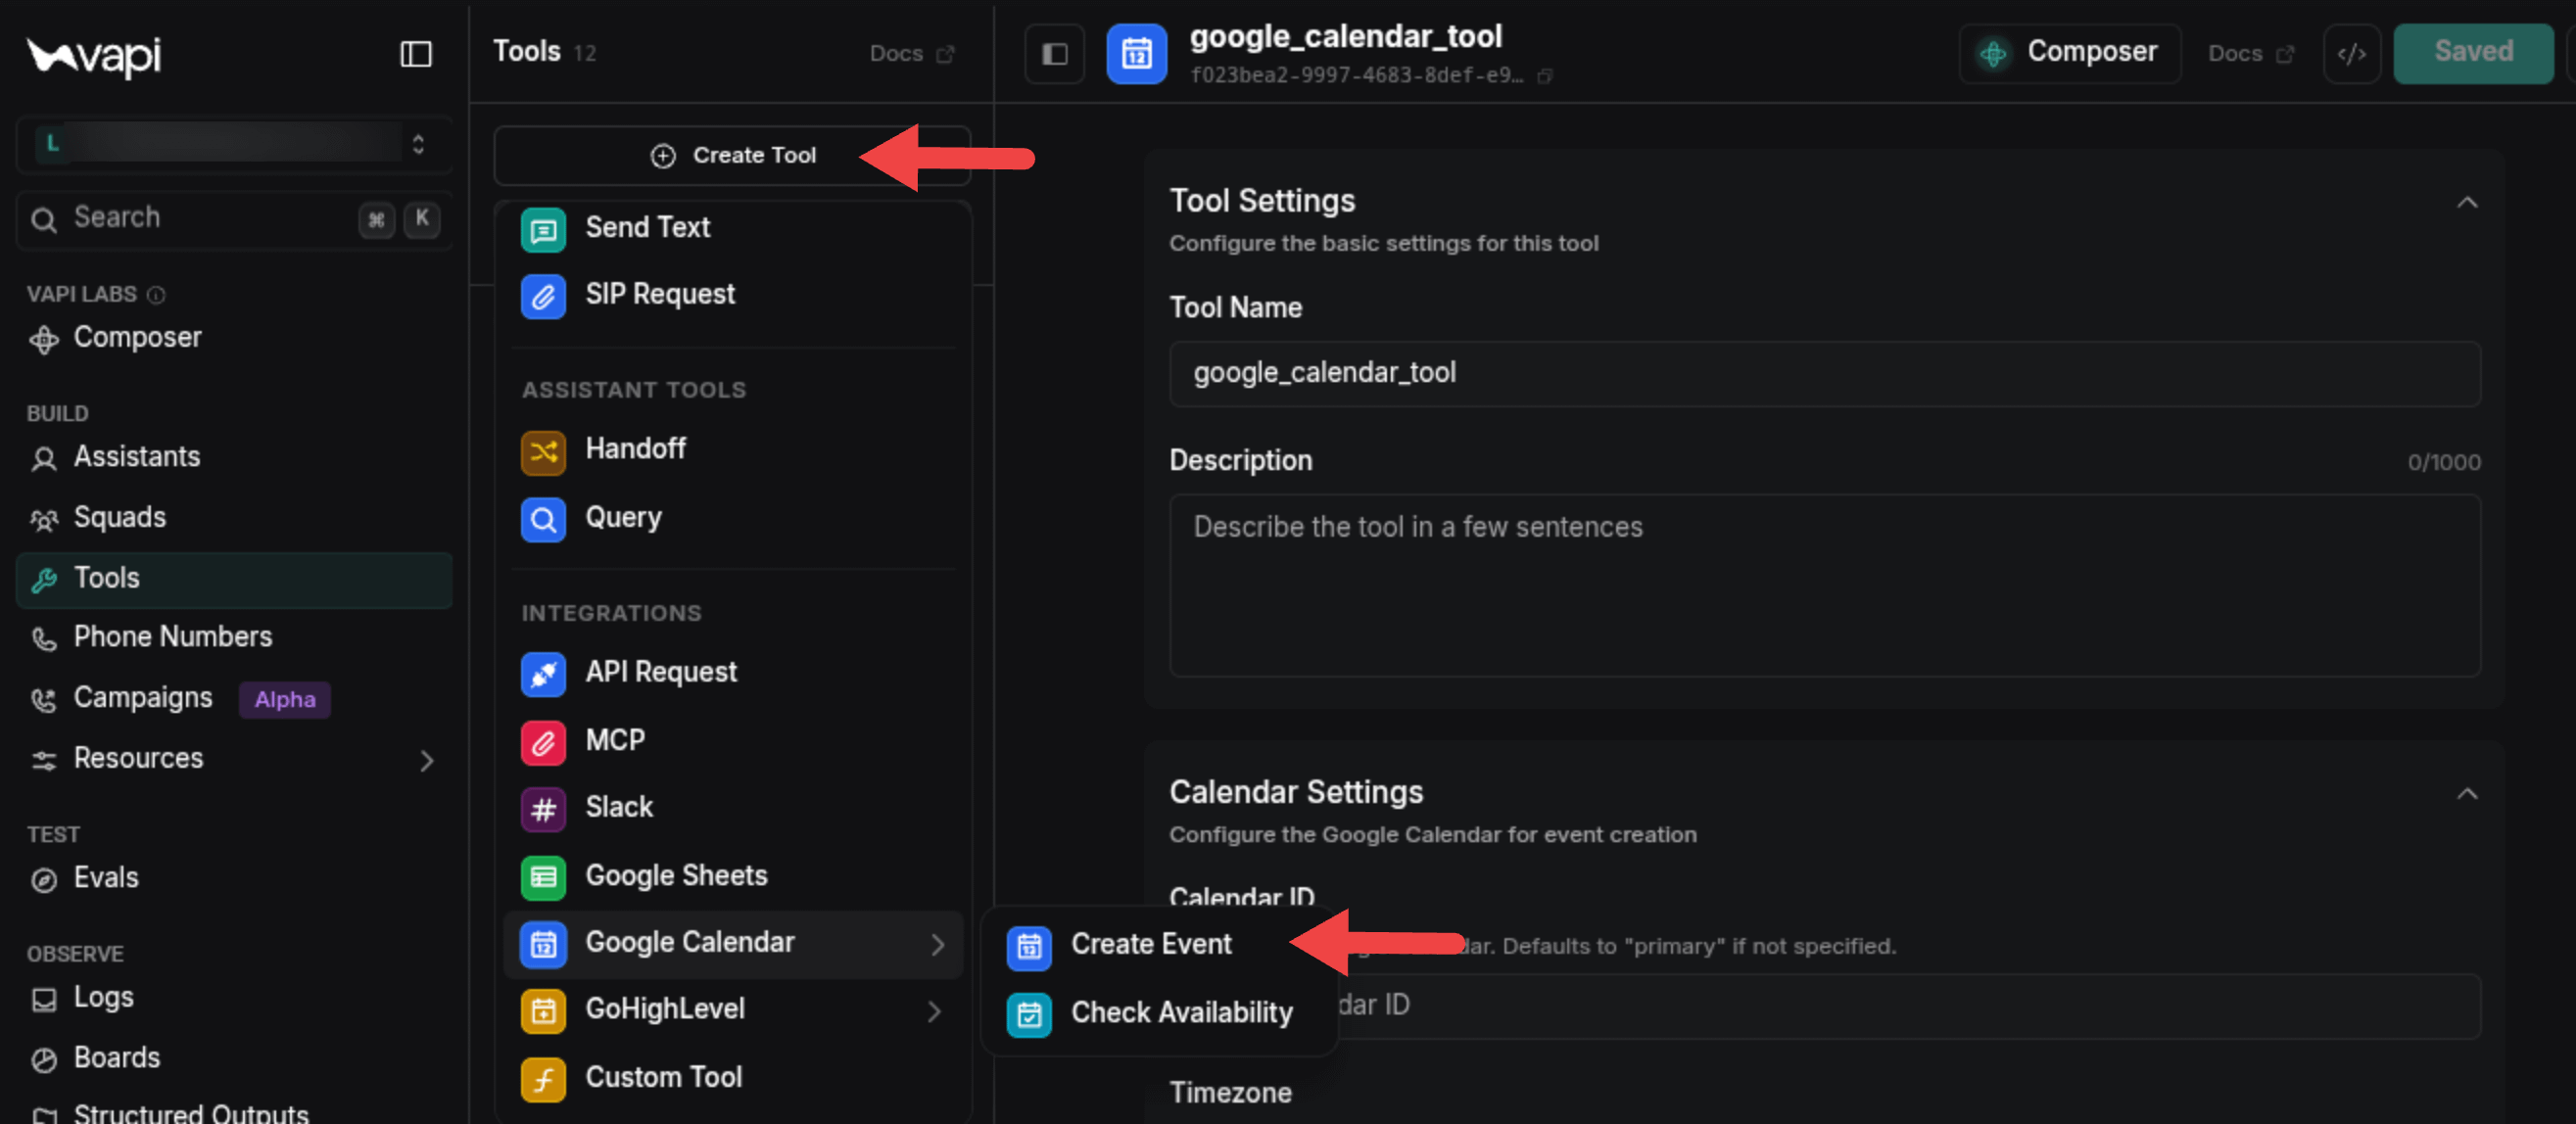
In the left side menu, click Tools.
Next, click Create Tool.
This opens a list of integrations and tool types that you can connect to your assistant.
For this tutorial, we’ll create a scheduling tool using Google Calendar.
Scroll to the Integrations section.
Select Google Calendar, then choose Create Event.
Give your tool a clear and descriptive name.
For example, “book_appointment”.
💡 Using a simple name makes it easier for both you and your AI voice agent to identify the tool.
A clear description helps your assistant decide when to use the tool and reduces the chances of incorrect actions.
Briefly explain what the tool does and when your AI should use it.
For example:
This tool should only be used after the caller confirms they want to schedule an appointment. Collect the customer’s name, preferred date, preferred time, and phone number before creating the booking.
💡 The more specific your instructions are, the more reliable your AI assistant will be.
Choose the Google Calendar where appointments should be created.
This ensures every booking is added to the correct calendar.
🔎 Finding Your Google Calendar ID:
Open Google Calendar in your web browser
In the top right menu, click the ⚙️ icon. Then, click Settings.
Scroll down the calendar you want to use.
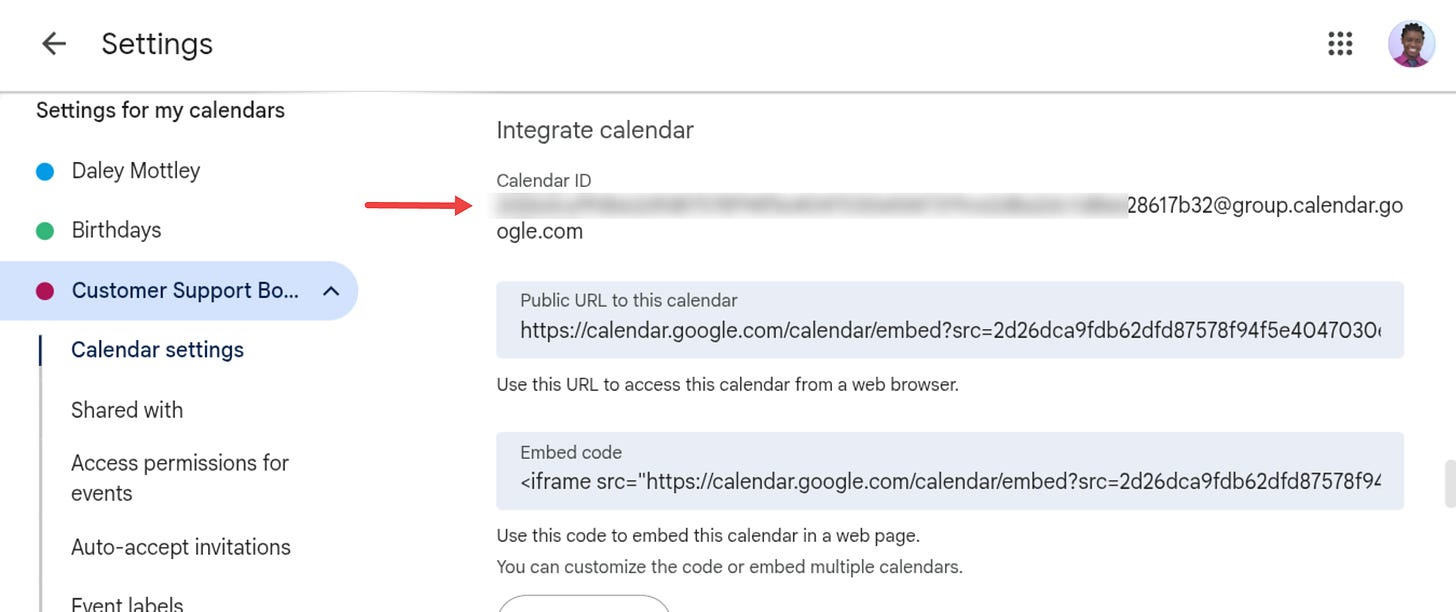
Locate Calendar ID.
Copy the Calendar ID.
Return to Vapi and paste it into the Calendar ID field.
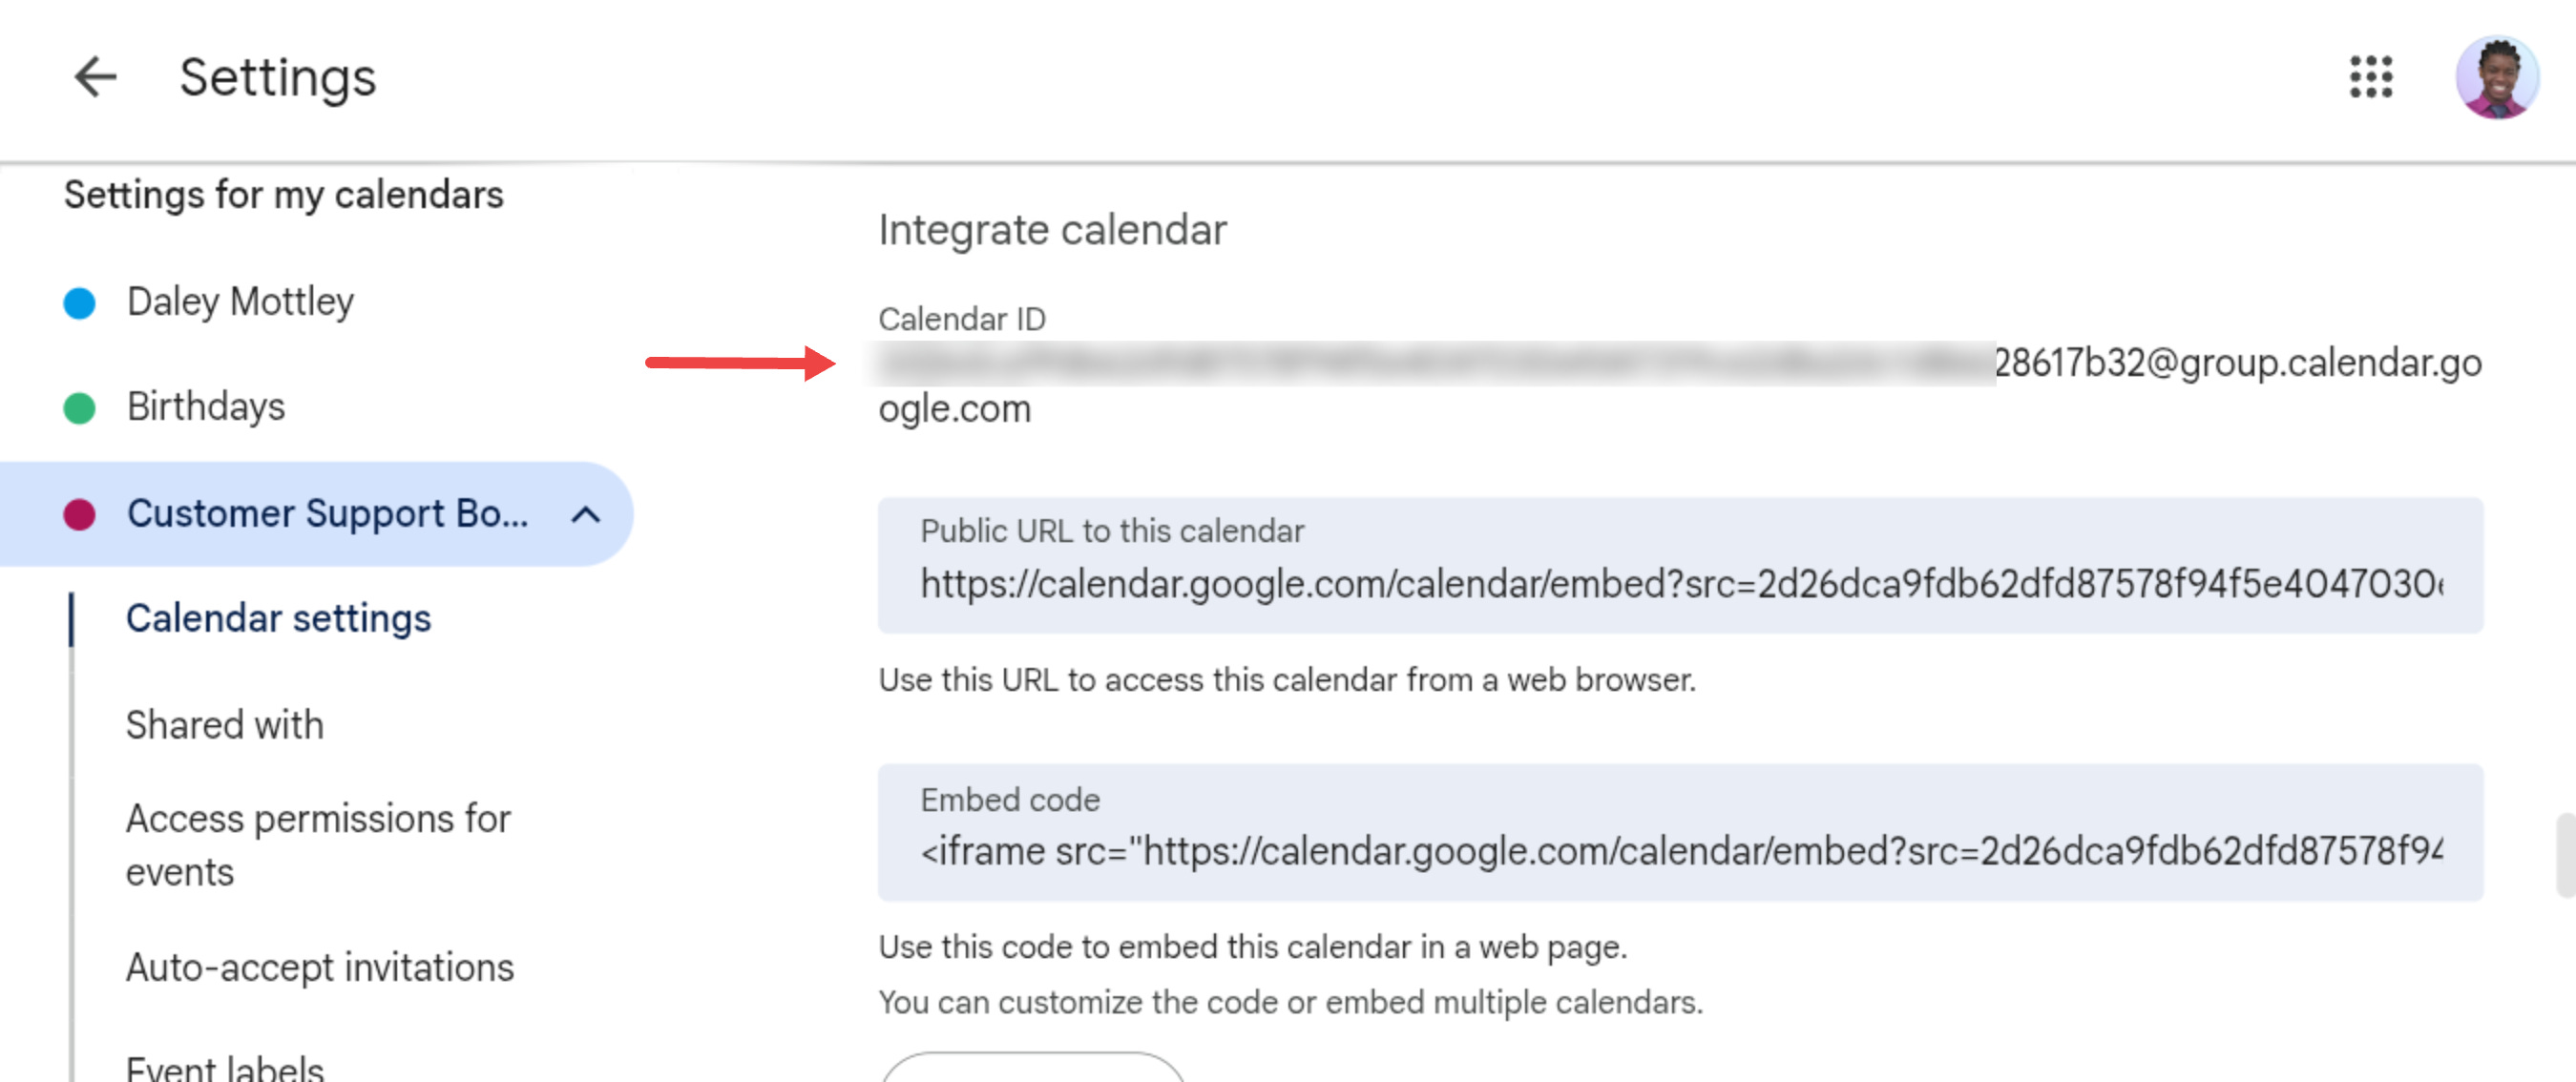
Your primary Google Calendar usually uses your Gmail address as its Calendar ID.
Shared calendars typically use a longer Calendar ID ending with @group.calendar.google.com.
💡 Double check that you’ve selected the correct calendar before publishing your assistant. Otherwise, appointments may be created in the wrong calendar.
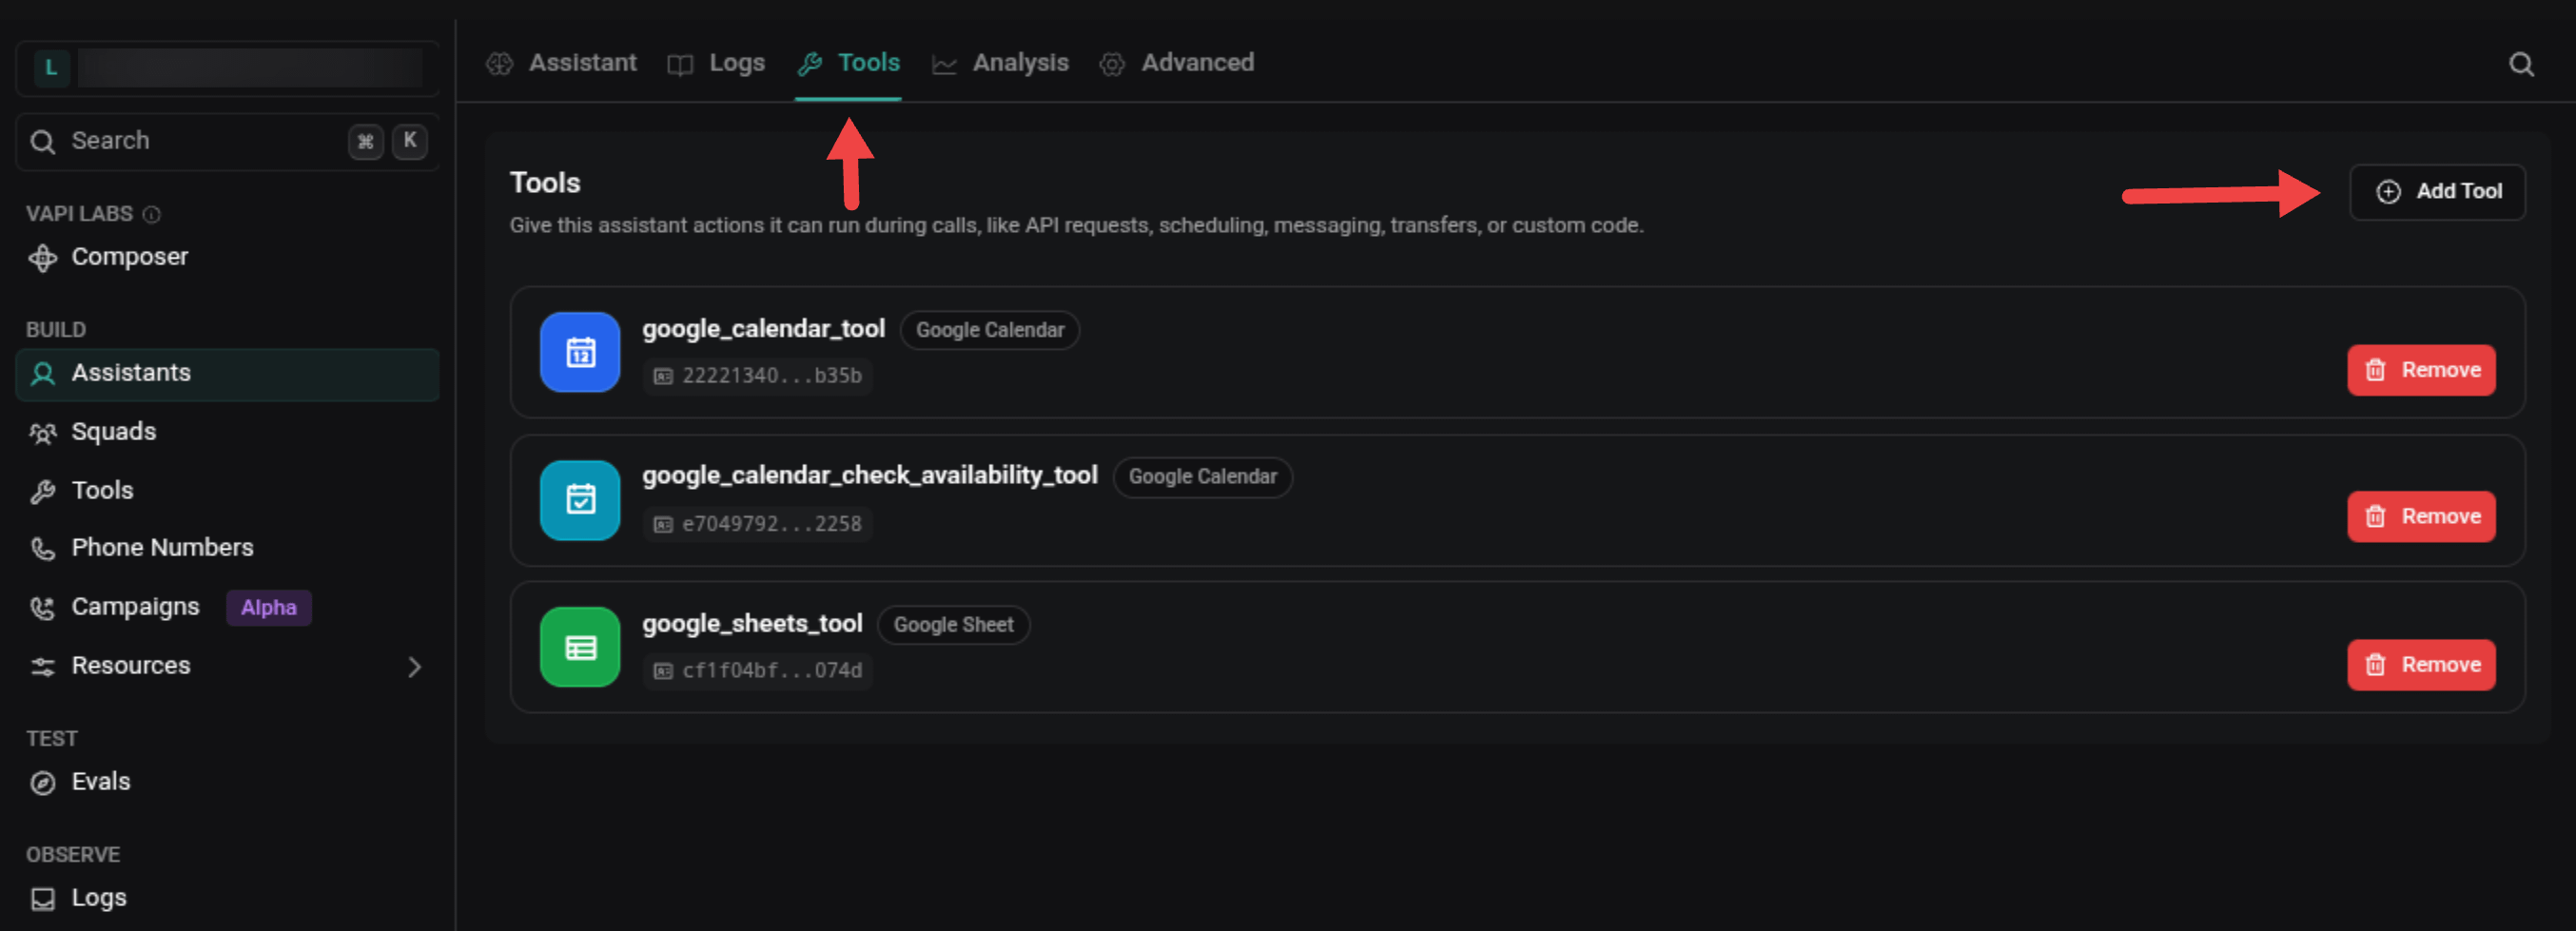
In the left side menu, click Assistants and select your assistant.
At the top of the page, click Tools.
Click Add Tool, then select the tool you’ve just created.
💡 Your assistant can have multiple tools attached, allowing it to perform different tasks during the same conversation.
At the top of the page, click Assistant.
Scroll down to the System Prompt field.
Add clear instructions explaining when the scheduling tool should be used. The more specific your instructions are, the more reliable your agent will be.
For example:
If a caller wants to schedule an appointment, first collect their name, phone number, preferred date, and preferred time. Confirm these details with the caller before using the book_appointment tool to create the calendar event. If any required information is missing, ask follow up questions before using the tool.Click Publish in the top right corner to save your changes.
Click Test in the top right corner.
Have a conversation that naturally requires your AI voice agent to use the tool.
For example, if you’re testing your scheduling tool, ask the agent to book an appointment.
Run several test conversations using different scenarios to confirm the tool works correctly and consistently before making your agent available to customers.
If something doesn’t work as expected, review your tool settings, improve your description, and test again until you’re satisfied with the results.
💡 Make sure your microphone is turned on and that you’ve granted your device permission to access it. Otherwise, you won’t be able to speak with your AI voice agent during testing.
Once your assistant is ready, it’s time to connect a phone number so customers can call your AI voice agent.
For this guide, we’ll use a Free Vapi Number. If you already have a business phone number, you can connect that instead by importing it from a supported provider such as Twilio, Telnyx, or Vonage, or by using a bring-your-own (BYO) SIP setup.
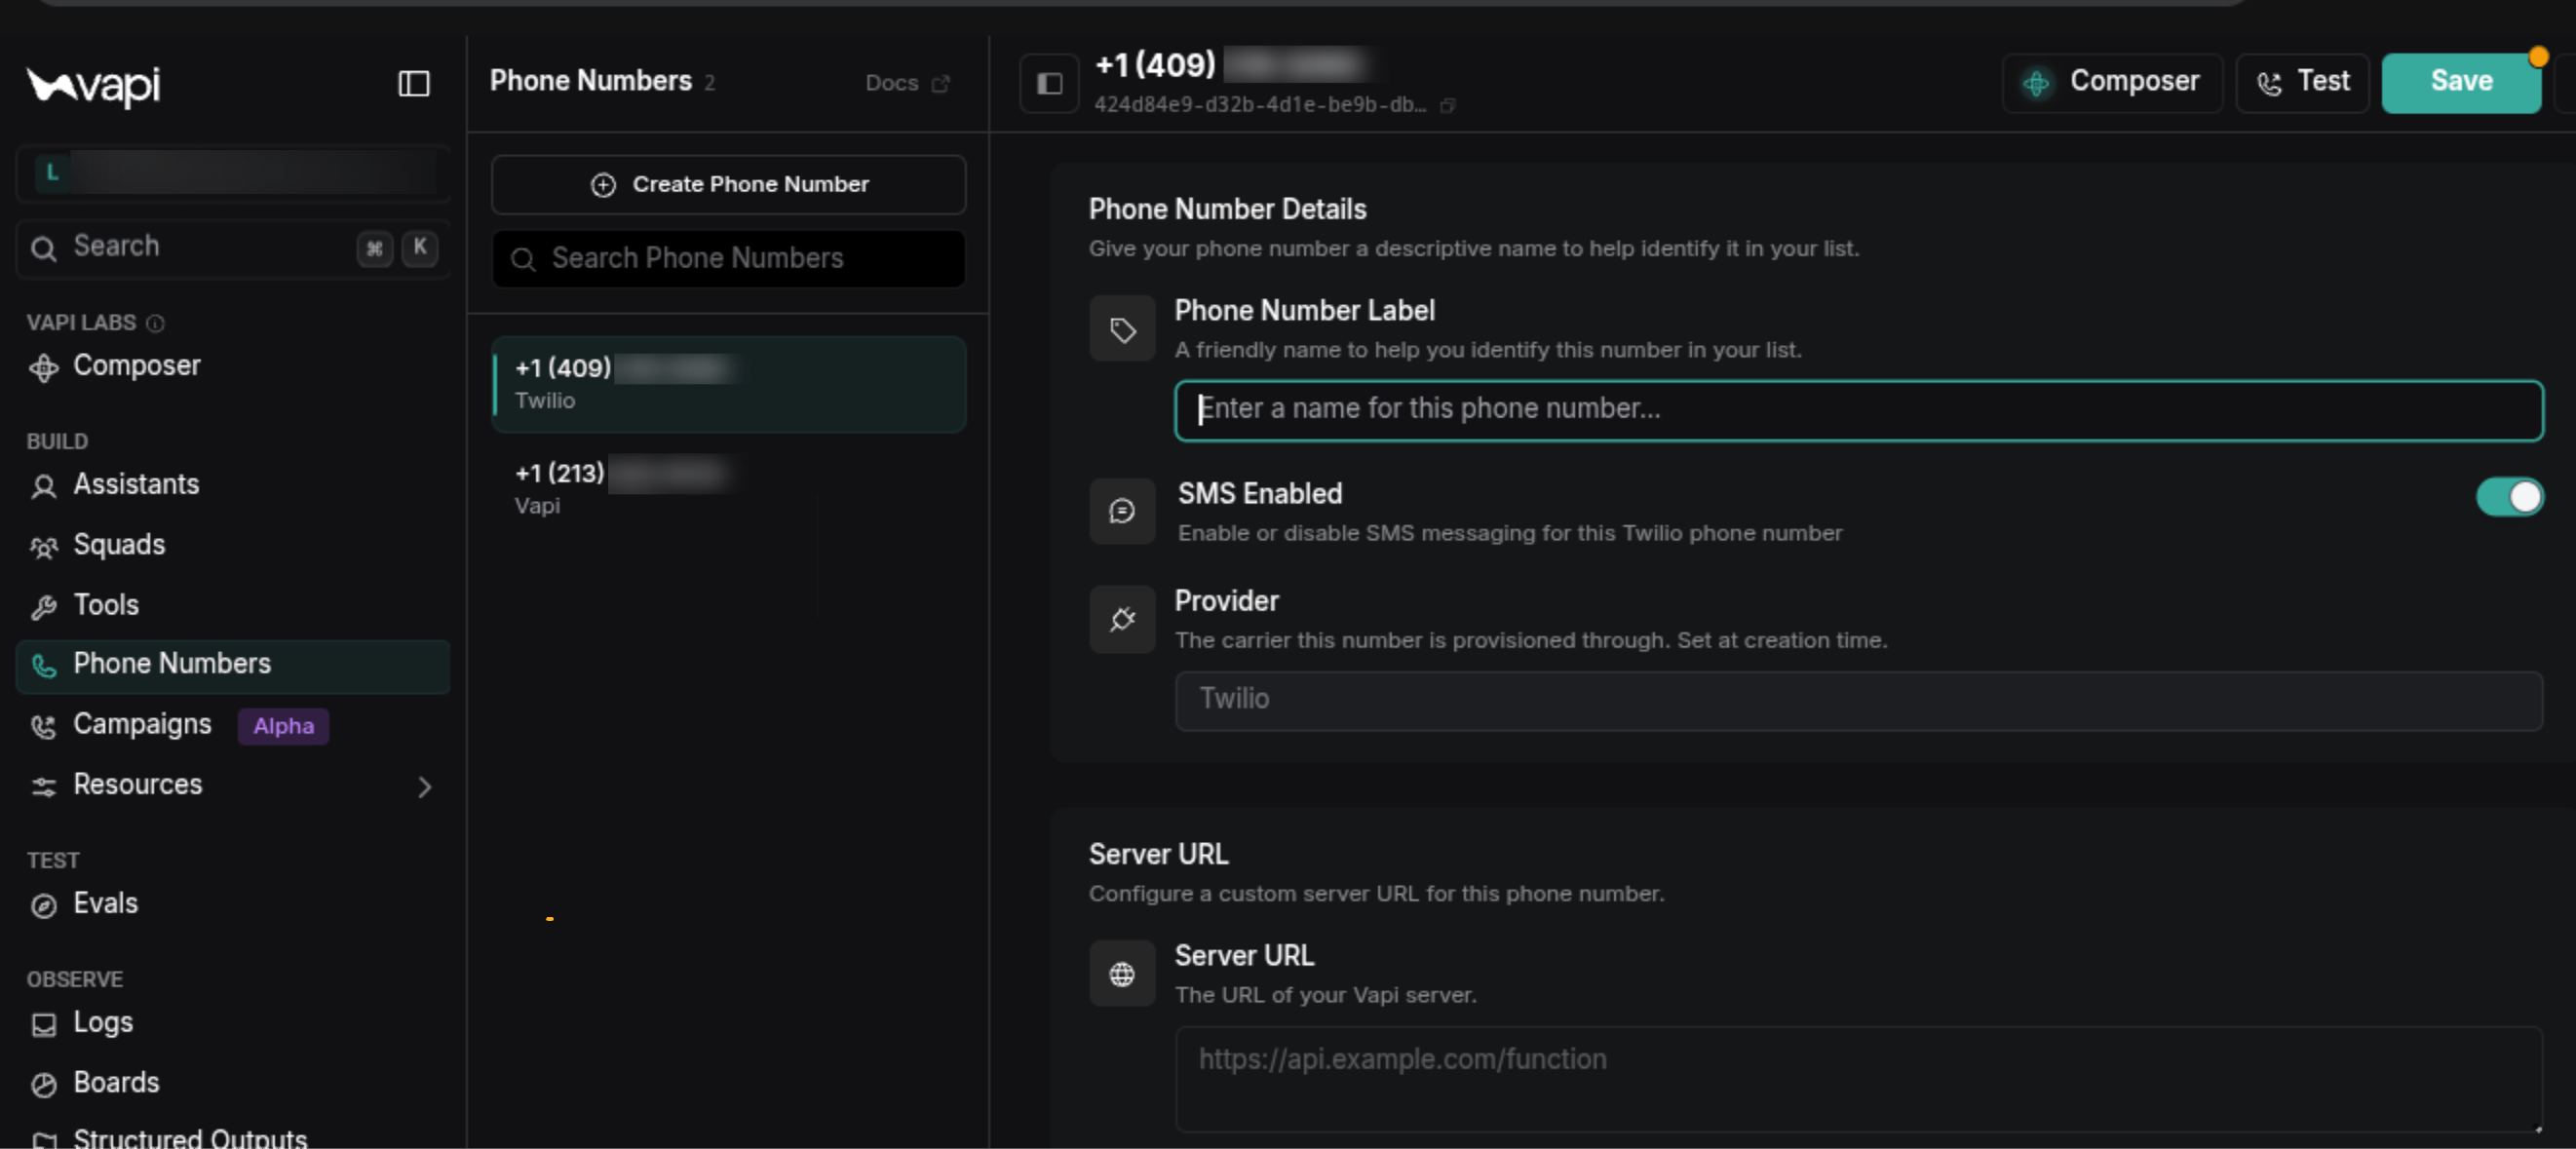
In the left side menu, click Phone Numbers.
Then click Create Phone Number.
Click Free Vapi Number.
Enter any available US area code.
Under Phone Number Details, enter a Phone Label to help you identify the phone number later.
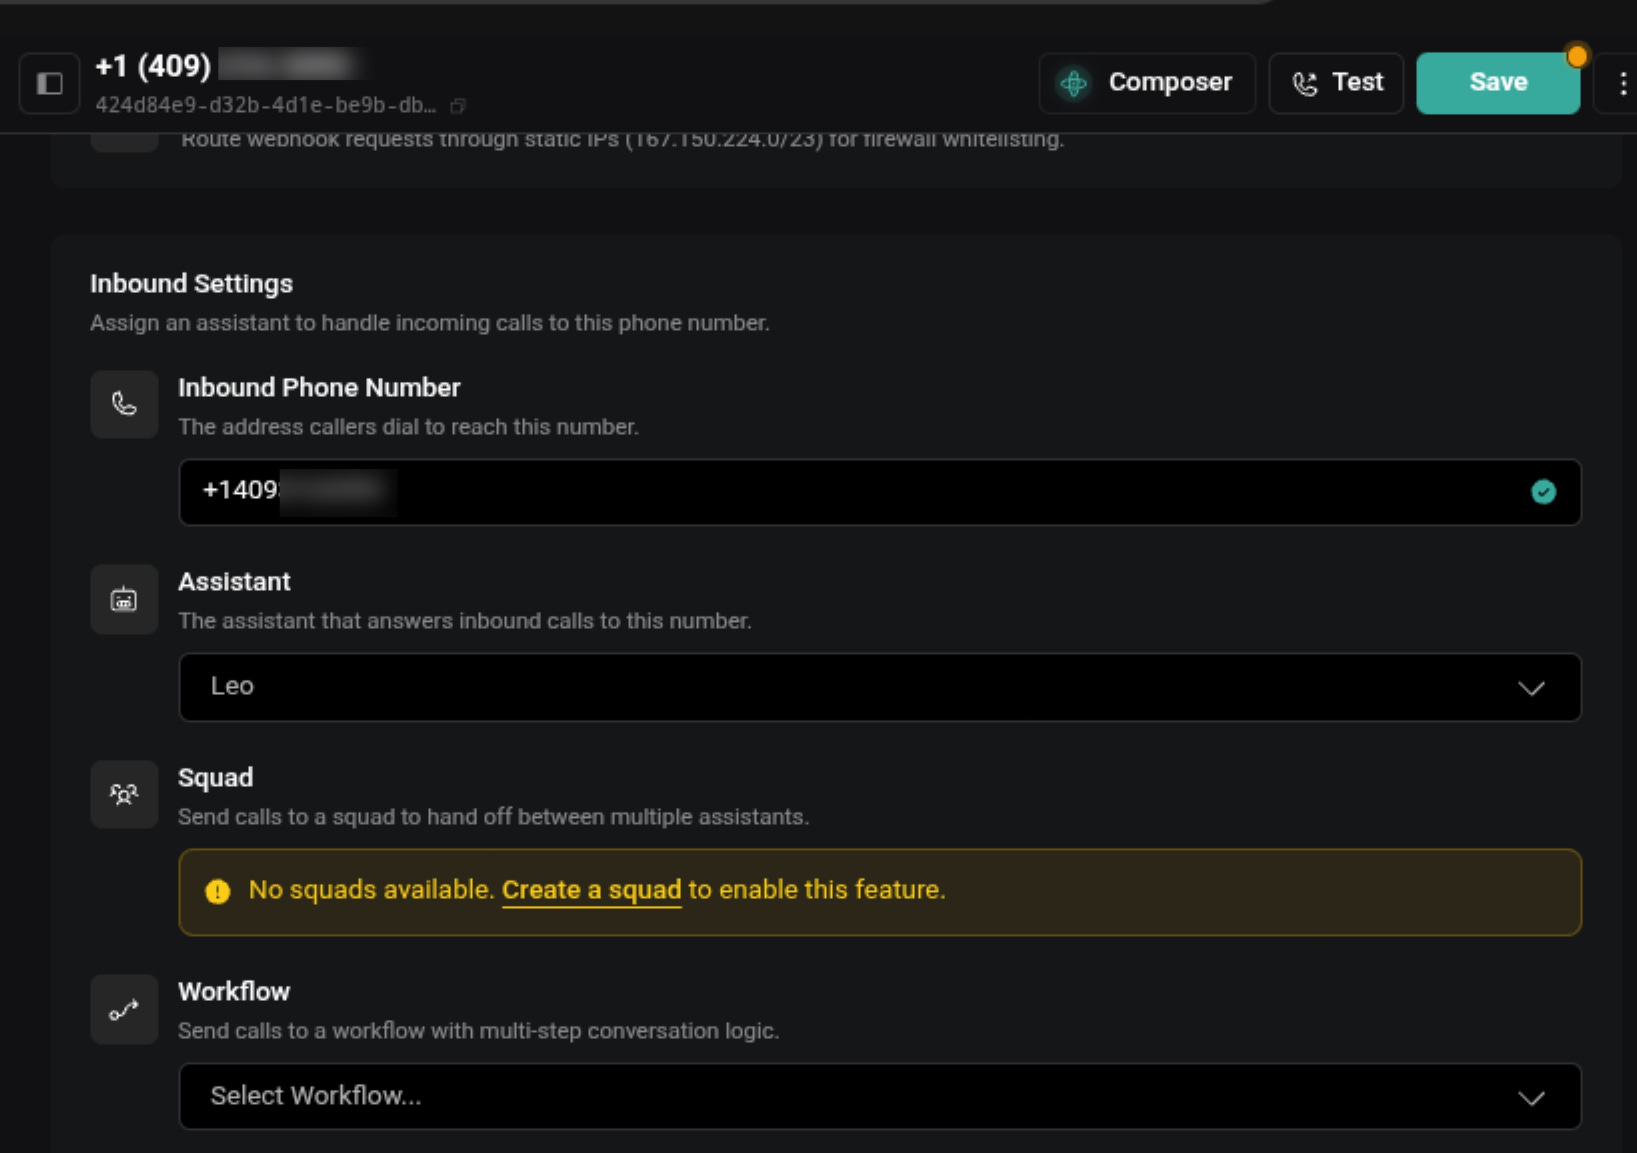
Scroll down to Inbound Settings.
Click Assistants and select your assistant.
This connects the phone number to your assistant so anyone who calls that number will speak with your AI voice agent.
Click Save in the top right corner.
Call your new phone number and verify that your AI assistant performs as expected.
❌ Using An Outdated Knowledge Base
Your AI can only answer questions using the information you provide.
Whenever your products, services, pricing, policies, or business information change, remember to update your documents.
❌ Uploading Too Many Unnecessary Documents
Keep your knowledge base organized and relevant.
Removing outdated or duplicate documents helps your AI find the correct information more quickly and accurately.
❌ Adding Too Many Tools At Once
Start with one or two essential tools, such as appointment scheduling or sending emails.
Once everything is working reliably, gradually add more tools as needed.
Your AI voice agent doesn’t need to be perfect on day one.
Review conversations regularly, identify where it makes mistakes, refine your prompts, update your knowledge base, and continue testing.
Small improvements made consistently will produce much better results.
Over time, your Vapi AI voice agent will become smarter, more accurate, and a valuable member of your team!
If you want more articles like this, tap the ‘❤️’ and ‘🔁’ to show your vote.
Bookmark ‘⭐’ AI Ready Tips in your browser or inbox 💌
Thanks for sharing, I truly appreciate your feedback 👍
If you found this helpful, share it with a friend who could use these AI-ready tips too. Have a great day! 🙂
Comments
Nothing yet. Say the first thing.
Sign in to join the conversation.