
It’s been eight years since Adobe pioneered AI masking when they rolled out the ‘Select Subject’ tool in Photoshop, back in 2018. They followed it up with the Object Selection tool in 2019 and then steadily iterated a comprehensive suite of AI masking tools in both Photoshop and Lightroom that have grown increasingly sophisticated and correspondingly accurate.
And it was in 2018 when a small company called Topaz Labs released the first beta version of an AI denoising tool, an idea that was then nicked by pretty much every commercial photo editor on the market, including Adobe.
And while nobody expects a bunch of hobbyist photo nerds coding modules on their spare time to compete with a massive multinational corporation, eight years is still eight years. Rome wasn’t built in a day, and apparently neither was a basic subject selection tool.
The wind of change has been blowing through Darktable’s arcane online repositories, like a post-curry trumpet voluntary, and the revolutionary new Darktable 5.6 is nearly upon us, bringing with it a trio of AI tools: denoise, masking and upscaling.
Today I’m specifically taking a look at the new AI tools in Darktable, officially due for release on the 21st of June 2026, though you can try them now by downloading one of the nightly builds.
I can only imagine the spirited conversations that took place between the traditionalists and the progressives, as the subject of AI tools gripped the Darktable development team. I’d like to think there were some slide rulers involved, several lengthy arguments about colour spaces, and definitely a few litres of home-brewed ale.
But here we are, on the cusp of an open source revolution, because yes, believe it or not, Darktable 5.6 includes not one, not two, but THREE brand new AI tools to enhance your post-processing efforts.
If you’ve been following my Darktable Hater’s Guide series, you’ll know I’ve been putting in the hours teaching myself this app, despite the fact that nobody is making me do this and I only have myself to blame. And it was during an extended session of military-grade cursing, sorry, post-processing, that I discovered the nightly builds for this app and the revelation that Darktable was getting some AI functionality.
There will, no doubt, be some expert guidance on this subject from the likes of Bruce Williams and Boris Hajdukovic, but if you want the ‘for dummies’ version, and some real-world comparisons, I’m your man.
These tools are officially arriving with the forthcoming 5.6 release of Darktable, but have been available for a while in the nightly builds. Since we’re only a week out from launch at the time of writing and since it took them eight years to reach this point, I don’t imagine they’re going to change much before then.
Worth noting from the release notes: the AI subsystem is opt-in by design. It’s compiled with a -DUSE_AI=ON flag and disabled by default in preferences, meaning no runtime libraries get loaded and no AI-related activity happens at all until you switch it on. So if you’re the sort who wants nothing to do with any of this, you don’t have to lift a finger.
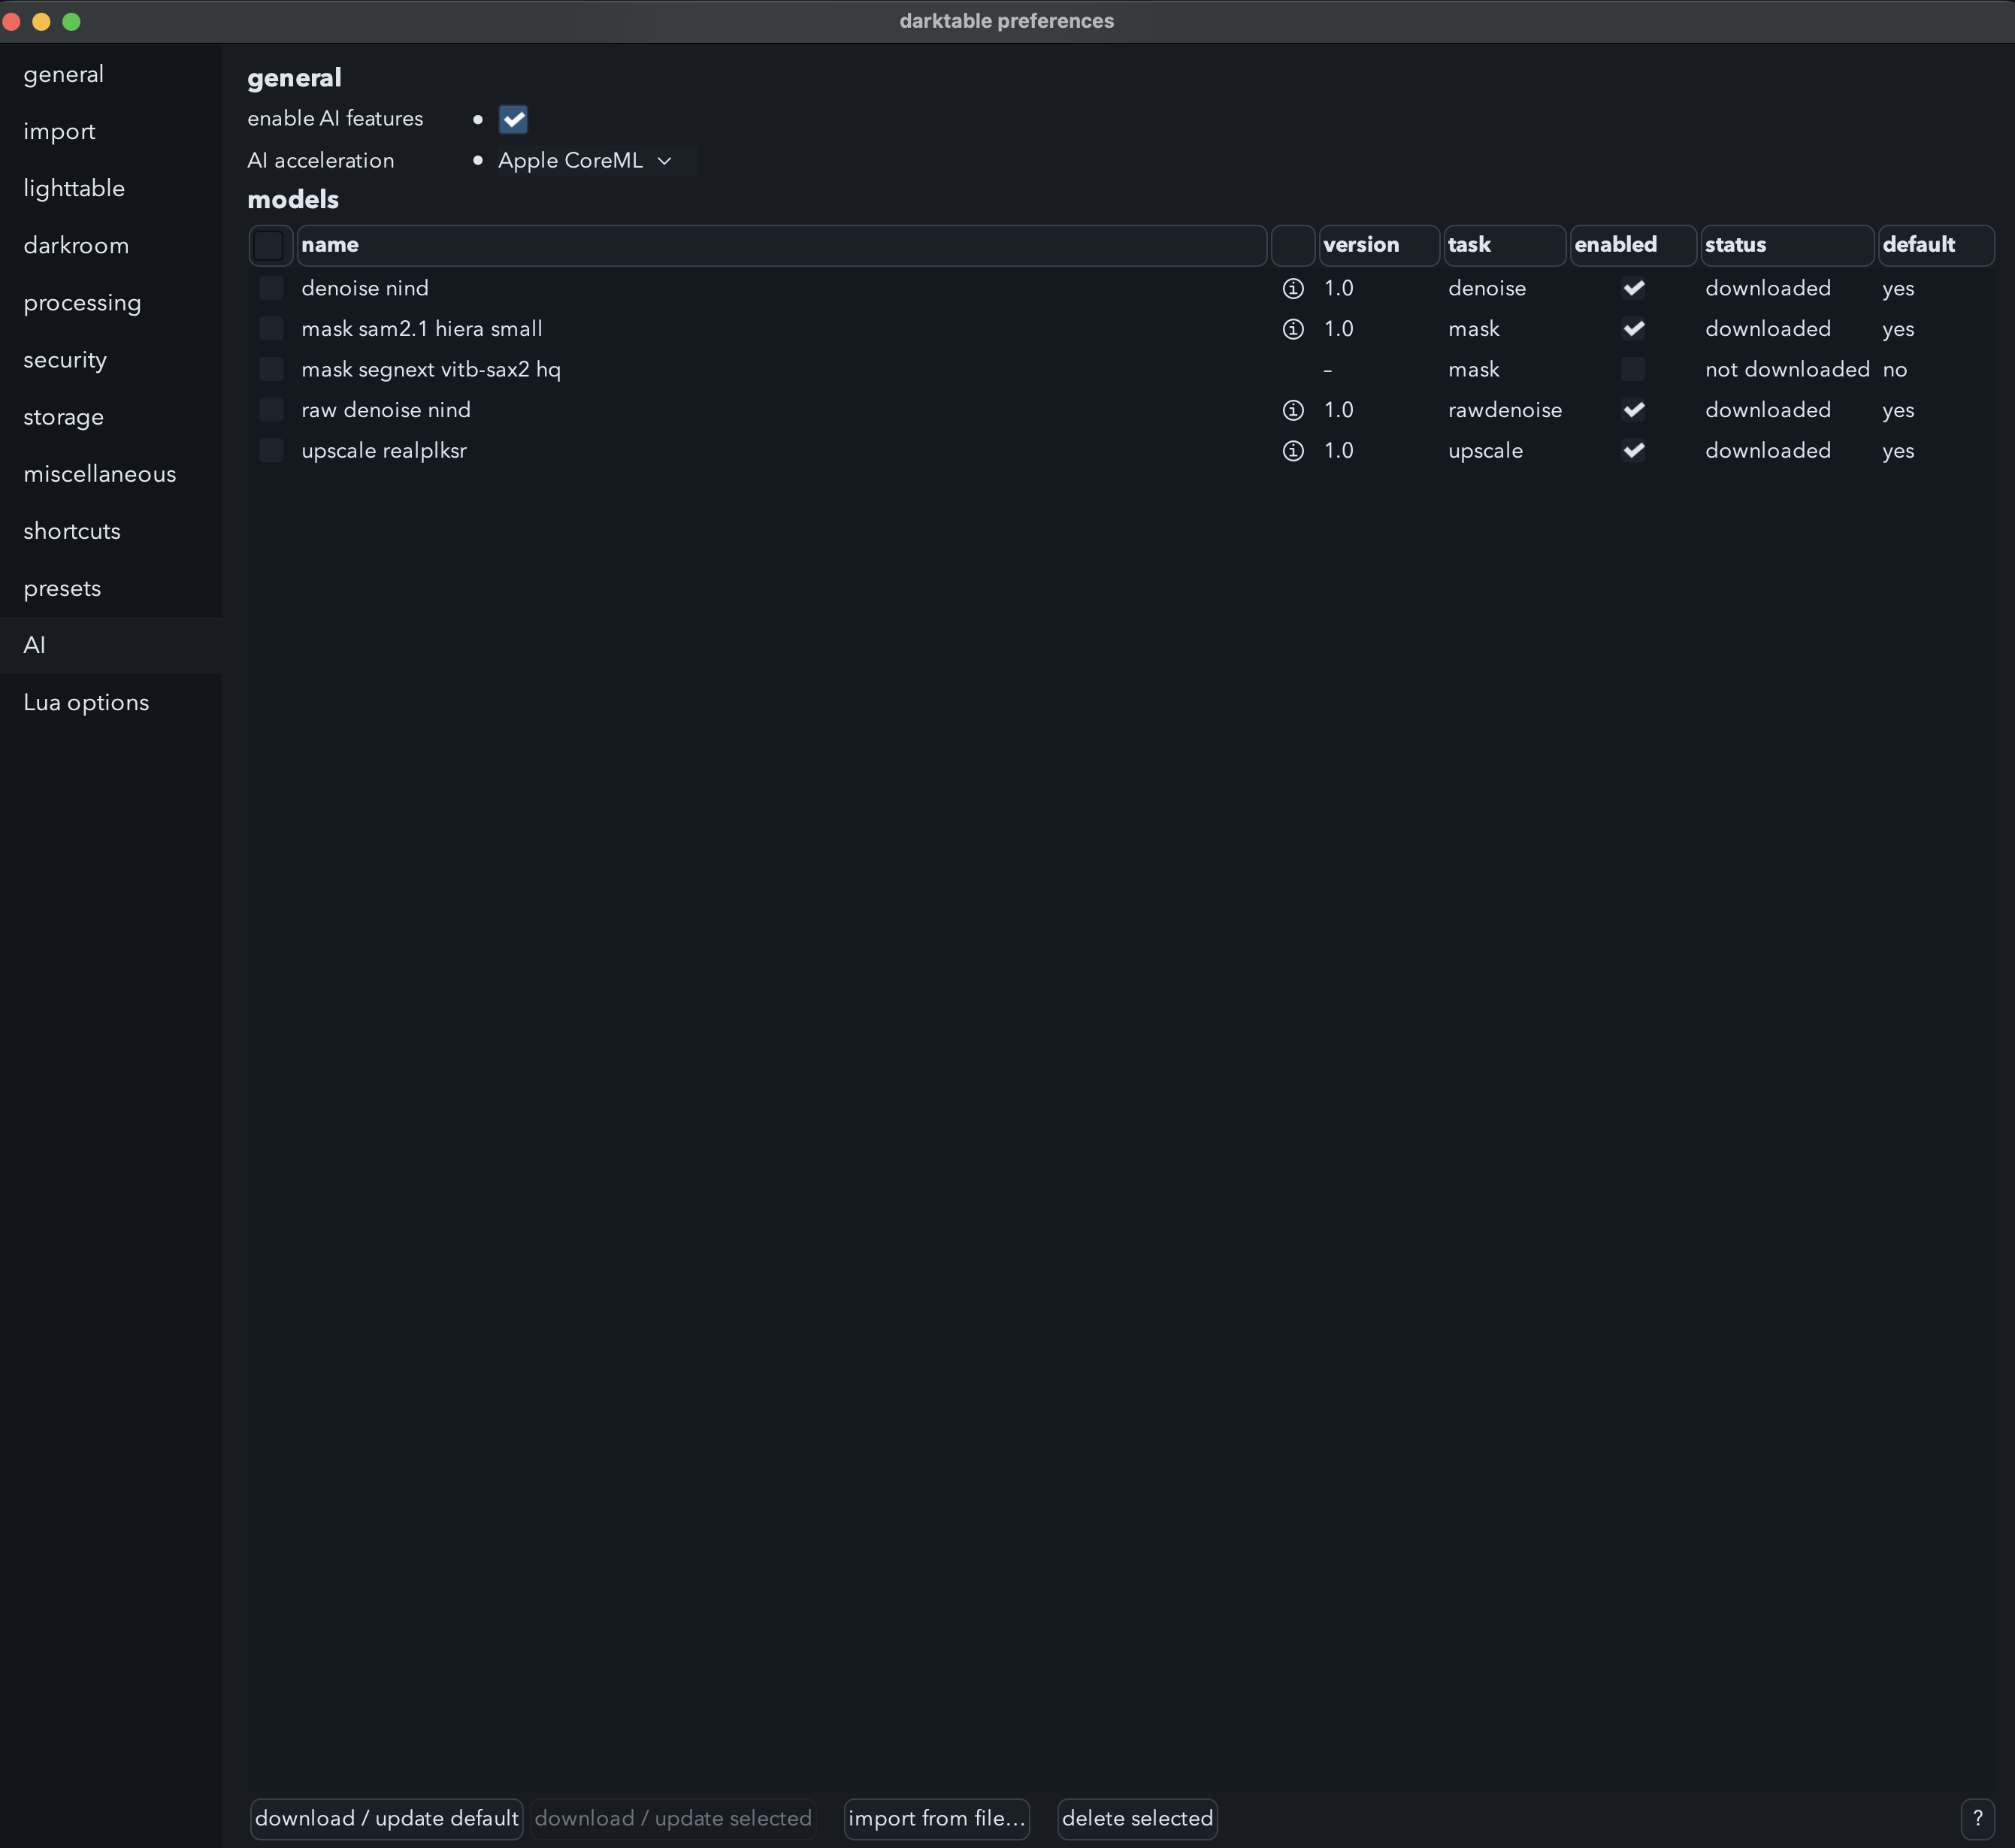
Prior to using the new AI tools, you need to download the models, because remember, these are local-only and all processing takes place on your device, not on an Nvidia GPU server located on a Texan data farm. Go into settings, click on AI in the sidebar, then download and enable any of the AI tools you wish to use. You will then have to restart Darktable and you’re good to go.
GPU acceleration is bundled automatically on macOS and most Windows installs. If you’re on Linux or running an unsupported Windows GPU, there are install scripts that detect your GPU vendor (Nvidia, AMD or Intel) and install the matching runtime for you.
As you can probably imagine, the implementation of AI masking in Darktable is not a series of granular tools as found in the latest versions of Lightroom. Instead, it’s a segmented masking tool powered by Meta’s SAM2 model, which is widely used throughout the industry. The release notes mention SegNext as an alternative model option too. Like all of the new AI tools it is local-only, so don’t be concerned by that reference to Meta; nothing’s being uploaded to Facebook.
On Apple Macs it uses Core ML acceleration and if you’re on Windows, it uses your GPU.
It took me a fair bit of hunting around the interface to locate the new AI selection, and that’s because it’s located in the ‘Drawn Mask’ tool. Hold on, Andy, did you say ‘drawn’ mask? Yes, legends, I did. This AI masking tool creates a vector path around whatever object you click on, not a raster selection. And if you’re thinking that’s probably not the best option for selecting fine detail, ten points to Gryffindor.
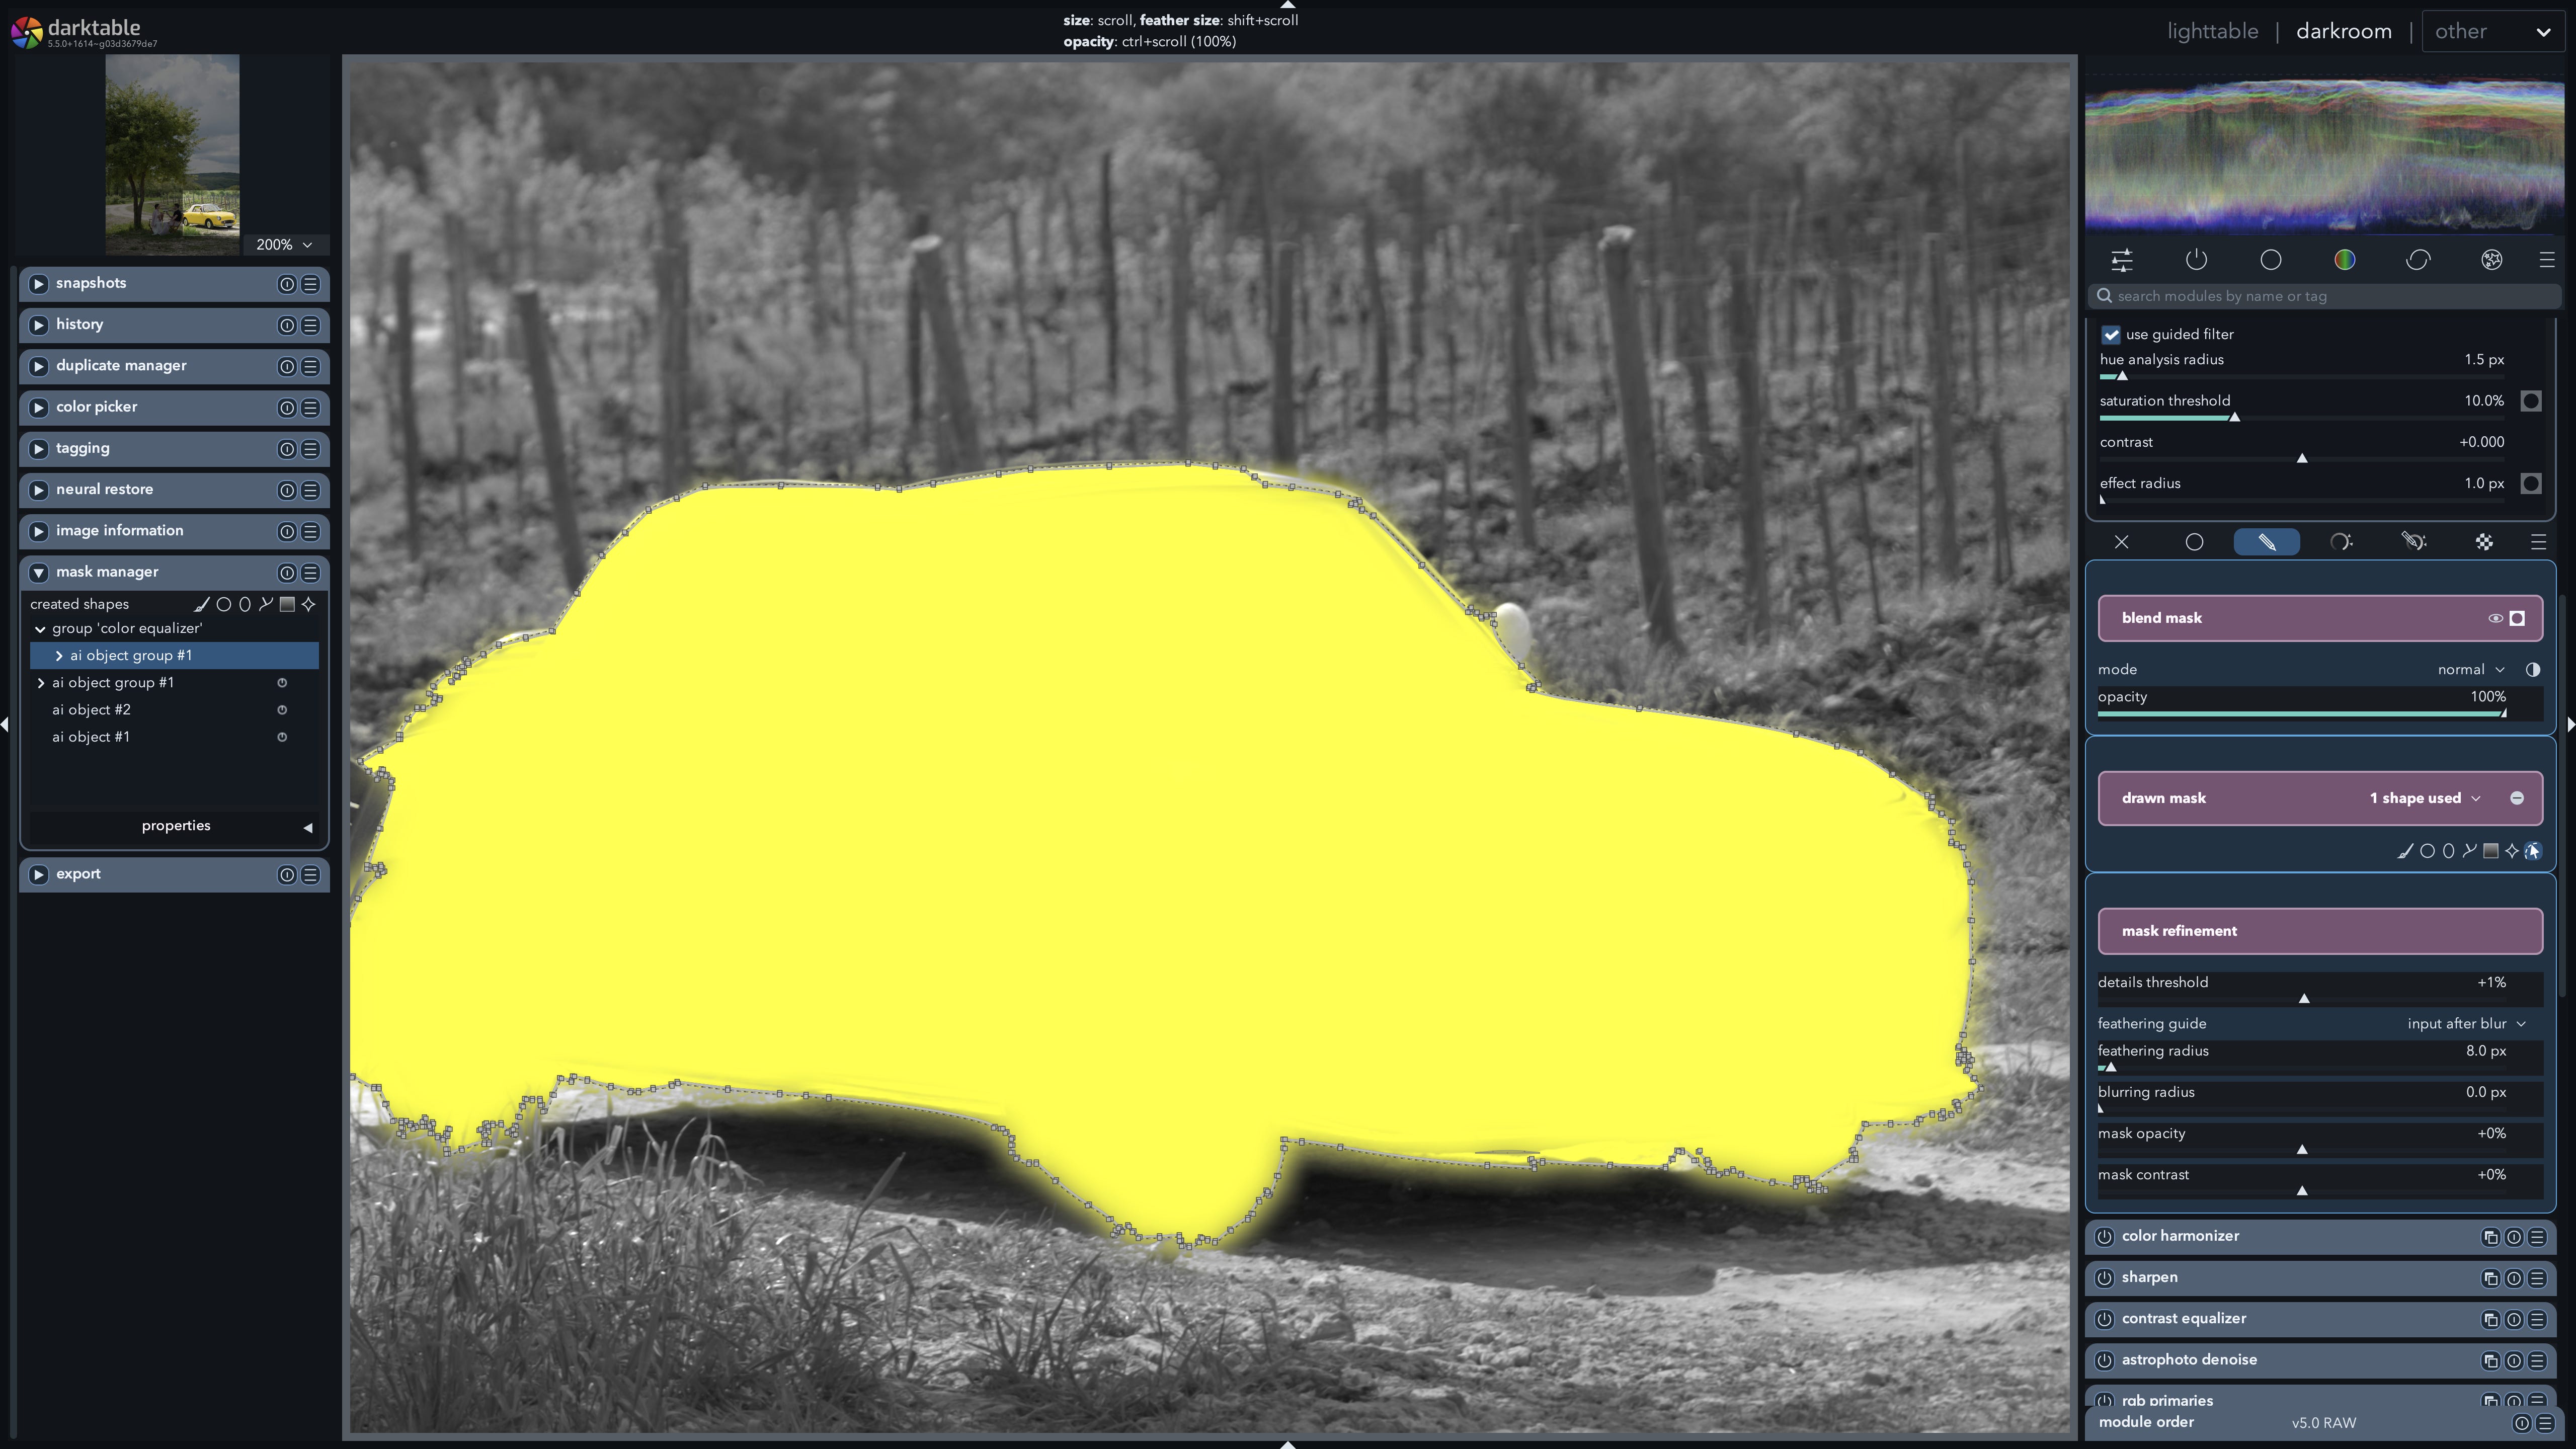
On my M2 MacBook Pro Max the analysis required to initiate the new AI mask tool took only a couple of seconds, and I was then prompted to click on the object I wished to select.
In my tests, it performed pretty well, assuming you want to select the type of object you could conveniently draw a vector path around. In other words, the simpler the object and the more it stands out against the background, the better the outcome. You click once to select the object, click again to add anything the selection missed, and shift-click to remove areas. When you’re happy with your selection you right-click to lock it in, and you can then apply whatever adjustments you wish. All of the masks get stored in the ‘mask manager’ panel, so you can re-use them on other modules should you wish. Since it is a drawn path you can of course refine it manually by dragging any of the node markers, and you can use the details, feathering, blurring and mask opacity and contrast sliders to finesse the vector path.
There’s no doubting that it’s a comprehensively designed system, I just question the usefulness of a tool that is only going to work effectively on relatively simple and well defined shapes. Anything with wispy edges, hair, fur, complex foliage, or gradual transitions is going to be a poor target for the tool. And while you can easily argue that you’d just use any of the existing masks for that (luminance, colour, etc.), the raster AI masks in commercial photo editors are getting extremely good at selecting complex edges such as hair.
On the up-side, because it uses vector data, you won’t end up with some stupidly large sidecar file, and since it is a path, it’s very simple to edit. From my testing the accuracy is pretty decent, but you will definitely have to go in and fix up the selection because it will miss edges and include or exclude areas that make up the subject.
Darktable’s implementation of AI denoising helpfully (not sarcasm) comes in two varieties: a RAW denoise and an RGB denoise. The former is designed to be used before you edit your photograph and the latter is designed to be used after you edit your photograph. But you’re not supposed to use both on the same photo, unless you want it to look like you left it out in the sun for too long.
The RAW denoise runs before you touch a slider, since it’s operating on the sensor data even before it gets demosaiced. You’d typically use it if you’re shooting very high ISO, long exposure or astro, when there’s a high percentage of colour sensor noise and/or hot pixels. It’s located in the new ‘neural restore’ module, located by default in the left sidebar. Yes, ‘neural’... ‘restore’. Continuing the venerable Darktable tradition of obfuscating tool names with convoluted alternatives for the sole purpose of looking like clever arseholes. They used the demonic letters ‘A’ and ‘I’ in the settings; why couldn’t they bring themselves to use it in the module?
In terms of functionality the RAW denoise is nicely designed. You get a little preview window, which you can point at any part of the image and which includes a before/after slider so you can gauge the outcome before committing to the processing. It also has a strength slider, and I was delighted to discover that, unlike many costly commercial applications, it doesn’t have to recompute the denoise if you change strength.
The model being used here is called RawNIND UtNet2, which operates on 512 x 512 tiles and, of course, operates in full 32-bit floating point. And yes, Fuji friends, it will work on X-Trans RAW files, though it does have to demosaic them to Rec.2020 linear RGB first, so the outcomes aren’t going to be as good as Bayer RAWs. Also, no, it doesn’t do monochrome RAWs.
After you hit the Process button, the module does its work and spits out a clean DNG into the same folder. I like to think they adopted this workflow only after Adobe abandoned it in Lightroom in favour of simply creating massive sidecar files. You can then continue to post-process the shot using the same dynamic range and colour as the original RAW, because it’s a linear DNG file.
Meanwhile, RGB denoise runs after you’ve developed the image, through the full pipeline including whichever tone-mapping module floats your boat. Rather than working on RAW data, it’s just analysing the raster pixel data and trying its best to clean it up.
In my testing the RAW denoise was far and away the better option of the two, which I don’t find surprising in the least, but I also don’t think the quality of either denoise option is going to cause much concern in DXO’s Q&A department.
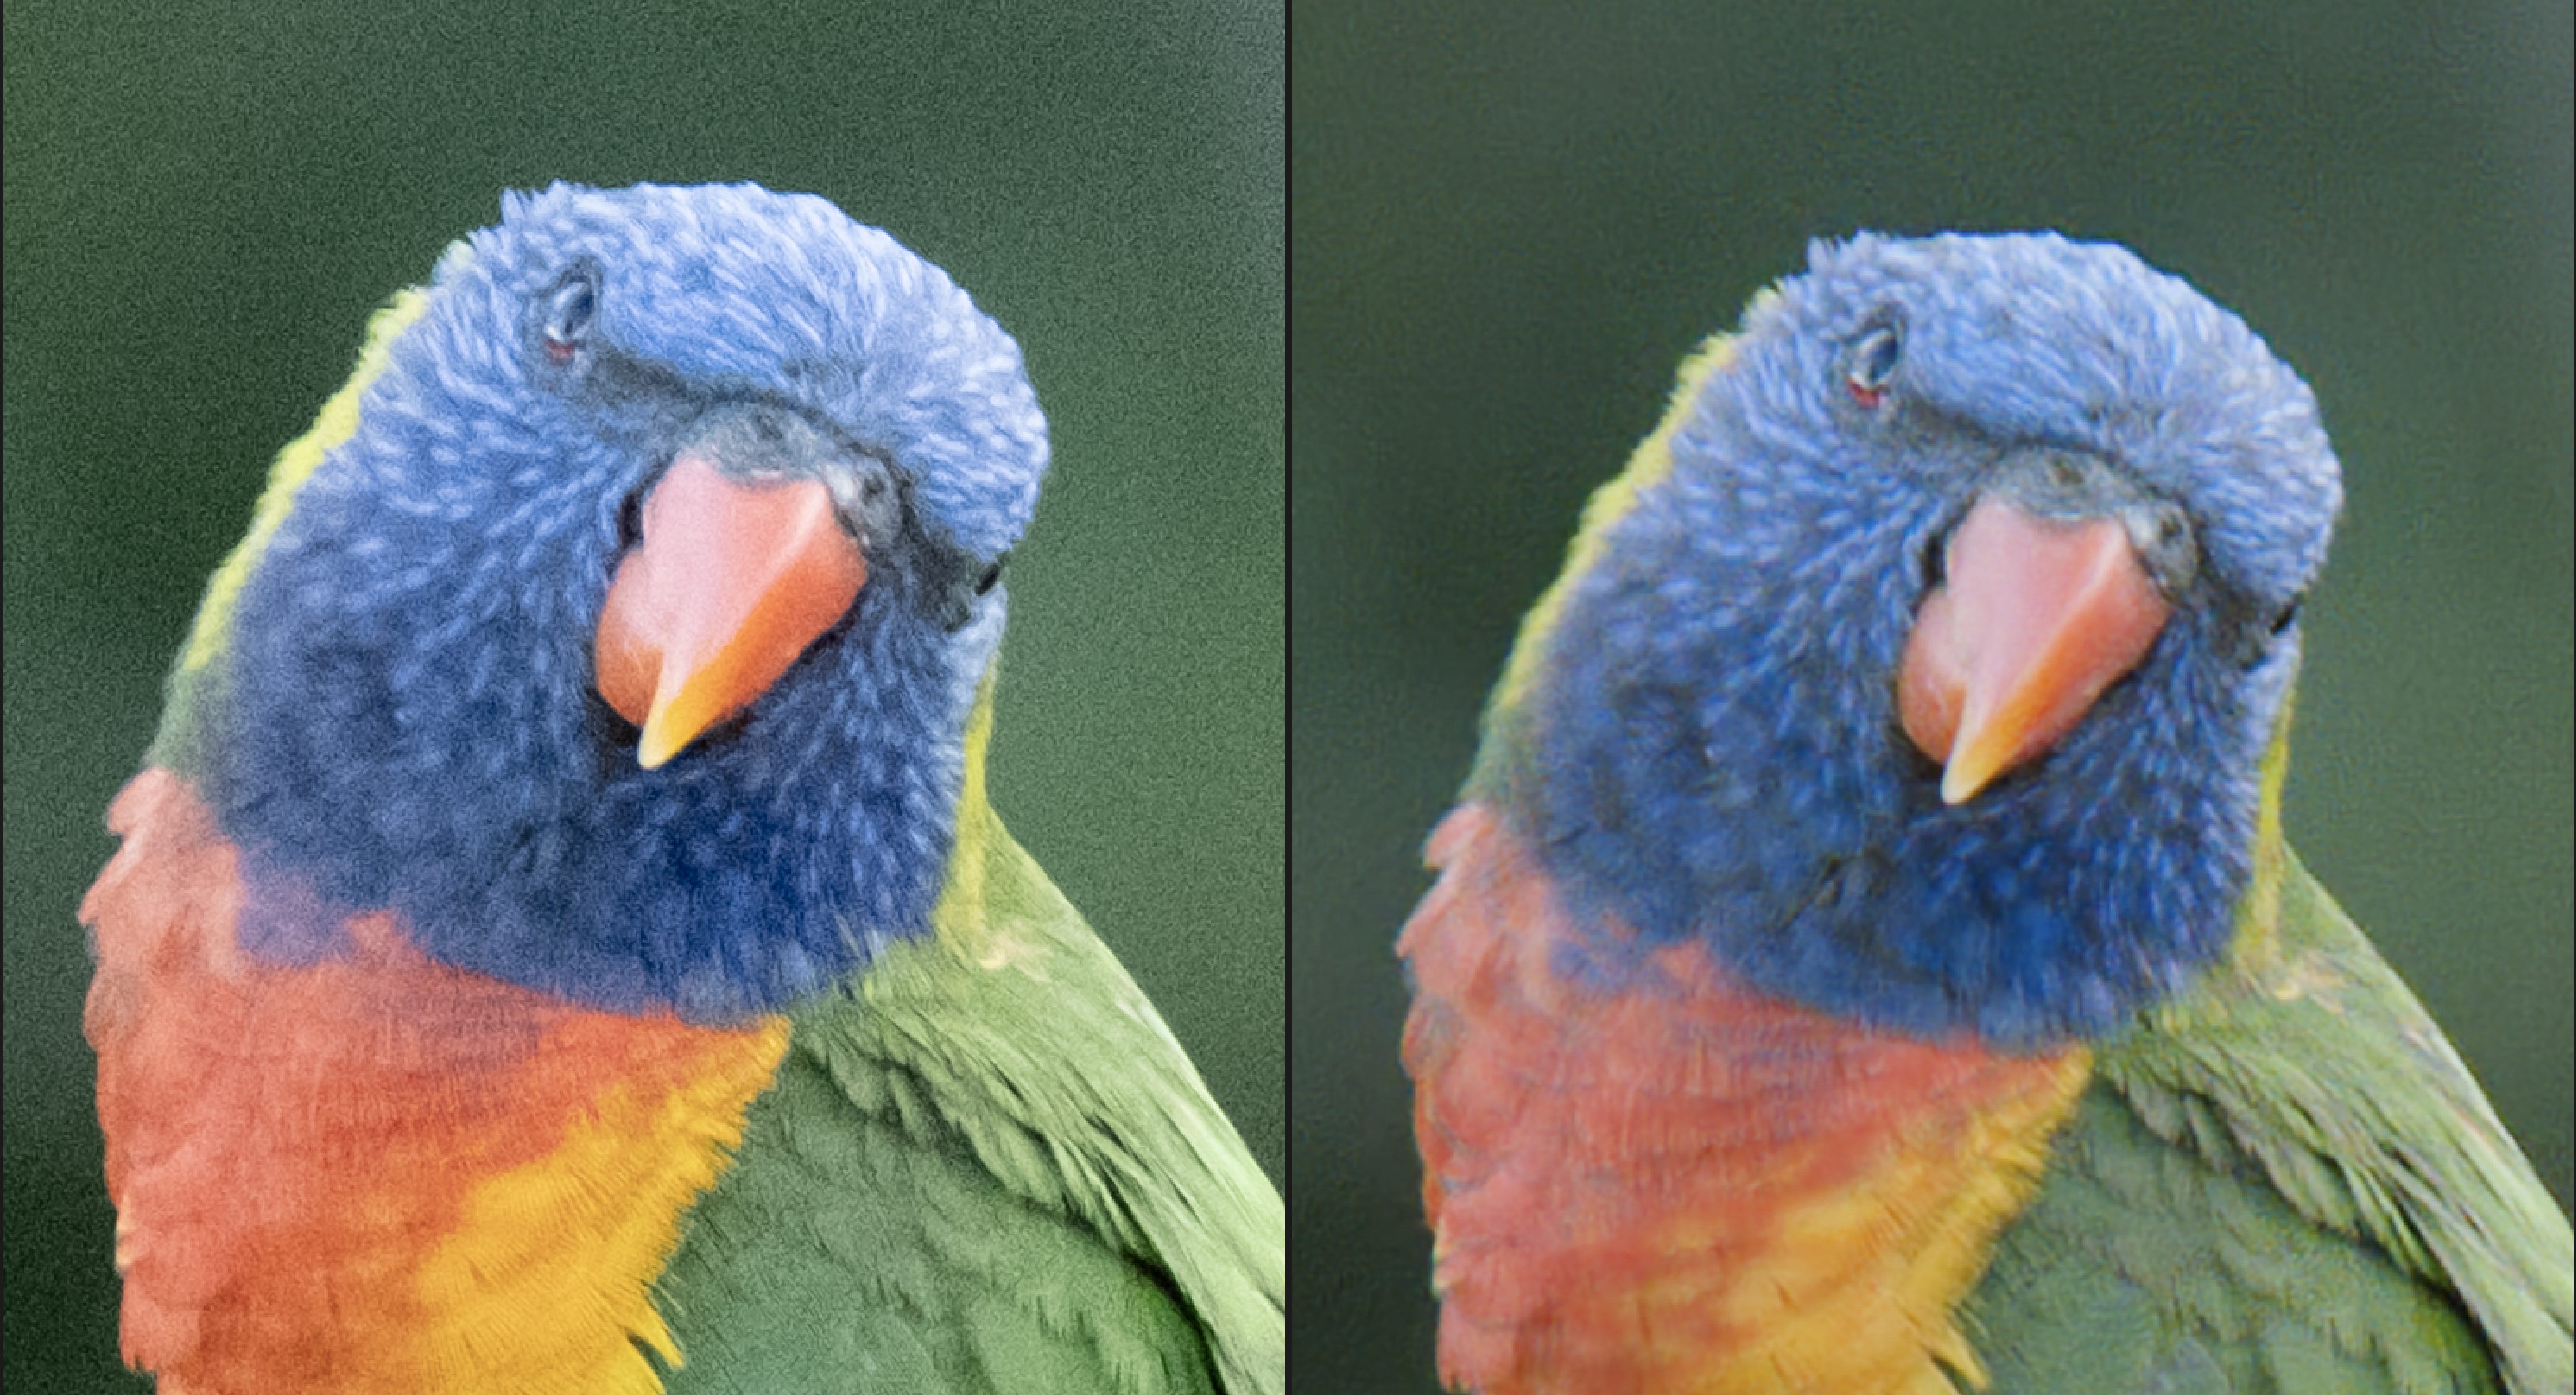
I tested across my usual collection of high ISO shots on a noisy lorikeet photo shot on my Fuji X-T4. There’s a decent reduction in high ISO noise, but a noticeable amount of detail loss in fine areas like feathers. Comparing the same shot against DXO PureRAW 6’s DeepPrime XD3, the difference in detail retention is stark.
I also ran it against a Canon 7D2 shot from the Vivid festival in Sydney, since Bayer RAWs don’t need the X-Trans conversion overhead. The result was a bit better on the detail-retention front than the Fuji files, though DXO still cleaned up the ISO noise more thoroughly.
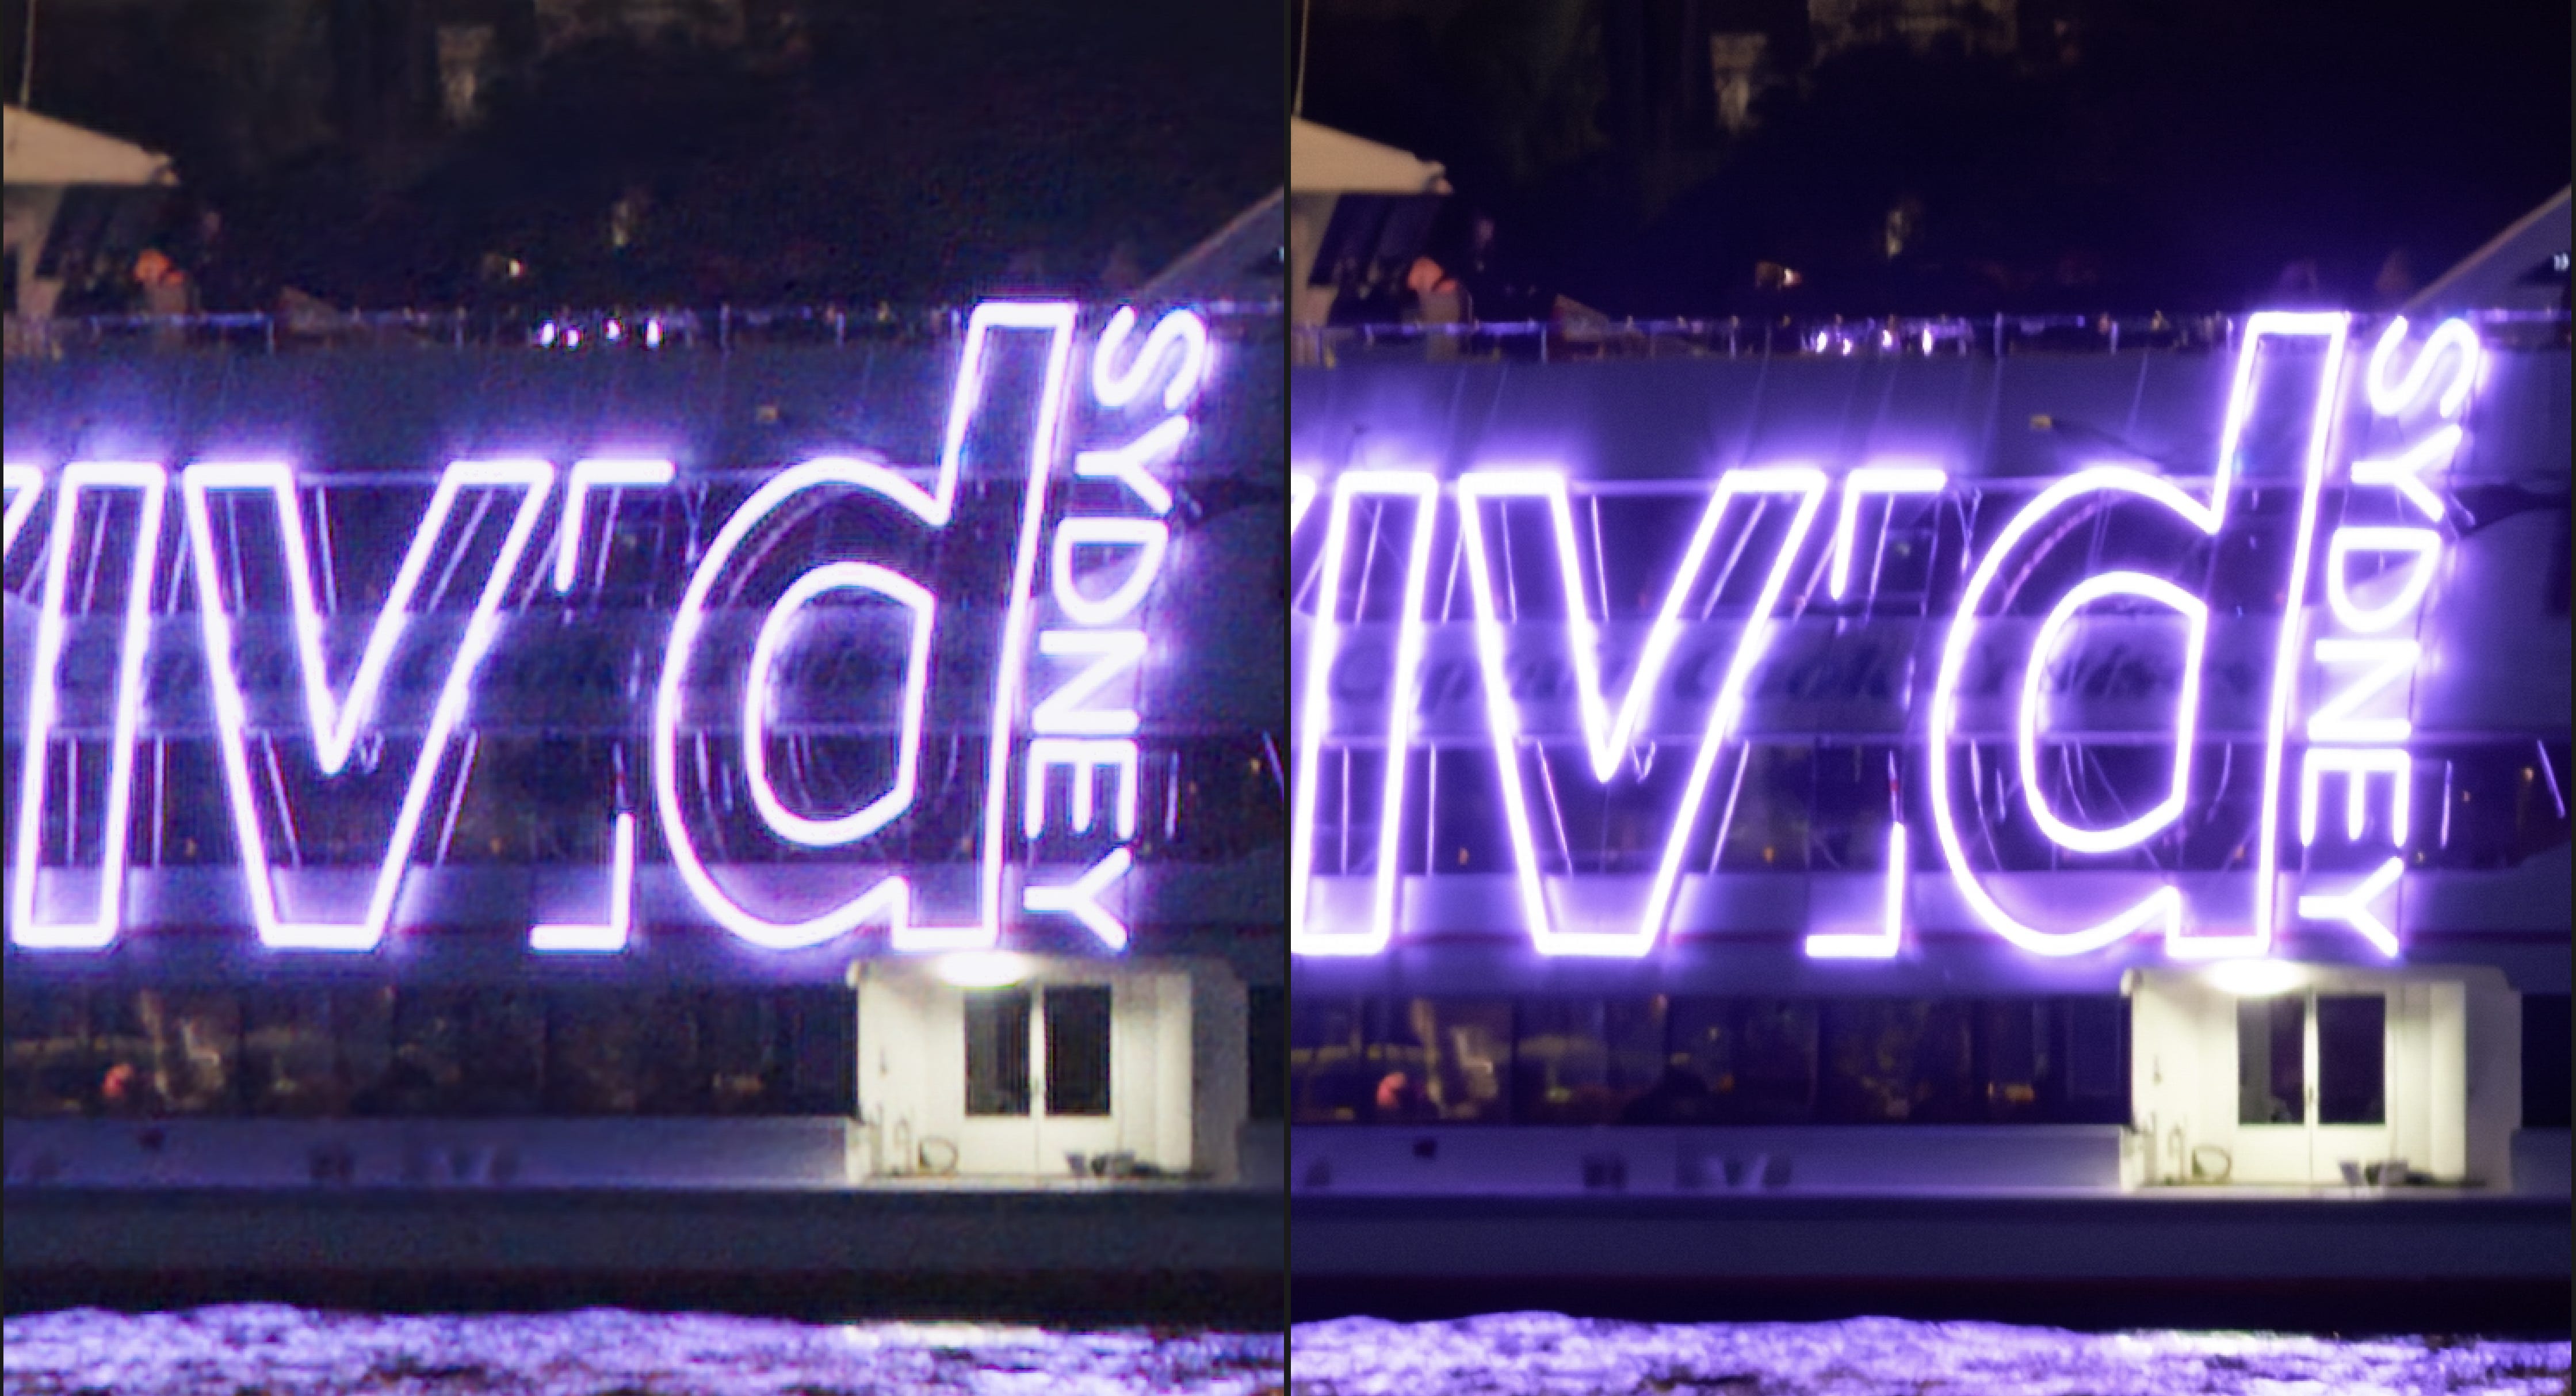
My main impression of the RAW denoise tool is that it does an average job on Bayer RAW files but bleeds detail in the conversion. X-Trans RAW files taken on Fuji cameras suffer from heavier detail loss during the conversion process.
Alongside masking and denoising, upscaling images is, of course, one of the most popular uses of AI in post-processing, and it’s great to see it implemented in Darktable.
The developers have chosen RealPLKSR, a lightweight modern successor to the RealESR GAN approach. It uses the same general philosophy of training on realistically degraded images but replaces the older ‘GAN’ architecture with a more efficient network.
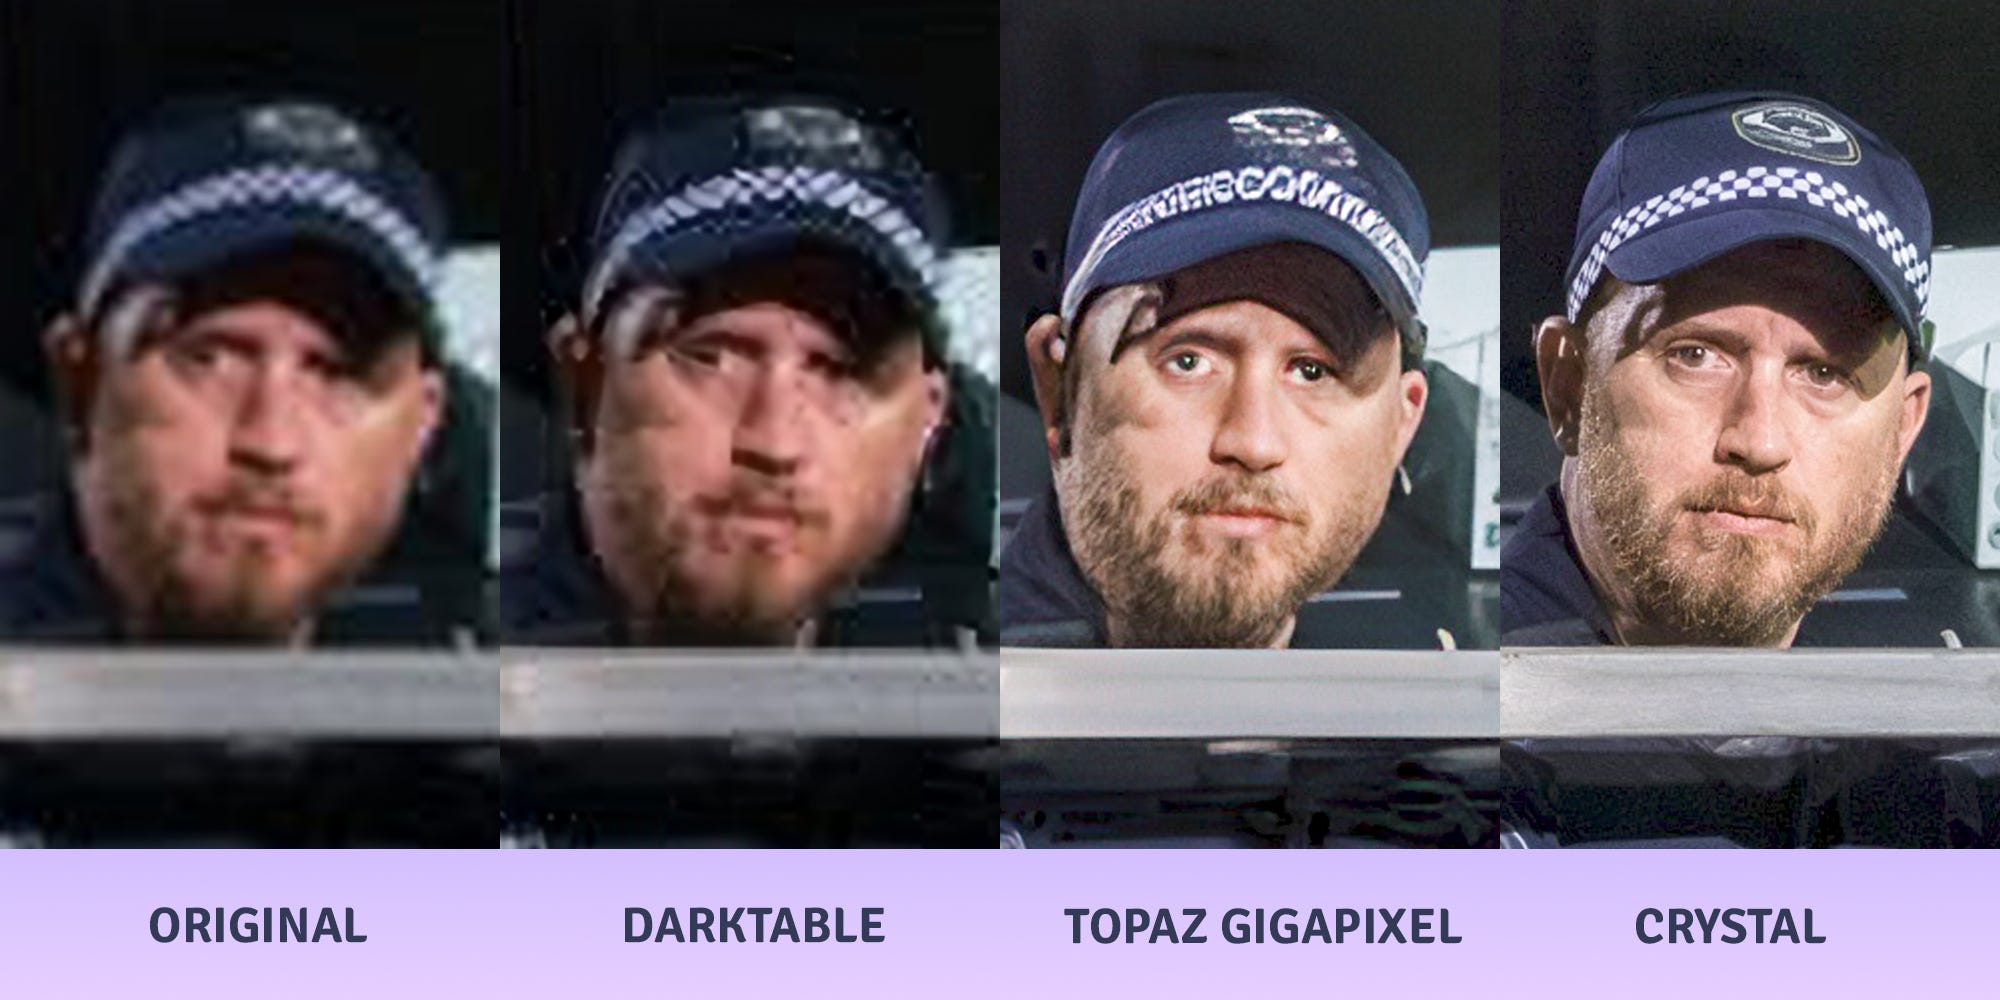
And after some comprehensive testing, I came to the conclusion that it’s basically a load of shit. It is, however, better than Topaz Gigapixel. Free and shit beats $100 a year and shit.
On a 4x upscale test, Darktable actually outperformed Gigapixel, which eradicated texture entirely and made a mess of face recovery. On a rodeo photo, the result flipped: Topaz’s output was nightmarish, but Darktable left a visible grid pattern in the background foliage. For comparison, the Crystal upscaling model did a staggeringly better job than either of them.
It’s great to see the developer team behind Darktable starting to embrace the sort of post-processing tools that users of commercial apps have been enjoying for nearly a decade.
As my testing has clearly illustrated, the best you can say about the best of the tools is that they are average. And at the risk of damning with faint praise, that’s actually a lot better than I thought it would be.
The standout tool is definitely the RAW denoise, but only when used on Bayer RAW files and only if you keep a very careful eye on detail loss.
Denoising generates an intermediate DNG file, which means more disk space being consumed and more bloat in your photo catalogue. Yes. if you use a commercial app like DXO PureRAW rather than PhotoLab, you also end up with an intermediate DNG, but DXO’s compressed DNGs are much smaller than the original RAWs, while Darktable’s DNGs are nearly five times larger. In my tests, an original 34MB RAW file becomes a 160MB DNG when processed using Darktable’s RAW denoise.
Obviously all of these tools will slowly improve over time, and the beauty of the Darktable architecture is such that you can just drop in new AI models as and when they become available, which offers a degree of flexibility you certainly don’t get in commercial apps. There’s even a new Lua AI API in 5.6 for anyone who wants to script their own custom denoise or upscale workflows, which is a level of tinkering you’ll never get from Adobe or DXO.
I’ve now spent more time testing Darktable’s AI tools than most people spend on their tax returns, and the conclusion is roughly the same: it’s fine, nobody’s happy, and the numbers don’t quite add up.
Yes, it’s free. I know. But here’s the thing, free doesn’t mean we suspend all critical judgement. ‘Free’ is a release model, not a review category. If the tools are average, they’re average. The price tag changes your purchasing decision, yes, but it doesn’t change the output.
No posts
Comments
Nothing yet. Say the first thing.
Sign in to join the conversation.