
⋆。°✩ Main features -✩- Initial Setup -✩- Wkbk Maintenance ✩°。⋆
Welcome to Vashle’s Art Task Scheduling Tool! I created this tool for myself as I greatly struggle with juggling tasks, as some of you are well aware of. I’ve tried a multitude of planner options— both created by myself and others— to try and keep myself on task as much as possible with an overwhelming mound of art WIPs. Lists by themselves are okay, but often the task of scheduling the list of tasks took a large chunk out of my available time to actually complete the list of tasks. This cycle of task completion time competing with task planning time is hellish. To hopefully break out of this cycle, I sat down and took a couple weeks to create this tool.
This tool asks of you to create that list, a list of generalized task types with your estimated completion time, and to also give your available time per day— and creates a recommended schedule based on your availability in less than a minute. No more spending an hour+ on sitting down and scheduling what & when to work on your list, or stressing on the thought of needing to figure out a schedule. This tool is your friend in combating executive dysfunction’s stress & difficultly with scheduling. Simply maintain your list of WIPs (as you normally would with a task list) in this workbook, update your availability if it changed, and regenerate the recommended schedule in less than 10 minutes.
This tool can also help project how long large projects will take and what your pace needs to be— a necessary part of planning, especially when it comes to comics.
In the creation of this tool I made sure to soft-code functions/charts/tables/scripts instead of hard-coding for flexibility, making the tool convenient, adaptable, and easy to use. Of course this also means the tool can easily adapt to others’ data as well, so offering a blank version is no additional strain and a potential boon for others.
I hope you are able to find this tool useful if you give it a try. Without further ado, let’s dig into the details.
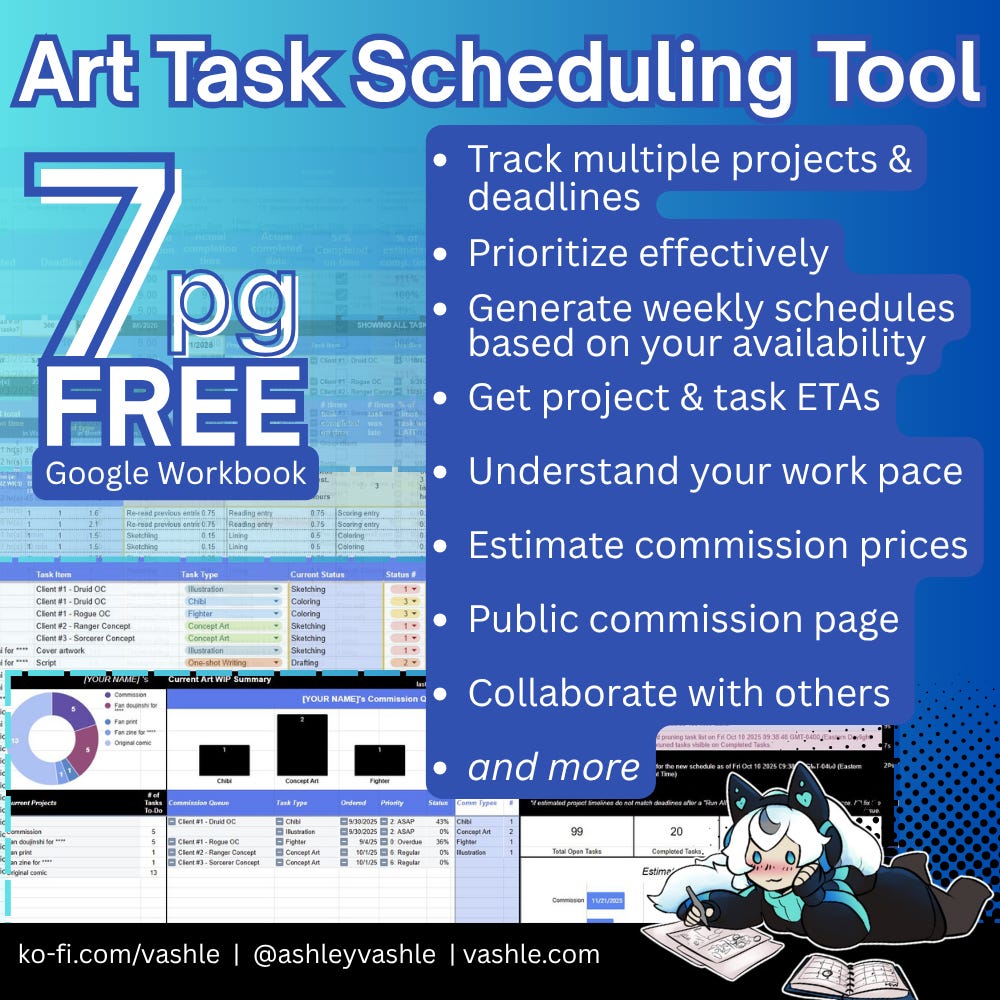
Track multiple projects & deadlines
The hierarchy of organization used by this tool is “Project > Task Item”, allowing grouping of tasks by project name. Projects with many large parts should have each part as a “Project” with individual task items to effectively split up an overview of the work (ex. ‘Comic Ex | Chapter 1’ with task items ‘Script’, ‘Comic’, ‘Cover art’ as one project, ‘Comic Ex | Chapter 2’ with task items…). This is at your discretion with how you choose to organize your workbook.Each task can have up to 5 statuses/phases/stages. These are defined in the ‘Task Types’ tab.
Prioritize effectively
Each task item can have its own priority and deadline, allowing for tasks from different projects to be prioritized accordingly within one schedule.Generate weekly schedules based on your availability
Since you provide your weekly availability along with the estimated time of each task, this tool can generate weekly schedules with each day’s availability and give a breakdown of how much time to spend on each task per day. This is incredibly important for planning large projects like comics & graphic novels which take months to complete at minimum.Get project & task ETAs
Since you generate a schedule based on availability, this tool also gets the estimated completion date of each project and task. An estimated timeline view featuring all projects is available on the Dashboard.Understand your work pace
This tool has an analysis tab dedicated to recording how long tasks actually took, so that you can revise your predicted times and create more accurate future schedules. It also gives feedback on if your working pace will actually meet your desired deadline.Estimate commission prices
Since the tool requires estimated task completion time, it includes a simple calculator for how much each task costs at an hourly rate. It has a toggle for you to see your desired commission hourly rate vs your current job’s hourly rate, and an option to add an admin fee to all tasks. (An admin fee covers the time spent talking to a commissioner & related admin tasks.)Public commission page
Taking advantage of Google Sheets’ capability of publishing a sheet to the web (which has various embedding options), you can make only the “Dashboard” view available to your audience (which tracks commissions per task item by default). This eliminates the need to use a different tool to publicly communicate your current commission queue & overall project status. The commission queue here updates as you work on the rest of your task list :)Collaborate with others
Taking advantage of Google Workspaces’ generally excellent collaboration/sharing features, you can use this workbook with a team. The scheduling features were created for use by an individual, but should adapt to team usage as well.
Here’s the recommended steps to take when setting up your own workbook. For reference, cells with a light blue background have formulas that will populate with information, so please do not edit the contents of those cells.
Setting up for the first time may take an hour or so, depending on how many tasks you write in and an idea of time estimates.
Copy the workbook file into your own Google Drive. This is what you’ll work off of and edit. Rename if you wish.
File > Make a CopyEdit cell I16 on the HOW TO USE tab with your user/name— this cell is referred whereever [YOUR NAME] appears.
Feel free to check out the tab overviews on HOW TO USE for quick pointers on utilizing the workbook, or read further in this post for in-depth explanations.
Go to the Task Types tab. Fill out generalizations of your common tasks with estimated times. (If you don’t have a good estimate, just guess for now and adjust it later.) The estimated times are necessary for later calculations in scripts. It cannot produce a schedule without estimated times.
Hours need to be recorded in decimal format (ex 1.0 = 60 minutes, 0.5 = 30 minutes, etc.)
(Optional) Fill out hourly & admin rates in column V. This is used in calculating how much each task should be charged for (bare minimum) based on time requirements. This is the commission calculator feature.
Go to the Task List tab. Fill out your current list of WIPs (and recently completed tasks, if you’re inclined). Column C utilizes a dropdown which pulls the task types from step 3, so that should be completed before this step.
Go to the Overall Schedule tab. Fill out your available hours per day of the week.
If you are filling this out for the first time and plan on running the script on a day other than Monday, I advise changing the order of the dates (A3-G3). The name for the day of the week is not tied to the numeric date that will be recorded in the schedule.
(It is possible to have the wrong day name to a date if the script is run on a different day from the name recorded in cell A3. Numeric dates will always be correct for deadlines, however availability per day is tied to the date names...)
Now our data initialization is complete. Head over to the Dashboard tab and hit ‘Run All’. You will need to give permission for the scripts to run upon first use. The scripts will populate data across the Dashboard and other tabs we haven’t touched yet. Congratulations, you have generated your first schedule!
Here’s the recommended steps for maintaining the workbook. These should be quick steps that don’t take more than 10 minutes per day or 30 minutes per week.
Take 5-10 minutes to update the status(es) of tasks that were worked on the day prior on the Task List tab.
For completed tasks, run ‘Prune tasks’ script to pull the completed tasks over to the Completed Tasks tab. Fill in the completion date and time taken.
Check the View Week tab for today’s tasks.
Check that all tasks are up to date on the Task List tab.
Make any needed adjustments—
Update weekly availability & check pace of work to see if you are still on pace to complete by your desired deadlines
Run ‘Prune tasks’ script to pull completed tasks & fill in information if it hasnt been done already. Check the Task Completion Analysis tab for recommendations on changes to task time estimates
Run ‘Run all’ script for an updated task list & schedule. Best practice is to run these scripts on the first day of your availability week (cell A3 in Overall Schedule).
If you want to play with pacing/availability per day, you can update availability in Overall Schedule, then rerun just the ‘Schedule’ script to get new schedules.
If you want to see the full schedule in list view (rather than the per-week view of View Week), unhide the ‘Schedule Helper’ tab. This is what the script writes to.
The following goes over each sheet view within the workbook:
✩ Dashboard - List - Types - Completed - Analysis - Overall Schedule - Weekly View ✩
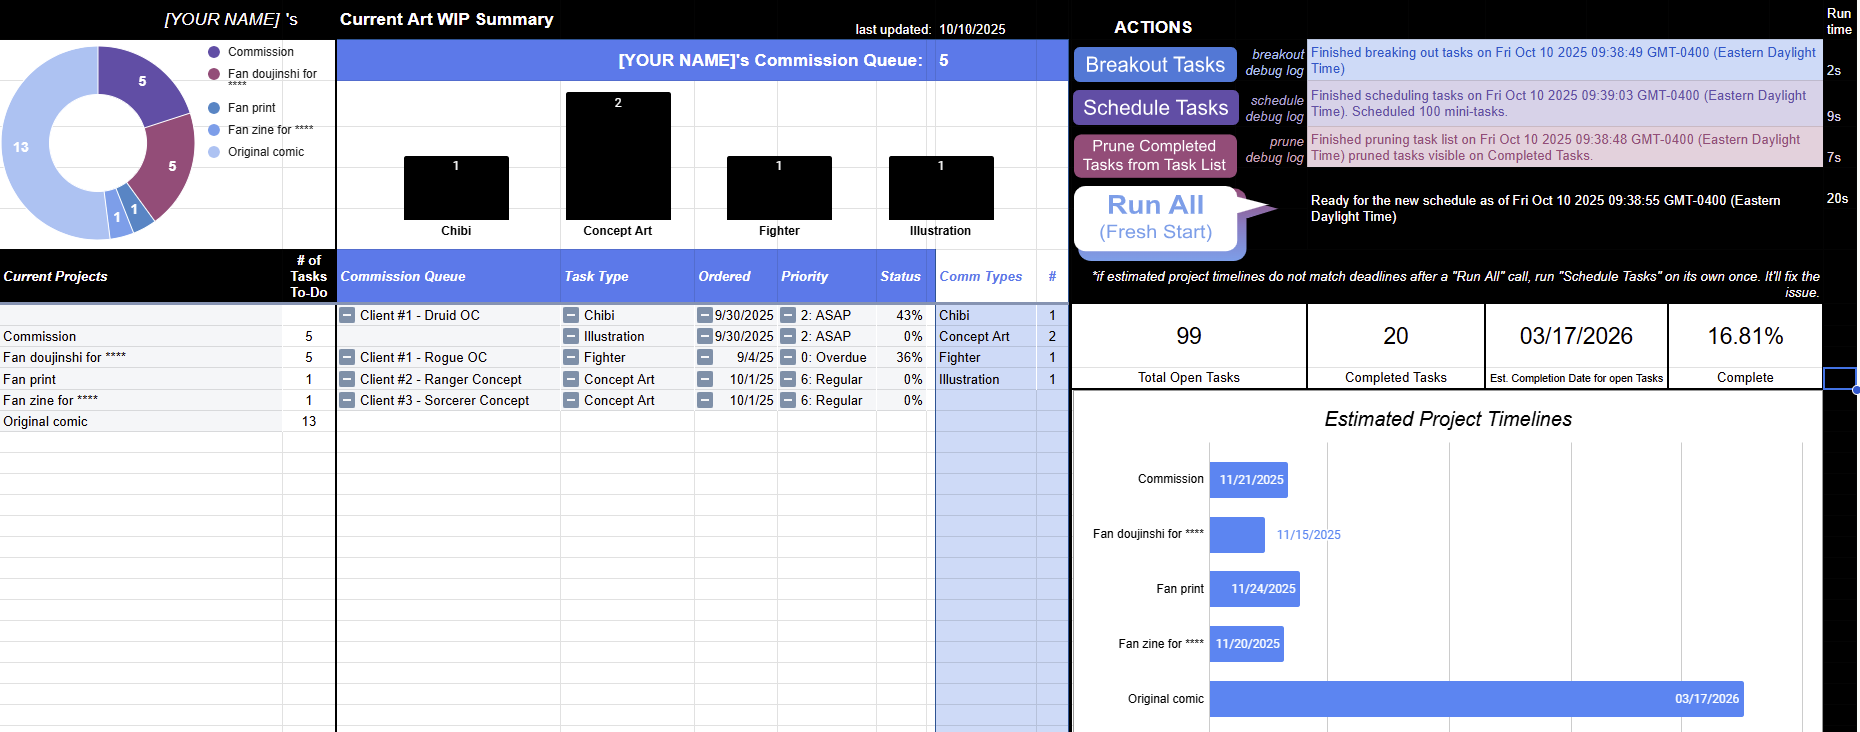
Welcome to your dashboard. Here’s a high-level view of & includes:
your ongoing projects with # of tasks and a chart for ratio of projects by task #
current project task list (by default it uses task items recorded as “Commission” under the project column in the Task List tab)
ongoing project timelines as a bar chart and final end date of all tasks
buttons for triggering scripts
NOTE: You do not need to edit anything on this tab. ([YOUR NAME] will be replaced by editing cell I16, “”YOUR NAME”“, on the HOW TO USE tab.)
After completing the following actions, you will be able to hit the “”Run all”“ button to get your first recommended schedule.
Each part of the larger “Run All” script can be run individually if needed. “Run All”’s script order is Prune > Breakout > Schedule. Ex. If you only want to modify your available time per weekday, you only need to run “Schedule” to see an updated recommended schedule.Complete the steps of initialization in the previous section.
On the “Dashboard’, click “Run All”. This will prompt several authorization windows. Google tries to dissuade from running custom scripts, so bear with me as we fend off the pop-ups.
First “Authorization required” pop-up, hit “OK”
“Google hasn’t verified this app” pop-up. It’s okay, they don’t need to. This script is only accessing the workbook and writing back to the workbook; it’s not writing elsewhere.
Look for the ‘advanced’ underlined button, which then prompts another warning about the author of the script. Since the script is attached to the document, it will show your gmail as the developer. Select ‘continue (unsafe)’.
Final “Make sure you trust …” pop-up. This is where the requested permissions will show. Hit continue.
All permission has been granted to the script— we’re done!
You may need to hit “Run All” again. The scripts will actually run this time.
You can now check “View Week” and “Overall Schedule” for more detailed information on the generated schedule
To change “Commission Queue” to another project…
Edit the pivot table with the pencil icon
In the Pivot Table pane, scroll down to the “Filter” section. It is currently filtering to “Commission”.
We want to change “Filter by values”. You can change it to another value (this information is populated by the “Project” column in “Task List”) or show all projects.
Then hit “OK”. The “Commission Queue” should now be showing items from a different project. You can change “Commission Queue” to a new name.
If you would like to publicly share your progress, you can “Publish to Web” any page of this workbook. I recommend publishing only the “Dashboard” for an overall progress board; it leaves out specific details of tasks, which gives you breathing room while also having an efficient way of publicly sharing your commission queue. NOTE: It will update automatically as you update this planner. Cell I1 calls =today(), which will update with the last date you opened & edited the workbook. You do not need to publish again.
Additionally, published sheets hide formula information and are NOT interactable. Viewers will not be able to run scripts or edit anything on the sheet.
Borrowing steps from Publish specific sheets of an excel document - Google Docs Editors Community
In the Sheets menu, go to File > Share > Publish to web.
After the “Publish to the web” window opens, do NOT click “Publish”. Instead, look in the lower half of the window, and click on “Published content & settings”.
Then click on “Start publishing”.
When prompted “Are you sure you want to publish this document?”, click OK.
After you return to the “Publish to the web” window, look for the “Entire Document” dropdown underneath the “Link” section.
Click the dropdown to switch the URL from the Entire document to each single sheet.
After making a selection, you can click the URL and copy it.
View published example dashboard
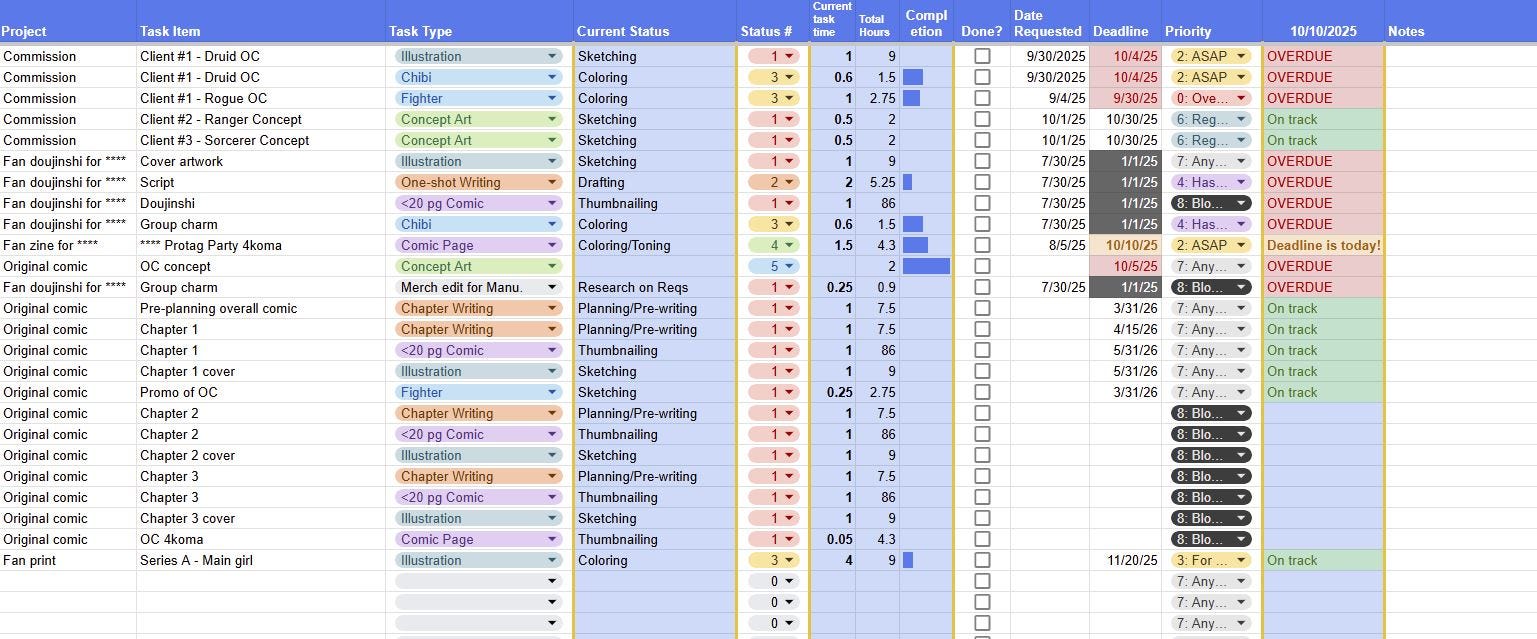
Welcome to the task list. This is where most of your work in the workbook will be and you’ll routinely update the items in this tab. This list is used to get each item’s current status and time estimates, so please keep it updated to get an accurate recommended schedule.
“Task Types” column is pulling the dropdown list items from “Task Types” tab, so please complete that tab before working on the task list for your first use.
Deadline and Priority columns are used to prioritize the work when scheduling, so please fill out these columns (even if you don’t have an actual, hard deadline for a task).
For your reference, the script prioritizes tasks by sorting Priority, then sorting Deadline. In practice this means tasks are prioritized by their deadline dates, then priority level, so your most urgent and closest deadline tasks appear in your queue early. If you’d like to test the prioritization of tasks, follow this same sorting order in the Task List tab by using the filters.
Priority (A→Z) sorting means we start with 0→9; this is why each priority verbage has a leading number. You may edit priority categories, but please follow this format.
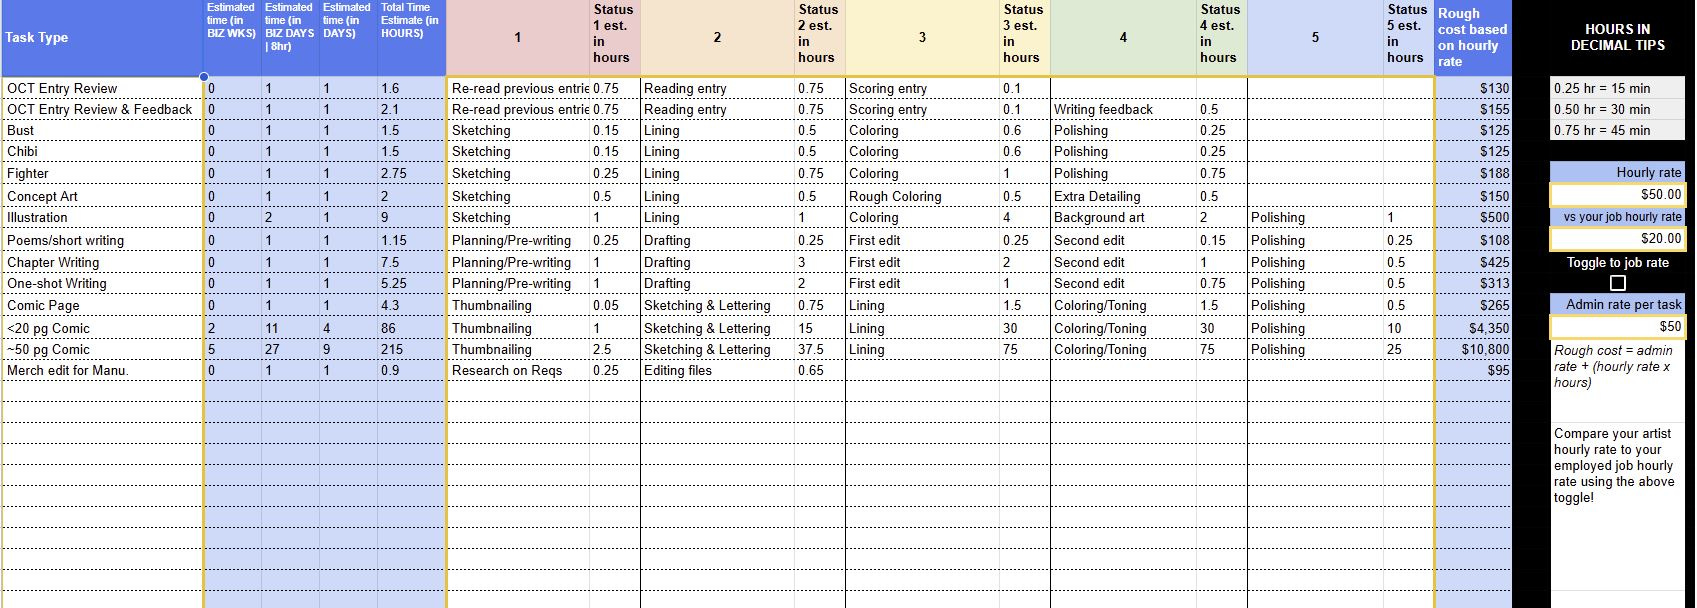
“Task Types” is what you’ll work on first, and only update when you need to later. This is where you’ll define the steps (up to 5) for each task.
If you have a task that takes more than 5 steps, consider breaking up that task into multiple tasks.
Ex. for a 20~30pg comic, it requires a script, artwork, and promotional materials. The script itself needs to be planned, drafted, and edited.Including the script as one step in the comic is not the best way to break down the task; we want the baby steps that make up each task, and each task that makes up a project.
We need to make each task realistic and attainable.
If you don’t already have an idea of how long each type of task takes, you have a few options:
Set a timer and only work up to the last second of the timer. If you weren’t able to complete the task in this focused-down time, you probably need more time (or to pick up the pace). This is a good option for working on drawing speed.
Record the time a task takes. This is less pressure to meet a particular time, but you need to stay focused and on-task to get an accurate recording.
Guess! You may have an idea how long tasks take based on history. If you’re wrong, it’s okay, we can always adjust task time later.
Because we have time estimates, there is an additional calculator that shows how much you should charge per task if it were a commission (even if you don’t explicitly charge per hour worked). There is also a toggle so you can see your hourly pay rate at your regular job vs what you believe your time is worth. Pricing can be difficult, especially when we have low self-worth, so please recognize that your time is valuable and you should be charging above minimum wage.
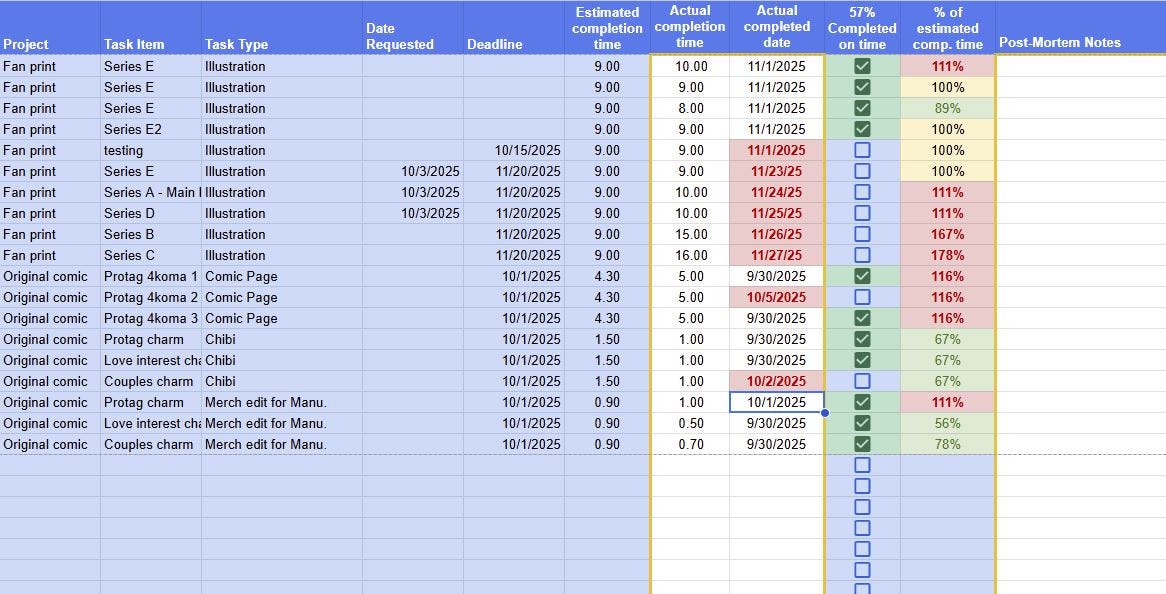
“Completed Tasks” is where tasks marked as Done in “Task List” will be moved to upon calling the Prune script.
After pruning completed tasks, please mark the day the task was completed and how much total time the task took. This will help gather accurate data, used by “Task Completion Analysis”, to tweak “Task Types” with more accurate times. (You do need to modify the times in the “Task Types” tab yourself. It is better practice for you the user to do this than it is to write a script for.)
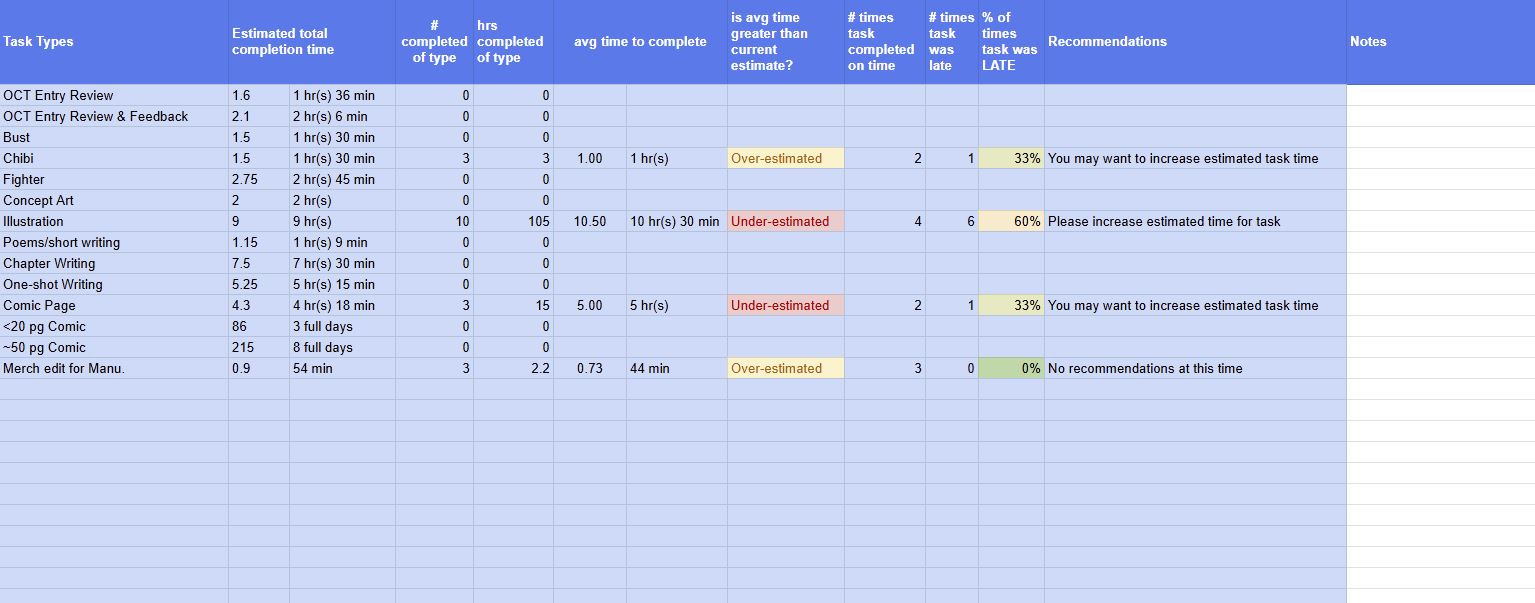
Use “Task Completion Analysis” after completing tasks, pruning them from Task List, and adding completion times and dates. This tab will give you feedback on your average completion time and if you should modify your time estimates.
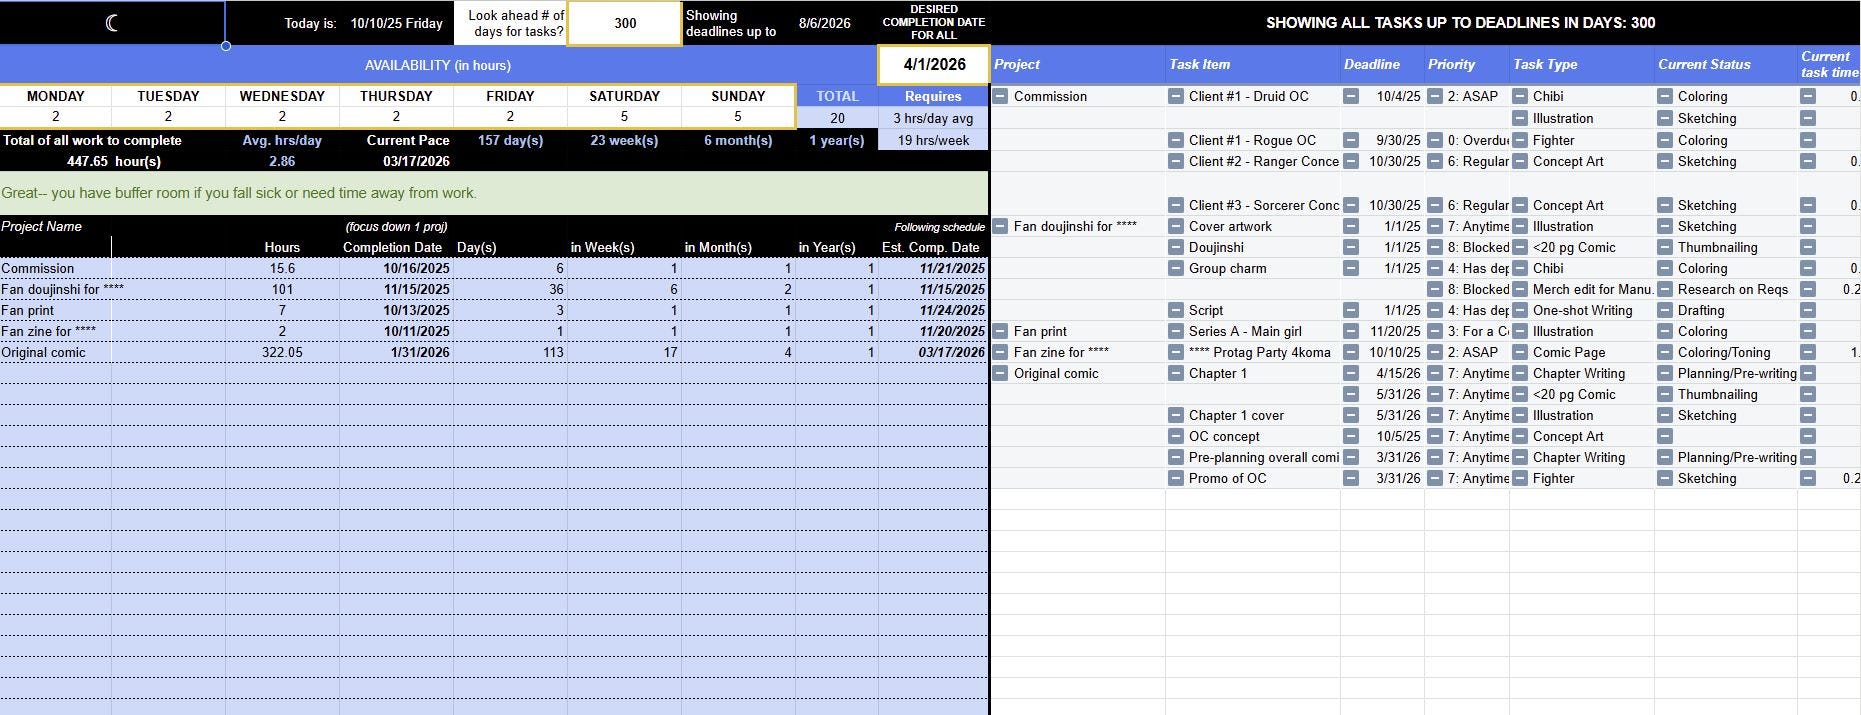
“Overall Schedule” is where you will include your availability per week day. (Please change the order of the days of the week if you are not going to be running this script on a Monday.)
You can:
see a total list of tasks up to a number of days
put in a date when you would like to complete all tasks. It will calculate what your pace of work needs to be to meet that date.
see each project’s estimated completion date based on priorities, and
what the completion date of the project would be if you only focused on this one project.
This tab is the most useful in looking at your overall pace and getting an idea of how long lengthy tasks will take. You may want to adjust your expectations for your magnum opus if it would take an unfeasible amount of time.
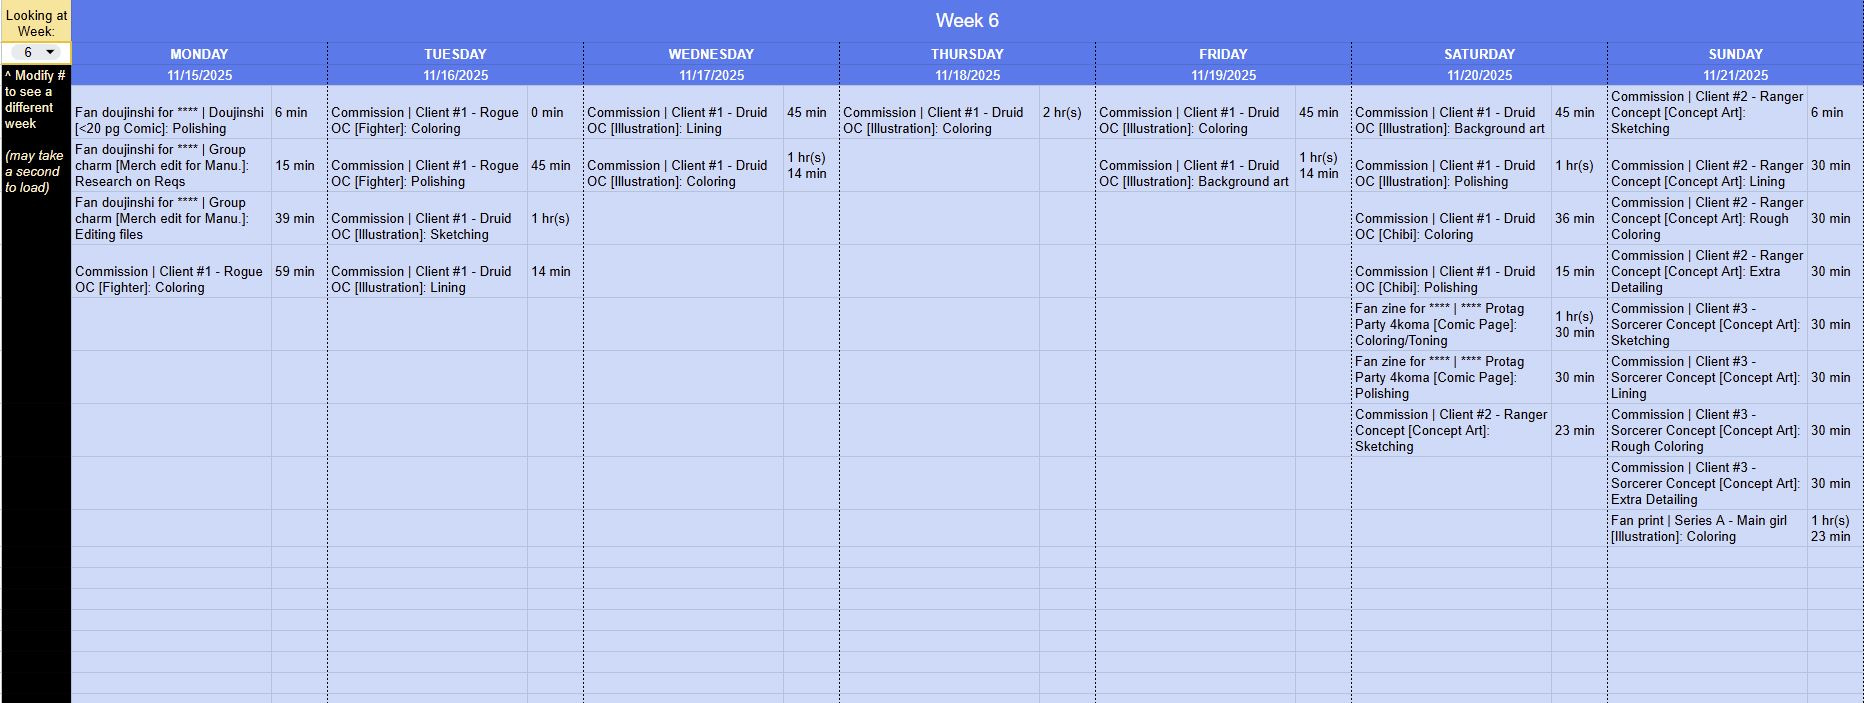
“View Week” will let you view a generated schedule 1 week at a time. The only editable item is the dropdown to change what week you’re looking at.
Please note that dates may not match the actual day of the week (ex “Monday” “10/8/25” is not actually Monday, 10/8/25 is a Wednesday). The order for days of the week is based on what is in the “Overall Schedule” tab. The dates are based on the actual date (”today”) you run the scripts.
If you want the days of the week to match the date, you need to modify the order of days in “Overall Schedule” with the A column day being the current day. Otherwise, run these scripts only on a Monday.
If you’ve tried out the tool and found it useful, tips are greatly appreciated. The tool is a solution for a common issue (especially among artists) and it wouldn’t be right to paywall it. If you’ve paid for this tool from a different platform, please let me know who was selling it. This is meant to be free for all. Thank you!
(This tool could be used to track non-art-related tasks as well, like college assignments for a semester. Use it as you see fit.)
If you’re interested in an in-depth function & code review of how the workbook was put togther using cell formulas, pivot tables, charts, and Apps Script, I may put one up at a later time. Feel free to leave a comment with any questions you’d like answered.No posts
Comments
Nothing yet. Say the first thing.
Sign in to join the conversation.