
In the previous article, we built a CI/CD pipeline for our Node.js application using AWS CodeBuild and CodeDeploy. But we had to manually create all the resources (EC2, CodeDeploy, CodeBuild, S3, security group, and IAM roles). It is not a scalable approach to manage infrastructure.
Let's automate the boring stuff.
This article is a part 2 of Deploying Node.js to AWS series:
- Deploying Node.js to AWS with CI/CD
- 👉 Automate with CloudFormation and IaC
- Monitoring and alerting using AWS CloudWatch
- Securing your Node.js Application with AWS
- Achieve high availability on your Node.js application with AWS
We will look at some of important aspects of a CloudFormation template and apply them to build a template for our Node.js deployment.
Here's how the article is structured:
- 🎑 Why you should use AWS CloudFormation
- ⛩ Introduction to CloudFormation
- 🔮 Concepts
- 🗄 Using parameter store with CloudFormation
- ➫ Rollbacks
- 🪺 Nested Stacks
- 🦄 Change sets
- 🕋 Deletion policy
- 🤺 Termination protection
- 🏎 Drift detection
- 📝 Creating template for our application
- 🦺 Best practices
- 🖼 Conclusion
Why do you need AWS CloudFormation?
AWS is awesome but it has a wide variety of offerings. For a production application, you may be required to set up a lot of services sequentially, in the right order, or else you risk wasting time and effort. Not to mention AWS is costly at times.
In the previous article, we deployed a Node.js application to AWS with CI/CD. But it was a lot of manual work. Creating resources takes time. Clearly, that time can be better spent elsewhere.
Recreating an infrastructure from scratch (eg. recovering from an outage, or expanding to a new AWS region) can be a nightmare.
On 25th February 2011, AWS came up with CloudFormation. The goal was to save time in creating & managing infrastructure. Since its initial launch, CloudFormation has become an inseparable part of the AWS ecosystem.
Introduction to CloudFormation
At its core, AWS CloudFormation leverages templates of code. The code can be written in either YAML or JSON. A CloudFormation template declaratively instructs AWS what resources are required for your infrastructure and in what order.
AWS creates all the resources automatically, behind the scenes, abstracting away all the manual work and complexities. You only need to write the CloudFormation template.
Let's clarify a few concepts before we write the template for our Node.js application.
Concepts
I've chosen YAML to write CloudFormation templates. You can use JSON, if you prefer. You can refer to the official documentation.
Parameters
This helps in providing inputs to your CloudFormation template. This is crucial because some parameters cannot be predicted ahead of time. Some of the important attributes a parameter can have:
- Type – Data type of the parameter (String, Number, CommaDelimitedList, etc.).
- AllowedValues – Allowed values for a parameter in an array.
- NoEcho – Instructs AWS to mask the value to prevent it from being shown in the console.
You can look at all the available parameters in detail here.
You can use a parameter in your CloudFormation template with the help of Fn::Ref function. It fetches the value of the parameter or resource passed to it. We will look at this in practice in a later section.
Mapping
It is just like a hashmap. For example, a mapping helps in selecting AMI value based on region. Mappings are always hard coded.
mappings stored in template.yml
1Mappings:
2 SampleMapping:
3 Key1:
4 Name: Value1
5 Key2:
6 Name: Value2
7 Key3:
8 Name: Value3
It is imperative that to use mapping, you need to know all keys and values beforehand. If you want to find a value in a mapping, you can use Fn::FindInMap.
Outputs
You can import (after exporting) values in a different CloudFormation stack. This helps in writing modular stacks.
You can't delete a CloudFormation Stack if its outputs are being used or referenced somewhere else.
To export a value from a CloudFormation template, you need to declare it in the Output section like this:
Exporting value from a template.yml
1Outputs:
2 SampleEC2:
3 Description: Sample EC2 instance
4 Export:
5 Name: MySampleEC2Instance
To import it in a different CloudFormation stack, you can use Fn::ImportValue function.
Resources
All the services or components that AWS provides can be considered as a resource (eg. EC2, Auto-scaling group, VPC, security group, IAM, etc.). You can use almost any resource in your template.
The CloudFormation template must have all the resources you intend to create. You cannot specify resources using generated code (eg. creating 100 EC2 instances using a for loop).
Condition
Conditions allow you to specify resources or outputs conditionally. For example, you may want to add a resource only for the production environment, you can do it like this:
Conditionally adding CloudFront for caching
1Conditions:
2 CreateCloudFrontForCaching: !Equals [ !Ref ENV, production]
In the above snippet, we are adding CloudFront only for the production environment. For the rest, we are not caching because the data might change more frequently there.
And then, you can attach this condition in the resource section of your template like this:
1Resources:
2 ProdCloudFront:
3 Type: AWS::CloudFront::Distribution
4 Conditions: CreateCloudFrontForCaching
5
User data
When launching an EC2 instance, we often want to do some configurations once the instance is up & running. User data helps you achieve exactly that.
We are using it to install a few dependencies in our Node.js application.
Installs packages once the EC2 instance is up
1AWSTemplateFormatVersion: 2010-09-09
2
3Resources:
4 Type: AWS::EC2::Instance
5 Properties:
6 UserData: !Base64 |
7 #!/bin/bash -xe
8 sudo yum update -y
9 curl -sL https://rpm.nodesource.com/setup_16.x | sudo bash -
10 sudo yum install -y ruby wget nodejs
11 wget https://aws-codedeploy-eu-west-1.s3.eu-west-1.amazonaws.com/latest/install
12 chmod +x ./install
13 sudo ./install auto
14 node -e "console.log('Running Node.js ' + process.version)"
15 npm i pm2 -g
AWS::CloudFormation::Init
This is a better version of user data. It is declarative in nature. Updating your CloudFormation template updates your EC2 instance(s) in place – without replacing the whole instance.
Let's look at an example:
cfn::init creating an index.html file upon instance bootstrap
1Resources:
2 MyInstance:
3 Type: AWS::EC2::Instance
4 Metadata:
5 AWS::CloudFormation::Init:
6 config:
7 files:
8 "/var/www/html/index.html":
9 content: |
10 <h1>Hello World!</h1>
11 mode: '000644'
There's a lot more that cfn::init can do, the official documentation is definitely worth checking out.
Using parameter store with cloudformation
We can use the AWS parameter store to store our values and directly reference them in our CloudFormation template like this:
Instance type parameter fetching values from parameter store
1Parameters:
2 InstanceType:
3 Type: 'AWS::SSM::Parameter::Value<String>'
4 Default: /Production/InstanceType
CloudFormation will resolve the value of /Production/InstanceType during the deployment. It uses the fallback value (provided in the template) by default.
To create a new parameter, simply head over to the parameter store and create a new parameter like shown below.
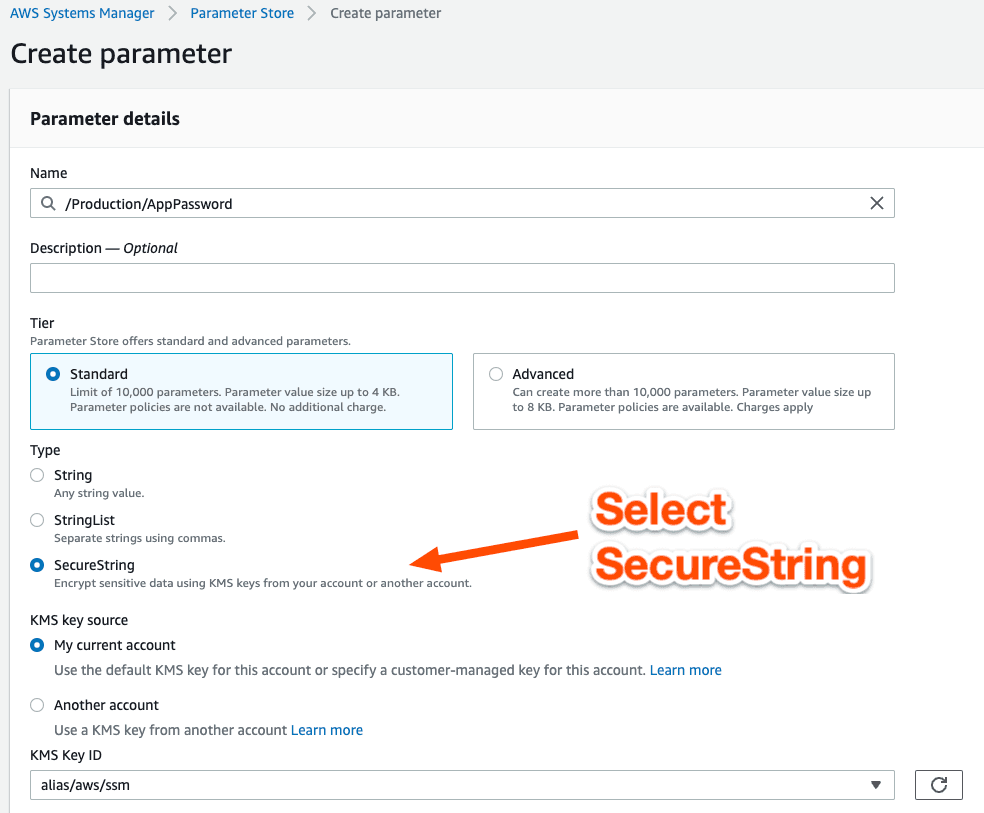
It supports secureString to allow storing credentials or any sensitive information.
Rollbacks
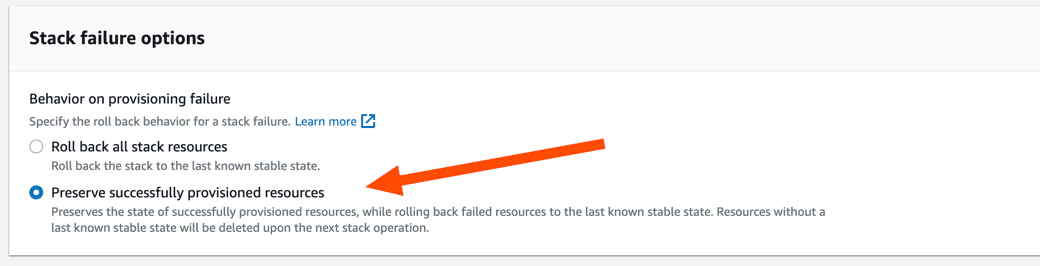
By default, CloudFormation rolls back completely whenever the stack creation fails.
But you can configure this behavior.
If you want to debug or find the reason for failure, you can choose to keep the resources and not delete them on rollback.
You can choose it when creating a new stack from this setting:
Nested stacks
The DRY (Don't Repeat Yourself) principle is the main motivation behind nested stacks. Modularity is the second.
Moving common pieces out of your template to a nested stack not only reduces duplicacy but also makes it reusable across teams and developers.
To define a nested stack, put the type as AWS::CloudFormation::Stack. This successfully creates a nested stack:
1Resources:
2 myStack:
3 Type: AWS::CloudFormation::Stack
4 Properties:
5 TemplateURL: https://cloudformation-templates-ap-south-1.s3.amazonaws.com/EC2InstanceWithSecurityGroupSample.template
6 Parameters:
7 DBName: "analytics-primary"
8 DBUser: "admin"
9 DBPassword: “secretPassword"
10
You can look at some sample CloudFormation templates to help you along the way. The templates are also hosted on Amazon S3.
To update a nested stack, update the parent stack (where the nested stack is being used).
changeSets
A change set helps you understand the proposed changes. However, it won't tell you if the update will be successful. Let's take a look.
We have created a stack that contains an EC2 instance in the us-east-1 region. We want to update our CloudFormation template to change the region of the instance. Let's create a change set:
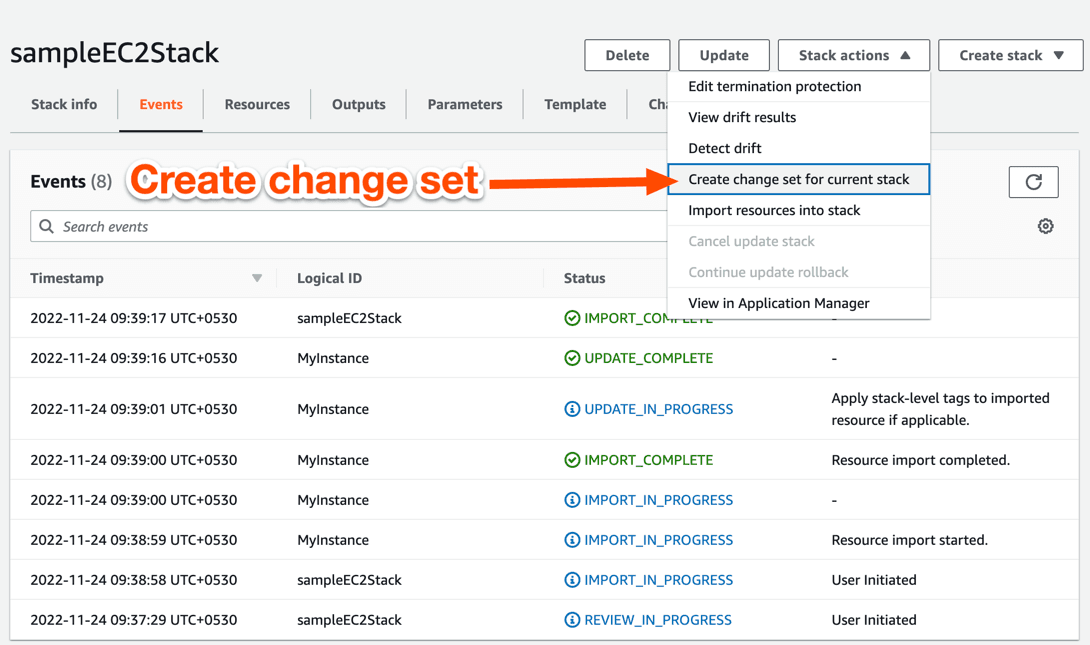
Here it is:
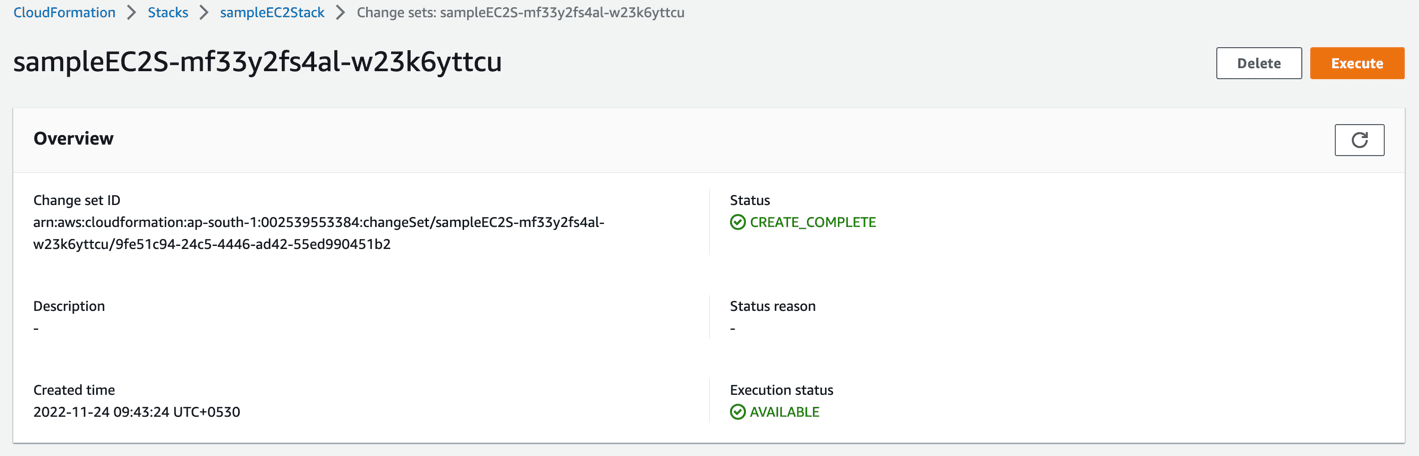
Note that it doesn't execute automatically. ChangeSet is for us to review the changes involved. It only updates the stack upon manual approval (top right in the above picture).
Since we only updated our EC2 region, there's only one change involved:

The existing instance will be replaced with an instance in the desired region (i.e., ap-southeast-1).
DeletionPolicy
You need to specify what happens to a resource when the CloudFormation stack is deleted. There are three options:
- Retain
- Snapshot
- Delete
It used to be Delete by default but now you need to specify this in the template explicitly.
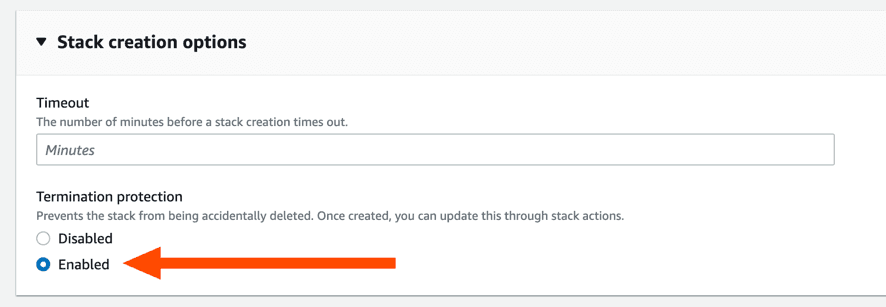
Termination protection
If you don't want to accidentally delete your stack, make sure to enable termination protection. This makes sure you cannot delete your stack until you turn the setting off from Stack Actions.
Drift detection
Drift detection helps you understand whether a stack's configuration has changed from what's specified in the template. For example, one of your EC2 instances got terminated, or are in the wrong VPC, etc.
You can check for drifts in your stack by going to the Stack Actions shown below.
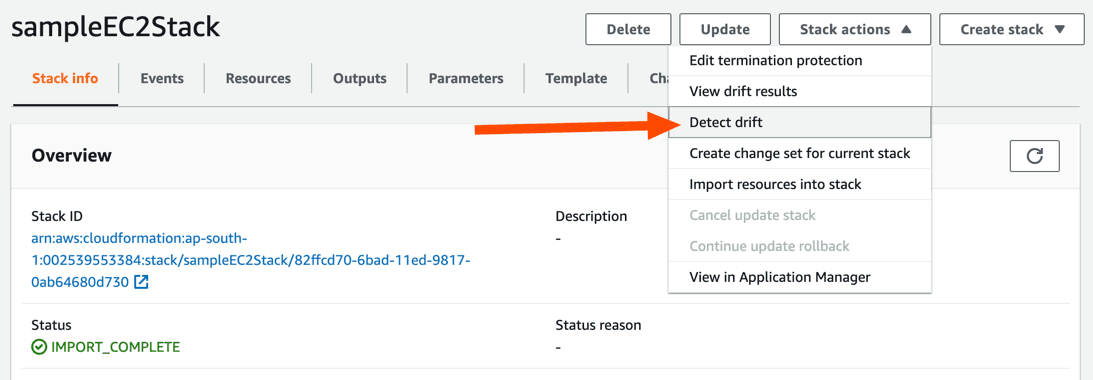
This is useful and helps you find out whether your stack has drifted. You can periodically run drift detection to keep an eye on your stack.
Creating a template for our application
Before creating a CloudFormation template, we need to list down all the resources we need to deploy our application.
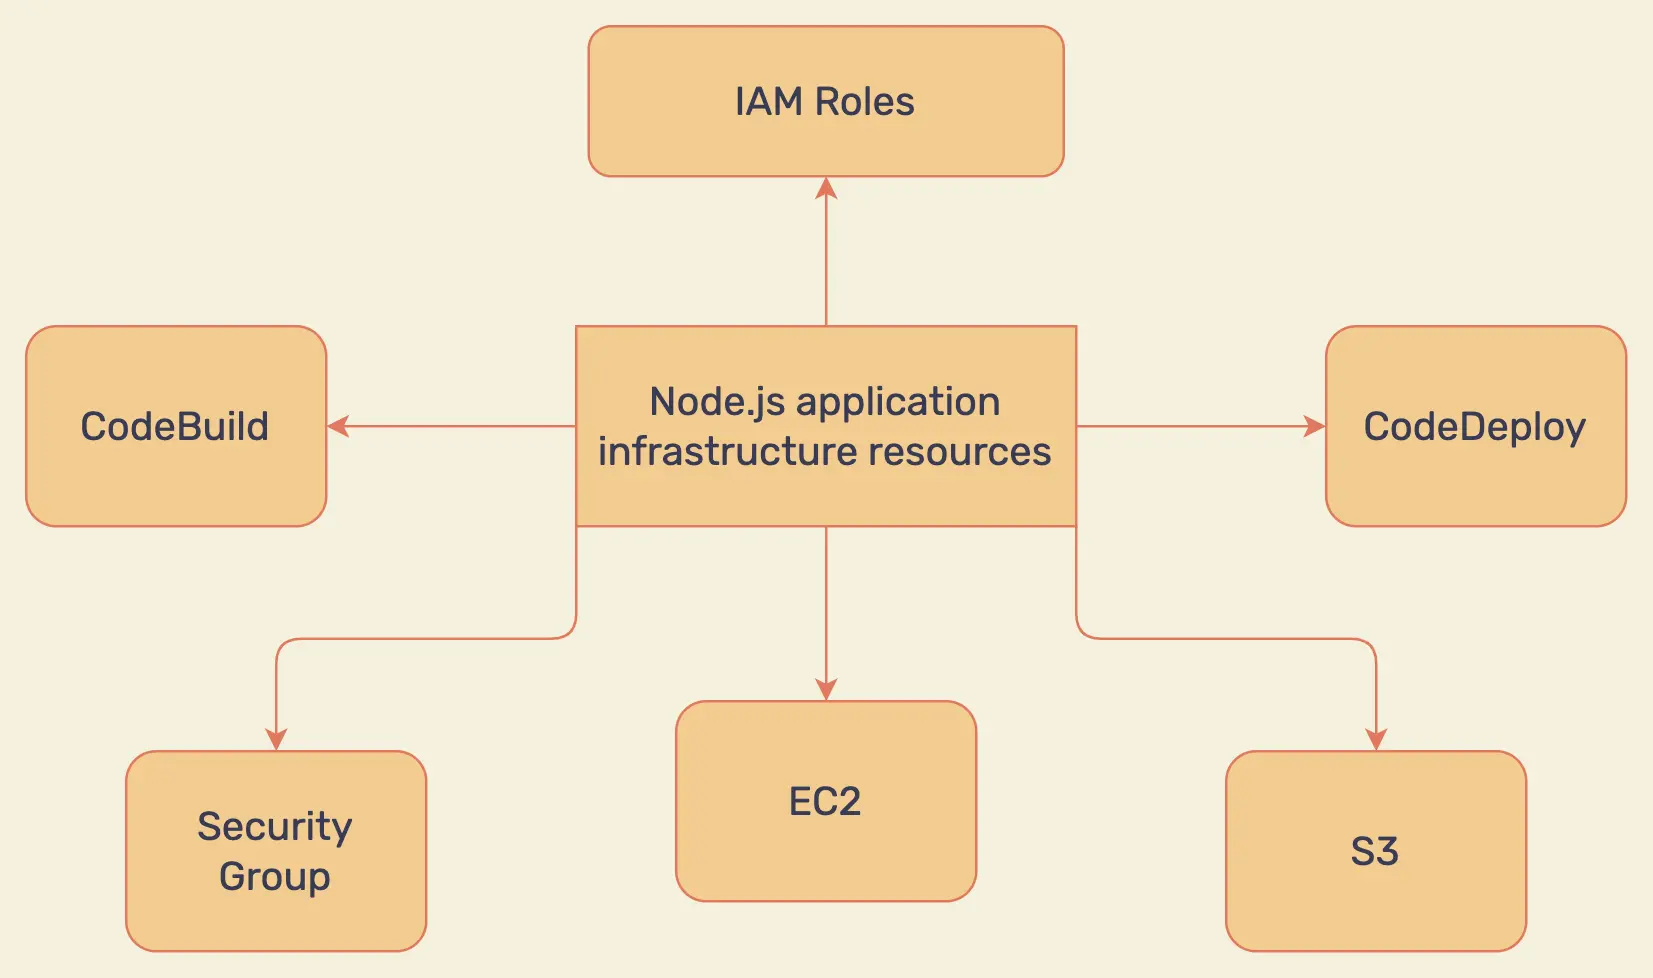
There are a few key points to note when creating our CloudFormation template:
- We need to manually connect our GitHub account to CodeBuild (shown below). This will allow CodeBuild to listen for GitHub repository events and trigger a build.
- CodeBuild should be able to upload build logs and artifacts to a dedicated S3 bucket.
- CodeBuild needs to read secret variable(s) from the parameter store.
- EC2 needs an appropriate IAM role to access the code revision from S3 during the deployment.
- We need to attach a security group to the EC2 instance, to make it accessible over a specific port.
- The EC2 instance needs to install a few dependencies (codedeploy agent, node, pm2) once it is up & running.
- The EC2 needs to have a tag which CodeDeploy will use to find & filter the target instances for the deployment.
Before proceeding any further, here's how you can connect your Github account to AWS CodeBuild using OAuth. It is a one-time process.
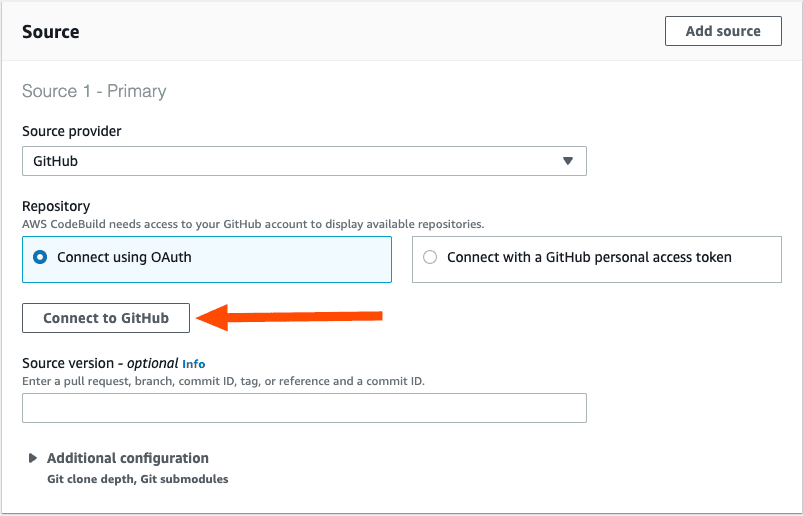
Now we are ready to apply the theory to practice. Let's build the template step by step.
Creating a CodeBuild project with artifact support
1AWSTemplateFormatVersion: 2010-09-09
2
3Resources:
4 BuildArtifactS3Bucket:
5 Type: AWS::S3::Bucket
6 Properties:
7 AccessControl: Private
8 BucketName: cfn-codebuild-artifacts
9 VersioningConfiguration:
10 Status: Enabled
11
12 IAMRoleForCodeBuild:
13 Type: AWS::IAM::Role
14 Properties:
15 Path: /
16 AssumeRolePolicyDocument:
17 Version: '2012-10-17'
18 Statement:
19 - Action: ['sts:AssumeRole']
20 Effect: Allow
21 Principal:
22 Service: [codebuild.amazonaws.com]
23 Policies:
24 - PolicyName: "CodeBuildAccess"
25 PolicyDocument:
26 Version: "2012-10-17"
27 Statement:
28 - Action:
29 - 'ssm:GetParameters'
30 - 'logs:*'
31 - 's3:*'
32 - 'codedeploy:*'
33 Effect: "Allow"
34 Resource: "*"
35
36 CodeBuildProject:
37 Type: AWS::CodeBuild::Project
38 DependsOn:
39 - BuildArtifactS3Bucket
40 - IAMRoleForCodeBuild
41 Properties:
42 ServiceRole: !GetAtt IAMRoleForCodeBuild.Arn
43 Artifacts:
44 Type: S3
45 Location: cfn-codebuild-artifacts
46 Name: buildArtifact.zip
47 Packaging: ZIP
48 Path: deploy-nodejs-cicd
49 Environment:
50 Type: LINUX_CONTAINER
51 ComputeType: BUILD_GENERAL1_SMALL
52 Image: aws/codebuild/standard:6.0
53 EnvironmentVariables:
54 - Name: PASSWORD
55 Value: /Production/AppPassword
56 Type: PARAMETER_STORE
57 Source:
58 Type: GITHUB
59 Location: https://github.com/Rishabh570/deploy-nodejs-aws-cicd.git
60 Auth:
61 Type: OAUTH
62 SourceVersion: cloudformation
63 Triggers:
64 Webhook: true
Let's take a closer look at the template so far:
- On line 4-10, we are creating one S3 bucket for storing build artifact.
- We are also creating one IAM role to give CodeBuild certain permissions (line 29-32). These permissions can only be used by the principal i.e., CodeBuild (line 22).
- Line 43-48, we're attaching the S3 bucket to CodeBuild.
- CodeBuild is using a secret from parameter store.
- Lastly, we're attaching our Github repository and the branch ("cloudformation") along with the connection method (OAuth). Webhook trigger is turned on to make sure any repository event on our repo triggers a build.
With the above template, we have taken care of the build phase for our CI/CD pipeline. Deployment phase comes next. But before provisioning CodeDeploy, we need one EC2 instance.
Creating an EC2 instance (previously created resources are skipped for brevity)
1AWSTemplateFormatVersion: 2010-09-09
2
3Parameters:
4 SSHKeyPairKeyName:
5 Type: AWS::EC2::KeyPair::KeyName
6 Description: This secure string parameter holds our application password
7 Default: NodejsDeploymentKeyPair
8
9Resources:
10 CodeRevisionS3Bucket:
11 Type: AWS::S3::Bucket
12 Properties:
13 AccessControl: Private
14 BucketName: cfn-codedeploy-revisions
15 VersioningConfiguration:
16 Status: Enabled
17
18 EC2IAMRoleForCodeDeploy:
19 Type: AWS::IAM::Role
20 Properties:
21 Path: /
22 AssumeRolePolicyDocument:
23 Version: '2012-10-17'
24 Statement:
25 - Action: ['sts:AssumeRole']
26 Effect: Allow
27 Principal:
28 Service: [ec2.amazonaws.com]
29 Policies:
30 - PolicyName: "CodeDeployAccess"
31 PolicyDocument:
32 Version: "2012-10-17"
33 Statement:
34 - Action:
35 - 's3:*'
36 - 's3-object-lambda:*'
37 Effect: "Allow"
38 Resource: "arn:aws:s3:::cfn-codedeploy-revisions/*"
39
40 EC2IAMInstanceProfile:
41 Type: AWS::IAM::InstanceProfile
42 Properties:
43 Path: /
44 Roles:
45 - !Ref EC2IAMRoleForCodeDeploy
46
47 SSHSecurityGroup:
48 Type: AWS::EC2::SecurityGroup
49 Properties:
50 GroupDescription: SSH and HTTP
51 SecurityGroupIngress:
52 - CidrIp: 0.0.0.0/0
53 FromPort: 22
54 IpProtocol: tcp
55 ToPort: 22
56 - CidrIp: 0.0.0.0/0
57 FromPort: 80
58 IpProtocol: tcp
59 ToPort: 80
60 - CidrIp: 0.0.0.0/0
61 FromPort: 3001
62 IpProtocol: tcp
63 ToPort: 3001
64
65 MyEC2Instance:
66 Type: AWS::EC2::Instance
67 DependsOn:
68 - SSHSecurityGroup
69 Properties:
70 IamInstanceProfile: !Ref EC2IAMInstanceProfile
71 KeyName: !Ref SSHKeyPairKeyName
72 AvailabilityZone: ap-south-1a
73 ImageId: ami-0e8bfae08669b4b89
74 InstanceType: t2.micro
75 Monitoring: false
76 SecurityGroups:
77 - !Ref SSHSecurityGroup
78 UserData: !Base64 |
79 #!/bin/bash -xe
80 sudo yum update -y
81 curl -sL https://rpm.nodesource.com/setup_16.x | sudo bash -
82 sudo yum install -y ruby wget nodejs
83 wget https://aws-codedeploy-eu-west-1.s3.eu-west-1.amazonaws.com/latest/install
84 chmod +x ./install
85 sudo ./install auto
86 node -e "console.log('Running Node.js ' + process.version)"
87 npm i pm2 -g
88 Tags:
89 - Key: environment
90 Value: development
91 - Key: name
92 Value: webserver
With our EC2 instance ready, we can provision CodeDeploy now. This is the final checkpoint for our CI/CD pipeline.
Provisioning AWS CodeDeploy (previously created resources are skipped for brevity)
1AWSTemplateFormatVersion: 2010-09-09
2
3Resources:
4 CodeDeployServiceRole:
5 Type: AWS::IAM::Role
6 Properties:
7 Path: /
8 ManagedPolicyArns:
9 - arn:aws:iam::aws:policy/service-role/AWSCodeDeployRole
10 AssumeRolePolicyDocument:
11 Version: '2012-10-17'
12 Statement:
13 - Action: ['sts:AssumeRole']
14 Effect: Allow
15 Principal:
16 Service: [codedeploy.amazonaws.com]
17
18 CodeDeployApplication:
19 Type: AWS::CodeDeploy::Application
20 DependsOn: MyEC2Instance
21 Properties:
22 ApplicationName: cfn-codedeploy-application
23
24 CodeDeployDeploymentGroup:
25 Type: AWS::CodeDeploy::DeploymentGroup
26 DependsOn: CodeDeployApplication
27 Properties:
28 ApplicationName: cfn-codedeploy-application
29 ServiceRoleArn: !GetAtt CodeDeployServiceRole.Arn
30 Ec2TagFilters:
31 - Key: environment
32 Type: KEY_AND_VALUE
33 Value: development
34 DeploymentGroupName: development
35 DeploymentConfigName: CodeDeployDefault.OneAtATime
- We are using pre-build service role for CodeDeploy.
- A CodeDeploy application named cfn-codedeploy-application is being created on line 22.
- We're adding a deployment group to the CodeDeploy application. A deployment group is a selected set of instances targeted for a deployment. For instance, you can have three separate deployment groups for development, staging, and production. All targeting different EC2 instances.
CloudFormation best practices
A CloudFormation template is written in yaml (or JSON) and follows some of the commonly known best practices 🦺, same as code:
- Build modular templates. Reusable template components allow easier replication of your deployment stack across multiple environments.
- Principle of least knowledge – Do not embed any sensitive information (eg. credentials) in your template.
- Use changeSets to update your templates rather than deleting your stack and recreating it again.
- Commit your templates to a version control system. This helps in visibility over the different versions of a template. Moreover, you get to enjoy the benefits of a version control system (eg. Code reviews, reverting to previous version, etc.).
Conclusion
We have learned about AWS CloudFormation, why it's needed, how it works, and how you can leverage it to automate the tedious process of managing infrastructure.
We have also created a CloudFormation template for the stack we created in the previous article 🏭.
Next up, we will look at how to set up monitoring & alerting setup for our Node.js application.
I hope this helped you get an initial understanding of AWS CloudFormation.
Happy to take questions and feedback in the comments or on my Twitter ✌️.
Comments
Nothing yet. Say the first thing.
Sign in to join the conversation.