
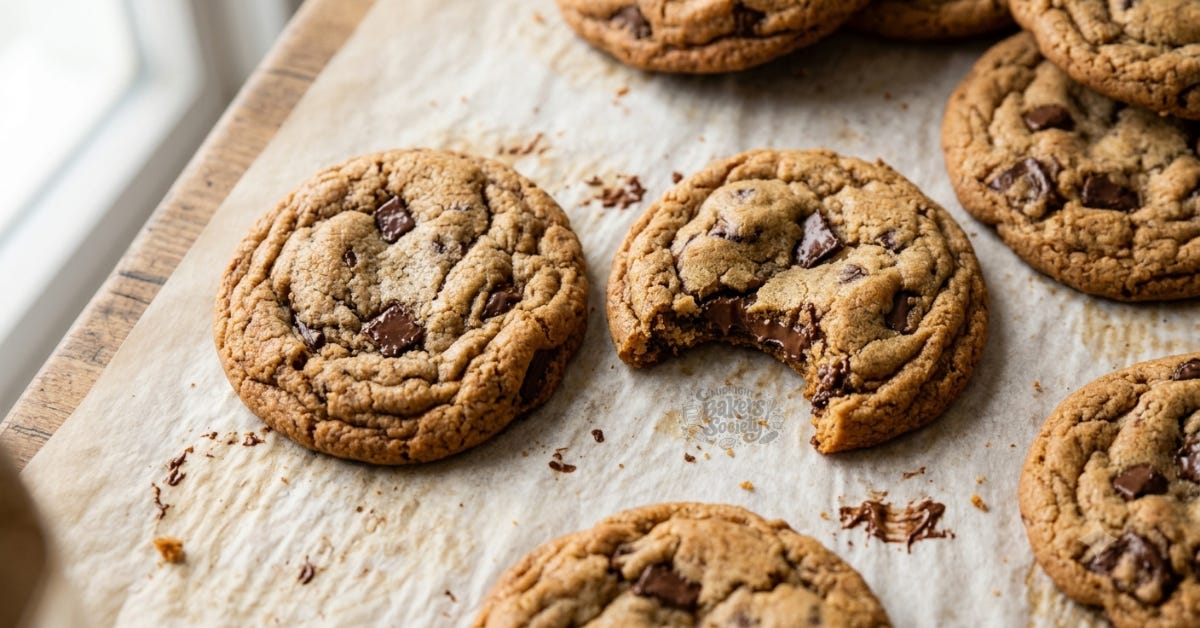
There are chocolate chip cookies, and then there are the chocolate chip cookies people remember.
The ones with crisp, golden edges and thick, soft centers. The ones that feel substantial when you pick them up. The ones with enough chocolate in every bite that nobody is left holding a sad piece of plain cookie while staring longingly at someone else’s.
This is that cookie.
It was built to be big, thick, deeply golden, and unapologetically bakery-style. It uses cold butter, a long chill, a generous amount of chocolate, and a hotter oven than many traditional chocolate chip cookie recipes. Every part of the method is working toward the same goal: a cookie with structure on the outside, softness through the center, and enough chew to keep it from drifting into cakey territory.
This is also one of those recipes where the instructions matter just as much as the ingredient list.
Could you mix it quickly, skip the chill, toss the dough into a lukewarm oven, and still end up with something technically recognizable as a cookie?
Probably.
Would it be this cookie?
Absolutely not.
The five-minute mixing time, the four-hour rest, the large portions, the 400°F oven, and the long cooling period are not little decorative notes included to make the recipe appear more professional. They are the method. They are what turn a bowl of chocolate chip cookie dough into a thick, bakery-style cookie instead of a tray of sweet, buttery pancakes.
So, before you decide the chill time sounds optional or that the cookies look done enough to move after three minutes, let’s talk through what makes this recipe work.
Makes: 16 large cookies
Active time: Approximately 15 minutes
Chill time: At least 4 hours; overnight is best
Bake time: 8–12 minutes
Storage: Airtight at room temperature for up to 7 days
Freezer storage: Up to 2 months
1 cup / 227g salted butter, cold and cubed
[Chilled browned butter may be substituted]1 cup / 213g light brown sugar
½ cup / 100g granulated sugar
2 large eggs
2 teaspoons / 10g vanilla extract
3 cups / 340g all-purpose flour
2 tablespoons / 20g cornstarch
¾ teaspoon baking soda
½ teaspoon salt
1 cup semi-sweet chocolate chips or chunks
1 cup dark chocolate chips or chunks
Line two cookie sheets with parchment paper and set them aside.
In the bowl of a stand mixer fitted with the paddle attachment, combine the cold cubed butter, light brown sugar, and granulated sugar. Beat on medium speed for approximately five minutes, or until the mixture becomes creamy, cohesive, and visibly smoother.
Add the eggs one at a time, mixing well after each addition.
Add the vanilla extract and mix only until incorporated.
Add the flour, cornstarch, baking soda, and salt. Mix on low speed just until the visible flour disappears. Do not continue mixing once the dry ingredients have been incorporated.
Fold the semi-sweet and dark chocolate chips or chunks into the dough by hand using a spatula.
Divide the dough into 16 portions, approximately 3.4 ounces each. Shape each portion into a thick ball and place the dough portions on the prepared trays or in a covered container.
Cover and refrigerate for at least four hours. Overnight chilling is preferred.
When ready to bake, preheat the oven to 400°F / 205°C.
Arrange six to eight chilled dough portions on each parchment-lined cookie sheet, leaving plenty of space between them.
Bake for 8–12 minutes, or until the edges and tops are golden while the centers still appear slightly underdone.
Allow the cookies to rest on the baking sheet for 15–20 minutes before moving them to a cooling rack. For the best final texture, allow them to cool for up to one hour before serving.
Most traditional chocolate chip cookie recipes begin with softened butter. This one begins with butter taken directly from the refrigerator, cut into cubes, and mixed with the sugars for approximately five minutes.
That choice is intentional.
Cold butter gives the dough more structure from the beginning. It also helps control spread, which is especially important when you are making large cookies weighing approximately 3.4 ounces each. A cookie that size contains a substantial amount of fat and sugar. If the butter begins too warm, the outside of the dough can start melting before the cookie has enough time to establish structure in the oven.
That is when a thick bakery cookie becomes a wide, flat bakery cookie.
The five-minute mixing period allows the friction of the paddle attachment to soften the cold butter gradually while the sugar crystals work their way through it. At first, the mixture may look crumbly or stubborn. This is normal. Cold butter is not especially interested in cooperation during the first minute or two.
Keep mixing.
As the butter warms slightly, the ingredients begin to come together into a smoother, creamier mixture. By the end of the mixing period, the butter and sugars should look cohesive rather than sandy, with no large visible chunks of butter remaining.
This is not exactly the same as traditional creaming with room-temperature butter. You are not trying to whip the mixture into something extremely pale and airy. The goal is to soften the butter through controlled mixing, distribute the sugars evenly, and incorporate enough air to give the cookie lift without encouraging excessive spread.
Stopping after one or two minutes because the mixture appears “mostly combined” will produce a different dough. The butter may still be too firm, the sugar may not be evenly distributed, and the mixture will not have developed the texture the recipe was designed around.
In this recipe, the full mixing time matters.
This recipe uses twice as much brown sugar as granulated sugar, and that ratio is a major part of the finished texture.
Brown sugar contains molasses, which brings additional moisture, acidity, and flavor into the dough. That moisture contributes to a softer, chewier center, while the molasses adds the deeper caramel notes people associate with a really good chocolate chip cookie.
Granulated sugar behaves differently. It encourages spread, crispness, and browning. It helps the edges of the cookie become golden and lightly crisp rather than remaining soft from edge to center.
Using only brown sugar would produce a very soft, moist cookie, but it could also become overly dense and lose some of the crispness around the edges. Using too much granulated sugar would create more spread and a crisper texture but could leave the cookie thinner and less chewy.
The combination gives us the best of both worlds: deep flavor and moisture from the brown sugar, balanced by the spread and crispness contributed by the granulated sugar.
This is why sugar should never be treated as something that exists only to make a recipe sweet. In cookie dough, sugar is part of the structure.
Adding the eggs one at a time gives each egg a better chance to emulsify into the butter-and-sugar mixture.
An emulsion is simply a stable mixture of fat and liquid, two things that do not naturally want to remain blended. The butter provides the fat. The eggs introduce water along with proteins and emulsifiers that help everything come together.
If both eggs are added at once, especially if they are very cold, the mixture can become curdled or broken-looking. That does not necessarily mean the dough is ruined, but adding them separately makes the process smoother and creates a more uniform base before the flour is introduced.
Add the first egg and allow it to mix in fully before adding the second. Scrape the bowl if needed, particularly around the bottom, where bits of cold butter can sometimes hide from the paddle.
The mixture may still look slightly separated after the eggs go in. That is not unusual with a cold-butter dough. The dry ingredients will help bring everything together, but the eggs should still be mixed well enough that no obvious streaks of liquid remain.
Cornstarch is one of the quiet little workhorses in this recipe.
It helps create a softer, more tender interior by reducing the overall strength of the flour mixture. All-purpose flour contains proteins that form gluten when hydrated and mixed. Cornstarch does not form gluten, so adding it effectively softens the flour’s structural impact.
That does not mean the finished cookie becomes delicate or cakey. There is still enough flour and gluten development to support a large cookie. The cornstarch simply helps prevent the center from becoming overly firm or bready.
It also supports thickness. A softer flour mixture allows the cookie to remain tender while the chilled fat and high oven temperature help it hold its shape.
The result is a cookie that can be thick without feeling heavy.
Be sure to measure the cornstarch accurately. Too little and you lose some of that softness. Too much can push the texture toward powdery or cakey, which is not what we are after here.
The flour is where restraint becomes important.
Before the flour goes in, the dough can handle a reasonable amount of mixing. Once flour and liquid meet, gluten development begins. The longer and more aggressively the dough is mixed from that point forward, the stronger that gluten network becomes.
A little gluten is necessary. It gives the cookie enough structure to hold together and contributes to its chew.
Too much creates a cookie that is tough, dense, and more bread-like than tender.
Add the flour, cornstarch, baking soda, and salt together, then run the mixer on low speed. Stop as soon as you can no longer see obvious dry flour.
The dough does not need to look perfectly polished while it is still in the mixer. Any small remaining streaks can be incorporated while the chocolate is folded in by hand.
This is also why the chocolate should not be mixed in with the stand mixer for another full minute. At that point, the flour has already been hydrated, and every additional turn of the paddle is continuing to work the gluten.
Use a spatula and fold the chocolate into the dough gently, scraping from the bottom of the bowl to make sure there are no hidden pockets of flour or unmixed dough.
The goal is even distribution, not a workout.
This recipe uses equal amounts of semi-sweet and dark chocolate.
The semi-sweet chocolate provides the familiar sweetness and creamy chocolate flavor most people expect in a classic chocolate chip cookie. The dark chocolate adds depth, slight bitterness, and balance.
Together, they keep a large cookie from tasting overwhelmingly sweet.
That balance becomes more important as cookie size increases. In a small cookie, a very sweet chocolate may not dominate the experience. In a 3.4-ounce cookie, there is a lot more dough and a lot more chocolate in every serving. Using dark chocolate helps keep each bite rich rather than cloying.
Chocolate chips will hold their shape more distinctly during baking. Chocolate chunks or chopped chocolate will melt into larger pockets and create a more irregular bakery-style appearance.
Both work.
A combination works beautifully too.
You can use chips for even distribution and chunks for larger melted pools. Just keep the total amount of chocolate at approximately two cups so the dough retains the balance it was designed to have.
It may be tempting to keep adding chocolate indefinitely. I understand this instinct deeply. But there is a point where the dough can no longer hold the amount of mix-ins being added. Too much chocolate can prevent the dough from binding properly, create weak spots in the cookie, and cause portions to break apart.
Two cups gives you a generous amount in every cookie without turning the dough into loose chocolate pieces held together by hope.
This recipe makes 16 large cookies, with each portion weighing approximately 3.4 ounces.
That size is not merely a serving suggestion.
The baking temperature and time were developed around a thick dough portion of that weight. Large cookies bake differently from small cookies. The outside begins to set and brown while the center remains soft, which creates the contrast we want between golden edges and a slightly underdone middle.
If you divide the dough into 32 smaller portions and bake them for the same amount of time, you will not get miniature versions of the same cookie. You will get a different ratio of edge to center, and the cookies may become crisp or overbaked before you realize what happened.
For consistent results, weigh the portions.
A cookie scoop is useful for moving dough, but it is not always precise enough on its own, especially when the dough contains large chunks of chocolate. One scoop may contain mostly dough while another contains several heavy pieces of chocolate.
A scale ensures every cookie is approximately the same size, which means they should bake at roughly the same rate.
Shape the portions into thick balls rather than flattening them. You can make them slightly taller than they are wide if you want to encourage additional height.
Do not press them into discs unless you specifically want a wider, thinner cookie.
This dough needs at least four hours in the refrigerator, and overnight is even better.
The chilling period does several things at once.
First, it firms the butter back up after mixing. Even though the butter started cold, friction from the mixer and handling during portioning will warm it. Chilling returns the fat to a solid state so it melts more slowly in the oven.
That controlled melting gives the outside of the cookie time to establish structure before the dough begins spreading heavily.
Second, chilling allows the flour to hydrate more fully. Flour continues absorbing moisture from the eggs, butter, brown sugar, and vanilla while the dough rests. A more evenly hydrated dough produces a more consistent texture and reduces the likelihood of a dry or floury interior.
Third, the resting period improves flavor. The ingredients have time to mingle, the flour’s starches begin breaking down into simpler sugars, and the overall flavor becomes deeper and more rounded.
A cookie baked immediately after mixing may taste sweet and buttery.
A cookie baked after an overnight rest tastes more developed.
This is one of those differences that can seem small until you bake the two versions side by side. Then it becomes very difficult to unlearn.
Cover the dough while it chills so the surface does not dry out or absorb refrigerator odors. You may chill the portions on a tray covered tightly with plastic wrap or transfer them to an airtight container.
Once the dough is firm, the portions can also be placed together in a container with parchment between layers.
A 400°F oven may sound aggressive for chocolate chip cookies, especially if you are used to recipes baked at 350°F.
That higher temperature is intentional.
A hot oven sets the outside of the cookie quickly. The edges begin browning, the top develops color, and the outer structure firms while the center remains thick and soft.
A lower oven temperature would allow the butter more time to melt before the exterior sets. That usually means more spread and a flatter cookie.
The combination of cold, rested dough and high heat is what creates the bakery-style contrast: golden and structured on the outside, soft and slightly underdone through the center.
Make sure the oven is fully preheated before the tray goes in.
The display saying “400°F” does not always mean the entire oven has stabilized at that temperature. Give it enough time to heat thoroughly, and use an oven thermometer whenever possible.
Home ovens are frequently inaccurate. Some run hot, some run cool, and many cycle unevenly throughout the bake.
When a cookie recipe gives you a time range of 8–12 minutes, that variation is not indecision. It accounts for differences in ovens, pans, dough temperature, and portion shape.
Start checking at eight minutes, but read the cookie rather than relying only on the clock.
These cookies are ready when the edges and top are golden but the centers still look slightly underdone.
The center may appear soft, a little glossy, or not fully set.
That is exactly what you want.
The cookies continue cooking from residual heat after they are removed from the oven. The tray is still hot. The butter and sugar are still molten. The internal structure is still setting.
If you wait until the center looks fully baked while the cookie is still in the oven, it will likely be overbaked by the time it cools.
Look for edges that have taken on real color rather than remaining pale. The top should no longer look completely raw, and the cookie should have enough structure that it does not appear liquid in the center.
But do not wait for the entire cookie to feel firm.
That firmness comes later.
The exact bake time may vary from tray to tray. Dough that has chilled overnight may bake slightly differently from dough chilled for four hours. A dark metal pan may brown the bottoms faster than a light-colored aluminum sheet. Cookies placed near the outer edges of an uneven oven may set before those in the center.
This is why professional baking depends on visual cues as much as written times.
Once the tray comes out of the oven, leave the cookies alone for 15–20 minutes.
This may be the hardest instruction in the entire recipe.
They are warm. They smell incredible. There is melted chocolate involved. Everyone suddenly appears in the kitchen asking whether they can have one.
Be strong.
At this stage, the cookies are still setting. The centers are soft, the chocolate is melted, and the internal structure is fragile. Moving them too early can cause them to bend, collapse, or break apart.
The time on the tray allows the residual heat to finish the bake gently while the butter and sugar begin to cool and firm.
After 15–20 minutes, the cookies should be stable enough to move to a cooling rack.
For the best overall texture, wait up to one hour before serving.
I know.
But a warm cookie straight from the oven and a properly cooled cookie are almost two different desserts.
The very warm cookie will be extremely soft, rich, and melty. The fully cooled cookie will have a more defined crisp edge, a chewy center, and a balanced texture throughout.
Cooling allows the flavor to settle too. The sweetness becomes less aggressive, the chocolate firms slightly, and the deeper caramel and vanilla notes become more noticeable.
You are, of course, allowed to eat one warm; I’m not a monster.
Just understand that the final texture is not fully developed yet.
The cold salted butter may be replaced with browned butter, but the browned butter needs to be chilled before mixing.
Brown butter adds toasted, nutty, almost caramel-like flavor by cooking the milk solids until they become golden. It gives the finished cookie more depth and makes the vanilla, brown sugar, and dark chocolate taste even richer.
However, browning butter changes both its temperature and its composition.
During browning, some of the butter’s water evaporates. The butter also becomes fully melted, which means it can no longer be used in the cold-butter method immediately.
After browning, transfer the butter and all of those flavorful browned milk solids to a heat-safe container. Allow it to cool, then refrigerate it until firm.
You want the browned butter chilled enough that it can be cut or scooped into pieces and mixed similarly to the cold cubed butter in the original method.
Do not pour warm browned butter into the mixer with the sugars and expect the same cookie.
Warm melted butter will shift the dough toward the one-stage mixing method. It will incorporate less air, create a softer dough, and encourage more spread. The flavor may still be excellent, but the texture and shape will change.
Also note that browned butter loses water as it cooks. Depending on how aggressively it is browned, the finished dough may be slightly drier than the original version. For the most consistent result, begin with a little more butter than the recipe requires, brown it, and then weigh out 227 grams of the finished chilled browned butter.
That way, the amount going into the dough remains accurate.
This dough freezes beautifully, which is one of the reasons it works so well for home bakers, market preparation, and the very important emergency-cookie portion of your freezer.
After the dough has been divided and chilled until firm, place the portions on a parchment-lined tray and freeze until solid. Once frozen, transfer them to an airtight freezer container or freezer-safe bag.
Label the container with the recipe name, portion size, baking temperature, and date.
Frozen dough will keep for up to two months.
You can thaw the portions overnight in the refrigerator and bake them according to the original instructions, or bake them directly from frozen.
When baking from frozen, expect to add a few extra minutes to the bake time. The exact amount will depend on your oven and how solidly frozen the dough is.
Do not lower the oven temperature automatically. The 400°F heat is still needed to set the outside of the cookie and control spread.
Watch the same visual cues: golden edges and tops with centers that still look slightly underdone.
Directly frozen dough may produce a slightly thicker cookie because the center remains cold longer while the outside begins setting. Thawed dough may spread a little more evenly.
Both are good.
They are simply slightly different.
Once completely cooled, store the cookies in an airtight container at room temperature for up to seven days.
The words “completely cooled” matter.
If the cookies are still warm when they are sealed in a container, trapped steam turns into condensation. That added moisture can soften the exterior, make the cookies sticky, and create an environment where they deteriorate faster.
Allow the cookies to cool fully before packaging.
Layer them with parchment paper if necessary, especially if the chocolate is still soft or the cookies have decorative toppings.
These cookies remain soft for several days because of the brown sugar, cornstarch, generous size, and slightly underbaked center. However, no cookie tastes exactly the same on day seven as it did on day one.
For the best bakery-quality experience, serve them within the first three to four days.
To refresh an older cookie, warm it in the microwave for a few seconds or place it briefly in a low oven. The heat softens the chocolate and makes the center feel more tender again.
Finished cookies may also be frozen for up to two months.
Wrap them individually or separate them with parchment, then place them in a freezer-safe airtight container. Allow them to thaw while still covered so condensation forms on the container rather than directly on the cookie.
Once thawed, a brief warm-up can bring back much of that freshly baked texture.
For a more polished appearance, reserve a small handful of chocolate chips or chunks before folding the rest into the dough.
After portioning, press a few additional pieces into the tops and sides of each dough ball. This ensures the chocolate remains visible after baking instead of disappearing entirely into the dough.
You can also add a few extra chocolate pieces to the tops immediately after the cookies come out of the oven. The residual heat will soften them and help them settle into the surface.
For rounder cookies, use a large circular cookie cutter or bowl slightly wider than the baked cookie. While the cookie is still hot and soft, place the cutter around it and gently move it in a circular motion. This nudges uneven edges inward and creates a more uniform shape.
Do this immediately after the tray comes out of the oven. Once the cookies begin setting, they will no longer reshape as easily.
A small amount of flaky salt can be added after baking to balance the sweetness and emphasize the chocolate flavor. Use it lightly. The dough already contains salted butter and additional salt, so the goal is contrast, not turning the cookie into a pretzel.
The butter may have become too warm during mixing, the dough may not have chilled long enough, or the oven may not have been fully preheated.
Make sure the portions chill for at least four hours and go into a properly heated 400°F oven while still cold.
Also check the flour measurement. Too little flour creates a dough with insufficient structure. Weighing the flour is the most reliable option.
Warm baking sheets can also cause extra spread. Never place chilled dough onto a sheet that is still hot from the previous batch.
The dough may be extremely cold, the flour may have been over-measured, or the butter and sugars may not have mixed long enough.
If the dough has been chilled for more than a day and is very hard, allow the portions to sit at room temperature for a few minutes while the oven preheats.
Do not flatten them aggressively, but a slight press may help if your first test cookie remains excessively tall.
The dough was likely overmixed after the flour was added, or the cookies were baked too long.
Mix on low only until the flour disappears, then fold the chocolate in by hand.
Pull the cookies while the centers still look slightly underdone.
Too much flour is one of the most common causes. Use 340 grams rather than relying solely on cups.
Overbaking can also dry the center and create a more cake-like texture.
Check the cornstarch measurement as well. Cornstarch helps tenderness, but an excessive amount can push the texture away from chewiness.
Dark-colored pans absorb more heat and brown cookie bottoms faster.
Use light-colored aluminum baking sheets when possible, line them with parchment, and move the oven rack slightly higher if the bottoms consistently darken before the tops are ready.
An oven that runs hot can also cause this problem, which is why an oven thermometer is such a useful little truth-teller.
These cookies should be soft and slightly underdone when they leave the oven, but they should not remain wet or liquid after cooling.
If they are still raw after the full cooling period, they may be portioned larger than 3.4 ounces, the oven may be running cool, or the bake time may need to be extended.
Add time in small increments rather than baking until the entire cookie looks firm.
This recipe works because every part of it supports the same bakery-style result.
Cold butter helps control spread.
Five minutes of mixing softens that butter gradually and creates structure.
Brown sugar keeps the center soft and chewy.
Granulated sugar helps the edges spread, brown, and crisp.
Cornstarch tenderizes the interior.
Two types of chocolate create depth and balance.
Large portions produce the contrast between golden edges and soft centers.
The long chill firms the fat, hydrates the flour, and develops flavor.
The 400°F oven sets the outside quickly.
And the long cooling period finishes the bake without drying out the middle.
None of these details are especially difficult.
But together, they are the difference between making a chocolate chip cookie and making this chocolate chip cookie.
It is thick, rich, deeply chocolatey, and designed to look like it belongs behind glass in a bakery case.
More importantly, it is repeatable.
And once you understand why the method works, you can stop treating a great batch like a lucky accident.
That is the entire point of this series.
The recipe gives you the cookie.
The science teaches you how to make it yours.
Comments
Nothing yet. Say the first thing.
Sign in to join the conversation.