
***A note just before you start reading. Most online recipes require you to scroll for what seems like an eternity, while you are being bombarded with ads and other rubbish, before actually revealing the ingredients. I put the ingredients at the top because I respect my readers’ time and intelligence. If you like the way I present information, Please become a paid subscriber , even if it’s for just one month - it will help a lot. Thank you -g.***
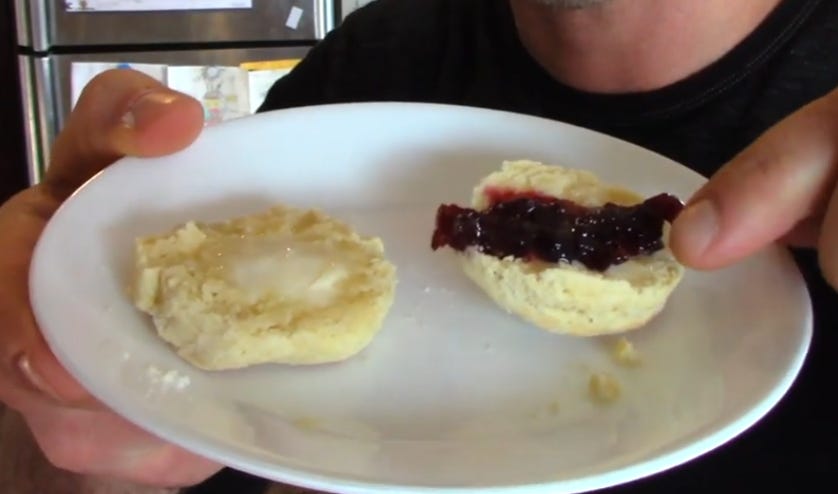
I have been making these biscuits for years, and I call them tea biscuits - but they are actually (technically) scones. Regardless of what you call them - they are a family favorite and are so good with a little tea and jam! Here’s how to make them:
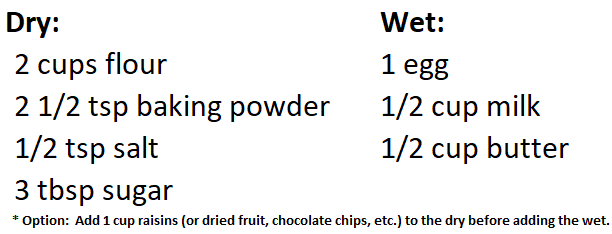
Combine all dry ingredients with a whisk or fork.
Add butter to dry ingredients and “cut in” with pastry cutter, or fork and knife, or or finger tips1. You can use also hard margarine for this, or even soft margarine works - but the best results in terms of texture and flavor are with cold butter.
Mix the egg and milk together, then add to the flour mixture. Mix just until it is fully combined - do not over mix as that will make them less fluffy.
Place on baking sheet using any of the following techniques: (1) Scoop 12 heaping teaspoonfuls onto a greased pan for random shapes (fast and easy). (2) Gingerly form into 12 balls and place onto a greased pan for uniform shapes (easy & pretty). (3) Flour counter top, gently press out dough into a circle about 1/2” or 3/4” thick, cut into 12 equal-sized pieces and place onto a greased pan for classic scone presentation (more work but pretty). (4) Do same as option 3, but use empty tomato paste can to cut into 12 circles, and lie to everyone and call the tea biscuits (no one will ever know). (5) Grease a muffin tin (with 12 pockets) and scoop equal amounts into each pocket (achieves same as option 4 but is way easier and less messy). Many options but they all taste the same - I do option # 1 90% of the time!
Bake in 400f oven on middle rack for 12 minutes.
They taste great on their own just with a little butter - but I think they are at their best buttered, with tea and jam. Sometimes I make them for breakfast, and we have them with scrambled eggs and jam of course. They also go great with any soup or stew. Some people also like them with gravy (personally I’m not a fan).
Scones are a “quick bread” that use egg and baking powder to create lift for a nice, soft, fluffy texture. The added step of cutting in the butter create little butter pockets melt in the oven, creating flaky layers. All of this combines for a very simple yet wonderful snack. They are surprisingly quick to make after doing it a few times and will likely become a new family favorite. Give them try and let me know what you think!
FREE SHIPPING FROM VESEYS SEEDS
Use my COUPON CODE “GAVS26” to get free shipping from Veseys Seeds on seed catalogue orders. Free shipping is not applicable on surcharges on larger items. Promo code is valid until November 30, 2026.
Cutting butter into flour is all about keeping the butter cold and creating small pieces, like tiny pebbles that stay intact until baking. Those little butter pockets melt in the oven and create flaky layers. There’s three ways to do it:
Method 1: Pastry Cutter (Most Reliable)
Cut butter into small cubes (about ½ inch).
Add the butter to the flour.
Press down with the pastry cutter, lifting and rotating the bowl as you go.
Continue until the mixture looks like:
Pea-sized pieces for flaky pie crust
Coarse crumbs for biscuits or scones
Method 2: Two Knives
Hold one knife in each hand.
Cross them through the butter in a scissor-like motion.
Keep cutting and tossing until pea-sized pieces form.
This works well if you don’t have a pastry cutter.
Method 3: Fingertips
Rub butter and flour together lightly using your fingertips.
Lift and crumble rather than press.
Work quickly so the butter doesn’t melt.
No posts
Comments
Nothing yet. Say the first thing.
Sign in to join the conversation.