
We’re tackling an approachable kitchen makeover on a budget. I love this design dilemma, as it’s exactly what I did after moving into our current home. Our kitchen was perfectly functional, but a bit dated. I used my experience updating our kitchen on a budget for some affordable and simple updates I think will make a big difference in the space for Tessa!
If you’d like to submit your Design Dilemma, visit this post:
Tessa’s Design Dilemma:
“We’re moving to a house built in the 90s and the whole place is painted gray. Yuck. The kitchen feels especially uninspiring. The cabinets are white and the countertops are black. There’s an odd shaped dining area attached to it and I don’t know if I have to use a round table or can get more creative. We can only afford a small facelift right now and I really want to warm up the space. All the windows are south facing which is lovely so tons of natural light. Thinking wall paint, new hardware, a painted island (like yours?), new table and chairs. We will spend a ton of time in the kitchen and attached dining so I just want it to feel light and fun and friendly for us and our four young kiddos.”
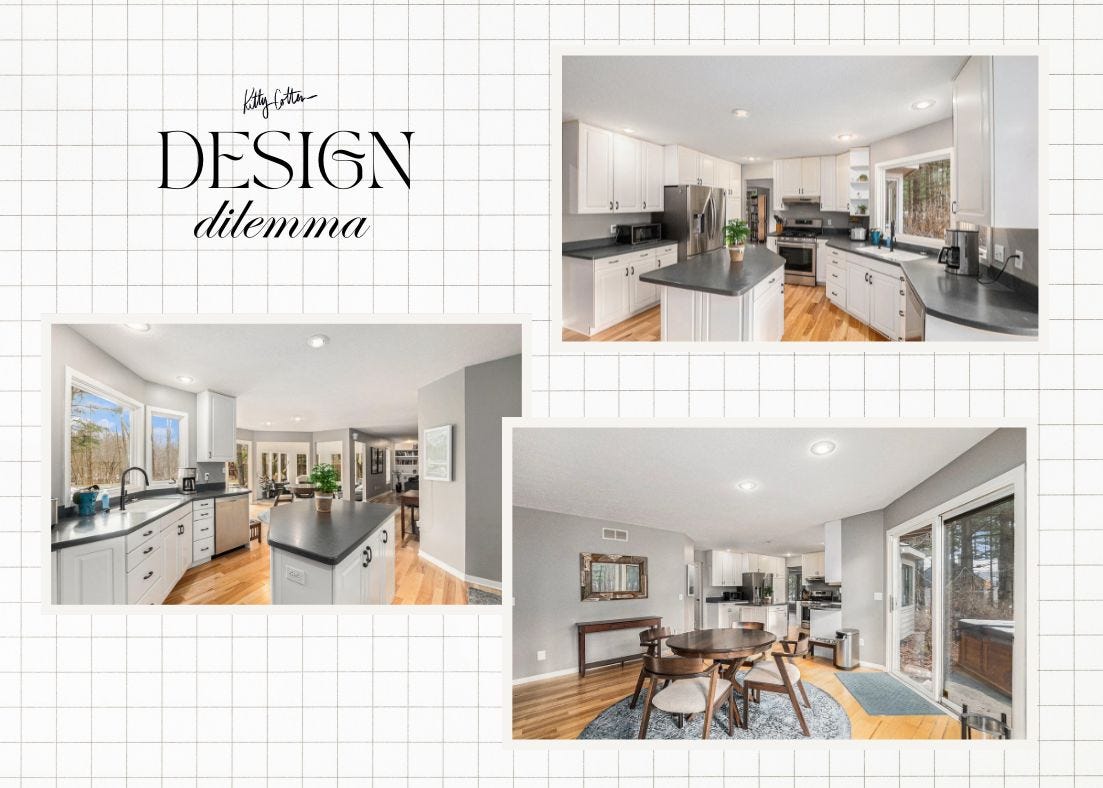
Congrats on the new home Tessa! Your kitchen looks like it gets amazing light. I have some simple updates I think will transform the space to feel more cozy and warm.
Behind this paywall you’ll find:
The exact swaps and updates I’d make for Tessa’s cozy kitchen and dining room makeover on a budget (with links!)
My 5 best tips for a mini budget kitchen makeover (plus, one bonus tip)
Before and after photos of my mini no demo kitchen makeover
Let’s start in the kitchen…
Kitchen updates:
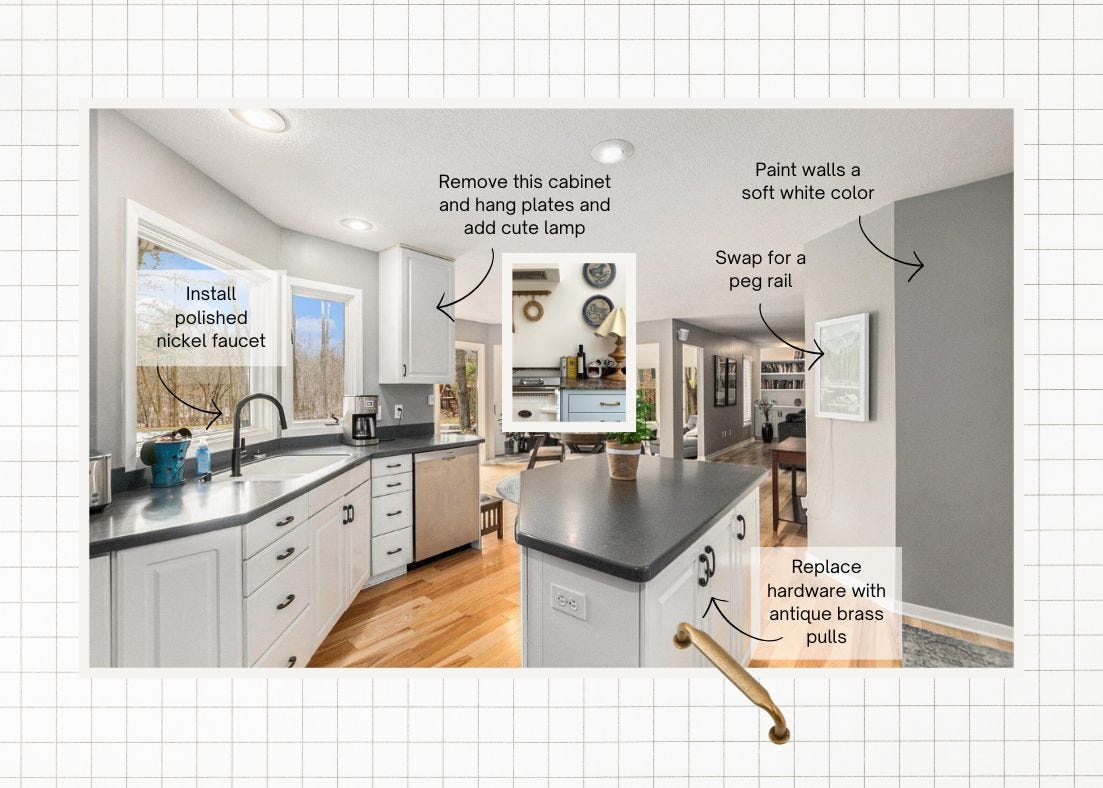
I’d start by painting the walls a soft white. I would continue the color throughout the dining room space too. I think getting rid of the gray color will instantly warm up and soften the space.
Remove the upper cabinet to the right of the sink. It feels like it just floating there and would make that area feel more open. The kitchen looks like it has ample storage, so I don’t think it would be missed. It would give you an opportunity to add some art to the wall like a set of hand painted plates and a lamp* on the counter. It would make the room feel less utilitarian and more homey. I loooove a small kitchen counter lamp.
Swap your faucet for a polished nickel faucet*. I love when the faucet is a different metal from the cabinet hardware (I’ll get to that swap next!). Polished nickel is a warm-toned silver versus chrome or satin nickel which are cool toned. I think the space needs more warmth and I think adding a simple timeless faucet would modernize the kitchen. The warmth of the polished nickel faucet will tie together nicely with antique brass hardware I’m suggesting for the cabinets next.
Swap cabinet hardware for antique brass color pulls*. Something that feels a bit modern, but still a bit traditional. I found these ones on amazon at great price and they would add instant warmth to the white cabinets.
You could swap the art off the wall by the island and a peg rail (traditional options*, modern option*) there for some visual interest. Hang a pretty wood broom and metal dust pan for easy access. Add a linen apron to a hook and a small hanging basket to catch and coral the random things.
Kitchen updates continued:
Add a peel-and-stick backsplash* above the countertops. I did this in my current kitchen, because when we replaced our stove there was a big gap in the backsplash behind it that I wanted to cover up. It’s held up so great. I found a pretty square stacked handmade tile looking peel-and-stick backsplash for you. It will add texture and pattern to the space and pretty affordable too! To the right of the sink where I suggested removing the cabinet I would just match the height of the tile on the left side of the window. Then, hang the plates stacked above the backsplash.
In the open shelves to the left of the sink I would add in some plants. It would add lots of texture. You could do a mini herb garden in some terracotta planters for all the Nancy Meyers cozy vibes.
Adding a cute rug* (it’s washable too!) beneath the kitchen sink is not only functional, but a great chance to layer in more color or pattern in this case.
Next, I’d hang some navy and beige gingham cafe curtains on an antique brass rod to really soften the space and add more color. This could be an easy sewing project or etsy has a lot of options*.
You mentioned painting the kitchen island, which I think could be fun and a great way to breakup all the white. A dark cool-toned blue gray color would be really pretty and tie in the countertops in nicely.
Dining room updates:
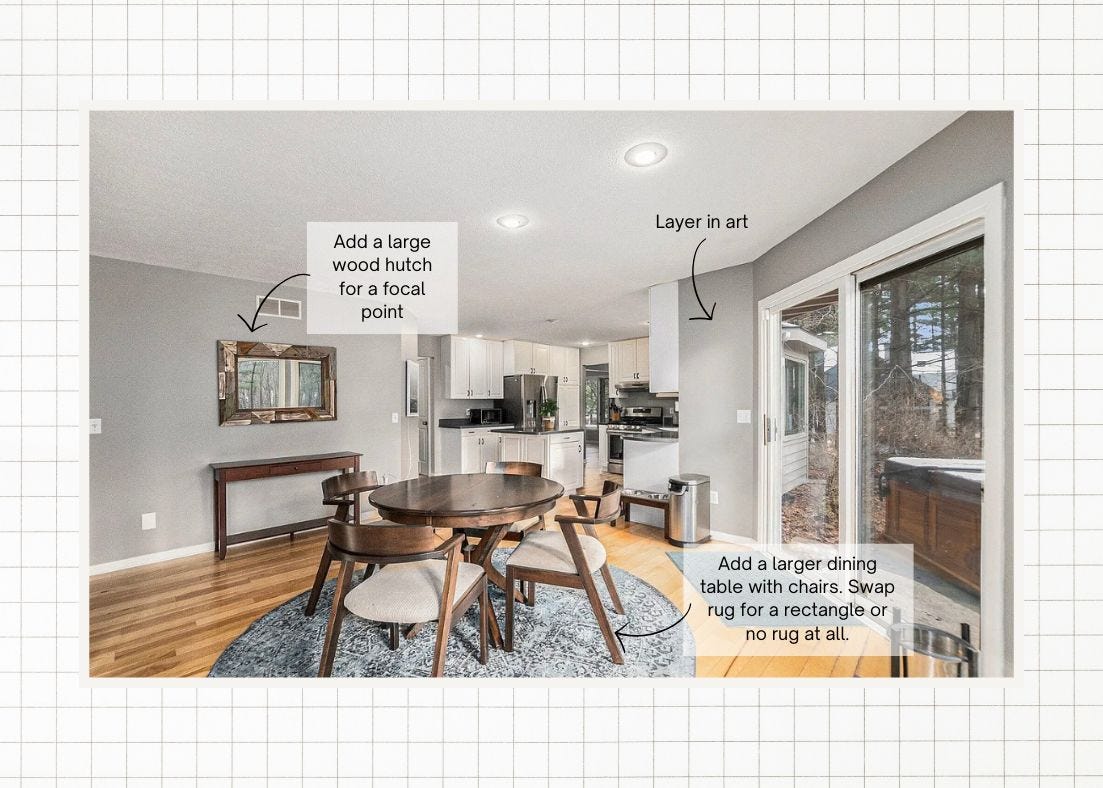
The dining room seems like the trickiest area because of all the walking doorways creating multiple walking paths. It’s also not a rectangular room where the dining table orientation usually feels more obvious. I would consider a long oval dinging table from my inspiration photos below and from your photos I would put it parallel with the back wall where the mirror is.
Without being able to measure the space, I think a tall midcentury style hutch on the back wall (where the mirror and skinny table is) would be a great anchoring piece in the dining space. It would create some height and balance between the dining room and kitchen cabinets. The cabinet could be wood or maybe you could find one on facebook marketplace in need of a coat of paint for more color! I’d do an olive or sage green color. Greens are always timeless to me.
If you have the space or desire you could put this rug* beneath for the dining table. I know you mentioned kids and sometimes dining room rugs are great in theory, but a pain in real life when you have little kids. I love the printed rugs from Loloii* because they’re super easy to keep clean under a dining table and don’t get crud stuck in the fibers like a traditional woven rug. Plus, they’re super affordable! I’m currently in my no-rug-under-the-dining-table era, so that’s an option too (and even more affordable haha!).
I also think getting art up on the walls will really help the space feel lived in and an opportunity to add more color. Here’s my shameless plug for a print of one of my oil paintings in my etsy shop*. I think the colors would look nice in the space and keep the cozy cottage vibes going.
Kitchens are often left to the bottom of many people’s home renovations list, because they usually cost the most. When we first moved into our current house five years ago, I absolutely thought we’d paint the wood cabinets and replace the countertops. I knew it would be several years before we got to that point, so I did a mini budget makeover to our kitchen with nearly all the same updates I suggested above. Something surprising happened—I actually found with small tweaks I love our kitchen as is, even our brown granite.
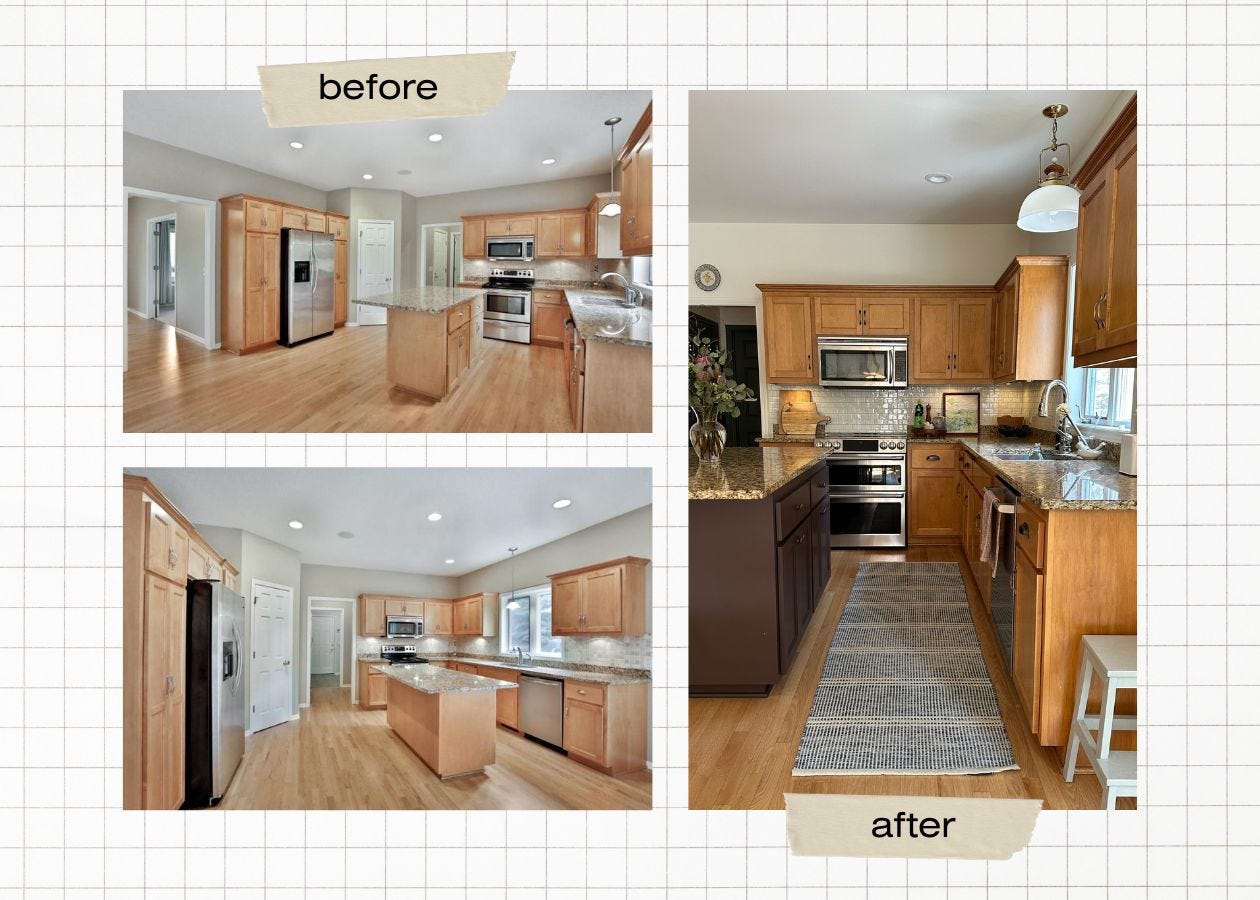
So in the interim, here are my best tips for easy, affordable updates to a kitchen.
My 5 best tips for a mini budget kitchen makeover:
Swap cabinet hardware! It really makes such a different in transforming style of the kitchen on a small budget. Plus, it’s really easy to do.
Next, I’d swap your kitchen faucet if it’s in your budget. I know they can cost a couple hundred dollars, but it’s something you’ll use daily.
Hang art in your kitchen! I think people often overlook hanging art in their kitchen, but it will give the space instant character. I love hanging plates because it helps break up all the rectangles of the cabinetry.
Find a way to add in warm, soft lighting. This could be done with a small lamp or under cabinet lights (2700k will give you that best cozy evening glow). I love turning off all the overhead lights after making dinner in favor of our under cabinet lights and pendant above the sink.
Keep countertops minimal and style what you keep out. I try to store nearly all my small kitchen appliances away when I’m not using them. Then style the countertops with the necessary items like a pretty soap dispenser and dish for sponge/scrubber. I corral all my cooking items near the stove on a try that holds a salt cellar, pepper cracker and oil in a pretty bottle (or I splurge at the grocery store and get the prettiest packaging option). I like to layer my cutting boards near the stove and conceal an ugly outlet we have. Then, I put any produce in pretty thrifted pottery or wood bowls and style them in the awkward corner we have in our cabinet layout.
Bonus tip: When I have the budget, I will keep a bouquet of fresh flowers in the center of my island. Sometimes, I’ll simply add a potted plant there as a center piece. It’s even better if it’s an herb I can use in my recipes!
No posts
Comments
Nothing yet. Say the first thing.
Sign in to join the conversation.