

Serving assets from a content delivery network is a really efficient way to improve performance of your application as well as reduce your costs and deliver a great user experience for your users. But how can we do this securely with Google Cloud’s native tools assuming we don’t want to use signed URLs?
There seems to be conflicting documentation on this topic. On one hand, Google pushes you pretty hard in the direction of preventing public bucket configurations but nudging you in many places throughout the console and in various docs pages. For example, they offer the option to “enforce” public access prevention when configuring a bucket and they also have various organisation wide configuration settings / policies relating to data protection, of these, including enforcing private buckets only and preventing any kind of public access.
This is all well and good, but now the question arises of serving assets from your bucket to your users. How could we do that in a secure way? Like any experienced cloud architect might tell you, it depends. Google’s own documentation will tell you to make the bucket public, and set it as a backend for your load balancer which you can then attach Cloud CDN to. Licking a finger and putting in the air to tell which way the wind is blowing, I would hazard a guess that this is probably what most people do.
But now I’m going to put on my security / compliance hat, and slap you over the wrists with the proverbial ruler and say NO SIR/MADAM, YOU MAY NOT HAVE A PUBLIC BUCKET. But but but, you plead, it’s for serving public content. But the security engineer/architect will not have any of it. They will stick their nose up at you and say something about compliance or ISO/SOC certification. Ok, so public buckets are out. Now what?
Well you could have a Cloud Function as a backend listening to requests for assets and then the function will have explicit permissions from IAM, operating with the principle of least privilege enabling read on bucket object keys which are provided in the request coming in from the load balancer which can fill the CDN if it’s a cache miss. You could also create another endpoint in your app purely to serve the assets this way, but then you’d need to make inclusion/exclusion paths in the CDN since you don’t want to cache your http requests to the app. Both of these would work but it feels clunky. There must be another way.
Turns out there is, but it’s not documented anywhere and to get it to actually work you need to mess about with HOST headers.
Let’s dig in.
Google Cloud’s own docs website has a page entitled: “Set up third-party object storage” which is where much of the content for this architecture is setup. At the top of the page we have:
You can use an external backend when the content is hosted either on-premises or in another cloud. The external backend lets you serve the content from Google’s Cloud CDN.
What will throw most people off, and also why I think many have “public bucket access” for their CDN assets, is because the literal next line in the docs says:
Note: If your content is already in a Cloud Storage bucket, see Set up Cloud CDN with a backend bucket for configuring Cloud CDN with Cloud Storage.
Except, as we’ve discussed, this will not work if you have private buckets on and public access prevention turned on. The guide on the docs page here, walks the user on setting up a load balancer to serve static assets via an Amazon S3 bucket, but for all intents and purposes, let’s just swap out the Amazon part for a Google Cloud part as shown in this diagram.
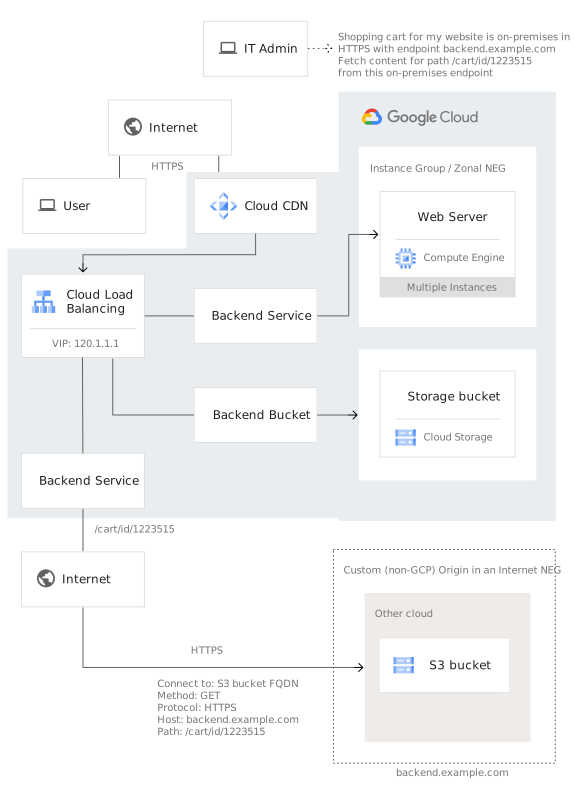
In short, have your bucket setup, and note the bucket name. Next up, we will need to create a service account which has just the permission we need. For this example, I created a custom role called “bucket object getter” and gave it the IAM permission of storage.objects.get. Once created, you will need to create an HMAC key that the account can use to securely access the bucket from the load balancer.
To generate an HMAC key, you will need to go to the bucket’s configuration page. On the buckets page in the console, select “Settings”, then go to the interoperability tab, and in the “HMAC keys for service accounts” section, click the create a key for a service account button From the list, choose the service account that you want to associate the HMAC key with. The service account must have the role on your bucket that allows viewing of the objects. When you click Create key, you will be presented with the Access ID and Secret. The secret is shown only once, so you must copy and store it securely somewhere (for now).
Then, create a new backend on the load balancer, but instead of selecting a bucket, choose an “Internet Network Endpoint Group (NEG)”. This will give us access to configure a few things. Set the mode to Global, the endpoint type is a FQDN and port. Use the default port of 443, and get your bucket name and then tack on the googleapi’s domain name. This will look like this:
my-cool-bucket.storage.googleapis.com
In the backend configuration of the load balancer, we’ll need to finalise a few things here to make it work. On the internet NEG backend you just created, assign it to the internet neg, and then select the internet neg you just created. For the protocol, choose HTTPS. In the private origin authentication section, this is where you use the HMAC keys you created earlier. Enter the HMAC key ID and key into the two boxes here.
Nearly there, still with me? It’s a lot, I know!
Hang on though, I have questions I hear you ask! I know, I had the very same questions (probably). Why do we need to use an internet neg for a backend which is already inside GCP’s network?
We have to use an internet neg to serve assets from a private Cloud Storage bucket through a CDN without making the bucket itself public and whilst this might seem counterintuitive since the bucket is a Google Cloud resource, it seems to be only mechanism that I could find that enables secure authentication.
Ok, hmph. I don’t like it, but fine. What about egress? Will I need to pay egress twice? This is a question I am very interested in. My first thought on this was yes. Because I’ve done some Cloud Run work before where the service was retrieving data from a Cloud SQL instance which had public IP connectivity. So you pay for the data out of the instance to the cloud run instance which is also on public infrastructure and then again when responding to the user. In this case, though, Google’s search AI tool thing which I don’t trust all too well yet, gave me this explanation.
That’s an excellent and crucial question. The short answer is no, you do not pay for traffic egress twice. The total egress cost is calculated once when data leaves Google’s network for the end user, with specific pricing applied to the CDN and not the GCS-to-CDN transfer.
I’m not convinced of it’s answer either, but I do recognise this is a different setup to the cloud run <> cloud sql scenario above and it very well could be right. So I will be following up with Google through some of the channels I have access to, to verify there isn’t a double egress charge here. It would be good to get some official wording on this architecture.
Ok, so we’re nearly done. If you try to get access to your resources at this point, you’ll probably see this generic XML error:
<Error>
  <Code>NoSuchBucket</Code>
  <Message>The specified bucket does not exist.</Message>
</Error>
Now I could not find an answer to this for quite some time and I lost a good few hours on it trying to understand where I was going wrong. Let me help you out and save you hours. Turns out, what’s happening when you access bucket via the internet neg via the load balancer is that the Load Balancer, by default, is forwarding the original client Host header (cdn.yourdomain.com) to the GCS origin instead of the correct GCS bucket endpoint (my-cool-bucket.storage.googleapis.com). However! This is easily fixed (thankfully), you just need to know where to look.
In your load balancer settings, under the backend configuration, go to the “advanced configuration”. Then from there, click on “Custom Reuqest Headers”. Click on the add header option, then add Host as the header name, and your FQDN bucket url:
my-cool-bucket.storage.googleapis.com
Save these changes and then within a few minutes, your content will start being served and filling the cache!
Nice.
This post discussed connecting your bucket to your CDN to serve your assets whilst maintaining a “no public access bucket”. We setup an internet neg, attached it to a backend of a load balancer. Then we created a service account with an HMAC key, and assigned it to the backend configuration and applied a Host header to the advanced configuration.
So there you have it: a solid, secure way to serve your assets from a private Cloud Storage bucket using Google’s CDN. This setup lets you keep the compliance and security team happy by avoiding public buckets, all while giving your users the snappy, low-latency experience they expect.
No posts
Comments
Nothing yet. Say the first thing.
Sign in to join the conversation.