
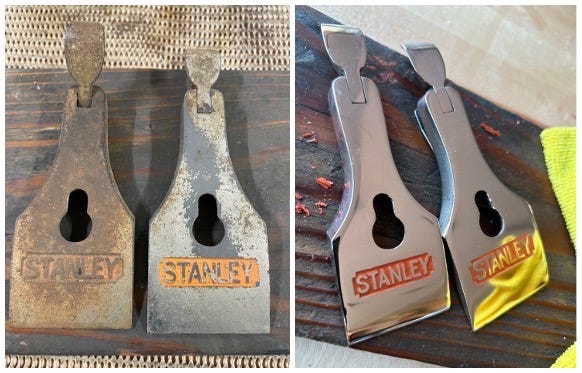
Almost every time I post before-and-after photos of tools I have re-nickel-plated, I’m asked the same question: “How can I do that?” I’ve answered that question so many times that I saved this short answer: “Nickel electroplating moves positively charged metal ions through a chemical solution to deposit a thin layer of nickel onto a negatively charged part. Unfortunately, it’s not possible to explain more in a text message.”
I genuinely enjoy teaching this skill, developing new processes, and writing about tool restoration and history. Once you work through the methods and techniques described here, I hope you will appreciate the full scope and reasoning behind that short answer.
Stanley Tools began nickel-plating select iron and steel tool parts in 1888. Until about 1955, nickel plating was the industry standard for beautiful, durable, and corrosion-resistant metal finishes on premium tools. Nickel was then largely replaced by chrome. Although exceptions exist, such as certain fully nickel-plated shoulder planes made before World War II, nickel-plated tool parts were rarely longer than twelve inches. The methods in this tutorial are therefore optimized for the sizes and shapes of tools made when nickel plating was most popular, which also tend to be the most collectable vintage woodworking tools.
Nickel plating is one of the most valuable and highly regarded skills in tool restoration, yet it is no more difficult to master than other specialty processes such as handle repair, japanning, and mirror polishing steel. Nothing looks worse on a tool or lowers its value more than flaking nickel on rusty metal, while a well-polished nickel part provides one of the most striking visual upgrades possible. Learning nickel plating through trial and error is challenging and elusive, and comprehensive step-by-step guidance for home workshops has long been unavailable. As a result, many vintage tool restorers still regard it as a wizard-like craft rather than an accessible and achievable skill.
If you are ready to take your restorations to the next level and master nickel plating, my main advice is this: Simply watching a short YouTube video and trying to follow its basic instructions will most likely lead to frustration and years of mediocre results before you can consistently produce professional work. By investing the time to read and practice the information in this tutorial, you can avoid that long learning curve and quickly develop the skills needed to produce repeatable, show-quality finishes you will be proud to show off.
These terms are used throughout this tutorial and are defined here to avoid repetitive explanations.
Agitation: Agitation improves current and nickel ion distribution, helps dislodge hydrogen bubbles that can cause pitting, and promotes even nickel plating. Options include rotating and thumping the parts during plating, air agitation, and stirring.
Amp-Hours (Ampere-Hours): A unit measuring the total electrical charge delivered to plating solution over time (amps multiplied by hours). It is a practical standard to track the life of solution and when it should be replenished or replaced.
Anode: Positively charged electrodes in the plating tank. In this tutorial, anodes are the pure nickel strips that dissolve during plating to replenish nickel ions in the solution.
Anode Bags: Protective fabric bags placed over the nickel anodes to minimize release of solid precipitate into the solution. They are most practical in large plating tanks.
Brightener: Chemical additives that promote a bright, reflective nickel deposit over a dull matte finish. Brightener is consumed during plating and must be replenished based on amp-hours and after carbon filtration.
Brush Plating: An electroplating method that uses a handheld anode wrapped in fabric. It is especially useful for spot repairs, touch-ups, relief areas, and areas that cannot be fully immersed in a tank.
Burning: Rough, dark, or brittle deposits caused by excessive current density, most often appearing on edges and other high points of the workpiece.
Carbon Filtration: Filtering the plating solution through activated carbon to remove organic impurities and degraded brightener compounds.
Cathode: Negatively charged electrodes in the plating tank. In this tutorial, it refers to the parts being nickel plated, as nickel ions are attracted to the part and deposited onto its surface.
Constant Current (CC) Mode: The power-supply setting that keeps current fixed at the value you set, while voltage fluctuates when resistance changes in the tank. It is the power-supply setting used for electroplating in this tutorial.
Constant Voltage (CV) Mode: The power supply setting that keeps voltage fixed at the value you set, while current fluctuates when resistance changes in the tank. It is an available setting on your power supply but not used in this tutorial.
Current (Amperage or Amps): The flow of electric charge through the plating circuit, measured in amperes. In electroplating, current drives nickel ions from the anode through the electrolyte and onto the cathode.
Current Density: Current (in amps) divided by the surface area being plated, expressed here as amps per square inch (A/in²). Proper current density produces smooth, well-adhered plating. Too high a density causes burning, roughness, or porosity, while too low a density results in slow or non-uniform plating.
Drag-out: Solution that adheres to the workpiece when it is removed from the tank. This gradual loss of chemicals requires periodic replenishment and pH adjustment.
Electroless Plating: A chemical process that plates nickel onto a workpiece without electricity. It produces very uniform coverage on complex shapes but requires different chemicals, higher operating temperatures, and more active bath management than electroplating.
Equilibrate: Allowing a solution enough time to reach stable chemistry after preparation, mixing, heating, replenishment, or pH adjustment. In general, allow 15–30 minutes of agitation after any significant change to the solution before plating. Plating in a bath that has not equilibrated can produce uneven thickness, poor adhesion, or other defects.
Filtration: The process of removing precipitate, particles, and contaminants from the plating solution. Regular filtration helps prevent pitting, roughness, and cloudy deposits. It may be performed periodically by manual methods, or continuously with a pump and filter in a large tank.
Flash Plating (Strike Plating): A thin intermediate layer of nickel or copper that is quickly applied as an underlayer to improve adhesion for a subsequent plating layer.
Leveling (Filling): The ability of a plating bath to fill microscopic scratches, pits, and other surface irregularities, producing a smoother plated surface than the original substrate.
Lines of Force (Ionic Flow or Current Paths): Electrical paths that positively charged nickel ions follow through the plating solution from the anodes to the cathode. The ions travel along these invisible paths similar to how iron particles align with a magnetic field. Surfaces facing the anodes or in high areas receive stronger lines of force and thicker plating, while recessed areas or surfaces turned away from the anodes receive thinner plating.
Nickel Acetate Method (Vinegar Bath): The simplest and lowest-cost nickel electroplating system, well suited to individual tool parts and home workshop restoration projects.
Nickel Sulfate Method (Watts Nickel Bath): A more efficient nickel electroplating system that offers better economy of scale for larger tanks, larger parts, and higher production volumes.
pH: The scale that indicates how acidic or alkaline a solution is. Proper pH control is essential for high-quality nickel plating.
Pitting: Small holes or voids in the plating caused when hydrogen gas bubbles or solid particles cling to the workpiece due to insufficient agitation. The term can also refer to corrosion pits in the base metal that were not fully smoothed by mechanical resurfacing before plating.
Polarity: The direction of electrical current flow in the plating circuit. Always connect the red (positive) lead to the nickel anode and the black (negative) lead to the workpiece. Plating with the leads reversed will damage the part and contaminate the solution.
Power Supply (DC Power Supply or Rectifier): The device that converts household alternating current into direct current for electroplating. For high-quality nickel plating, the power supply must provide adjustable controls for current and voltage.
Precipitate: Fine particles formed from dissolving anodes and other chemical reactions in the bath. These particles cloud the solution and settle on the tank floor as a silvery, grayish, or greenish sludge. If not removed by filtration, precipitate may cause pitting, roughness, or cloudy deposits that reduce plating quality.
Resistance: Opposition to the flow of electric current, measured in ohms. It increases with poor connections, long or thin wires, low bath temperature, or depleted solution, requiring higher voltage to maintain the same current. An unexplained rise in voltage usually indicates a resistance problem.
Shadowing: Thin or incomplete nickel plating that occurs in deep recesses, tight corners, and behind edges. These areas receive less current than raised surfaces, so nickel builds up more slowly and can leave a shadow-like appearance. Better throwing power and anode placement can improve plating uniformity in these areas.
Solution (Electrolyte or Bath): In general chemistry, an aqueous liquid in which one or more substances (solutes) are dissolved. In this tutorial the term most often refers to the conductive nickel plating bath that enables the transfer of nickel ions from the anode to the cathode.
Throwing Power: The ability of a plating bath to deposit metal evenly into recesses and contours rather than concentrating it on edges and high points. Lower current densities, greater anode surface area, and better anode placement improve throwing power and help produce more uniform plating on complex tool surfaces.
Underplating: In this tutorial, a complete copper base layer applied before nickel plating to improve adhesion, fill shallow surface defects, or enhance the corrosion resistance of the nickel plating.
Voltage: The electrical force that pushes current through the circuit. In CC mode, voltage rises or falls automatically in response to changes in resistance, anode condition and placement, anode-to-workpiece distance, connection quality, and bath temperature.
Home-scale nickel plating is safer than commercial methods that use stronger acids and industrial-strength baths, but still requires careful handling of electricity, mild acids, and heavy metal waste. Nickel compounds can act as skin sensitizers and are classified as possible carcinogens based on prolonged or high-level exposure.
Follow these safety practices during every plating session:
Mixing acids: Always add acid slowly to water. Never pour water into acid. Reversing this order can cause a violent exothermic reaction with splashing or boiling.
Ventilation: Work in a well-ventilated area or outdoors. Use a fan to direct fumes away from your breathing zone.
Electrical safety: Plug all power supplies into GFCI-protected outlets whenever working near water or conductive solutions.
Personal protective equipment: Wear nitrile or other chemical-resistant gloves, safety goggles, and long sleeves or a lab coat when handling chemicals.
Fire safety: Hydrogen gas is generated at the cathode during plating. Although the volume is small in hobby-scale work, the gas is still flammable. Keep open flames, sparks, and smoking materials away from the work area. Maintain readily accessible fire extinguishers in the shop.
Spill and waste management: Perform all work on surfaces that will contain spills. Neutralize small acid spills with baking soda, then absorb and dispose of the waste material properly. Never pour plating solutions, rinses, or waste down drains or into regular trash. Take all depleted chemicals and hazardous waste to a municipal hazardous waste collection facility.
Hygiene and access control: Wash hands thoroughly after handling chemicals, especially before eating, drinking, or touching your face. Keep children and pets out of the work area at all times.
This tutorial covers four nickel plating methods that are well suited to vintage tool restoration in home workshops:
I. Nickel Acetate Method
II. Nickel Sulfate Method (Watts Bath)
III. Electroless Plating
IV. Brush Plating, Spot Repairs, and Copper Underplating
I use the Nickel Acetate Method for most general plating needs and recommend mastering it first before trying the other methods. It is the fastest, easiest, and least expensive system to set up and run, and the skills you learn will transfer directly to the other methods. A complete nickel acetate plating setup, including all necessary equipment and materials, can be assembled for $200 or less.
The other methods are best suited for:
Larger parts or higher-volume plating work
High-friction or high-wear functional surfaces
Complex shapes with deep recesses and intricate details
Localized repairs to avoid stripping and re-plating an entire part
Copper underplating to fill shallow scratches and pitting when complete mechanical resurfacing is not practical
Filling deep pits or surface flaws with specialty solders before nickel plating
The best method to use on a particular part depends on its condition, size, geometry, the finish and quality you want, and your available materials and equipment.
To minimize repetition, this tutorial first presents the processes and techniques common to all four methods, then covers the additional processes and techniques unique to each individual method.
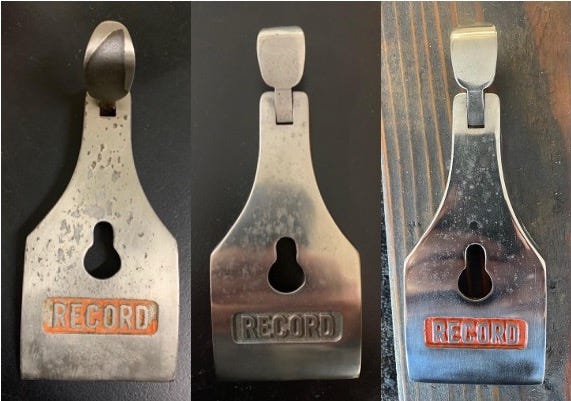
The most important factor in nickel plating quality can be summed up by the 5 Ps: Proper Preparation Prevents Poor Plating. Plating is a classic “garbage in, garbage out” process, or as I like to call it, “quality in, quality out.”
At least 95 percent of nickel plating quality depends on surface preparation. There are no effective shortcuts to the hard work required before every part goes into the plating tank. Nickel plating does not adhere well to any surface with even minor oxidation, rust, or contamination. It conforms closely to the surface being plated and, unlike paint or fillers, will not fill, level, or hide scratches, pitting, or other flaws. The bright, reflective nature of nickel makes minor surface imperfections even more visible through highlights and shadows.
To achieve high-quality results, every part must be stripped of old finishes, derusted, resurfaced to remove scratches and blemishes, polished to the highest possible shine, then cleaned to laboratory standards before plating. Skipping or shortcutting any preparation step will produce a poor result. When properly performed, the processes in this tutorial produce a durable, attractive nickel finish that equals or surpasses the original factory finish while preserving the tool’s historical character and extending its functional life.
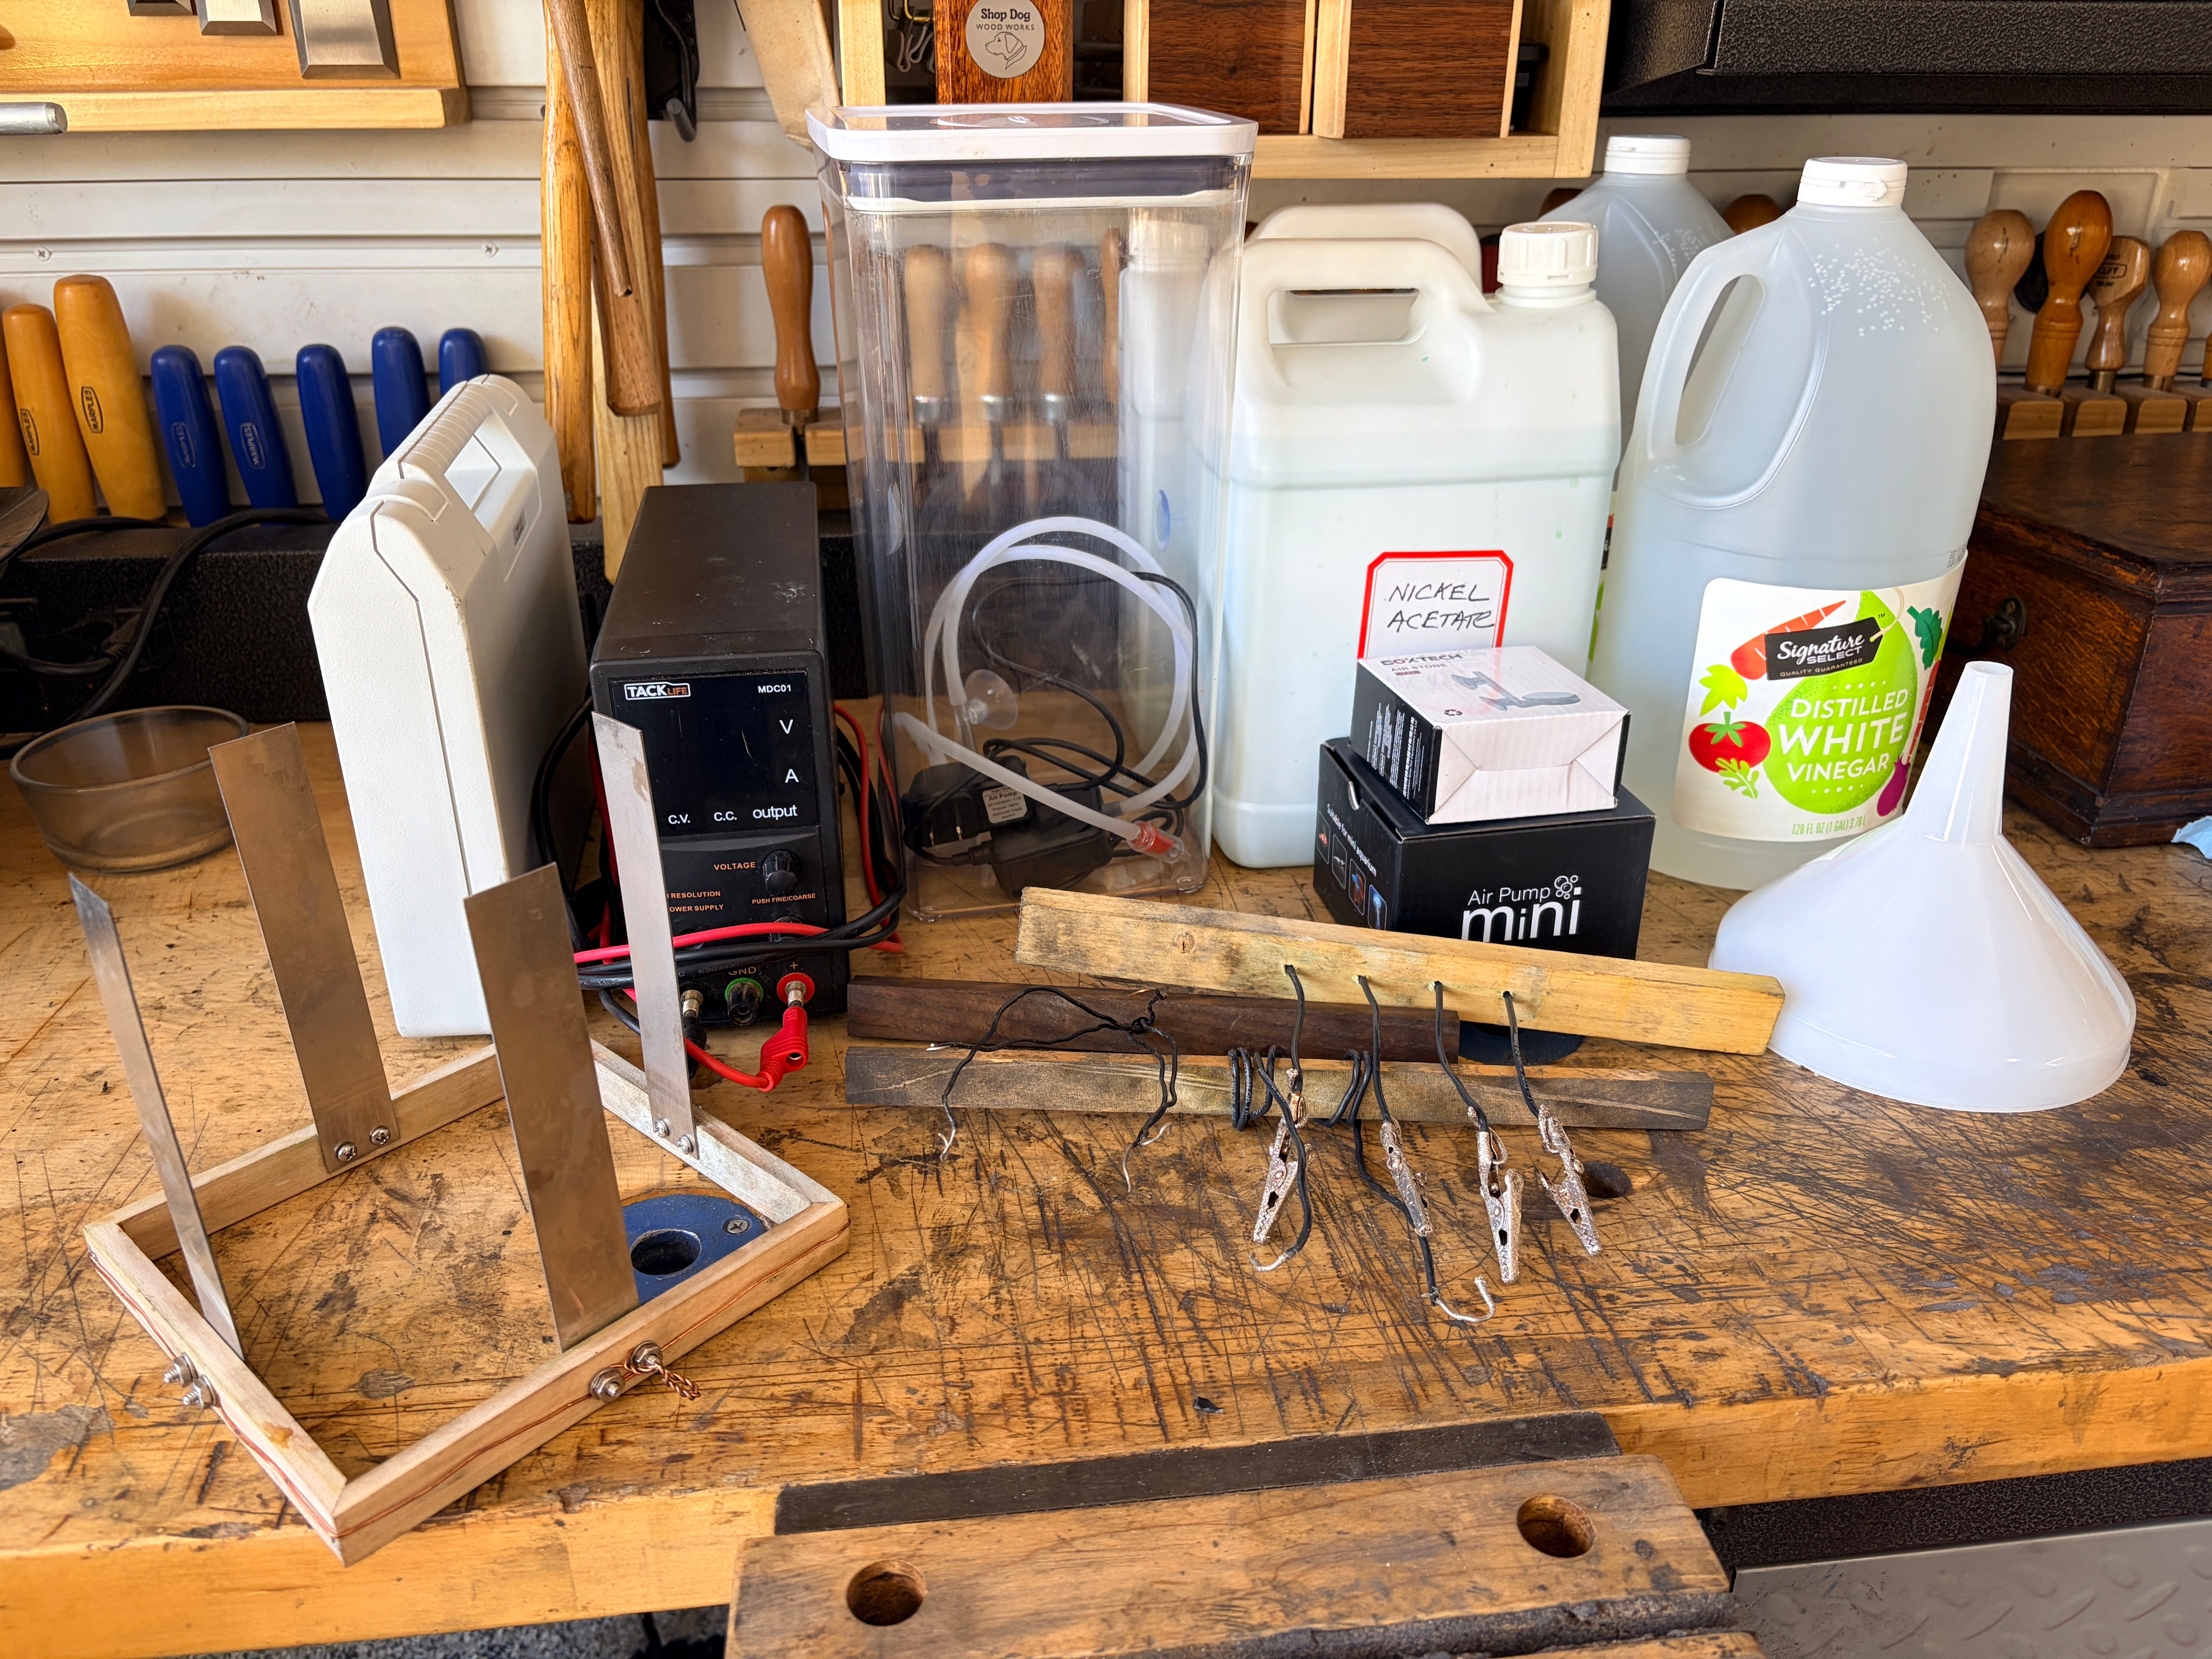
The following products are recommended for both the Nickel Acetate and Nickel Sulfate Methods. Additional items specific to each method are listed in their respective sections.
Non-conductive tank: Use a tall, square wide-mouth hard plastic container with at least a 1.5-gallon capacity and an airtight lid for storage. After trying many options, I have found the OXO Good Grips Big Square Tall 6-Quart container works best. Its 6-inch width and 12” height make it ideal for most hand tool parts. Avoid glass containers, since they can shatter if a heavy or sharp-edged metal part is dropped inside.
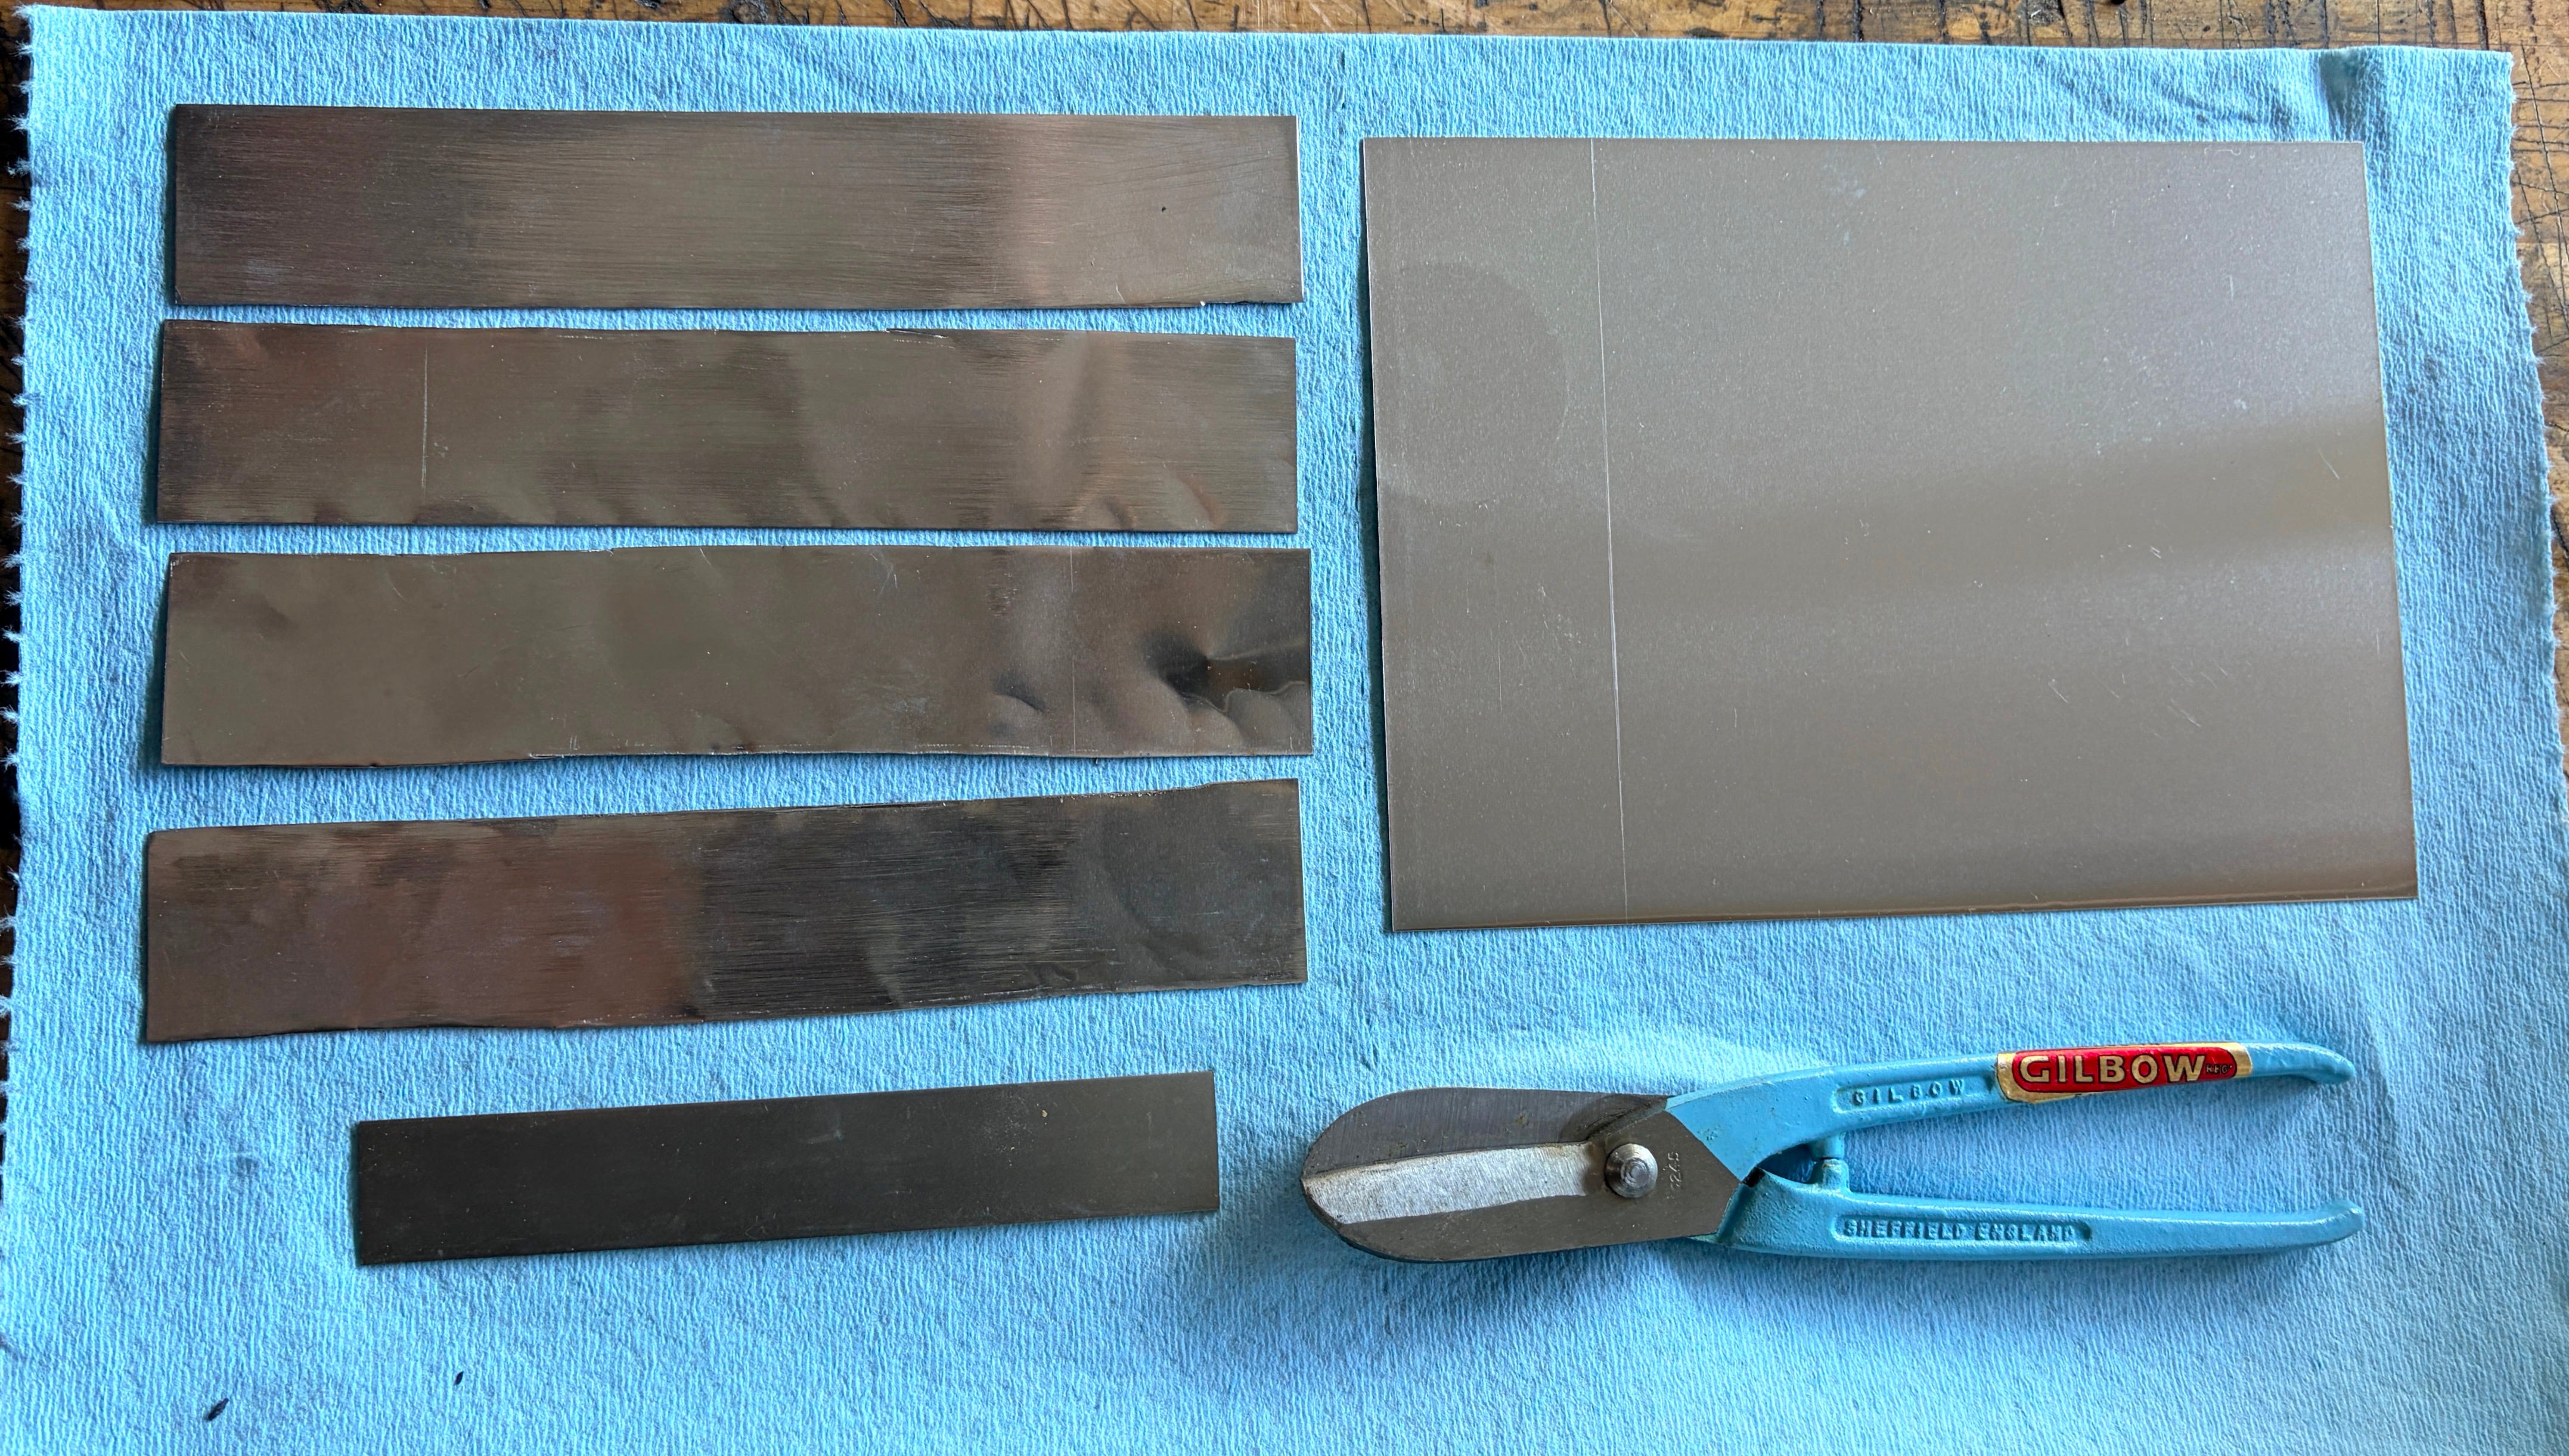
Pure nickel anodes: Get either six 99.99% pure 6” × 1” × 0.4” nickel strips (~$12 each), or two of those strips plus one 6” × 8” pure nickel plate (~$55), and then cut that into four 8” x 1.5” strips for improved coverage.
Premium DC power supply: This is the same unit I recommended in my earlier tutorial about electrolysis rust removal.
Heavy-duty power supply clamps: The same clamps recommended in my earlier electrolysis rust removal guide.
Nitrile gloves (6 mil, XL): 100-count box, dispose of them after each use.
Cleaning supplies: Simple Green, dish soap, and distilled water for rinsing. Single gallon jugs of distilled water from your grocery store are fine.
Pickling solution: Prepare and use as described below to activate iron and steel immediately before plating.
Hanging brackets: As shown in the photo examples below, make several custom brackets to hang parts of different sizes and types.
Mini air pump and diffuser kit (optional but recommended): To agitate the plating solution if you prefer not to do so manually.
External heater (optional): Use as described below to indirectly heat plating solution when needed.
PH Tester: Needed to test and maintain the pH of your solution. If you prefer not to purchase a good pH tester to start, use pH test strips.
Distilled water: You will need plenty of distilled water for cleaning and solution replenishment. Use ONLY distilled water. Grocery store distilled water is fine, or buy it in bulk from Amazon.
Gallon jugs: I use these heavy duty jugs to store all of my mixed chemicals, including plating solutions, pickling solution, and nickel stripper solution. You will also need a properly sized funnel if you don’t have one.
Post plating rinse and finish protection: Use a small bucket with water to dip the parts when they come out of the plating tank, then pat dry and apply CRC 3-36 to prevent flash discoloration and for long term corrosion protection.
It is possible to plate one side of a part using just one anode, or both the front and back of a relatively flat part (such as a hand plane lever cap) using two anodes. For typical odd-shaped and multi-dimensional tool parts, however, I strongly recommend using four anodes, each positioned vertically and centered against one side of the tank. This arrangement provides the most even distribution of lines of force from the anodes to the part, produces the most uniform plating, and minimizes shadowing on concave and complex surfaces.
I strongly recommend making a simple wooden frame to secure the anodes in your plating tank. Attach one nickel strip to the inside of each side of the frame with screws, nuts, and washers, as shown in the photo below. Position the strips to hang as deep as possible into the solution while keeping all electrical connections above the liquid. This setup keeps every anode parallel and fully immersed, prevents them from protruding diagonally or flopping around during plating, maximizes space for the parts, and isolates the anodes from the workpieces. As a result, the anodes cannot contact the parts when you rotate the hanging bracket, which would short-circuit the process and interrupt plating.
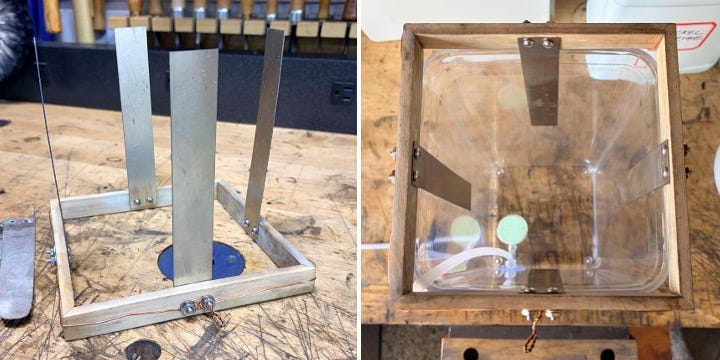
It is possible to hang anodes in your tank by bending the ends of the anode strips, connecting them with wire, and hanging them over the edge of the tank. From experience, however, you will a enjoy a much more reliable and trouble-free plating system if you make a harness to holds the anodes securely in position so they do not shift, come apart, or short-circuit while plating.
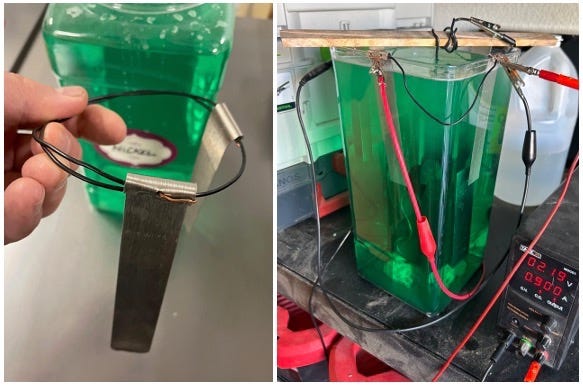
Be careful never to immerse wires, clips, screws, or non-nickel metals into the plating solution on the anode side. Foreign metals, especially copper, zinc, and lead, will dissolve into the plating solution and cause irreversible contamination, resulting in dark staining on plated parts that will not buff out.
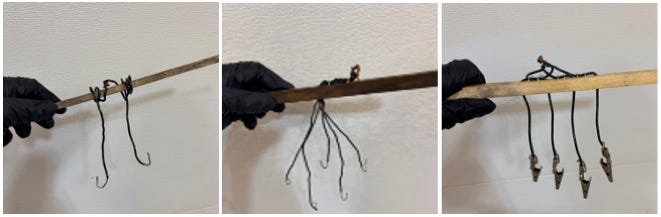
You can use copper wire to hang parts in the plating solution. Because the wire is connected to the negative side of the power supply, it will attract nickel ions rather than dissolve into the solution and become nickel-plated along with the workpiece.
For individual parts with a hole or other attachment point, a flat wooden stick makes a great hanging bracket. Drill a hole through the stick, then bend one end of a copper wire into a hook. Pass the wire through the hole and secure it by stapling it to the stick or wrapping it around a conductive screw. Form a loop on the other end of the wire so it can be securely connected to the negative (black) power supply lead.
To plate multiple small parts at once (such as screws, bolts, and depth stops), attach several copper hooks to one wooden strip. All the hooks can share a single common loop for the negative lead.
Clamp parts without holes or attachment points (such as rods) with alligator clips. Attach an alligator clip to one end of a copper wire and connect the other end to your hanging bracket. You can hang up to four 1/4” rods on alligator clips from the same bracket in the recommended plating tank. If a small shadow appears under the clip after plating, touch it up with brush plating (covered below).
Every part must be cleaned to laboratory standards before it goes into the plating tank. Even after stripping, rust removal, mechanical resurfacing, lapping, smoothing, and final polishing, a final meticulous cleaning is still required.
Begin by putting on nitrile gloves. New gloves often have powder or manufacturing residue on them, so wash your gloved hands thoroughly at the sink with Dawn dish soap before handling any parts. Keep the gloves on throughout the entire cleaning process, since fingerprints on the parts will not be nickel plated.
Spray parts generously with a 50% dilution of Simple Green concentrate and distilled water. Use a soft toothbrush to scrub every surface, crevice, and detail. Next, apply Dawn dishwashing liquid and brush the part thoroughly again. Rinse well under running water. Repeat the Simple Green spray and brushing step one more time. This sequence degreases parts as effectively as strong solvents such as brake cleaner or acetone, and is much safer to use.
After cleaning the parts as described above, perform the Water-Break Test while still at the sink. Hang the parts vertically and spray them with distilled water from a spray bottle held several inches away. If the part is clean, the water will sheet evenly across the entire surface. If any contamination remains, the water will bead up or fail to sheet uniformly. Repeat the cleaning process until the part passes the test.
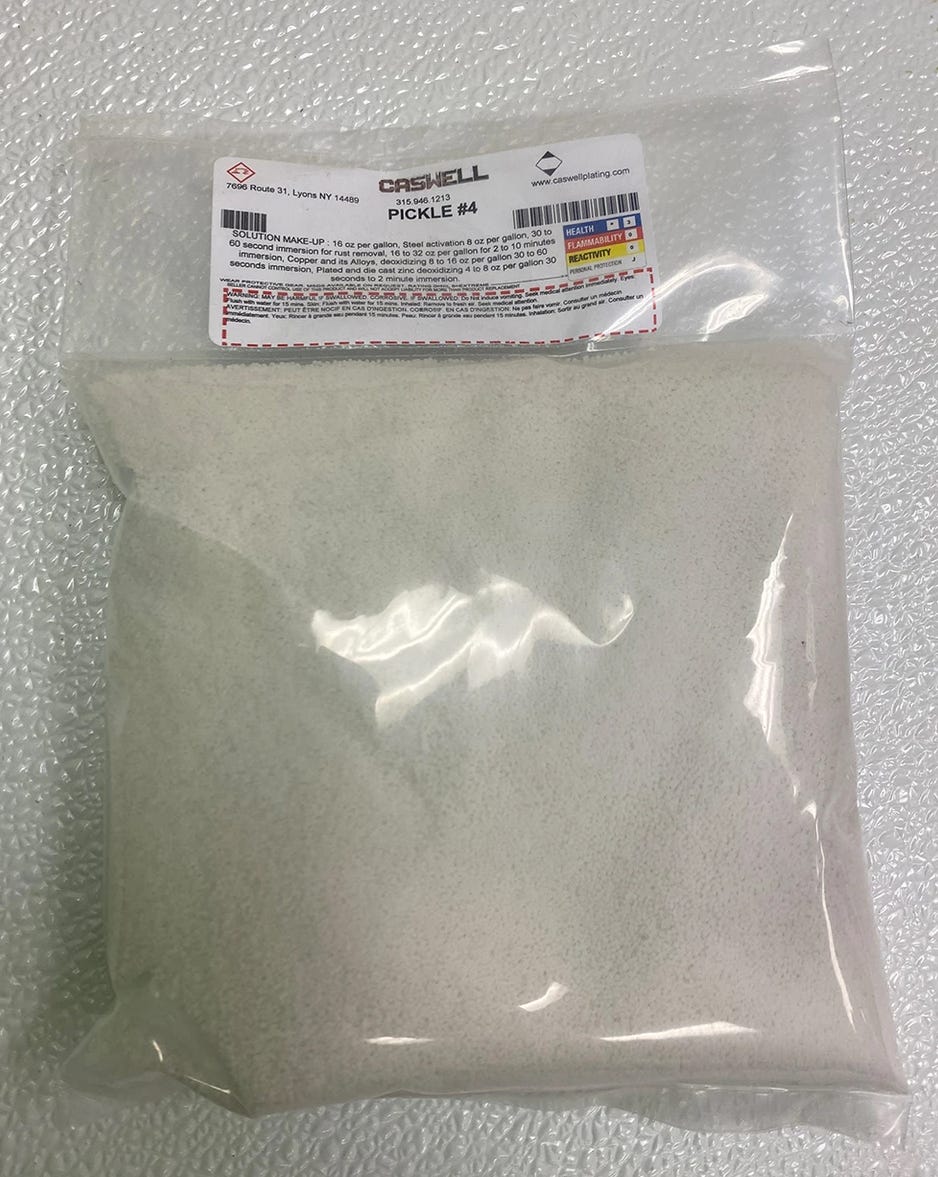
Even after passing the water-break test, the part can still carry trace alkaline residues and microscopic scale from tap water, and especially hard water. Immerse the part in a mild pickle bath for 30 to 60 seconds immediately before plating to neutralize those residues, remove thin surface oxides, and expose fresh, chemically active iron atoms. The result is a clean, active surface that promotes strong nickel adhesion and reduces the risk of delamination.
Mixing the Pickle Solution
In a plastic container marked at the 1-gallon level, add about 3 quarts of distilled water. Slowly mix in 8 oz (by weight) of Caswell Pickle #4 while stirring continuously with a plastic utensil until fully dissolved. Top off with distilled water to exactly 1 gallon and stir thoroughly. This solution can be used at ambient temperature, but in winter warm it to about 70°F before use.
Pickling Procedure
Dip the parts in the pickle solution for 30 to 60 seconds.
Immediately transfer the parts to a bucket of distilled water to neutralize the pickle.
Still wearing laboratory-clean nitrile gloves, quickly attach the parts to your hanging bracket and immerse them in the plating tank.
This pickling solution can be reused many times. Store it in a clean plastic container with an airtight lid, and replace about every six months or when it becomes discolored.
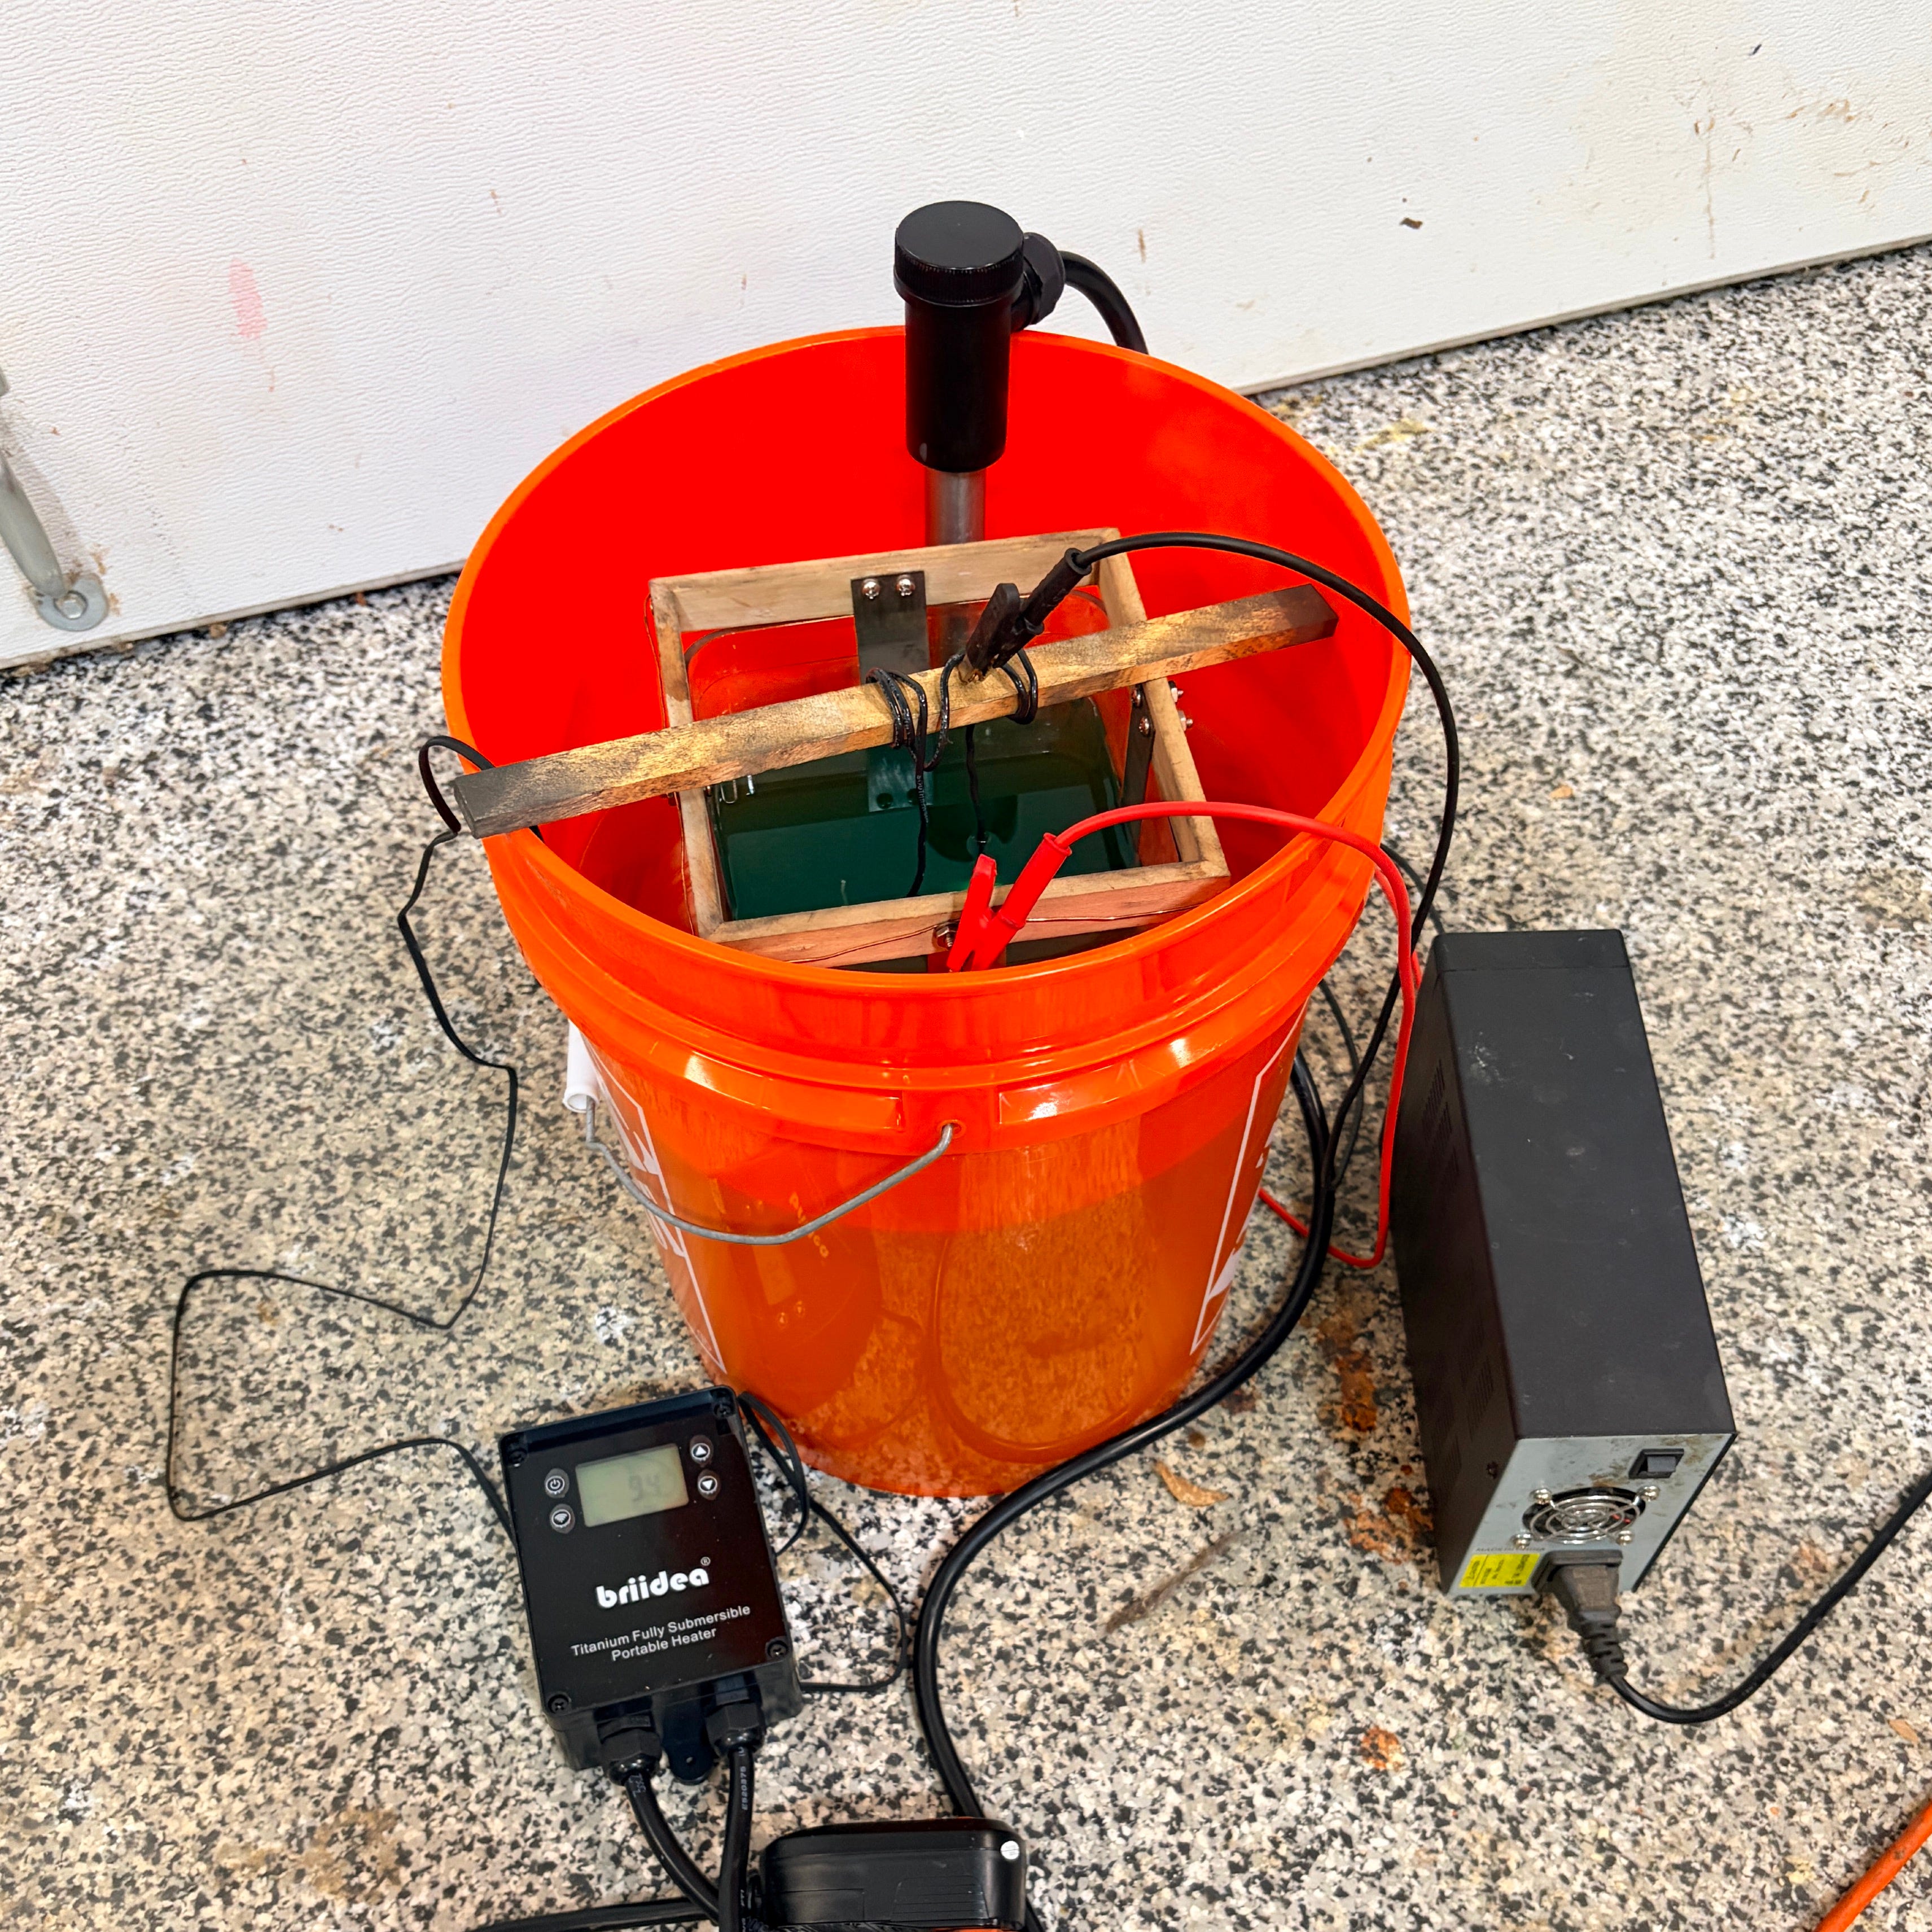
Some solutions can be used at room temperature, while others must be heated and held within specific temperature ranges.
The recommended 6” × 12” 1.5-gallon plating tank is too narrow to fit a heater while leaving sufficient room for anodes and parts, so it must be heated indirectly. Place the filled tank inside a bucket, add water to a level below the solution surface to prevent floating, and fully submerge an immersion heater in the water. Raise the tank on a cement block if needed so the heating element is fully immersed and the parts bracket clears the top of the bucket.
Indirect heating surrounds the tank with warm water so heat enters evenly from all sides. The water acts as a thermal buffer, releasing heat gradually without temperature spikes. Because the plating solution never contacts the hot element, localized overheating, brightener breakdown, and premature solution degradation are avoided.
For temperatures above about 120°F, use a metal bucket rather than plastic. The heating element can get very hot and melt plastic on contact, so especially keep it off the floor and sides of PVC buckets like the one shown in the photo.
Direct immersion heaters rated for acidic solutions are either very expensive laboratory-grade units or too large for small tanks. Larger acid-rated heaters designed for 5-gallon tanks require far more solution volume than needed for most vintage tool parts, making them unnecessary and not cost-effective.
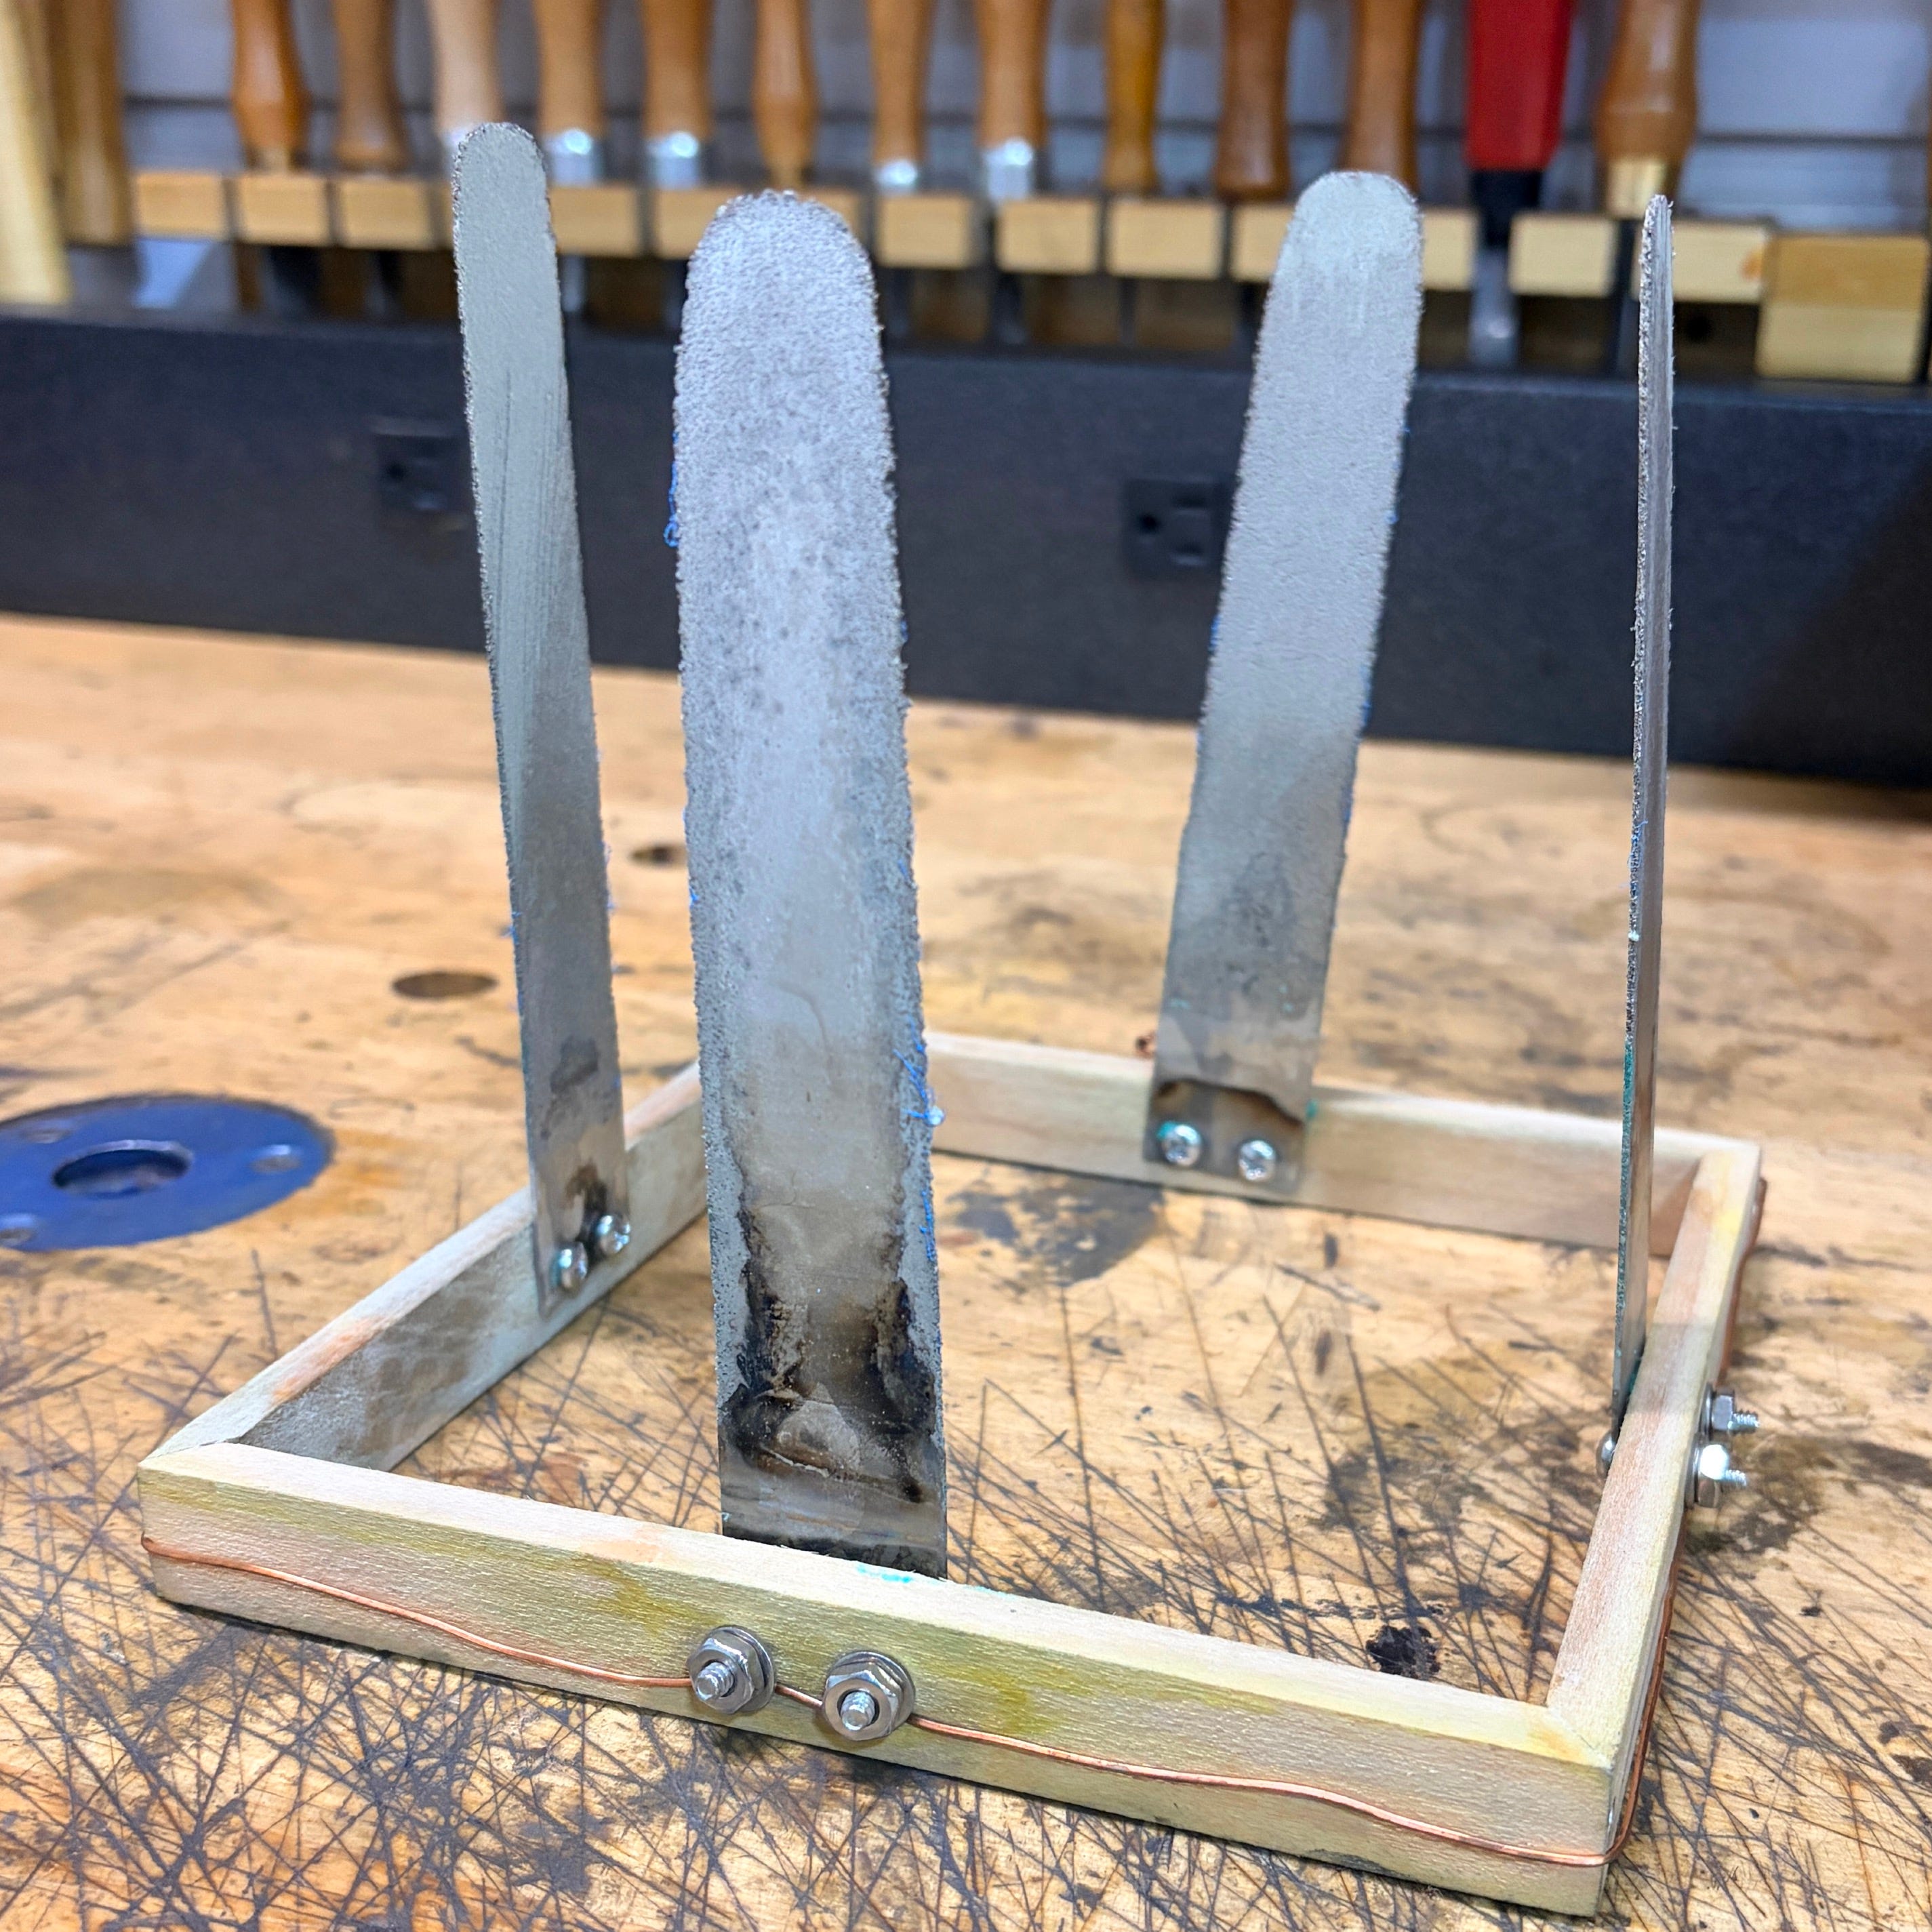
During electroplating, nickel ions in the solution are primarily replenished by dissolution of the nickel anodes. Replace the anodes when they appear noticeably thinner with rounded tips and rough edges. These changes signal reduced system performance and plating quality, along with the release of excess nickel particles into the solution from accelerated anode disintegration.
After several plating sessions, precipitate will begin to form in the solution. Larger nickel particles and salts from the dissolving anodes settle to the bottom of the tank, while finer particles remain suspended and make the solution appear cloudy. Running the tank at the lowest effective amperage slows anode dissolution and reduces the rate at which precipitate forms.
Black streaks or dark discoloration on plating that will not buff out indicate the solution is contaminated and should be replaced. Filtering, diluting, or replenishing the solution is unlikely to correct this problem. When these signs appear, recycle the old solution, prepare a fresh batch, and replate the parts.
Suspended particles can produce white streaks or a powdery matte finish on plated parts. Although this haze can usually be buffed out, it is easier to minimize it with regular filtering.
Replenishing and Filtering Solution in Small Tanks
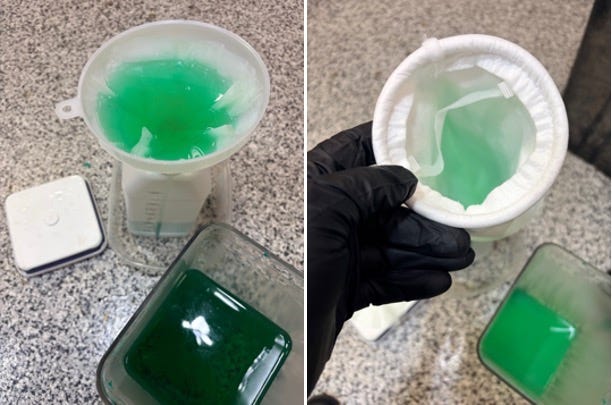
The solution level will gradually drop due to evaporation and drag-out. It is easiest to replenish and filter the solution at the same time. First top the solution up to the fill line, then allow it to equilibrate, test, and adjust the pH according to the guidance in the respective section below for each solution. Always plate a test piece of metal after making changes to the solution before plating an important part.
After the solution is topped up and the pH is verified as correct, filter it if it appears cloudy or has particles settled on the bottom. For small tanks, the easiest way to remove this precipitate is to filter the solution manually.
Pour the solution into clean plastic containers through a funnel fitted with two layered paper coffee filters or a 5-micron polypropylene filter bag.
Dispose of the solid residue in a waste container, then thoroughly clean the plating tank. Wash it with dish soap anda soft sponge, followed by a final rinse with distilled water.
Return the filtered solution to the clean plating tank and bring it back to the fill line. The solution should betranslucent and a deep emerald color.
Filtering for Larger Tanks
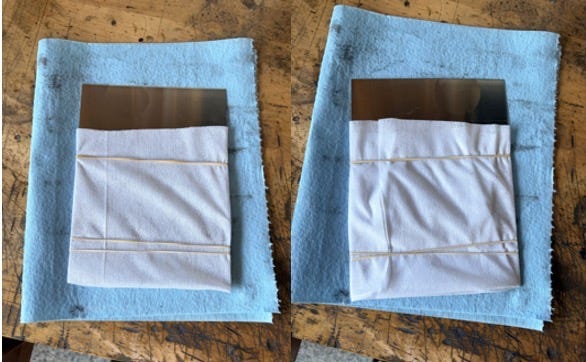
It is efficient to use anode bags with large anode plates in large tanks because they reduce the amount of precipitate that enters the solution and how often you need to filter. You must keep the bags clean, however, to maintain good plating quality. If you want to try anode bags, you will need to make your own, since ready-made anode bags are usually available only as custom wholesale orders. Fortunately the process is simple: wrap the anode in fabric, fold up the bottom, and secure it with a rubber band. The best fabric for nickel plating solutions is woven polypropylene, which Caswell includes with its large anode plates.
Filter pumps are generally too large for small tanks, but combination filter and agitation pumps work well in 5-gallon tanks and larger. They provide gentle agitation and filter precipitate as it forms. This improves current distribution, enhances throwing power, and helps prevent nickel ion depletion around the parts, producing more consistent plating results with less manual effort.
By cleaning parts with distilled water before plating, using only pure ingredients, avoiding contamination, filtering regularly, and maintaining proper pH, a batch of electroplating solution can last up to a year of regular use. When not in use, store your solution in an airtight containers to minimize evaporation and contamination.
Setting the current within the optimal range for plating is just as important as using pure materials and avoiding contamination. There are two practical ways to set a good starting current: calculate it from the surface area of the parts, or estimate it based on direct observation and experience.
For the Nickel Acetate Method, estimate the starting current using the guidance in that section, then adjust it based on observations and results. For the Nickel Sulfate Method, calculate the surface area and starting amperage as provided below, then refine the setting based on observations and results. For electroless plating, which does not use electricity, you must still calculate surface area to determine solution replenishment during plating.
Surface area is the total area of the surface to be plated, measured in square inches. The area of flat, square, and cubic parts is easy to calculate using the length, width, and number of sides being plated. Most tool parts, however, have irregular shapes with curves, holes, and recesses, making exact calculation impractical. In these cases, you need to estimate the surface area. An estimate within roughly 25 percent of the actual total area is good enough for excellent DIY results.
Estimate surface area using the Caswell calculator at https://caswellplating.com/surface.html. This tool includes calculators for common shapes and provides excellent guidance for complex parts. To estimate the area of irregular shapes, I cover the part with aluminum foil, remove the covering, flatten it into a rectangle, enter the length and height in the calculator, click “plate both sides,” then press calculate to obtain the estimated surface area.
Once you have a surface area estimate for all the parts you plan to plate together, enter that number into the Caswell amperage calculator tool at https://caswellplating.com/cdcalc.html. Set your power supply to the recommended amperage in constant current (CC) mode.
Estimates and calculations are only starting points. Good plating combines science, observation, and experience. Monitor bubble activity and plating quality, then adjust current and time as needed. Record successful settings for parts (amperage, time, and temperature) so you can use them when plating similar parts in the future. With experience, you will learn to judge amperage by the bubble pattern. When plating a new type of part for the first time, practice on scrap first, starting with a low current setting and adjusting incrementally. Specific guidance for setting and fine-tuning amperage is provided in the method-specific sections below.
Immediately after the pickle solution and final distilled water rinse, attach the parts to an appropriate hanging bracket. Do not overcrowd the tank. Space the parts so they will not contact the anodes when you manually rotate the bracket during plating. Accidental contact between the parts and anodes will short the circuit and interrupt plating. Arrange the parts for even coverage so most surfaces will be able to face an anode during at least part of the process as you rotate the bracket. It is faster to plate fewer items in a session than to crowd them together and have to rework or replate them afterwards.
Lower the parts into the tank and visually confirm they are hanging freely and not touching the anodes or tank walls. Attach the power supply clamps. Polarity is critical: the red (positive) clamp always connects to the anodes, and the black (negative) clamp always connects to the parts. Turn on the power supply, set the voltage knob to the maximum level, then press the OUTPUT (or CC) button. The voltage will self-adjust based on the current setting. Adjust the current according to the guidelines provided for the specific plating method you are using.
Parts with threads or tight sliding fits (such as screws and plane fence rods) should be plated for only about half the normal time as other parts to avoid becoming too tight to function properly. Do not plate parts that require different plating thicknesses in the same session.
Important: If power is interrupted for even a split second (for example, if you remove and reattach a part during plating or if a part contacts an anode), you must re-activate the part with diluted hydrochloric acid before you restart plating.
To re-activate the part, dilute 31% hydrochloric acid with distilled water at a ratio of 1 part acid to 2 parts distilled water. Immerse the part for 30 to 60 seconds, rinse it in distilled water, then immediately return it to the plating tank before restarting. Restarting without this step creates a high risk that new plating will form as a separate layer, which can cause delamination and ruin your hard work.
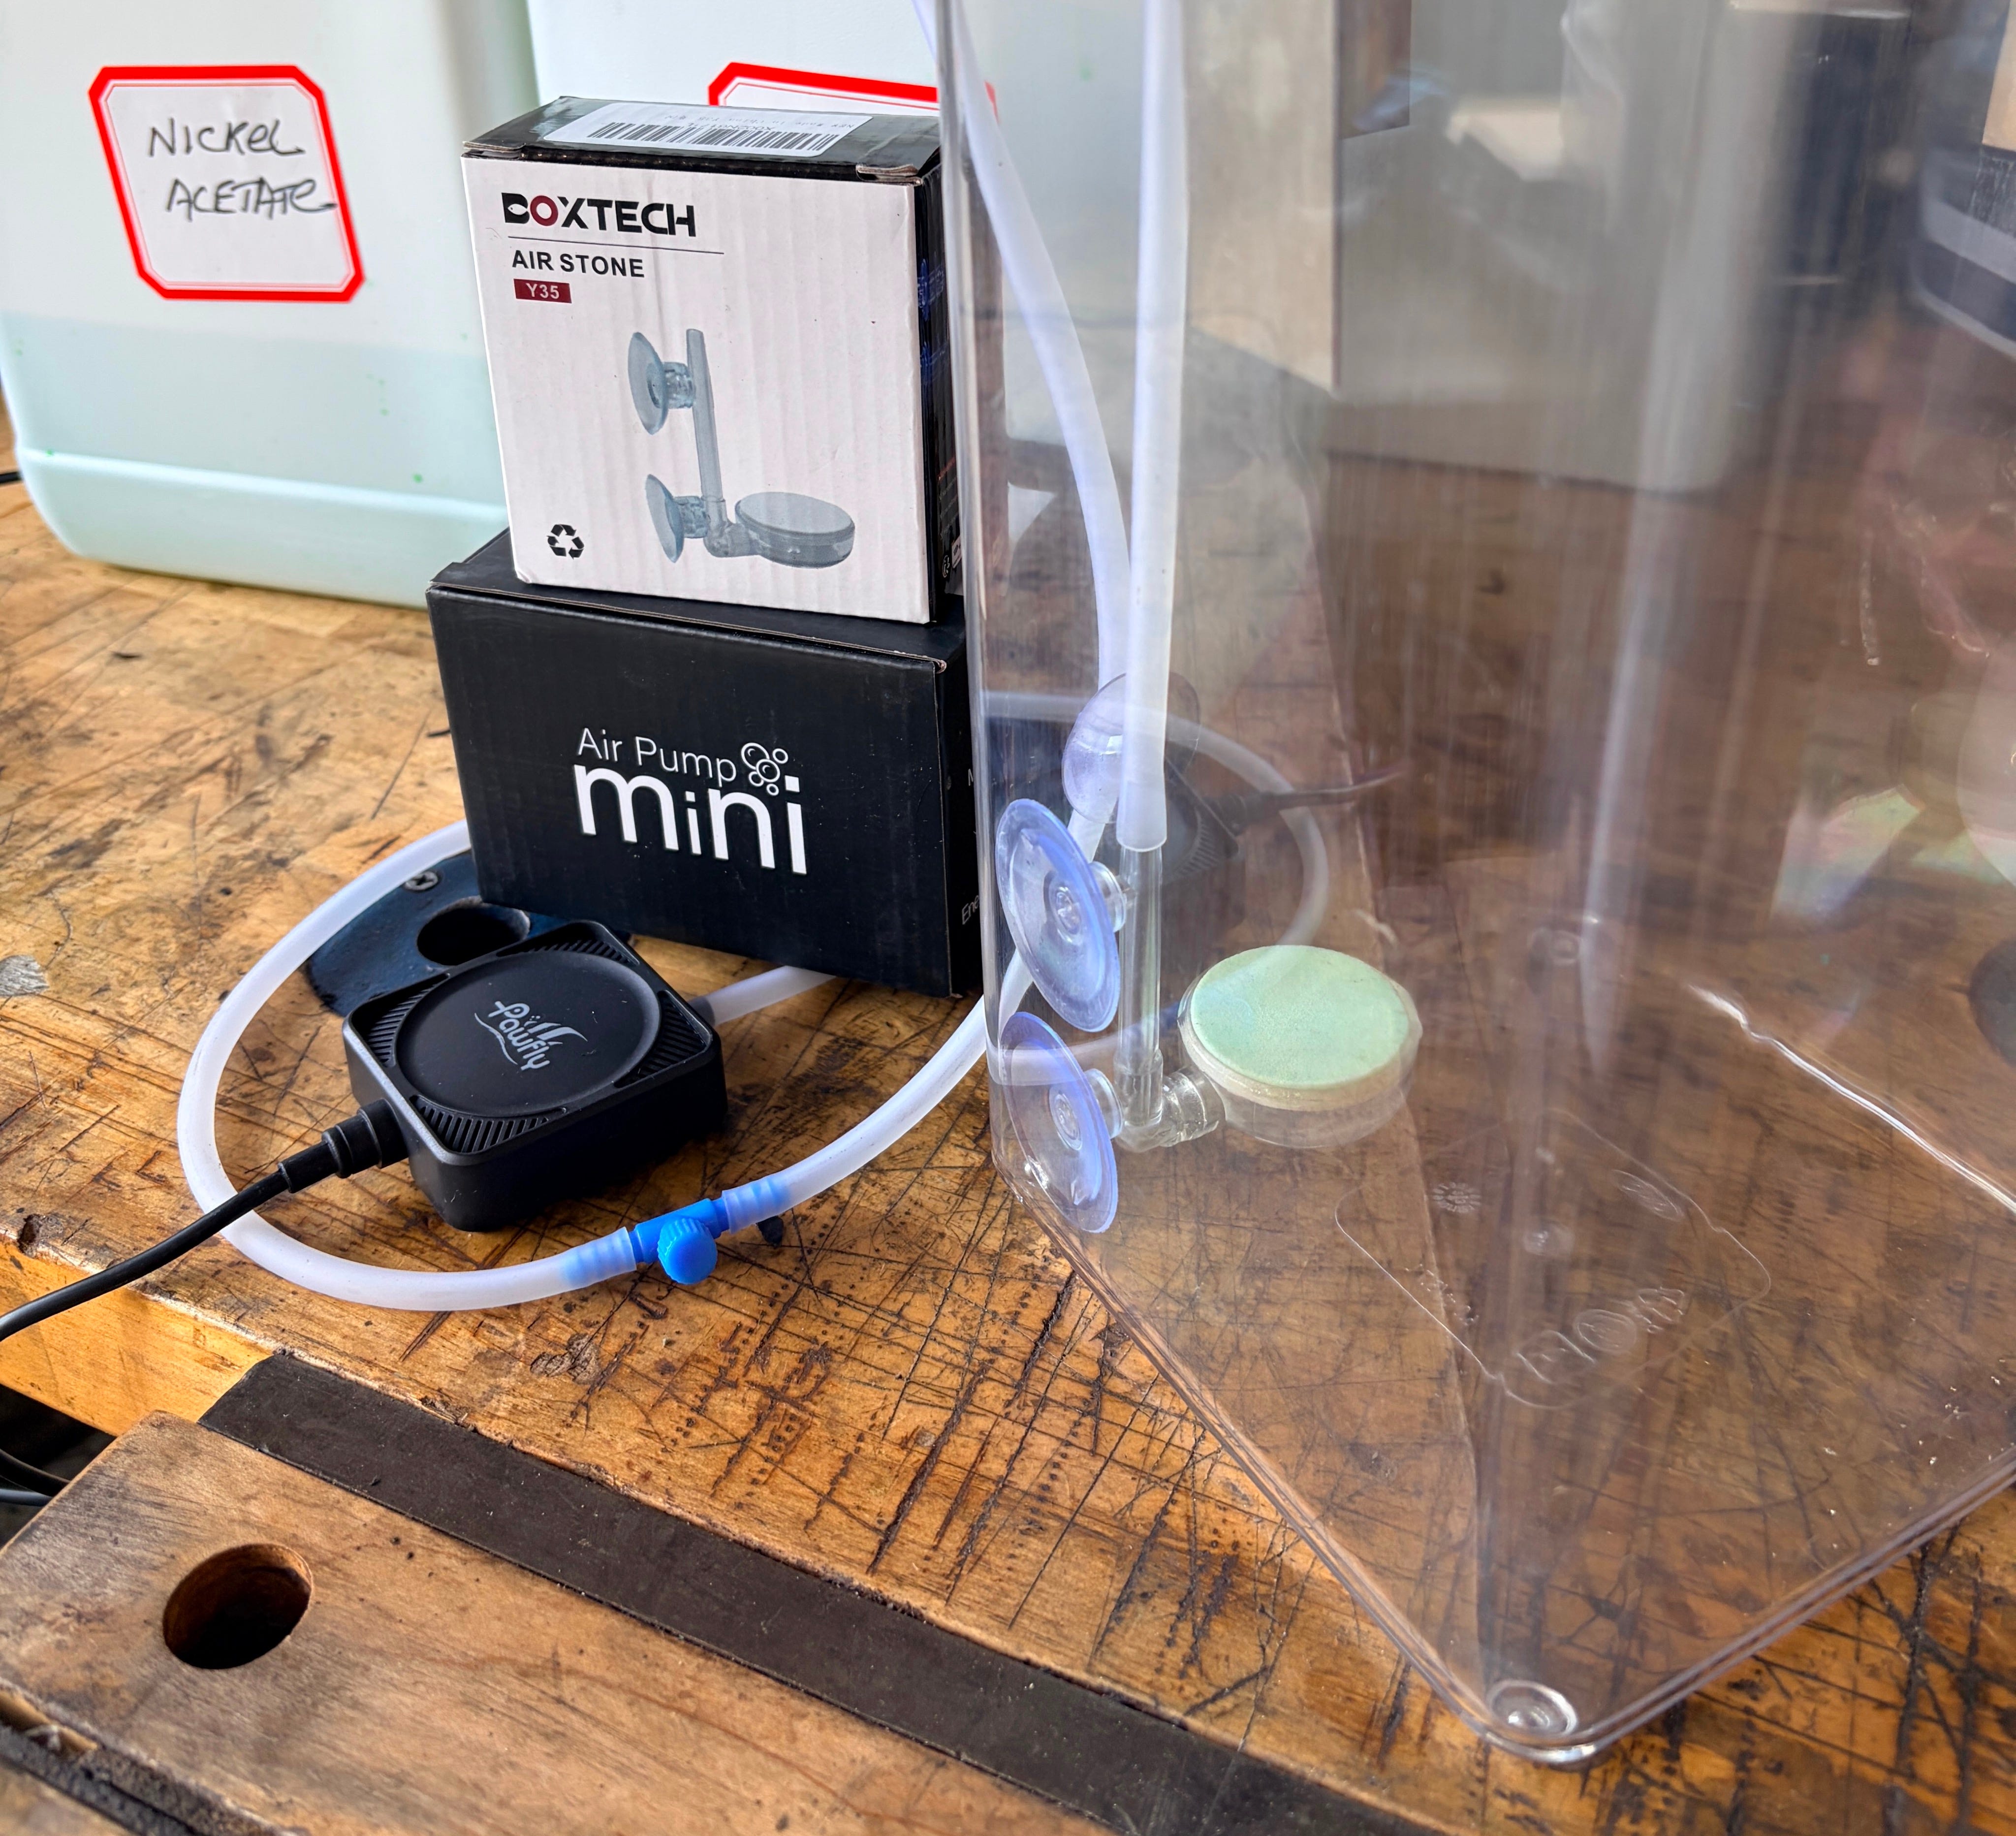
You must agitate the solution throughout each plating session to dislodge hydrogen bubbles and precipitated particles that can adhere to the workpiece and cause pitting. Agitation also prevents ion depletion at the part surfaces and improves circulation into recesses and crevices. There are two methods of agitation suitable for a small tank:
Air agitation: Use a Mini air pump with a diffuser stone attached by a suction cup about 1” above the bottom of the tank. This provides continuous agitation without recirculating sediment from the floor of the tank.
Manual agitation: Every few minutes, gently lift one end of the hanging bracket about half an inch and let it drop back down. This light thump dislodges bubbles and debris and promotes a smoother plated finish.
I consider the manual method critical and the air agitation method optional, but I use both in most plating sessions. For even plating, you must also rotate the parts bracket about a quarter turn every 10 minutes or so. You might as well thump the bracket while you are rotating it.
Be careful never to drop anything into the solution or allow the parts to contact the anodes while rotating the bracket, as this will cause a short circuit and interrupt plating.
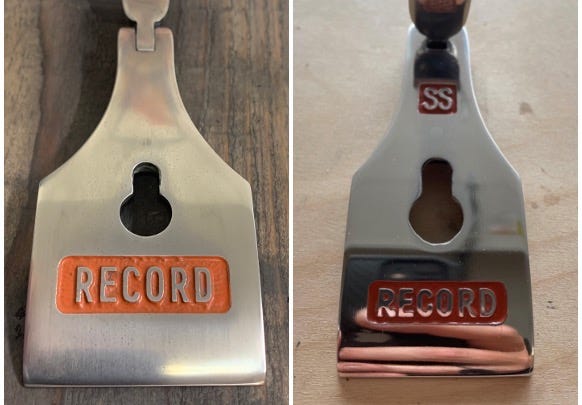
Immediately after removing parts from the plating tank, dip them into a bucket of water, pat them dry with a clean terry cloth or similar material, place them in a plastic tray or bucket, spray them with CRC 3-36, then wipe off the oil before polishing. Rinsing, drying, and applying oil right after removal from the tank is critical. Delaying these steps can allow flash discoloration or tarnish under or through the plating, ruining all your hard work.
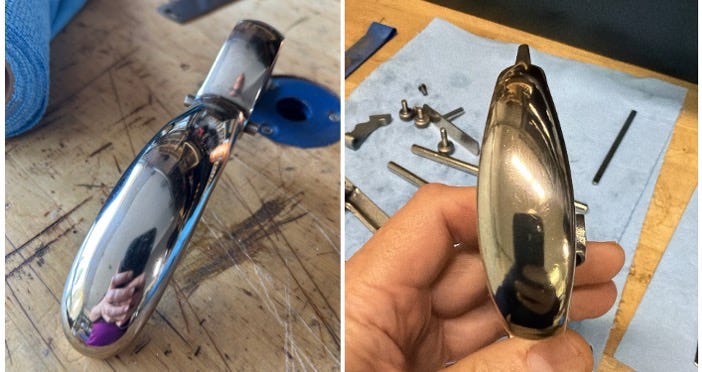
Depending on surface prep, the plating method and condition of the plating solution, parts can emerge from the tank with a matte, satin, or mirror finish. To increase the shine, buff the parts with white and purple compound as described in the polishing section of the previous tutorial. For the brightest, most professional results, use a dedicated bench buffer. If a bench buffer is not available, apply the same compounds with a die grinder or angle grinder fitted with felt pads, a rotary tool with polishing pads, or even an electric screwdriver with buffing attachments. For an authentic vintage hand-polished look, spray the parts with CRC 3-36, lightly hand sand them with 2000 to 3000 grit silicon carbide paper, then polish them by hand using compound on a strop or another friction-polishing method.
No plating or very slow deposition with little or no bubbles at the cathode: Check for reversed polarity, poor electrical contact to the anodes or hanging bracket, insufficient nickel content in the solution, depleted anodes, or low solution temperature. Verify all connections and increase solution temperature if needed.
Dull, rough, or powdery nickel plating: Current density is too high. Reduce amperage, plate at a lower current for a longer duration, and improve solution agitation.
Flaking or delaminated plating: Inadequate cleaning or surface activation, or electricity was interrupted during plating. Strip the failed plating and repeat the complete cleaning, pickling, and activation process before replating.
Flaked or wrinkled plating: You may be attempting to nickel plate stainless steel, chrome, or a chromium alloy. It is possible (but beyond the scope of this tutorial) to nickel plate chromium. Vintage tool manufacturers did not nickel plate onto chromium.
Pitting or pinholes: Caused by hydrogen gas bubbles or particles in the solution sticking to the part surface. Increase agitation and filter the solution more thoroughly and more often.
Uneven thickness or shadowed/unplated areas: Too few anodes, poor anode placement, suboptimal part orientation, poor agitation, or failure to rotate the parts bracket during plating. Add or reposition anodes to face all part surfaces more evenly, rotate the hanging bracket more frequently, and agitate the solution more often.
Cloudy solution: Filter the solution thoroughly until it becomes crystal clear, then allow it to settle before reuse.
Excessive bubbling, foaming, or rapid anode consumption: Current is set too high. Lower the amperage until you observe only a gentle upward stream of fine, champagne-like bubbles.
The information above applies to all four plating methods covered in this tutorial: the Nickel Acetate Method, Nickel Sulfate Method, Electroless Plating, and Brush Plating methods. The sections below cover additional processes and techniques specific to each method.
The Nickel Acetate Method is a modern DIY approach to nickel plating that uses only pure nickel strips, white vinegar, salt, and electricity. Created by home hobbyists, it offers a simple, low-cost alternative to the industrial nickel electroplating processes first developed in the 1800s.
I developed many of the refinements and techniques detailed below during thousands of hours of trial-and-error work. They are intended to help you master this method and achieve repeatable, professional-quality nickel plating finishes on tool parts while avoiding most of the time, experimentation, and expense I slogged through to learn them.
The Nickel Acetate Method produces high-quality nickel plating on properly prepared iron and steel surfaces through a straightforward electrochemical process. Metallic nickel from the anodes is oxidized and dissolved into the vinegar-and-salt solution as nickel ions (Ni²⁺). These ions are then reduced on the tool part, where they deposit as a smooth, adherent layer of metallic nickel.
During bath preparation, metallic nickel dissolves into the solution through this oxidation reaction:
Anode:
Ni → Ni²⁺ + 2e⁻
During plating, nickel ions in the solution are reduced and deposited back as metallic nickel onto the part:
Cathode:
Ni²⁺ + 2e⁻ → Ni
Sacrificial nickel anodes are used throughout the process. As nickel is deposited onto the cathode, the anodes dissolve to replenish the Ni²⁺ ions in the solution. When properly controlled, this elegant electrochemical cycle produces reliable, high-quality nickel plating that can equal or exceed the original factory finish on most vintage tool parts.
This method is well suited for typical hand tool parts and small plating tanks. For larger parts and higher-volume plating, the Nickel Sulfate Method offers better economy of scale and operating efficiency.
Advantages
Simplest and least expensive method for producing direct-to-steel, show-quality nickel plating on most tool parts, using minimal equipment and easy-to-source materials.
Provides excellent adhesion when applied over properly prepared iron and steel surfaces.
Delivers good corrosion protection, wear resistance, and hardness for cosmetic and light-duty applications.
Ideal for most vintage tool restoration and small-scale home plating projects.
Disadvantages
Parts typically emerge from the tank with a matte to semi-bright finish and require polishing on a bench buffer to achieve a professional mirror shine.
Limited throwing power, so it does not plate effectively into deep recesses or complex geometries.
Poor leveling, so scratches and surface flaws are not filled by the plating.
Slightly lower hardness than alternative methods, making it less suitable for high-friction functional surfaces that will rub against wood during use.
Requires longer plating times and precise current control.
In addition to the common items needed for nickel plating listed above, you also need these items for this method:
Distilled white vinegar (5% acidity): Start with two gallons for the recommended 1.5-gallon tank. Use only standard 5% distilled white vinegar that lists distilled water and acetic acid as the only ingredients. Do not use concentrated vinegar or any other type.
Pure sodium chloride (laboratory grade salt): Avoid ordinary table salt, which contains iodine and anti-caking agents.
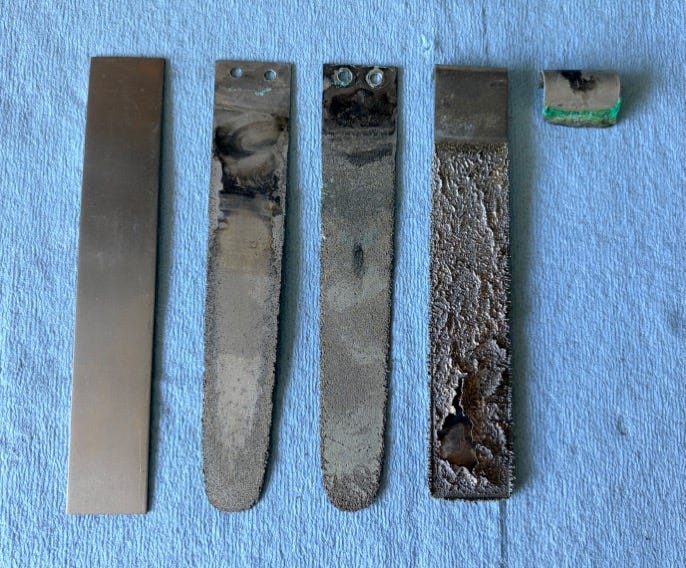
Position the tank on a stable, level surface. Fill it with distilled white vinegar, leaving approximately 1/2 inch of headspace at the top. Add two tablespoons of pure salt and stir thoroughly using plastic until it is fully dissolved.
Using needle-nose pliers, bend the top edges of two 6” × 1” × 0.4” pure nickel strips into a U shape so they will hang over the rim of the tank (as shown with strips 4 and 5 in the photo above). Attach the power supply clamps securely to the leads, then clip one clamp onto the bent edge of each nickel strip. The strips should hang into the solution while the clamps and leads remain completely above the liquid. Polarity does not matter at this stage.
Turn on the power supply and set the voltage knob to its maximum (30 V). Press the OUTPUT or CC button, then adjust the current knob until the display reads 1.0 amp. You should see bubbles forming and rising from the nickel strip connected to the negative (black) lead. Allow the system to run for 3 to 4 hours. During this time the solution will gradually turn green as nickel ions dissolve from the strip connected to the positive (red) lead and deposit onto the strip connected to the black lead.
Switch the clamps between the two nickel strips every several hours (it is acceptable to let the process run overnight) until both strips are completely and equally dissolved. The finished solution should be a deep emerald green, with a layer of precipitate settled on the bottom of the tank.
Filter the solution to remove the precipitate. Mark a fill line on the tank about 1/2 inch to 3/4 inch below the top to leave room for liquid displacement when parts are immersed. Top off the solution with distilled white vinegar to the fill line. It is now ready for use.
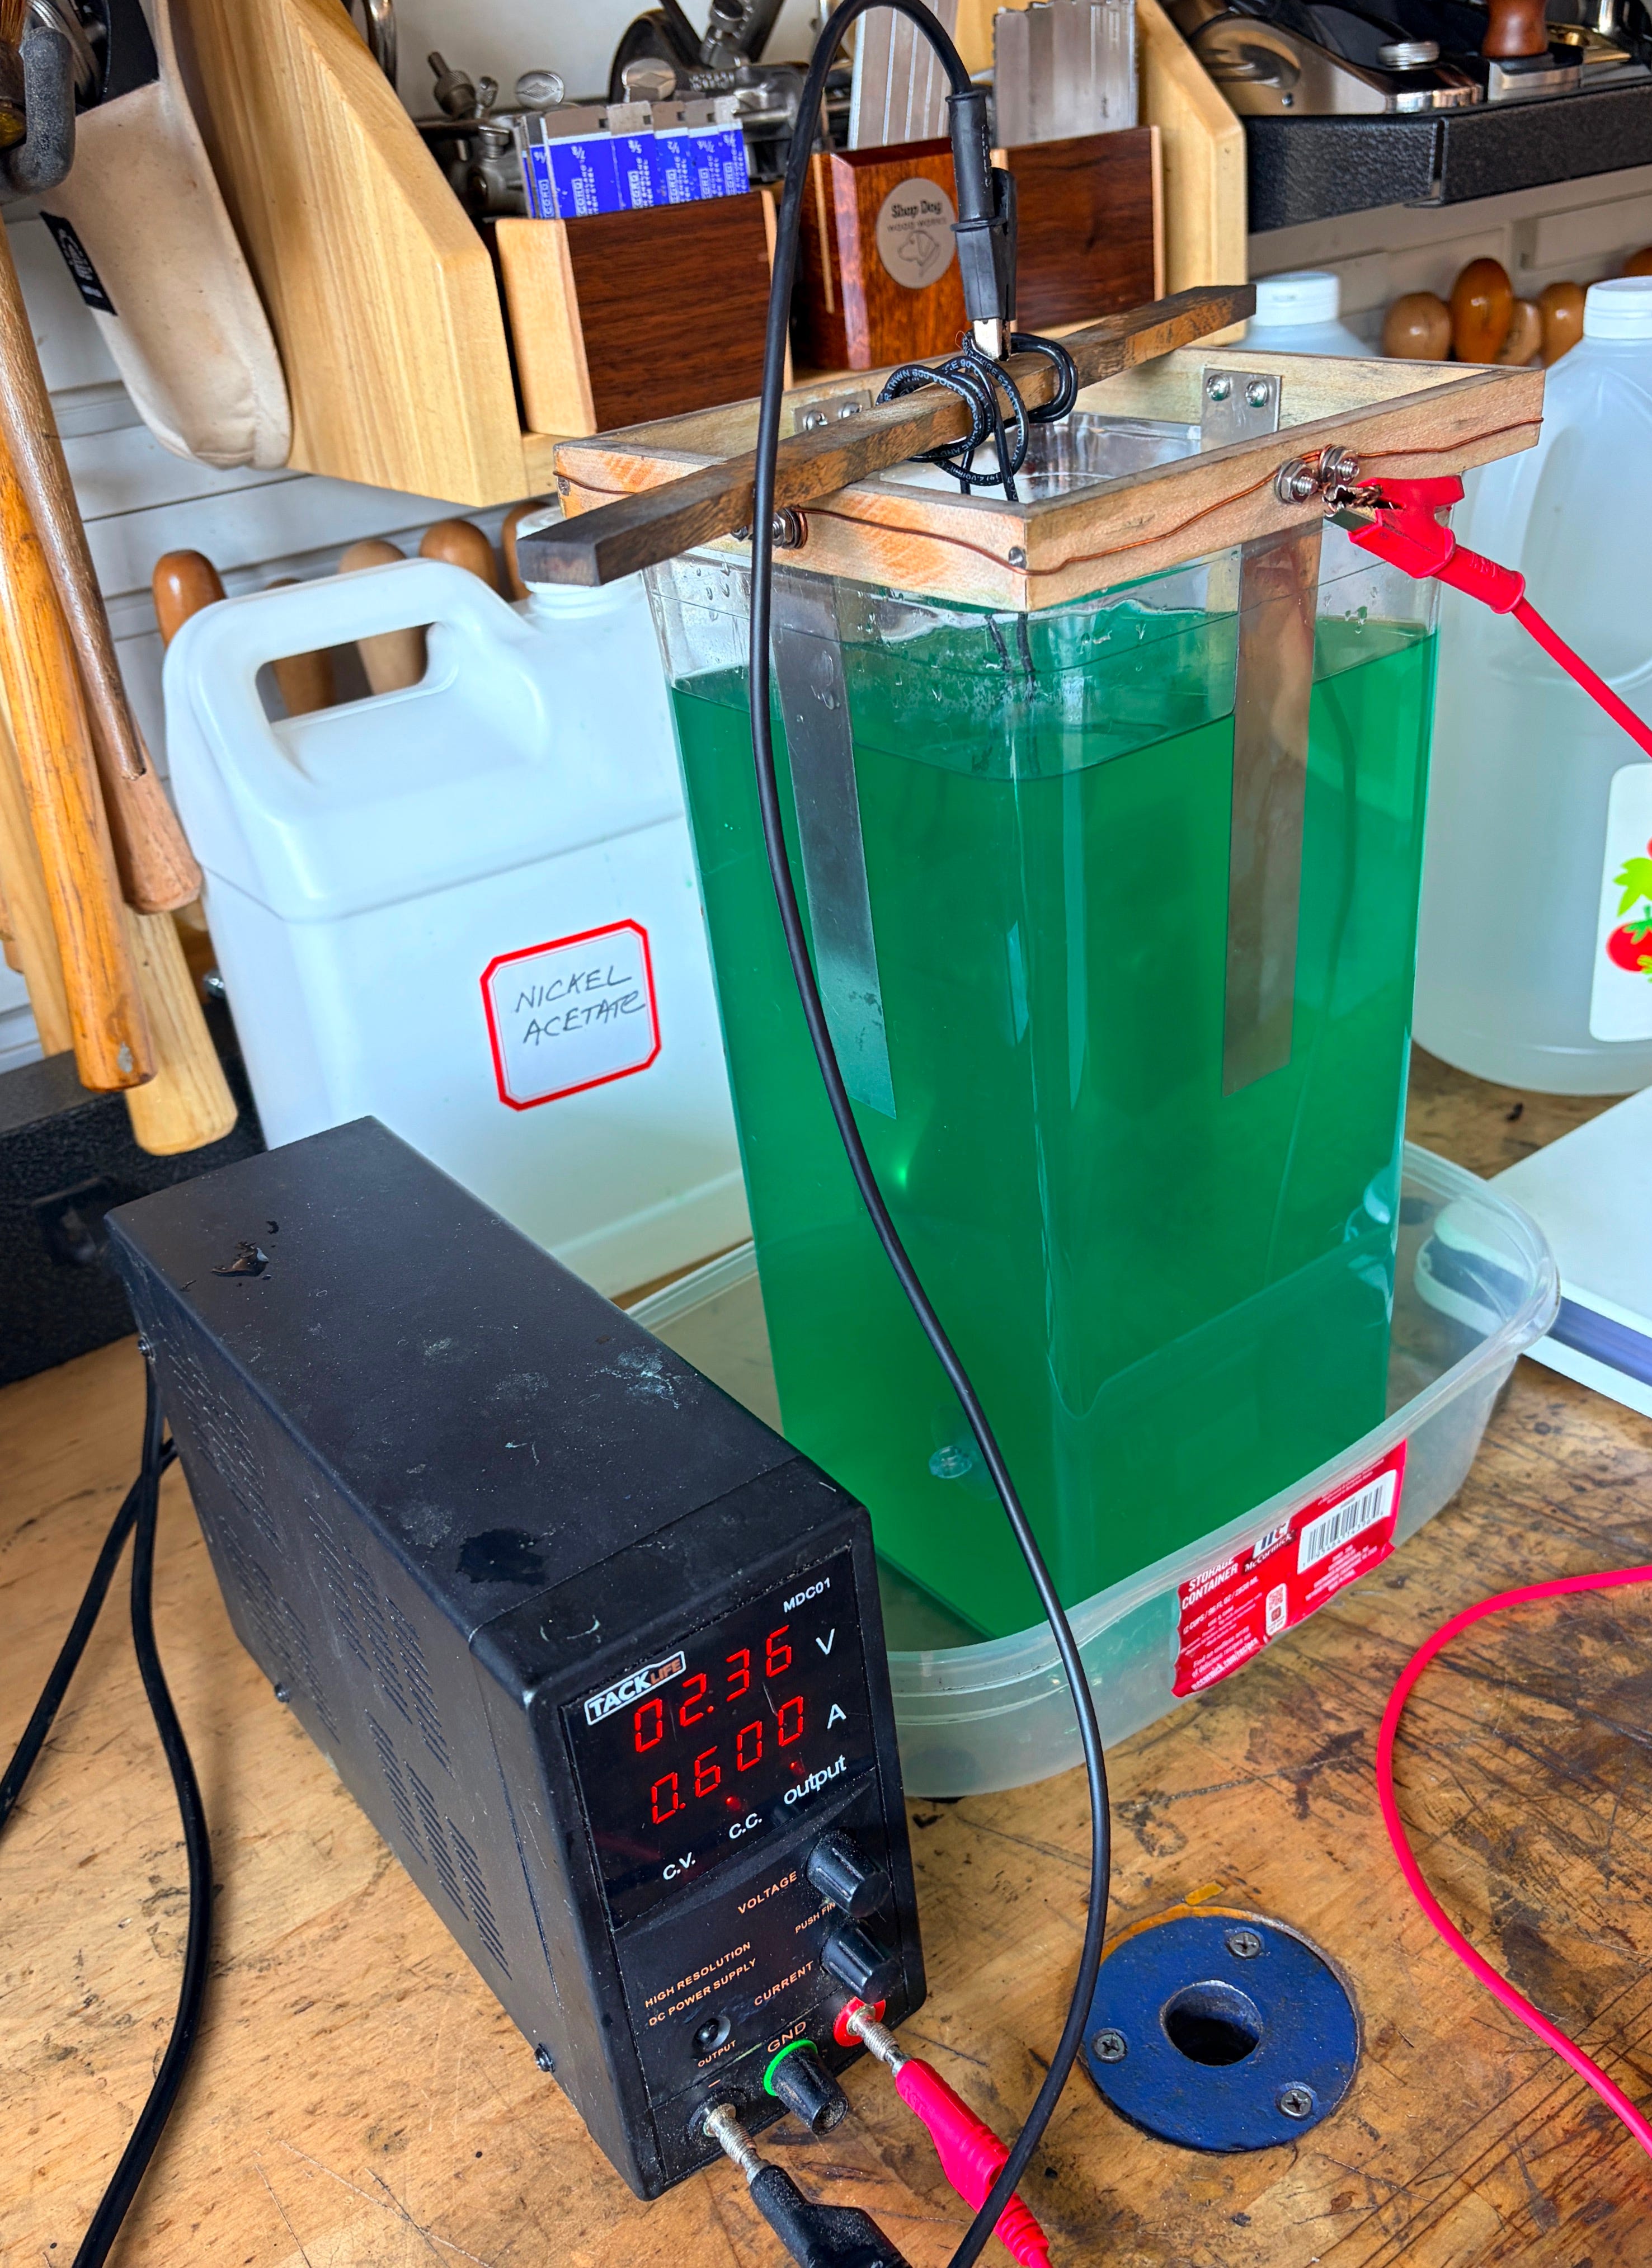
Nickel acetate solution should be kept between 70°F and 100°F during plating. The process works best near 100°F. Warmer temperatures increase plating speed but are not required for high-quality results. Plating is slower at lower temperatures, but you can still achieve excellent results without a heater. In my non-climate-controlled workshop I only heat the tank in winter. During spring and summer I run it at ambient temperature and adjust plating time based on the results I observe.
For this method I always start at 0.7 A and then adjust the current up or down based on the bubble intensity I observe. In the recommended tank size my working current for nearly all parts stays between 0.5 A and 1.0 A. At the correct amperage you should see very fine, champagne-like bubbles rising gently from the parts. The bubbles should never appear frothy, turbulent, or like boiling water. Reduce the current if the surface becomes foamy or the solution turns cloudy from excessive bubbling.
Plating time should be guided by solution temperature, observation, experience, and the size and characteristics of each tool. For cosmetic surfaces on larger parts, I typically plate for one hour at 100°F, or 1 hour 15 minutes to 1 hour 30 minutes at lower temperatures. For small functional parts that depend on precise threads or sliding fits, such as screws and plane fence rods, I plate for half the normal time to avoid thicknesses that could interfere with tool function. Thicker plating provides greater protection, but a thinner layer still delivers a good appearance and adequate corrosion resistance.
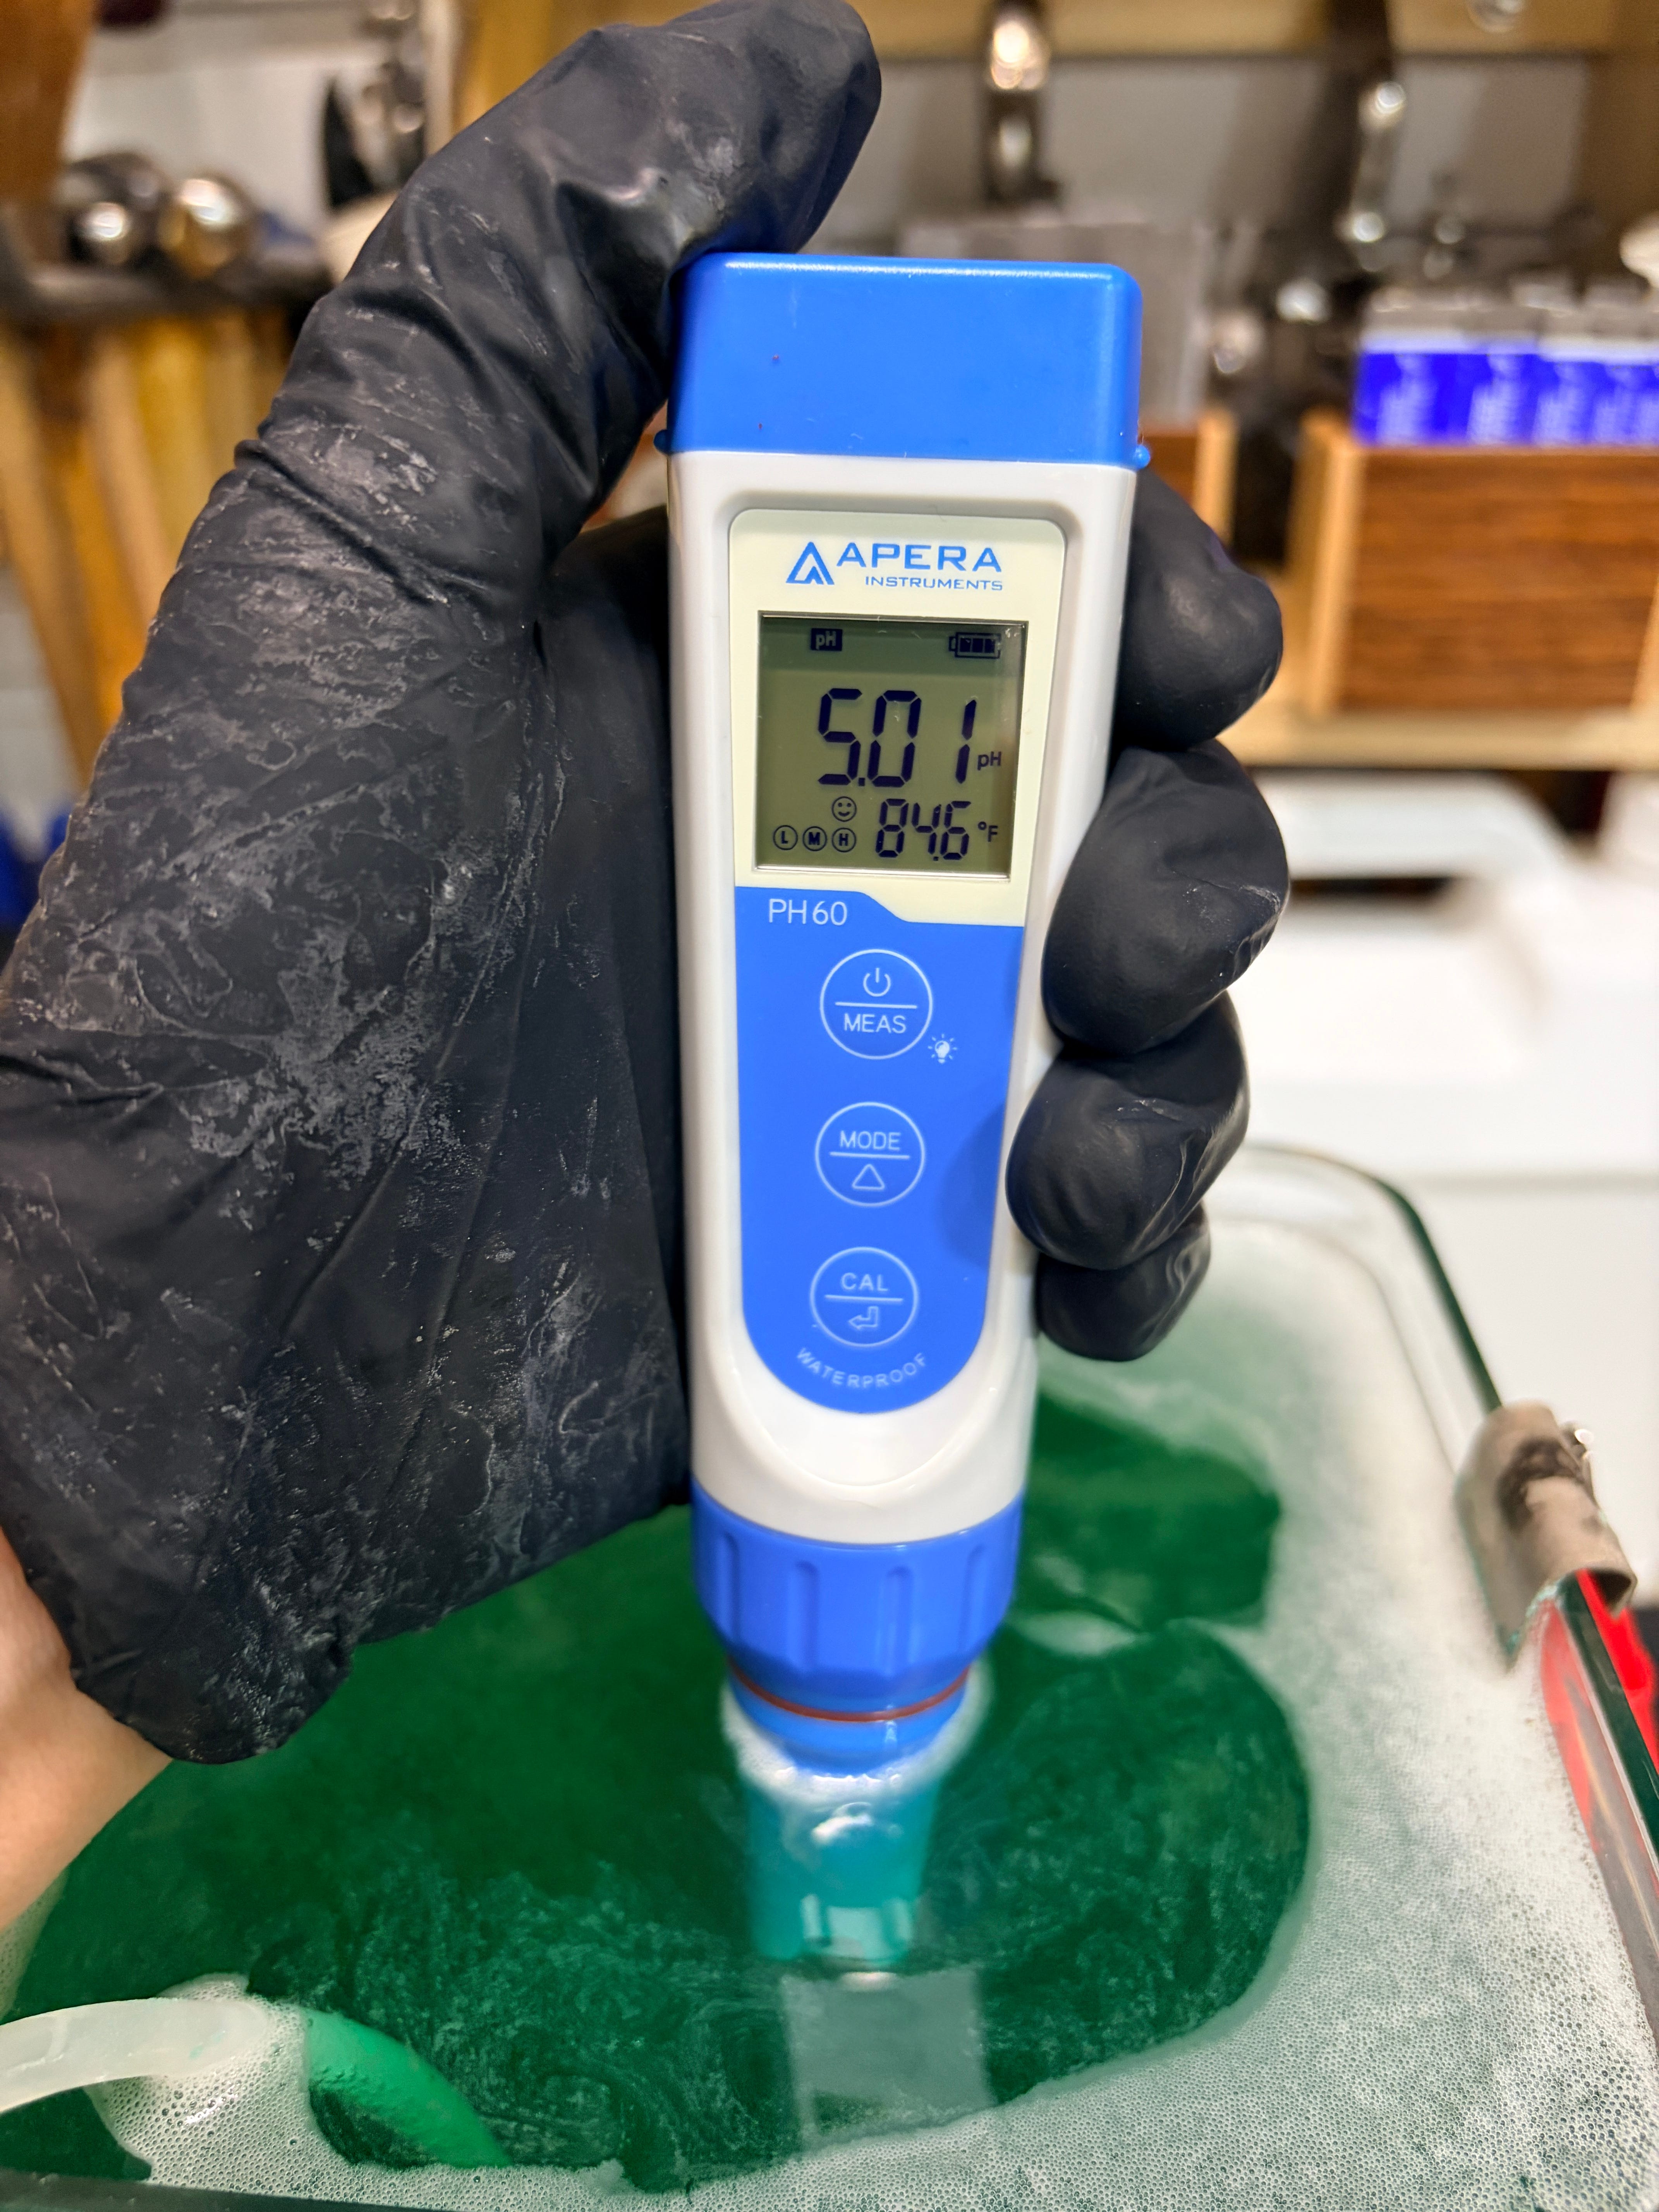
Standard household white vinegar has a pH of approximately 2.4. While the nickel acetate solution is prepared, the acetic acid is converted to nickel acetate as the nickel anodes dissolve, causing the pH to rise to the optimal working range of 4.5–5.5 (5.0 ± 0.2 is ideal for this method).
With clean, well-filtered solution at around pH 5.0, you will achieve bright, smooth, adherent nickel plating. A much lower pH tends to produce dull, non-uniform, or powdery deposits. A much higher pH causes the solution to turn cloudy and dark, leading to hydrogen pitting, poor adhesion, and potential plating failure.
Water evaporates from the bath, but acid and dissolved nickel salts do not. Although the solution concentrates as the level drops, the electrochemical reaction near the cathode continues to raise the pH. For best results, adjust the pH and filter the solution whenever the level drops by an inch or more or the it appears cloudy. Use a calibrated pH meter (preferred) or high-quality pH test strips.
To adjust pH:
Replenish evaporation loss by topping up with approximately two-thirds distilled vinegar and one-third distilled water. This ratio is based on years of practical experience rather than a strict formula.
Run two nickel anodes in the solution for at least one half hour after topping it up to restore nickel ions and equilibrate the pH.
Test the pH. A reading between 4.5 and 5.5 is ready for plating; it does not need to be exactly 5.0.
If the pH is still outside the optimal range, add a splash of distilled water if it is too low, or a splash of distilled vinegar if it is too high. Run the opposing anodes again for 10 minutes, recheck the pH, and repeat as needed.
Once the solution is within the optimal pH range, filter it through coffee filters. It is now ready for use.
The Watts Nickel Sulfate bath, developed in 1916 by Oliver P. Watts, remains the industry-standard process for high-quality professional nickel electroplating. Compared with the Nickel Acetate Method, it offers superior throwing power, better brightness with less post-plating polishing, and greater durability. It is also the best choice for high-volume plating operations and larger parts.
There are three options to set up the solution for this method:
Purchase the individual chemicals from chemical suppliers and mix your own solution.
Buy a complete ready-made kit with pre-mixed chemicals from Caswell (available in various tank sizes).
Purchase only the pre-mixed chemicals from Caswell and follow the instructions provided below.
I cover all three options so you can understand how this method works, but I strongly recommend the third option for most users because it offers the best balance of convenience and cost.
Except where noted otherwise, all equipment and general procedures (pre-plating preparation, anode and hanging bracket setup, troubleshooting, and post-plating rinsing, drying, and polishing) are the same as described for the Nickel Acetate Method.
The core plating reaction of this method is the same as for the Nickel Acetate Method:
Ni²⁺ + 2e⁻ → Ni
The two methods differ in how nickel ions are introduced into the solution, how the bath chemistry is controlled, and how the solution is maintained and replenished. Both can produce excellent nickel plating, but they vary in chemistry, operating conditions, performance characteristics, ease of use, and suitability for different applications.
The Nickel Sulfate Method uses nickel sulfate as the primary source of nickel ions. Nickel chloride is added to improve anode dissolution and solution conductivity, and boric acid is used as a pH buffer. Brightening additives, notably saccharin, are also included to enhance the finish. This solution is more acidic than the Nickel Acetate bath, with a typical operating pH of 3.5–4.5. It is also operated at higher temperatures (115–140 °F / 46–60 °C) and can support higher current densities.
The Nickel Sulfate Method produces the highest-quality plating directly from the tank, but the solution is significantly more expensive to set up and maintain, and the process requires more effort and attention than the Nickel Acetate Method.
Advantages
Produces denser, more uniform, and brighter plated surfaces directly from the tank.
Offers better throwing power, with improved coverage in recessed areas and fine details.
Provides better leveling of superficial scratches and minor surface imperfections.
Creates a harder deposit that performs better on functional surfaces subject to friction.
Disadvantages
Requires purchase of a pre-made commercial kit or industrial-grade chemicals, resulting in much higher upfront costs.
Demands more setup, monitoring, and ongoing maintenance, including more frequent checks of pH, temperature, and filtration.
Has stronger acid that requires extra handling precautions and safety considerations.
Is less practical for occasional or small-scale plating projects due to the added complexity and expense, but is more economical at higher volumes.
In addition to the common items needed for nickel plating listed above, you also need these items for this method, depending on which of the three options you choose.
1. Chemical Recipe Option (Mix Your Own 1.5-Gallon Bath):
Nickel Sulfate Hexahydrate: 60 oz / 1,700 g (purchase 4 × 500 g packages, ~$200)
Nickel Chloride Hexahydrate: 12 oz / 340 g (purchase 500 g, ~$55)
Boric Acid: 9 oz / 255 g (purchase 1 lb, ~$16)
Sodium Saccharin Dihydrate (brightener): 8 g to start (adjust conservatively) (purchase 8 oz, ~$30)
Total cost for chemicals: Approximately $300.
This option gives you full control over the bath but requires more time and effort to source, mix and maintain the solution.
2. Complete Caswell Kit Option:
Caswell offers complete Nickel Electroplating Kits that include pre-mixed chemicals:
1.5-gallon kit: ~$350
4.5-gallon kit: ~$540
These kits also include a filter/agitation pump, degreaser, and wide but shallow plating buckets. You will still need to purchase a power supply and tank heater separately to use these kits.
Important considerations:
The included degreaser is not required if you follow my surface preparation instructions in this and the previous tutorial.
The shallow buckets have length limitations (5” for the 1.5-gallon kit and 9” for the 4.5-gallon kit). These lengths are too short for many common tool parts. The tall narrow tank I recommend can plate parts up to 11” long using only 1.5 gallons of solution.
The supplied filter/agitation pump is designed for wide buckets and is too bulky for the tall narrow tank I recommend.
If you purchase a Caswell kit, read their plating manual carefully, as their operating instructions are different from this tutorial. Caswell products are high quality, however, and their technical support is excellent.
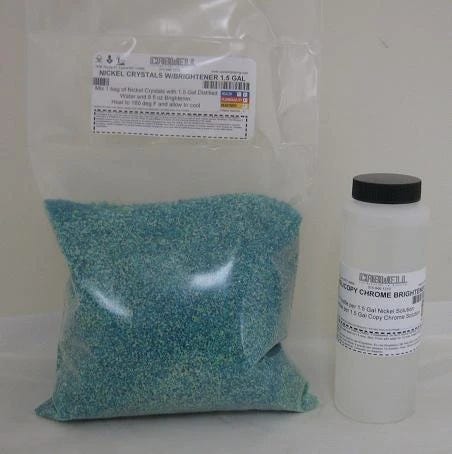
3. Caswell Pre-Mixed Chemicals Option (Recommended):
This is the most cost-effective and convenient option for most users:
Nickel crystals with brightener (1.5-gallon size): ~$88
Nickel crystals with brightener (10-gallon size): ~$289
This option includes all the chemicals you need to prepare the solution. The 10-gallon package offers the best value by far, providing enough material for six full 1.5-gallon tank fills plus replenishments, or two complete fills with a larger 5-gallon tank, at a much lower cost per gallon than buying individual chemicals or a complete kit.
Using the Chemical Recipe Option
Heat approximately 1 gallon (3.8 L) of distilled water to 140 °F (60 °C) in a clean plastic container.
Add the boric acid and stir until mostly dissolved.
Slowly add the nickel sulfate hexahydrate while stirring continuously.
Add the nickel chloride hexahydrate and stir until all chemicals are fully dissolved.
Top up with distilled water to exactly 1.5 gallons (5.7 L).
Dissolve the sodium saccharin (8 g) in a small amount of warm distilled water, then stir it into the bath.
Check the pH and adjust to 3.8–4.5 if needed (4.0 ± 0.2 is ideal).
To lower pH: Add 10% sulfuric acid one tablespoon at a time. Stir, wait a few minutes, and recheck.
To raise pH: Add nickel carbonate powder one tablespoon at a time. Stir, wait a few minutes, and recheck.
Filter the solution through multiple layers of paper coffee filters or a 5-micron polypropylene filter until it is crystal clear. Allow the solution to equilibrate for several hours before use.
Using Caswell Pre-Mixed Chemicals
Heat 1.5 gallons of distilled water in a clean plastic tank to approximately 160 °F.
Add the full 1.5-gallon bag (or 3 lbs) of Nickel Crystals to the heated water. Stir until completely dissolved.
Add 8 fl oz of Caswell brightener and stir thoroughly.
Check the pH and adjust to 3.8–4.5 if needed (4.0 ± 0.2 is ideal).
To lower pH: Add 10% sulfuric acid one tablespoon at a time. Stir, wait a few minutes, and recheck.
To raise pH: Add nickel carbonate powder one tablespoon at a time. Stir, wait a few minutes, and recheck.
Filter the solution through multiple layers of paper coffee filters or a 5-micron polypropylene filter until it is crystal clear. Allow the solution to equilibrate for several hours before use.
For best results, heat the solution to 120–130 °F (49–54 °C) and maintain that temperature throughout the plating process. Before starting, always replenish evaporation and drag-out losses with distilled water to the fill line, check the pH and adjust if needed, and filter the solution if it is cloudy or when solids appear on the tank bottom. Use the same pure nickel anodes, anode harness, and part hanging brackets recommended for the Nickel Acetate Method.
Before placing parts in the tank, estimate the appropriate current using the Caswell surface area calculator and Caswell amperage calculator. A good starting point for the this method is roughly 1 amp per 16 square inches of surface area. For average hand-tool parts plated in the tank I recommend, this usually works out to approximately 2–3 amps. Always start conservatively, especially with fresh solution or unfamiliar parts, and fine-tune the current based on what you observe during plating.
At the correct amperage you should see a steady stream of fine, champagne-like bubbles rising gently from the parts. The bubbles should never look frothy, turbulent, large, or like boiling water. Reduce the current if the bath shows excessive bubbling.
Use the same agitation methods described for the Nickel Acetate Method. Good agitation is especially important at the higher operating temperatures of this method. If you are working with a larger volume of solution in a wide tank, an immersion filter and agitation pump is highly recommended.
Because nickel sulfate solution has higher conductivity than nickel acetate solution, plating occurs much faster. As a general guideline, plate most parts for 30–45 minutes for good appearance and corrosion resistance. For small functional parts with close tolerances (such as screws or plane fence rods), limit plating time to about 15 minutes to avoid excessive buildup that could interfere with threads or sliding fits.
Expect plating quality to decline over time as bath chemistry changes from drag-out, evaporation, anode dissolution, and contamination. Follow these steps to maintain and restore solution quality, and replace the solution when it no longer produces consistent top-quality results.
Boric acid (buffer): If parts show burning, scorching, frosty or rough texture, pitting, cracking, or poor leveling, add 1 ounce of boric acid per gallon. Pre-dissolve it in a small volume of hot distilled water, add to the warm, agitated bath, and recheck pH after allowing the solution a short time to equilibrate.
Brightener: If plating becomes dull, add 1 ounce of Caswell Brightener Additive. Add conservatively, since excess brightener can cause brittle plating.
Carbon treatment: If dull or rough plating persists after filtration and maintenance, add activated carbon to the filter and re-filter the bath. After carbon treatment, add 2 ounces of Caswell Brightener Additive, mix thoroughly, and plate a properly prepared steel test piece. Add more brightener only if needed.
Dummy plating: Periodically plate scrap steel at low current density to remove metallic impurities.
Properly used and maintained nickel sulfate solution should provide many months of high-quality plating.
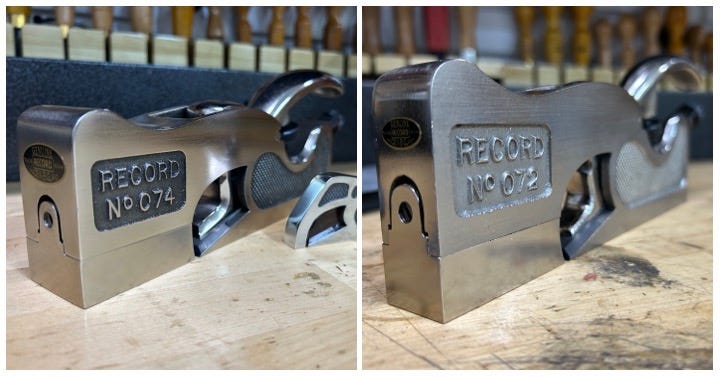
Electroless nickel plating uses a chemical reduction reaction that requires no electrical current to deposit a nickel-phosphorus alloy onto iron, steel, nickel, and previously nickel-plated surfaces. The reaction is autocatalyzed by the metal surface itself, so plating forms evenly on all surfaces of properly prepared parts, including complex geometries, recesses, threads, and internal features. The result is uniform plating with good hardness, brightness, and excellent corrosion resistance.
As with the other plating methods, the final appearance of electroless nickel depends mainly on surface preparation. A mirror-polished steel part will emerge from fresh solution with a bright, reflective nickel finish that can be buffed to a higher shine. For a brushed or grained finish, prepare the surface using the techniques described in the previous tutorial before plating, or brush the surface after plating if the result is shinier than you want.
The modern process of electroless nickel plating was developed by Abner Brenner and Grace Riddell at the U.S. National Bureau of Standards in 1946. Commercial development of their process followed in the 1950s and has been used industrially ever since as an alternative to electroplating.
In electroless nickel plating, nickel ions are reduced and co-deposited with phosphorus, forming a nickel-phosphorus (Ni-P) alloy rather than pure nickel. The phosphorus content of this plating deposit is typically between 5% and 9%.
The chemical reaction for electroless nickel plating is more complex than the nickel acetate and nickel sulfate electrolytic methods:
2 Ni²⁺ + 8 H₂PO₂⁻ + 2 H₂O → 2 Ni⁰(s) + 6 H₂PO₃⁻ + 2 H⁺ + 2 P(s) + 3 H₂(g)
Once a thin initial layer of nickel forms on the workpiece, that deposit continues to catalyze additional plating. This self-sustaining process is why it is called autocatalytic.
Because this process is purely chemical, it is highly sensitive to temperature, pH, nickel concentration, hypophosphite concentration, and the progressive buildup of reaction by-products. These variables make bath control much more demanding and solution life much shorter than electroplating solutions.
The additional safety requirements for this method are stricter than the minimum safety practices recommended for electroplating. The combination of open vessels, high temperatures, and airborne toxic chemicals creates simultaneous hazards with greater risks. Following these practices will substantially reduce those risks.
Personal Protective Equipment: Wear thick chemical-resistant gloves, a full face shield, a chemical-resistant apron or lab coat, closed-toe shoes, and long sleeves and pants. Wear a properly fitted respirator when working over a heated open pot. Keep an eyewash station or bottle of saline flush and a chemical spill kit within reach.
Ventilation and Mist Control: This process runs at approximately 185 °F, just below boiling, and generates mists and vapors containing nickel compounds. Always use the recommended mist-control balls to suppress surface evaporation and aerosols. Operate under an exhaust hood or arrange strong fans to move exhaust fumes outdoors and away from your breathing zone. Never use this method in a closed or poorly ventilated space.
Thermal and Splash Hazards: The high temperature and open metal pot used in this method create a higher burn and splash risk than other plating methods. Use only plastic or wooden tongs and tools to retrieve parts from the tank. Do not handle hot plated parts with bare hands or nitrile gloves. Immediately transfer plated parts into a distilled-water rinse to cool them. Never leave a heated bath unattended. After plating, allow the bath to cool completely before transferring it to a plastic storage container or covering it.
Chemical Hazards Specific to Electroless Nickel: Nickel compounds in the solution are known skin and respiratory sensitizers and are classified as possible carcinogens, particularly through inhalation of mists or dusts. Wash thoroughly after any contact and seek medical attention for persistent irritation or respiratory symptoms.
Work-Area Practices: Perform all mixing, heating, plating, and rinsing on a surface that can contain the entire volume of the bath in the event of a spill.
The greatest strength of this method is its ability to plate evenly on every surface the solution can reach, including deep recesses, threads, internal features, and complex shapes. The main disadvantages are the need to keep the solution temperature near boiling and the limited bath life of just three to four plating sessions.
Advantages
Produces completely uniform plating thickness and coverage on all surfaces, where electrolytic methods produce uneven thickness and coverage due to current density and shadowing effects.
Requires no power supply, anodes, or electrical connections other than the heating source.
Allows large numbers of small or irregularly shaped parts to be plated together in non-reactive baskets instead of connecting each part to a power source.
More reliably plates over existing nickel than electrolytic methods, since nickel itself is catalytic.
Disadvantages
Operates at a much higher temperature than the electrolytic methods, increasing burn risk and requiring strict temperature control.
Chemistry is significantly more complex and sensitive to temperature, pH, nickel concentration, hypophosphite level, and by-product buildup.
Bath life is limited to roughly three to four uses before the solution must be discarded and replaced.
Requires careful calculation of surface area for each part and multiple solution replenishments during each plating session.
Has the highest cost per part of all plating methods covered in this tutorial.
Deposits a nickel-phosphorus alloy rather than pure nickel. The deposit is harder but less ductile, so it is more prone to cracking from impact or flexing than electrolytic nickel.
Requires the most rigorous PPE and safety practices.
Demands the highest level of process control and continuous operator attention.
Requires a nickel strike before plating onto copper, brass, bronze, or other non-catalytic metals.
Caswell currently offers the best home-workshop scale electroless nickel plating products available. You can purchase a complete Caswell One-Plate® 1 kit with everything included, or buy the concentrate separately and acquire a few additional items yourself.
If you plan to plate large automotive or motorcycle parts, the full Caswell kit is a good option and includes everything you need. For the smaller scale and volumes required for vintage tool parts, I recommend buying the Caswell concentrate separately and also purchasing enamel pots and an immersion heater.
Caswell Complete Kit Option
The standard size Caswell One-Plate® 1 Electroless Nickel Kit (~$148 at https://caswellplating.com/one-plate-1-electroless-nickel-kit/) is a good starting point. It includes one quart of concentrate that makes approximately 1.6 gallons of working solution, along with other basic items. You should also purchase at least one extra quart of concentrate for replenishment. You will also need a supply of distilled water and an immersion heater.
Individual Items Option
These are the items I recommend for the most economical electroless plating experience. You will need the Caswell concentrate, several enamel containers in various sizes, an immersion heater, mist control balls, and a good supply of distilled water.
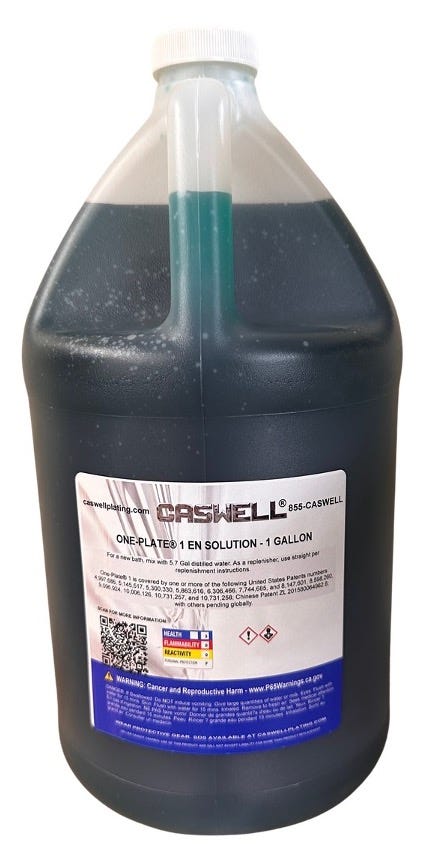
Caswell One-Plate® 1 Electroless Nickel Solution: Buy the 1-gallon size at ~$172 for the best value and repeated use. Or, just start with a quart if you want to try this out before making a larger investment.
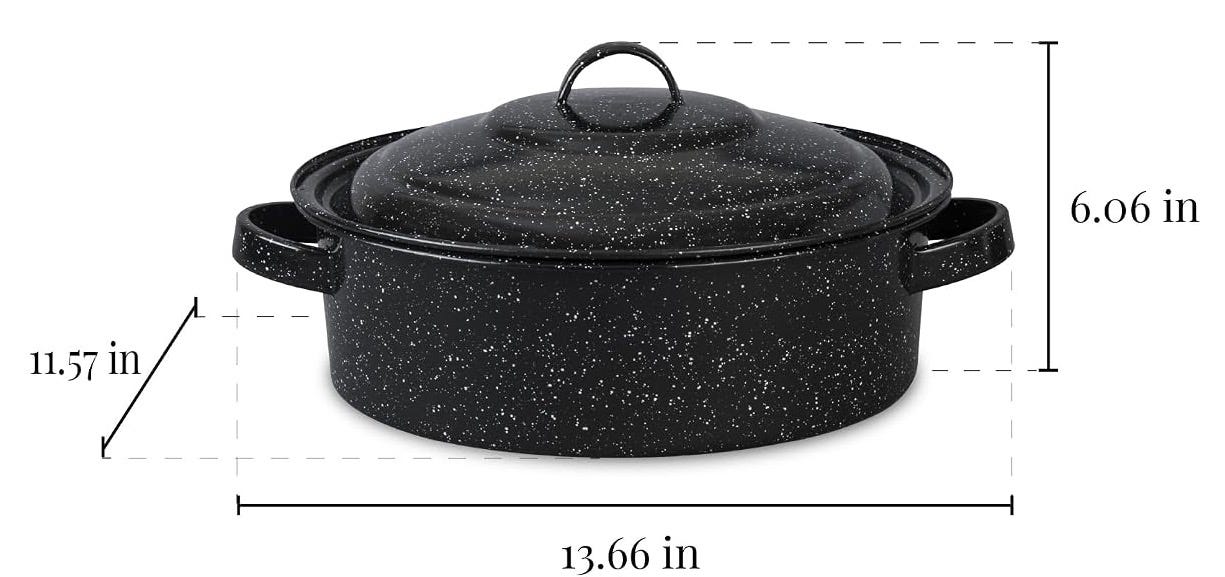
Enamel pots: Because the solution must be kept near boiling temperature during the entire plating process, I prefer using enamel or porcelain-coated metal containers rather than plastic containers or the reusable plastic bags supplied with the Caswell kit. Purchase a small assortment of enamel pots to match different solution volumes and part sizes. Parts are typically hung horizontally in these pots. This is a good set with three sizes, or try this deeper 5-quart pot for parts up to about 11”.
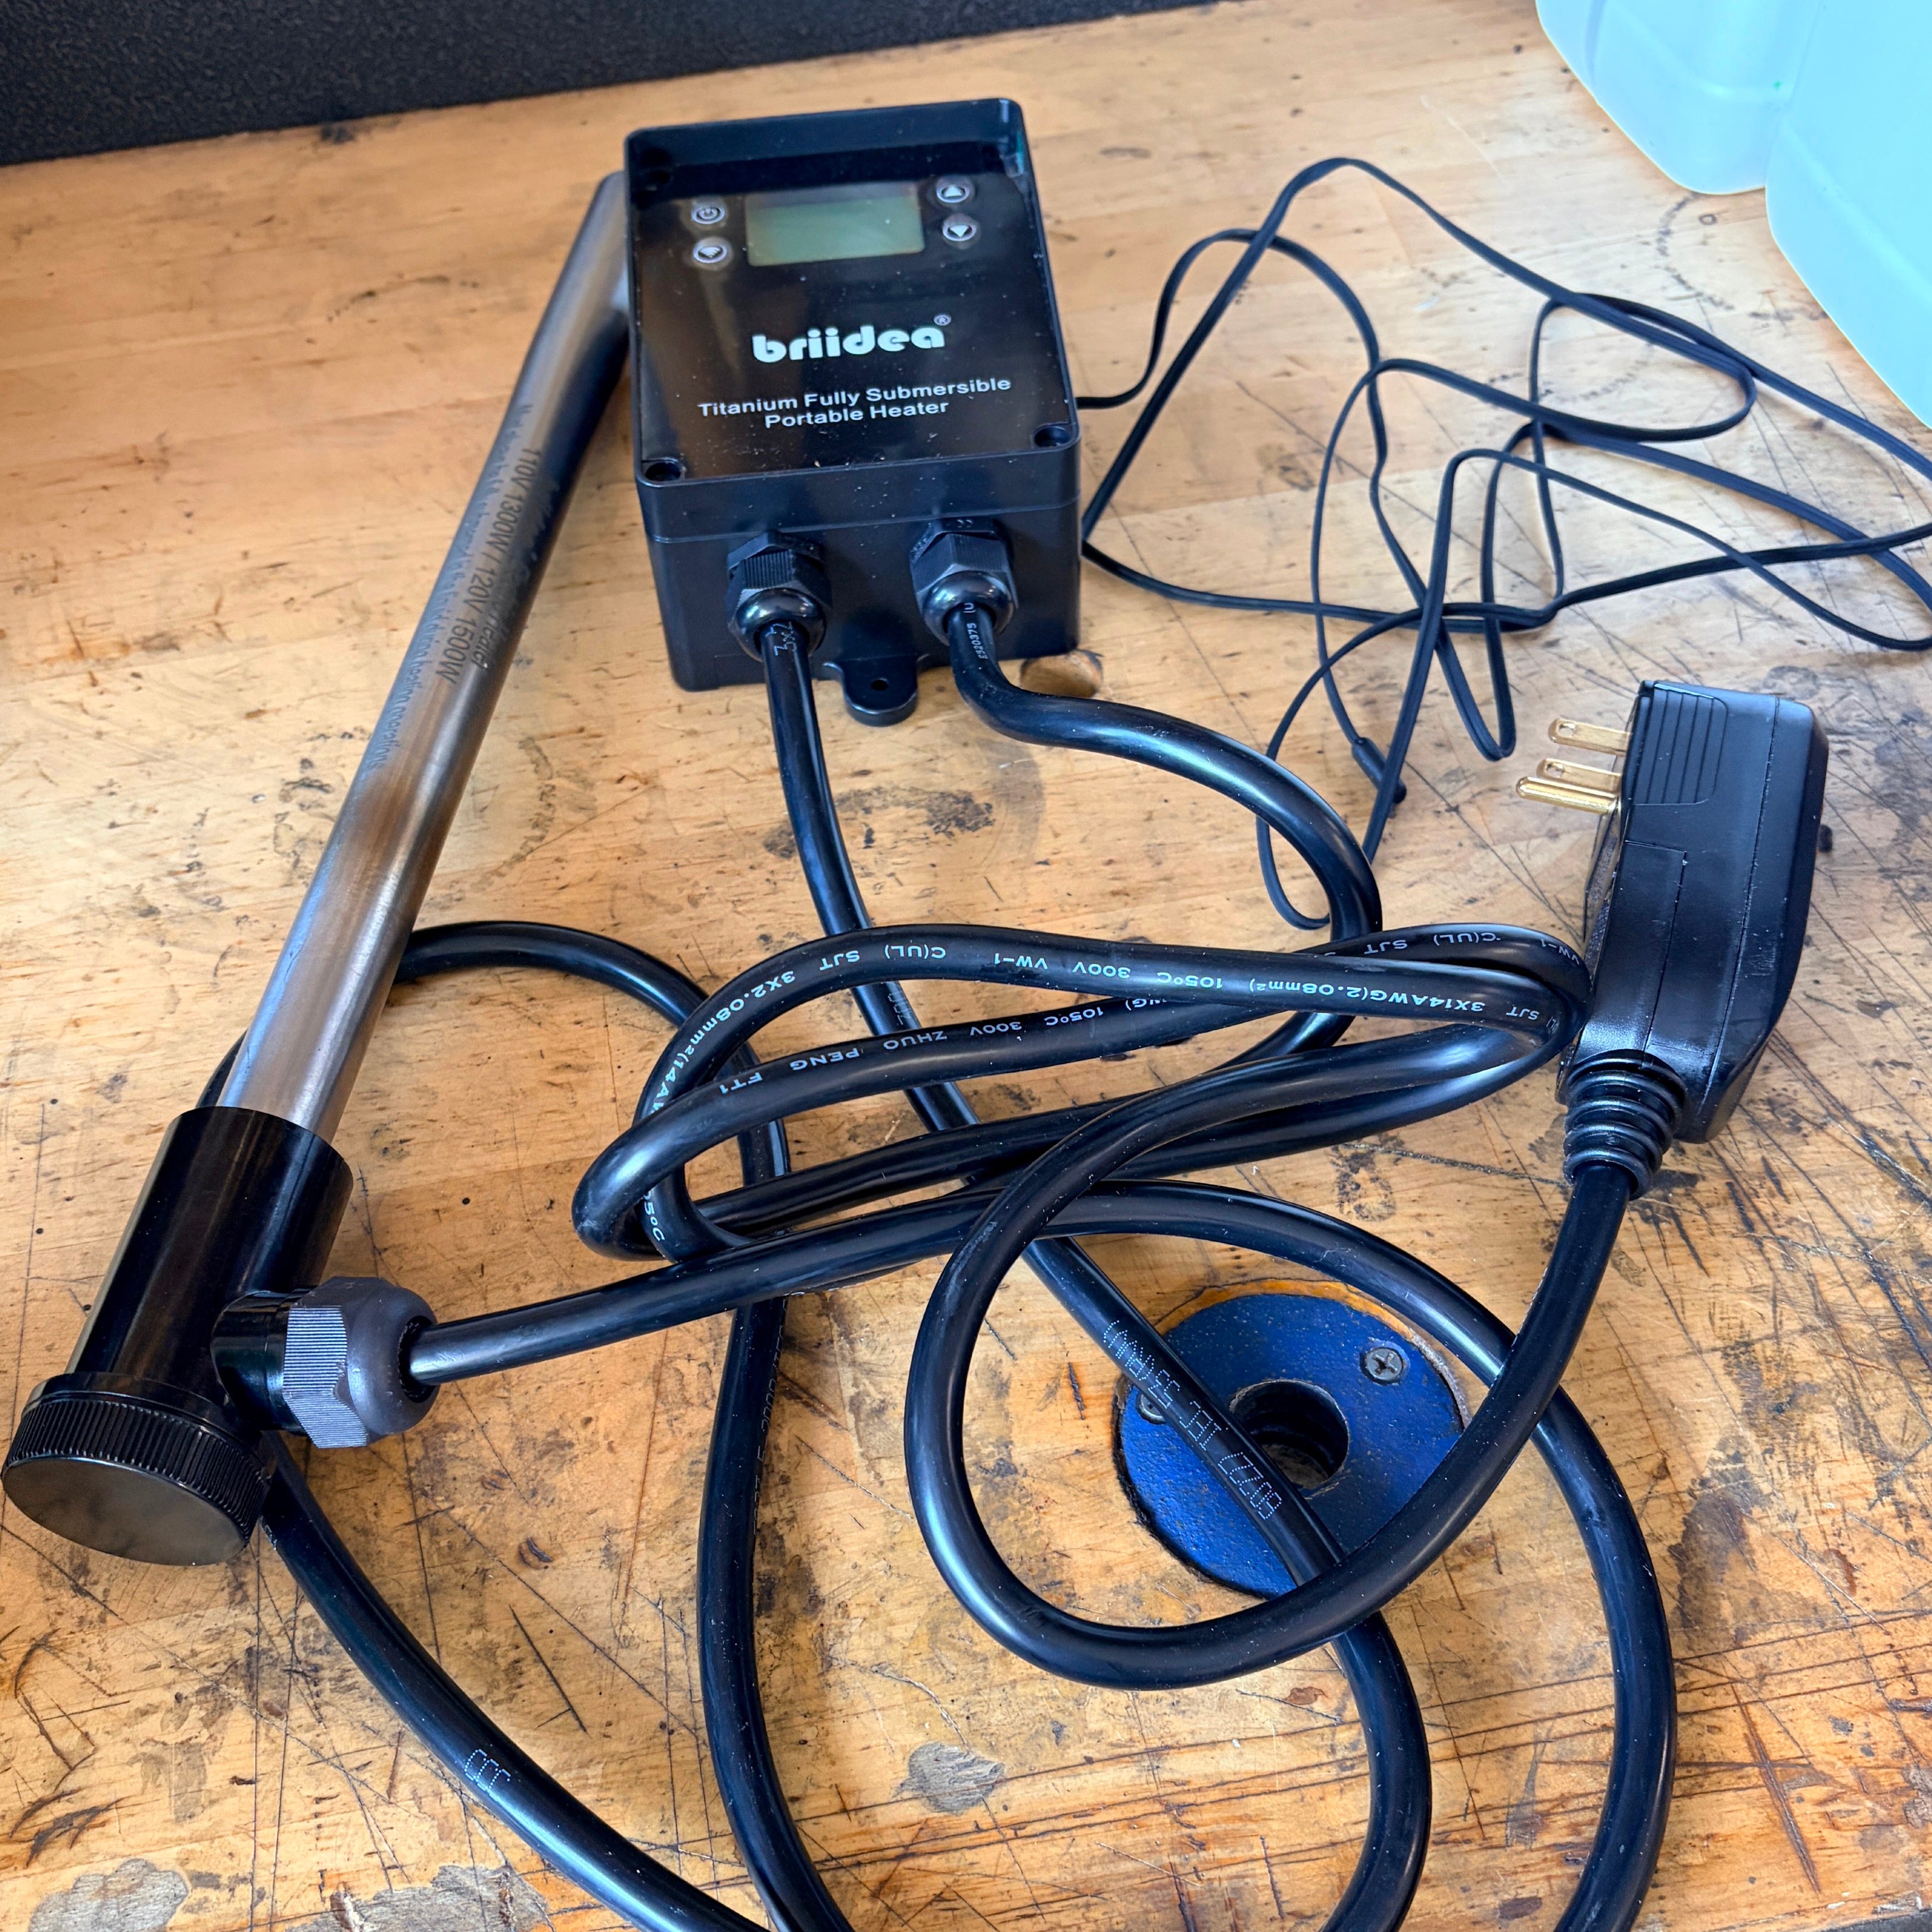
Immersion heater: With the wider pots used for this method, you can use indirect heating or an immersion heater directly in the solution. Choose a unit with temperature display and adjustable control that is suitable for chemical use. Get this good basic heater, or this high-quality industrial model. Alternatively, if you have a portable cooktop with precise temperature control, you can use that with the recommended enamel pots instead.
Mist control balls: These polyethylene balls float on the surface of the plating bath, and can reduce mist by as much as 70 percent, lowering evaporation and airborne vapor. Each pack supplies 25 one inch balls and covers about one square foot.

Distilled water: You will need a substantial amount for mixing the bath, rinsing parts, and replacing evaporation losses.
The total surface area of all parts in a single plating session must not exceed 87.5 square inches per gallon of working solution. Exceeding this limit significantly increases the risk of crashing the bath and ruining the solution.
Use these maximum plating surface areas for these common bath sizes:
4 quarts → 85 sq in
6 quarts → 130 sq in
8 quarts → 175 sq in
10 quarts → 220 sq in
12 quarts → 260 sq in
These numbers represent the combined surface area of every part in the load. When in doubt, stay below the listed maximum. You may safely place a smaller surface area into a larger volume of solution, but not the reverse.
Caswell specifies mixing One-Plate® 1 at a ratio of 15 parts concentrate to 85 parts distilled water by volume (approximately 15% concentrate).
Mix only the amount of solution needed for a specific tank and project. The most accurate way to prepare an exact volume is to weigh both the concentrate and the distilled water on a digital scale.
Use Weights to Mix Solution Volumes
A fluid ounce (fl oz) measures volume, while an ounce (oz) measures weight. Because liquids have different densities, 1 fl oz of concentrate does not weigh the same as 1 fl oz of water.
1 fl oz of Caswell One-Plate® 1 concentrate ≈ 1.25 oz by weight
1 fl oz of distilled water ≈ 1.04 oz by weight
Formula to Create Any Volume of Electroless Solution
Let V = desired final volume in gallons:
Concentrate volume (fl oz) = V × 0.15 × 128
Concentrate weight (oz) = concentrate volume (fl oz) × 1.25
Water volume (fl oz) = V × 0.85 × 128
Water weight (oz) = water volume (fl oz) × 1.04
Divide ounces by 16 to convert to pounds.
Example: Mixing 1.5 Gallons of Solution
Concentrate needed: Volume: 1.5 × 0.15 = 0.225 gallons = 28.8 fl oz Weight: 28.8 × 1.25 = 36 oz = 2.25 lb of concentrate
Distilled water needed: Volume: 1.5 × 0.85 = 1.275 gallons = 163.2 fl oz Weight: 163.2 × 1.04 = 169.7 oz ≈ 10.61 lb of distilled water
Weigh 2.25 lb of concentrate and 10.61 lb of distilled water. Combining these quantities produces 1.5 gallons of solution at the correct 15% concentration ratio.
This formula can be scaled up or down for any desired solution volume.
Mixing Procedure
Pour the distilled water into the tank first, then add the concentrate and stir thoroughly.
For individual tool parts, make a simple hanging support. Place a stick across the top of the container so it rests on the rim. Take any copper wire that can be separated into thin strands, cut two lengths, and tie one end of each strand to opposite ends of the part to be plated. Tie the free ends of the strands onto the stick to hold the part horizontally in the solution, fully immersed but clear of the tank bottom.
If you want to plate a quantity of small parts and screws, you can do so in several ways. Use a plastic cage made from material that will not melt or deform at 200 °F, or a polypropylene mesh bag that allows free solution flow during plating. Alternatively, place the small parts in a heat-resistant plastic bag with solution and heat the bag indirectly by immersing it in a vessel of water indirectly heated by an immersion heater.
When plating small parts this way, shake or agitate the container each time you replenish the solution so that all sides and contours of the parts are equally exposed to the solution during the plating cycle.
Heat the solution to 185°F (85°C) and maintain this temperature throughout the process. Do not exceed approximately 190°F.
Cover the solution surface with mist balls to help stabilize temperature and reduce evaporation, vapor, and mist during plating.
Once the solution is at temperature, carefully lower the parts into the solution using your selected brackets, cage, or bags. Ensure the parts are fully submerged in the solution and have free circulation around all surfaces.
You should begin to see gentle hydrogen gassing and bubbling as the plating reaction starts autocatalytically.
Check and adjust the heat source frequently during the process. Insulate the tank with blankets during cold weather if necessary.
Plate for the desired time and thickness:
~15 minutes → 0.25 mil. This produces a light, attractive, fully finished nickel surface. This thickness is recommended for threaded parts such as bolts, screws, and rods that need to slide through holes.
~30 minutes → 0.5 mil. This thickness is adequate for cosmetic, non-functional vintage tool parts.
~45 minutes → 0.75 mil. In my opinion, this is the best thickness for vintage tools and produces a durable, robust plating finish.
~60 minutes → 1.0 mil. This produces the heaviest-duty nickel coating and is recommended for functional tool surfaces that will encounter friction in use.
Monitor during plating:
Steady, gentle gassing of the solution is normal.
Keep parts fully immersed and separated so solution can flow freely between them.
Gently shake or disturb parts in bags and cages from time to time.
If gassing stops early or plating quality appears poor, recheck the temperature and verify your surface-area and concentrate-replenishment calculations.
In electrolytic nickel plating, nickel depleted from the solution is continuously replaced by dissolving anodes. Electroless nickel has no anodes, so nickel must be replenished manually throughout the plating cycle.
If the nickel concentration in the solution drops too low (Caswell specifies roughly the 80% level), the bath will “crash.” Once crashed, the solution is ruined and cannot be restored by adding more concentrate. Careful, timely replenishment is therefore essential.
Caswell’s official replenishment process uses a “checkbook balancing” approach based on “total area-time units”: approximately 1 pint (16 fl oz / 20 oz by weight) of One-Plate® 1 concentrate for every 100 square inches of surface area plated for 30 minutes (3,000 area-minutes per pint). After calculating the total surface area of the parts, the required concentrate is divided into smaller additions and added every 10–15 minutes.
I find that approach overly complicated, so I developed a simpler formula, which is mathematically identical and achieves the same replenishment requirements:
0.08 fl oz (0.10 oz by weight) of concentrate per 1 square inch of surface area, every 15 minutes.
My formula replenishes exactly the same amount of concentrate at correct intervals and produces the same plating results.
How to Calculate Replenishment Amounts
Determine the total surface area of the parts. Use Caswell’s surface-area calculator: https://caswellplating.com/surface.html. For complex or concave shapes, wrap the part tightly in aluminum foil, unwrap the foil, measure its length and width, enter those dimensions, select “plate both sides,” and calculate. This gives a reliable estimate of total surface area.
Weigh the concentrate on a digital scale set to ounces for the most accurate measurement. Formula: Concentrate (oz) = 0.10 × total surface area (sq in) This is the amount to add every 15 minutes. Example: 50 square inches of surface area 0.10 × 50 = 5.0 oz of concentrate every 15 minutes.
Replenishment Schedule
Add the first portion about 2 minutes after plating begins, once the reaction is underway.
Add the same portion again every 15-minutes during the plating process.
After adding each portion, gently move the parts or lightly swirl the solution to distribute the concentrate. Avoid vigorous agitation.
At the end of the plating session, if you plan to reuse the same bath, add one final replenishment portion to top it up for the next use.
At the end of the plating session, replace water lost to evaporation with distilled water to restore the original solution volume.
This steady replenishment approach will keep the nickel solution within the safe operating range, prevent crashing, and maximize the useful life of the bath.
Follow the same post-plating procedures described in the Common Processes and Techniques section to rinse, dry, oil, and polish your parts after electroless nickel plating.
The Caswell plating manual specifies that after 10 solution replenishments, the bath is spent and should be discarded and replaced with fresh solution. Based on my recommended replenishment process of one addition every 15 minutes, that makes bath life limited to approximately three full 45-minute plating sessions (with three replenishments per session).
To extract the maximum life from each batch, however, I usually aim for four full 45-minute sessions or their equivalent. The brightest, most reflective results will always come from the first plating session. Later sessions will produce progressively duller deposits, slower plating rates, and eventually rough, powdery, or dark plating accompanied by solution discoloration. Replenishment can modestly extend bath life, but waste by-products accumulate progressively during use. These by-products cannot be removed by ordinary filtration. Once contaminant levels become critical, the bath has irreversibly degraded and must be replaced.
Always plate your most important, most valuable, and most visible parts in the first session. Reserve later sessions for less critical or less visible items, or for parts where a dull or matte finish is acceptable. Dull plating can usually be improved to a mirror finish with white and purple compound on a bench buffer, but rough or dark plating cannot.
In addition to cost, the burden of ethical solution disposal motivates me to extract every possible use from each batch. Spent solution must never be poured down the drain. It belongs in a labeled waste container and must be taken to a hazardous-waste facility. Caswell publishes a neutralization procedure that uses household ammonia, steel wool, and roughly two hours of near-boiling treatment to render the bath non-toxic, but I (and many other users) find this process too tedious and prefer taking depleted solution to a hazardous-waste facility for proper disposal.
Because it has the shortest usable bath life, the highest cost per use, and the greatest hazardous-waste disposal burden of the home-scale plating methods, I use electroless plating less than any other process. While it can produce beautiful, durable nickel finishes, I only use it on parts with deep relief areas and other complex geometric features that will not plate evenly using electrolytic methods.
In addition to nickel plating iron and steel parts from scratch, there are special techniques you can use to repair small defects in existing plating and fill scratches and pits that are not practical to smooth with mechanical resurfacing before plating.
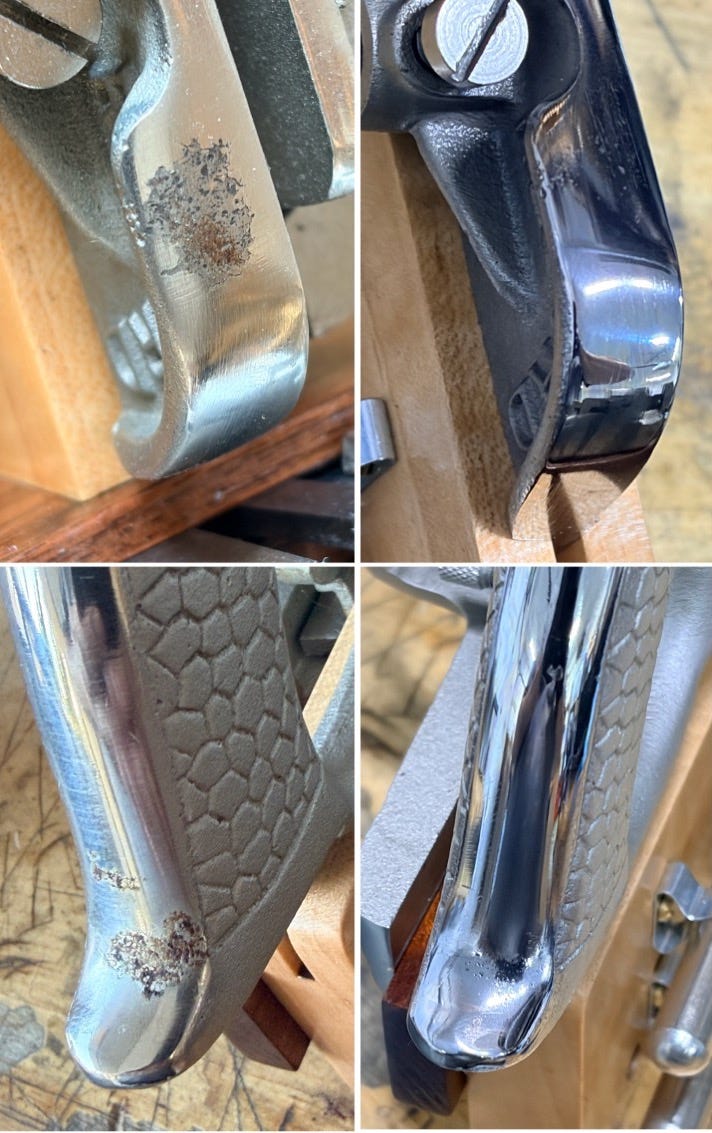
There are times when repairing or plating only a small area is more practical than stripping and re-nickel plating the entire part:
A small area of delamination, edge lift, or a black spot with adhesion failure appears after plating.
Inadequate throwing power leaves shadowed or incomplete plating in corners and relief areas.
Original nickel plating on a part is in excellent condition except for one or two small corrosion or flaking spots.
Very small parts, such as screw heads, that you would rather not run through a full plating process.
Brush plating allows you to deposit nickel exactly where it is needed on small areas of a part. It is especially useful for historic preservation when you want to leave the original plating, patina, and markings intact on the surrounding surfaces. It is also practical to use on components that cannot be removed from a larger tool, or for very small parts.
Brush plating should be viewed as a last-resort, localized repair method. The plating can appear patched and less uniform than tank plating when examined closely. Achieving smooth edge feathering and seamless blending requires skill and practice. Expect your results to improve as you develop experience with this technique.
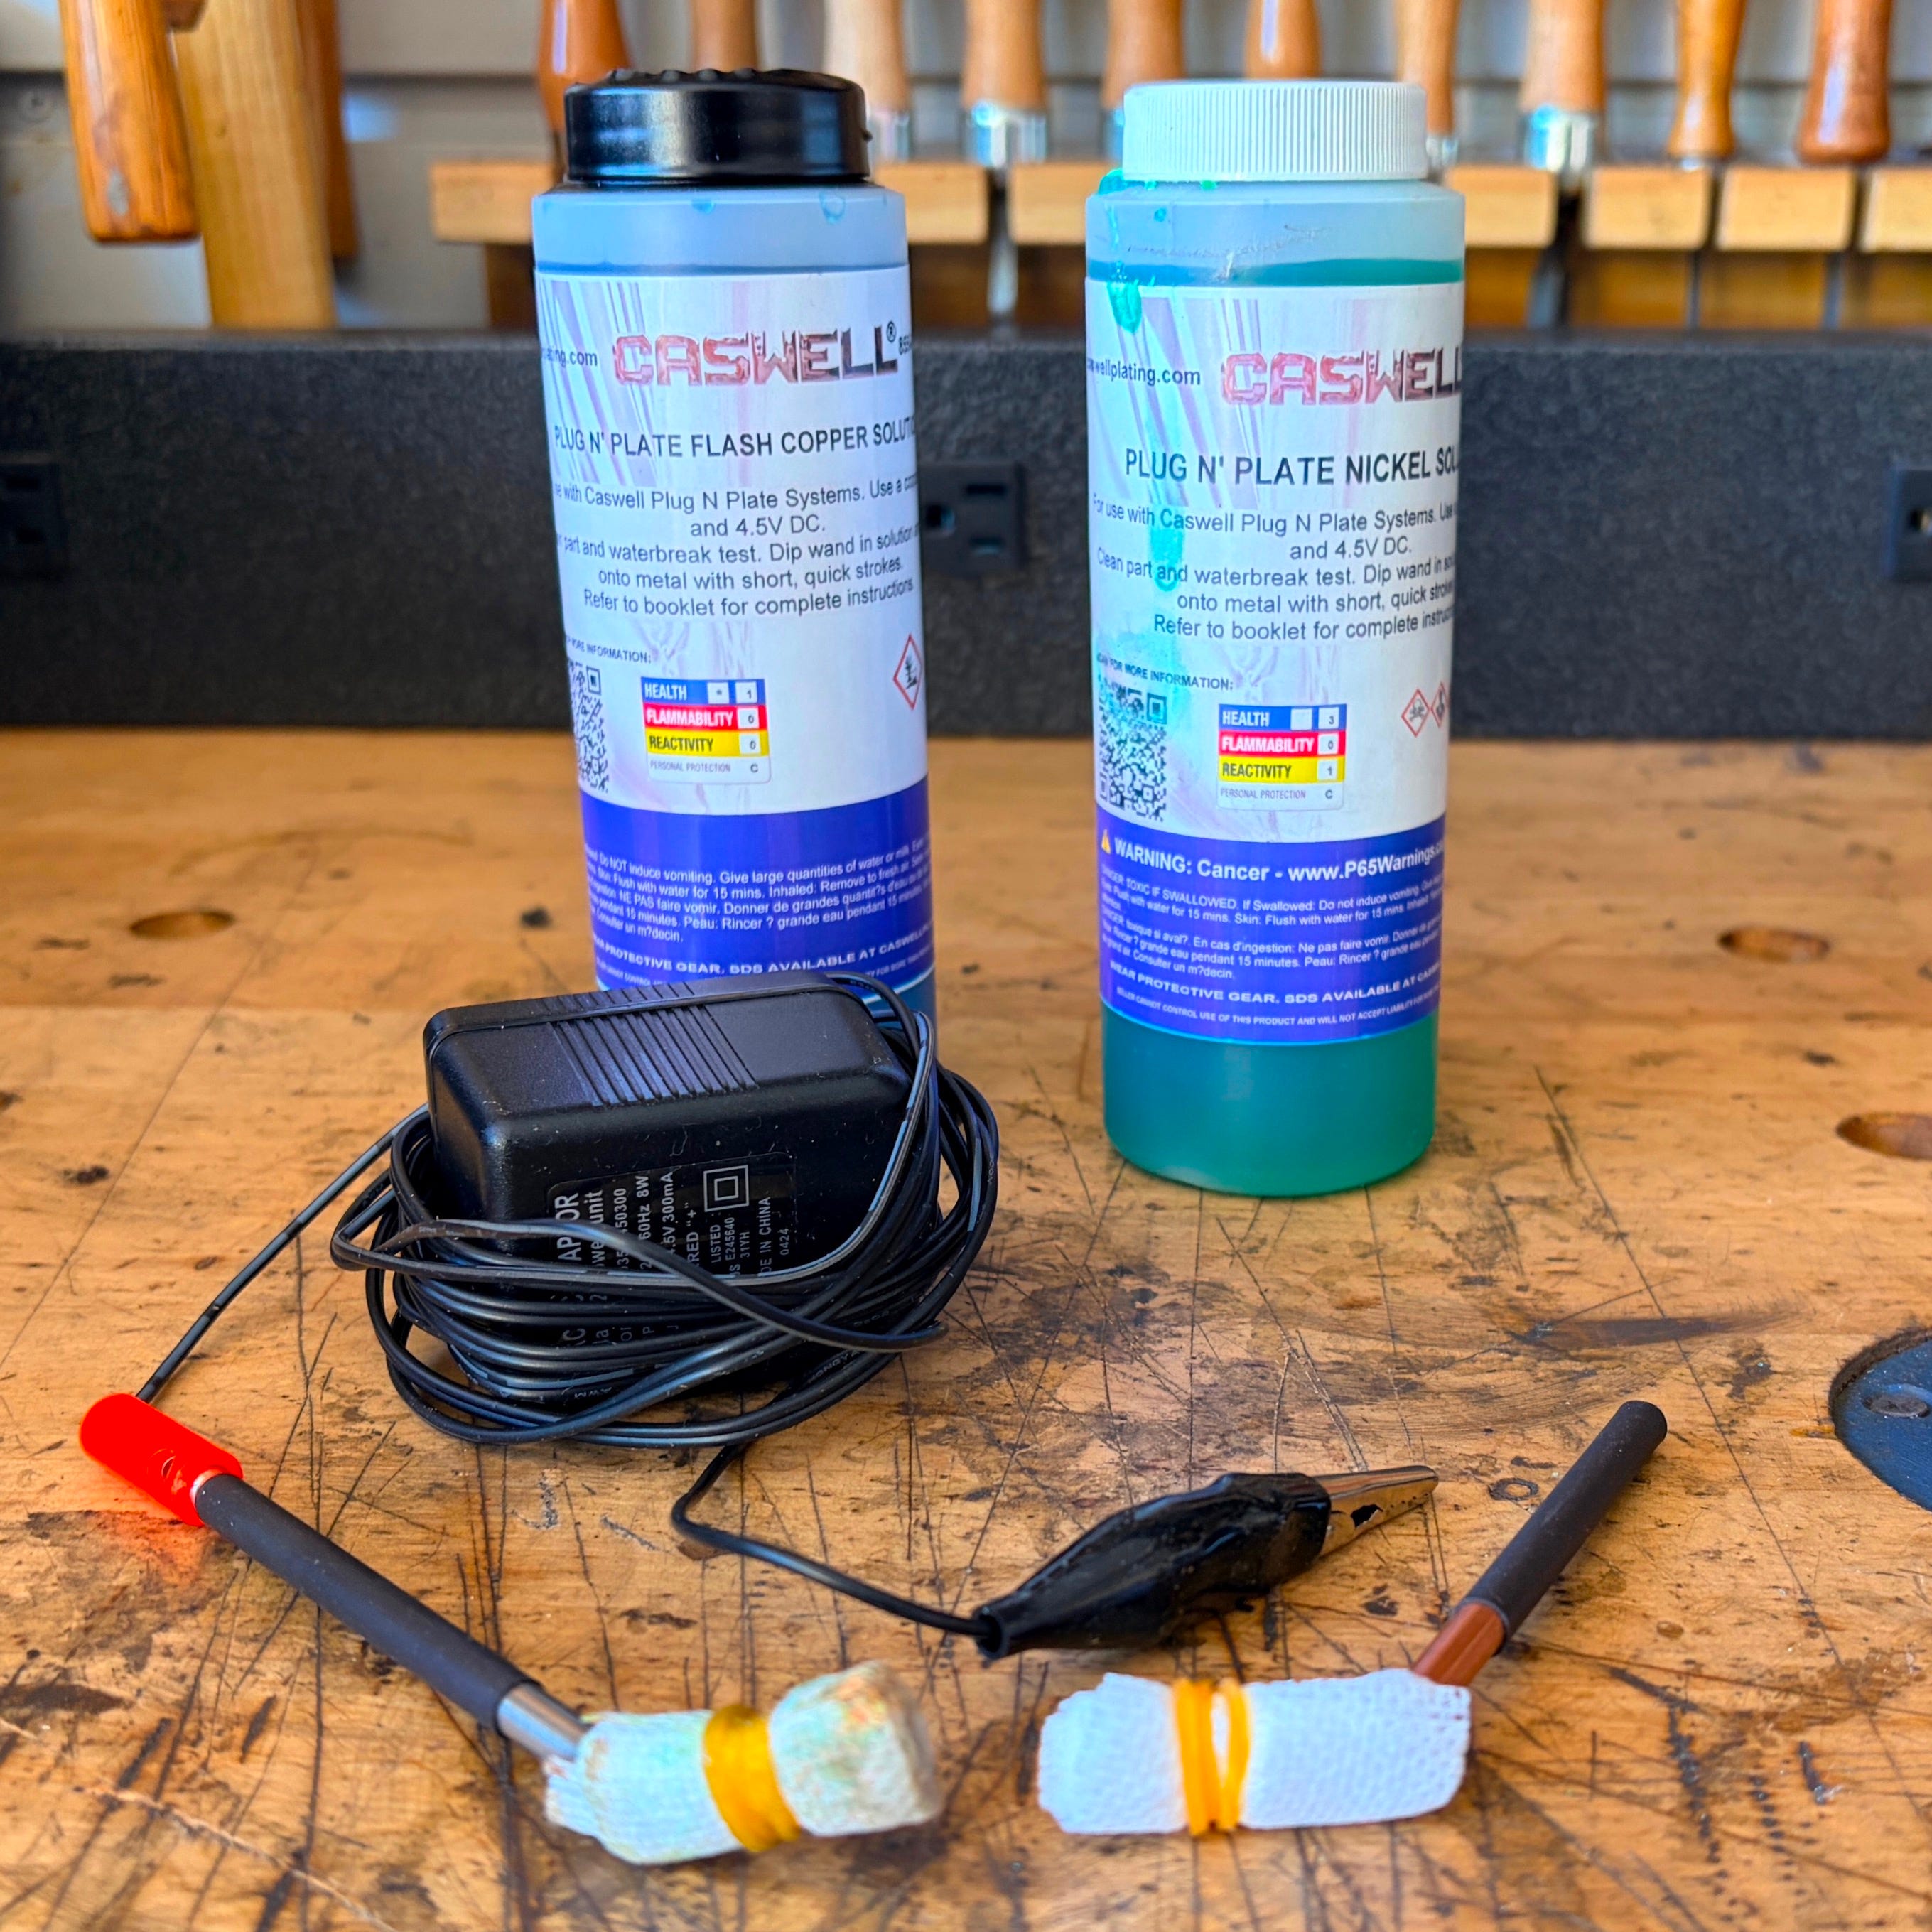
Caswell Plug N’ Plate Nickel/Flash Copper Kit (~$77): This kit includes most of what is needed to perform a substantial number of brush plating and spot repairs.
Caswell Fine, Dome and Angle Point Detailing Wands (~$18): These three specialized brush plating wands allow precise plating on fine details and in tight areas that the wider wand supplied with the kit cannot reach.
Caswell Brush Plating Bandages: (~$1): Purchase several at this price. The plating kit includes only one, and you will need to replace it multiple times before you use up all the brush plating solution. I do not know the exact material, but it performs better than ordinary gauze bandages.
Start by confirming that the plating defect you want to repair is limited to a small area and that the plating is not bubbling or flaking elsewhere on the part. If the damage is more extensive, replate the entire part instead.
Smooth and feather the damaged area with progressively finer abrasives, focusing carefully on the boundary between plated and bare metal. Hand held diamond abrasive sticks and successive grits of silicon carbide paper work best for precise control in small zones. Sand with even pressure in a uniform direction until the defective plating is gone and the edges are fully feathered, with no raised ridges that look like peeled paint. Continue smoothing to at least 800-grit paper, then polish the area to a mirror finish using black, white, and purple compounds. A die grinder or Dremel-style rotary tool with a felt buffing wheel is ideal for polishing small areas. When finished, the resurfaced zone should blend seamlessly into the surrounding surface, and both the plated and unplated metal should present a continuous texture and shine.
For shadowed, concave, or relief areas that received inadequate plating, or for small items such as screw heads, no mechanical preparation is required. Proceed directly to cleaning and pickling, then brush plating.
Clean the brush plating area to laboratory standards and confirm cleanliness with the water-break test. Do not use acetone, alcohol, or lacquer thinner, as these solvents evaporate too quickly and can leave residue that prevents a water-break clean surface. After a successful water-break test, brush the area with pickling solution to activate the surface. Rinse thoroughly with distilled water to neutralize the pickle. The surface is now ready for brush plating.
The recommended Caswell Plug N’ Plate kit includes a stainless steel plating wand, cloth bandages for the wand tip, a bottle of nickel brush plating solution, a copper plating wand, a bottle of copper flash plating solution, and a power supply that connects to the wands and the workpiece.
Wand Setup
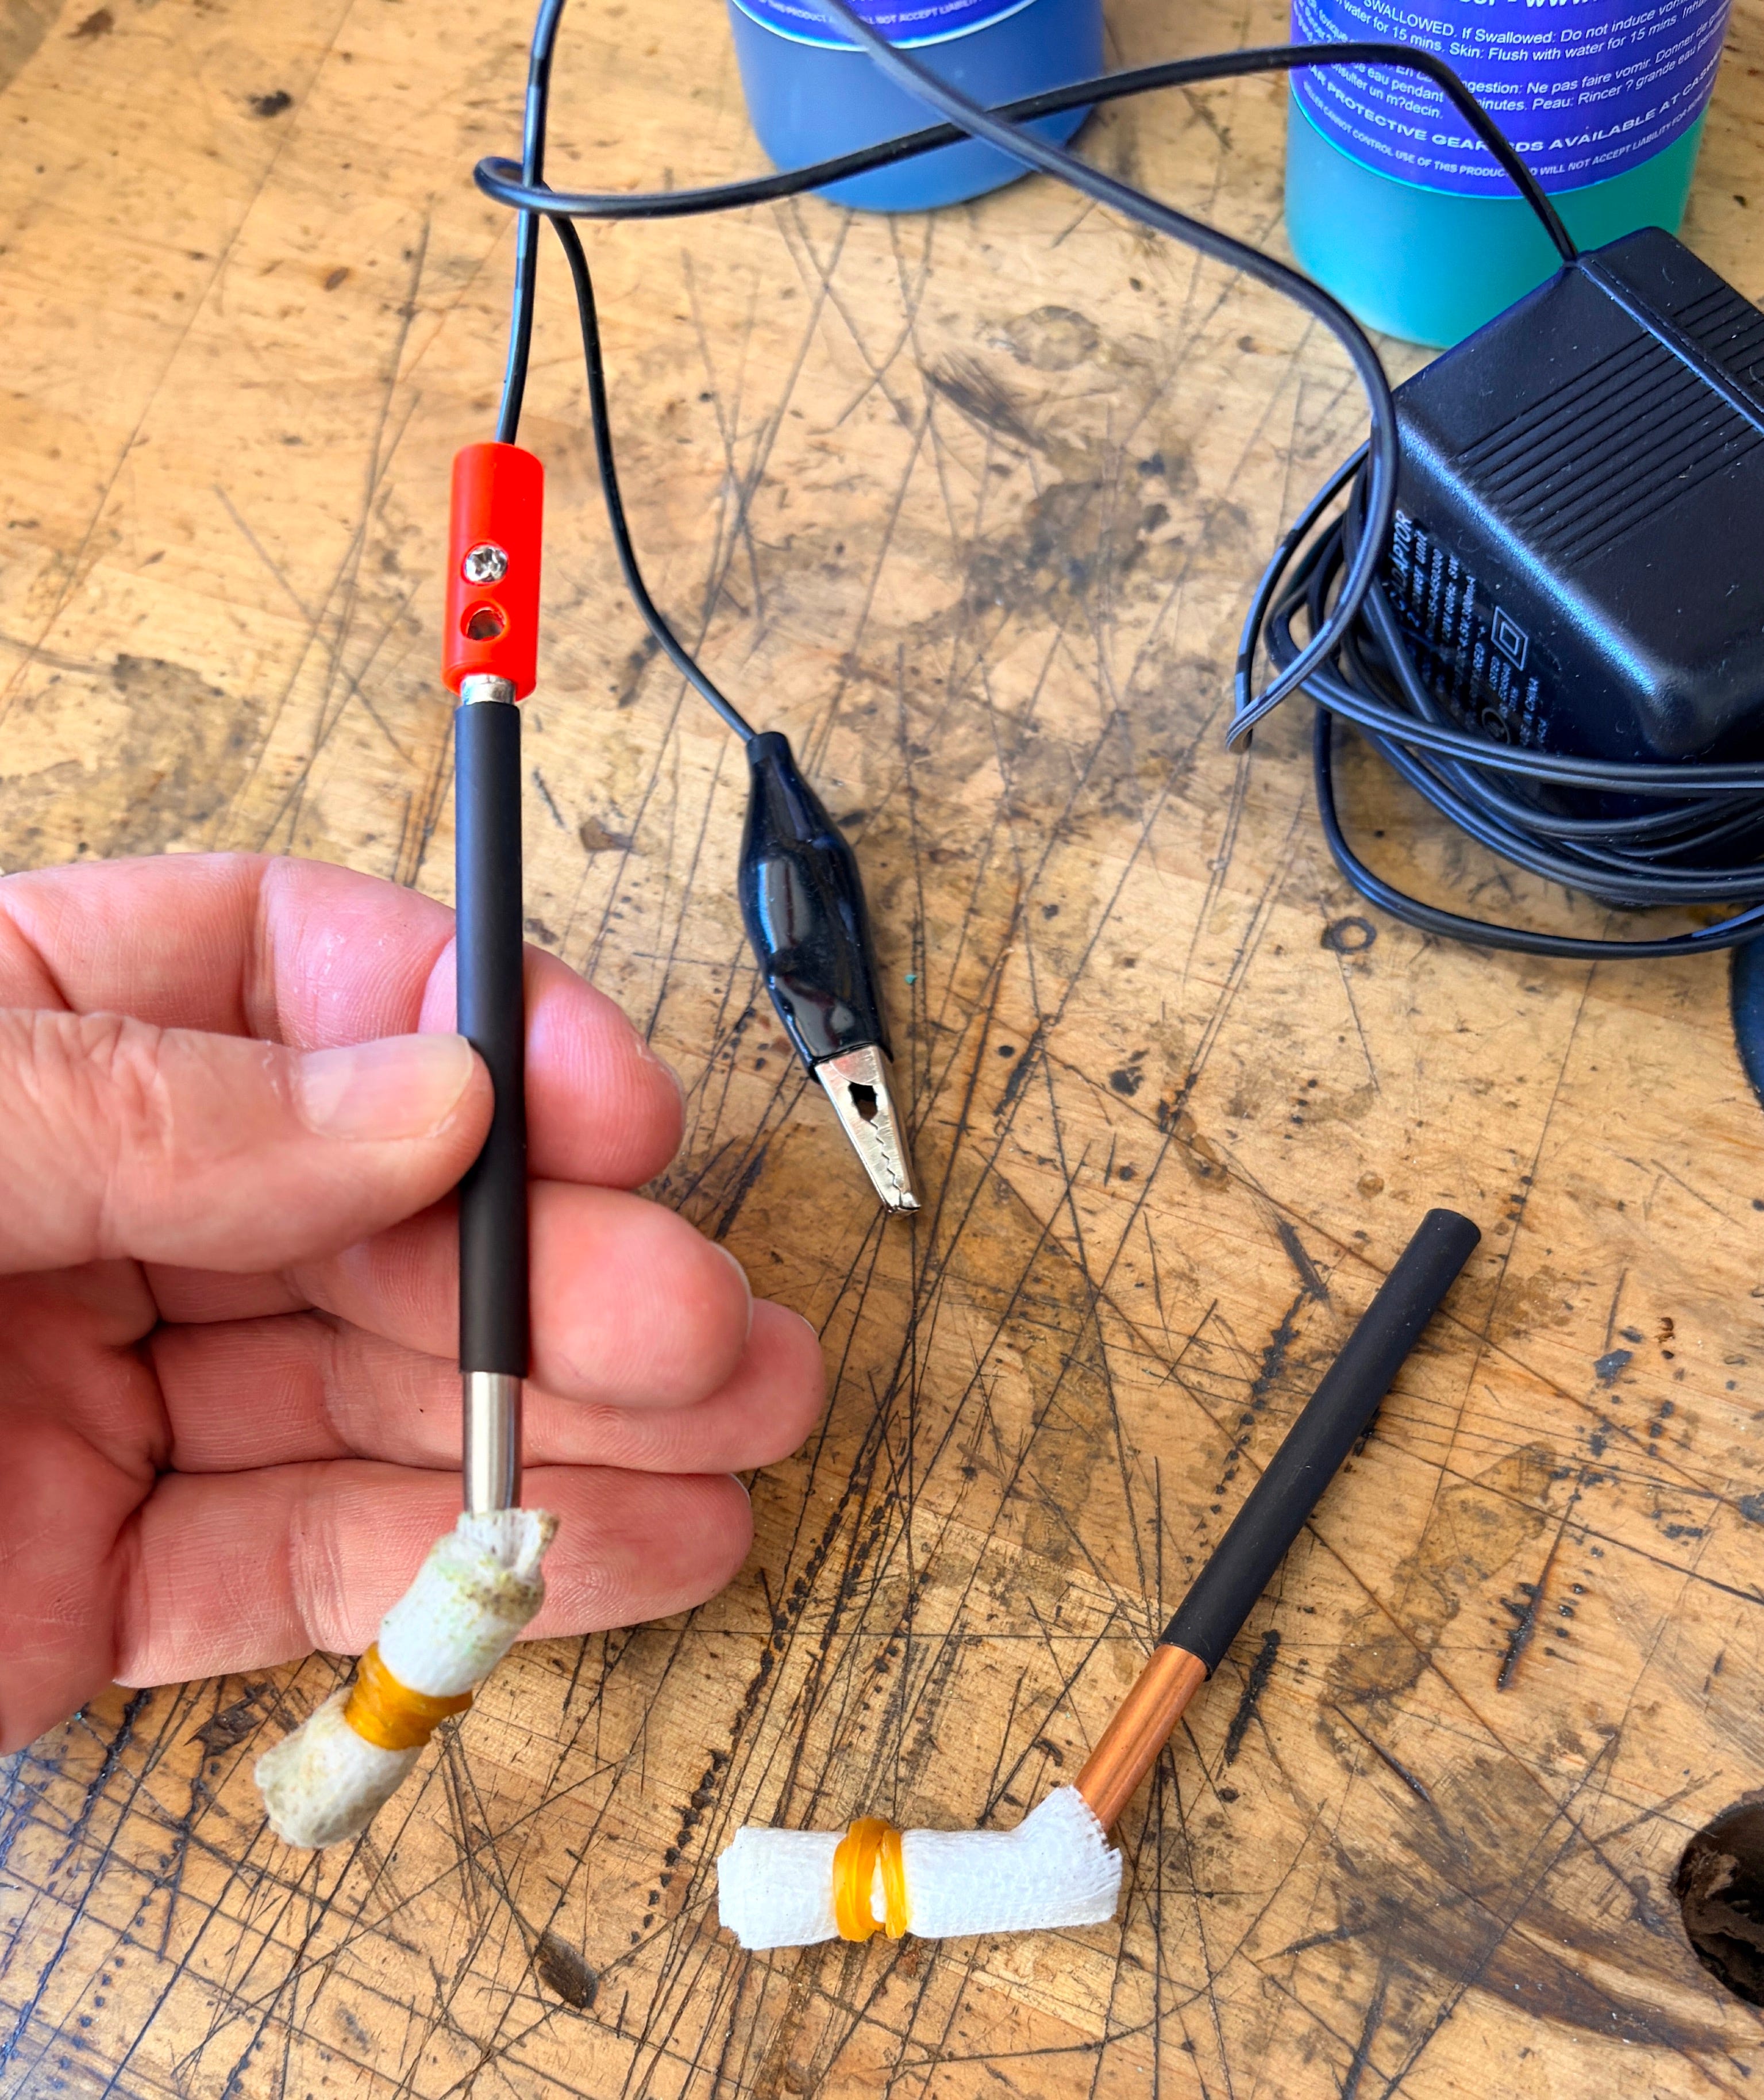
Use the full-width stainless steel wand to brush plate wider areas. Wrap and fold the cloth bandage around the blade so that no metal is exposed at the tip, then secure it with a rubber band. Do not wrap the bandage tightly; a looser wrap allows the plating solution to absorb more effectively and reach the blade tip.
Use the detailing wands with small nibs (fine, dome, and angle point) for fine details, narrow areas, and inside surfaces that the standard wand cannot reach. These detailing wands connect to the power supply the same way as the standard wands but do not require a cloth wrap.
Insert the banana plug on the positive (red) lead of the power supply into the end of a wand. If the connection feels loose, gently spread the leaves of the banana plug with a jeweler’s screwdriver until it seats snugly. Attach the negative (black) lead to the workpiece with the alligator clip.
Oxides will gradually build up on the wand blades during use and reduce conductivity. Periodically reactivate the contact areas on the blades with steel wool or fine silicon carbide paper.
Brush Plating Steps
Pour a small amount of Caswell Plug N’ Plate nickel solution into the screw-on cap of its bottle. Dip the end of the standard plating wand into the solution and allow it to soak for about 30 seconds before first use. For the detailing wands, dip the nib until it is fully soaked, then use them in the same manner as the standard wand.
Plug the power supply into a 110-volt GFCI-protected outlet. Keep the red and black leads from touching, since contact between them will short and may permanently damage the power supply. The voltage used in this process is not dangerous, but because you are handling electricity and conductive chemicals, wear nitrile or other non-conductive gloves to avoid becoming part of the circuit and interrupting the plating.
Brush the prepared area with short, fast, overlapping strokes. Keep the wand moving constantly. Pausing in one spot can cause burning, which can usually be buffed out but should still be avoided. Caswell recommends covering the full area at least twice, once with horizontal strokes and once with vertical strokes. I usually apply at least four overlapping coats, alternating the direction with each pass. Brush plating does not deposit plating as uniformly as tank electroplating, so continue with additional passes until you are satisfied with the coverage and appearance.
Expect to brush plate about one square inch per minute. The rate will slow as solution on the wand becomes depleted. Re-dip the wand into the solution in the cap as needed. Replace the cloth wrap when it turns black from oxide buildup.
If black streaks appear on the workpiece during plating, increase wand speed and apply slightly more pressure. A few additional passes will usually eliminate the discoloration. If not, the discoloration will most likely buff out.
Vintage tool makers sometimes applied a copper underlayer before nickel plating. Although the copper layer added corrosion resistance, adhesion, and leveling benefits, its primary production advantage was lower labor costs. Copper is much softer than nickel and can be buffed to a high shine much faster than iron or steel. Manufacturers could copper plate steel parts to fill surface defects, polish the copper to a high shine, and then apply a nickel topcoat to achieve a mirror finish at a much lower labor cost than smoothing and polishing the steel and then nickel plating the parts.
Special considerations apply when you strip old nickel plating and find a copper layer underneath. It is possible to strip residual copper, but there are only so many processes and containers of chemicals I am willing to store and manage. Instead of stripping the copper underplating, I usually proceed with my normal resurfacing and smoothing processes and then just nickel plate over the residual copper.
Fortunately, electrolytic nickel plates well on copper and copper alloys. If residual copper can be feathered smoothly into the surrounding surface with any distinct layer lines eliminated, there is no need to remove it before nickel plating.
Electroless nickel will not autocatalyze onto copper, brass, or bronze. If you want to use electroless plating over complete or residual copper, brass, or bronze coatings, first apply a short electrolytic nickel strike, using either the Acetate or Sulfate Method, for five to ten minutes. After the strike, activate the nickel surface with diluted hydrochloric acid.
To activate the nickel surface, dilute 31% hydrochloric acid with distilled water at a ratio of 1 part acid to 2 parts distilled water. Immerse the part in the diluted acid for 60–90 seconds, rinse it briefly in distilled water, and immediately transfer it into the electroless nickel bath so the surface does not re-oxidize. You should see normal gassing begin shortly after the activated part enters the electroless bath.
There are situations when it is worthwhile to apply a copper underlayer before nickel plating. Copper plating can level minor pitting and scratches on iron and steel without the need to perfectly smooth and polish the surface first. It can create a smooth, uniform substrate for the nickel layer resulting in a flawless, show-quality mirror finish. The copper-nickel combination also reduces the likelihood that the nickel plating will crack over time, because copper is more ductile than nickel.
Despite these advantages, copper underplating adds extra processing steps, expense, time, and labor. Based on extensive experience, I find that it usually takes less time to properly prepare and smooth an iron or steel surface than to perform the additional copper plating, intermediate polishing, and surface activation steps. Copper solution waste must also be disposed of at a hazardous-waste facility.
If you want to restore a nickel-plated part with significant shallow scratches or pitting that cannot be smoothed perfectly, there are two practical options for filling the imperfections with copper plating.
Caswell offers an alkalyne flash copper plating kit (~$265) that works directly on iron, steel, and stainless steel. It is convenient to use and produces excellent copper plating, but is relatively expensive for occasional use and requires additional storage space.
For a less expensive option, prepare a vinegar-based copper solution exactly as you would a nickel acetate solution, using distilled vinegar and pure salt, but substituting pure copper anodes for nickel anodes. Acidic copper solutions do not adhere well to steel or iron without a nickel strike. First activate the part using the same pickling process specified for nickel electroplating, then apply a nickel strike layer for at least five to ten minutes using either of the electrolytic nickel methods.
Activate the nickel strike layer with diluted hydrochloric acid using the process described above. Copper plate for about 30 minutes, then buff the surface to a high shine and inspect it. If surface defects are still visible, clean then re-activate the copper layer with diluted hydrochloric acid, replate with copper for another 10 to 30 minutes, polish with white and purple compound, and re-inspect. Repeat once more if needed. Once the copper surface is perfectly smooth, polished, clean and re-activated, nickel plate over it using either of the electrolytic nickel methods and complete the usual post-plating steps. The resulting copper-nickel layered finish should polish to a perfect, brilliant shine.
Deep pits, scratches, and other cavities that cannot be leveled by mechanical resurfacing or copper underplating can be filled with specialty solder products before nickel plating. When needed, include this step during initial surface preparation, prior to polishing and before plating. These techniques are covered here because they use the Caswell Plug N’ Plate Nickel/Flash Copper Kit recommended for brush plating.
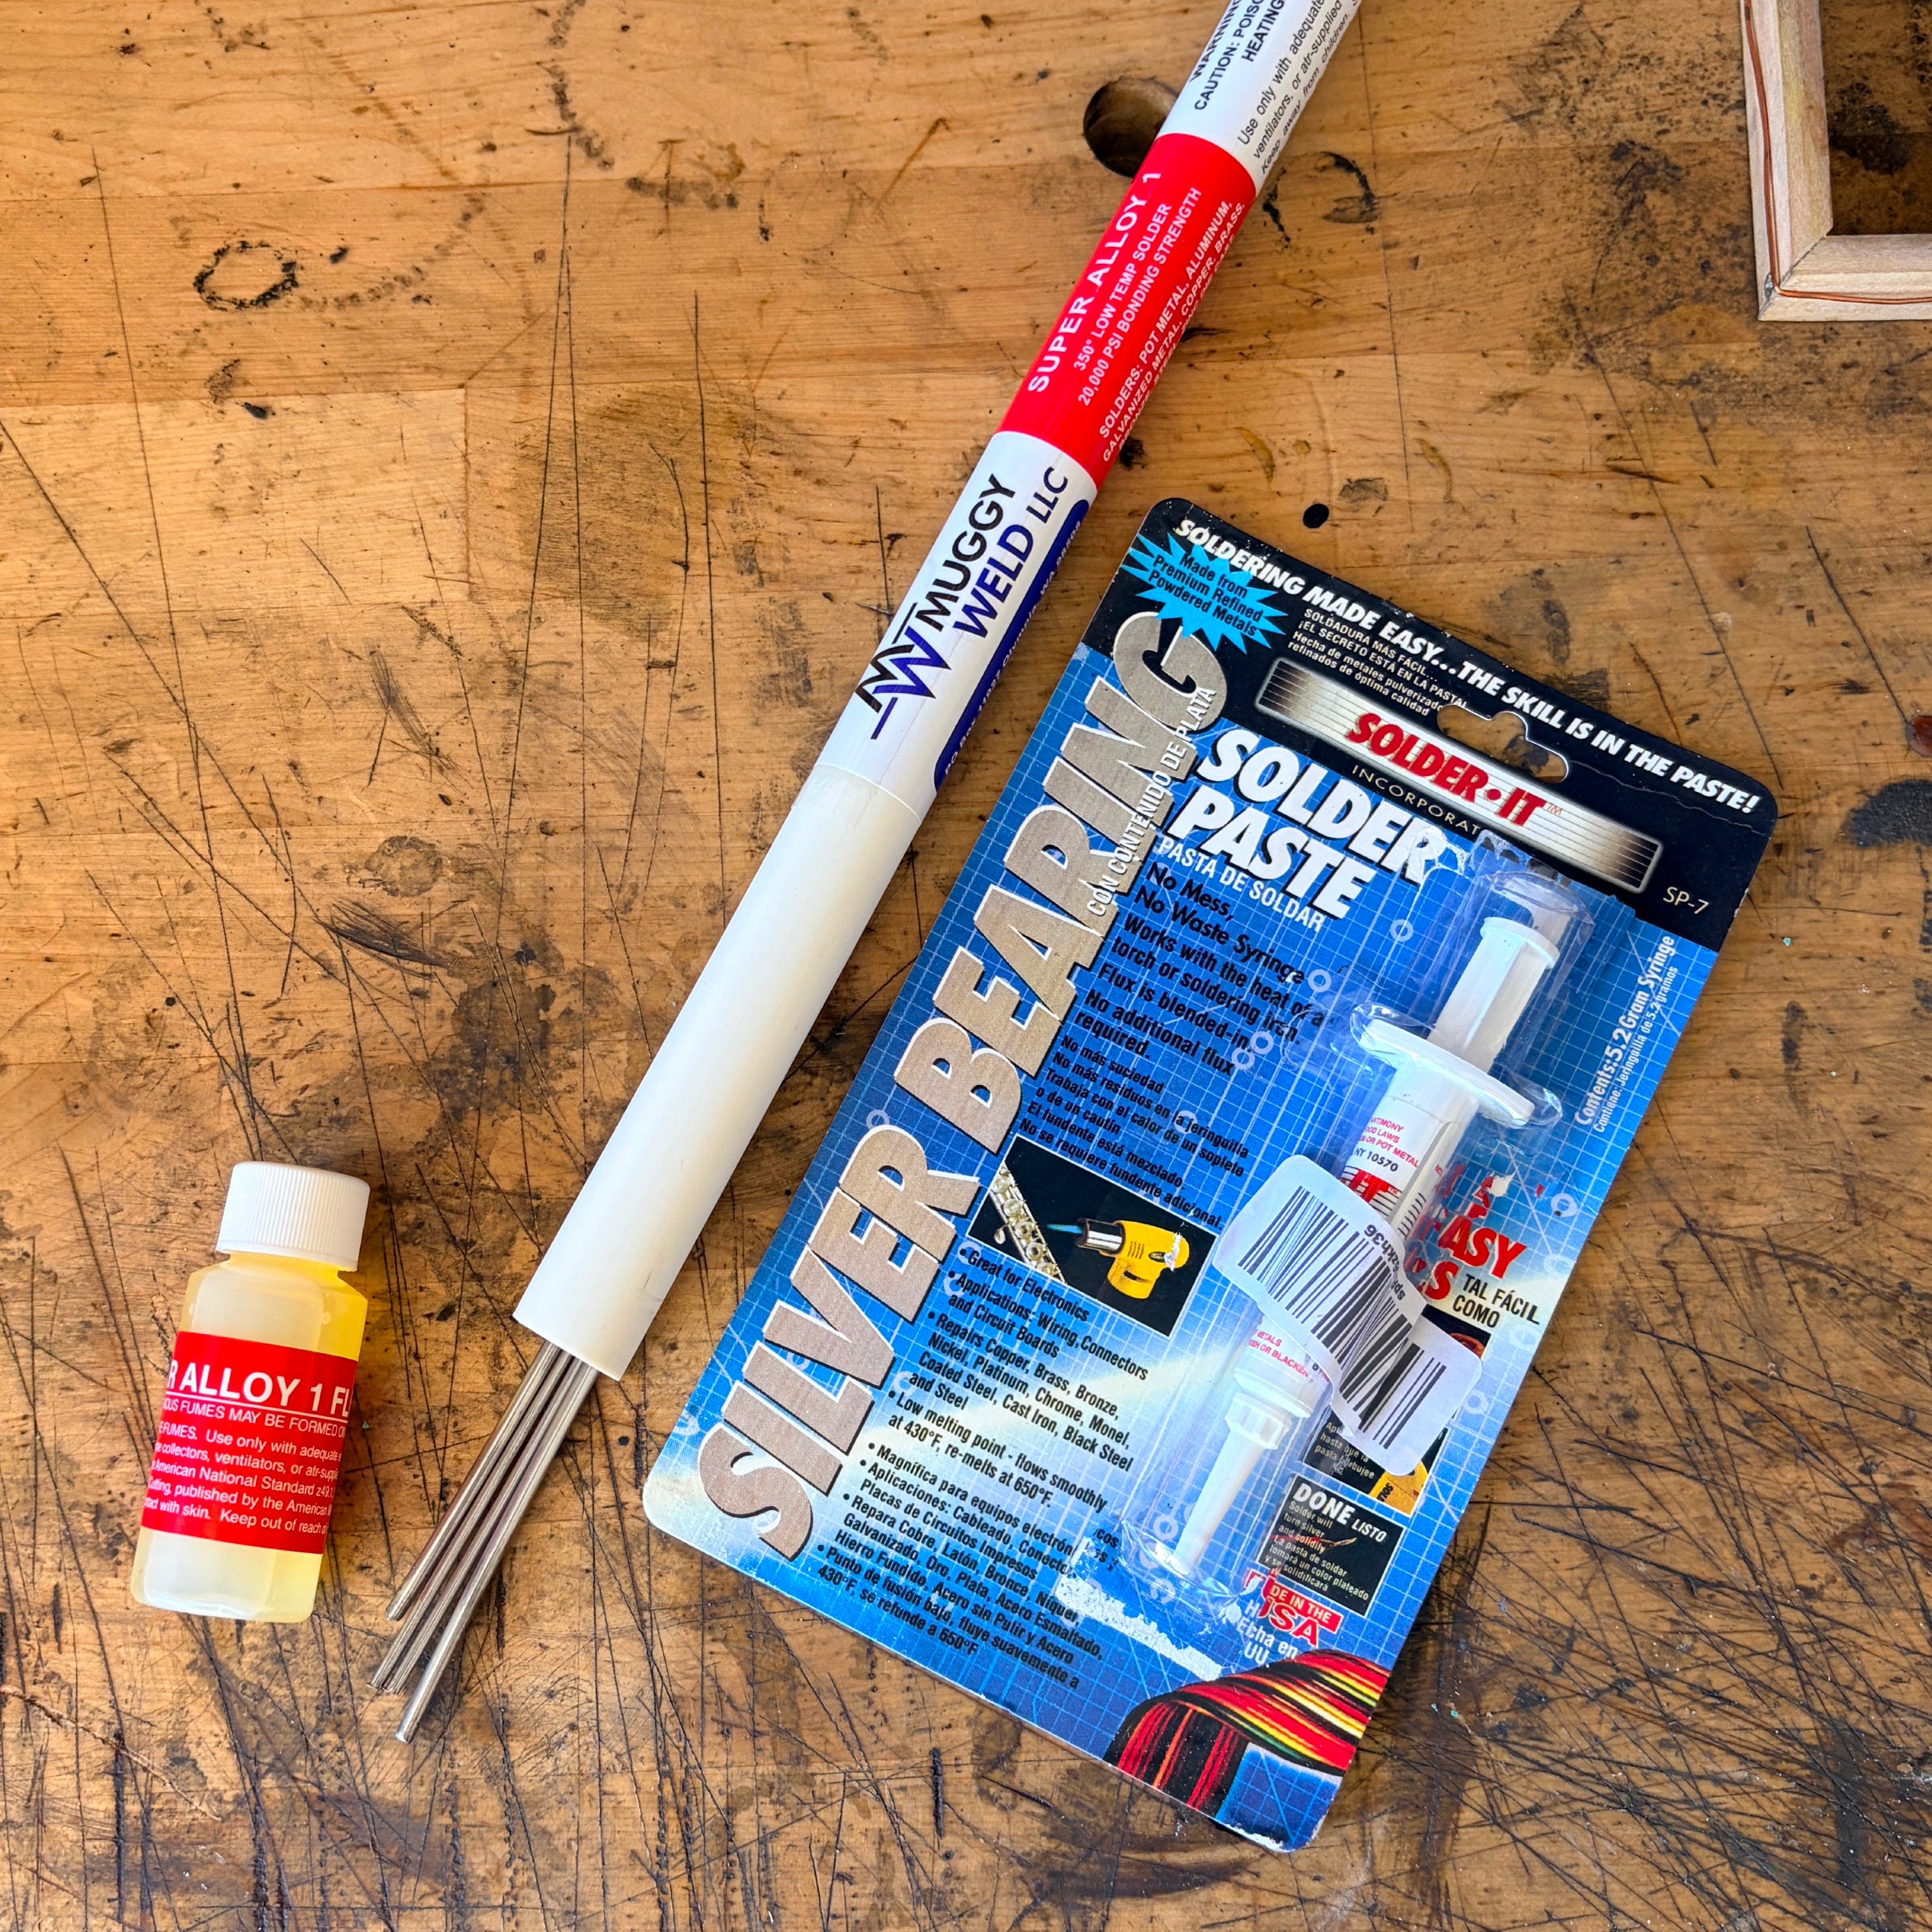
Items Needed
Muggy Weld Super Alloy 1 Mixed Diameter Sample Kit: A low-temperature multi-metal solder that melts at approximately 350°F. The required flux is included. This solder fills deep pits in steel exceptionally well and offers excellent adhesion. It contains a small amount of cadmium (which is extremely toxic) and therefore requires careful handling and good ventilation. (~$65)
Solder-It: A cadmium-free, silver-bearing solder paste with flux already blended in. It is less toxic, less expensive, and easy to apply from a syringe. It melts at around 430°F and works well for smaller repairs, but does not match the flow and filling performance of Muggy Weld on steel in deep cavities. (~$13)
Small handheld butane or propane torch: Required for either product. (~$18)
Brush Plating Flash Copper
Prepare the area to be filled for brush plating. Clean it to the water-break standard, brush with pickling solution, rinse thoroughly with distilled water, and pat dry.
Iron and steel do not bond reliably to most low-temperature solders. A thin copper flash will substantially improve adhesion and create a clean, highly solderable surface. Caswell Flash Copper solution will plate directly onto properly prepared iron and steel without a nickel strike. Using the copper wand or a detailing wand, dip the anode wrap in a small amount of solution. Attach the alligator clip to the workpiece and power on the brush plating system. Apply light pressure and move the brush steadily across the area. A visibly copper color should appear within seconds to a minute. Continue only as long as needed to produce a continuous, bright copper film. Over-plating is unnecessary and undesirable for a flash copper coat.
After brush plating, lightly smooth the copper with 800-grit silicon carbide paper without cutting through the deposit, then fill the cavities with either Muggy Weld Super Alloy 1 or Solder-It silver-bearing paste.
Muggy Weld Super Alloy 1
Dip a rod into the included flux. Lightly preheat the part with the torch held a few inches from the repair area, then coat the cavity with flux from the rod. Continue heating from a distance until the flux turns dark brown. Place the rod on the cavity and heat it directly until the alloy flows into the void.
Solder-It
Lightly preheat the part, apply the smallest amount of paste possible, and heat directly with the torch until the paste liquefies, flows into the cavity, and hardens.
Once the solder has cooled, shape the excess with fine abrasives and polish the area using the same directions given for brush plating. Complete all remaining pre-plating cleaning and preparation steps. Any of the nickel plating methods will adhere directly to the filled surfaces.
After nickel plating, a slight difference in sheen or texture may be visible between the solder-filled spots and the surrounding iron or steel. For the most uniform appearance, apply a nickel strike, followed by copper underplating, then polish and apply the final nickel plate.
Nickel plating is one of the most valuable skills you can master to restore vintage tools. The four methods covered in this tutorial each serve different circumstances. No single method works best for every tool. The right choice depends on the geometry of the part, how it will be used, the condition of the surface, and whether full re-plating or localized repair is the better option.
Start with the Nickel Acetate Method as the simplest and least expensive option for most iron and steel tool parts. If your work is limited to occasional lever caps, depth stops, and similar parts, this method may be all you need. Use the Nickel Sulfate Method for high-volume or larger projects, electroless nickel for even coverage on complex surfaces, brush plating for spot repairs and to preserve surrounding original plating and patina, copper underplating to fill shallow pits or scratches that cannot be fully resurfaced, and specialty fillers for deep cavities before final plating.
The quality of finished plating depends far more on surface preparation, process control, and patience than on which method you use. Always test new techniques on scrap steel or less valuable parts first. Activate surfaces properly, monitor bath chemistry and temperature, and dispose of spent solutions responsibly. After plating and polishing, protect the surface with a light coat of oil, then polish or brush it to the final appearance you want.
Applied with patience and care, these methods will restore the function and the original factory finish of your tools while respecting their history.
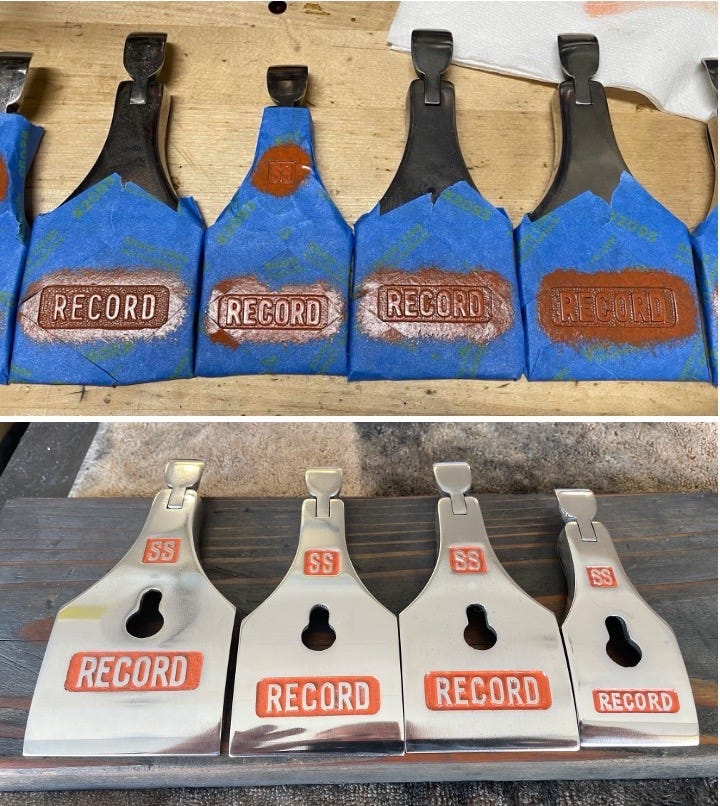
Copyright © 2026 Eric O’Grey. All rights reserved. No part of this content may be reproduced, scraped, or otherwise used by artificial intelligence models, machine learning systems, or large language models without express written permission.
Disclosure: I received nothing from anyone in exchange for the recommendations in this article. I purchased everything reviewed at my own expense and at full cost.
No posts
Comments
Nothing yet. Say the first thing.
Sign in to join the conversation.