
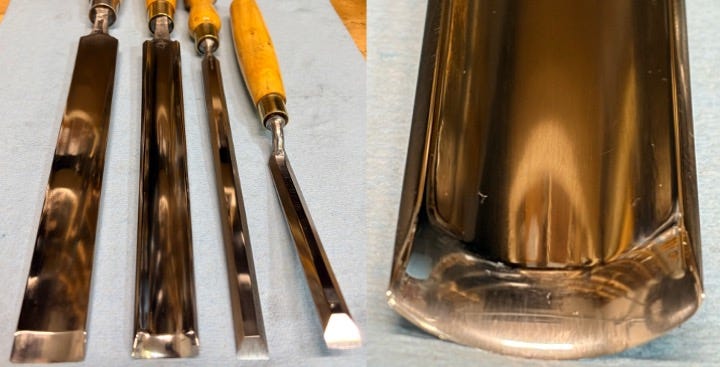
This is the fourth tutorial in this series about restoring vintage woodworking tools.
The first article outlines the factors to consider before beginning a restoration project, whether your primary goal is to improve the tool’s functionality, preserve its original patina and historical authenticity, or return it to original factory condition. The second article offers a detailed guide to the cleaning and stripping phases of tool restoration, with practical options and techniques for stripping plating, japanning, paint, and other finishes. The third article provides a comprehensive tutorial on electrolysis for rust removal, along with a balanced comparison of the advantages and disadvantages of other common rust removal methods.
This article provides a complete guide to effectively removing corrosion pitting and other surface damage from metal tool parts while carefully preserving maker’s marks, stamps, and other details. You will learn about the history and different types of metals used in vintage and modern hand tools, along with the key differences between modern abrasives and polishing products.
You will also learn about the important distinction between flatness and smoothness, and how to use my One-Hour 7-Step Flattening Process, which I developed over thousands of hours of hands-on experience, to precisely flatten nearly any hand plane sole or other functional tool surface in about one hour. Finally, you will learn how to achieve any desired finish on iron and steel, from matte to brushed satin to show-grade mirror polish.
Iron became the foundational material for hand tools during the Iron Age in Europe around 1200 BC. Over the following centuries, it was refined through forging, casting, and alloying with controlled amounts of carbon and other elements to produce cast iron, wrought iron, high-carbon steel, and tool steel, with each variation tailored to the tool’s intended purpose and the technological capabilities of its era.
In the sections that follow, we will examine the key differences in composition, properties, toolmaking applications, and restoration considerations for each type of metal. Understanding these distinctions is essential for properly using, maintaining, repairing, resurfacing, and sharpening vintage tools with techniques that preserve their historical character, function, and appearance.
Cast iron parts are traditionally made by pouring molten metal into sand molds, a cost-effective process that allows for complex shapes. This material became a standard in vintage woodworking tools and is commonly found in hand plane bodies, vises, tool frames, bases, and tables.
Cast iron parts in hand planes were typically cast and then machined flat on the sole and sides, leaving those surfaces with a bare metal finish. After machining, manufacturers then usually sanded those surfaces smooth to between 120 and 400 grit, depending on the brand. In contrast, the top surfaces and other non-functional areas of plane soles were usually left in their rough as-cast texture and then coated with paint or japanning.
Most cast iron contains 2.0–4.0% carbon and 1–3% silicon. The two most relevant types found in vintage tools are gray cast iron and ductile (nodular) cast iron.
Gray cast iron (the dominant type in vintage tools) contains graphite in the form of thin flakes. These flakes create stress points that make the material relatively brittle, but they also provide excellent vibration damping, dimensional stability, and machinability.
Ductile cast iron is produced by adding small amounts of magnesium (or cerium) during melting, which forms the graphite into rounded nodules or spheres. This structure allows the metal to deform rather than crack, making it significantly tougher and about twice as strong in tension as gray cast iron.
Gray cast iron became the standard material for plane beds, machine tool bases, and frames due to its excellent vibration damping, dimensional stability, and ability to be cast into intricate shapes. Ductile iron, by contrast, is rarely found in pre-1950 tools because it was not widely produced until the 1940s. It was used in later production pieces, such as spokeshaves, braces, and frames, to increase toughness and resistance to breakage from drops.
Cast iron has good wear resistance but is prone to chipping, cracking under impact, and rusting. It can be resurfaced by careful grinding, hand scraping, and lapping, provided the part is fully supported and heavy pressure and impacts are avoided. Never squeeze cast iron in a vise, as it will easily fracture under stress.
Broken cast iron is notoriously difficult to weld successfully. Its high carbon content causes the material to become brittle in the heat-affected zone, often cracking during the welding process or as the part cools and contracts. Although welding cast iron is possible with specialized expertise, equipment, and techniques, it is generally not recommended to use for repairing vintage woodworking tools.
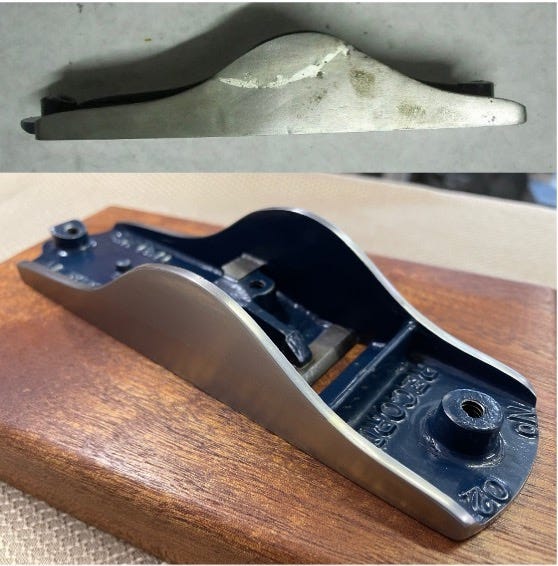
A more practical repair method for cast iron is brazing, which uses bronze or nickel-silver rods and an oxy-acetylene torch. Because brazing operates at significantly lower temperatures than fusion welding, it creates a strong joint while greatly reducing the risk of cracking the surrounding cast iron. This technique should only be attempted by experienced metalworkers. A successful example of a brazed repair is shown in the photo above.
While brazed repairs to cast iron are possible, it is usually less expensive to replace the broken part. Fortunately, there are active second-hand sources for most vintage tool parts through online marketplaces and specialty vintage tool part suppliers. So when you have a broken part, always compare the cost of repair versus replacement.
Wrought iron served as the primary material for hand tools from the Iron Age until the rise of industrialized steel production in the mid-to-late 19th century. Blacksmiths produced it by first smelting iron blooms and then repeatedly hammering the hot metal under a hammer and anvil, and later with power hammers, to refine and shape it. This “wroughting” process created a distinctive fibrous structure with elongated slag inclusions, resulting in excellent toughness, ductility, and corrosion resistance.
Wrought iron’s excellent forgeability and resistance to cracking made it ideal for tools subjected to heavy shock and impact, such as hammers, axes, and chisels. However, it has one major drawback: poor edge retention. Edge tools made entirely from wrought iron dull quickly and require frequent sharpening.
Until improved steel-making methods were developed in the mid-18th century, steel remained scarce and expensive. To use it efficiently, blacksmiths forge-welded thin strips of high-carbon steel onto the cutting edges of wrought iron tool bodies. This created composite, or “steel-faced,” tools that combined the best qualities of both metals. The wrought iron provided a tough, shock-resistant core, while the harder steel edge offered superior cutting performance and much better edge retention. These laminated tools became the standard from the medieval period through the early Industrial Revolution.
Wrought iron usually has a very low carbon content (less than 0.08–0.25%) and contains fibrous slag inclusions (typically 1–3% by weight). These inclusions create a distinctive wood-grain-like fibrous microstructure that becomes visible when the metal is broken, etched, or bent. It is highly malleable and ductile, making it exceptionally forgiving under stress. It can be hammered, forged, bent, or hot-welded without cracking easily. It is weldable and can tolerate aggressive hammering and bending during repairs. Unlike high-carbon and tool steels, it cannot be hardened through heat treatment or quenching.
Wrought iron polishes to a smooth finish but often reveals slag lines. It has excellent natural rust resistance, as the slag inclusions help limit rust progression and promote a stable protective patina. True wrought iron is no longer produced in significant quantities, and modern material sold as “wrought iron” is almost always mild steel.
Common examples of vintage tools made from wrought iron include:
Braces, bits, augers, and gimlets: Early spiral or pod augers had wrought iron bodies and shanks. Many 18th- and early 19th-century braces, such as Scotch and Spofford styles, featured wrought iron frames and chuck components.
Chisels and gouges: Early firmer, mortising, and paring chisels were typically made with a wrought iron body and tang, and a forge-welded steel cutting edge, and especially socketed framing and heavy-duty chisels and gouges.
Drawknives: The blade body was frequently wrought iron with a hardened steel cutting edge.
Adzes and axes: The heads were most often wrought iron with forge-welded steel edges. You can always confirm this by looking for a weld line near the sharpened bevel.
Other forged hardware and tools: Holdfasts, hooks, early plane irons with wrought iron backing and laminated steel edges, froes, and various carpenter’s clamps.
For repairs and when adding or replacing steel cutting edges on wrought iron tools, joints can be arc welded by an experienced welder or with traditional forge welding by a blacksmith. Stick welding (Shielded Metal Arc Welding or SMAW) is often the best option for antique pieces, particularly in the field. MIG welding (Gas Metal Arc Welding or GMAW) provides cleaner results and greater speed in the shop. Many restorers who specialize in old wrought iron prefer oxy-acetylene welding (OAW) because it provides lower, more controllable heat input and most effectively handles the slag stringers. Oxy-acetylene can be used for both welding and brazing.
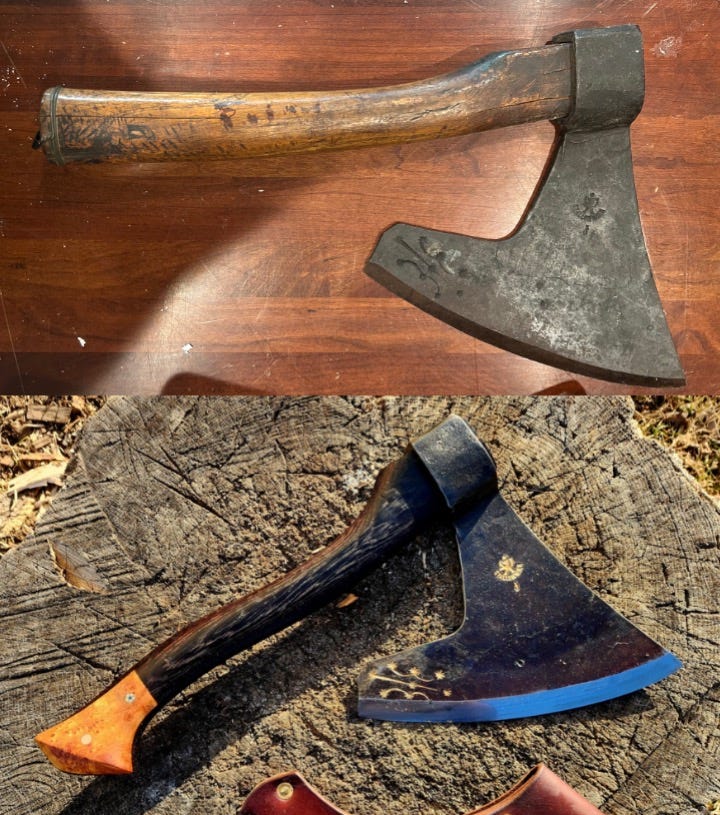
Most experienced restorers prefer to preserve the natural dark iron oxide patina on vintage wrought iron. This patina provides both authentic historical character and ongoing corrosion protection. You can polish wrought iron to a bright metallic finish if you prefer, but it will need regular oiling or waxing to prevent re-rusting. If a repair or regrinding removes the original patina, you can restore a similar dark appearance with multiple coats of bluing until the surface is blackened.
Carbon steel technology evolved gradually over many centuries as blacksmiths discovered that adding controlled amounts of carbon to iron (typically 0.5–1.5%) dramatically improved its hardness, edge retention, and overall performance in tools and weapons compared to wrought iron. However, early production methods often produced inconsistent results.
A major breakthrough in steel technology came around 1740 when Benjamin Huntsman, a clockmaker in Sheffield, England, perfected the crucible (or cast) steel process. Huntsman melted bars of lower-grade steel in clay crucibles with added flux, using high temperatures made possible with coke-fired furnaces. The result was a far more uniform and homogeneous steel than anything previously produced by manual forging. Huntsman’s “cast steel” quickly gained widespread acceptance for its exceptional reliability and purity, and made consistent, industrial-scale production of high-quality tool steel possible.
By the mid-1750s, all-steel saw blades made using Huntsman’s crucible steel replaced wrought iron saws in Britain. Their uniform, high-quality material enabled superior tensioning, sharper and more consistent teeth, and significantly longer service life. Soon afterward, chisels, plane irons, files, and axes were standardized with cast steel cutting edges, which were forge-welded onto wrought iron bodies to achieve the optimal combination of toughness and edge performance.
This transition marked the beginning of modern toolmaking and laid the groundwork for the specialized alloy steels that followed in the 19th and 20th centuries. Huntsman’s crucible steel process remained the benchmark for premium tool steels well into the Industrial Revolution.
Additional advances in the 1850s, most notably the Bessemer process and open-hearth methods, made steel much more abundant and affordable by the late 19th century. This shift gradually replaced wrought iron as the primary material for tool bodies, but tools made from the 1850s to the early 1900 often still used laminated or forge-welded construction.
Wrought iron production in the United States largely ended around 1910 and was replaced by milder steels. Mixed-steel tools became increasingly common, featuring mild steel bodies paired with high-carbon steel cutting edges, especially in premium brands.
Laminated and forge-welded mixed-steel construction continued to be widely used for axes, chisels, and other edge tools until the mid-20th century. This composite approach remained popular because it delivered an excellent balance of cost, toughness, and cutting performance. Most modern hand tools are made from solid high-carbon steel to support consistent, large-scale industrial production.
The Rockwell C scale (Rc or HRC) is the modern standard for measuring the hardness of tool steels and cutting edges. Most modern carbon steel tool edges are tempered to between 58 and 62 HRC, the range generally considered to give the best balance between edge wear resistance and ease of re-sharpening. Higher HRC values deliver better edge retention and wear resistance, while lower values produce a tougher edge that is more resistant to chipping and breaking under impact.
Steel is hardened by heating it to a critical high temperature and then rapidly quenching it in oil, water, or another medium, which creates a very hard but brittle microstructure. After hardening, the steel is tempered by reheating it to a lower, precisely controlled temperature and cooling it again. Tempering reduces brittleness, improves toughness and impact resistance, and makes the tool much more usable, but with a reduction in hardness.
Carbon steel responds exceptionally well to grinding, honing, and polishing during restoration. However, it is critical to avoid overheating steel when using power tools, especially near cutting edges, as excessive heat will draw the temper and soften the tool. Temperatures above 400°F (204°C) risk compromising hardness. If the metal begins to turn straw-colored or blue, you have overheated it, and it may need to be re-hardened and tempered by a blacksmith.
A reliable rule of thumb is to quench steel in water or oil, or simply allow it to cool naturally, when it becomes too hot to hold comfortably. This practice almost always prevents damaging the temper.
Repairing carbon steel is generally straightforward. It can be welded using stick, MIG, oxy-acetylene, or traditional forge welding methods. While carbon steel rusts more easily than many modern alloys, it is much easier to repair than cast iron.
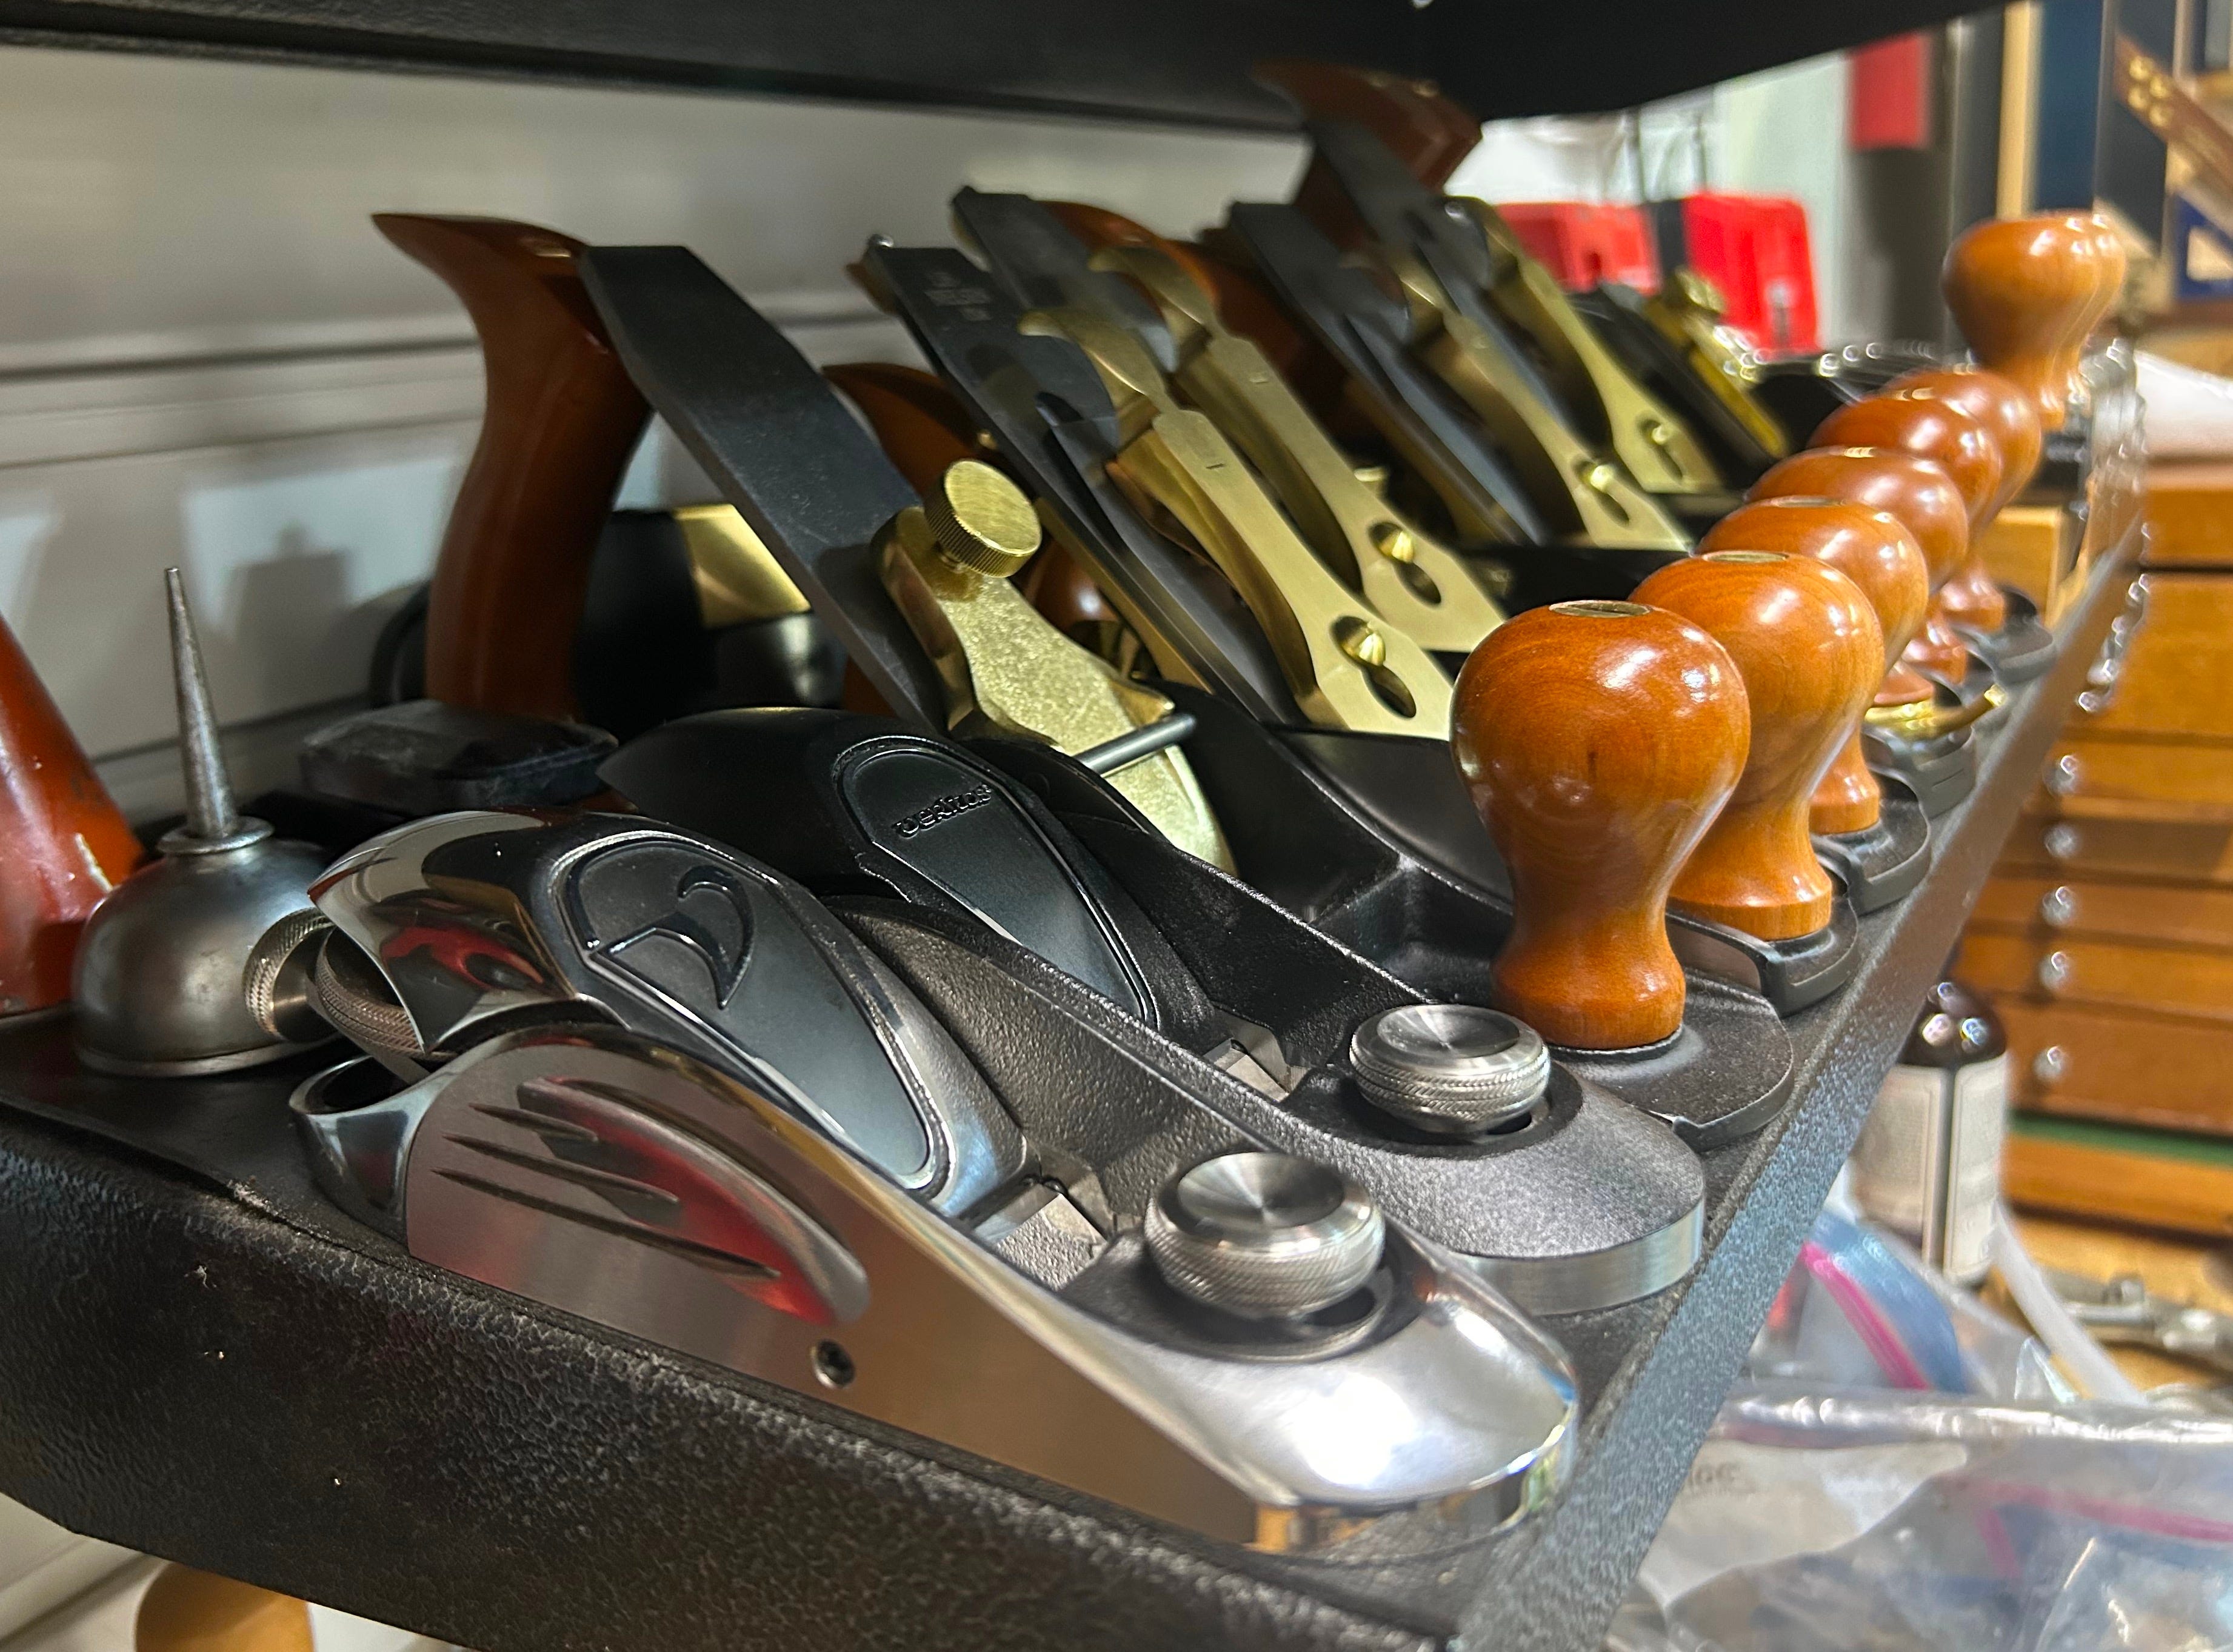
Around the early 20th century, advanced alloy tool steels were developed to improve the performance of carbon steel. While the carbon content generally remained between 0.5% and 1.5%, manufacturers added elements such as chromium, tungsten, molybdenum, vanadium, and others to create specialized alloys tailored for specific uses. These new alloy steels offered superior wear resistance, edge retention, toughness, and, in some formulations, the ability to retain hardness at elevated temperatures. Compared to plain high-carbon steel, the new steels were more expensive and more difficult to forge and grind. In vintage tools, they were typically reserved for premium plane irons, high-end chisels, files, and saw blades. Many modern replacement irons for older hand planes are made using these advanced tool steels.
Tool steels are harder than plain carbon steels, often ranging from 60 to 68+ HRC. As a result, they require more time and effort to resurface and sharpen, and they wear down abrasives faster. Each tool steel also has a unique alloying profile that affects how it rusts, sharpens, holds an edge, and responds to restoration.
Many woodworkers have strong preferences when it comes to modern tool steels, specifically high-speed steel (HSS), O1, A2, D2, M2, and PM-V11. While I’ll share my own experiences and preferences in the following sections, I encourage you to experiment and find which you like best, based on your individual working style and shop environment.
This is a summary of the most popular modern steels used in woodworking tools:
High-speed steel (HSS) containing tungsten was developed around 1900 to maintain hardness at elevated machining temperatures. In 1937, the molybdenum-bearing M2 grade was introduced, with approximately 4% chromium, 5–6% molybdenum, 6% tungsten, and 2% vanadium. M2 offered superior heat and wear resistance at a lower cost than earlier tungsten-heavy alloys and quickly became the most popular steel for drills, taps, milling cutters, and lathe tools. I prefer HSS for my lathe tools because it dramatically reduces how often I must regrind them compared to high-carbon steel. Even with improved heat tolerance, always avoid overheating steel during grinding to prevent damaging its hardness and temper.
O1 (oil-hardening steel) was developed in 1905. It contains approximately 0.9% carbon, 0.5% chromium, and small amounts of tungsten and manganese. This composition produces a tough steel that is easy to sharpen and capable of exceptional sharpness, making it an excellent choice for edge tools. Ashley Iles uses O1 in their chisels and carving gouges, and I have about 200 in my shop. While O1 may require more frequent sharpening than other modern steels, in my experience an O1 edge can be re-stropped to razor sharpness many more times before it needs regrinding. I sharpen my gouges freehand and strop them frequently during use, and it only takes about 30 seconds to strop. For these reasons, O1 is my preferred steel for chisels and gouges: it delivers the sharpest edge, is the fastest to re-sharpen, and allows the greatest number of stroppings before regrinding.
A2 (air-hardening steel) A2 (air-hardening steel) contains approximately 1% carbon, 5% chromium, and 1% molybdenum. Developed in the 1920s, it was widely used by the late 1930s. Compared to O1, A2 offers superior edge retention and better corrosion resistance. Although A2 takes longer to sharpen than O1, I find its edge-holding ability makes it a better choice for plane irons and other tools where longevity matters more than quick sharpening. Lie-Nielsen uses A2 in most of their planes because the blades stay sharp longer, which reduces the frequency of removing, sharpening, reinstalling, and retuning the iron during use.
D2 (high-carbon, high-chromium steel) contains approximately 12% chromium, 1% molybdenum, and 1% vanadium. Introduced around 1930, it offers outstanding wear resistance and corrosion resistance approaching that of 304 stainless steel. This makes D2 an excellent choice for humid environments or shops without climate control. Avoid overheating D2 during grinding, as that can destroy its temper. The high chromium content also makes the steel relatively easy to restore and maintain. I use a set of Ray Iles mortise chisels in D2 and have found that they are exceptionally tough in hardwoods and maintain a pristine appearance over time with almost no maintenance.
PM-V11 (Veritas’ proprietary powder-metallurgy steel) is optimized with a high vanadium content and uniform carbide distribution. This advanced alloy delivers an excellent balance of edge retention, toughness, and ease of sharpening.
It polishes beautifully to a mirror finish and is straightforward to restore and maintain. Like A2, PM-V11 takes longer to sharpen than O1, but holds an edge much longer, significantly reducing how often it needs to be resharpened. I use PM-V11 on my Veritas bench, block, and specialty planes because of its outstanding edge retention and low maintenance during extended use.
In summary, carbon provides the foundation of hardness in all tool steels, while other alloying elements enhance specific performance qualities. Chromium improves corrosion resistance and wear resistance, though high amounts can make the steel more brittle and harder to sharpen. Tungsten and molybdenum increase hardness and wear resistance, especially at high temperatures. Vanadium delivers excellent wear resistance while also improving toughness. Therefore, the best steel for any particular tool depends on how you will use it, your personal sharpening preferences, and the environmental conditions in your shop.
The remainder of this guide focuses on using sandpaper and related products to restore iron and steel. Here’s a breakdown of the most popular modern abrasives available for flattening, smoothing and polishing iron and steel:
Diamond lapping film consists of micro-abrasive diamond particles bonded to a flexible film backing. It is the hardest and longest-lasting abrasive available, offering the fastest cutting action and exceptional durability. These films will produce a mirror polish on hard steels when used in higher grits on hard surfaces such as glass and hard sanding blocks. They can be used dry or wet with water or water-based liquids. Due to their high cost, diamond lapping films are best reserved for sharpening, fine flattening, and polishing rather than large areas or rough work. I use them in progressive grits from 220 to 60,000 to hone, flatten, and polish chisels, blades and small parts
Ceramic abrasives rank next in longevity and performance. They are made from specially engineered synthetic grains that fracture under pressure, continuously exposing fresh, sharp edges. This self-sharpening action provides exceptional durability and extended cutting power on iron and steel during heavy resurfacing, but requires firm, consistent pressure to activate. These abrasives are available in paper, cloth, and adhesive-backed sheets and rolls. I use ceramic exclusively in 120, 220, and 320 grits for aggressive flattening, resurfacing, and shaping. While they are among the more expensive options, they are also the best-performing and longest-lasting abrasives for these uses.
Zirconia alumina is a heavy-duty, self-sharpening abrasive that offers excellent durability and fast cutting action under pressure. It handles heat well during heavy abrasion on iron and steel and outperforms less expensive materials during medium-to-heavy stock removal. Zirconia is the best alternative when ceramic abrasives are unavailable, especially for flap discs and sanding belts. It performs very well in coarse and medium grits for removing corrosion and resurfacing, but it is too aggressive for fine finishing and polishing work.
Aluminum oxide is a versatile, tough, general-purpose synthetic abrasive that delivers reliable, consistent results on iron and steel with moderate pressure. It is typically the most affordable and widely available option for high-quality sandpaper sheets, rolls, discs, and power-tool abrasives. While it does not match the longevity of ceramic or zirconia under heavy use, aluminum oxide excels at general surface refinement and medium-to-fine smoothing. I buy it in full sheets for use on sanding blocks with soft pads, although it loads with debris and dulls faster than tougher abrasives during aggressive work.
Silicon carbide is a very hard, sharp synthetic abrasive commonly available in waterproof sheets for wet sanding. It delivers efficient cutting and smooth, consistent finishes, particularly in finer grits from 400 and up. This makes it my preferred choice for hand polishing on harder steels. It performs well wet or dry, especially with light oil lubricants to minimize loading. Due to its brittleness, it wears faster under heavy pressure, so it is better suited for finer finishing and polishing work than heavy stock removal.
Always progress from coarser to finer grits with every abrasive. I typically start with 120 grit to remove pitting and corrosion and to avoid creating deep scratches that can take as long to eliminate as the original damage. For heavy stock removal, use the most aggressive and durable abrasives such as ceramic or zirconia. Then switch to aluminum oxide for intermediate smoothing and finish with silicon carbide or diamond lapping film for final polishing.
In vintage tool restoration, flatness and smoothness are often confused, yet they serve different purposes and require different techniques. Understanding this distinction helps you avoid wasting time, effort, and unnecessary metal removal.
Flatness is a geometric standard that directly affects tool performance. Non-functional surfaces, by contrast, are primarily cosmetic. They only need to be smoothed to bare metal and polished to achieve an attractive appearance, which involves far less work and material removal than true flattening.
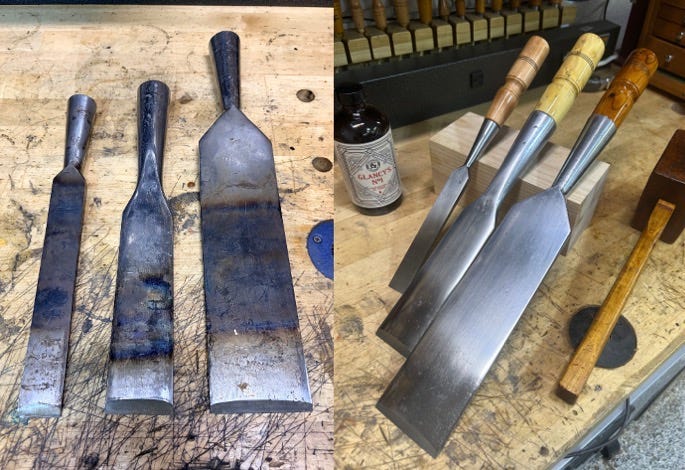
Flatness is a functional and geometric standard that describes how closely a surface conforms to a true, straight plane across its entire area. It is not a cosmetic concept: a surface can be perfectly flat yet have a matte or lightly scratched appearance. For functional tool surfaces, such as the sole of a hand plane or the back of a chisel or plane iron, flatness is critical because it directly determines whether the tool can perform as intended.
A plane sole that isn’t flat can rock or shift on the workpiece during use, causing uneven cuts or chatter. A chisel back that is out of flat will not seat evenly against a board or sharpening stone, resulting in imprecise cuts, poor paring, concave edges, or unwanted back-bevels.
Flatness is easily checked with a straightedge, precision square, or flat reference surface. Deviations, often measured in thousandths of an inch, will show up as visible light gaps underneath a tool. For practical purposes in tool restoration, the standard is simple: no light should be visible under a straightedge or reference surface. This straightforward test requires no specialized equipment and is the most reliable way to verify flatness on functional surfaces.
It is helpful to understand the historical standards used to achieve and evaluate flatness on tool surfaces. It is also useful to know how iron and steel parts, originally machined flat, can later warp or lose their flatness over time.
In his book Memories of a Sheffield Tool Maker, Ashley Iles wrote that when Stanley acquired J.A. Chapman (makers of Acorn tools) in 1936 to establish a UK manufacturing base, their plane bodies sometimes warped by as much as 1/8 inch after machining. The cause was eventually traced to machining the bodies too soon after casting, before the internal stresses in the iron had time to dissipate.
By contrast, Record planes from the same period had an excellent reputation for long-term flatness due to their weathering process. After casting, the raw iron bodies were left outdoors in the factory yard and exposed to rain, snow, heat, and cold for six months or longer. These natural temperature and moisture cycles allowed the castings to slowly expand, contract, and release internal stresses. Once seasoned, the castings were machined flat, and the finished plane soles often remain flat to this day.
Record manufactured its planes to British Standard BS 3623, which required hand plane soles to be ground flat and square to within 0.0015 inch (approximately ±0.04 mm) or better. Veritas and Lie-Nielsen continue to meet or exceed this standard today. Instead of outdoor weathering, they stabilize their iron castings with cryogenic treatment and controlled heat cycling before machining. As a result, their planes typically arrive very flat and require only light lapping to maintain that flatness, even after many years of use.
Online woodworking communities often debate the necessity of flattening hand planes. A common comment I see is, “I’ve been woodworking for thirty years and have never flattened a hand plane.” While that may be true, it also logically means that person may have never used a flat hand plane and therefore does not understand its advantages. In my experience, tools with flat working surfaces perform better and more consistently than those that are not flat.
Smoothness is an aesthetic concept that refers to surface texture and the absence of visible peaks, valleys, pitting, and scratches. It offers two main benefits: an attractive appearance and improved corrosion resistance by eliminating tiny crevices where rust can form.
Smoothing a surface is much faster and removes far less metal than achieving true flatness. Even if a surface is not perfectly flat, a smooth, well-polished finish can be just as visually appealing as a geometrically flat one. By contrast, a cupped, skewed, or wavy surface can be polished to a mirror shine to look attractive, but it will perform poorly in use. Even the highest level of mirror polish contributes almost nothing to functional performance.
Veritas states this principle clearly: “Veritas blades are factory-lapped flat on the back (non-bevel face) to a flatness tolerance of 0.0005” or better over the working surface, with an average roughness of 0.000005” or better, so they require no lapping/flattening and are ready for final honing only.” In other words, Veritas plane irons leave the factory very flat with a matte gray finish, and polishing will not improve their performance.
When both flatness and polish are desired on functional surfaces, always flatten first, then polish. Detailed methods for measuring and achieving flatness, as well as for smoothing and polishing, are provided below.
Modern manufacturers flatten iron and steel tool surfaces using precision industrial equipment such as surface grinders and vertical mills. These machines can achieve exceptional accuracy to tolerances of one thousandth of an inch or better. However, good used surface grinders are expensive, require specialized expertise, and take up significant shop space, making them impractical for most home shops. The good news is that you can still achieve excellent results using the fast and effective manual methods described below.
Many woodworkers first try to flatten hand plane soles, chisel backs, and blades using power tools such as belt sanders, disc sanders, or grinders. These shortcut methods rarely save time and often create more problems than they solve.
Power tools are difficult to control accurately on long, flat surfaces. They tend to round over edges, dig hollows, and leave deep, uneven scratch patterns. They also generate intense friction heat rapidly on metal. To prevent the metal from overheating, turning blue, and losing its temper, the tool must be lifted on and off the abrasive in short bursts. This makes it extremely challenging to maintain consistent, even contact, often resulting in wavy, scarred, and concave surfaces. Belt sanders are particularly problematic because the flexible belt acts as a soft cushion rather than a true flat surface, causing the edges of the tool to become rounded relative to the center.
After becoming frustrated with power tools, many home restorers turn to traditional lapping, which involves rubbing the tool back and forth on sandpaper affixed to a hard, flat surface. While this method will eventually produce a flat surface, it requires many hours or even days of tedious work, along with substantial amounts of sandpaper and frequent replacements.
You are welcome to try these common methods if you like. However, my One-Hour, 7-Step Flattening Process, which I’ve developed and refined over thousands of hours of restoration experience, will deliver superior results with significantly less time, effort, and cost.
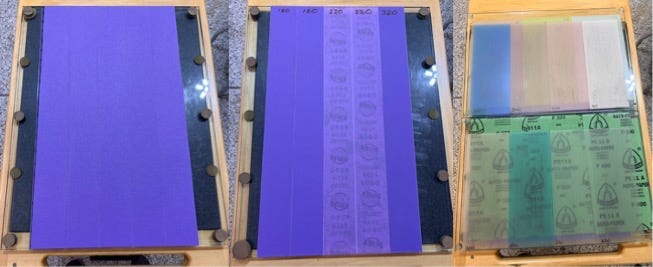
I recommend the products linked below for use with my One-Hour 7-Step Flattening Process. Detailed instructions for using these products follow this section.
Permatex 80038 Prussian Blue Paste: This non-drying paste highlights the high spots on your tool surface when rubbed against a flat reference surface, such as float glass or a surface plate. It allows you to see exactly where material needs to be removed so you can precisely flatten the high areas.
Float Glass: I recommend at least two pieces of float glass in your workshop: one large piece dedicated to lapping with ceramic abrasives, and a smaller piece to use as a flat reference surface and for lapping with fine diamond and silicon carbide abrasives.
Modern thick float glass is often as flat or flatter than a premium granite surface plate, and will hold up better against abrasive wear. I strongly prefer non-tempered plate glass over tempered safety glass in the shop. If accidentally bumped by metal, standard glass usually chips rather than shattering.
For my main lapping plate, I use 20” × 24” x 3/8” float glass. This size accommodates the longest iron plane soles and allows long, efficient strokes for faster and more consistent results. I prefer 3/8” thickness over the more common 1/4” because it is significantly more rigid, durable, and resistant to breakage. You will likely need to order 3/8” glass from a local glass shop, but the added strength is well worth it.
For my smaller plates, I use 20” × 12” × 3/8” glass. I attach rubber adhesive feet to the corners and midpoints of all plates so they don’t slide during use. I also built a rolling cart with locking wheels to store and use my plates. At 32 inches high, the cart allows comfortable lapping with strong downward body pressure and includes upright storage for the plates on the sides. When not in use, I can easily roll the entire setup under my table saw. This arrangement minimizes handling of the glass and greatly reduces the risk of accidental breakage.
Adhesive-Backed Ceramic Sandpaper Rolls for Lapping: I’ve tested nearly every brand of adhesive-backed abrasive on the market and strongly prefer Dura-Gold Premium rolls. In my experience, this sandpaper offers the best combination of longevity and ease of removal. It peels cleanly off the glass when it’s time to replace it, while most other brands require tedious scraping once worn out. After peeling off a depleted strip, I clean off any remaining adhesive residue using Simple Green, then clean the glass with water and dish soap so replacement strips adhere securely.
On one side of my large lapping plate, I affix five side-by-side strips of 120-grit ceramic abrasive, each 2.75 inches wide. I butt the strips together tightly without gaps so I can lap in either direction. This side is dedicated to aggressive material removal. I rarely use anything coarser than 120 grit for flattening, as deeper scratches can sometimes take as much effort to remove as the flattening process itself.
On the opposite side of the glass, I apply two strips of 180 grit, two strips of 220 grit, and one strip of 320 grit, again butted edge-to-edge with no gaps. Once the surface is flat, I simply flip the plate and progress through the finer grits for smoothing.
Machinist Files for Cross and Draw Filing: This 14-inch American Pattern Double Cut Coarse file is excellent for aggressive cross filing, and this 10-inch Smooth Cut Mill file provides a smooth, fine finish for draw filing.
Card Scrapers: I recommend these thick card scrapers by Blue Spruce, as their width and rigidity make them perfect for iron flattening with minimal flex.
Following the process below, I can precisely flatten an average No. 5½ plane sole in about one hour. By comparison, achieving the same level of flatness with traditional plate lapping alone can take several hours to several days. For best results, please follow the techniques in the order presented.
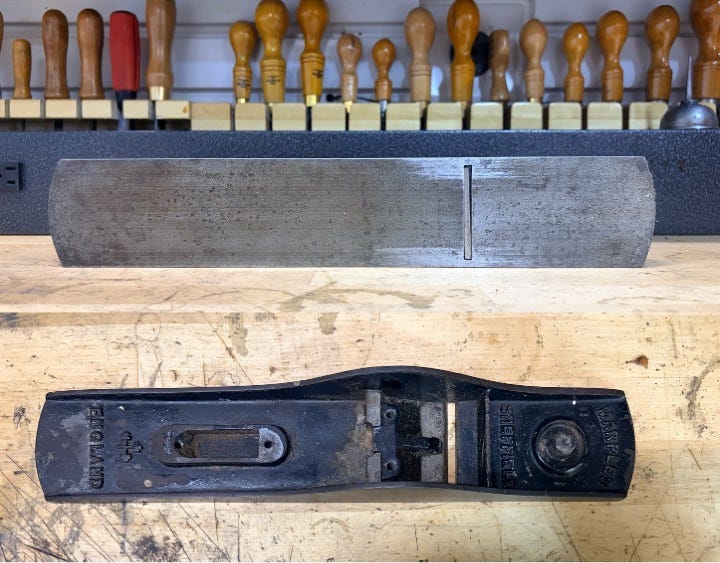
Step 1: Use Prussian Blue Paste to Reveal the High Spots. You can apply Prussian Blue paste in two ways:
On the Tool: Wipe a very thin film of paste onto the surface you want to flatten. As you work, the blue will precisely wear off the high spots, revealing bright metal, while low spots remain covered in blue.
On the Reference Plate: Wipe a very thin, even layer onto a flat reference surface such as float glass, a granite plate, or a precision surface plate. Press the tool onto the plate and slide it forward with moderate pressure. High spots will pick up the blue, while low spots remain metallic and untouched.
Once most of the blue has worn away, reapply using your preferred method. Repeat as often as needed until the surface is flat. Clean Prussian Blue from tools with mineral spirits or CRC 3-36, and from reference surfaces with mineral spirits or Simple Green.
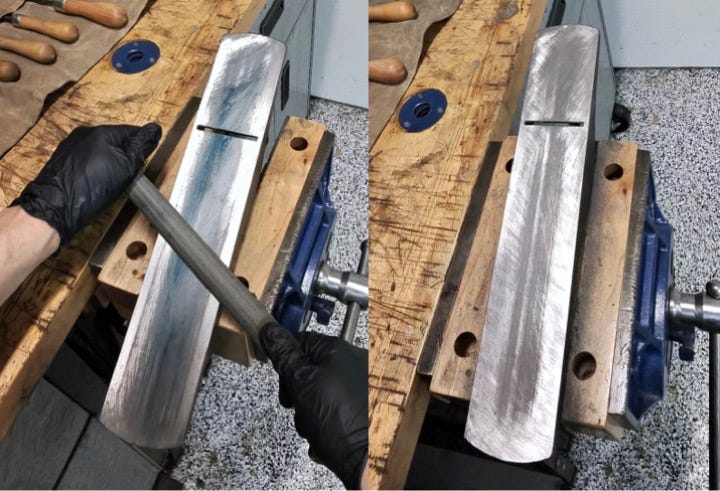
Step 2: Cross filing. This aggressive flattening technique works well on both cast iron and steel. Secure the tool in a wide wood vise with the surface to be flattened facing up. Avoid clamping hand plane bodies directly, as even moderate force can crack the sides and ruin the tool. Instead, tighten the frog onto the plane and clamp the frog in the vise, using a block of wood underneath to support the base and prevent it from rocking or being stressed.
If flattening cast iron, start with a long, coarse double-cut flat file (see the recommended product link). If flattening steel, begin with a medium-coarse long bastard file or flat file, then reassess your file choice as you work.
Hold the file diagonally to the surface with one hand at each end, and firmly push it forward along the full length of the surface while simultaneously moving it diagonally from right to left. Keep the file flat on the surface at all times and apply even pressure. Begin with lighter pressure until you develop a good feel for your progress and the rate of material removal.
Focus on the high areas revealed by the Prussian Blue. Use a precision straightedge along with the Prussian Blue to accurately identify where and how much material needs to be removed. Reapply Prussian Blue as needed and frequently check your progress with the straightedge. Continue cross filing until Prussian Blue shows the surface is nearly flat. When you are satisfied, move on to scraping if flattening cast iron, or to draw filing if flattening steel.
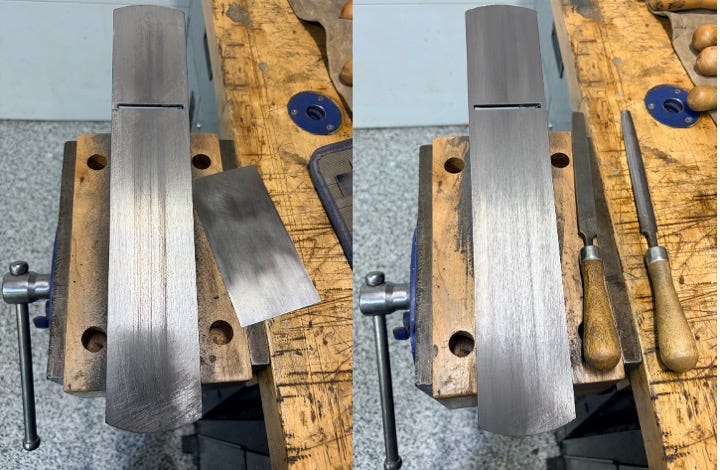
Step 3: Iron Scraping. Hand scraping works well on cast iron hand plane bodies and wrought iron, but is not suitable for hardened steel due to its greater hardness. I achieve the best results by far using thick cabinet scrapers like the ones linked above. Thin, flexible scrapers don’t work well and tend to skate across the surface rather than cutting effectively.
To use the scraper, hold it firmly with the edge flat against the iron surface and apply strong, even pressure with your thumbs on the bottom edges. Lean the top of the scraper slightly forward and push it steadily across the surface, adjusting the angle until you find the one that cuts most effectively. You may experiment with burnishing a mild hook on the edge, but I achieve the best results using a crisp, unburnished 90-degree edge. Unlike the fine shavings you aim for when scraping wood, just accept the powdered iron residue that results from scraping iron.
Apply Prussian Blue and continue working to remove cross-filing marks and any remaining high spots it reveals. Reapply Prussian Blue as it wears off to reassess your progress. You will find this iterative process fast, satisfying, and remarkably effective at producing accurate flattening results. Move on to the next step once all file marks are gone and the surface looks similar to the photo above.
Step 4: Draw Filing. This technique works well on both iron and steel. Use a fine-cut flat file (such as the one linked above). Hold the file firmly with both hands and keep it flat against the tool surface. Draw the file in long, straight strokes perpendicular to the length of the sole (at 90 degrees) using a push-and-pull motion with steady pressure. This removes remaining high spots while creating a uniform surface texture.
Reapply Prussian Blue as it wears off and continue working until the surface appears uniformly (or nearly) flat, even though it will still show texture from draw filing. You can expect to be pleasantly surprised by how quickly and effectively this technique flattens the surface. When your result looks similar to the photo above, it’s time to move on to speed lapping.
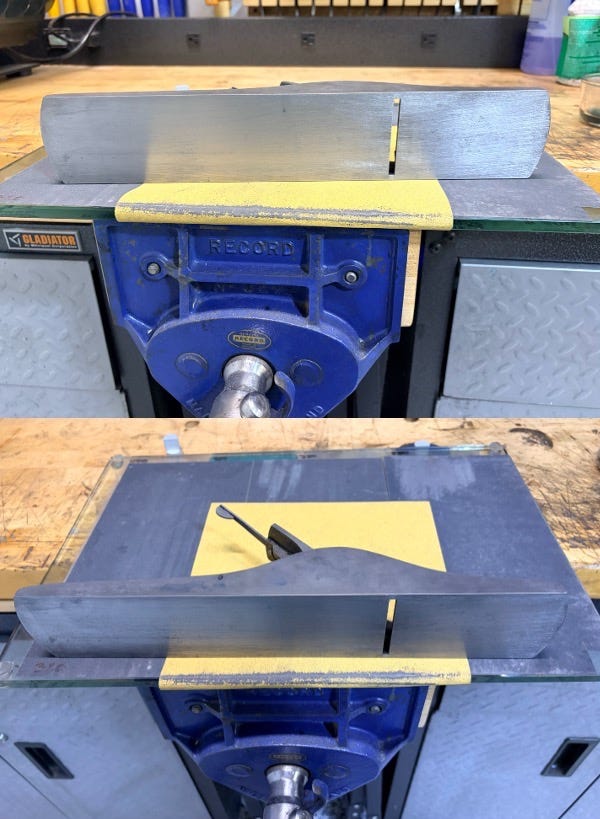
Step 5: Speed Lapping. I developed this technique as an accelerated method for quickly and uniformly flattening iron and steel. To maintain overall flatness, it is important to alternate this technique with traditional full-plate lapping.
The main drawback of traditional flat lapping is explained within this physics formula: Pressure equals Force divided by Area (P = F / A).
When lapping a plane sole or chisel blade on sandpaper adhered to a flat plate, the contact area (A) increases as high spots are worn down and more of the tool surface touches the abrasive. The total downward force (F) you apply with your arms and body (typically 20–50 pounds) is spread over this growing area, resulting in progressively lower pressure (P) on each abrasive grain. Lower pressure means slower cutting action on cast iron and steel. As the surface becomes flatter, the contact area continues to expand, pressure drops further, and material removal slows dramatically. This is why traditional plate lapping is so time-consuming, especially in its later stages.
Speed lapping solves this problem by keeping the contact area very small at all times. The downward force is concentrated along a narrow abrasive edge stretched over the hard edge of a glass plate. This creates much higher localized pressure, allowing each grit to cut more aggressively and remove material significantly faster, especially from the high spots.
To use this technique, stretch a sheet of 120-grit sandpaper securely under one side of your small float glass plate. Allow the edge of the glass plate to overhang your bench and wedge the plate against bench dogs to keep it secure. Push your workpiece forward with pressure, along the full length of the workpiece, at 45 degrees to the glass edge.
When the sandpaper on the glass edge wears out, advance the sheet by about 1/4” to expose fresh abrasive. The remainder of the sandpaper sheet can be reused for other sanding tasks, since only the abrasive along the lines is depleted.
After every two minutes of speed lapping, switch to full-plate lapping on your large lapping plate for about one minute, to maintain overall flatness and prevent dishing or waviness. Alternating between the two methods allows for rapid material removal while maintaining excellent flatness and surface uniformity on your workpiece.
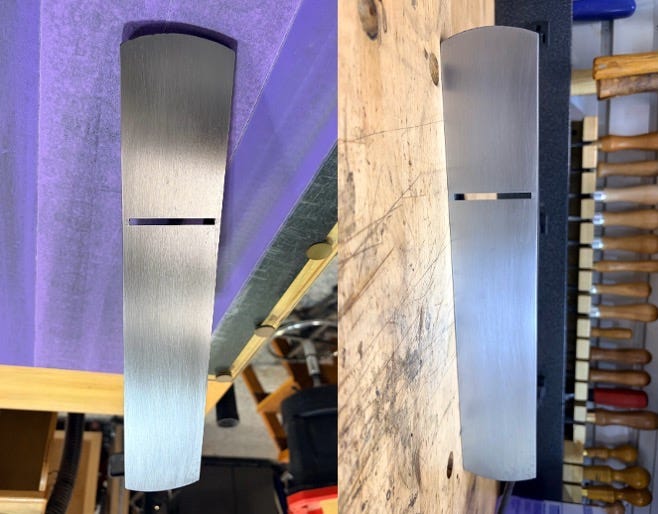
Step 6: Traditional Plate Lapping. This step follows speed lapping and refines the overall flatness of your workpiece while producing a smooth, uniform surface finish. Start on the 120-grit side of your large lapping plate. Apply consistent pressure and rub the workpiece forward and backward in straight-line strokes to create an even grain pattern. Continue until Prussian blue indicates that the workpiece is perfectly flat. Once you are satisfied with the results at 120 grit, flip the plate to the finer-grit side and progress through the 180, 220, and 320-grit abrasives until you achieve your desired final finish.
Continue with higher grits of silicon carbide sandpaper using a hard sanding block if desired. Most vintage hand plane manufacturers finished cast iron soles to about 200 grit. Modern premium makers such as Lie-Nielsen and Veritas appear to finish their plane soles to between 400 and 600 grit.
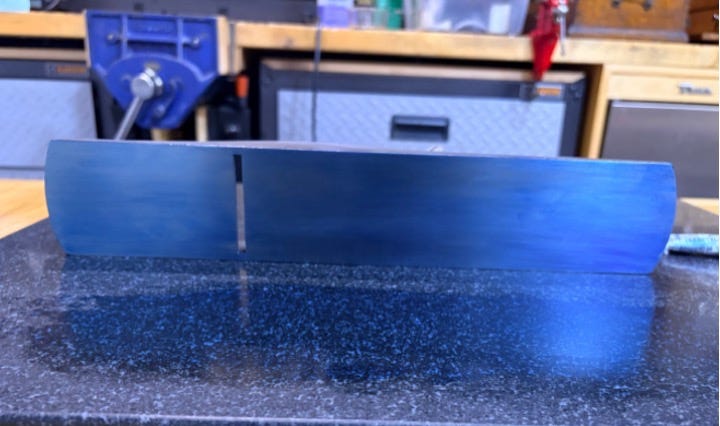
Step 7: Checking Flatness. Begin by thoroughly cleaning the surface to remove all dust, debris, and residue. Next, place a precision straightedge against the workpiece in multiple orientations—lengthwise, widthwise, diagonally, and along both edges. Gently rock the tool on the straightedge to detect any high spots or incomplete contact. Then shine a bright light from behind and the side and look for light leaking through any gaps; even a 0.001-inch gap will be clearly visible under good lighting.
If there is no rocking and no light passes underneath, the surface is flat. Any remaining gaps can be measured with a feeler gauge at the widest points.
Alternatively, slide the workpiece over a thin layer of Prussian Blue on your reference plate and check for uniform blue transfer. Repeat the necessary flattening steps until you achieve full, even contact with no visible light gaps or rocking, or until the entire surface shows uniform blue coverage. Once the functional surfaces are flat, the tool is ready for use, or for additional smoothing and polishing, as you prefer.
Once you have flattened functional surfaces so the tool performs as the factory originally intended, it’s time to decide how far to take the cosmetic restoration.
I think of vintage tool restoration much like classic car restoration, with three main paths:
Concours-Level Restoration: This exceeds the original factory finish to achieve the highest possible “show grade” standard. It uses superior materials when available, finer polishing, and more meticulous detailing than the manufacturer could economically justify during production. Examples include mirror-polishing steel, flawless nickel electroplating, perfect japanning or powder coating, and polishing or bluing all metals to exhibition quality.
Factory-Original Restoration: This aims to match the tool’s original appearance as closely as possible using the same or the closest available materials, finishes, and methods of workmanship used by the factory. The goal is a clean, correct, and period-authentic look, exactly as the tool would have appeared when it left the factory, without excessive shine or over-polishing. This “new old-stock” standard is what I prefer for most restorations, especially when significant corrosion or damage makes it impractical to preserve original patina and wear marks.
Minimal or Preservation Restoration: This path emphasizes retaining visible wear, dents, scratches, and other user marks while making the tool fully functional and visually respectable. At its basic level, it involves thorough cleaning, rust removal, and addressing only the worst cosmetic issues.
Now is the time to choose and commit to your restoration goal. Each path requires different techniques, materials, and time investments, so deciding upfront helps avoid wasted effort and ensures the final result matches your vision. Your choice will also guide which tools, supplies, and techniques you will need for the smoothing and polishing road ahead.
For cosmetic restoration, I use a wide variety of power tools and products depending on the tool’s condition and my restoration goal. While every step can be done entirely by hand, as armorers, bladesmiths, and toolmakers did for centuries, power tools save considerable time when heavy resurfacing is needed to remove corrosion pitting and other damage.
Knowing how to effectively use both power tools and manual techniques, and when to switch between them, is one of the most important restoration skills. I typically use power tools for initial aggressive material removal, especially when smoothing corrosion pitting. I always transition to manual methods after 220 grit, once the surface is clean and smooth enough for finer finishing, to eliminate scratches left by coarser abrasives.
I rely on sanding blocks and hand sanding for smoothing between 320 and 800 grit. When I want a finer finish beyond 800 grit, up to a full mirror polish, I switch to a bench buffer with progressive buffing wheels and polishing compounds.
What follows are the processes and techniques I use for cosmetic restoration. These steps follow a clear, logical sequence: heavy material removal and shaping, intermediate and fine smoothing with sanding blocks to remove power tool marks and coarser abrasive scratches, progressive hand sanding to eliminate remaining scratches, and finally brushing or polishing on bench buffers to achieve the desired final finish.
With experience and a light touch, floor-standing and bench-mounted disc and belt sanders can quickly remove deep pitting and other damage while producing a smooth, even finish that preserves the tool’s original geometry. Variable-speed machines are always preferable to fixed-speed models.
These tools excel at smoothing curved surfaces such as axe heads, hammer faces, chisel backs, plane irons, and rounded tool bodies. Always keep the metal moving continuously against the abrasive, gently rolling or rocking the tool side to side. This helps maintain the original contours and prevents flat spots.
Narrow 1-inch or 2-inch belt sanders are ideal for edges and tight contours, while larger disc sanders work best on broad faces and radial surfaces. To save space in my small workshop, I had two 12-inch aluminum sanding discs made to mount on my wood lathe. I keep 120 grit on one and 220 grit on the other because both grits are useful and this avoids the time-consuming process of replacing adhesive-backed sandpaper. I limit abrasives on all power tools to 120 grit and 220 grit, since coarser grits leave deep scratches that can take as long to remove as the original damage. I typically run my 12-inch disc sander at 600 RPM or lower for the best control.
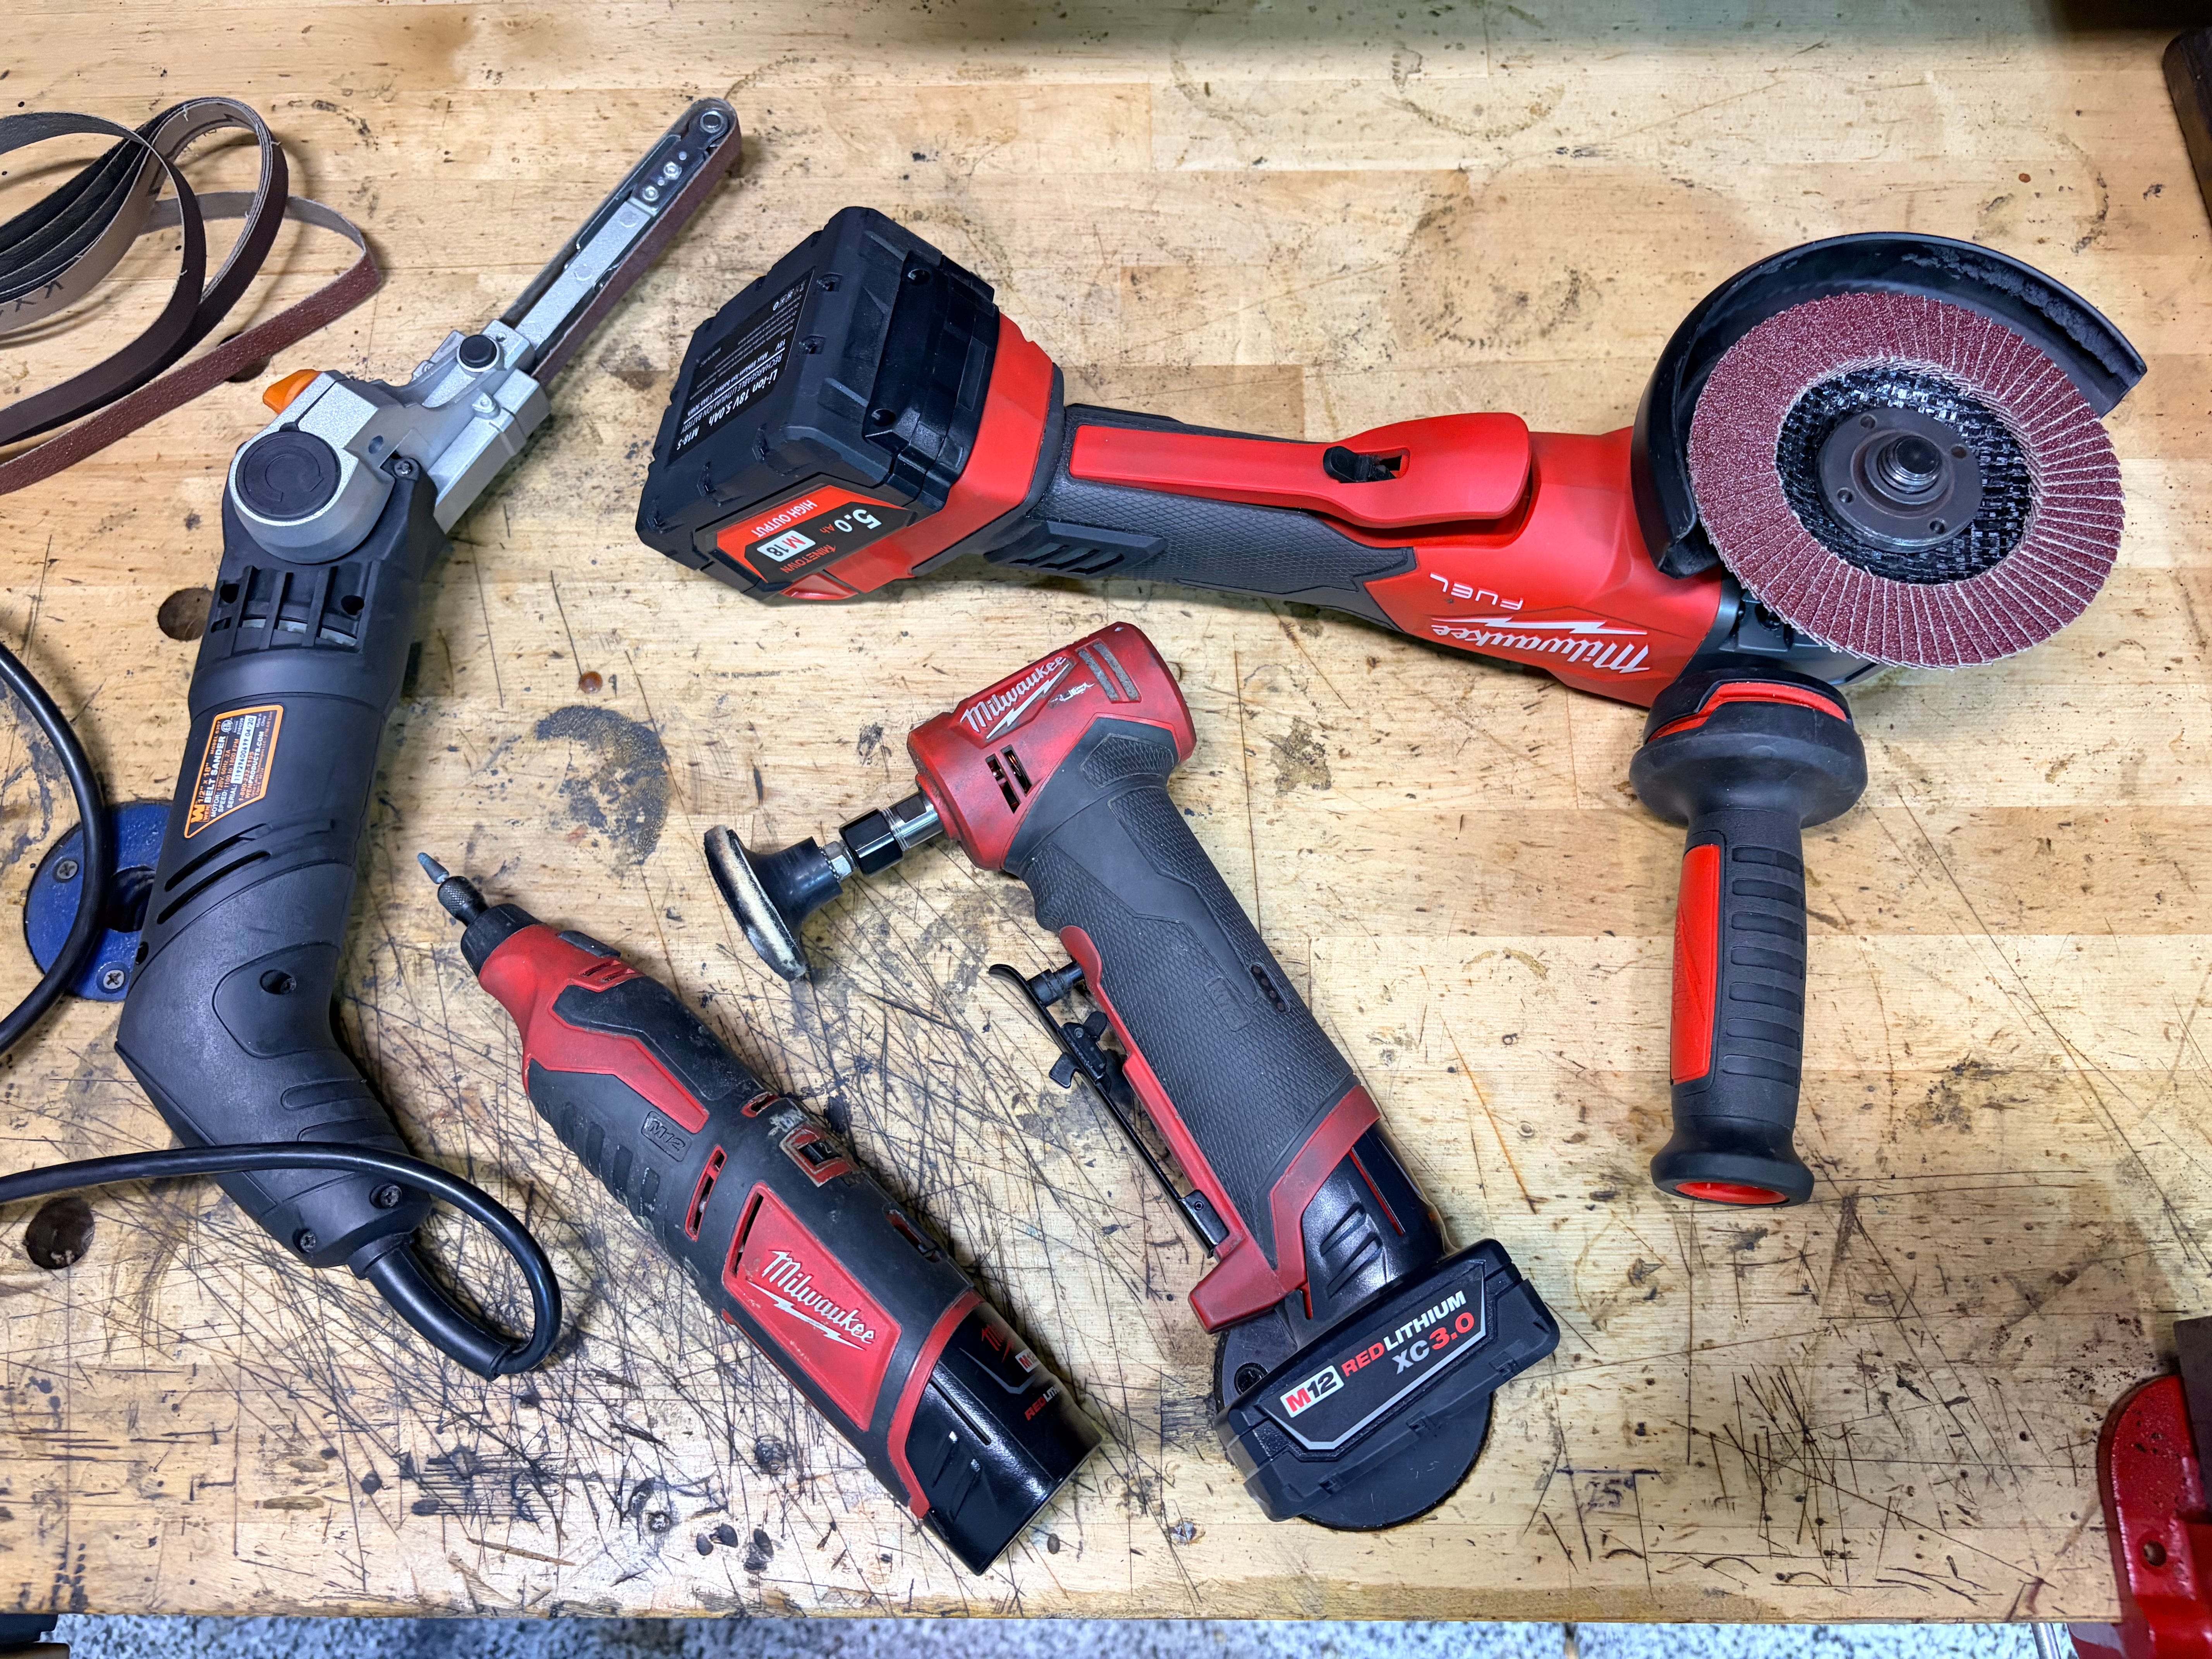
When properly controlled, these handheld power tools excel at the rough work of quickly removing corrosion pitting and other heavy resurfacing to expose smooth bare metal before transitioning to manual sanding. Their compact size and high maneuverability often provide better control than floor-standing machines, especially on irregular shapes, tight curves, crevices, and other hard-to-reach areas. Because you are holding the power tool rather than the workpiece, always secure the workpiece in a vise or clamp it to your bench during use.
I primarily use Milwaukee M18 and M12 cordless tools for their quality and interchangeable battery system, but the best brand for you is whichever one you already own batteries for.
Angle grinders equipped with flap discs are fast and effective for removing heavy scale, pitting, weld marks, and other surface damage. A variable-speed model is highly recommended. Operating in the 5,000–8,000 RPM range provides the best balance of efficient material removal, cooler operation, longer disc life, and reduced risk of swirl marks and overheating steel. I usually avoid flap discs coarser than 120 grit on tool parts, as lower grits can leave deep scratches that are difficult to remove at higher grits.
Hold the grinder at a 15° to 20° angle to the surface—never flat. Running the disc flat reduces control and can cause deep gouges or uneven patches. Keep the grinder moving continuously in smooth back-and-forth or circular passes, applying only light pressure and letting the disc do the work. Always position the guard to deflect sparks away from you and use both hands, including the side handle, for full control.
If you do not have a bench buffer, you can mount a felt polishing disc on the angle grinder for use with polishing compounds. With thin cutoff discs, angle grinders are also excellent for shortening screws and bolts, trimming rusted fasteners, cutting metal bars and rods, and similar tasks.
Die grinders are compact, high-speed tools that function like miniature angle grinders. They accept a wide variety of rotary attachments, including flap wheels, carbide burrs, sanding drums, grinding stones, and Scotch-Brite wheels. Their small size, wide RPM range, and excellent maneuverability make them ideal for detailed work on tight curves, intricate contours, and hard-to-reach areas. They excel at precision blending, removing small pits, refining edges, cleaning crevices, and smoothing surfaces, and are especially useful near maker’s marks, stamps, or delicate sections on chisels and plane irons.
Most variable-speed models operate between 8,000 and 30,000 RPM. Always apply light pressure and keep the tool moving continuously to avoid burning the metal or clogging the abrasive. Lower speeds provide better control with coarser abrasives, while higher speeds work best for polishing and finishing. When used with finer abrasives after initial flap disc work, a die grinder can significantly speed the transition to a smooth, ready-to-polish surface.
Bandfile sanders are very useful in vintage tool restoration, especially for curved surfaces and precise smoothing where larger tools risk removing too much material or are difficult to control. Most models use narrow 1/2” x 18” belts. I use mine only for intermediate smoothing with 120 or 220-grit aluminum oxide or zirconia belts. After trying many expensive models, I recommend the inexpensive corded Wen model (linked) because it works well and is an outstanding value.
The narrow belt and controlled linear abrasion can effectively remove swirl marks, scratches, and gouges left by flap discs and die grinders. It follows contours smoothly, making it ideal for the irregular and rounded profiles common on vintage tools. Its slim, rotatable arm reaches easily into corners, recesses, and edges that would otherwise require tedious hand filing.
For best results on chisels and other long surfaces, keep the belt moving side to side while running it perpendicular to the workpiece. Let the tool’s weight do the work and avoid pushing down hard to prevent heat buildup, wavy marks, or belt loading.
A bandfile sander can effectively bridge the gap between aggressive grinding and fine finishing. Once you own one, it will quickly become an indispensable part of your restoration workflow. I typically follow it with sanding blocks and progressive hand sanding.
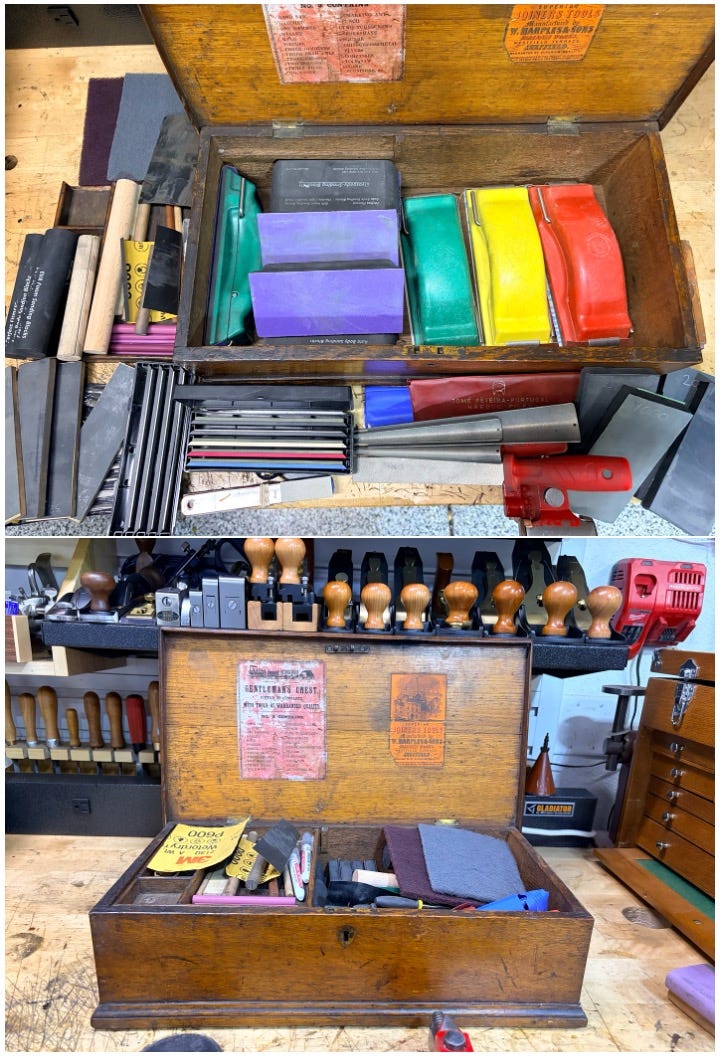
After removing surface damage using power tools, the next step is to use sanding blocks to eliminate the marks caused by the power tools, resulting in a smooth and even surface for final finishing.
Begin with 220 grit on a sanding block and sand parallel to the length of the tool to produce a uniform scratch pattern. If you are working on hardened steel and 220 grit is not cutting quickly enough, start with 120 or 180 grit instead. After 320 grit, advance to 400-grit silicon carbide paper and continue progressing through 600 grit and then 800 grit. Starting at 400 grit, change sanding direction with each new grit, first crosswise and then lengthwise until the crosswise marks are fully removed. Work under bright light so you can clearly see when the scratches from the previous grit and direction have been completely eliminated before advancing.
If you plan to polish the part on a bench buffer, you can stop at 800 grit once all visible scratches are gone. If you do not have a bench buffer but still want a polished appearance, continue hand sanding from 1000 grit to 3000 grit. This manual process produces an attractive, lightly streaked finish that gives the tool a clean yet respectfully used look rather than a brand-new mirror polish.
Preppin Weapon large sanding blocks: I use these large sanding blocks in red, yellow, and green colors with 2 3/4” wide non-adhesive ceramic sandpaper in 120, 220, and 320 grits respectively. Their lever mechanism clamps the sandpaper drum-tight, preventing any slipping or bunching and making sanding far more effective than with other blocks.
The shape of these large blocks allows them to be securely clamped in a wood vise with the abrasive facing upward. This setup lets you move the tool across the stationary block instead of the other way around, which greatly improves the ease and effectiveness of sanding while reducing the risk of cracking cast iron parts in the vise.
The medium-firm pads on these blocks perform well for heavy resurfacing through intermediate smoothing. However, they are not suitable for flattening because the pads compress under pressure and can round over edges. These blocks are also excellent for general woodworking, making them worthwhile as multi-purpose tools for all shops.
Auto Body Sanding Blocks: These solid medium-firm foam blocks are comfortable to hold and provide excellent pressure feedback. I cut the longer blocks in half to create more manageable hand-sized lengths. They accept adhesive-backed PSA sandpaper, so I cut matching lengths from 2 ¾” wide ceramic PSA rolls for dry sanding or silicon carbide PSA sheets for wet sanding.
These flexible blocks conform beautifully to curved and irregular shapes, making them ideal for finishing work in the 400 to 3000 grit range. They are not suitable for flattening or maintaining crisp edges, however, because the foam compresses under pressure and rounds over edges. You can clamp these blocks in a wood vise with the abrasive facing upward, or use them handheld while the tool is lightly clamped in a vise with soft jaws or padded faces.
Hard Maple Sanding Blocks: I make my own 2” x 6” x 3/8” sanding blocks from hard maple for finish smoothing and polishing. I use them with two types of PSA-backed abrasives:
Sharpo Diamond PSA Backed Lapping Film: These sheets work well when trimmed to size and used with hard blocks for smoothing and polishing. I also use them on glass lapping plates to mirror polish flattened steel and small parts like chisels, plane irons, and flat screw heads. In regular use, I find that these sheets usually last at least six months.
Silicon Carbide 6 inch by 12 inch PSA Backed Sheets: I stock these sheets in grits from 220 through 3000, and cut them to size as needed for use with sanding blocks. These sheets are ideal for spot-smoothing small scratch areas without reworking the entire surface. I also apply them to lapping plates in the 220 to 400 grit range because they perform so well for wet lapping screw heads, bolt heads, and blade backs before switching to diamond lapping film. Progressing through the grits from 400 to 3000 with firm pressure on hard blocks will produce a beautiful hand-rubbed mirror polish on steel. When replacing sheets, peel them off the block or glass and remove any residual adhesive with alcohol before applying the new sheet.
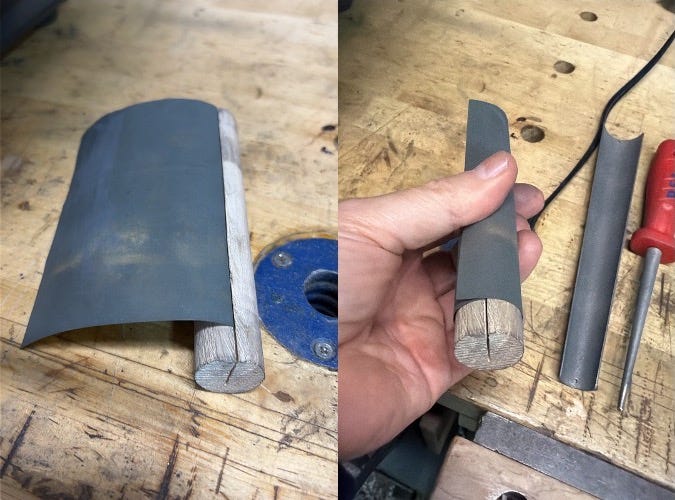
Hardwood dowels: I use 6-inch lengths of hardwood dowels with 1/4”to 1” diameters for smoothing and polishing concave surfaces. Cut a narrow slot lengthwise down the center of each dowel using a thin-kerf saw, then insert the end of a non-PSA silicon carbide sandpaper strip into the slot and wrap the paper tightly around the dowel. These simple sanding rods work exceptionally well on all inside radii and curves, especially gouge flutes and incannel bevels.
PSI Woodworking Products Diamond Laminated Sharpening Set: This diamond stone set includes conical, round, and flat shapes, making it ideal for smoothing, finishing, and honing irregular concave, convex, and other curved metal surfaces.
EZE-LAP Color Coded Diamond Hones: I purchased a set of these after seeing them recommended by Christopher Schwarz. They are very convenient for precise work on small areas, removing stubborn isolated scratches, and detailed honing.
DMD Diamond Sharpening Stone Set 240-1000 and 1000-12000 Grit: These handheld diamond stones are versatile for all smoothing, polishing, and honing tasks. This wide range of progressive grits works well for mirror-polishing small steel areas and is also excellent for honing bench chisels.
There are many situations when hand sanding with folded sandpaper works better than sanding blocks. These include creating a uniform brushed or polished finish on long surfaces, working on round and convex shapes where the paper naturally conforms between your hand and the curve, applying fingertip pressure in concave areas, and spot-removing small scratches without reworking the entire surface. Hand sanding also excels at blending contours and flat areas smoothly without rounding crisp edges, which can happen with soft sanding blocks.
The key to success when hand sanding to a satin or polished finish is patience and steady progression through finer grits under bright, direct lighting. This allows you to clearly see when scratches from the previous grit have been completely removed before advancing.
I normally begin hand sanding with silicon carbide paper at 400 grit. Cut 9” x 3” lengths and fold them into thirds. These folded pads fit comfortably in the hand, support full-length strokes, and allow firm thumb pressure on problem spots.
Starting at 400 grit, change sanding direction with each new grit, first crosswise and then lengthwise. Continue sanding with each grit until all scratches from the previous grit and direction are fully removed. Apply light pressure and switch to fresh paper as soon as it begins to wear. Wipe the surface clean with a tack cloth before every grit change to prevent coarse particles from causing deeper scratches. A light mist of mineral spirits helps prevent the paper from loading during dry sanding.
Once you reach 800 grit and all previous scratches have been eliminated, decide whether to stop now with a matte finish or continue to a mirror polish. If you have a bench buffer, stopping at 800 grit is good enough because the buffing compounds and wheels will handle the rest. For a true hand-rubbed mirror finish, continue with wet sanding using progressively finer grits.
To achieve a hand-polished finish after 800 grit, begin with 1000 grit silicon carbide wet-and-dry paper and progress through 1200, 1500, 2000, and 3000 grit. Use PSA-backed sandpaper on hard sanding blocks or glass lapping plates for flat surfaces, and folded sandpaper for contoured areas. Apply a few drops of light oil such as CRC 3-36 to both the metal and the paper. The lubricant floats away particles, reduces clogging, and allows smoother cutting. Continue alternating sanding directions with each grit and wipe the surface with mineral spirits before moving to the next finer grit.
For the final polishing step, choose between these two options depending on the look you want:
Satin Finish: Use a grey ultra-fine Scotch-Brite pad with a drop of oil. Lightly brush the tool lengthwise across the pad. This removes any haze left by the 3000-grit paper and produces a beautiful low-luster satin finish that looks hand-finished rather than machine-polished. Many people prefer this appearance to a full mirror shine.
Mirror Polish: Progress to 6000, 16,000, and 60,000-grit PSA-backed diamond lapping film adhered to sanding blocks. Rub in long, straight strokes parallel to the tool’s length. I prefer sanding dry with these and cleaning the film with Simple Green to remove iron particle buildup. If you prefer to sand wet, use Simple Green as the lubricant rather than oil. After polishing, wipe the tool clean and immediately protect it with CRC 3-36 or a similar oil product to prevent rust.
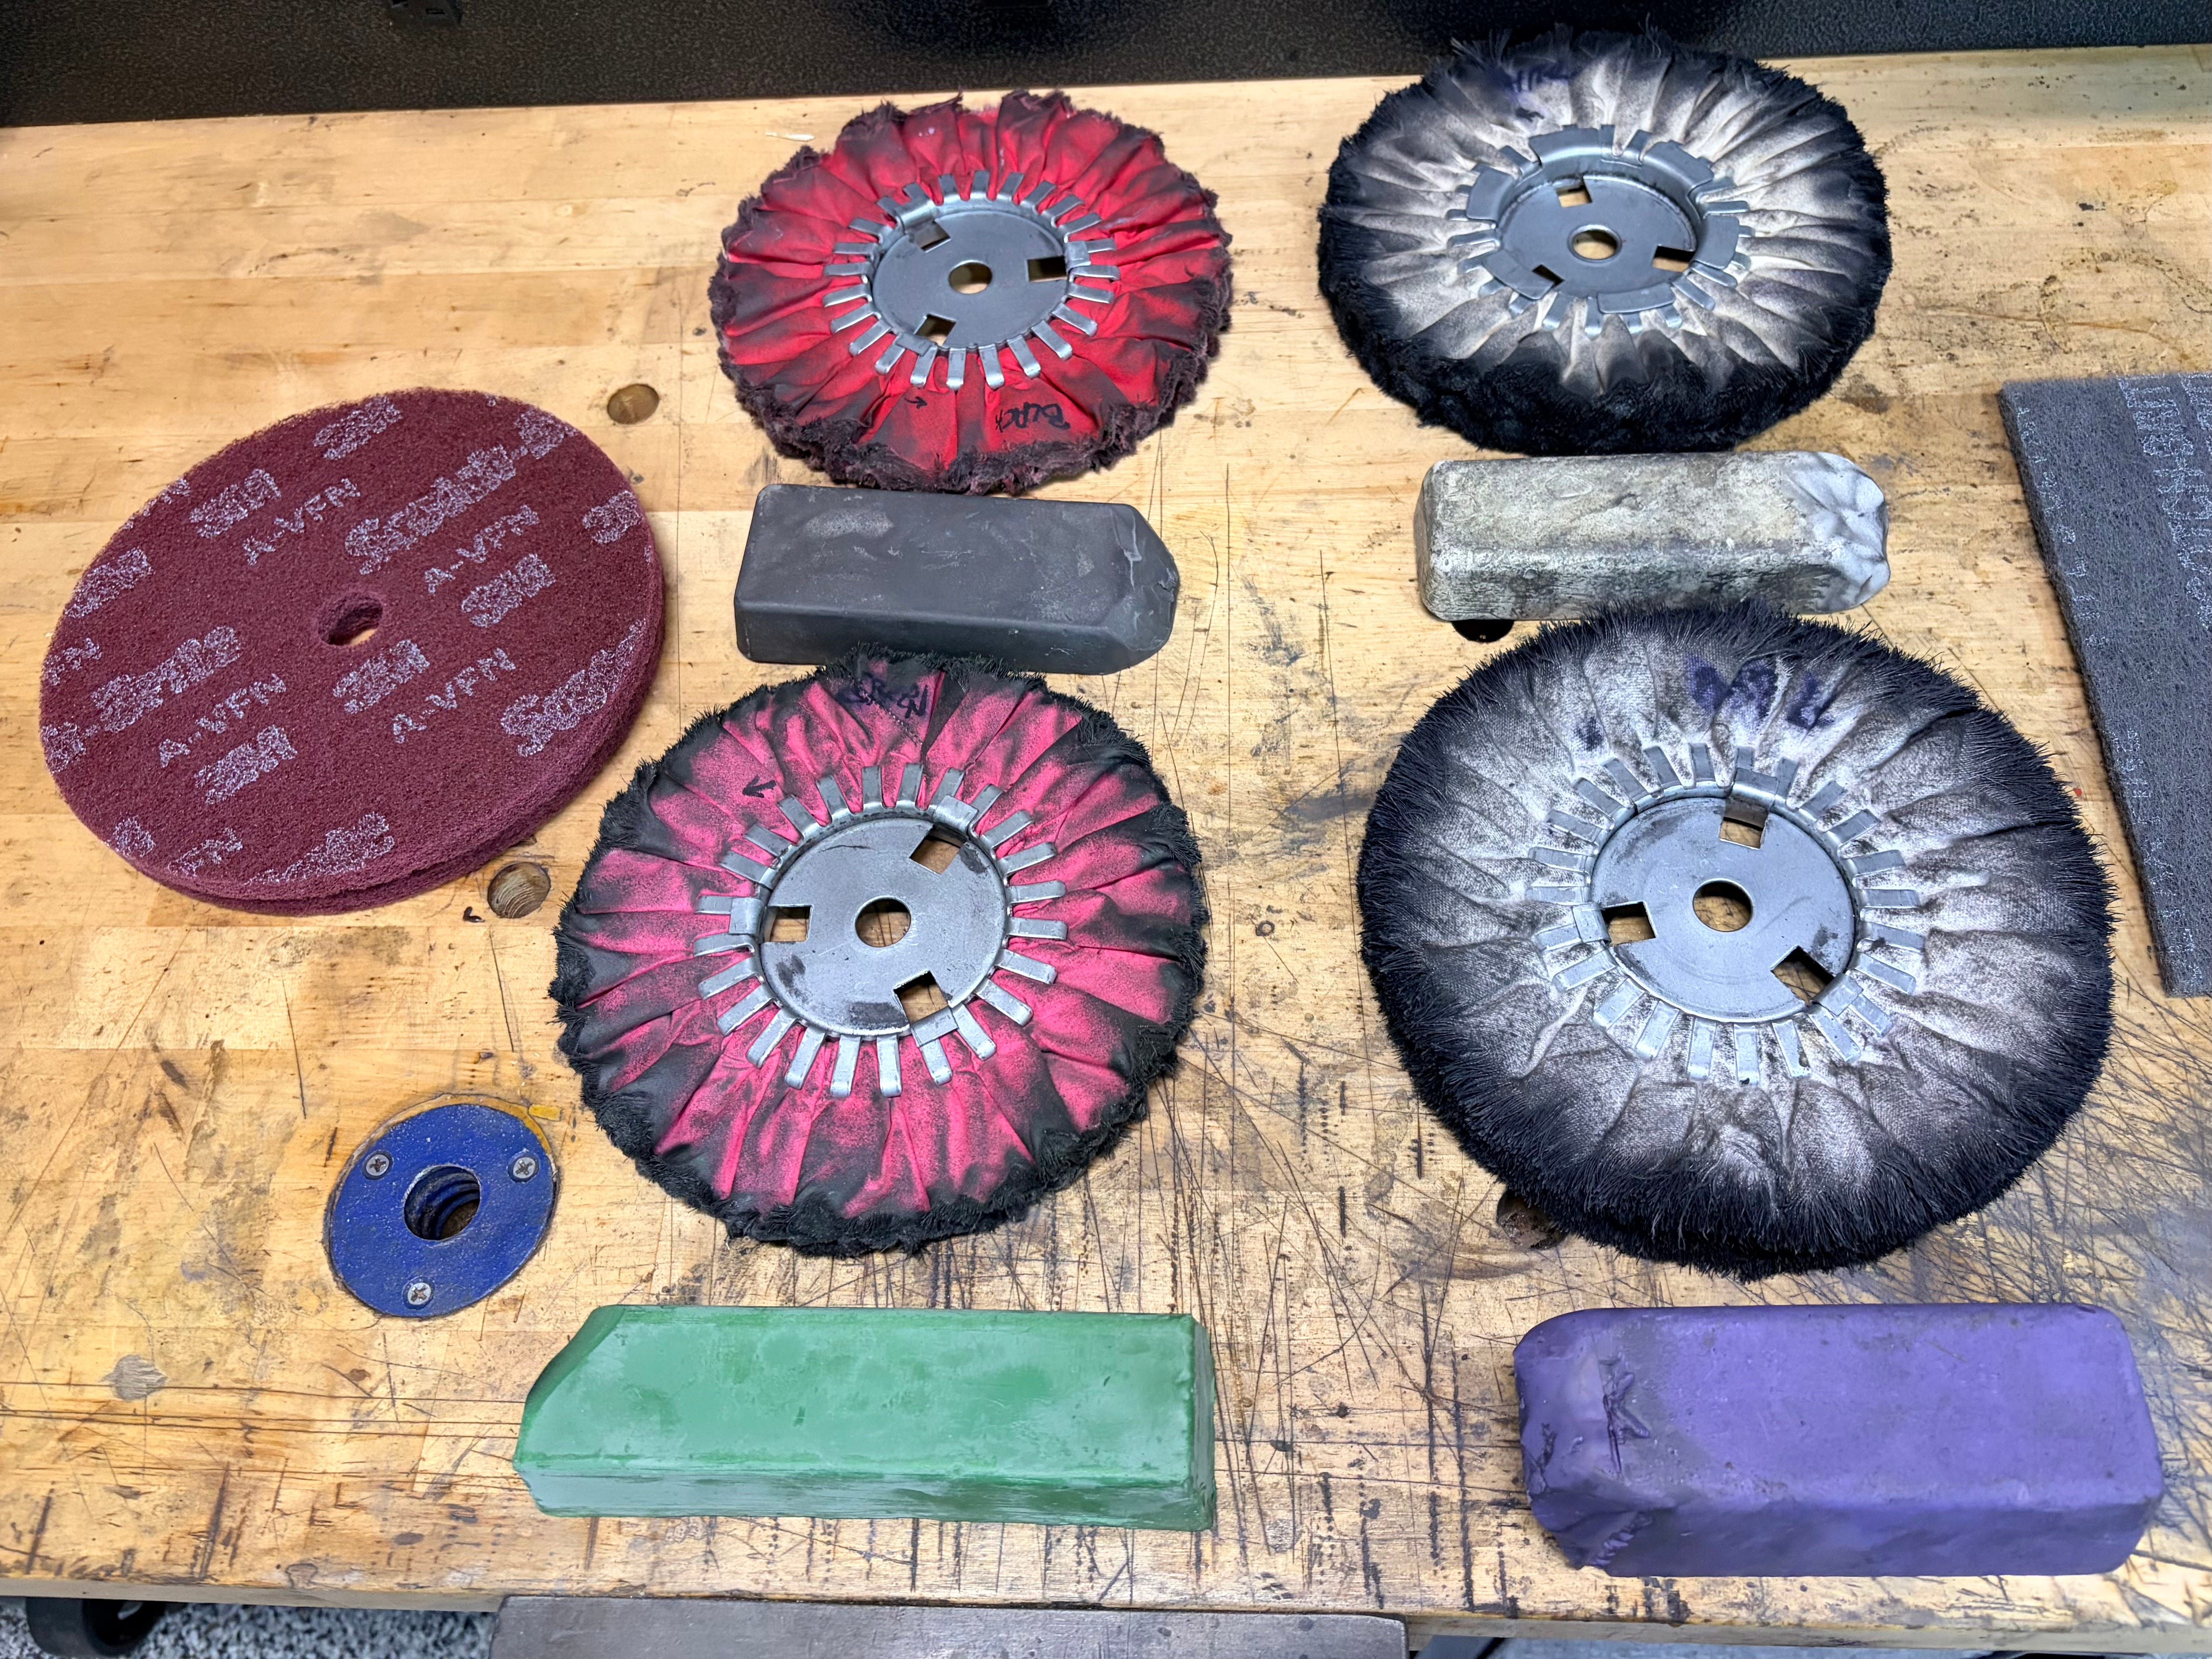
Once your iron or steel surface has been sanded clean to 800 grit, you can choose from a beautiful brushed satin finish, a mirror polish, or any finish in between. While you can achieve these finishes with an angle grinder or die grinder, a bench buffer will deliver the most professional results.
Vintage tool manufacturers rarely polished steel parts to a mirror shine due to the extra time and cost involved. Most received a matte or brushed satin finish. A brushed satin finish provides a professional, low-luster appearance that hides minor imperfections, looks period-authentic, and is quick to achieve. A mirror polish creates a deep, reflective shine, but can sometimes appear overly modern or out of place on a vintage tool. Whichever look you prefer, any finish is possible with the right wheels, compounds, and techniques.
After spending thousands of dollars and countless hours trying different buffing products, I use and can strongly recommend the products described and linked below.
Bench buffers are among the most dangerous power tools in the shop. Treat them with the same level of respect and caution as table saws, shapers, jointers, and lathes.
Always work in a well-ventilated area and keep a fire extinguisher close by. Polishing compounds mixed with fine metal dust can be flammable.
Always wear a face shield, a dust mask or respirator, hearing protection, and thin protective gloves that do not interfere with your sense of touch.
Never wear long sleeves, loose clothing, jewelry, or anything that could get caught in the wheel.
Always hold small parts securely with locking pliers or a handheld vise when using the bench buffer. Even when the wheel spins downward, centrifugal force can cause a small part to whip around the wheel toward your face when it slips from your grasp.
Take your time, maintain a firm grip on the workpiece, and never force the work.
A single moment of carelessness with a bench buffer can cause serious injury. Stay focused and work safely.
The angle grinders and die grinders recommended earlier for resurfacing and smoothing can also be used for polishing iron and steel. However, for polishing hand tools and small parts, you’ll find a bench buffer is much easier to use and delivers significantly higher quality results.
Angle Grinders: For polishing with an angle grinder, use felt wheels or felt flap discs and run the tool at 3,500–6,000 RPM. Hold the grinder at a 10–20° angle to the workpiece and move it in long, overlapping strokes parallel to the tool’s length or desired grain direction. Apply light, consistent pressure and keep the wheel constantly moving to avoid creating swirl marks and heat buildup.
After finishing with a felt wheel and compound, thoroughly clean the workpiece with mineral spirits or CRC 3-36 before moving to the next wheel. This prevents cross-contamination between compounds.
Professional polishers sometimes remove the wheel guard from angle grinders to use large polishing wheels on big surfaces such as truck tanks or sheet metal. This practice is not recommended for smaller tool parts, as it greatly increases the risk of injury from kickback.
Die Grinders: Die grinders excel at polishing in tight contours, edges, and small areas that are difficult to reach with an angle grinder or bench buffer. They are also ideal for feathering transitions near maker’s marks and stamps.
With a die grinder, you are limited to felt wheels for polishing. You can use the same progressive compounds as with a bench buffer, but you will not achieve the same high gloss possible with the finer wheels on a bench buffer. For best results, run the die grinder at 8,000–15,000 RPM, apply light pressure, and work in straight lines. Thoroughly clean the workpiece with mineral spirits or CRC 3-36 after each wheel and compound change to prevent cross-contamination.
Bench Buffers: For the best finish quality and overall polishing experience, I recommend a dedicated 8-inch bench buffer. The cheapest models are generally underpowered and not worth buying. Six-inch buffers are too small and lack sufficient power, while 10-inch and larger models are unnecessarily expensive for most home workshops.
Avoid trying to repurpose a bench grinder as a buffer. The wheel guards interfere with buffing wheels, changing wheels is more cumbersome, and the short shafts make it harder to work safely and comfortably with them. Since you will frequently switch between brushing and polishing wheels, a proper buffer with long shafts on both sides is much easier and safer to use.
After testing many options, my top entry-level recommendations are the Rikon 8-inch low-speed buffer and the Powertec 8-inch slow-speed buffer (each currently sell for under $175). Both work well as starter units, although their 1/2 HP motors can stall under heavy pressure. They will also serve as good secondary machines (so you’ll never need to change wheels) if you upgrade later.
For heavier-duty performance, consider the Eastwood 8-inch 1 HP dual-speed buffer (around $270–$330), the Baileigh 8-inch 1 HP industrial buffer (around $429), or the Jet 8-inch industrial buffer (around $400). Do your own research to find the best bench buffer for your needs, compare current prices, and watch for sales from local tool suppliers.
Scotch-Brite 8” x 1/2” Very Fine Non-Woven Finishing Discs: If you have properly prepped your workpiece to 800 grit and plan to finish it to mirror polish, you can skip this step. However, I often still use these non-woven discs before moving on to buffing wheels. They are excellent for quickly creating a subtle, uniform, factory-like brushed satin finish on all metal parts.
These discs are the same type and quality used by plumbing and hardware manufacturers to convert shiny nickel, brass, and stainless steel to a brushed satin finish. They function like a very fine 400-grit abrasive and leave the surface with a subtle linear grain pattern. Do not confuse these with other maroon-colored wheels: most similar-looking burgundy non-woven wheels are coarser (typically around 200 grit) and are not suitable for use as the next step before polishing compounds. If you cannot find the specific discs I linked, search for generic “very fine”, “ultra-fine” or “A-VFN” non-woven maroon or grey polishing discs that specify a 400 to 600-grit equivalent finish.
To achieve a clean, linear brushed finish, hold the workpiece firmly and draw it up and down in straight passes parallel to the wheel. For many vintage tools, this finish alone may perfectly duplicate the original factory appearance.
If you want to follow these discs with buffing wheels and polishing compounds, first lightly hand sand the workpiece with 800-grit silicon carbide wet-and-dry paper using a light oil lubricant. You can then proceed directly to the buffing wheels.
The discs I recommended have a 1/2” arbor hole and install tightly on 5/8” buffer arbors. Do not purchase discs with 3/4” or 7/8” arbor holes unless those sizes match your arbor exactly, as they will wobble off-center and therefore will not work well. For best results, stack two discs together on the arbor. This creates a wider, more stable polishing surface and improved uniform brushed pattern, and will also allow you to brush both sides of a part at the same time between the two discs.
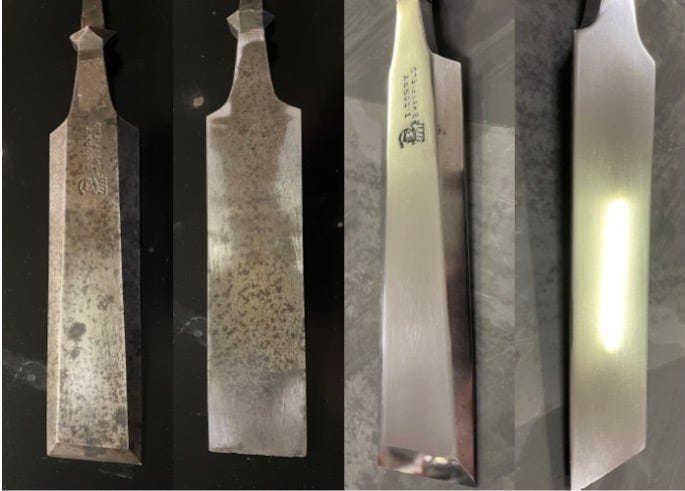
Using the products and processes outlined below on iron or steel that has been prepped to 800 grit, you can achieve any finish you want, ranging from matte to a show-grade mirror polish.
For a full mirror polish, use all four wheels and compounds listed below, in the order listed. Each compound should only be used with its designated wheel. Or, you can experiment with one or more of the wheels and compounds to achieve any finish between brushed satin and full mirror polish. For example, to get a sheen one step above brushed satin, try using just the white compound with the UBM wheel. For a shine one step above that, try just the green rouge compound with the pink Airway wheel. For a gloss one step above that but less than a full mirror polish, stop after the black stainless cutting compound with the red wheel. If you don’t like any result, just hand sand back to 800 grit and start over.
After testing nearly every buffing wheel available in the US, I’ve found that the Airway wheels listed below produce the best results. The Red and Pink Airway wheels significantly outperform traditional sisal, spiral-sewn, and denim wheels with visually superior finishes.
The compounds listed below are available in two sizes: full-size bars and smaller junior bars. The full-size bars are gigantic, so I cut mine in half for easier handling. Even after a full year of regular use, I still have over 90% of each bar remaining. So for convenience and storage, I suggest buying the junior-size bars.
To load a new buffing wheel with compound, lightly touch the compound bar to the spinning wheel and move it evenly across the entire face and edges for no more than two to three seconds. A common mistake is applying too much compound. The actual polishing effect is produced by the combined effect of the wheel fabric and embedded compound. Too much compound acts as a lubricant rather than a polish, so excess compound simply builds up on the workpiece rather than polishing it.
To reload the wheel during use, press the compound against it for just one or two seconds. If buildup appears on the workpiece, stop adding more compound until the excess clears.
Use a separate wheel for each compound to avoid cross-contamination. I label each wheel with the name of its designated compound to prevent ruining a finer wheel with more aggressive compound. Thoroughly clean the workpiece with mineral spirits or CRC 3-36 after each wheel to remove all residue before moving on to the next wheel and compound.
Always keep your workpiece moving continuously on your wheels. If your steel workpiece becomes too hot to hold comfortably during buffing, set it aside to cool to avoid drawing the temper and softening the metal.
Airway Red 8” Steel Polishing Wheel with Black Stainless Cutting Compound: This combination will remove scratches finer than 600-grit from iron and steel, level the surface, and produce a moderate polish. This wheel is very firm and should be dressed before first use. Turn on the buffer and use a buffing wheel rake on the spinning wheel to loosen and open its fibers. Then apply the black cutting compound as described above.
For best results, apply at least medium pressure while buffing with this wheel. Begin by moving the workpiece crosswise across the wheel while keeping it in constant motion, then switch to several lengthwise passes. When finished, you should see a uniform shine.
Airway Pink 8” Steel Polishing Wheel with Green Rouge Compound: Green rouge adds depth and clarity and should add a clear enhancement in shine on carbon steel compared to the previous step. Thanks to its chromium oxide content, it will produce a very bright luster on stainless steel and D2 tool steel.
Some polishers skip green rouge on plain carbon steel and go straight from black to white compound. I prefer using the full sequence of black to green to white to purple on all workpieces because it consistently delivers the best possible results when working toward a true mirror finish, especially when the alloy of the workpiece is unknown.
Like the red wheel, the pink Airway wheel is stiff when new and should be dressed with a buffing wheel rake before its first use. Apply compound to the wheel and use it in the same way described for the red wheel.
Airway 60/60 UBM 8” Polishing Wheel with White Rouge Compound: This wheel does not require raking before first use. As a finishing wheel, buff the workpiece in the lengthwise direction only. You should see at least a slight improvement in shine compared to the previous step.
Airway Domet Flannel 8” Polishing Wheel with Purple Rouge Compound: This is a soft, loose cotton flannel wheel that requires no raking. It is used exclusively for final polishing when you want the highest possible mirror shine. Buff in the lengthwise direction only. You should see a final, subtle increase in depth and reflectivity when used after the previous step.
This guide has provided you with practical, time-saving techniques for performing functional repairs and cosmetic restorations on vintage hand tools. You now understand how metals, abrasives, and finishing methods influence your decisions, giving you the flexibility to tailor each restoration to your vision.
Whether you choose a simple functional repair, a light refresh that preserves patina and history, a factory-original appearance, or a concours-level restoration, with time and practice, these methods will give you the skills and confidence to achieve world-class results in your home workshop.
By mastering these skills, you will significantly improve both the performance and appearance of your tools while building a solid foundation for the advanced techniques covered in upcoming tutorials.
If you found this article helpful, please subscribe to my Substack. You’ll receive all future tutorials in your inbox.
The following in-depth topics will be covered in future tutorials in this series:
Repairing Screws, Bolts, and Threading in Vintage Tools: Detailed guidance on fixing tear-out, deformed screw head slots, damaged threads, and stripped tool threading. Includes a practical overview of American, British, metric, and specialty thread standards used in vintage tools, plus how to source and use taps, dies, and other essential repair tools and products.
Professional Nickel Electroplating in Your Home Workshop: Step-by-step instructions to set up and operate a nickel electroplating tank in a home workshop and achieve consistent, world-class results using my innovative direct-to-steel processes. You’ll also learn about products and techniques for patching and repairing existing nickel plating.
Factory-Original Finishing for Iron and Steel Tool Parts: How to refinish metal components using historical and modern methods and materials in a home workshop. Covers traditional bluing, multi-coat baked japanning, color matching paint, spraying, baking enamel finishes, and powder coating.
Restoring, Repairing and Remaking Wood Tool Handles: Techniques for making strong, permanent, and nearly invisible repairs to broken or chipped wooden handles. Includes creating your own clear or color-matched authentic shellac, a review of the best traditional and modern finishes for tool handles, professional application methods, and step-by-step guides with templates for making replacement plane and chisel handles.
Copyright © 2026 Eric O’Grey. All rights reserved. No part of this content may be reproduced, scraped, or used to train artificial intelligence models, machine learning systems, or large language models without express written permission.
No posts
Comments
Nothing yet. Say the first thing.
Sign in to join the conversation.