
Hello Astro-nuts and DWARF-wranglers,
If you’ve ever felt a wave of analysis paralysis looking at the dozen different software options for processing your astro-images, you are not alone.
We’ve all seen it in almost every astrophotography group online: someone shares a stunning capture from their smartscope, and the Processing description appears to be written in some foreign tongue and rarely describes a complete process—it so often sounds like mysterious BLACK BOX magic.
My goal at DwarfVision is to help you demystify the processing ‘black box’—that intimidating gap between capturing raw data and creating a masterpiece.
Before we dive in, if this is the kind of practical, no-nonsense content you find valuable, make sure you subscribe to DwarfVision. It’s 100% free and ensures you never miss a guide like this one. Our goal is to build the best resource for DWARF users, together.
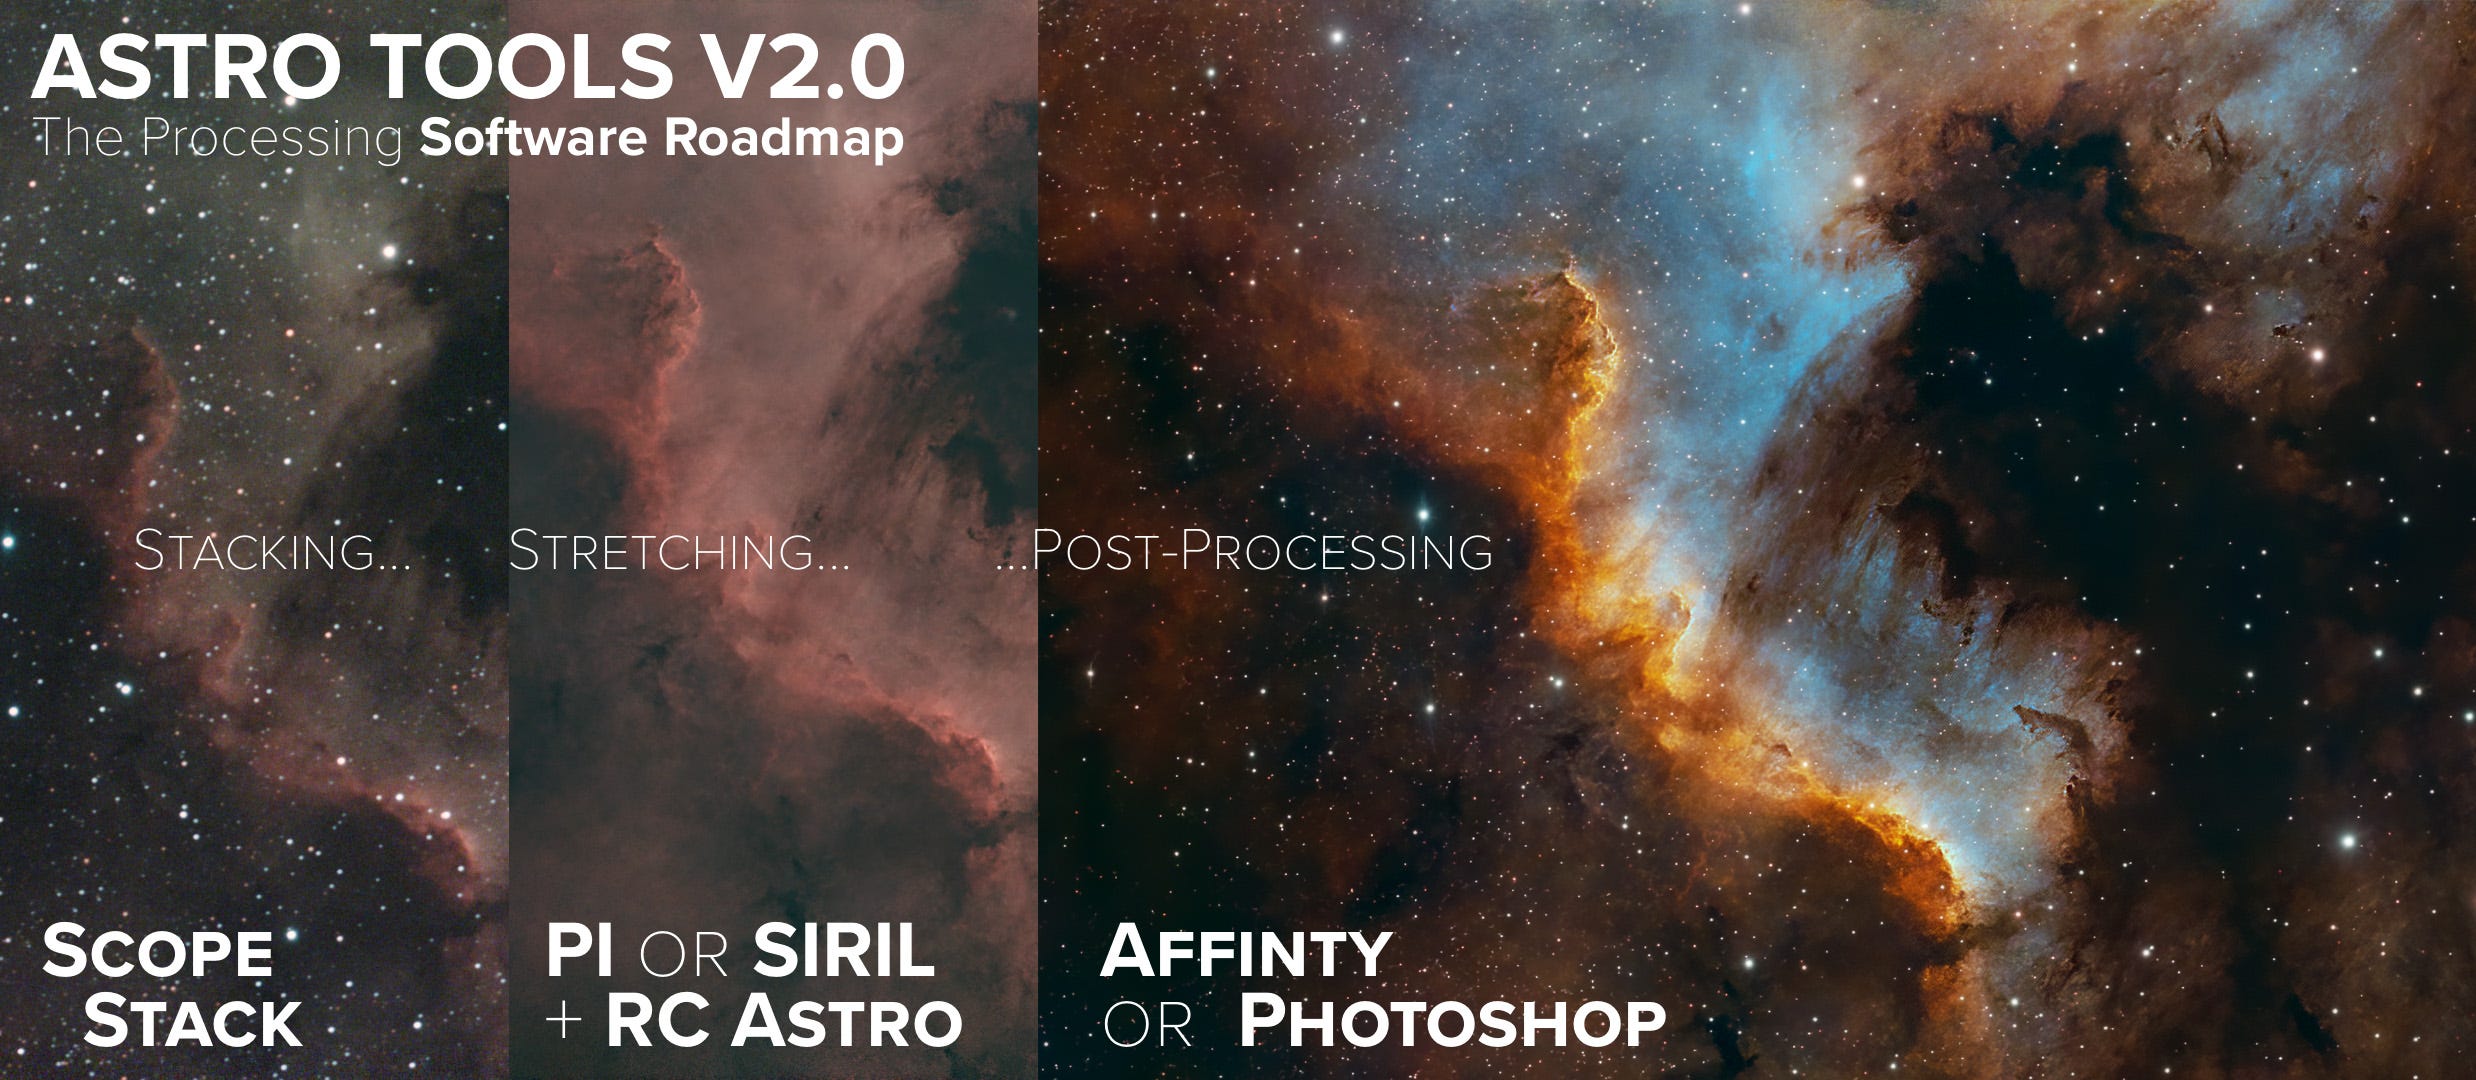
As you already know, these are not “photos” in the traditional sense; we are capturing a “data set”, a series of individual “exposures” that must be combined.
We call this process of combining exposures “stacking.” This happens as you shoot, right on your DWARF, and you see the result in the field stack right in your album.
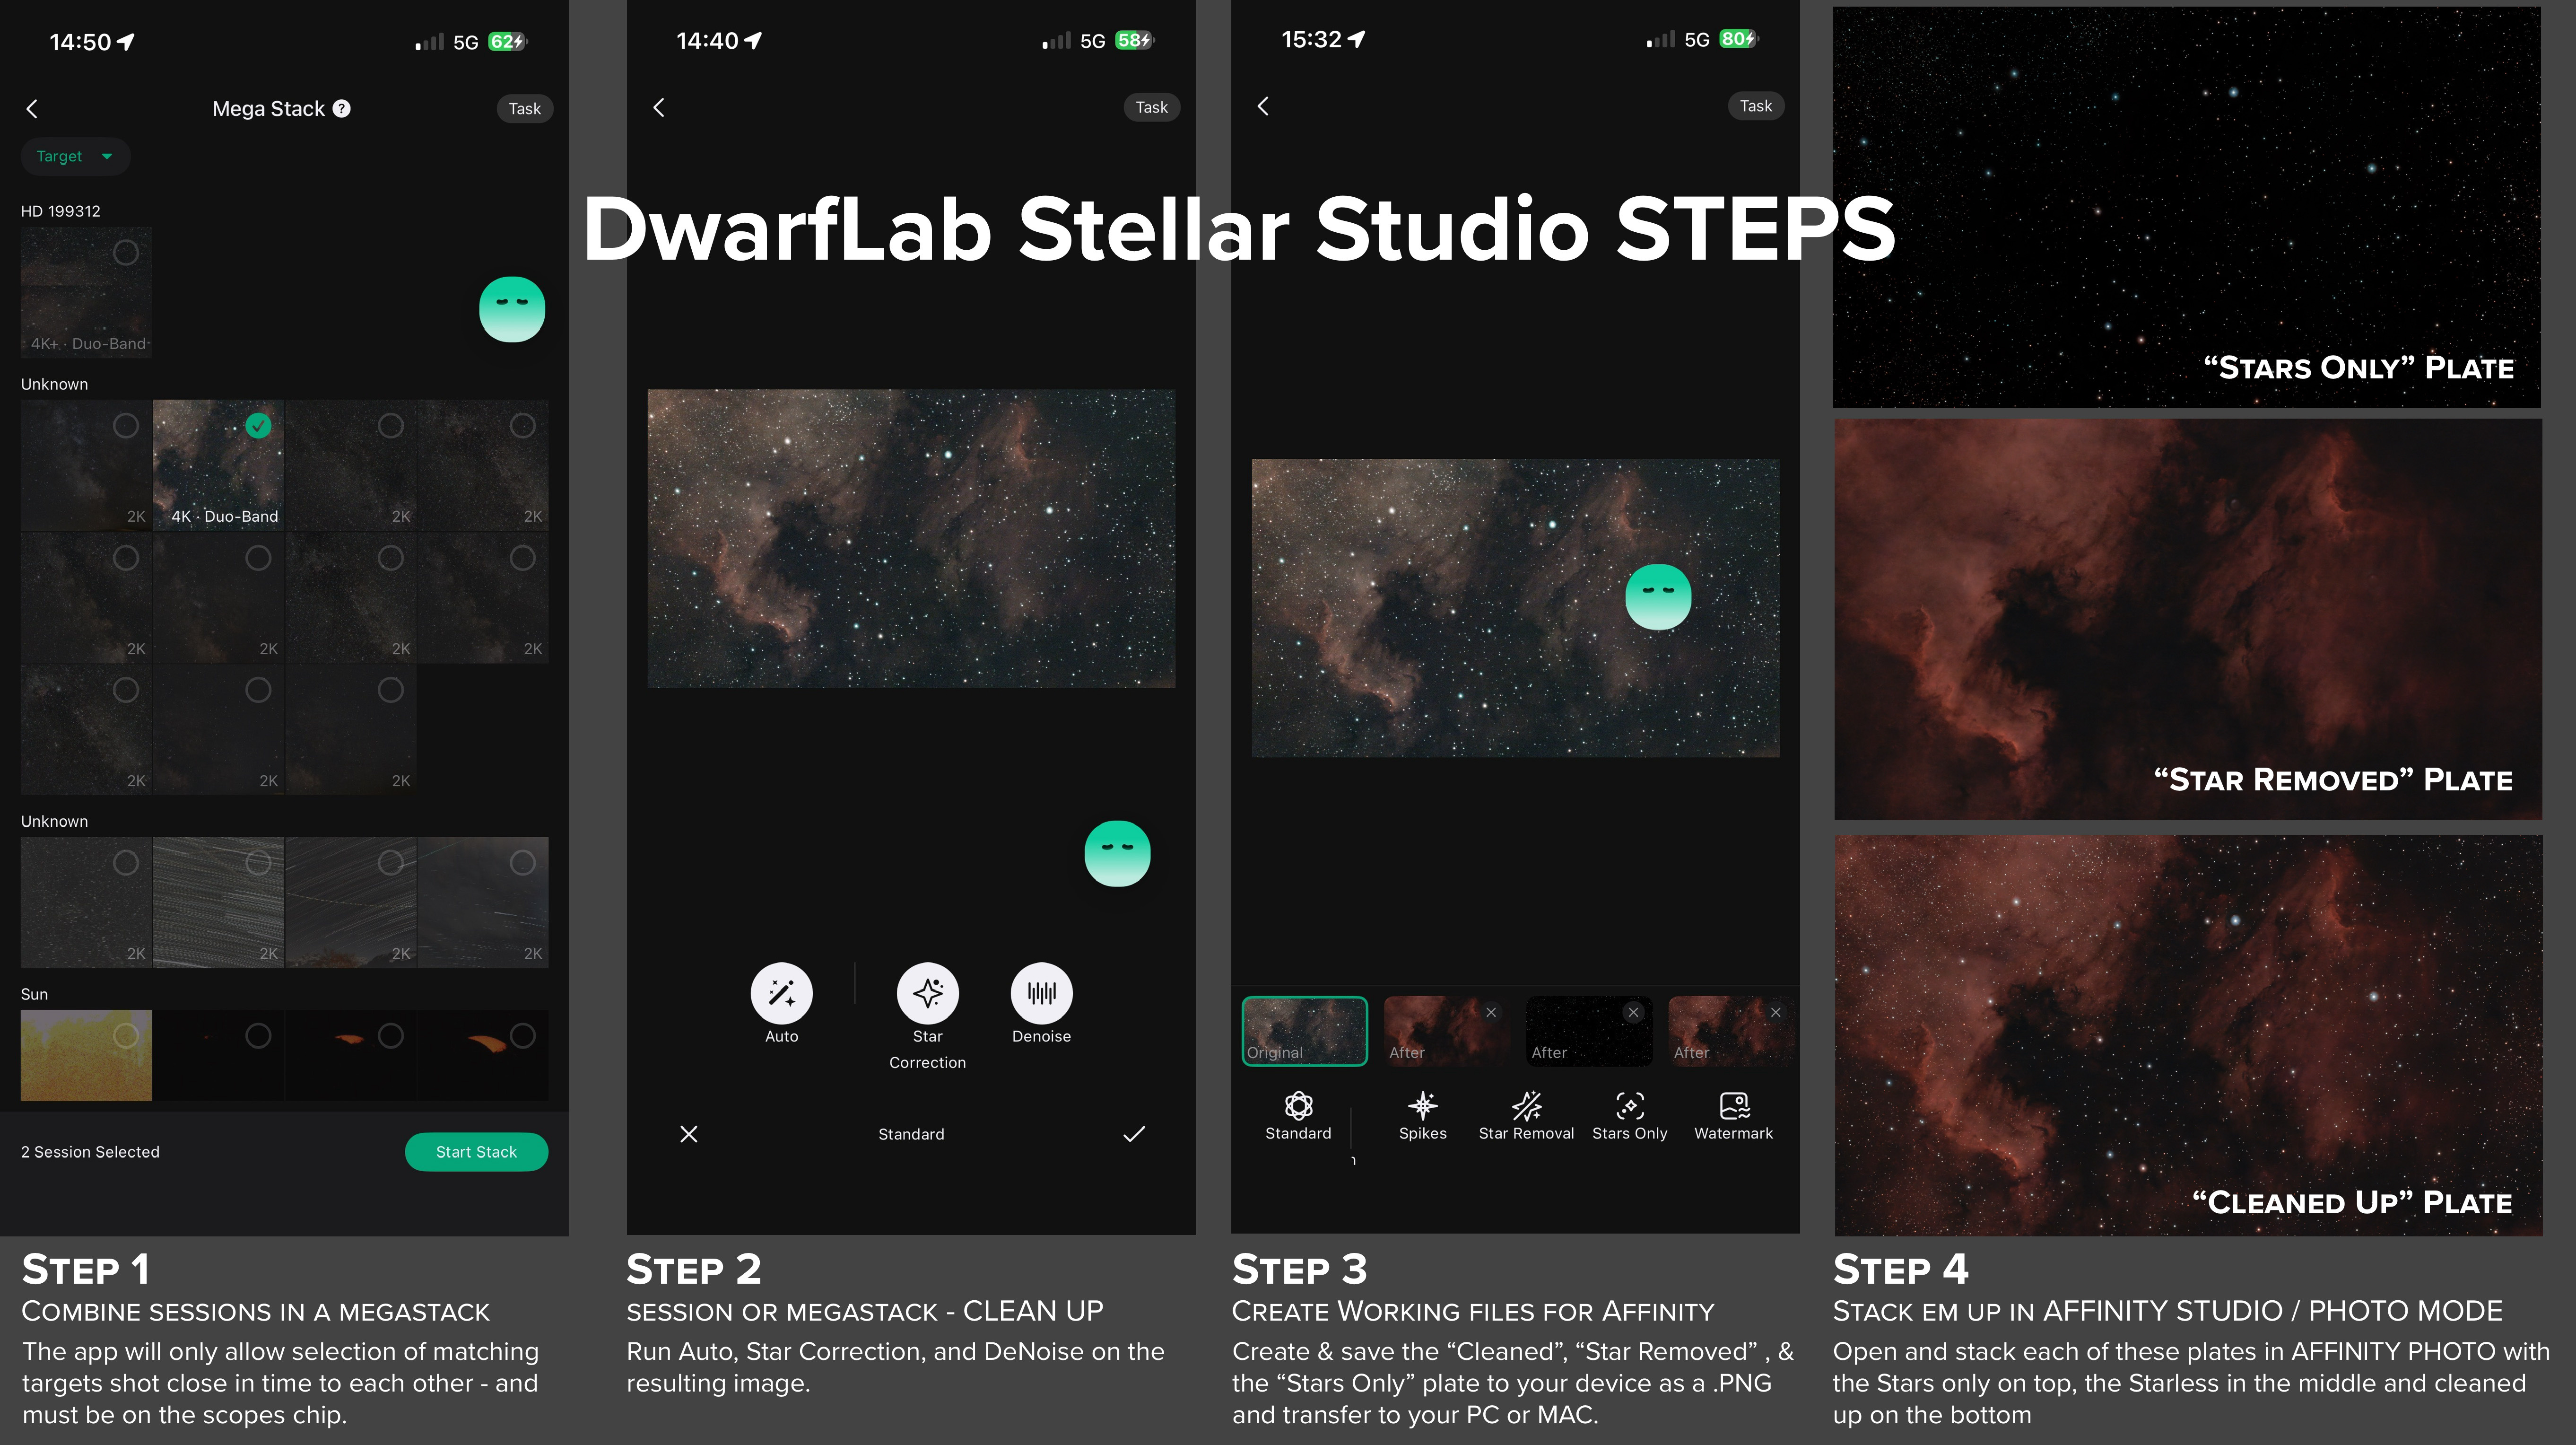
If you use Stellar Studio’s “Megastack” function to combine two sessions, the sessions are stacked again within the app and displayed in Stellar Studio.
In the same way, you can also stack your own shots outside of Stellar Studio by using the files provided in your DWARF’s “Astronomy” folder when you connect it to your PC or Mac.
The two main PC-based stacking programs you will encounter are PixInsight and SIRIL.
Once the image series is stacked, we call the next steps “stretching,” during which we clean up the data, boost the signal, reduce noise, remove the stars, and finally produce a visible, naked-eye image of your nebula or galaxy capture.
But we don’t stop there! Next up are the “Post-Processing” steps, where we adjust the color, brightness, and contrast, add the stars back in, and export the final masterpiece.
Navigating these steps essentially comes down to choosing your path: on one end, you have streamlined, one-stop solutions that require no additional plugins, and on the other, a spectrum of workflows involving multiple apps and a mix of paid and free plugins. To help you navigate these roads and cut through the noise of standalone suites, scripts, and macro tools.
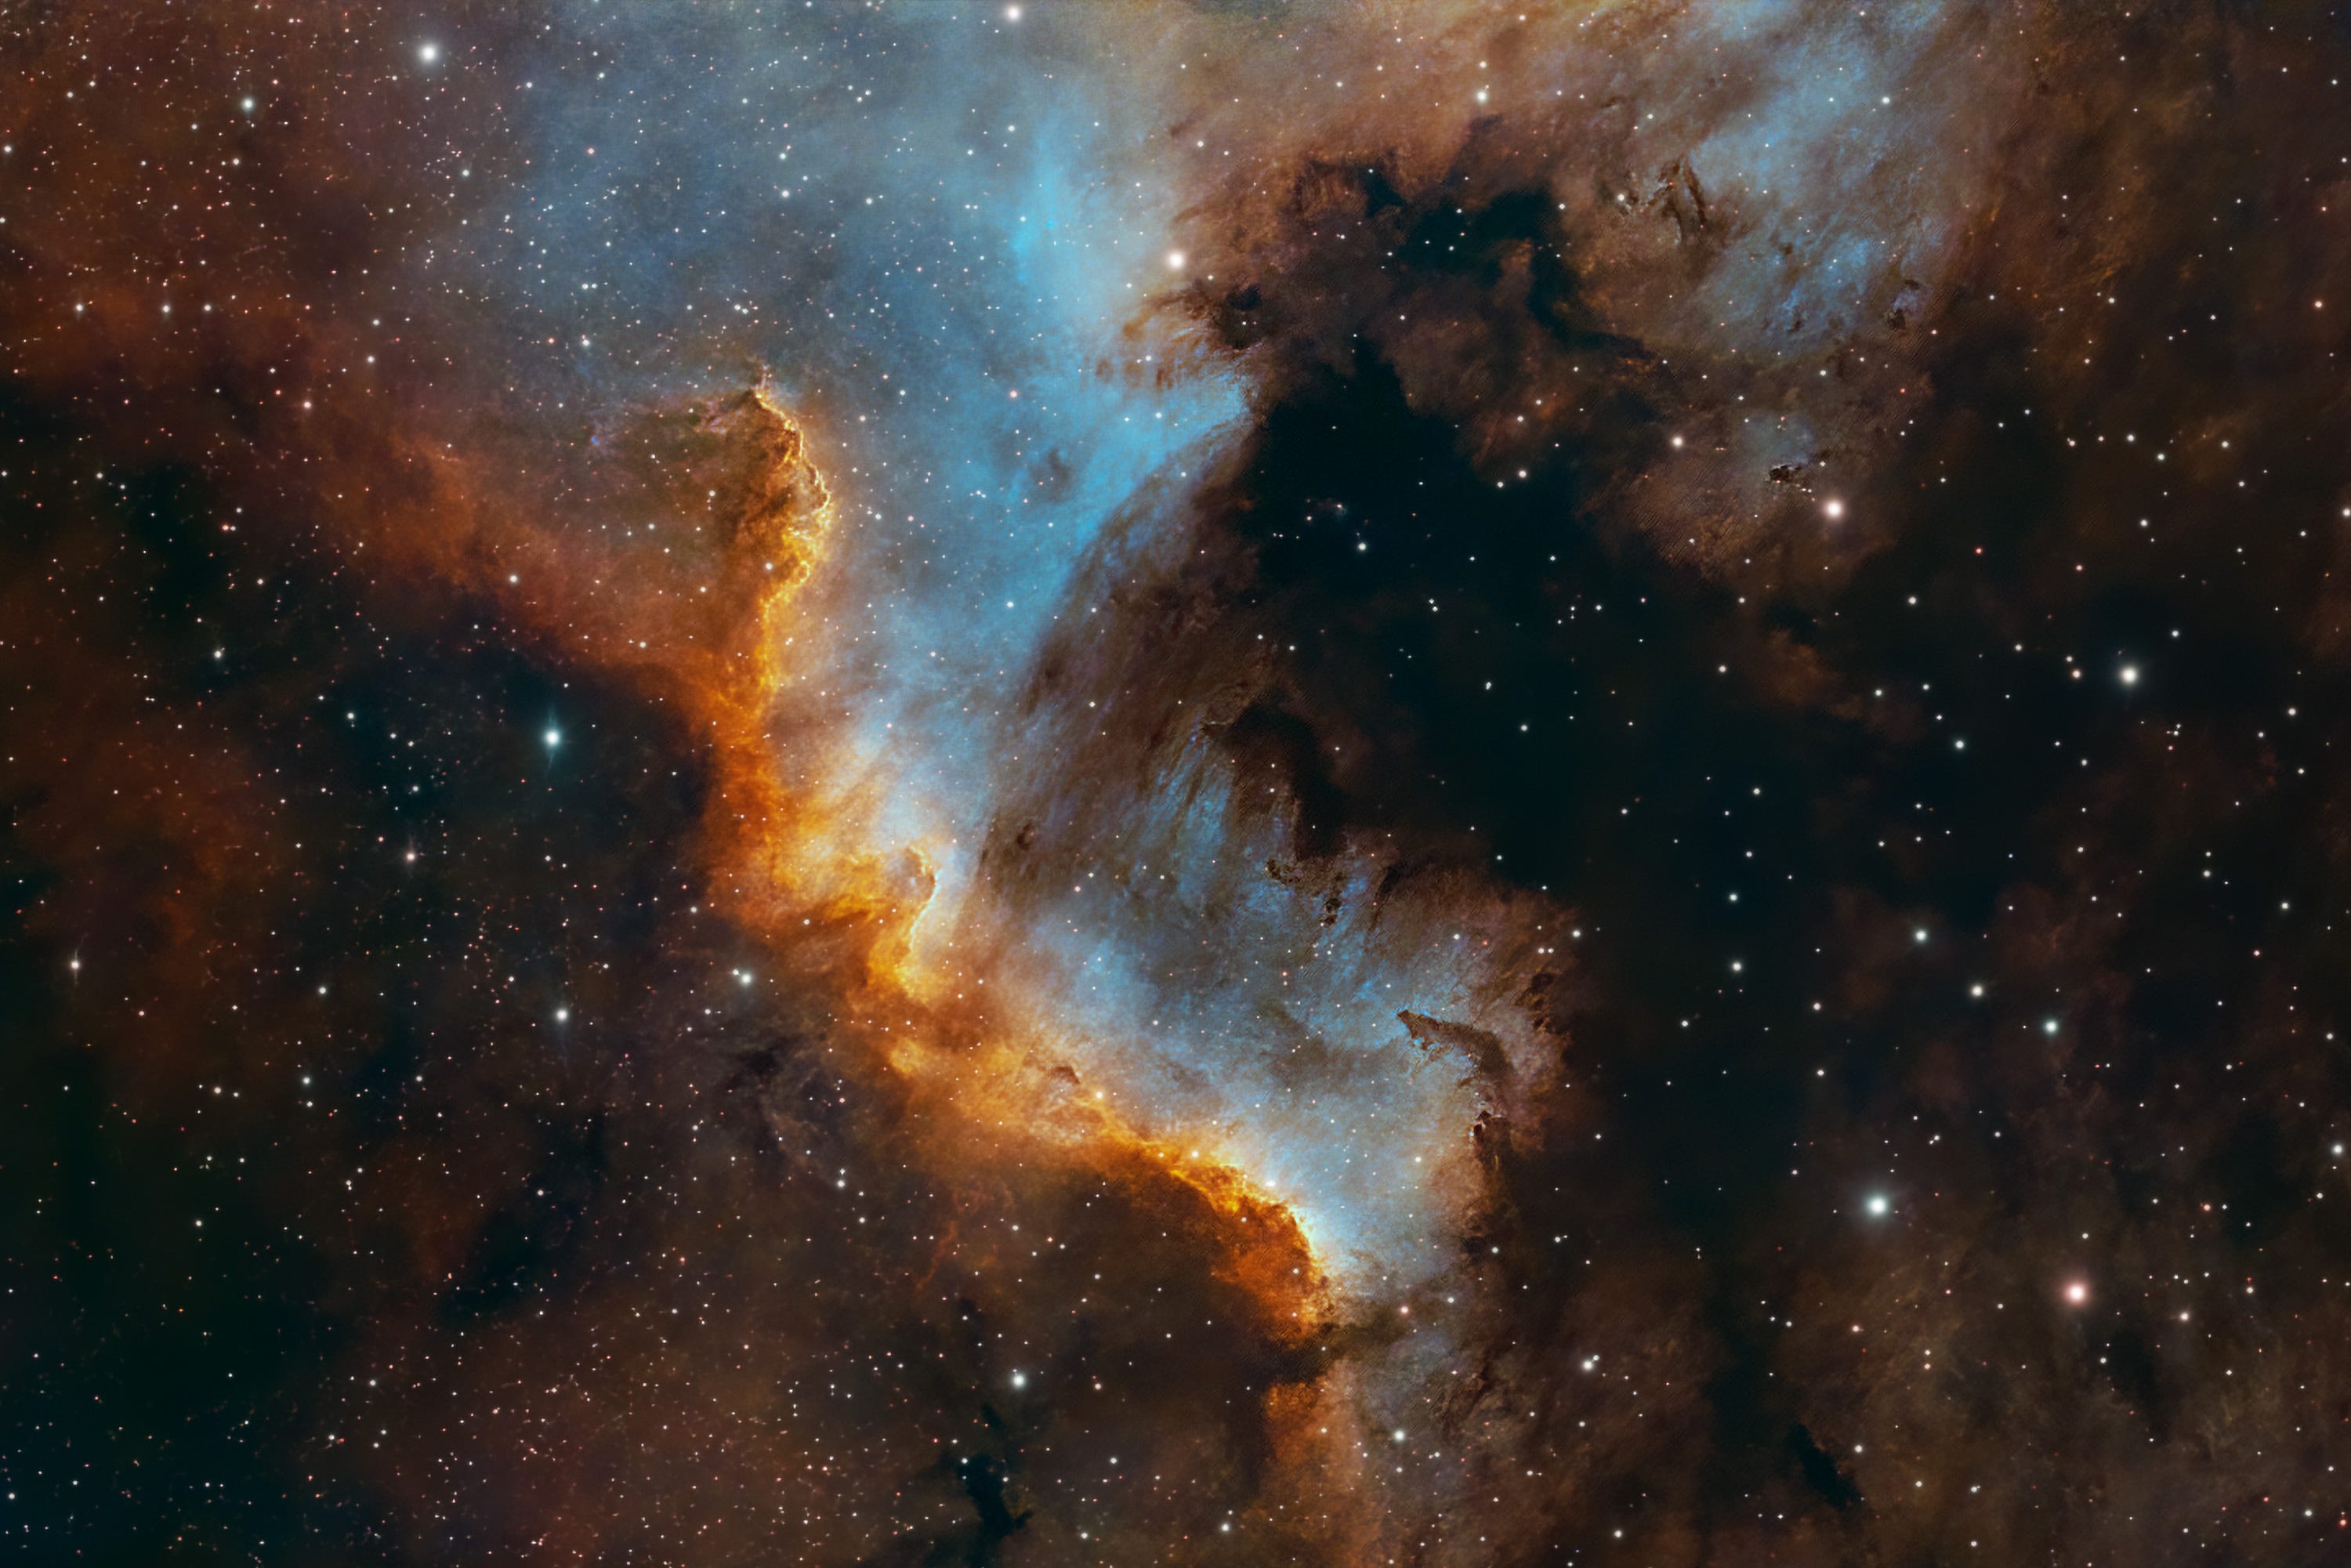
Just look at what is possible when you apply the right workflow to a solid dataset. Below is a detail of our single-night session on the North America Nebula—stacked & stretched in Siril with the post-processing in Photoshop using a scope-based “Faux”-SHO palette:
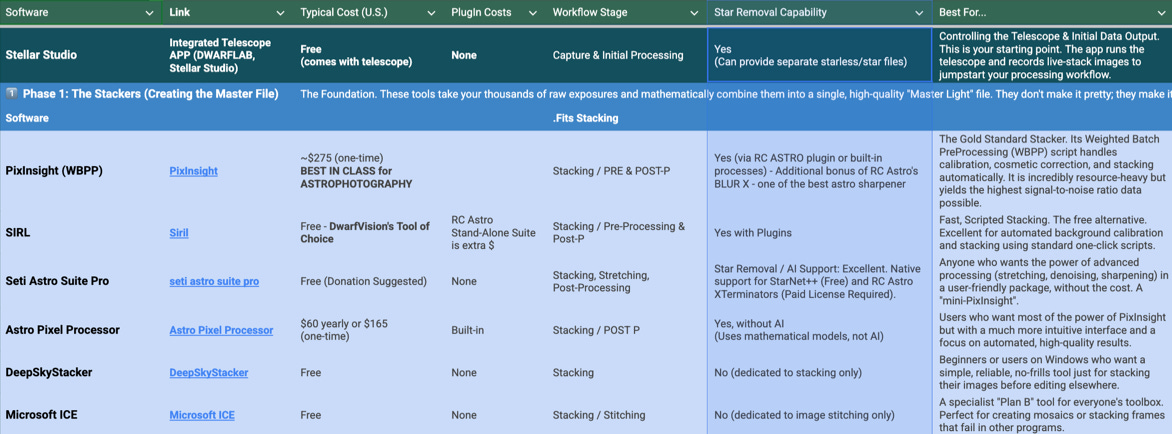
I’ve put together a comprehensive roadmap to guide you through the modern astrophotography software landscape.
To find your path, build your toolbox, and start turning that raw data into cosmic art, DwarfVision presents: The Smart Telescope Processing Roadmap.
Our interactive directory doesn’t just list software; it groups tools chronologically into the exact four phases of a modern workflow:
Let’s explore the paths — from beginner to budget astrophotographer to the uncompromising pro.
Stellar Studio is a great place to start, and with its DeBlur & Star removal tools, you already have the stacking and stretching done.
With the Megastacking features, you can restack a multi-session stack over any number of days, and the more data you add, the better the result will be.
Stellar Studio only lacks tools for the final color and tonal modifications performed in the “Post-Processing” steps, but this is quickly remedied by adding the free program for your PC or Mac, AFFINITY by CANVA.
The truth is, there’s no single “best” program—only the best program for you.
It’s about building a workflow that fits your budget, your computer, and your goals.
If your goal is to squeeze every last photon of detail out of your data and create the most stunning, competition-worthy images, then you’ll want to invest in the most powerful tools.
This path requires a financial investment and a commitment to learning, but the results are unparalleled.
Recommendation: For ultimate control, PixInsight is the gold standard. The learning curve can be daunting, so consider getting the trial version before you buy. Many users pair PI with powerful plugins like RC Astro’s tools (e.g., BlurXTerminator & NoiseXterminator) to speed up complex tasks. For finalizing the image, many choose the Adobe Photography Plan (Photoshop) for fine-tuning colors and tonal controls, making it the workflow choice of pros.
DV Budget Tip: Pair PixInsight with AFFINITY Studio by CANVA - A FREE heavyweight alternative to Photoshop - the features and learning curve match Photoshop 1:1.
Let’s be clear: the free tools can have a learning curve just as steep as the paid ones. The incredible advantage, however, is the cost. If you’re willing to invest some time in learning, you can achieve stunning, shareable images without spending a dime on software. This path is gratifying for those on a budget.
OUR FAV WORKFLOW. - Use the FREE app SIRIL for your stacking and initial color calibration. Then buy and use the powerful stand-alone plugins from RC ASTRO (BlurX, NoiseX, StarX) to further boost signal, reduce noise, and sharpen details. For final image processing, pair SIRIL with AFFINITY, using its excellent JR Astrophotography macros set and Photoshop-quality color and layer control.
The truth is, there’s no single “best” program—only the best program for you.
It’s about building a workflow that fits your budget, your computer, and your goals.
Our interactive directory doesn’t just list software; it groups tools chronologically into the exact four phases of a modern workflow:
📱 RAW DATA (Capture): Your starting point. Directly from your scope—cabled to your PC so you can see the raw “.FITS” files, also known as “lights”. Sometimes combined with a few other files (darks, biases, flats) this is your box of raw ingredients. All of these short exposures and files will be combined into a dough.
1️⃣ Phase 1: The Stackers (Creating the Master File). Mathematically combining (stacking) your raw sub-exposures into one master file. It’s not an image yet! This gathers all your ingredients into a single, data-rich bowl of “unbaked dough“—still pitch black, but physically complete.
2️⃣ Phase 2: Linear Tools (Fixing the Physics / The Cleanup). Removing light pollution gradients, boosting the nebula’s “signal,” and balancing star colors while the file is still dark (linear). We sift our ingredients before baking because the dark data is mathematically pure. Removing light pollution and noise, boosting signal, and sharpening DSO details here prevents “artificial ingredients” from ruining the image later.
3️⃣ Phase 3: The Stretch & Mid-Processing (Baking the Data into an Image). Executing a histogram stretch and executing star removal. This is the Non-Linear Transformation. We tell the software to protect the black sky and bright stars while vigorously pulling the faint, hidden nebula pixels into the light. The cake is baked—the image is finally bright and visible to human eyes.
4️⃣ Phase 4: Post-Processing & Artistry (Decorating Your Masterpiece). Blending star and starless layers, boosting local contrast, and fine-tuning color palettes using tools like Affinity Photo (which is now completely free via Canva!). The science is over, and the artistry begins—this is where you add the frosting and polish the frame for sharing.
Make sure to check the “Addendum” tab in the sheet! It tracks the exploding AI filter wars, comparing the industry-standard RC Astro plugins against the impressive new standalone AI challenger, SyQon.
A final piece of advice: the world of astrophotography software is constantly evolving. The tools we’ve listed here are popular and receive continuous updates, so features can change and new techniques are continually emerging. To reduce the learning curve and frustration caused by outdated tutorials, the master spreadsheet includes direct links to verified, recent YouTube videos for every tool listed. Staying current is the best way to get the most out of these powerful programs.
I hope this guide serves as a valuable resource you can return to again and again. The goal of DwarfVision has always been to learn and grow together as a community, and that means sharing the knowledge that helps us all create better images.
If you found it useful and want to take your astrophotography to the next level, consider upgrading to become a paying DwarfVision CREW member.
As a paid member, you’ll not only be supporting this project, but you’ll also unlock exclusive access to:
The DSO Data Club: Get your hands on my raw, high-integration DWARF FITS datasets to practice your processing skills (including the raw files for the Cygnus Wall edit above).
Exclusive Community Access: Join our private CREW-only chat group on Facebook Messenger to share tips in real-time, ask me questions directly, and collaborate on targets.
Thanks for reading DwarfVision! This post is public so feel free to share it.
Clear skies! - Duncan
Comments
Nothing yet. Say the first thing.
Sign in to join the conversation.