
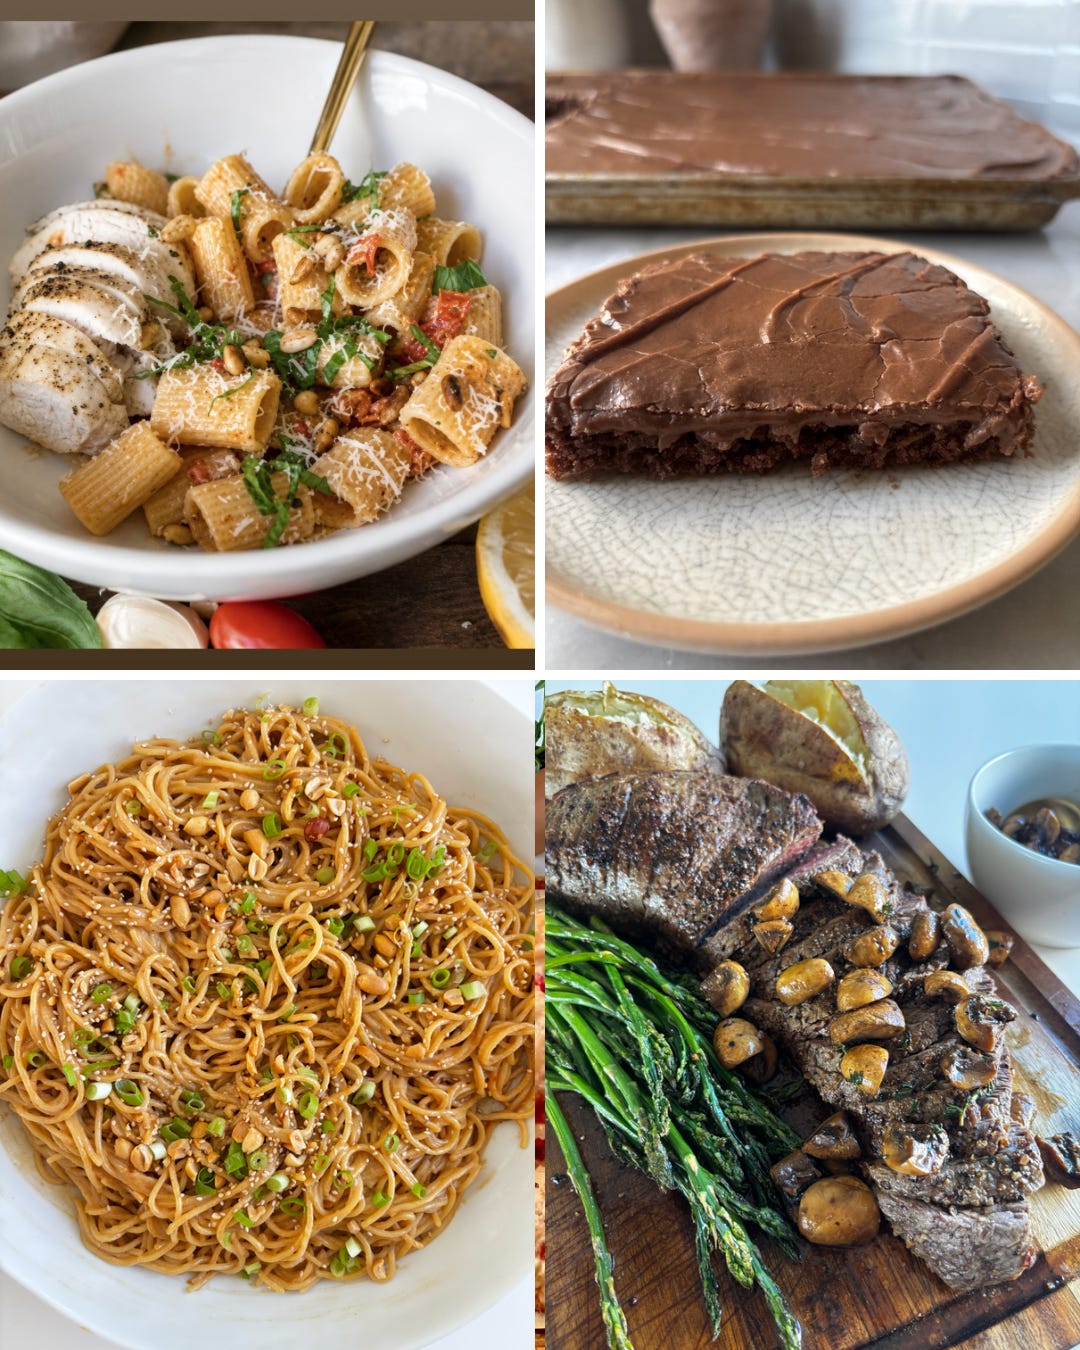
Last week was my daughter’s 15th birthday, so of course she got to pick dinner and the cake. I’m sharing both with you, plus the Peanut Butter Noodles my niece has been asking me to make and exactly how I’m cooking the ButcherBox filets that just showed up (the recipe was written for Tri-Tip but the method is perfect for Filets. Just cook them a shorter time until they hit your desired internal temperature). A little birthday, a little weeknight dinner, and a really good steak.
P.S. Prefer a printable version? I’ve linked all four recipe PDFs at the bottom of the post.
One of our favorite pasta dishes - creamy tomato mascarpone pasta with chicken, oven-roasted tomatoes, fresh basil, and toasted pine nuts.
This is one of my daughter’s most-requested dinners, and thankfully, it’s also one of the simplest. Sweet roasted tomatoes, garlic, lemon, and mascarpone come together to make a creamy sauce that is so, so good.
I especially love using a big, chunky pasta with ridges—penne rigate or mezzi rigatoni are perfect—because the sauce really clings to every noodle. I usually serve this with my Perfect Roasted Chicken, but it’s so satisfying on its own too.
Serves 6 | Prep time: 10 min | Cook time: 25 minutes
Ingredients
1 pint cherry or grape tomatoes, about 12 ounces
2 garlic cloves, smashed
1 teaspoon dried oregano
Zest of 1 lemon
1 teaspoon sugar
2–3 tablespoons extra-virgin olive oil
1 teaspoon kosher salt, plus more for the pasta water
½ teaspoon freshly ground black pepper
1 pound chunky, ridged pasta, such as penne rigate or mezzi rigatoni
8 ounces mascarpone cheese, softened
⅓ cup freshly grated Parmesan, plus more for serving
½ cup chopped fresh basil
⅓ cup toasted pine nuts, optional but I love them in this
Instructions
Preheat the oven to 400°F.
Add the tomatoes, garlic, oregano, lemon zest, sugar, olive oil, salt, and pepper to a 9-by-13-inch baking dish. Toss until everything is evenly coated.
Roast for 20–25 minutes, until the tomatoes are soft, juicy, and beginning to caramelize.
While the tomatoes roast, cook the pasta in generously salted water according to the package directions. Before draining, reserve about 1 cup of the pasta water.
Remove the tomatoes from the oven. Use a fork or potato masher to gently crush the tomatoes and roasted garlic directly in the baking dish.
Add the softened mascarpone and ½ cup of the reserved pasta water. Stir until the mascarpone melts into the tomatoes and creates a creamy sauce.
Add the drained pasta, Parmesan, and basil. Toss until the pasta is evenly coated, adding more pasta water as needed to loosen the sauce.
Taste and add more salt or pepper if needed. Finish with toasted pine nuts, additional Parmesan, and fresh basil. Yum.
Choose a pasta with ridges. Penne rigate and mezzi rigatoni are my favorites because all those little ridges hold onto the creamy tomato sauce.
Soften the mascarpone. Let it sit at room temperature while the tomatoes roast so it melts easily into the sauce.
Save your pasta water. The starch helps the mascarpone and roasted tomato juices come together. I always reserve more than I think I’ll need.
Make it a full meal. I love serving this pasta with my [Perfect Roasted Chicken], but it’s delicious and filling all on its own.
Toast the pine nuts. It only takes a few minutes and gives the finished pasta a little crunch.
For leftovers: Add a splash of water before reheating to loosen the sauce.
Deep porcelain 9-by-13-inch baking dish - I love this beautiful one by Dowan
Microplane for zesting the lemon and grating the Parmesan
Maldon salt - this stuff really does make a difference.
This cake is rich, old-school, and completely iconic. It’s a family recipe that never needs an update.
Serves 12–16 | Prep Time: 15 minutes | Cook Time: 20–28 minutes (pan-dependent)
My Grandma Sue was a legend. Her parents immigrated from Russia right before she was born, and she went to school not speaking any English. And I think because of those life experiences — and maybe just genetics — she was a very strong woman. The kind of woman who did what she wanted and didn’t explain herself.
She showed up to every family gathering with a cake (or something homemade)… and there was always a corner piece missing. No one ever questioned her. And honestly, if they did, she would just raise an eyebrow and look at you. 😂
Also… she was Russian, so of course she loved sour cream. (Russians put sour cream on everything.) And this cake? Still a family favorite. Perfect as-is. No edits, Grandma. Love you forever. 🤎
Ingredients
For the Cake
1 cup salted butter (2 sticks)
1 cup water
¼ cup unsweetened cocoa powder
2 cups sugar
2 cups flour
½ tsp salt
1 tsp baking soda
½ cup sour cream
2 eggs
1 tsp vanilla
For the Frosting - 9x13 pan
½ cup butter (1 stick)
¼ cup milk, plus more as needed
¼ cup cocoa powder
4½–5 cups powdered sugar
Dash of kosher or sea salt
1 teaspoon vanilla
For the Frosting - 13x18 sheet pan
¾ cup butter (1½ sticks)
⅓ cup plus 2 tablespoons milk, plus more as needed
6 tablespoons cocoa powder
6¾–7½ cups powdered sugar
Dash of kosher or sea salt
1½ teaspoons vanilla
For the Frosting — Two Round Pans (8” or 9”)
Use the 13x18 frosting amount if you want enough for layering + the sides.
Instructions
Preheat oven to 350°F. Grease your pan(s).
In a saucepan, melt butter, water, and cocoa, whisking until smooth. Remove from heat.
In a large bowl, whisk together sugar, flour, salt, and baking soda. Pour the warm cocoa mixture over the dry ingredients and stir until combined.
Add sour cream, eggs, and vanilla. Beat 30–45 seconds, just until smooth.
Pour into prepared pan(s) and bake: 9x13 pan, 22–28 minutes; 13x18 sheet pan, 18–22 minutes; two 8-inch rounds, 22–26 minutes; two 9-inch rounds, 18–24 minutes.
Cool completely before frosting.
For the frosting, melt butter, milk, and cocoa in a saucepan, whisking until smooth. Remove from heat and whisk in powdered sugar and vanilla until glossy and smooth. Spread immediately — this frosting sets fast.
Slice, serve, and watch it disappear.
For the Frosting
In a saucepan, melt butter + milk + cocoa, whisking until smooth. Remove from heat.
Whisk in powdered sugar + vanilla until glossy and smooth.
Spread immediately over cooled cake (this frosting sets fast).
Slice, serve, and watch it disappear.
This frosting sets up fast once it hits the cake, so have your pan ready and don’t walk away mid-stir.
The cake layer freezes well unfrosted — wrap tightly and frost the day you’re serving it.
Sour cream is what keeps this cake so moist; don’t sub it out for yogurt if you can help it.
This one’s just as good (some say better) the next day, once the frosting sets fully. I love it for a second breakfast the next day 😆.
Hershey’s Cocoa Powder - for the classic chocolate flavor.
My favorite darker cocoa powder - for a deeper, richer flavor.
My favorite porcelain Dowan 9x13 - lovely and functional.
My favorite sheet pans - for the sheet pan version. Good equipment really does make a significant difference.
My Favorite Hand Mixer - makes baking so much more enjoyable! The light feature is especially helpful.
A silky, savory peanut-tahini sauce that coats every strand and tastes like take-out. Made with mostly pantry staples. Easy, fast, and so good - my kind of dinner.
My son has always called these “peanut butter noodles” — and the name stuck. It’s a silky peanut butter–tahini sauce made with soy sauce, honey, and frozen garlic + ginger cubes. Mostly pantry ingredients. Comes together in minutes. Tastes like takeout.
I used to mix in tons of veggies… but honestly? I like my noodles uninterrupted. Now I serve the veggies on the side and drizzle them with extra sauce.
Ingredients
• 1 lb spaghetti (or GF noodles / zoodles)
• 4 frozen garlic cubes (or 4 cloves)
• 6 frozen ginger cubes (or 2 tbsp fresh grated)
• ½ cup soy sauce (or tamari for GF)
• ½ cup tahini
• ½ cup natural peanut butter
• ⅓ cup rice wine vinegar
• ¼ cup honey
• 1 tbsp dark sesame oil
• 1–2 tsp chili paste (Sambal Oelek), to taste
• ⅓ cup reserved pasta water
Toppings-
Chopped peanuts
Green onions
Toasted sesame seeds
Instructions
Boil pasta in salted water. Reserve ½ cup pasta water before draining.
Whisk garlic, ginger, soy sauce, tahini, peanut butter, vinegar, honey, sesame oil, and chili paste until smooth and glossy.
Toss noodles with about ⅔ of the sauce, adding pasta water as needed to emulsify and coat.
Finish with chopped peanuts, green onions, and a generous sprinkle of sesame seeds. Spoon a little of the extra sauce over the top. Serve with roasted chicken and broccoli on the side, or just enjoy them straight up. So good!
On the frozen garlic + ginger cubes: if you’re new here, these are my not-so-secret weapon — I freeze crushed garlic and grated ginger in ice cube trays so I never have to peel a clove at 6pm on a weeknight. If you don’t have them stashed in your freezer yet, 4 fresh cloves and 2 tablespoons of fresh grated ginger work just as well. Just know that once you start doing this, you won’t go back.
On the tahini: give the jar a good stir before measuring — tahini separates in the pantry just like natural peanut butter does, and a spoonful of the solid stuff at the bottom will throw off your sauce.
On the sauce ratio: I hold back about a third of the sauce on purpose. It keeps the noodles from drinking it all up and going dry by the time you’re eating leftovers, and it means you always have extra to drizzle over whatever veggies or protein you’re serving alongside.
On the veggies: I know, I know — a noodle dish with zero vegetables in it feels like it should come with a disclaimer. But I’ve made peace with it. Roasted broccoli, blistered green beans, or just a big pile of cucumbers on the side, all doused in extra sauce, and everyone’s happy. Nobody’s picking soggy carrots out of their noodles at my table anymore. Let the noodles live!
Make ahead: the sauce keeps in the fridge for about a week — I usually double it and keep a jar on hand for a fast weeknight dinner or a sad-desk-lunch upgrade.
Leftovers: they’ll firm up in the fridge. A splash of water and 30 seconds in the microwave brings them right back to life.
Frozen Ginger Cubes - A total game-changer — no peeling, no grating, just toss one straight into the blender for a fresh ginger kick every time.
Frozen Garlic Cubes - this is how I get dinner on the table faster. No prep, no mess, full flavor.
My Favorite Tongs - These KitchenAid silicone-tipped tongs are my favorite 🙌🏻 Sturdy, safe on pans, and the pull-tab locks them shut so they don’t get stuck in the drawer 🫠 I’ve had mine for years and they still work like new.
My favorite brand of spaghetti - I really think it’s the best! Authentic, slow-dried, made in Italy, tastes really good.
My favorite way to cook tri-tip. It feels special enough for company, but it’s easy enough for a Sunday dinner. Just a simple seasoning blend, a hot pan, and pulling it at the right temperature.
Serves 4–6 | Total Time: 1 hour 15 minutes (includes resting time before + after cooking)
A simple, deeply seared tri-tip finished in the oven until perfectly medium, served with sautéed garlic mushrooms and baked potatoes. No marinades. No fuss. Just good technique.
Ingredients
Tri-Tip
• 2½ lb tri-tip roast
• 1½–2 Tbsp Montreal steak seasoning
• Or homemade Montreal-style blend: 1 Tbsp kosher salt, 1 Tbsp coarse black pepper, 1 tsp garlic powder, 1 tsp onion powder, 1 tsp paprika, ¼ tsp crushed red pepper (optional)
• 1–2 Tbsp avocado oil
Pan Dripping Mushroom Sauce
• 16 oz cremini or white mushrooms, wiped clean and quartered
• 1–2 Tbsp chicken stock (optional, for deglazing)
• 1 Tbsp butter
• 1 tsp fresh thyme
Instructions
Prep - Remove tri-tip from refrigerator 45–60 minutes before cooking. Pat completely dry. Lightly coat with 1 Tbsp avocado oil. Season generously on all sides, pressing seasoning into the meat. Preheat oven to 400°F.
Sear - Heat a large cast-iron skillet over medium-high for 3–4 minutes until very hot. Add remaining avocado oil. When shimmering, add tri-tip. Sear 4 minutes per side until a deep brown crust forms. Briefly sear the edges.
Finish in the Oven - Transfer skillet directly to the oven. Roast at 400°F for 12–15 minutes for a 2½ lb roast. Start checking internal temperature at 12 minutes in the thickest part. Remove at 130–135°F for medium (see below). Temperature will rise slightly while resting. Here’s temps for different doneness:
rare: 120–125°
medium-rare: 130–135° (this is where the magic happens)
medium: 140–145°
medium-well: 150–155°
well: 160°+
Transfer to a cutting board. Loosely tent with foil and rest 10–15 minutes before slicing. Resting is so important for juicy, tender meat.
Pan Dripping Mushroom Sauce - While the meat rests, return skillet to medium heat. If there is excess grease, carefully pour some off, leaving about 1 tablespoon in the pan. Add mushrooms in a single layer and cook undisturbed 3–4 minutes to develop color. Stir and continue cooking until browned and tender, about 6–8 minutes total. Add chicken stock (if needed) to loosen browned bits, then stir in butter and thyme until glossy. Taste first — the pan drippings are already seasoned.
Slice Properly - Tri-tip has two grain directions. Cut the roast in half where the grain changes, then slice each section thinly against the grain for maximum tenderness. Serve with baked potatoes, butter, flaky salt, and roasted asparagus.
Don’t skip bringing the meat closer to room temperature before cooking. It helps it cook more evenly.
An instant-read thermometer is the easiest way to nail tri-tip every time.
I pull mine around 132–135°F and let it rest. That’s my sweet spot.
If you don’t have Montreal seasoning, the homemade blend works beautifully.
Leftovers make amazing sandwiches, salads, and wraps the next day.
My favorite way to serve this is with baked potatoes, roasted asparagus, and the pan mushrooms. Love it with mashed potatoes too.
An instant-read thermometer is the easiest way to nail tri-tip every time.
My go-to Cast Iron Skillet. This pan is perfect for this recipe because gets beautifully hot for a really good sear and goes straight from the stovetop to the oven.
Thank you so much for being here. Your support means the world.
xo,
Chelsea
Want to print or save this week’s recipes? Download each printable PDF below.
Subscribe to get simple, dependable recipes and my weekly recipe roundup delivered straight to your inbox.
Paid subscribers also get access to my full library of printable recipe PDFs, with new ones added each week.
Comments
Nothing yet. Say the first thing.
Sign in to join the conversation.