
As a photographer, dealing with digital image files is a necessary part of daily life. In 2004 I switched to a full digital photography workflow, leaving my medium format film system behind. For over two decades I have been acquiring lots of RAW, JPEG, and related image files. At the latest count, I have over 202,000 image files of various types living in my computer, and yes, backed up to three additional locations.

To some people that may sound like a lot, and to others this is only a drop in their “data” bucket. Either way you look at it, storing all that data can become complex and costly. Thankfully, most image files can and often do leverage file compression to reduce the storage overhead. In the case of certain types of image files, they can also employ optimization to further reduce the size of the resulting file. Optimization comes at the cost of the loss of some data, the amount of which can vary depending on how “aggressive” the optimization is applied.
The goal of using compression and optimization is the reduction of the storage needs for our digital files, and there are two terms often used when referring to image file compression: lossy and lossless. As you can infer from the names, one maintains all the information, and the other discards (or loses) some information.
Note: Lossy and Lossless compression types can also be applied to other media files types like audio and videos.
In this article I intend to provide a high-level understanding of the differences between lossy and lossless compression so you can make the best decision on the approach for your own needs. I also want to clarify that I feel we should all be using the phrase “lossy file size reduction” instead of “lossy compression” since compression is only one part of this type of file size reduction.
If the previous paragraphs indicate to you that this might be a bit of a “nerdy” article, you’re not wrong. However, I will try my best to keep the following from getting too deep, as I believe understanding the principles here will be valuable to photographers as well as their clients.
For example, I’m sure we’ve all had clients who asked for a “high-res” file and were disappointed when they received a 5 MB JPEG file, thinking that small size is indicative of the resolution. It doesn’t matter that the 24-megapixel image in that JPEG has more than enough resolution for the print sizes they want; they insist it must be larger. I’ve been there, which is part of why I’m writing this article.
Reduced image file types like JPEG files use a lossy process to achieve smaller file sizes; this is the nature of how JPEGs work. Even with a low amount of optimization, as in the case of high-quality JPEGs, there is still a tiny amount of lost detail. However, even high-quality JPEG files can still deliver vastly reduced file sizes while still offering high pixel counts. Lossless compressed files such as LZW TIFF, DNG, and some RAW files (depending on the camera) can reduce file size without the loss of any data.
Before we dig in, I should point out that what is being termed as lossy and lossless compression isn’t the best way to describe what’s actually happening when file sizes are being reduced. In the case of a losslessly compressed file, all the data in the digital file is retained, but the information is being organized in a way that allows that data to be more compact. I’ll explain more shortly, but let’s get on to the Lossy part.
When a lossy compression, such as that used for exporting to a JPEG file, is applied, there is another step that occurs before the actual data compression. What happens initially is optimization. In this step, some information is discarded, which reduces the overall amount of distinct information in favor of a final output that is very similar in appearance. Depending on how aggressive this optimization step is allowed to proceed, it determines the overall quality of the resulting file, which in this case would be an image file.
With this in mind, let’s look at how lossless compression works.
Note: I’m not attempting to go full on science here in the following, but rather, explain what’s going on in a high level, non-detailed fashion that gets the basic ideas across.
If you’ve ever worked with a .zip type file, you know this file type allows one to save a file or group of files into a compressed format that is smaller in size than the original. When you “extract” the files from within the .zip file, they return to their original size. Unless the .zip file is damaged, all the original data will present. In other words, this is a lossless compression.
This type of compression relies on repeating patterns that reside in the raw data of the file itself. For example, let’s use a text document that contains three thousand words. Within that word count, the word “the” appears 78 times. That adds up to 234 characters used to convey each instance of “the” So what if we replace the word “the” with the pound symbol? Now “#” represents “the” and by replacing it with a single character, we’ve just reduced the overall character count in the document by 156.
Note: The above is an oversimplification of the file compression process, but the principal is correct.
Take the idea of replacing just one word and applying it across any instances where a word is repeated in a document, and you can see how the space savings add up. But how do you get that information back when you open/expand that zip file?
When the .zip file is created, an index of the various substitutions is within the file. If you open a .zip and extract the files from it, that index is used to rebuild the original information. It will be exactly like it was before the “squeeze”. If you’re thinking that the index takes up space, it does. The index does add a little bit of overhead to the final file size, but it usually is quite small and worth the overall file storage savings.
When this principal is applied to an image file, you can think of it as replacing areas containing the same color value with a substituted character or symbol. Of course, to the computer/device you’re using, it’s all digital data that has repeating patterns in it. It doesn’t really care if it’s an image, text, or audio file.
Lossless compression often can save a lot of space and reduce file sizes. However, it does have limitations. For instance, if you zip or compress a file like a JPEG, MP3, or MP4, you will often find that the resulting file or group of files doesn’t get much, if at all, smaller compared to the original file. That’s because these file types are already compressed and may offer little to no room for additional file size reduction.
Another aspect of a file that reduces the effectiveness of file compression is variety of details. If every word in a text document is unique, substitution doesn’t end up being as effective. In the case of image files, images that contain a lot of variances of colors and details will not compress as effectively as would a headshot of a person against a white background.

The result is easy to see when you notice that lossless compressed RAW files are rarely equal in size. They will vary in size depending on how many distinct colors and details are present in the overall image. Looking at uncompressed RAW files will show only small variances in file sizes as the data is kept just as recorded by the camera.
Note: There are still small variations in size of uncompressed RAW which can be due to the information included about aspects included in EXIF data and such.
Before moving on two what happens in a “Lossy” compression, I want a quick pause. Some readers might be thinking “Why don’t we just compress all of our files on our devices all the time? Wouldn’t that save us a ton of space everywhere!?”
Well yes, in fact, we could, and for image files like our lossless compressed raw files and TIFF files, this works very well. However for every text document, spreadsheet, and the dozens or even hundreds of file types that might be on your device, it would be impractical.
Recall that in order to do this lossless file compression, we create an index of substitutions for repeating patterns within a file. This is used to decompress the file when it is opened. That compression/decompression step makes for extra work by your computer.
Working with a bunch of image files is one thing, but asking your computer to compress and then extract all the files that your computer or device uses in real time can become a real bottleneck to performance. Not that it can’t be done (and it was an option offered in the past) but it’s not practical and can be potentially risky to important data.
Now let’s take a look at what is referred to as lossy compression. It may be more accurate to refer to this as image optimization and file compression, but for the sake of this article, we’ll continue to refer to it as lossy compression.
What happens in lossy compression is that some data gets tossed away for the sake of reducing file size, hence the “loss”. For instance, you have an image that is 800x600 pixels in dimensions. That’s a total of 480,000 pixels, and there may be a wide variety of distinct colors. So for a specific pixel, let’s say there is a color value such as R126, G033, and B177 (that’s a shade of purple, by the way).
If you were to reduce the total number of available colors in an image, the number of distinct values would be reduced. For example, if you have the color values rounded to the nearest multiple of ten, our example purple color would shift to R130, G030, and B180. If you plug these values into your color picker in your favorite image editing app, you’ll see the color is a little different, but not by much.
This is basically what is happening when you convert a full-color (8-bit) RGB image to an indexed color image format like a GIF. Some image information is changed, leaving you with a reduced number of possible values. In the case of GIF files, the amount of available colors can be adjusted when the image is converted to GIF.
It’s easy to see why an 8 color file might be smaller than a 256 color one. There are much fewer colors and therefore much less variety in the information of the resulting file. Of course the resulting 8 color image with look radically different from the original at the expense of file size as you can see in the series of images below.
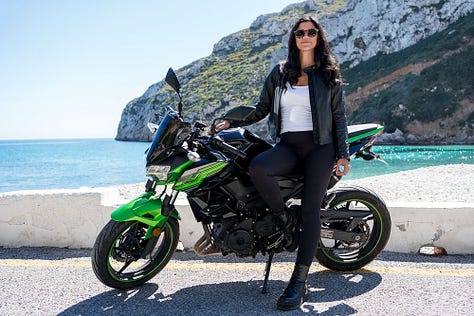


If you picked up the word indexed above and think it might relate to the lossless compression we discussed earlier, you are correct. An index of colors has been created and the smaller the number of colors allows for more times one can use a substitution index value to define a pixel’s color. You can see now how the lossless compression function can then be applied to this file to make it much smaller than the original full color version.
Note: GIF, JPEG, TIFF, and other filetypes use the Lempel–Ziv–Welch (LZW) type lossless of file compression which functions on a high level much like I described in the lossless compression section earlier
Like the GIF file, JPEG’s toss away some information that was in the original image file. On a very basic level, it reduces the total number of colors in an image like in a GIF. But unlike a simple index of color values like the GIF, JPEG’s use some rather advanced math to determine the final color palette. I could go into detail about how discrete cosine transform (DCT) is used to create the final quantization. I could also mention how it is leveraged to determine how colors are reduced in a fashion to create a pleasing looking, yet reduced size file.
But I’m not doing that. :)
Mostly because I don’t fully understand all the “wibbly-wobbly / timey-wimey” science involved. Also, because it isn’t necessary to understand the underlying science in this case (thank goodness, right?).
JPEG image optimization uses information based on the perception of human vision to reduce the data needed to display an image. It does this in a way that still looks pleasing to our eyes, or at least the way our brain’s interpret what our eyes see. Depending on how aggressively one applies the JPEG optimization the results can be very close to the original, or quite poor in quality.
In both GIF and JPEG files, compromises are being made to reduce the overall information needed to display an image file. The amount of “optimization” being applied will determine the overall quality of the final image output. So the ”optimization” stage is where the “lossy” element of this lossy compression technique comes from. The actual “file compression” stage does not remove any information, but just packs the optimized results efficiently.
As a photographer, and as a client of a photographer, understanding how image file sizes can be so small and yet still contain a lot information is important. Understanding the process can clear up any misgivings of file size versus image size and detail. To demonstrate this, let’s take a look at an image at 100% crop so we can see the difference between different optimization levels.
Below we have an image of Renata, a very talented violinist here in Valencia who can often be found playing for crowds near the Central Market. Since I don’t want to blow up your device (or Substack) with a very large image file, this image is reduced in size for and is just for illustrative purposes. The original file is from a Sony A7rIV camera shooting a 61 megapixel image (6336x9504 pixels).

Below we have a 100% crop from this image showing the details in Renata’s hair and of the fine-tuning knobs of the violin. Also note the texture of her skin and her eyelashes. This image was exported at 100 quality in Adobe Photoshop. The entire image came in at 15.01MB, which about one quarter the size of the original raw file.
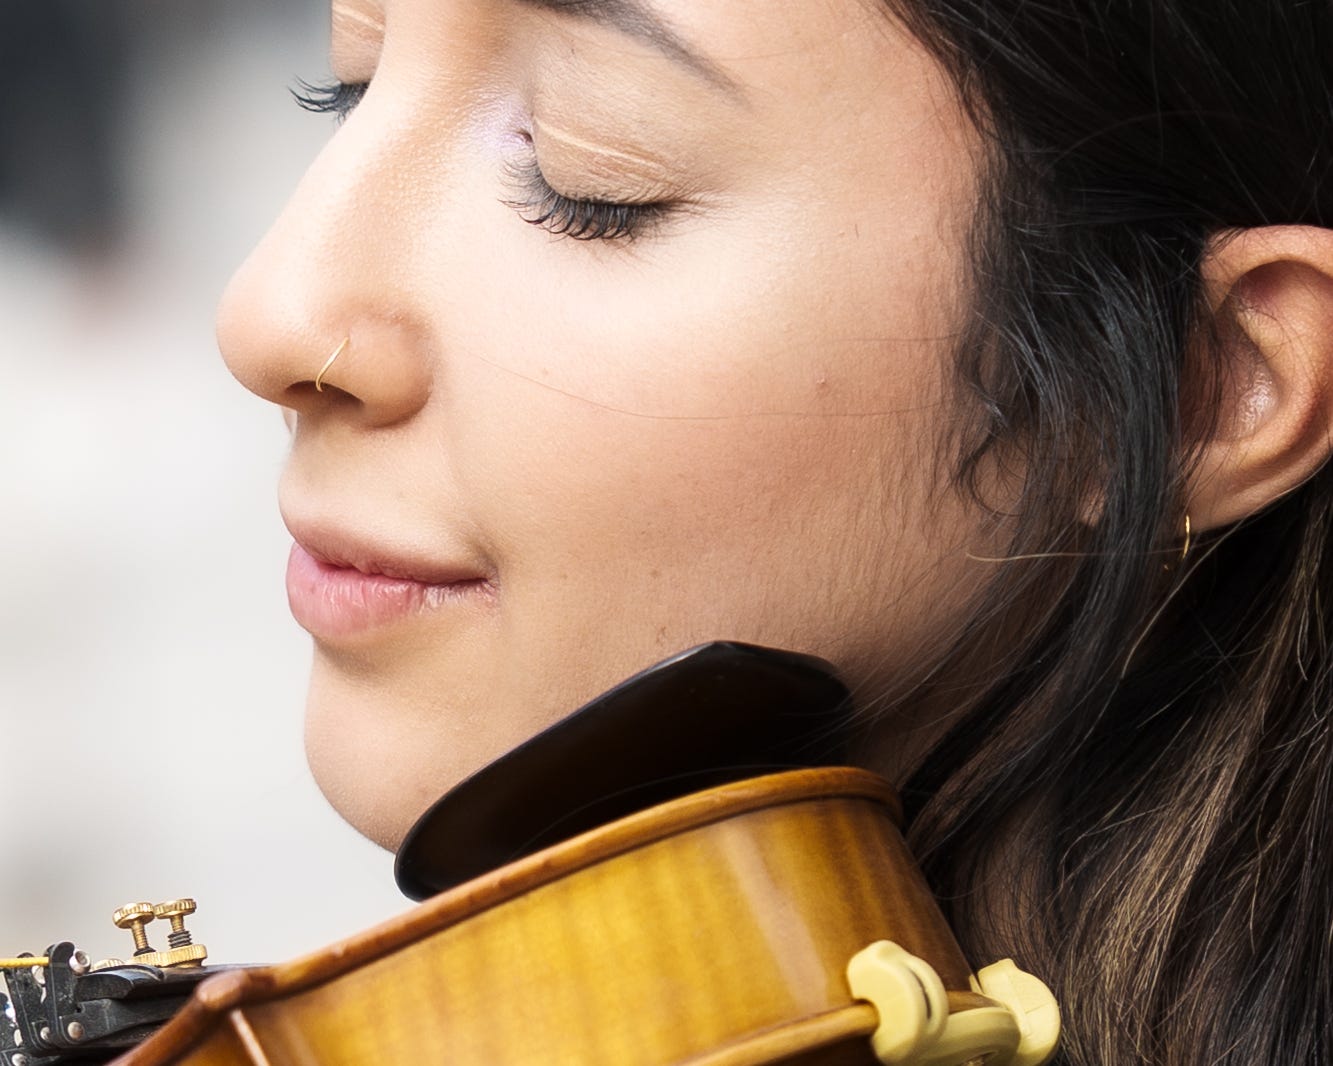
At the highest quality setting like shown above, I could see no difference between the raw file opened in Camera Raw and this JPEG when view both at 200% view. So what happens when we turn up the optimization?
This next image (below) was exported at 60 quality and the file size has dropped to 3.13 megabytes, or roughly 5% of the raw file size. In order to see any difference I had to zoom into 400% and even then I had to search a lot until I found some softening of details at the edge of her hair.
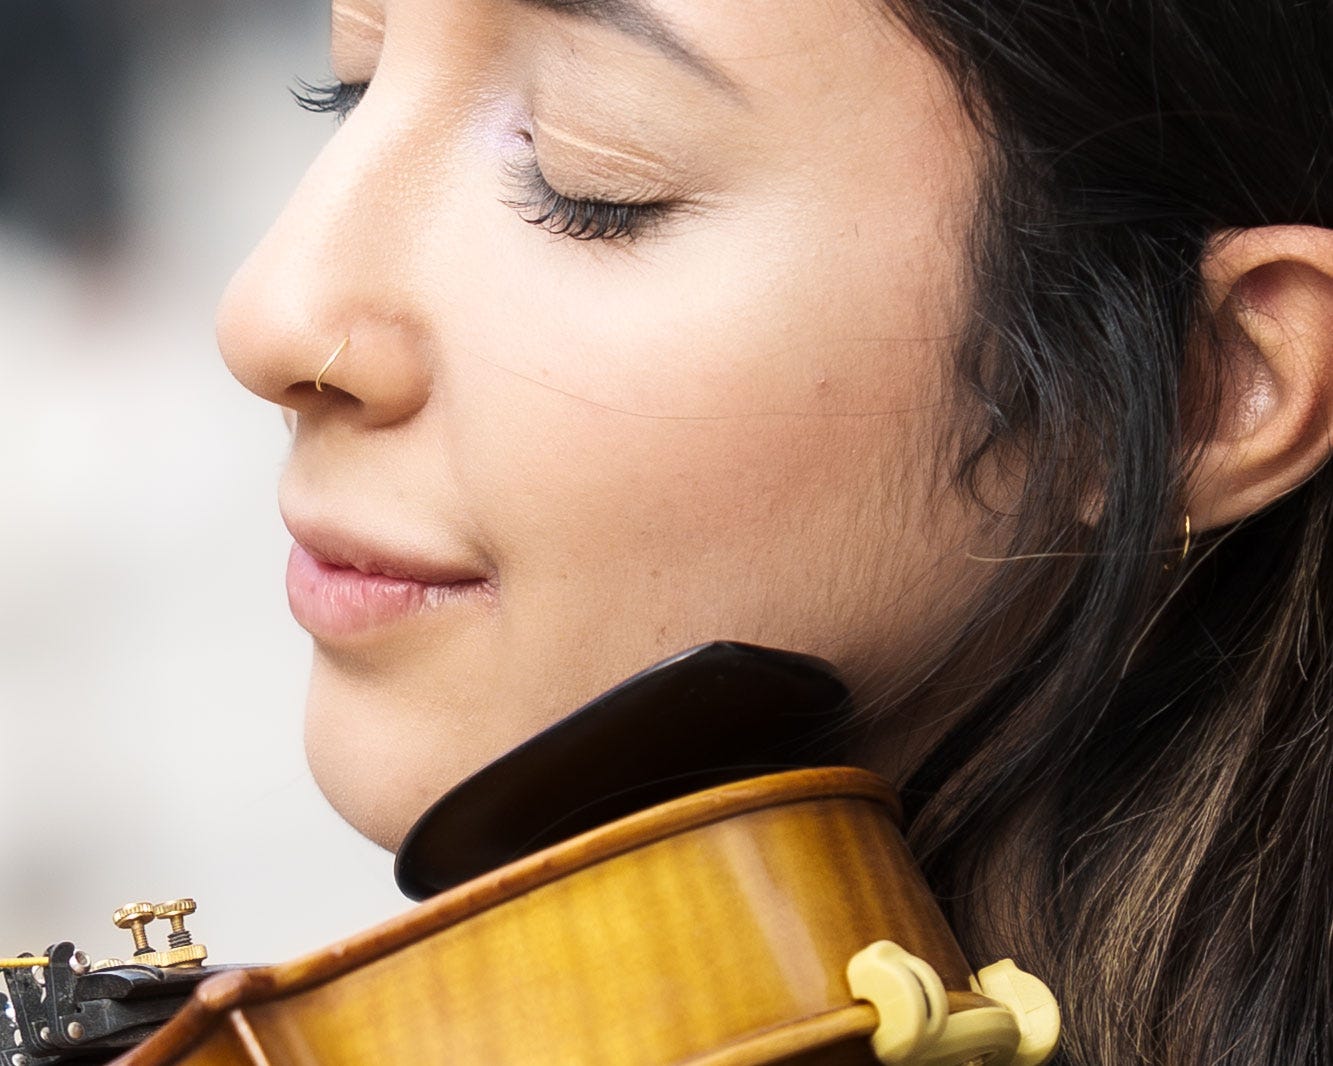
Even at this point it was tough to see the difference even when looking for it. On the other hand, this file takes up only 20% of the file storage the 100 level JPEG does. This makes it easy to share and store for the client and would result in very good prints. Certainly for the best quality printing I would export a new version at highest JPEG quality or to a TIFF, but I’m betting I’d be hard-pressed to find a difference.
Finally, let’s look at a 100% crop with the JPEG quality set to 10 shown below. Now we can start to see some visible artifacts and the loss of some detail. Viewed at 100%, it may be hard to see the differences, but look at the edges around her chin, the space around the fine-tuning knobs, and the texture of the skin of her cheek. Also the single hair across her cheek looks a little “ragged” at this point.
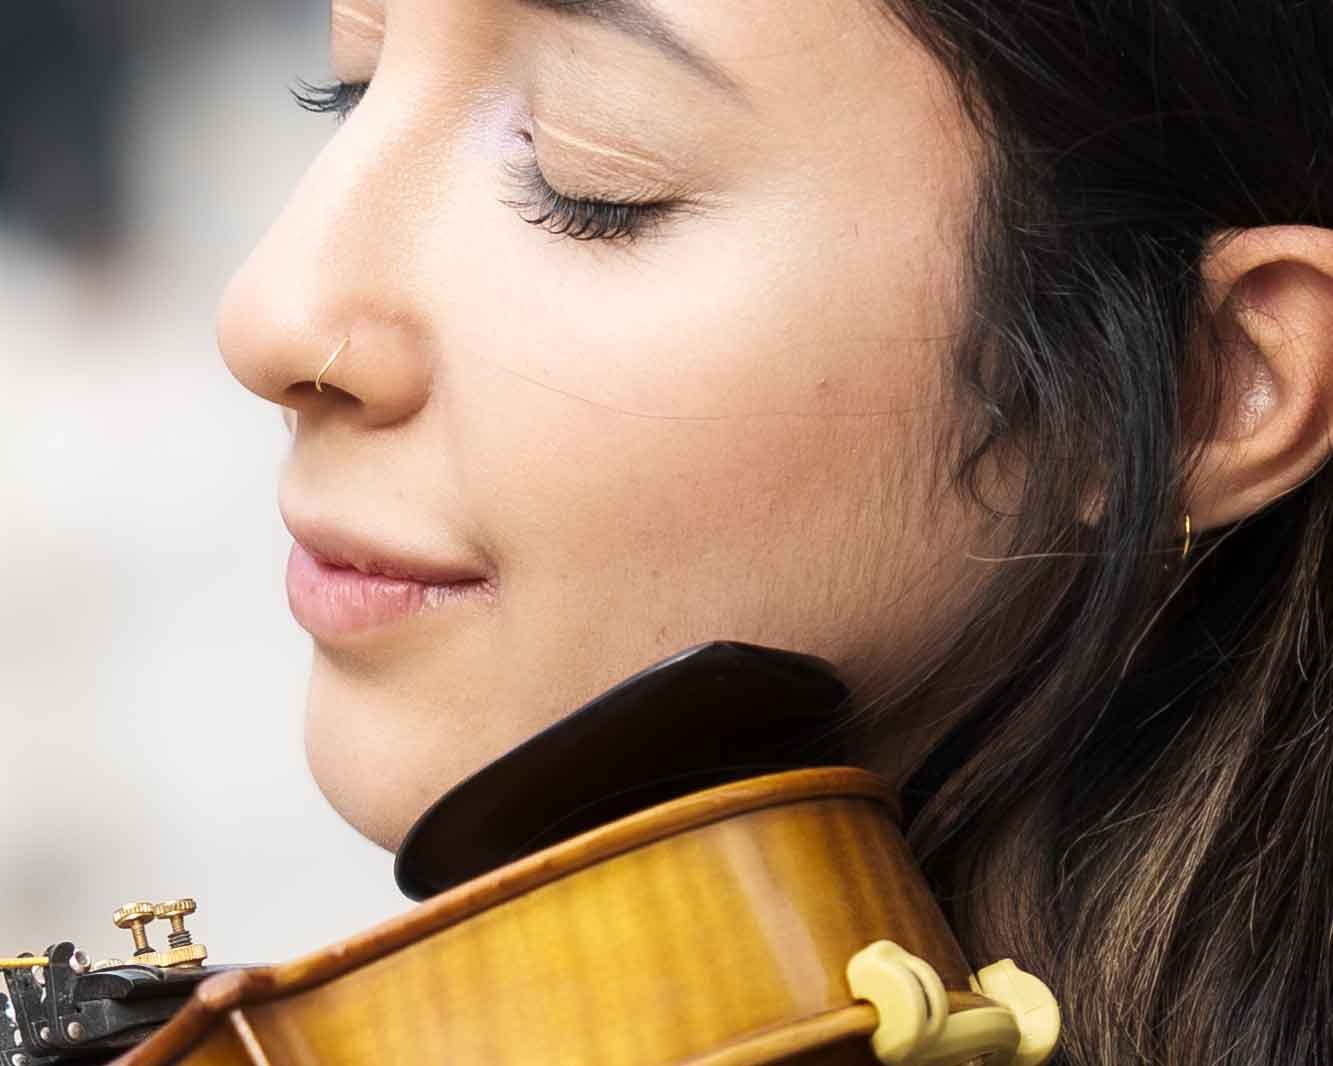
It may not be very obvious at first, but zooming in to 200% things become noticeable. However, considering this 61 megapixel image started out as a losslessy compressed 60.1 megabytes raw file has been reduced to just over 860 kilobytes (yes, kilobytes!), the amount of detail still present is pretty impressive. That’s about 1/70th the size of the raw file.
So a couple of important notes here for those keeping score. The actual file size of the 100% cropped images show above is much less than the numbers I provided. This is because I’m giving you the size of the full, un-cropped image after being compressed. For the examples I cropped just the small area from those compressed files to illustrate the differences in detail.
My hope is that this article helps improve the understanding about how compression of image files works. I have demonstrated how a high pixel count image can be greatly reduced in size and still maintain excellent detail. This will of course vary based on the details present in the image, but the savings are still significant and one can adjust quality levels as needed.
I hope this helps dispel the idea that a small sized file must result in a low quality image. Please let me know what you think. I want to know if I missed something here and I’m happy to update this article based on new information.
And thanks for sticking with me to the end. I know this was a lot!
Thanks for reading Brandon Jackson Photography! This post is public so feel free to share it.
No posts
Comments
Nothing yet. Say the first thing.
Sign in to join the conversation.