
Microservices solved the deployment problem. They created the security problem.
With a monolith, you had one front door. One TLS certificate. One authentication layer. One place to audit. Security was simpler because the attack surface was smaller.
With microservices, every service is a potential entry point. Service A calls Service B calls Service C — and each hop is an opportunity for an attacker. A bug in Service B’s authentication doesn’t just compromise Service B. It potentially compromises every service that trusts Service B’s tokens.
This post covers the complete security stack for microservices — from the front door (API Gateway) to the internals (JWT, OAuth 2.0), with real Spring Boot code for each layer.
The Security Stack
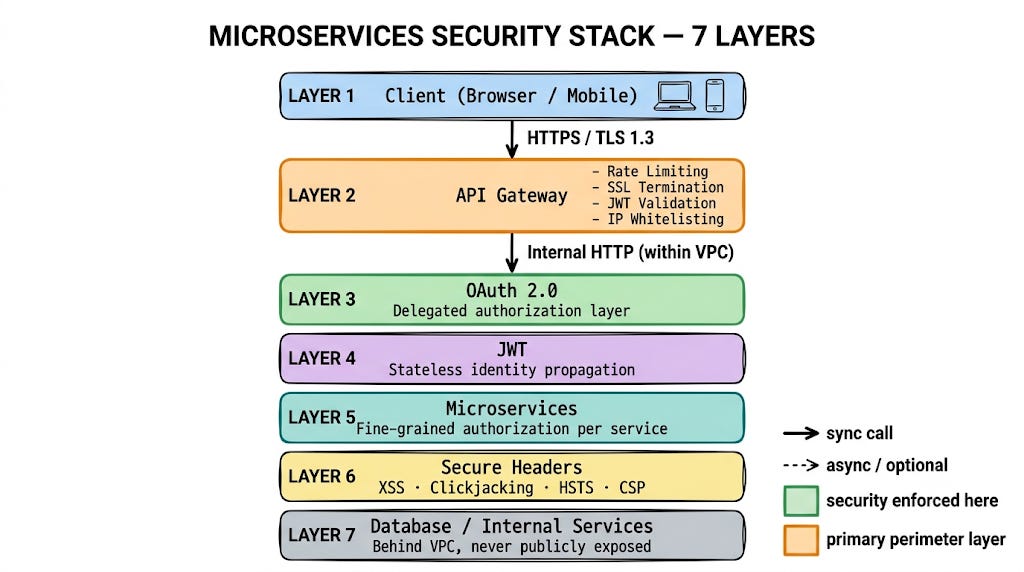
Each layer has a specific job. The API Gateway handles the perimeter. OAuth 2.0 handles delegation. JWT handles identity propagation. Secure headers handle browser-level protection. None of these replaces the others — they work together.
Layer 1: Authentication vs Authorization — Get the Distinction Right
Before writing a single line of security code, understand the difference:
Authentication — Who are you? Establishing the user’s identity. Verifying that you are who you claim to be. Username + password, biometrics, OAuth, API keys — all authentication.
Authorization — What are you allowed to do? Establishing what an authenticated user can access. Role-based access control, permission checks, resource ownership — all authorization.
In a monolith, both often lived in the same codebase. In microservices, they must be separated:
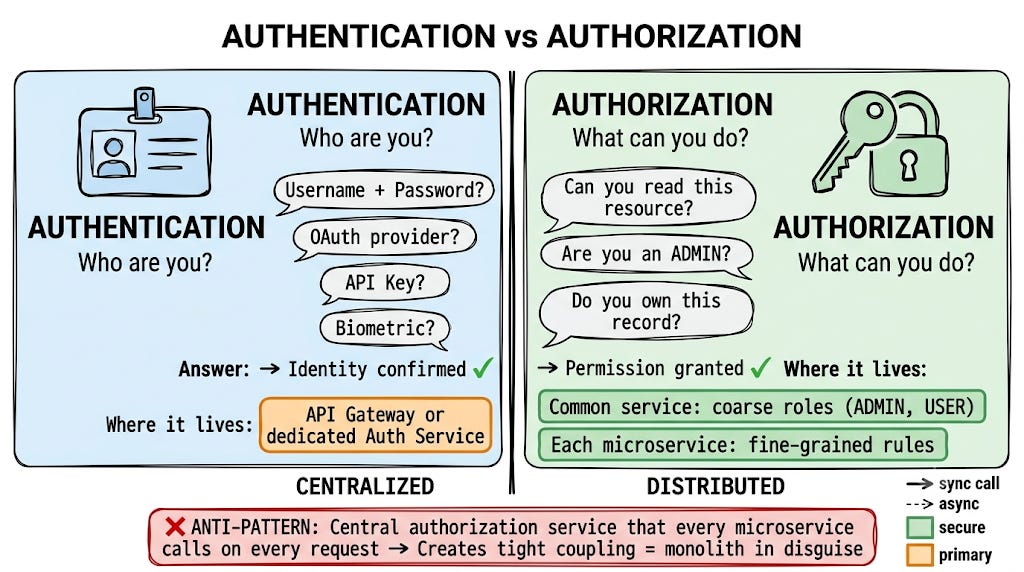
Why this separation? If Service B needs to call Service A to authorize every request, you’ve created a dependency that breaks Service A’s independent lifecycle. Instead: authenticate centrally, propagate identity via JWT, let each service enforce its own fine-grained rules.
The anti-pattern: A centralized authorization service that every microservice must call for every permission check. This creates the same coupling problem as a monolith — your “microservices” now share a single authorization bottleneck.
The pattern: Keep group or role definitions coarse-grained in common cross-cutting services. Allow individual services to maintain their own fine-grained controls. A user is an ADMIN globally. Whether that admin can delete a specific resource is decided by the resource’s service.
Layer 2: OAuth 2.0 — Delegated Authorization
OAuth 2.0 is the industry standard for delegated authorization. It enables a third-party application to obtain limited access to an HTTP service on behalf of a resource owner — without the resource owner sharing their credentials with the third party.
The key word is limited. OAuth doesn’t give the third party your password. It gives them a scoped, time-limited access token.
The OAuth 2.0 Authorization Code Flow
This is the flow used by every “Login with Google / GitHub / Apple” button:
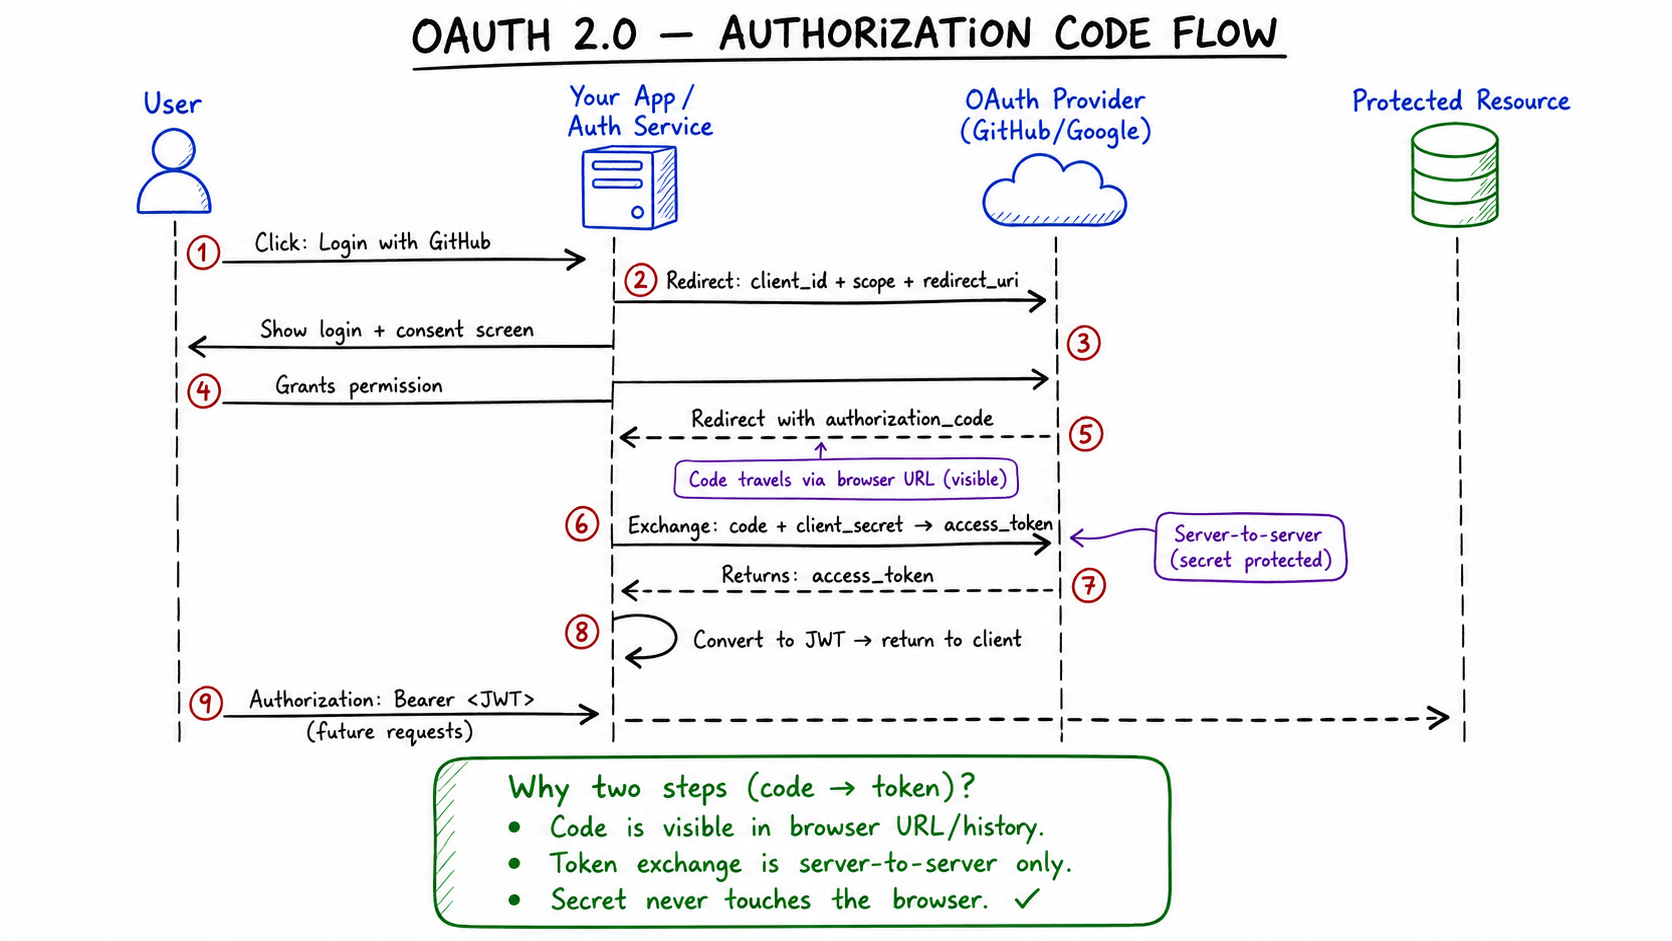
Why the two-step code → token exchange? The authorization code travels through the browser (redirect URL), which is visible in browser history and logs. The actual token exchange happens server-to-server, keeping the secret away from the browser.
Spring Boot OAuth 2.0 Implementation
<!-- pom.xml -->
<dependency>
    <groupId>org.springframework.boot</groupId>
    <artifactId>spring-boot-starter-oauth2-client</artifactId>
</dependency>
<dependency>
    <groupId>org.springframework.boot</groupId>
    <artifactId>spring-boot-starter-security</artifactId>
</dependency>
# application.yml
spring:
  security:
    oauth2:
      client:
        registration:
          github:
            client-id: ${GITHUB_CLIENT_ID}
            client-secret: ${GITHUB_CLIENT_SECRET}
            scope: read:user, user:email
          google:
            client-id: ${GOOGLE_CLIENT_ID}
            client-secret: ${GOOGLE_CLIENT_SECRET}
            scope: openid, profile, email
@Configuration
@EnableWebSecurity
public class OAuth2SecurityConfig {
    @Bean
    public SecurityFilterChain filterChain(HttpSecurity http) throws Exception {
        http
            .authorizeHttpRequests(auth -> auth
                .requestMatchers("/public/**").permitAll()
                .requestMatchers("/admin/**").hasRole("ADMIN")
                .anyRequest().authenticated()
            )
            .oauth2Login(oauth2 -> oauth2
                .loginPage("/login")
                .defaultSuccessUrl("/dashboard", true)
                .userInfoEndpoint(userInfo -> userInfo
                    .userService(customOAuth2UserService())
                )
            )
            .oauth2ResourceServer(oauth2 -> oauth2
                .jwt(Customizer.withDefaults())
            );
        return http.build();
    }
}
Layer 3: JWT — Stateless Identity Propagation
After OAuth 2.0 authenticates the user, something must carry that identity from service to service without hitting the auth database on every request. That something is a JSON Web Token.
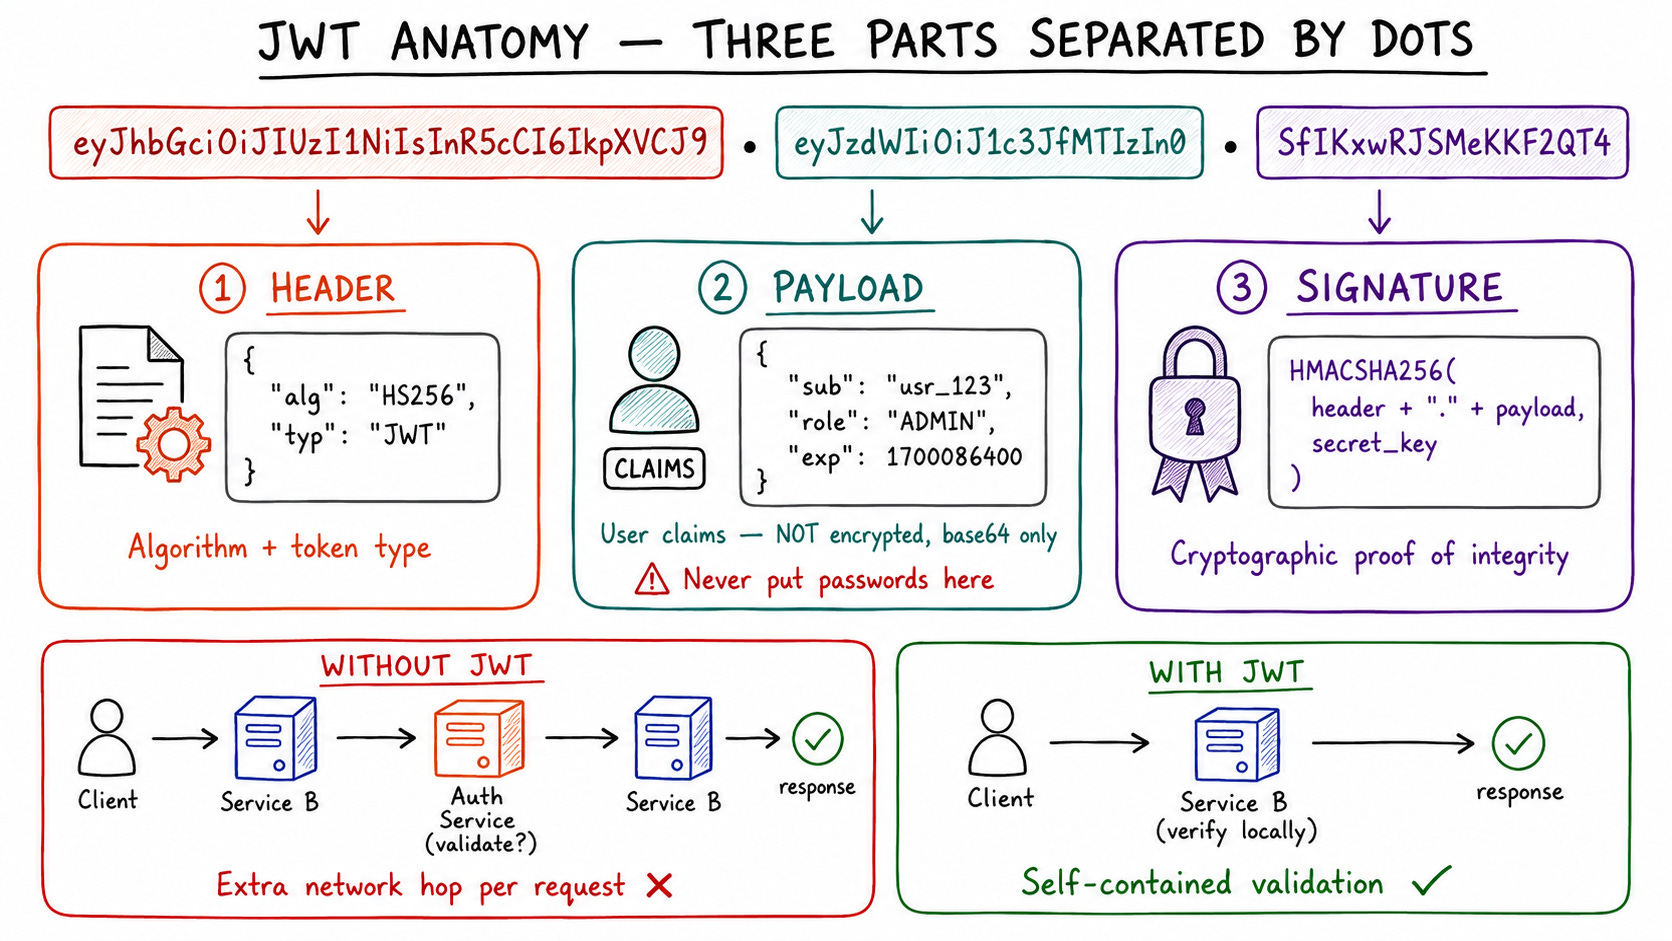
Anatomy of a JWT
Better Engineers is a reader-supported publication. To receive new posts and support my work, consider becoming a free or paid subscriber.
A JWT is three Base64URL-encoded JSON objects separated by dots:
eyJhbGciOiJIUzI1NiIsInR5cCI6IkpXVCJ9    ← Header
.
eyJzdWIiOiJ1c3JfMTIzIiwibmFtZSI6IkRldiIsInJvbGUiOiJBRE1JTiIsImlhdCI6MTcwMDAwMDAwMCwiZXhwIjoxNzAwMDg2NDAwfQ==    ← Payload
.
SflKxwRJSMeKKF2QT4fwpMeJf36POk6yJV_adQssw5c    ← Signature
Header — algorithm and token type:
{
  "alg": "HS256",
  "typ": "JWT"
}
Payload — the claims (who the user is, what they can do, when it expires):
{
  "sub": "usr_123",
  "name": "Dev Dhar",
  "role": "ADMIN",
  "email": "dev@example.com",
  "iat": 1700000000,
  "exp": 1700086400
}
Signature — cryptographic proof it hasn’t been tampered with:
HMACSHA256(
  base64UrlEncode(header) + "." + base64UrlEncode(payload),
  secret
)
Why JWT works for microservices
Without JWT, Service B must call the Auth Service to validate every incoming request:
Client → Service B → Auth Service (is this token valid?) → Service B → response
With JWT, Service B validates the token locally using the shared signing key:
Client → Service B (verify signature locally) → response
No extra network hop. No Auth Service dependency. No single point of failure. The token is self-contained.
Spring Boot JWT Implementation (Spring Security 6)
<dependency>
    <groupId>org.springframework.boot</groupId>
    <artifactId>spring-boot-starter-security</artifactId>
</dependency>
<dependency>
    <groupId>io.jsonwebtoken</groupId>
    <artifactId>jjwt-api</artifactId>
    <version>0.12.3</version>
</dependency>
<dependency>
    <groupId>io.jsonwebtoken</groupId>
    <artifactId>jjwt-impl</artifactId>
    <version>0.12.3</version>
    <scope>runtime</scope>
</dependency>
@Service
public class JwtService {
    @Value("${jwt.secret}")
    private String secretKey;
    private static final long EXPIRATION_MS = 86_400_000; // 24 hours
    // Generate a JWT for an authenticated user
    public String generateToken(UserDetails userDetails) {
        return Jwts.builder()
            .subject(userDetails.getUsername())
            .claim("roles", userDetails.getAuthorities()
                .stream().map(GrantedAuthority::getAuthority)
                .collect(Collectors.toList()))
            .issuedAt(new Date())
            .expiration(new Date(System.currentTimeMillis() + EXPIRATION_MS))
            .signWith(getSigningKey())
            .compact();
    }
    // Validate JWT and extract username
    public String extractUsername(String token) {
        return extractClaim(token, Claims::getSubject);
    }
    public boolean isTokenValid(String token, UserDetails userDetails) {
        final String username = extractUsername(token);
        return username.equals(userDetails.getUsername())
            && !isTokenExpired(token);
    }
    private boolean isTokenExpired(String token) {
        return extractClaim(token, Claims::getExpiration)
            .before(new Date());
    }
    private <T> T extractClaim(String token, Function<Claims, T> claimsResolver) {
        final Claims claims = Jwts.parser()
            .verifyWith(getSigningKey())
            .build()
            .parseSignedClaims(token)
            .getPayload();
        return claimsResolver.apply(claims);
    }
    private SecretKey getSigningKey() {
        return Keys.hmacShaKeyFor(
            Decoders.BASE64.decode(secretKey)
        );
    }
}
// JWT Filter — runs before every request
@Component
@RequiredArgsConstructor
public class JwtAuthFilter extends OncePerRequestFilter {
    private final JwtService jwtService;
    private final UserDetailsService userDetailsService;
    @Override
    protected void doFilterInternal(
        HttpServletRequest request,
        HttpServletResponse response,
        FilterChain filterChain
    ) throws ServletException, IOException {
        final String authHeader = request.getHeader("Authorization");
        // Skip if no Bearer token
        if (authHeader == null || !authHeader.startsWith("Bearer ")) {
            filterChain.doFilter(request, response);
            return;
        }
        final String jwt = authHeader.substring(7);
        final String username = jwtService.extractUsername(jwt);
        if (username != null &&
            SecurityContextHolder.getContext().getAuthentication() == null) {
            UserDetails userDetails =
                userDetailsService.loadUserByUsername(username);
            if (jwtService.isTokenValid(jwt, userDetails)) {
                UsernamePasswordAuthenticationToken authToken =
                    new UsernamePasswordAuthenticationToken(
                        userDetails,
                        null,
                        userDetails.getAuthorities()
                    );
                authToken.setDetails(
                    new WebAuthenticationDetailsSource().buildDetails(request)
                );
                SecurityContextHolder.getContext().setAuthentication(authToken);
            }
        }
        filterChain.doFilter(request, response);
    }
}
Three JWT rules you must follow
Rule 1: Short expiry + refresh tokens. A JWT that never expires is a permanent credential. Set expiry to 15 minutes to 1 hour for access tokens. Use refresh tokens (longer-lived, stored securely, rotated on use) to get new access tokens.
Rule 2: Never store sensitive data in the payload. The payload is Base64-encoded, not encrypted. Anyone with the token can decode it. Put user ID, roles, and expiry in the payload. Never put passwords, SSNs, or financial data.
Rule 3: Use RS256 for inter-service tokens. HMAC (HS256) uses a shared secret — every service that validates tokens must know the secret. RSA (RS256) uses public/private keys — the Auth Service signs with the private key, all other services verify with the public key. Compromise of Service B doesn’t expose the signing key.
Layer 4: Rate Limiting — Your First Line of Defence
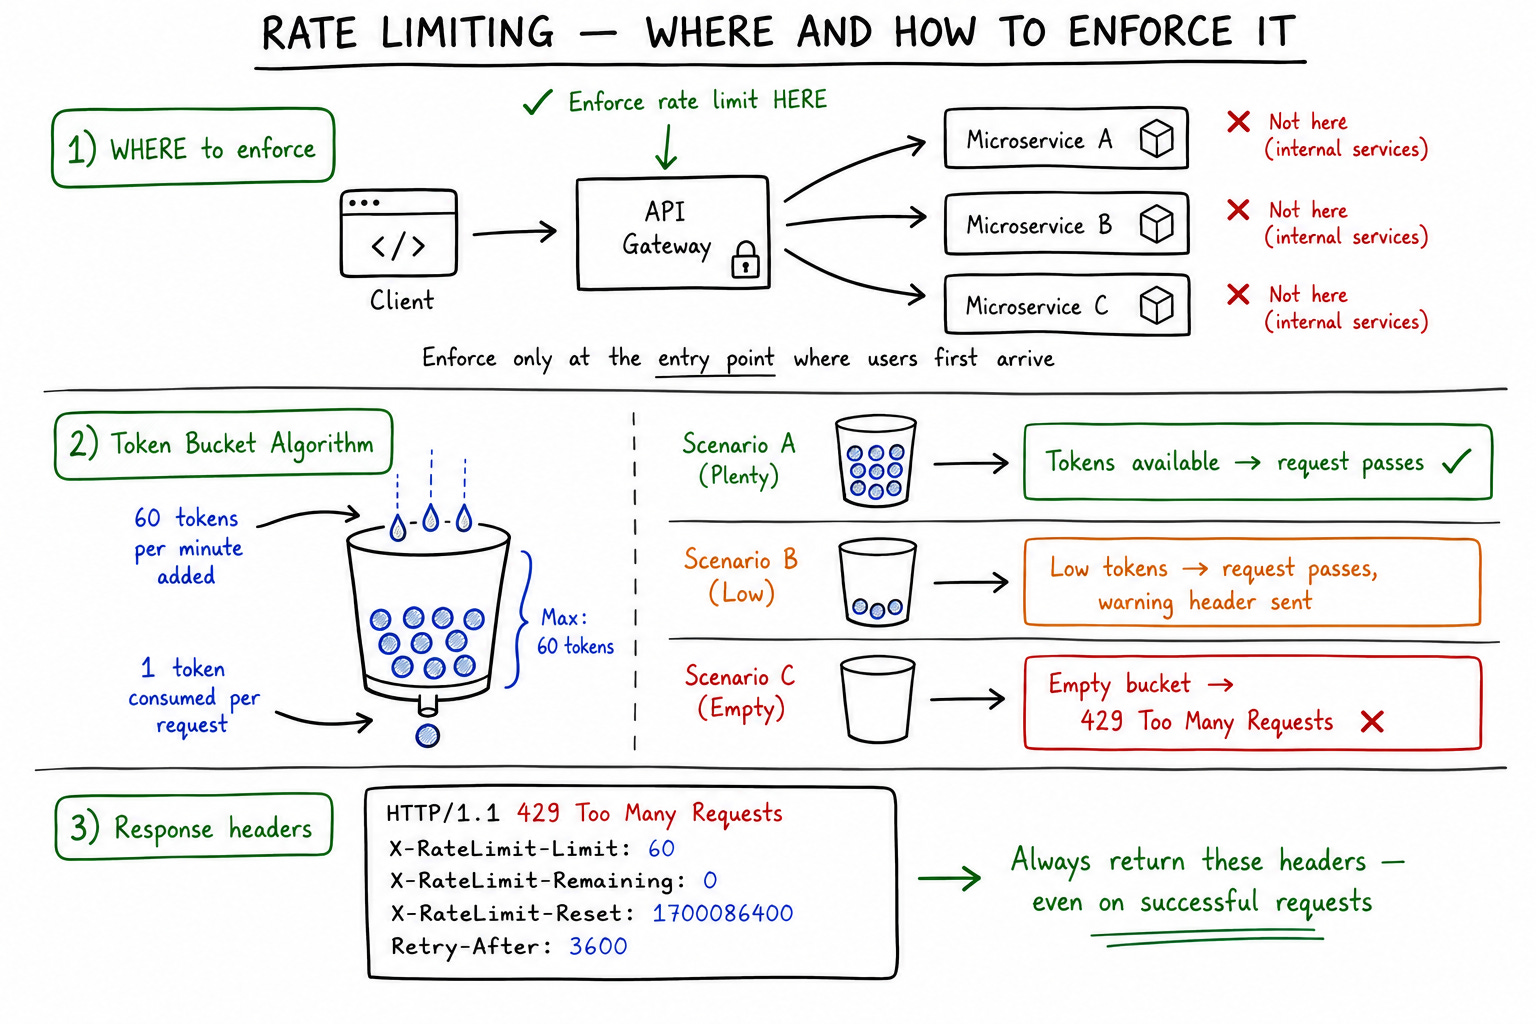
Rate limiting prevents abuse — a slow brute-force attack on your login endpoint, a runaway bot scraping your API, or a DDoS attempt against your services.
Where to enforce it: Only at the furthest downstream point where user requests first enter your organization — at the API Gateway, not at each individual microservice. Enforcing rate limits on internal service-to-service calls adds unnecessary overhead and latency.
GitHub’s rate limit response format
This is the industry standard response when a rate limit is exceeded:
HTTP/1.1 429 Too Many Requests
X-RateLimit-Limit: 60
X-RateLimit-Remaining: 0
X-RateLimit-Reset: 1377013266
Retry-After: 3600
{
  "message": "API rate limit exceeded.",
  "documentation_url": "https://docs.yourdomain.com/rate-limiting"
}
Three headers every rate-limited API should return:
X-RateLimit-Limit— total requests allowed in the windowX-RateLimit-Remaining— requests remaining in current windowX-RateLimit-Reset— Unix timestamp when the window resets
Spring Boot Rate Limiting with Bucket4j + Redis
<dependency>
    <groupId>com.github.vladimir-bukhtoyarov</groupId>
    <artifactId>bucket4j-core</artifactId>
    <version>8.10.1</version>
</dependency>
<dependency>
    <groupId>com.github.vladimir-bukhtoyarov</groupId>
    <artifactId>bucket4j-redis</artifactId>
    <version>8.10.1</version>
</dependency>
@Component
public class RateLimitingFilter extends OncePerRequestFilter {
    private final Map<String, Bucket> bucketCache = new ConcurrentHashMap<>();
    // 60 requests per minute per client IP
    private Bucket createNewBucket() {
        Bandwidth limit = Bandwidth.builder()
            .capacity(60)
            .refillGreedy(60, Duration.ofMinutes(1))
            .build();
        return Bucket.builder().addLimit(limit).build();
    }
    @Override
    protected void doFilterInternal(
        HttpServletRequest request,
        HttpServletResponse response,
        FilterChain filterChain
    ) throws ServletException, IOException {
        String clientIp = request.getRemoteAddr();
        Bucket bucket = bucketCache.computeIfAbsent(
            clientIp, k -> createNewBucket()
        );
        ConsumptionProbe probe = bucket.tryConsumeAndReturnRemaining(1);
        // Set rate limit headers on every response
        response.addHeader("X-RateLimit-Limit", "60");
        response.addHeader("X-RateLimit-Remaining",
            String.valueOf(probe.getRemainingTokens()));
        if (probe.isConsumed()) {
            filterChain.doFilter(request, response);
        } else {
            response.setStatus(429);
            response.addHeader("Retry-After",
                String.valueOf(probe.getNanosToWaitForRefill() / 1_000_000_000));
            response.getWriter().write(
                "{\"message\": \"Rate limit exceeded. Try again later.\"}"
            );
        }
    }
}
Rate limiting strategies
Strategy Algorithm Best for Fixed window Count requests per minute Simple APIs Sliding window Weighted rolling count More accurate, standard APIs Token bucket Tokens replenished at fixed rate Burst-tolerant APIs Leaky bucket Queue, drain at fixed rate Smooth output, strict rate
Token bucket (used above) is the most common for REST APIs — it allows short bursts while enforcing an average rate over time.
Layer 5: API Gateway — The Perimeter
An API Gateway is the single entry point between your clients and your microservices. Every request passes through it. This makes it the right place for perimeter security.
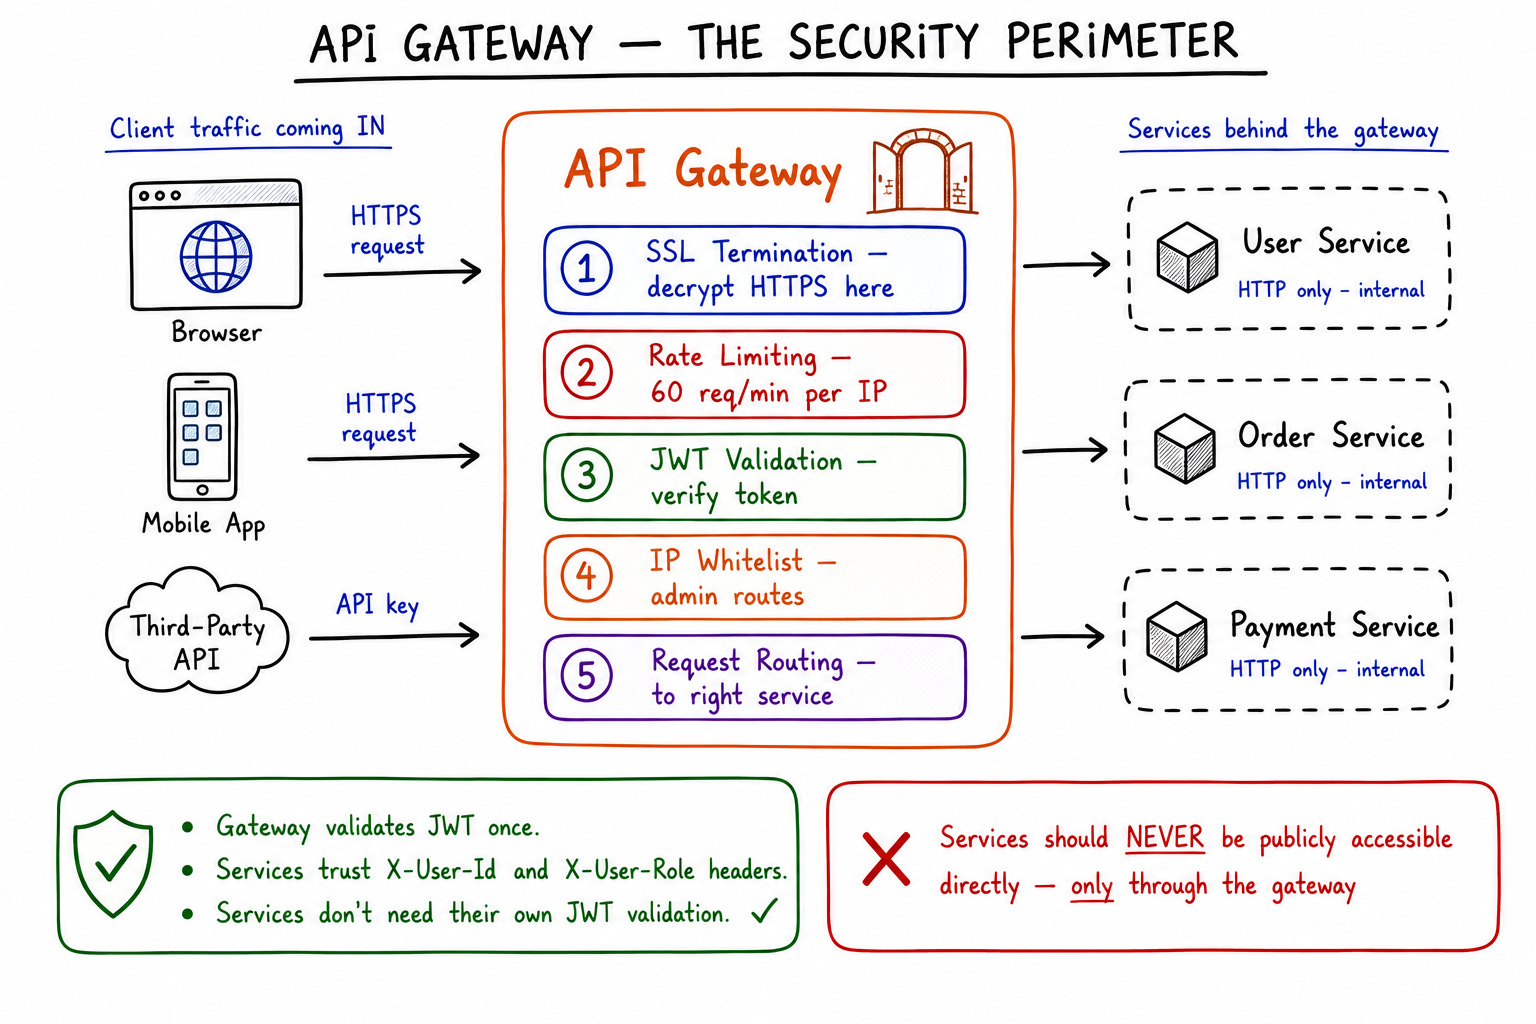
What your API Gateway should handle
1. Rate Limiting — enforced here, nowhere else.
2. SSL/TLS Termination — the gateway decrypts incoming HTTPS traffic. Internal service-to-service calls travel over HTTP within the private VPC. This means your microservices don’t need TLS configuration — the gateway handles it. One certificate to manage, not N.
3. Authentication — JWT validation at the gateway. Services behind the gateway can trust that X-User-Id and X-User-Role headers are set correctly. They don’t need to validate tokens themselves.
4. IP Whitelisting — restrict access to admin endpoints or internal services by source IP. Admin APIs should only be accessible from your office VPN or internal CIDR ranges.
# Example: restrict /admin/* to corporate IP range
# In Nginx / Kong / AWS API Gateway
location /admin/ {
    allow 10.0.0.0/8;       # internal VPC
    allow 203.0.113.0/24;   # office VPN
    deny all;
    proxy_pass http://admin-service;
}
5. Serving Static Content — serve HTML, JS, CSS from S3/Azure Blob directly at the gateway level via CDN integration, without hitting your application servers.
Spring Cloud Gateway configuration
# application.yml — Spring Cloud Gateway
spring:
  cloud:
    gateway:
      routes:
        - id: user-service
          uri: lb://user-service
          predicates:
            - Path=/api/users/**
          filters:
            - name: RequestRateLimiter
              args:
                redis-rate-limiter.replenishRate: 10
                redis-rate-limiter.burstCapacity: 20
            - name: CircuitBreaker
              args:
                name: userServiceCB
                fallbackUri: forward:/fallback/users
            - AddRequestHeader=X-Gateway-Source, api-gateway
            - RemoveRequestHeader=Cookie
        - id: order-service
          uri: lb://order-service
          predicates:
            - Path=/api/orders/**
          filters:
            - JwtAuthFilter    # custom filter that validates JWT
            - name: Retry
              args:
                retries: 3
                statuses: BAD_GATEWAY
Layer 6: Secure Headers — Browser-Level Protection
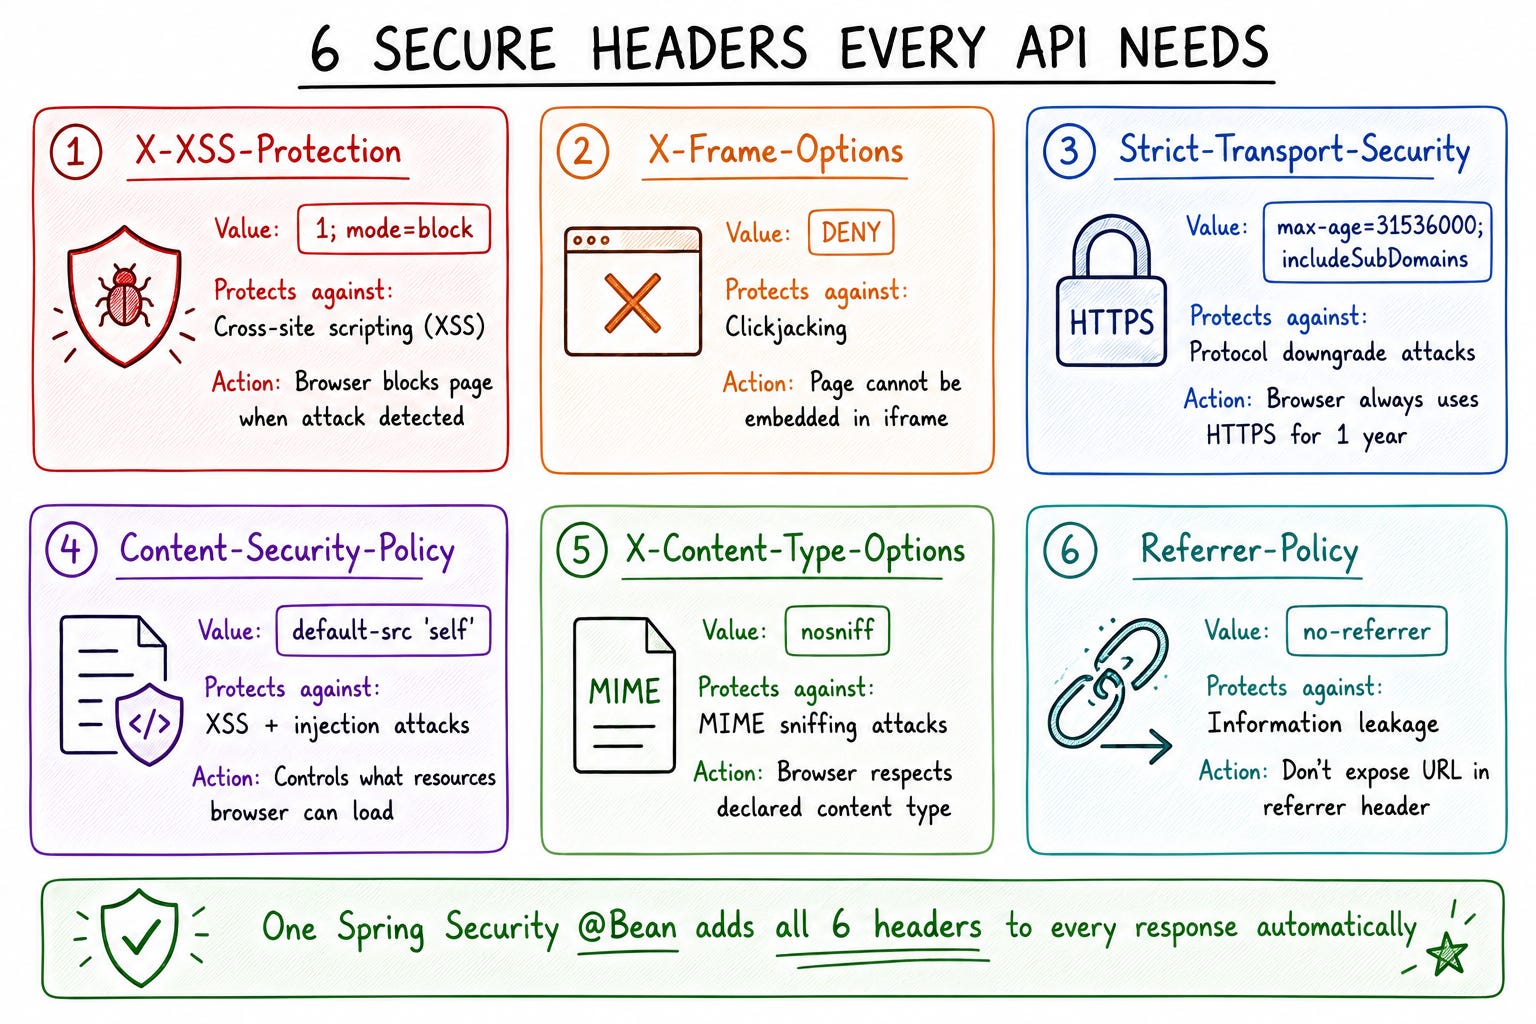
Secure headers instruct browsers on how to behave when rendering your application’s content. They’re the last line of defence against XSS, clickjacking, and MIME sniffing attacks.
@Configuration
@EnableWebSecurity
public class SecureHeadersConfig {
    @Bean
    public SecurityFilterChain filterChain(HttpSecurity http) throws Exception {
        http.headers(headers -> headers
            // 1. XSS Protection — block page if attack detected
            .xssProtection(xss -> xss.headerValue(
                XXssProtectionHeaderWriter.HeaderValue.ENABLED_MODE_BLOCK
            ))
            // 2. Clickjacking protection — refuse iframe embedding
            .frameOptions(frame -> frame.deny())
            // 3. HSTS — force HTTPS for 1 year
            .httpStrictTransportSecurity(hsts -> hsts
                .includeSubDomains(true)
                .maxAgeInSeconds(31_536_000)
                .preload(true)
            )
            // 4. MIME sniffing protection
            .contentTypeOptions(Customizer.withDefaults())
            // 5. Content Security Policy
            .contentSecurityPolicy(csp -> csp.policyDirectives(
                "default-src 'self'; " +
                "script-src 'self' https://trusted-cdn.com; " +
                "style-src 'self' 'unsafe-inline'; " +
                "img-src 'self' data: https:; " +
                "frame-ancestors 'none'"
            ))
            // 6. Referrer policy — don't leak URLs
            .referrerPolicy(referrer -> referrer.policy(
                ReferrerPolicyHeaderWriter.ReferrerPolicy.STRICT_ORIGIN_WHEN_CROSS_ORIGIN
            ))
            // 7. Permissions policy — disable unneeded browser features
            .permissionsPolicy(permissions -> permissions.policy(
                "camera=(), microphone=(), geolocation=(self), payment=()"
            ))
        );
        return http.build();
    }
}
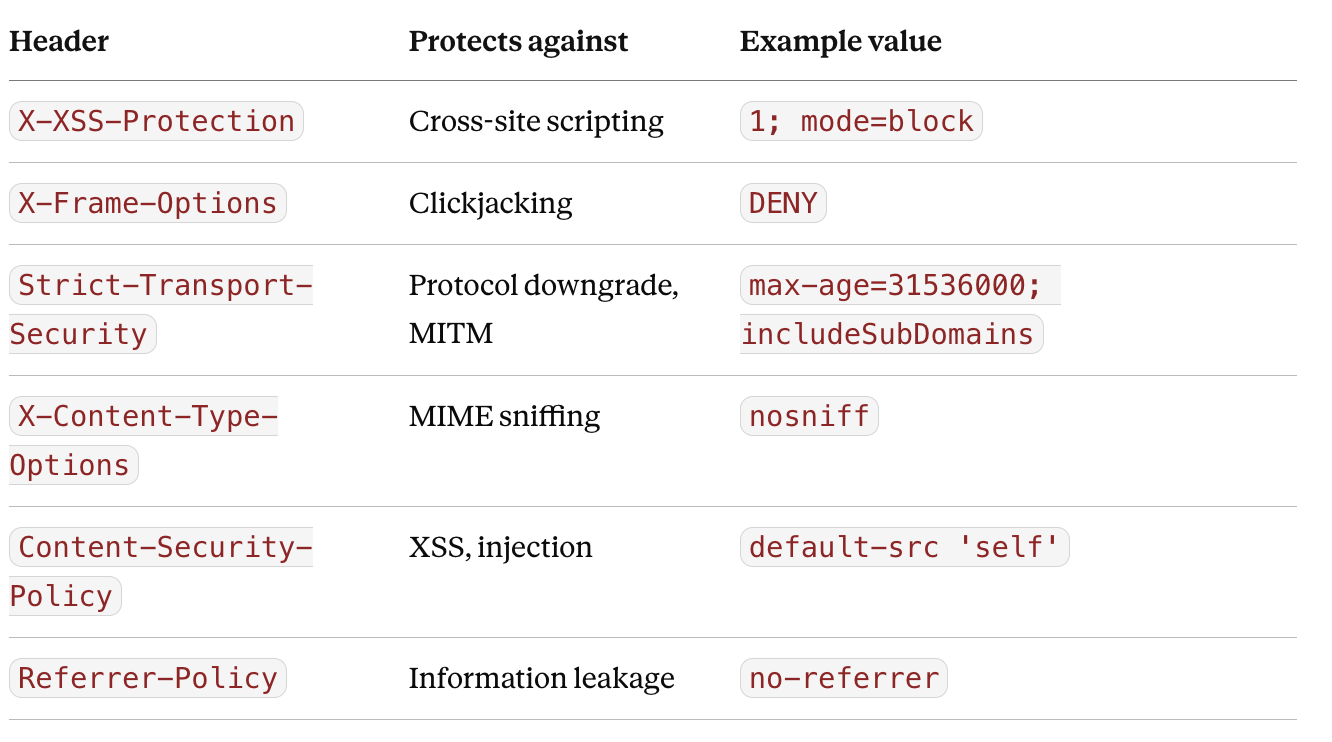
What each header does:
Layer 7: HTTPS and TLS — The Transport Layer
Everything above is useless if your transport is unencrypted. HTTPS wraps HTTP in TLS (Transport Layer Security), encrypting all traffic between client and server.
Why it matters: On regular HTTP, every packet is readable by anyone on the same network. Public WiFi users are trivially intercepted. Passwords, JWTs, session cookies — all plaintext.
With TLS: even if packets are captured, they decrypt to gibberish without the private key.
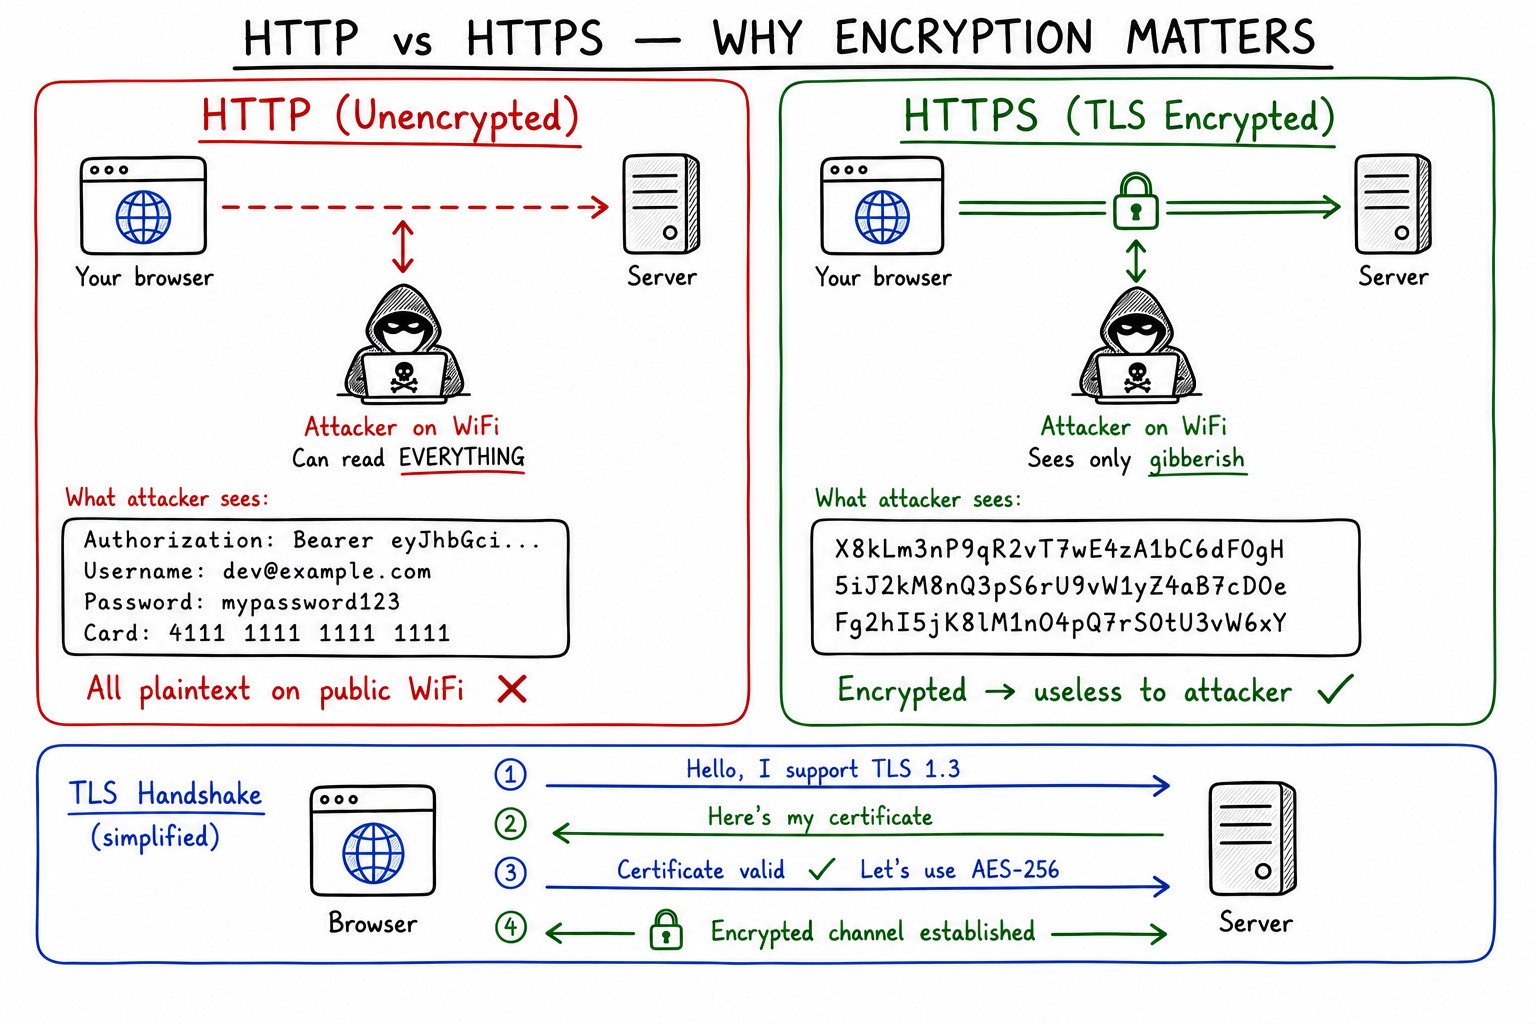
Before encryption:
Authorization: Bearer eyJhbGciOiJIUzI1NiJ9.eyJzdWIiOiJ1c3JfMTIzIn0...
After encryption (what attacker sees):
X8kLm3nP9qR2vT7wE4zA1bC6dF0gH5iJ2kM8nQ3pS6rU9vW1yZ4aB7cD0eF
Enable HTTPS in Spring Boot
# application.yml
server:
  port: 8443
  ssl:
    key-store: classpath:keystore.p12
    key-store-password: ${SSL_KEYSTORE_PASSWORD}
    key-store-type: PKCS12
    key-alias: myapp
    protocol: TLS
    enabled-protocols: TLSv1.2, TLSv1.3
    ciphers: >
      TLS_AES_256_GCM_SHA384,
      TLS_CHACHA20_POLY1305_SHA256,
      TLS_AES_128_GCM_SHA256
// Force HTTP → HTTPS redirect
@Configuration
public class HttpsRedirectConfig {
    @Bean
    public TomcatServletWebServerFactory servletContainer() {
        TomcatServletWebServerFactory tomcat =
            new TomcatServletWebServerFactory() {
                @Override
                protected void postProcessContext(Context context) {
                    SecurityConstraint constraint = new SecurityConstraint();
                    constraint.setUserConstraint("CONFIDENTIAL");
                    SecurityCollection collection = new SecurityCollection();
                    collection.addPattern("/*");
                    constraint.addCollection(collection);
                    context.addConstraint(constraint);
                }
            };
        tomcat.addAdditionalTomcatConnectors(httpConnector());
        return tomcat;
    }
    private Connector httpConnector() {
        Connector connector = new Connector("org.apache.coyote.http11.Http11NioProtocol");
        connector.setScheme("http");
        connector.setPort(8080);
        connector.setSecure(false);
        connector.setRedirectPort(8443);
        return connector;
    }
}
In production on AKS or EKS, TLS termination happens at the ingress controller or API Gateway — Spring Boot itself runs HTTP internally within the cluster. The SSL configuration above is for running HTTPS directly on Spring Boot.
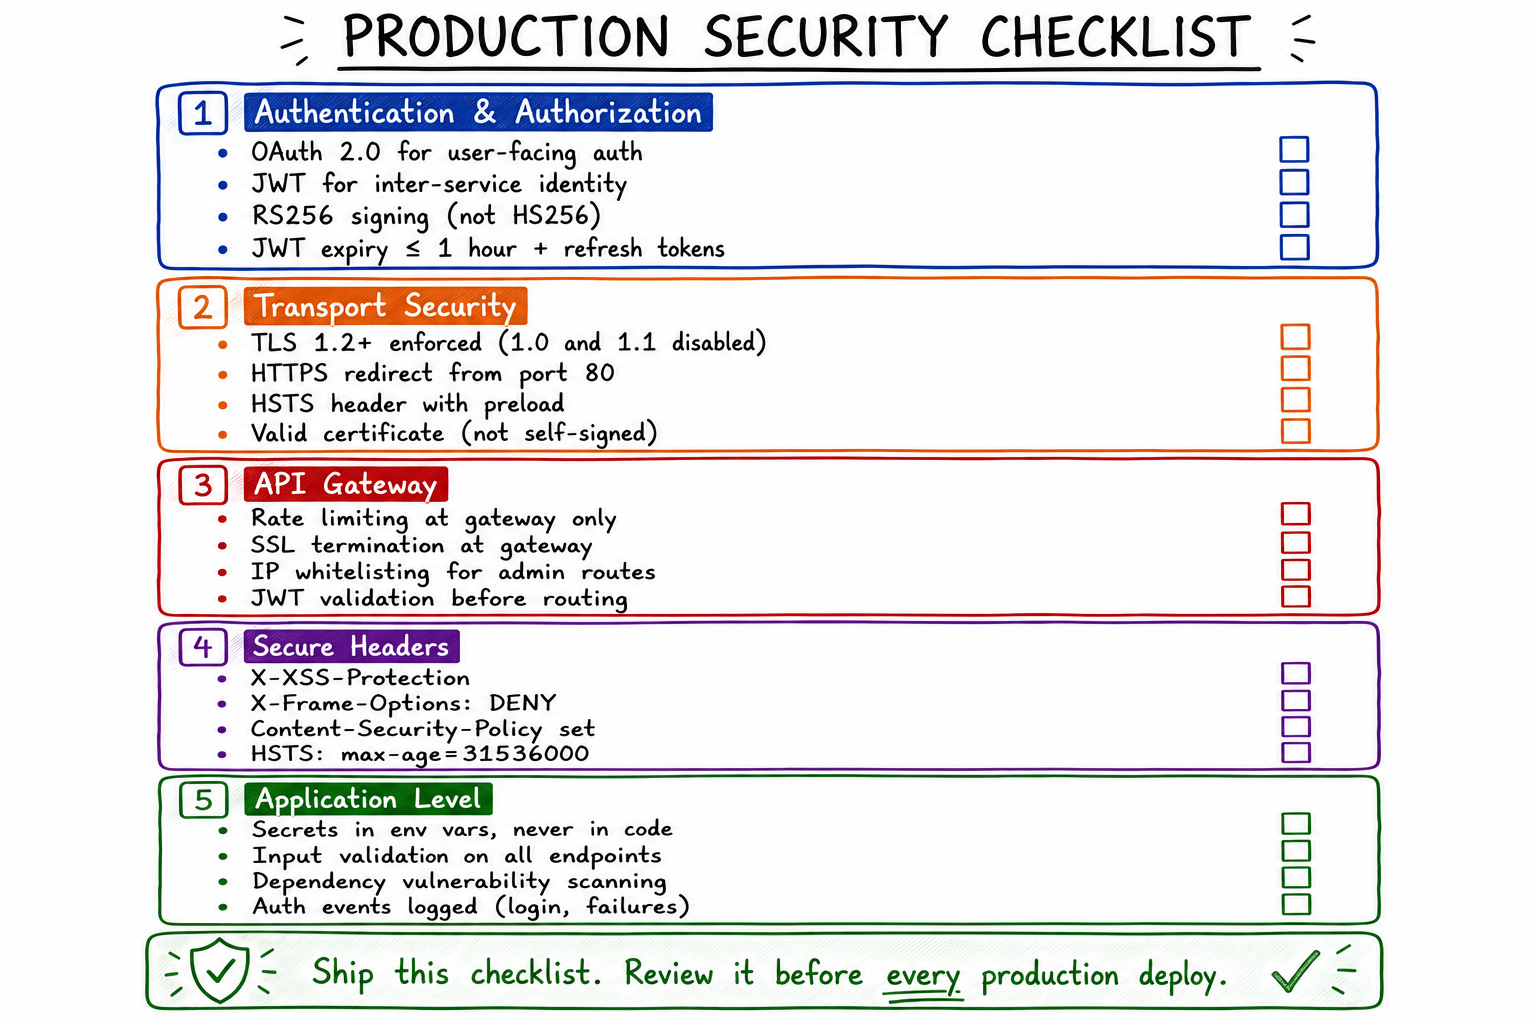
The Security Checklist
Before shipping any microservice to production:
TL;DR
Authentication vs Authorization:
Authentication = who are you (centralized)
Authorization = what can you do (coarse globally, fine per service)
OAuth 2.0:
Authorization Code Flow for user-facing auth
Two-step: code → token exchange keeps secrets off the browser
Spring Boot:
spring-boot-starter-oauth2-client
JWT:
Three parts: Header.Payload.Signature (Base64URL encoded)
Self-contained: services validate locally, no Auth Service call
Use RS256 for inter-service tokens
Expiry ≤ 1 hour, never store sensitive data in payload
Rate Limiting:
Enforce only at the API Gateway, not between internal services
Return
X-RateLimit-*headers on every responseToken bucket algorithm for burst-tolerant APIs
API Gateway:
Single entry point: rate limit, TLS terminate, authenticate, route
JWT validation here means downstream services trust headers
IP whitelisting for admin APIs
Secure Headers:
HSTS, CSP, X-Frame-Options, X-XSS-Protection, nosniff
One
@Beanin Spring Security covers all of them
HTTPS / TLS:
TLS 1.2+ only, disable older versions
In production: terminate at ingress/gateway, not Spring Boot
Force HTTP → HTTPS redirect
Security is not a feature you add at the end. It’s a constraint that shapes every architectural decision from day one. Add it in layer 1, not in the post-launch security audit.
If this was useful, share it with one engineer on your team whose microservices are currently running without rate limiting.
Comments
Nothing yet. Say the first thing.
Sign in to join the conversation.