

I really enjoyed working on Terrain, delving into the world of sound design and developing the UX for an instrument is definitely an area of design I’ve always wanted to explore. After releasing Terrain I wondered how feasible it would be to build an audio plugin with my newly honed Claude Code skills. Sure enough it seemed like a viable option – so a fresh rabbit hole presented itself, hence the months of silence…
I love the idea of creating a small series of audio plugins that put an experimental twist on some classics. I decided to tackle a reverb effect first, as an ambient musician reverb is one of my favourite effects. It is also one of the most complex effects so I am diving right into the deep end.
This immediately got me thinking about the UI – any excuse for some design. So most of the technical requirements were written alongside the creation of the mockups in Figma. I am definitely a visual thinker, somehow creating the interface helps to direct my thoughts so I can get a picture of the overall concept.
When an idea starts to take shape, I will often start to think about it when I close my eyes at night. As I started to visualise the UI it always had a Japanese Hannya mask sitting in the top corner, I’m really not sure where that came from! I hadn’t been consciously thinking about them or looking at art that could have influenced me, but I ran with it.
The plugin should have a shared control system across the 4 algorithms. A theming system would work really well and give me a base to work from for future plugins. It also means users would get a familiar experience across the family of plugins.
The UI is built entirely in C++ using JUCE, which is the industry-standard framework for audio plugin development. JUCE handles everything from the plugin format wrappers (VST3, AU, Standalone) to the rendering engine for custom UI components.
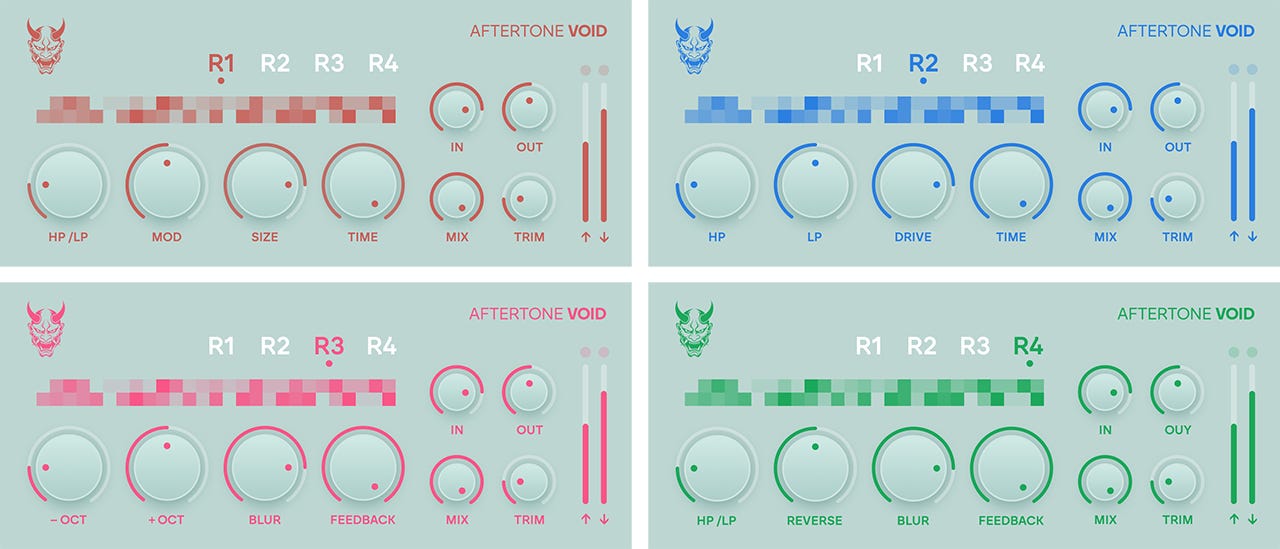
The visual design is built around a two-layer colour system: each plugin has a fixed background colour, and each algorithm within a plugin has its own accent colour. Switching algorithms triggers a live accent colour swap across every UI element without rebuilding any components.
The pixel grid is for freeze mode, where the incoming audio is captured and looped (more on this below). When active, the grid starts to randomly shuffle, as the pitch is changed the grid will either move faster or slower, giving a visual indication of what the frozen content is doing.
The large dials are the 4 customisable controls for each individual algorithm. The smaller controls on the right are the master controls, core things like volume, mix, input and output gain.
This is where it gets time consuming. I created a rough plan for how I wanted the reverbs to work, I wanted them to start clean but have the possibility to descend into feedback if you want a more gritty sound. A lot of experimentation went into this phase, working out how the signal should flow and making certain things bleed back into the signal at different levels to add interesting artefacts. It is a creative playground full of options – some work, some end in horrible swelling distortion and sore ears.
R1 uses 8 parallel delay lines. Each delay line has its own LFO modulation at a staggered phase and slightly different rate. The TIME dial has a two-zone design: the first half of the knob is a clean RT60 reverb; the upper half progressively degrades the feedback path with sample rate reduction and bandwidth limiting, inspired by the Chase Bliss Mood’s “Clock” knob, it brings a damaged cassette character rather than harsh digital aliasing.
R2 is a Hall-type architecture capable of near-infinite sustain. At maximum TIME it generates self-sustaining soundscapes. A DRIVE control adds soft distortion into the reverb body.
R3 and R4 both use a grain engine. R3 adds pitch layering via -OCT and +OCT controls, blending octave-shifted grain layers over the reverb. R4 adds a REVERSE mode where grains are simultaneously read forwards and backwards from the buffer, creating a timeless spatial character. In both, BLUR modulates each grain’s read position, producing organic smearing.
The plugin needed some analog emulation to add the subtle imperfections that make hardware units feel alive and add a warmer character.
Claude was excellent for helping me research the different methods that could be implemented to achieve this. I built a prototype to test how each method sounded, using a simple sine wave to A/B test the effect. It was interesting to hear how different modifications sounded in combination. In the end I went with these options:
Filter output saturation – Adds a gentle warmth to the sound
Component drift – Eight very slow LFOs each modulating a different delay line’s length. This simulates the tiny timing variations you get from real hardware components running at slightly different temperatures and tolerances.
Input transformer simulation – Applies a subtle low-shelf boost and adds a small amount of second harmonic content. Both are characteristics of real transformer-coupled hardware inputs.
Stereo asymmetry - The left and right channels have slightly different delay lengths, filter cutoffs, and LFO phases. This prevents the two channels from being perfectly identical, which real hardware never is.
The Hannya mask needed to serve a function in the plugin, something that might not be obvious at first, I really enjoy encouraging exploration in interfaces like this. When you move your mouse over the mask it begins to pulse; clicking initiates freeze mode. When engaged it captures the last two seconds of incoming audio into a buffer and loops it continuously, feeding that loop back through whichever reverb algorithm is active.
While frozen, a pitch control appears on the UI allowing you to pitch-shift the frozen content up or down by an octave. The speed of the pixel grid animation also tracks the pitch - at lower settings it moves slowly, at higher settings it moves faster.
Each of the four algorithms has its own independent freeze state, so switching algorithms while frozen doesn’t disengage it. I have yet to explore what this means in terms of automating algorithm changes while you have four different frozen states active simultaneously, but it could be interesting!
I am currently testing the reverb plugin which I have called VOID. There have been some battles along the way to get everything functioning correctly and several rounds of “where is that clicking sound coming from?”. Claude Code can only take you so far with sound – ultimately it is still up to the human ear to curate the experience and bring the idea into the world.
Testing is going well and it can create some interesting textural soundscapes. Next comes the task of getting it ready for distribution. I’ll be looking for testers soon if anyone is interested in getting an advanced copy to try out, comment below.
There are some demos on my instagram made during the development process if you would like a sneak peak.
This whole process got me thinking – could I write an EP using only instruments and effects that I have built? Could be fun.
Comments
Nothing yet. Say the first thing.
Sign in to join the conversation.