Oracle VirtualBox is a cross-platform virtualization application. That means it extends the capabilities of your existing computer so that it can run multiple operating systems, inside multiple virtual machines (VMs), at the same time. As an example, you can run Windows and Linux on your Mac, run Windows Server on your Linux server, run Linux on your Windows PC, and so on, all alongside your existing applications.
You can install and run as many virtual machines as you like. The only practical limits are disk space and memory. You can also save, copy, export and transfer VMs between hosts, and Oracle Cloud Infrastructure.
Oracle VirtualBox can run on multiple host operating systems, and on small embedded systems or desktop machines all the way up to data center servers and Cloud environments. You can install appliances (VMs pre-installed with applications and configured for a particular purpose, such as a mail server) to save time and improve consistency. You may even be able to install an old OS that your host computer no longer runs, because you can configure virtual hardware in a VM to suit your needs.
Virtualization can significantly reduce hardware and electricity costs. Most of the time, computers only use a fraction of their potential power and run with low average system loads. A lot of hardware resources are therefore wasted. So, instead of running many such physical computers that are only partially used, you can pack many VMs onto a few powerful hosts and balance the loads between them.
Oracle VirtualBox is a useful tool for development and testing. For example, you can investigate issues with software configuration or networking using VMs.
For more information on Oracle VirtualBox, including support and licensing, see https://www.oracle.com/virtualization/virtualbox/#licensing.
Oracle VirtualBox Components
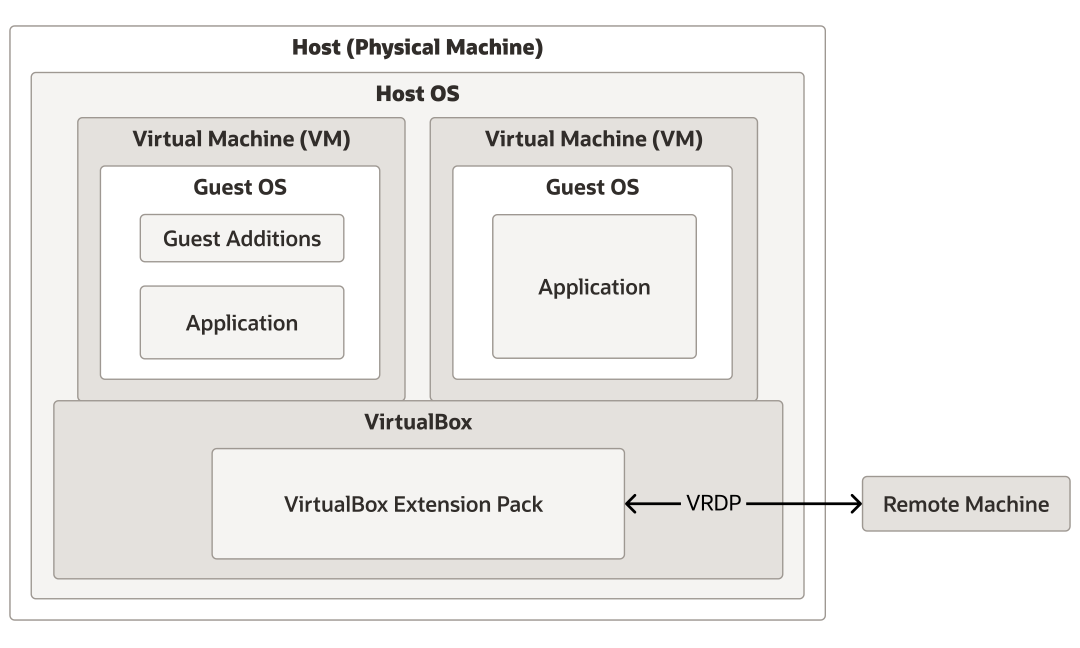
Oracle VirtualBox is installed on the host operating system. The host is the physical computer, such as a laptop or server, where you run VirtualBox and the virtual machines you create or import. There are versions of Oracle VirtualBox for Windows, macOS, Linux, and Oracle Solaris hosts. See Choosing an Installation Package for more information. The VirtualBox Platform Package consists of all open source components and is licensed under the GNU General Public License V3.
The Oracle VirtualBox Extension Pack is an optional, separately licensed, installation package that includes these additional features:
-
VirtualBox Remote Desktop Protocol (VRDP) server. See Remote Display (VRDP Support). This allows remote clients to connect to a VM using RDP. For example in the case of a server running several applications in different VMs. There is no need for a GUI for any of these on the host machine, but you may wish to connect to them remotely for troubleshooting or maintenance.
-
Host webcam passthrough. See Webcam Passthrough.
-
Intel PXE boot ROM.
-
Disk image encryption with AES algorithm. See Encryption of Disk Images.
-
Cloud integration features. See Integrating with Oracle Cloud Infrastructure.
The guest operating system (guest OS) is the OS that is running inside a virtual machine. Theoretically, Oracle VirtualBox can run any x86 OS such as DOS, Windows, OS/2, FreeBSD, and OpenBSD on an x86_64 host. It can also run a selection of Arm guests on Arm hosts. See Guest Operating Systems.
The virtual machine (VM) is the special environment that Oracle VirtualBox creates for your guest OS while it is running. In other words, you run your guest OS in a VM. Normally, a VM is shown as a window on your computer's desktop. Depending on which of the various frontends of Oracle VirtualBox you use, the VM might be shown in full screen mode or remotely on another computer.
Internally, Oracle VirtualBox treats a VM as a set of parameters that specify its behavior. Some parameters describe hardware settings, such as the amount of memory and number of CPUs assigned. Other parameters describe the state information, such as whether the VM is running or saved.
You can view these VM settings in VirtualBox Manager, in the Settings window, and by running the VBoxManage command. See VBoxManage.
Guest Additions for OSs that qualify for Oracle Premier Support are included in the VirtualBox base package. These are installed inside a VM, once the OS is installed and running, to improve performance of the guest OS and to add extra features. See Guest Additions.
Oracle VirtualBox Features
Portability
Oracle VirtualBox is a so-called hosted hypervisor, sometimes referred to as a type 2 hypervisor. Whereas a bare-metal or type 1 hypervisor runs directly on the hardware, Oracle VirtualBox requires an existing OS to be installed. It can thus run alongside existing applications on that host. Oracle VirtualBox runs on a large number of 64-bit host operating systems. See Choosing an Installation Package.
CAUTION:
Do not run other hypervisors together with Oracle VirtualBox.
While several hypervisors can normally be installed in parallel, do not attempt to run virtual machines from competing hypervisors at the same time. Oracle VirtualBox cannot track what another hypervisor is currently attempting to do on the same host, and especially if several products attempt to use hardware virtualization features such as VT-x, this can crash the entire host.
Oracle VirtualBox is available on multiple host platforms, and the same file and image formats are used on each. This enables you to run virtual machines created on one host on another host with a different host OS. For example, you can create a virtual machine (VM) on Windows and then run it on Linux.
In addition, VMs can easily be imported and exported using the Open Virtualization Format (OVF), an industry standard created for this purpose. You can even import OVFs that were created with a different virtualization software. See Importing and Exporting Virtual Machines.
OCI Integration
You can export and import VMs to and from Oracle Cloud Infrastructure. This simplifies development of applications and deployment to the production environment. See Exporting an Appliance to Oracle Cloud Infrastructure.
Guest Additions
The Oracle VirtualBox Guest Additions are software packages that can be installed on VMs to improve their performance and to provide additional integration and communication with the host system. VMs running Guest Additions support automatic adjustment of video resolutions, seamless windows, accelerated 3D graphics, shared folders, clipboard sharing, drag and drop, and more.
Virtual Hardware
Oracle VirtualBox implements virtual hardware devices and drivers, and implements resource sharing with the real hardware on the host.
-
Guest multiprocessing (SMP). Oracle VirtualBox can present up to 32 virtual CPUs to each virtual machine, irrespective of how many CPU cores are physically present on your host.
-
USB devices. Oracle VirtualBox implements a virtual USB controller and enables you to connect arbitrary USB devices to your virtual machines without having to install device-specific drivers on the host. USB support is not limited to certain device categories. See USB Settings.
-
Hardware compatibility. Oracle VirtualBox virtualizes a vast array of virtual devices, among them many devices that are typically provided by other virtualization platforms. That includes IDE, SCSI, and SATA hard disk controllers, several virtual network cards and sound cards, virtual serial ports and an Input/Output Advanced Programmable Interrupt Controller (I/O APIC), which is found in many computer systems. This enables easy cloning of disk images from real machines and importing of third-party virtual machines into Oracle VirtualBox.
-
ACPI. The Advanced Configuration and Power Interface (ACPI) is available in Oracle VirtualBox. This enables easy cloning of disk images from real machines or third-party virtual machines into Oracle VirtualBox. With its unique ACPI power status support, Oracle VirtualBox can even report to ACPI-aware guest OSs the power status of the host. For mobile systems running on battery, the guest can thus enable energy saving and notify the user of the remaining power, for example in full screen modes.
-
Multiscreen resolutions. Oracle VirtualBox VMs support screen resolutions many times that of a physical screen, allowing them to be spread over a large number of screens attached to the host system.
-
Built-in iSCSI support. This unique feature enables you to connect a virtual machine directly to an iSCSI storage server without going through the host system. The VM accesses the iSCSI target directly without the extra overhead that is required for virtualizing hard disks in container files. See iSCSI Servers.
-
PXE Network boot. The integrated virtual network cards of Oracle VirtualBox fully support remote booting using the Preboot Execution Environment (PXE).
VM Management
-
Multigeneration branched snapshots. Oracle VirtualBox can save arbitrary snapshots of the state of the VM. You can go back in time and revert the VM to any such snapshot and start an alternative VM configuration from there, effectively creating a whole snapshot tree. This can be useful for experimenting with a computing environment, testing, or troubleshooting without the need for frequent backups and restores. See Snapshots. You can create and delete snapshots while the VM is running.
-
VM groups. Oracle VirtualBox provides a groups feature that enables the user to organize and control virtual machines collectively, as well as individually. In addition to basic groups, it is also possible for any VM to be in more than one group, and for groups to be nested in a hierarchy. This means you can have groups of groups. In general, the operations that can be performed on groups are the same as those that can be applied to individual VMs: Start, Pause, Reset, Close (Save state, Send Shutdown, Power off), Discard Saved State, Show in File System, Sort.
Remote Access
The VirtualBox Remote Desktop Extension (VRDE) is a host extension package that enables high-performance remote access to any running VM. This extension supports the Remote Desktop Protocol (RDP) originally built into Windows, with special additions for full client USB support.
The VRDE does not rely on the Windows RDP server and therefore works with guest OSs other than Windows, even in text mode, and does not require application support in the VM. The VRDE is described in detail in Remote Display (VRDP Support).
-
Oracle VirtualBox also provides
-
Extensible RDP authentication. Oracle VirtualBox already supports Winlogon on Windows and PAM on Linux and Oracle Solaris for RDP authentication. In addition, it includes an easy-to-use SDK which enables you to create arbitrary interfaces for other methods of authentication. See RDP Authentication.
-
USB over RDP. Using RDP virtual channel support, Oracle VirtualBox also enables you to connect arbitrary USB devices locally to a virtual machine which is running remotely on an Oracle VirtualBox RDP server. See Remote USB.
-
Modular Design and Interfaces
Oracle VirtualBox has an extremely modular design with well-defined internal programming interfaces and a clean separation of client and server code. This makes it easy to control it from several interfaces at once. For example, you can start a VM simply by clicking on a button in the Oracle VirtualBox graphical user interface and then control that machine from the command line, or even remotely.
The front ends available are:
-
VirtualBox Manager, a graphical user interface that uses the Qt toolkit. This interface is described throughout this user guide. While this is the simplest and easiest front end to use, some of the more advanced Oracle VirtualBox features are not included.
-
VBoxManage, the command-line interface for automated and detailed control of every aspect of Oracle VirtualBox.
-
VBoxHeadless, the Remote Desktop Server. An interface that produces no visible output on the host at all, but can act as a RDP server if the VirtualBox Remote Desktop Extension (VRDE) is installed and enabled for the VM. As opposed to the graphical interfaces, the headless front end requires no graphics support. This is useful, for example, if you want to host your virtual machines on a headless Linux server that has no X Window system installed.
-
Separate Mode. A front end that is based on VBoxHeadless, but does not require VRDE or an RDP viewer.
Oracle VirtualBox also provides a comprehensive software development kit (SDK), that enables integration of Oracle VirtualBox with other software systems. See Oracle VirtualBox Programming Interfaces.
Experimental Features
Features listed as Experimental Features do not qualify for Oracle support. Feedback and suggestions about these features are welcome.
Guest Operating Systems
You can run most operating systems (OSs) successfully on a virtual machine (VM) in Oracle VirtualBox.
However, to achieve near-native performance of the guest code on your machine, some optimizations that are specific to certain OSs had to be made. So while your favorite OS may run as a guest, Oracle provides premier support only for selected OSs and guest additions.
Other guest OSs can be used with Oracle VirtualBox, but only qualify for limited support. Therefore, resolution of customer issues for such guest OSs cannot be assured.
The virtual hardware determines the choice of guest OSs available, as does the host machine. Ensure you take all aspects of VM configuration into consideration when creating a VM.
Host and Guest Combinations
| Host Hardware Architecture | Host OS (all 64 bit) | Guest Virtual Hardware Architecture | Guest OS |
|---|---|---|---|
| x86_64 (for example Intel or AMD) |
Windows Windows Server macOS (requires Intel hardware) Linux (various distributions) Oracle Solaris |
x86 and x86_64 |
Windows Windows Server Oracle Solaris Linux (various distributions) |
| Arm64 |
Windows 11 (Experimental Feature) macOS (requires Apple silicon hardware) |
Arm64 |
Linux (various distributions) Windows 11 |
Guest OSs That Run on x86_64 Hosts
The following table shows the Guest OSs that run on hosts with an x86_64 processor and the tier of Oracle support offered for each. See also Guest OSs That Run on Arm64 Hosts.
| Guest Operating System (all x86) | Oracle Support Available |
|---|---|
| Windows 11 (64-bit). Released versions only. | Premier |
| Windows 10 (32-bit and 64-bit). Released versions only. | |
| Windows Server 2025 (64-bit) | |
| Windows Server 2022 (64-bit) | |
| Oracle Solaris 11 (32-bit and 64-bit) | |
| Oracle Linux 10 (64-bit), Red Hat Enterprise Linux 10 (64-bit) | |
| Oracle Linux 9 (64-bit), Red Hat Enterprise Linux 9 (64-bit) | |
| Oracle Linux 8 (64-bit), Red Hat Enterprise Linux 8 (64-bit) | |
| Windows 8.1 and 8 (32-bit and 64-bit) | Limited |
| Windows 7 (32-bit and 64-bit) | |
| Windows Vista SP2 and later (32-bit and 64-bit) | |
| Windows XP (32-bit) | |
| Windows Vista (32-bit) | |
| Windows Server 2019 (64-bit) | |
| Windows Server 2016 (64-bit) | |
| Windows Server 2012 and 2012 R2 (64-bit) | |
| Windows Server 2008 and 2008 R2 (32-bit and 64-bit) | |
| Windows Server 2003 (32-bit and 64-bit) | |
| Oracle Solaris 10 8/11 Update 10 and later (32-bit and 64-bit) | |
| Oracle Linux 7 (64-bit), Red Hat Enterprise Linux 7 (64-bit) | |
| Oracle Linux 6 (32-bit and 64-bit), Red Hat Enterprise Linux 6 (32-bit and 64-bit) | |
| Oracle Linux 5 (32-bit and 64-bit), Red Hat Enterprise Linux 5 (32-bit and 64-bit) | |
| Ubuntu 24.10 LTS (Oracular Oriole) (64-bit) | |
| Ubuntu 24.04 LTS (Noble Numbat) (64-bit) | |
| Ubuntu 22.04 LTS (Jammy Jellyfish) (64-bit) | |
| Ubuntu 20.04 LTS (Focal Fossa) (64-bit) | |
| Ubuntu 18.04 LTS (Bionic Beaver) (64-bit) | |
| Ubuntu 16.04 LTS (Xenial Xerus) (32-bit and 64-bit) | |
| Ubuntu 14.04.5 LTS (Trusty Tahr) (32-bit and 64-bit) | |
| SUSE Linux Enterprise Server 15 (64-bit) | |
| SUSE Linux Enterprise Server 12 (64-bit) | |
| OS/2 Warp 4.5 |
Guest OSs That Run on Arm64 Hosts
The following table shows the Guest OSs that run on hosts with an aarch64 processor and the tier of Oracle support offered for each. See also Guest OSs That Run on x86_64 Hosts.
| Guest Operating System (all 64-bit Arm) | Oracle Support Available |
|---|---|
| Windows 11 (64-bit). Released versions only. | Premier (macOS hosts only) |
| Oracle Linux 10, Red Hat Enterprise Linux 10 | |
| Oracle Linux 9, Red Hat Enterprise Linux 9 | |
| Oracle Linux 8, Red Hat Enterprise Linux 8 | |
| Oracle Linux 7, Red Hat Enterprise Linux 7 | Limited |
| Debian 12 | |
| Debian 11 | |
| Ubuntu 24.10 LTS (Oracular Oriole) | |
| Ubuntu 24.04 LTS (Noble Numbat) | |
| Ubuntu 22.04 LTS (Jammy Jellyfish) | |
| Ubuntu 20.04 LTS (Focal Fossa) | |
| Ubuntu 18.04 LTS (Bionic Beaver) | |
| SUSE Linux Enterprise Server 15 | |
| SUSE Linux Enterprise Server 12 |
64-bit Guests
Note:
Be sure to enable I/O APIC for virtual machines that you intend to use in 64-bit mode. This is especially true for 64-bit Windows VMs. See Motherboard Tab. For 64-bit Windows guests, ensure that the VM uses the Intel networking device because there is no 64-bit driver support for the AMD PCNet card. See Virtual Networking Hardware.
If you use the Create VM process in VirtualBox Manager, Oracle VirtualBox automatically uses the correct settings for each selected 64-bit OS type. See Creating a New Virtual Machine.
Installing VirtualBox
Installation of Oracle VirtualBox varies depending on your host operating system. Choose the instructions you require for Windows, macOS, Linux, or Oracle Solaris.
You may also require an extension package. For more information see Oracle VirtualBox Components and Managing Oracle VirtualBox Extensions.
Choosing an Installation Package
Download the appropriate Oracle VirtualBox platform installation package for the host processor and operating system (OS). These are the packages available, and the platforms you can install and run them on. See also Host and Guest Combinations.
-
Windows hosts:
-
Windows 11 with Arm processors (Experimental Feature, see Experimental Features)
-
Windows 11 with x86_64 processors
-
Windows 10 with x86_64 processors
-
Windows Server 2025 with x86_64 processors
-
Windows Server 2022 with x86_64 processors
-
-
macOS / Intel hosts:
-
26 (Tahoe) with Intel x86_64 processors
-
15 (Sequoia) with Intel x86_64 processors
-
14 (Sonoma) with Intel x86_64 processors
-
13 (Ventura) with Intel x86_64 processors
-
-
macOS / Apple Silicon hosts:
-
26 (Tahoe) with Apple Silicon Arm processors
-
15 (Sequoia) with Apple Silicon Arm processors
-
14 (Sonoma) with Apple Silicon Arm processors
-
13 (Ventura) with Apple Silicon Arm processors
-
-
Linux Distributions:
- Oracle Linux 10 / Red Hat Enterprise Linux 10 with x86_64 processors
- Oracle Linux 9 / Red Hat Enterprise Linux 9 with x86_64 processors
- Oracle Linux 8 / Red Hat Enterprise Linux 8 with x86_64 processors
- Ubuntu 24.10 with x86_64 processors
- Ubuntu 24.04 with x86_64 processors
- Ubuntu 22.04 with x86_64 processors
- Ubuntu 20.04 with x86_64 processors
- Debian 12 - Debian GNU/Linux 12 (Bookworm) with x86_64 processors
- Debian 11 - Debian GNU/Linux 11 (Bullseye) with x86_64 processors
- openSUSE 15.6 with x86_64 processors
- Fedora 40 / 41 / 42 with x86_64 processors
- All distributions with x86_64 processors - Built on EL6 and therefore not requiring recent system libraries. Not covered by Oracle Premier Support.
-
Solaris hosts and Solaris 11 IPS hosts
-
Oracle Solaris 11.4
-
Intel Host CPU Requirements
Intel host CPUs must have SSE2 (Streaming SIMD Extensions 2).
Arm Host Limitations
The following limitations apply when using an Arm platform host:
-
Using Oracle VirtualBox on an Arm processor running Windows 11 is not covered by Oracle Premier Support. See Windows on Arm Hosts.
Virtual machines must use an Arm-based guest operating system. Running an x86-based guest operating system on an Arm host platform is not supported.
Only VMSVGA is supported as a graphics controller.
Unattended installation isn't available.
The following System page settings aren't available for Arm guests:
Motherboard tab: Chipset, TPM
Processor tab: Extended Features such as Enable PAE/NX, Enable Nested VT-x/AMD-V
Installing on Windows Hosts
Prerequisites
For the various versions of Windows that are supported as host operating systems, please refer to Choosing an Installation Package.
In addition, Windows Installer must be present on your system. This should be the case for all supported Windows platforms.
Windows Installation Directory Security Requirements
The installation directory on Windows hosts must meet certain security requirements, in order to be accepted by the Windows installer.
This also applies for upgrades of Oracle VirtualBox.
For example, when installing Oracle VirtualBox into a custom location at X:\Data\MyPrograms\Oracle VirtualBox, all parent directories of this path (namely X:\Data and X:\Data\MyPrograms) must meet the following Discretionary Access Control List (DACL).
        Users               S-1-5-32-545:(OI)(CI)(RX)
        Users               S-1-5-32-545:(DE,WD,AD,WEA,WA)
        Authenticated Users S-1-5-11:(OI)(CI)(RX)
        Authenticated Users S-1-5-11:(DE,WD,AD,WEA,WA)
Directory inheritance must also be disabled for all parent directories.
You can use the icacls Windows command line tool to modify a directory to meet the security
requirements. For example:
      icacls <Directory> /reset /t /c
      icacls <Directory> /inheritance:d /t /c
      icacls <Directory> /grant *S-1-5-32-545:(OI)(CI)(RX)
      icacls <Directory> /deny  *S-1-5-32-545:(DE,WD,AD,WEA,WA)
      icacls <Directory> /grant *S-1-5-11:(OI)(CI)(RX)
      icacls <Directory> /deny  *S-1-5-11:(DE,WD,AD,WEA,WA)
Note that these commands must be repeated for all parent directories (X:\Data and X:\Data\MyPrograms in this example).
Performing the Installation
The Oracle VirtualBox installation can be started in either of the following ways:
-
By double-clicking on the executable file.
-
By entering the following command:
VirtualBox-<version>-<revision>-Win.exe -extract
This will extract the installer into a temporary directory, along with the .MSI file. Run the following command to perform the installation:
msiexec /i VirtualBox-<version>-<revision>-Win.msi
Using either way displays the installation Welcome dialog and enables you to choose where to install Oracle VirtualBox, and which components to install. In addition to the Oracle VirtualBox application, the following components are available:
-
USB support. This package contains special drivers for your Windows host that Oracle VirtualBox requires to fully support USB devices inside your virtual machines.
-
Networking. This package contains extra networking drivers for your Windows host that Oracle VirtualBox needs to support Bridged Networking. This enables your VM's virtual network cards to be accessed from other machines on your physical network.
-
Python support. This package contains Python scripting support for the Oracle VirtualBox API, see Oracle VirtualBox Programming Interfaces. For this to work, an already working Windows Python installation on the system is required.
See, for example: http://www.python.org/download/windows/.
Note:
Python version 3 is required. Python version 2.x is no longer supported.
Depending on your Windows configuration, you may see warnings about unsigned drivers, or similar. Click Continue for these warnings, as otherwise Oracle VirtualBox might not function correctly after installation.
The installer will create an Oracle VirtualBox group in the Windows Start menu, which enables you to launch the application and access its documentation.
With standard settings, Oracle VirtualBox will be installed for all users on the local system. If this is not wanted, you must invoke the installer by first extracting as follows:
VirtualBox.exe -extract
Then, run either of the following commands on the extracted .MSI file. This will install Oracle VirtualBox only for the current user.
VirtualBox.exe -msiparams ALLUSERS=2
msiexec /i VirtualBox-<version>-Win.msi ALLUSERS=2
If you do not want to install all features of Oracle VirtualBox, you can set
the optional ADDLOCAL parameter to explicitly name the features to be installed. The following
features are available:
- VBoxApplication
-
Main binaries of Oracle VirtualBox.
Note:
This feature must not be absent, since it contains the minimum set of files to have working Oracle VirtualBox installation.
- VBoxUSB
-
USB support.
- VBoxNetwork
-
All networking support. This includes the VBoxNetworkFlt and VBoxNetworkAdp features.
- VBoxNetworkFlt
-
Bridged networking support.
- VBoxNetworkAdp
-
Host-only networking support
- VBoxPython
-
Python support
For example, to only install USB support along with the main binaries, run either of the following commands:
VirtualBox.exe -msiparams ADDLOCAL=VBoxApplication,VBoxUSB
msiexec /i VirtualBox-<version>-Win.msi ADDLOCAL=VBoxApplication,VBoxUSB
Uninstallation
As Oracle VirtualBox uses the standard Microsoft Windows installer, Oracle VirtualBox can be safely uninstalled at any time. Click the program entry in the Add/Remove Programs list in the Windows Control Panel.
Unattended Installation
Unattended installations can be performed using the standard MSI support.
Public Properties
Public properties can be specified with the MSI API, to control additional behavior and features of the Windows host installer. Use either of the following commands:
VirtualBox.exe -msiparams NAME=VALUE [...]
msiexec /i VirtualBox-<version>-Win.msi NAME=VALUE [...]
The following public properties are available.
-
VBOX_INSTALLDESKTOPSHORTCUT
Specifies whether or not an Oracle VirtualBox icon on the desktop should be created.
Set to
1to enable,0to disable. Default is 1. -
VBOX_INSTALLQUICKLAUNCHSHORTCUT
Specifies whether or not an Oracle VirtualBox icon in the Quick Launch Bar should be created.
Set to
1to enable,0to disable. Default is 1. -
VBOX_REGISTERFILEEXTENSIONS
Specifies whether or not the file extensions .vbox, .vbox-extpack, .ovf, .ova, .vdi, .vmdk, .vhd and .vdd should be associated with Oracle VirtualBox. Files of these types then will be opened with Oracle VirtualBox.
Set to
1to enable,0to disable. Default is 1. -
VBOX_START
Specifies whether to start Oracle VirtualBox right after successful installation.
Set to
1to enable,0to disable. Default is 1.
Installing on macOS Hosts
Performing the Installation
For macOS hosts, Oracle VirtualBox ships in a dmg disk image file. Perform the following steps to install on a macOS host:
-
Double-click the dmg file, to mount the contents.
-
A window opens, prompting you to double-click the VirtualBox.pkg installer file displayed in that window.
-
This starts the installer, which enables you to select where to install Oracle VirtualBox.
-
An Oracle VirtualBox icon is added to the Applications folder in the Finder.
Uninstallation
To uninstall Oracle VirtualBox, open the disk image dmg file and double-click the uninstall icon shown.
Unattended Installation
To perform a noninteractive installation of Oracle VirtualBox you can use the command line version of the installer application.
Mount the dmg disk image file, as described in the installation procedure, or use the following command line:
hdiutil attach /path/to/VirtualBox-xyz.dmg
Open a terminal session and run the following command:
sudo installer -pkg /Volumes/VirtualBox/VirtualBox.pkg -target /Volumes/Macintosh\ HD
Installing on Linux Hosts
Prerequisites
For the various versions of Linux that are supported as host operating systems, see Choosing an Installation Package.
You may need to install the following package on your Linux system before starting the installation. Some systems will do this for you automatically when you install Oracle VirtualBox.
-
Qt 6.5.3 or later.
Note:
Qt is only required if you want to run the Oracle VirtualBox graphical user interfaces. In particular, VirtualBox, the graphical VirtualBox Manager, requires Qt. If you only want to run VBoxHeadless, Qt is not required.
The Oracle VirtualBox Kernel Modules
In order to run other operating systems in virtual machines alongside your main operating system, Oracle VirtualBox needs to integrate very tightly with your system. To do this it installs a driver module called vboxdrv into the system kernel. The kernel is the part of the operating system which controls your processor and physical hardware. Without this kernel module, you can still use VirtualBox Manager to configure virtual machines, but they will not start.
Network drivers called vboxnetflt and vboxnetadp are also installed. They enable virtual machines to make more use of your computer's network capabilities and are needed for any virtual machine networking beyond the basic NAT mode.
Since distributing driver modules separately from the kernel is not something which Linux supports well, the Oracle VirtualBox install process creates the modules on the system where they will be used. This means that you may need to install some software packages from the distribution which are needed for the build process. Required packages may include the following:
-
GNU compiler (GCC)
-
GNU Make (make)
-
Kernel header files
Also ensure that all system updates have been installed and that your system is running the most up-to-date kernel for the distribution.
Note:
The running kernel and the kernel header files must be updated to matching versions.
The following list includes some details of the required files for some common distributions. Start by finding the version name of your kernel, using the command uname -r in a terminal. The list assumes that you have not changed too much from the original installation, in particular that you have not installed a different kernel type.
-
With Debian and Ubuntu-based distributions, you must install the correct version of the linux-headers, usually whichever of linux-headers-generic, linux-headers-amd64, linux-headers-i686 or linux-headers-i686-pae best matches the kernel version name. Also, the linux-kbuild package if it exists. Basic Ubuntu releases should have the correct packages installed by default.
-
On Fedora, Red Hat, Oracle Linux and many other RPM-based systems, the kernel version sometimes has a code of letters or a word close to the end of the version name. For example "uek" for the Oracle Unbreakable Enterprise Kernel or "default" or "desktop" for the standard kernels. In this case, the package name is kernel-uek-devel or equivalent. If there is no such code, it is usually kernel-devel.
-
On some SUSE and openSUSE Linux versions, you may need to install the kernel-source and kernel-syms packages.
If you suspect that something has gone wrong with module installation, check that your system is set up as described above and try running the following command, as root:
rcvboxdrv setup
Kernel Modules and UEFI Secure Boot
If you are running on a system using UEFI (Unified Extensible Firmware Interface) Secure Boot, you may need to sign the following kernel modules before you can load them:
-
vboxdrv
-
vboxnetadp
-
vboxnetflt
-
vboxpci
See your system documentation for details of the kernel module signing process.
Performing the Installation
Oracle VirtualBox is available in a number of package formats native to various common Linux distributions. See Choosing an Installation Package. In addition, there is an alternative generic installer (.run) which you can use on supported Linux distributions.
Installing Oracle VirtualBox from a Debian or Ubuntu Package
Download the appropriate package for your distribution. The following example assumes that you are installing to a 64-bit Ubuntu Xenial system. Use dpkg to install the Debian package,as follows:
sudo dpkg -i virtualbox-version-number_Ubuntu_xenial_amd64.deb
The installer will also try to build kernel modules suitable for the current running kernel. If the build process is not successful you will be shown a warning and the package will be left unconfigured. Look at /var/log/vbox-install.log to find out why the compilation failed. You may have to install the appropriate Linux kernel headers, see The Oracle VirtualBox Kernel Modules. After correcting any problems, run the following command:
sudo rcvboxdrv setup
This will start a second attempt to build the module.
If a suitable kernel module was found in the package or the module was successfully built, the installation script will attempt to load that module. If this fails, please see Linux Kernel Module Refuses to Load for further information.
Once Oracle VirtualBox has been successfully installed and configured, you can start it by clicking VirtualBox in your Start menu or from the command line. See Starting Oracle VirtualBox on Linux.
Using the Alternative Generic Installer (VirtualBox.run)
The alternative generic installer performs the following steps:
-
Unpacks the application files to the target directory /opt/VirtualBox/, which cannot be changed.
-
Builds and installs the Oracle VirtualBox kernel modules: vboxdrv, vboxnetflt, and vboxnetadp.
-
Creates /sbin/rcvboxdrv, an init script to start the Oracle VirtualBox kernel module.
-
Creates a new system group called
vboxusers. -
Creates symbolic links in /usr/bin to a shell script /opt/VirtualBox/VBox which does some sanity checks and dispatches to the actual executables: VirtualBox, VBoxVRDP, VBoxHeadless and VBoxManage.
-
Creates /etc/udev/rules.d/60-vboxdrv.rules, a description file for udev, if that is present, which makes the USB devices accessible to all users in the
vboxusersgroup. -
Writes the installation directory to /etc/vbox/vbox.cfg.
The installer must be executed as root with either install or uninstall as the
first parameter. For example:
sudo ./VirtualBox.run install
Or if you do not have the sudo command available, run the following as root instead:
./VirtualBox.run install
Add every user who needs to access USB devices from a VirtualBox guests to the group vboxusers.
Either use the OS user management tools or run the following command as root:
sudo usermod -a -G vboxusers username
Note:
The usermod command of some older Linux distributions does not support the
-a option, which adds the user to the given group without affecting membership of other
groups. In this case, find out the current group memberships with the groups command and
add all these groups in a comma-separated list to the command line after the -G option. For
example: usermod -G group1,group2,vboxusers
username.
Performing a Manual Installation
If you cannot use the shell script installer described in Using the Alternative Generic Installer (VirtualBox.run), you can perform a manual installation. Run the installer as follows:
./VirtualBox.run --keep --noexec
This will unpack all the files needed for installation in the directory install under the
current directory. The Oracle VirtualBox application files are contained
in VirtualBox.tar.bz2 which you can unpack to any directory on your system. For
example:
sudo mkdir /opt/VirtualBox
sudo tar jxf ./install/VirtualBox.tar.bz2 -C /opt/VirtualBox
To run the same example as root, use the following commands:
mkdir /opt/VirtualBox
tar jxf ./install/VirtualBox.tar.bz2 -C /opt/VirtualBox
The sources for Oracle VirtualBox's kernel module are provided in the src directory. To build the module, change to the directory and use the following command:
make
If everything builds correctly, run the following command to install the module to the appropriate module directory:
sudo make install
In case you do not have sudo, switch the user account to root and run the following command:
make install
The Oracle VirtualBox kernel module needs a device node to operate. The above make command will tell you how to create the device node, depending on your Linux system. The procedure is slightly different for a classical Linux setup with a /dev directory, a system with the now deprecated devfs and a modern Linux system with udev.
On certain Linux distributions, you might experience difficulties building the module. You will have to analyze the error messages from the build system to diagnose the cause of the problems. In general, make sure that the correct Linux kernel sources are used for the build process.
Note that the /dev/vboxdrv kernel module device node must be owned by root:root and must be read/writable only for the user.
Next, you install the system initialization script for the kernel module and activate the initialization script using the right method for your distribution, as follows:
cp /opt/VirtualBox/vboxdrv.sh /sbin/rcvboxdrv
This example assumes you installed Oracle VirtualBox to the /opt/VirtualBox directory.
Create a configuration file for Oracle VirtualBox, as follows:
mkdir /etc/vbox
echo INSTALL_DIR=/opt/VirtualBox > /etc/vbox/vbox.cfg
Create the following symbolic links:
ln -sf /opt/VirtualBox/VBox.sh /usr/bin/VirtualBox
ln -sf /opt/VirtualBox/VBox.sh /usr/bin/VBoxManage
ln -sf /opt/VirtualBox/VBox.sh /usr/bin/VBoxHeadless
Updating and Uninstalling Oracle VirtualBox
Before updating or uninstalling Oracle VirtualBox, you must terminate any virtual machines which are currently running and exit the Oracle VirtualBox or VBoxSVC applications. To update Oracle VirtualBox, simply run the installer of the updated version. To uninstall Oracle VirtualBox, run the installer as follows:
sudo ./VirtualBox.run uninstall
As root, you can use the following command:
./VirtualBox.run uninstall
You can uninstall the .run package as follows:
/opt/VirtualBox/uninstall.sh
To manually uninstall Oracle VirtualBox, perform the manual installation steps in reverse order.
Automatic Installation of Debian Packages
The Debian packages will request some user feedback when installed for the first time. The debconf system is used
to perform this task. To prevent any user interaction during installation, default values can be defined. A file
vboxconf can contain the following debconf settings:
virtualbox virtualbox/module-compilation-allowed boolean true
virtualbox virtualbox/delete-old-modules boolean true
The first line enables compilation of the vboxdrv kernel module if no module was found for the current kernel. The second line enables the package to delete any old vboxdrv kernel modules compiled by previous installations.
These default settings can be applied prior to the installation of the Oracle VirtualBox Debian package, as follows:
debconf-set-selections vboxconf
In addition there are some common configuration options that can be set prior to the installation. See Automatic Installation Options.
Automatic Installation of RPM Packages
The RPM format does not provide a configuration system comparable to the debconf system. See Automatic Installation Options for how to set some common installation options provided by Oracle VirtualBox.
Automatic Installation Options
To configure the installation process for .deb and .rpm packages, you can create a response file named /etc/default/virtualbox. The automatic generation of the udev rule can be prevented with the following setting:
INSTALL_NO_UDEV=1
The creation of the group vboxusers can be prevented as follows:
INSTALL_NO_GROUP=1
If the following line is specified, the package installer will not try to build the vboxdrv kernel module if no module fitting the current kernel was found.
INSTALL_NO_VBOXDRV=1
The vboxusers Group
The Linux installers create the system user group vboxusers during installation. Any system user
who is going to use USB devices from Oracle VirtualBox guests must be a member
of that group. A user can be made a member of the group vboxusers either by using the desktop
user and group tools, or with the following command:
sudo usermod -a -G vboxusers username
Starting Oracle VirtualBox on Linux
The easiest way to start an Oracle VirtualBox program is by running the program of your choice (VirtualBox, VBoxManage, or VBoxHeadless) from a terminal. These are symbolic links to VBox.sh that start the required program for you.
The following detailed instructions should only be of interest if you want to execute Oracle VirtualBox without installing it first. You should start by compiling the vboxdrv kernel module and inserting it into the Linux kernel. Oracle VirtualBox consists of a service daemon, VBoxSVC, and several application programs. The daemon is automatically started if necessary. All Oracle VirtualBox applications will communicate with the daemon through UNIX local domain sockets. There can be multiple daemon instances under different user accounts and applications can only communicate with the daemon running under the user account as the application. The local domain socket resides in a subdirectory of your system's directory for temporary files called .vbox-<username>-ipc. In case of communication problems or server startup problems, you may try to remove this directory.
All Oracle VirtualBox applications (VirtualBox, VBoxManage, and VBoxHeadless) require the Oracle VirtualBox directory to be in the library path, as follows:
LD_LIBRARY_PATH=. ./VBoxManage showvminfo "Windows XP"
Installing on Oracle Solaris Hosts
For the specific versions of Oracle Solaris that are supported as host operating systems, see Choosing an Installation Package.
If you have a previously installed instance of Oracle VirtualBox on your Oracle Solaris host, please uninstall it first before installing a new instance. See Uninstallation for uninstall instructions.
Performing the Installation
Oracle VirtualBox is available as a standard Oracle Solaris package. Download the Oracle VirtualBox SunOS package, which includes the 64-bit version of Oracle VirtualBox. The installation must be performed as root and from the global zone. This is because the Oracle VirtualBox installer loads kernel drivers, which cannot be done from non-global zones. To verify which zone you are currently in, execute the zonename command.
To start installation, run the following commands:
gunzip -cd VirtualBox-version-number-SunOS.tar.gz | tar xvf -
The Oracle VirtualBox kernel package is integrated into the main package. Install the Oracle VirtualBox package as follows:
pkgadd -d VirtualBox-version-number-SunOS.pkg
The installer will then prompt you to enter the package you want to install. Choose 1 or all and proceed. Next the installer will ask you if you want to allow the postinstall script to be executed. Choose y and proceed, as it is essential to execute this script which installs the Oracle VirtualBox kernel module. Following this confirmation the installer will install Oracle VirtualBox and execute the postinstall setup script.
Once the postinstall script has been executed your installation is now complete. You may now safely delete the uncompressed package and autoresponse files from your system. Oracle VirtualBox is installed in /opt/VirtualBox.
Note:
If you need to use Oracle VirtualBox from non-global zones, see Configuring a Non-Global Zone for Running Oracle VirtualBox.
The vboxuser Group
The installer creates the system user group vboxuser during installation for Oracle Solaris
hosts that support the USB features required by Oracle VirtualBox. Any system
user who is going to use USB devices from Oracle VirtualBox guests must be a
member of this group. A user can be made a member of this group either by using the desktop user and group tools
or by running the following command as root:
usermod -G vboxuser username
Note that adding an active user to the vboxuser group will require the user to log out and then
log in again. This should be done manually after successful installation of the package.
Starting Oracle VirtualBox on Oracle Solaris
The easiest way to start an Oracle VirtualBox program is by running the program of your choice (VirtualBox, VBoxManage, or VBoxHeadless) from a terminal. These are symbolic links to VBox.sh that start the required program for you.
Alternatively, you can directly invoke the required programs from /opt/VirtualBox. Using the links provided is easier as you do not have to enter the full path.
You can configure some elements of the VirtualBox Qt GUI, such as fonts and colours, by running VBoxQtconfig from the terminal.
Uninstallation
Uninstallation of Oracle VirtualBox on Oracle Solaris requires root permissions. To perform the uninstallation, start a root terminal session and run the following command:
pkgrm SUNWvbox
After confirmation, this will remove Oracle VirtualBox from your system.
Unattended Installation
To perform a noninteractive installation of Oracle VirtualBox there is a response file named autoresponse. The installer uses this for responses to inputs, rather than prompting the user.
Extract the tar.gz package as described in Performing the Installation. Then open a root terminal session and run the following command:
pkgadd -d VirtualBox-version-number-SunOS-x86 -n -a autoresponse SUNWvbox
To perform a noninteractive uninstallation, open a root terminal session and run the following command:
pkgrm -n -a /opt/VirtualBox/autoresponse SUNWvbox
Configuring a Non-Global Zone for Running Oracle VirtualBox
After installing Oracle VirtualBox in the global zone (see Installing on Oracle Solaris Hosts for the installation instructions) the first step required to run Oracle VirtualBox in a non-global zone is to modify the zone's configuration to be able to access the Oracle VirtualBox device nodes located in the global zone. This is done by performing the following steps as a zone administrator in the global zone.
global$ zonecfg -z vboxzone
Replace vboxzone with the name of the non-gloabl zone where you plan to run Oracle VirtualBox.
Use zonecfg(8) to add the device resource and the
match property for each Oracle VirtualBox device node in
the global zone to the non-global zone as follows:
zonecfg:vboxzone> add device
zonecfg:vboxzone:device> set match=/dev/vboxdrv
zonecfg:vboxzone:device> end
zonecfg:vboxzone> add device
zonecfg:vboxzone:device> set match=/dev/vboxdrvu
zonecfg:vboxzone:device> end
zonecfg:vboxzone> exit
On Oracle Solaris 11 if you plan to use VMs configured to use a USB device, e.g. a USB pointing device or a USB pass-through device, you should also pass through the /dev/vboxusbmon device using the steps above.
Oracle Solaris 11 does not support sparse root zones so you will need to loopback mount
/opt/VirtualBox from the global zone into the non-global zone at the same path. This is
done using zonecfg(8) to set the dir attribute and the
special attribute for this directory. For example:
zonecfg:vboxzone> add fs
zonecfg:vboxzone:fs> set dir=/opt/VirtualBox
zonecfg:vboxzone:fs> set special=/opt/VirtualBox
zonecfg:vboxzone:fs> set type=lofs
zonecfg:vboxzone:fs> add options [readonly]
zonecfg:vboxzone:fs> end
zonecfg:vboxzone> exit
After making the above changes using zonecfg(8), reboot the zone using zoneadm(8) as follows:
global$ zoneadm -z vboxzone reboot
for the changes to take effect. You will then be able to run Oracle VirtualBox from /opt/VirtualBox within the configured non-global zone.
Starting Oracle VirtualBox
After installation, you can start Oracle VirtualBox as follows:
-
Windows hosts. In the Programs menu, click the item in the VirtualBox group. On some Windows platforms, you can also enter VirtualBox in the search box of the Start menu.
-
macOS hosts. In the Finder, double-click the VirtualBox item in the Applications folder. You may want to drag this item onto your Dock.
-
Linux or Oracle Solaris hosts. Depending on your desktop environment, an Oracle VirtualBox item may have been placed in either the System or System Tools group of your Applications menu. Alternatively, you can enter VirtualBox in a terminal window.
When you start Oracle VirtualBox, the VirtualBox Manager interface is shown. See Configuring Oracle VirtualBox.
Configuring Oracle VirtualBox
Before creating, adding or importing any Virtual Machines, configure Oracle VirtualBox for your host.
-
Install any extension packs you require, see Install the Oracle VirtualBox Extension Pack.
Extension packs provide extra functionality to the Oracle VirtualBox base package. The Oracle VirtualBox Extension Pack includes VirtualBox Remote DesktopProtocol (VRDP) support, disk image encryption using AES, and cloud integration features. For more information, see Oracle VirtualBox Components.
-
Set Oracle VirtualBox Preferences. These are settings that apply to Oracle VirtualBox rather than individual VMs.
-
If the default NAT network is not sufficient for your needs, set up virtual networks. See Configure Networking.
Managing Oracle VirtualBox Extensions
Oracle VirtualBox extension packs (file extension .vbox-extpack) extend the features of Oracle VirtualBox on the host machine. For more information on the Oracle VirtualBox Extension Pack, see Oracle VirtualBox Components
Extension packs can be installed and managed using the Extensions tool in VirtualBox Manager.
Alternatively, you can use the VBoxManage command line to install and manage extension packs. See VBoxManage extpack.
Install the Oracle VirtualBox Extension Pack
-
Download the latest Oracle VirtualBox Extension Pack from Download VirtualBox and save it on the host machine.
-
In VirtualBox Manager, Click Extensions.
-
Click Install and select the extension package file. Follow the on-screen instructions.
The extension pack is installed on the host and displayed in the extensions list.
Alternatively, in VBoxManage, use extpack install to install the extension pack.
Remove the Oracle VirtualBox Extension Pack
-
In VirtualBox Manager, Click Extensions.
-
Click Oracle VirtualBox Extension Pack, and then click Uninstall.
The extension pack is uninstalled from the host.
Alternatively, in VBoxManage, use extpack uninstall to remove the extension pack.
Set Oracle VirtualBox Preferences
Use the Preferences to change settings that apply to all virtual machines.
Note:
Settings will differ, depending on your host OS.
-
From the File menu, choose Preferences.
-
Choose your preferred experience level. To display all preferences, set the experience level to Expert.
See also Experience Levels for VirtualBox Manager.
-
On the General tab, specify the default folder or directory for VM files, and the VRDP Authentication Library.
-
On the Input tab, set keyboard shortcuts, both in VirtualBox Manager and in individual VMs. For example you might want to specify a different Host key. This is the key that toggles whether the cursor is in the focus of the VM or the Host OS windows, see Capturing and Releasing Keyboard and Mouse. The Host key is also used to trigger certain VM actions, see Typing Special Characters.
-
On the Update tab, select the type of software updates you want to install, and how frequently to check for updates.
-
On the Language tab, choose the language used for menus, labels, and text in VirtualBox Manager.
-
On the Display tab, specify the display properties for all VM displays.
-
On the Proxy tab, configure an HTTP proxy server if you need one.
-
On the Interface tab, select the color theme to be used by VirtualBox Manager. This can only be changed on Windows 10 or Windows 11. Other OSs use system settings.
Experience Levels for VirtualBox Manager
When you use VirtualBox Manager to configure preferences, and settings for virtual machines, you can select an experience level for the user interface. The following experience levels are available:
-
Basic. Only a limited number of settings and tools are shown. Workflows are used to display settings and configuration options. This is the default setting for new installations.
This level is suitable for a first time user of Oracle VirtualBox.
-
Expert. All available settings and tools are shown.
Single pages show all settings and configuration options. This is the default setting for upgrades when a user already has at least one saved VM.
This level is suitable for an experienced user who needs more control of virtual machine settings.
Experience levels apply, and can be set, in the following places in VirtualBox Manager:
Home (new installations only)
Preferences
Settings for a virtual machine
Wherever you set it, the preference applies throughout VirtualBox Manager.
Selecting the Experience Level
- In the File menu, choose Preferences.
Click Basic or Expert to select the required experience level.
The number of available settings and tools changes depending on the selected experience level.
Creating a New Virtual Machine
To create a Virtual Machine (VM) using the GUI, follow the steps below. To use VBoxManage, see Creating a New Virtual Machine Using VBoxManage.
-
In VirtualBox Manager window, click Home, then click New and follow the workflow.
If you don't see the New Virtual Machine workflow, change the experience level to Basic. See Experience Levels for VirtualBox Manager. In Expert mode you see all the options on one page.
The exact settings available depend on the architecture of the host platform.
Once created, the virtual machine is displayed in the Machines list in VirtualBox Manager, with the name that you specify. You can make changes later, in the Settings for the VM.
You must supply an operating system image, in ISO format, for the operating system you intend to install on the VM. Oracle VirtualBox does not supply the OS or any license required to use it.
Specify Name and Operating System
- Give the virtual machine (VM) a name. The name you enter is shown in the Machines tool in VirtualBox Manager and is also used for the VM's files on disk. Be sure to assign each VM an informative name that describes the OS and software running on the VM. For example,
Windows 10 with Visio. The name is also used to help Oracle VirtualBox suggest the appropriate OS and related field contents automatically, unless you have selected the OS Type. - Select the location where VMs are stored on your computer, called the VM Folder. Ensure that the folder location has enough free space, especially if you intend to use the snapshots feature. See also The VM Folder.
- Select the ISO image file for the operating system you intend to install on the new VM. The image file can be used directly to install an OS on the new VM as part of an unattended installation, or it can be attached to a DVD drive on the new VM. If the image contains more than one edition or variant, select the one you want to use.
- Oracle VirtualBox completes the OS and related fields if it can detect the operating system in the ISO. If it cannot detect the OS, then set these according to your OS. For example, if the OS is Linux, the OS Distribution might be Oracle Linux and the OS Version might be Oracle Linux 8.x (64-bit). The options available for the guest OS are also limited by the host architecture. See Guest Operating Systems for more information.
The supported OSs are grouped into types. If you want to install something very unusual that is not listed, select Other as the OS.
Depending on your selection, Oracle VirtualBox will enable or disable certain VM settings that your guest OS may require. This is particularly important for 64-bit guests (see 64-bit Guests).
- By default, Oracle VirtualBox will install the chosen OS using the ISO image provided, if the image supports unattended installation. See also Configure Unattended Installation of Guest OS.
If you prefer to install the OS manually, deselect Install OS Using Unattended Installation. The selected ISO image is attached to the new VM and you must install the OS from there.
Configure Unattended Installation of Guest OS
If you chose Unattended Installation, Oracle VirtualBox you must supply certain configuration options to be used in the installation.
See also Creating a New Virtual Machine Using VBoxManage for details of how to configure unattended installation from the command line.
- Enter the User Name and Password for a default user on the guest OS. On Windows, this will be an administrator. On Linux, the root user will also be created with the same password.
-
For Windows guests, enter the Product Key supplied with Windows.
-
Enter the Host Name for the VM. By default, this is the same as the VM name.
-
Enter the Domain Name for the VM.
- Select Install in Background if you want to create the VM without a GUI.
- Unattended Guest Additions installation is available for some guests. Select Install Guest Additions if you would like Oracle VirtualBox to install the Guest Additions after the OS. Specify the ISO to use, usually the default file that is part of the VirtualBox installation on the host machine.
Specify Virtual Hardware
-
Based on the OS you have chosen, Oracle VirtualBox suggests a suitable default size for Base Memory. This is the amount of RAM that Oracle VirtualBox should allocate to the virtual machine (VM) every time it is started. The guest OS will report this size as the VM's installed RAM.
CAUTION:
Choose this setting carefully. The memory you give to the VM will not be available to your host OS while the VM is running.
Do not specify more than you can spare, whilst ensuring you allocate enough for your guest OS and applications to run properly. For example, if your host machine has 4 GB of RAM and you enter 2048 MB as the base memory for a VM, you will have 2 GB left for all the other software on your host while that VM is running.
A guest OS may require at least 1 or 2 GB of memory to install and boot up. If you intend to run more than one VM at a time, plan accordingly. A VM will not start if it does not have enough RAM to boot.
Always ensure that the host OS has enough RAM remaining. If insufficient RAM remains, the system might excessively swap memory to the hard disk, which will effectively bring the host system to a standstill.
-
For Processors, select the number of virtual processors to assign to the VM. Do not assign more than half of the total processor threads from the host machine.
Choose the Disk Size for a new, dynamically allocated, virtual hard disk image to be created in the VM folder.
For other options when allocating virtual storage, see Virtual Storage.-
Select Use EFI to boot the guest OS using Extended Firmware Interface (EFI).
Creating a New Virtual Machine Using VBoxManage
You can create a VM on the command line using VBoxManage. See also VBoxManage createvm.
The following example uses various VBoxManage commands to specify the VM and configure an unattended guest installation for an Oracle Linux VM on a Linux host.
It then shows the use of the VBoxManage unattended install command to install and configure the guest OS.
-
Set a variable for the name of the OS.
# VM="ol8-autoinstall"
-
List the available guest OS types and note the exact name of the one you need. This is required in VBoxManage commands.
# VBoxManage list ostypes
-
Create the virtual machine.
# VBoxManage createvm --name $VM --ostype "Oracle_64" --register
The VM has a unique UUID.
An XML settings file is generated.
-
Create a 32768 MB virtual hard disk for the VM.
# VBoxManage createhd --filename /VirtualBox/$VM/$VM.vdi --size 32768
-
Create storage devices for the VM.
-
Create a SATA storage controller and attach the virtual hard disk.
# VBoxManage storagectl $VM --name "SATA Controller" --add sata --controller IntelAHCI
# VBoxManage storageattach $VM --storagectl "SATA Controller" --port 0 --device 0 \
--type hdd --medium /VirtualBox/$VM/$VM.vdi
-
Create an IDE storage controller for a virtual DVD drive and attach an Oracle Linux installation ISO.
# VBoxManage storagectl $VM --name "IDE Controller" --add ide
# VBoxManage storageattach $VM --storagectl "IDE Controller" --port 0 --device 0 \
--type dvddrive --medium /u01/Software/OL/OracleLinux-R7-U6-Server-x86_64-dvd.iso
-
-
(Optional) Configure some settings for the VM.
-
Enable I/O APIC for the motherboard of the VM.
# VBoxManage modifyvm $VM --ioapic on
-
Configure the boot device order for the VM.
# VBoxManage modifyvm $VM --boot1 dvd --boot2 disk --boot3 none --boot4 none
-
Allocate 8192 MB of RAM and 128 MB of video RAM to the VM.
# VBoxManage modifyvm $VM --memory 8192 --vram 128
-
-
Specify the Unattended Installation parameters, and then install the OS.
-
Specify an Oracle Linux ISO as the installation ISO.
# VBoxManage unattended install $VM \
--iso=/u01/Software/OL/OracleLinux-R7-U6-Server-x86_64-dvd.iso \
-
Specifiy a user name, full name, and password for a default user on the guest OS.
--user=login --full-user-name=name --user-password password \
Note that the specified password is also used for the root user account on the guest.
-
Specify that you want to install the VirtualBox Guest Additions on the VM.
--install-additions \
-
Sets the time zone for the guest OS to Central European Time (CET).
--time-zone=CET
-
-
Start the virtual machine.
# VBoxManage startvm $VM --type headless
The VM starts in headless mode, which means that it does not have a GUI.
Working with Virtual Machines
This chapter provides detailed steps for configuring an Oracle VirtualBox virtual machine (VM). For an introduction to Oracle VirtualBox and steps to get your first virtual machine running, see About Oracle VirtualBox.
You have considerable latitude when deciding what virtual hardware to provide to the guest. Use virtual hardware to communicate with the host system or with other guests. For example, you can use virtual hardware in the following ways:
-
Have Oracle VirtualBox present an ISO CD-ROM image to a guest system as if it were a physical CD-ROM.
-
Provide a guest system access to the physical network through its virtual network card.
-
Provide the host system, other guests, and computers on the Internet access to the guest system.
Running a Virtual Machine
To start a virtual machine (VM), you have the following options:
- Open the Machines list in VirtualBox Manager, and then double-click the VM's name.
-
Select the VM's name in the Machines tool in VirtualBox Manager, and then click Start.
-
Go to the VirtualBox VMs folder in your system user's home directory. Find the subdirectory of the machine you want to start and double-click the machine settings file. This file has a .vbox file extension.
The VM you started appears in a new window and you will see it start to boot up, or prompt you to install an operating system as required. Everything that would normally be seen on the virtual system's monitor is shown in the window.
In general, you can use the virtual machine as you would use a real computer. The following topics describe a few points to note when running a VM.
Starting a New VM for the First Time
When you start a VM for the first time the Unattended Installation process is started automatically, using the ISO image file specified. See Creating a New Virtual Machine.
Follow the onscreen instructions to install your OS.
The installation operation changes the boot device order to boot the virtual hard disk first and then the virtual DVD drive. If the virtual hard disk is empty prior to the automatic installation, the VM boots from the virtual DVD drive and begins the installation.
If the virtual hard disk contains a bootable OS, the installation operation exits. In this case, change the boot device order manually by pressing F12 during the BIOS splash screen.
Virtual Machine Status Bar
A status bar is displayed at the bottom of the virtual machine window. The status bar contains icons that enable you to view and change settings for the virtual machine, as follows:
Highlight an icon to show details of the current settings.
Right-click an icon to change a setting.
Some settings, such as audio, can be changed directly by right-clicking the status bar icon. For other settings, you select from the displayed menu options.
Table 4 describes the icons on the status bar.
|
Icon |
Description |
|---|---|
|
Storage (SATA) Settings for attached SATA storage devices, such as hard disk drives. See also Storage Settings. |
|
|
Storage (IDE) Settings for attached IDE storage devices, such as optical CD-ROM drives. See also Storage Settings. Right-click to show options for adding and removing IDE devices. See also The Virtual Media Manager. |
|
|
Audio Settings for audio output and audio input. Right-click to change a setting. The status bar icon is updated automatically to show which settings are enabled. See also Audio Settings. |
|
|
Network Settings for attached network adapters. Right-click to connect or disconnect a network adapter. See also Network Settings. |
|
|
USB Settings for attached USB devices. Right-click to select from the available USB devices on the host and to specify a USB filter. See also USB Settings. |
|
|
Shared Folders Settings for shared folders. Right-click to change shared folder settings or to add a new shared folder. See also Shared Folders. |
|
|
Display Settings for the virtual machine display. Right-click to show options for resizing and scaling the display. See also Resizing the VM's Window. |
|
|
Recording Settings for video and audio recording. Right-click to show options to enable and disable recording, or to change recording settings. To enable recording, right-click the status bar icon and select the Recording option. The icon changes to a pulsing red dot
To disable recording, right-click the status bar icon and deselect the Recording option. The icon changes back to the default image. See also Recording Tab. |
|
|
Processor Settings for the CPU used by the virtual machine. The colored bar in the icon indicates current processor activity. Red indicates high CPU usage, Green indicates low CPU usage. A green turtle icon indicates that a native hypervisor, such as Hyper-V, is running on the host. See also Processor Tab. |
|
|
Mouse Integration Settings for capturing the host mouse pointer. The icon indicates whether mouse integration is on (green arrow) or off (yellow arrow) and whether the pointer is captured (mouse icon colored) or not (mouse icon gray). Right-click to enable or disable mouse integration. |
|
|
Host Key Settings for capturing the host keyboard. The arrow on the icon is green if the keyboard is captured, and black if not. The background is blue if the host key is not pressed, and white when it is pressed. A check icon appears when the VM is waiting for a host key combination to be typed. The current host key is displayed to the right of the icon. Right-click to show options for configuring the host key combination and other keyboard shortcuts. Right-click to insert a special key combination, such as Ctrl-Alt-Del. See also Typing Special Characters. |

Configuring the Status Bar
You can configure the status bar as follows:
-
To hide the status bar, right-click in the status bar area and deselect Show Status Bar.
-
To show the status bar, select View, Status Bar, Show Status Bar from the virtual machine's menu bar.
-
To modify the status bar contents, right-click in the status bar area and select Status Bar Settings. You can then do the following:
Select icons that you want to include in the status bar.
Deselect icons that you want to remove from the status bar.
Drag and drop icons to change their order in the status bar.
Click the check mark button to save your changes to the status bar.
See also User Interface for other options to change the status bar.
Capturing and Releasing Keyboard and Mouse
Oracle VirtualBox provides a virtual USB tablet device to new virtual machines through which mouse events are communicated to the guest OS. If you are running a modern guest OS that can handle such devices, mouse support may work out of the box without the mouse being captured as described below. See Motherboard Tab.
Otherwise, if the virtual machine detects only standard PS/2 mouse and keyboard devices, since the OS in the virtual machine does not know that it is not running on a real computer, it expects to have exclusive control over your keyboard and mouse. But unless you are running the VM in full screen mode, your VM needs to share keyboard and mouse with other applications and possibly other VMs on your host.
After installing a guest OS and before you install the Guest Additions, described in Guest Additions, either your VM or the rest of your computer can own the keyboard and the mouse. Both cannot own the keyboard and mouse at the same time. You will see a second mouse pointer which is always confined to the limits of the VM window. You activate the VM by clicking inside it.
To return ownership of keyboard and mouse to your host OS, Oracle VirtualBox reserves a special key on your keyboard: the Host key. By default, this is the right Ctrl key on your keyboard. On a Mac host, the default Host key is the left Command key. You can change this default using the Preferences window. See Set Oracle VirtualBox Preferences. The current setting for the Host key is always displayed at the bottom right of your VM window.
Figure 1. Host Key Setting on the Virtual Machine Status Bar

This means the following:
-
Your keyboard is owned by the VM if the VM window on your host desktop has the keyboard focus. If you have many windows open in your guest OS, the window that has the focus in your VM is used. This means that if you want to enter text within your VM, click the title bar of your VM window first.
To release keyboard ownership, press the Host key. As explained above, this is typically the right Ctrl key.
Note that while the VM owns the keyboard, some key sequences, such as Alt+Tab, will no longer be seen by the host, but will go to the guest instead. After you press the Host key to reenable the host keyboard, all key presses will go through the host again, so that sequences such as Alt+Tab will no longer reach the guest. For technical reasons it may not be possible for the VM to get all keyboard input even when it does own the keyboard. Examples of this are the Ctrl+Alt+Del sequence on Windows hosts or single keys grabbed by other applications on X11 hosts such as the GNOME desktop Locate Pointer feature.
-
Your mouse is owned by the VM only after you have clicked in the VM window. The host mouse pointer will disappear, and your mouse will drive the guest's pointer instead of your normal mouse pointer.
Note that mouse ownership is independent of that of the keyboard. Even after you have clicked on a titlebar to be able to enter text into the VM window, your mouse is not necessarily owned by the VM yet.
To release ownership of your mouse by the VM, press the Host key.
As this behavior is inconvenient, Oracle VirtualBox provides a set of tools and device drivers for guest systems called the Oracle VirtualBox Guest Additions. These tools make VM keyboard and mouse operations much more seamless. Most importantly, the Guest Additions suppress the second "guest" mouse pointer and make your host mouse pointer work directly in the guest. See Guest Additions.
Typing Special Characters
Some OSes expect certain key combinations to initiate certain procedures. The key combinations that you type into a VM might target the host OS, the Oracle VirtualBox software, or the guest OS. The recipient of these keypresses depends on a number of factors, including the key combination itself.
-
Host OSes reserve certain key combinations for themselves. For example, you cannot use the Ctrl+Alt+Delete combination to reboot the guest OS in your VM, because this key combination is reserved by the host OS. Even though both Windows and Linux OSes can intercept this key combination, the host OS is rebooted automatically.
On Linux and Oracle Solaris hosts, which use the X Window System, the key combination Ctrl+Alt+Backspace normally resets the X server and restarts the entire graphical user interface. As the X server intercepts this combination, pressing it will usually restart your host graphical user interface and kill all running programs, including Oracle VirtualBox, in the process.
On Linux hosts supporting virtual terminals, the key combination Ctrl+Alt+Fx, where Fx is one of the function keys from F1 to F12, normally enables you to switch between virtual terminals. As with Ctrl+Alt+Delete, these combinations are intercepted by the host OS and therefore always switch terminals on the host.
If, instead, you want to send these key combinations to the guest OS in the virtual machine, you will need to use one of the following methods:
-
Use the items in the Input, Keyboard menu of the virtual machine window. This menu includes the settings Insert Ctrl+Alt+Delete and Insert Ctrl+Alt+Backspace. However, the latter setting affects only Linux guests or Oracle Solaris guests.
This menu also includes an option for inserting the Host key combination.
-
Use special key combinations with the Host key, which is normally the right Control key. Oracle VirtualBox then translates the following key combinations for the VM:
-
Host key + Del sends Ctrl+Alt+Del to reboot the guest OS.
-
Host key + Backspace sends Ctrl+Alt+Backspace to restart the graphical user interface of a Linux or Oracle Solaris guest.
-
Host key + Function key. For example, use this key combination to simulate Ctrl+Alt+Fx to switch between virtual terminals in a Linux guest.
-
-
-
For some other keyboard combinations such as Alt+Tab to switch between open windows, Oracle VirtualBox enables you to configure whether these combinations will affect the host or the guest, if a virtual machine currently has the focus. This is a global setting for all virtual machines and can be found under File, Preferences, Input.
-
A soft keyboard can be used to input key combinations in the guest. See Using the Soft Keyboard.
Soft Keyboard
Oracle VirtualBox provides a soft keyboard that enables you to input keyboard characters on the guest. A soft keyboard is an on-screen keyboard that can be used as an alternative to a physical keyboard. See Using the Soft Keyboard for details of how to use the soft keyboard.
CAUTION:
For best results, ensure that the keyboard layout configured on the guest OS matches the keyboard layout used by the soft keyboard. Oracle VirtualBox does not do this automatically.
The soft keyboard can be used in the following scenarios:
-
When the physical keyboard on the host is not the same as the keyboard layout configured on the guest. For example, if the guest is configured to use an international keyboard, but the host keyboard is US English.
-
To send special key combinations to the guest. Note that some common key combinations are also available in the Input, Keyboard menu of the guest VM window. See Typing Special Characters.
-
For guests in kiosk mode, where a physical keyboard is not present.
-
When using nested virtualization, the soft keyboard provides a method of sending key presses to a guest.
By default, the soft keyboard includes some common international keyboard layouts. You can copy and modify these to meet your own requirements. See Creating a Custom Keyboard Layout.
Using the Soft Keyboard
-
Display the soft keyboard.
In the guest VM window, select Input, Keyboard, Soft Keyboard.
-
Select the required keyboard layout.
The name of the current keyboard layout is displayed in the toolbar of the soft keyboard window. This is the previous keyboard layout that was used.
Click the Layout List icon in the toolbar of the soft keyboard window. The Layout List window is displayed.
Select the required keyboard layout from the entries in the Layout List window.
The keyboard display graphic is updated to show the available input keys.
-
Use the soft keyboard to enter keyboard characters on the guest.
-
Modifier keys such as Shift, Ctrl, and Alt are available on the soft keyboard. Click once to select the modifier key, click twice to lock the modifier key.
The Reset the Keyboard and Release All Keys icon can be used to release all pressed modifier keys, both on the host and the guest.
-
To change the look of the soft keyboard, click the Settings icon in the toolbar. You can change colors used in the keyboard graphic, and can hide or show sections of the keyboard, such as the NumPad or multimedia keys.
-
Creating a Custom Keyboard Layout
You can use one of the supplied default keyboard layouts as the starting point to create a custom keyboard layout.
Note:
To permanently save a custom keyboard layout, you must save it to a file. Otherwise, any changes you make are discarded when you close down the Soft Keyboard window.
Custom keyboard layouts that you save are stored as an XML file on the host, in the keyboardLayouts folder in the global configuration data directory. For example, in $HOME/.config/VirtualBox/keyboardLayouts on a Linux host.
-
Display the Layout List.
Click the Layout List icon in the toolbar of the soft keyboard window.
-
Make a copy of an existing keyboard layout.
Highlight the required layout and click the Copy the Selected Layout icon.
A new layout entry with a name suffix of
-Copyis created. -
Edit the new keyboard layout.
Highlight the new layout in the Layout List and click the Edit the Selected Layout icon.
Enter a new name for the layout.
Edit keys in the new layout. Click the key that you want to edit and enter new key captions in the Captions fields.
The keyboard graphic is updated with the new captions.
-
(Optional) Save the layout to a file. This means that your custom keyboard layout will be available for future use.
Highlight the new layout in the Layout List and click the Save the Selected Layout into File icon.
Any custom layouts that you create can later be removed from the Layout List, by highlighting and clicking the Delete the Selected Layout icon.
Resizing the VM's Window
You can resize the VM's window while that VM is running. When you do, the window is scaled as follows:
-
If you have scaled mode enabled, then the virtual machine's screen will be scaled to the size of the window. This can be useful if you have many machines running and want to have a look at one of them while it is running in the background. Alternatively, it might be useful to enlarge a window if the VM's output screen is very small, for example because you are running an old OS in it.
To enable scaled mode, press Host key + C, or select Scaled Mode from the View menu in the VM window. To leave scaled mode, press Host key + C again.
The aspect ratio of the guest screen is preserved when resizing the window. To ignore the aspect ratio, press Shift during the resize operation.
-
If you have the Guest Additions installed and they support automatic resizing, the Guest Additions will automatically adjust the screen resolution of the guest OS. For example, if you are running a Windows guest with a resolution of 1024x768 pixels and you then resize the VM window to make it 100 pixels wider, the Guest Additions will change the Windows display resolution to 1124x768.
See Guest Additions.
-
Otherwise, if the window is bigger than the VM's screen, the screen will be centered. If it is smaller, then scroll bars will be added to the machine window.
Pausing a VM
Pausing a VM suspends all the processes running on the VM.
To pause a VM:
-
Open the Machines tool in VirtualBox Manager, and select the running VM you want to pause.
-
Right-click the VM name, or open the Machine menu, and choose Pause.
To start a paused VM running again:
-
Open the Machines tool in VirtualBox Manager, and select the paused VM.
-
Right-click the VM name, or open the Machine menu, and choose Pause.
The VM starts running again.
Resetting a VM
Resetting a VM is the equivalent of choosing the reset or restart option in the OS. It does not reset to factory settings or other known state, it restarts the guest OS.
To reset a VM
-
Open the Machines tool in VirtualBox Manager, and select the running VM you want to reset.
-
Right-click the VM name, or open the Machine menu, and choose Reset.
-
Click Reset to confirm. Note that you will lose unsaved data.
Closing or Saving a VM
When you click the Close button of your virtual machine window, at the top right of the window, just like you would close any other window on your system, Oracle VirtualBox asks you whether you want to save or power off the VM. As a shortcut, you can also press Host key + Q.
The difference between the three options is important. They mean the following:
-
Save State With this option, Oracle VirtualBox freezes the virtual machine by completely saving its state to your local disk.
When you start the VM again later, you will find that the VM continues exactly where it was left off. All your programs will still be open, and your computer resumes operation. Saving the state of a virtual machine is thus in some ways similar to suspending a laptop by closing its lid.
-
Shut Down This will send an ACPI shutdown signal to the virtual machine, which has the same effect as if you had pressed the power button on a real computer. This should trigger a proper shutdown mechanism from within the VM. State is not saved. Save any open applications before choosing this option.
-
Power Off With this option, Oracle VirtualBox also stops running the virtual machine, but immediately without shutdown procedures or saving its state.
CAUTION:
This is equivalent to pulling the power plug on a real computer without shutting it down properly. If you start the machine again after powering it off, your OS will have to reboot completely and may begin a lengthy check of its virtual system disks. As a result, this should not normally be done, since it can potentially cause data loss or an inconsistent state of the guest system on disk.
As an exception, if your virtual machine has any snapshots, see Snapshots, you can use this option to quickly restore the current snapshot of the virtual machine. In that case, powering off the machine will discard the current state and any changes made since the previous snapshot was taken will be lost.
The Discard button discards a virtual machine's saved state. This has the same effect as powering it off, and the same warnings apply.
Adding Virtual Machines
- If you want to create a completely new VM, click New and follow the steps in Creating a New Virtual Machine.
- If you already have a VM saved on your machine, you can add it to the machine list by clicking Open.
- If you have a VM on a different machine, you can import it by clicking Import. See Importing an Appliance in OVF Format.
- If you want to view an OCI instance from within VirtualBox Manager, see Adding a Cloud VM.
Importing and Exporting Virtual Machines
Oracle VirtualBox can import and export virtual machines in the following formats:
-
Open Virtualization Format (OVF). This is the industry-standard format. See About the OVF Format.
-
Cloud service formats. Export to and import from cloud services such as Oracle Cloud Infrastructure is supported. See Integrating with Oracle Cloud Infrastructure.
About the OVF Format
OVF is a cross-platform standard supported by many virtualization products which enables the creation of ready-made virtual machines that can then be imported into a hypervisor such as Oracle VirtualBox. Oracle VirtualBox makes OVF import and export easy to do, using VirtualBox Manager or the command-line interface.
Using OVF enables packaging of virtual appliances. These are disk images, together with configuration settings that can be distributed easily. This way one can offer complete ready-to-use software packages, including OSes with applications, that need no configuration or installation except for importing into Oracle VirtualBox.
Note:
The OVF standard is complex, and support in Oracle VirtualBox is an ongoing process. No guarantee is made that Oracle VirtualBox supports all appliances created by other virtualization software. In particular, the following limitations exist:
-
OVF localization, with multiple languages in a single OVF file, is not yet supported.
-
Some OVF sections like StartupSection, DeploymentOptionSection, and InstallSection are ignored.
-
OVF environment documents, including their property sections are not yet supported.
-
Remote files using HTTP or other mechanisms are not yet supported.
Appliances in OVF format can appear in the following variants:
-
They can come in several files, as one or several disk images, typically in the widely-used VMDK format. See Disk Image Files (VDI, VMDK, VHD, HDD). They also include a textual description file in an XML dialect with an .ovf extension. These files must then reside in the same directory for Oracle VirtualBox to be able to import them.
-
Alternatively, the above files can be packed together into a single archive file, typically with an .ova extension. Such archive files use a variant of the TAR archive format and can therefore be unpacked outside of Oracle VirtualBox with any utility that can unpack standard TAR files.
Note:
OVF cannot describe snapshots that were taken for a virtual machine. As a result, when you export a virtual machine that has snapshots, only the current state of the machine will be exported. The disk images in the export will have a flattened state identical to the current state of the virtual machine.
Importing an Appliance in OVF Format
The following steps show how to import one or more VMs from OVF format.
-
In VirtualBox Manager, click Home, and then click Import. Choose the file you want to import.
Alternatively, double-click the OVF or OVA file in your file manager. Oracle VirtualBox creates file type associations automatically for any OVF and OVA files on your host OS.
-
In Appliance Settings, check the VMs described in the OVF or OVA file and change any of the VM settings you need to.
-
By default, membership of VM groups is preserved on import for VMs that were initially exported from Oracle VirtualBox. You can change this behavior by using the Primary Group setting for the VM.
The following global settings apply to all of the VMs that you import:
-
Base Folder: Specifies the directory on the host in which to store the imported VMs.
If an appliance has multiple VMs, you can specify a different directory for each VM by editing the Base Folder setting for the VM.
-
MAC Address Policy: Reinitializes the MAC addresses of network cards in your VMs prior to import, by default. You can override the default behavior and preserve the MAC addresses on import.
-
Import Hard Drives as VDI: Imports hard drives in the VDI format rather than in the default VMDK format.
-
-
Click Finish to import the appliance.
Oracle VirtualBox copies the disk images and creates local VMs with the settings described on the Appliance Settings page. The imported VMs are shown in the list of VMs in VirtualBox Manager.
Because disk images are large, the VMDK images that are included with virtual appliances are shipped in a compressed format that cannot be used directly by VMs. So, the images are first unpacked and copied, which might take several minutes.
You can use the VBoxManage import command to import an appliance. See VBoxManage import.
Exporting an Appliance in OVF Format
The following steps show how to export one or more VMs to OVF format.
-
Select File, Export Appliance.
On the initial Virtual machines page, you can combine several VMs into an OVF appliance.
Select one or more VMs to export, and click Next.
-
The Format Settings page enables you to configure the following settings:
-
Format: Selects the Open Virtualization Format value for the output files.
The Oracle Cloud Infrastructure value exports the appliance to Oracle Cloud Infrastructure. See Exporting an Appliance to Oracle Cloud Infrastructure.
-
File: Selects the location in which to store the exported files.
-
MAC Address Policy: Specifies whether to retain or reassign network card MAC addresses on export.
-
Write Manifest File: Enables you to include a manifest file in the exported archive file.
-
Include ISO Image Files: Enables you to include ISO image files in the exported archive file.
-
-
Click Next to show the Appliance Settings page.
You can edit settings for the virtual appliance. For example, you can change the name of the virtual appliance or add product information, such as vendor details or license text.
Double-click the appropriate field to change its value.
-
Click Finish to begin the export process. Note that this operation might take several minutes.
You can use the VBoxManage export command to export an appliance. See VBoxManage export.
Removing and Moving Virtual Machines
You can remove a VM from Oracle VirtualBox or move the VM and its associated files, such as disk images, to another location on the host.
-
Removing a VM. To remove a VM, click Machines in VirtualBox Manager. Right-click the VM in the machine list and choose Remove.
The confirmation dialog enables you to specify whether to only remove the VM from the list of machines or to remove the files associated with the VM.
Note that the Remove menu item is disabled while a VM is running.
-
Moving a VM. To move a VM to a new location on the host, click Machines in VirtualBox Manager. Right-click the VM in the machine list and choose Move.
Specify a new location for the VM.
When you move a VM, Oracle VirtualBox configuration files are updated automatically to use the new location on the host.
Note that the Move menu item is disabled while a VM is running.
You can also use the VBoxManage movevm command to move a VM. See VBoxManage movevm.
For information about removing or moving a disk image file from Oracle VirtualBox, see The Virtual Media Manager.
Cloning a Virtual Machine
You can create a full copy or a linked copy of an existing VM. This copy is called a clone. You might use a cloned VM to experiment with a VM configuration, to test different guest OS levels, or to back up a VM.
To clone a VM:
-
In VirtualBox Manager, click Machines. Ensure the VM you want to clone is not running.
-
Right-click the VM name in the Machines list, and choose Clone....
- Enter the following details for the clone.
- Name: A name for the cloned machine.
- Path: Choose a location for the cloned virtual machine, otherwise Oracle VirtualBox uses the default machines folder.
- MAC Address Policy: Specifies whether to retain network card MAC addresses when
cloning the VM.
The Generate New MAC Addresses For All Network Adapters value assigns a new MAC address to each network card during cloning. This is the default setting. This is the best option when both the source VM and the cloned VM must operate on the same network. Other values enable you to retain the existing MAC addresses in the cloned VM.
- Keep Disk Names: Retains the disk image names when cloning the VM.
- Keep Hardware UUIDs: Retains the hardware universally unique identifiers (UUIDs) when cloning the VM.
- Click Next. The Clone Type page is displayed.
- The Clone Type option specifies whether to create a clone that is linked to the
source VM or to create a fully independent clone:
- Full Clone: Copies all dependent disk images to the new VM folder. A full clone can operate fully without the source VM.
- Linked Clone: Creates new differencing disk images based on the source VM disk images. If you select the current state of the source VM as the clone point, Oracle VirtualBox creates a new snapshot.
- Click Next. If your VM has snapshots and you chose Full Clone, use the Snapshots page to select the parts of the snapshot tree to clone with the VM.
- Current Machine State: Clones the current state of the VM. Snapshots are not included.
- Everything: Clones the current machine state and all its snapshots.
Click Finish to start the clone operation.
The duration of the clone operation depends on the size and number of attached disk images. In addition, the clone operation saves all the differencing disk images of a snapshot.
You can also use the VBoxManage clonevm command to clone a VM. See VBoxManage clonevm.
Managing VMs
As you add, import or create VMs they will appear in the Machines list.
To change the hardware configuration of a VM. See Configure the Settings for a VM
To use VM Groups, see Using VM Groups.
Check the Notification Center for tasks in progress and error messages. Click Open notification center to see the list of notifications. Errors are indicated by a warning triangle.
Configure the Settings for a VM
You may need to change the configuration of a Virtual Machine (VM) after it has been created. For example, you may want to add more memory.
Be careful when changing VM settings. It is possible to change all VM settings after installing a guest OS, but certain changes might prevent a guest OS from functioning correctly if done after installation.
To change the settings for a VM:
- Select the VM in the Machines list.
- Ensure the VM is Powered off, not Running or Saved. You can't change fundamental characteristics of the VM if it is running.
- Click Settings to see the current configuration for the VM, and change the parameters as required.
The parameters are described in detail in Virtual Machine Settings.
Even more parameters are available when using the VBoxManage command line interface. See VBoxManage.
Using VM Groups
Create VM groups if you want to manage several VMs together, and perform functions on them collectively, as well as individually.
-
Create a group using VirtualBox Manager. Do one of the following:
-
Drag a VM on top of another VM.
-
Select multiple VMs and choose Move to Group, New Group from the right-click menu.
-
-
A default name is assigned to new groups, following the format New Group <Number>. To rename the new group, right-click on the group's name and choose Rename Group. Type the new name, and then press Enter.
- To remove a VM from a group, right-click the VM and choose Move to Group, No Group.
-
Create and manage a group using the command line. Do one of the following:
-
Create a group and assign a VM. For example:
VBoxManage modifyvm "vm01" --groups "/TestGroup"
This command creates a group
TestGroupand attaches the VMvm01to that group. -
Detach a VM from the group, and delete the group if empty. For example:
VBoxManage modifyvm "vm01" --groups ""
This command detaches all groups from the VM
vm01and deletes the empty group.
-
-
Create multiple groups. For example:
VBoxManage modifyvm "vm01" --groups "/TestGroup,/TestGroup2"
This command creates the groups
TestGroupandTestGroup2, if they do not exist, and attaches the VMvm01to both of them. -
Create nested groups, having a group hierarchy. For example:
VBoxManage modifyvm "vm01" --groups "/TestGroup/TestGroup2"
This command attaches the VM
vm01to the subgroupTestGroup2of theTestGroupgroup. -
Use VirtualBox Manager menu options to control and manage all the VMs in a group. For example: Start, Pause, Reset, Close (save state, send shutdown signal, poweroff), Discard Saved State, Show in Explorer, Sort.
Snapshots
With snapshots, you can save a particular state of a virtual machine for later use. At any later time, you can revert to that state, even though you may have changed the VM considerably since then. A snapshot of a virtual machine is thus similar to a machine in Saved state, but there can be many of them, and these saved states are preserved.
To see the snapshots of a virtual machine, click the VM name in the Machines list in VirtualBox Manager, and then click Snapshots.
If you select multiple VMs in the machine list, all snapshots are listed for each VM.
Until you take a snapshot of the virtual machine, the list of snapshots will be empty, except for the Current State item. This item represents the current point in the lifetime of the virtual machine.
The Snapshots toolbar includes the following snapshot operations:
-
Take. Takes a snapshot of the selected VM. See Taking, Restoring, and Deleting Snapshots.
-
Delete. Removes a snapshot from the list of snapshots. See Taking, Restoring, and Deleting Snapshots.
-
Restore. Restores the VM state to be the same as the selected snapshot. See Taking, Restoring, and Deleting Snapshots.
-
Properties. Displays the properties for the selected snapshot. The Attributes tab is used to specify a Name and Description for the snapshot. The Information tab shows VM settings for the snapshot.
-
Clone. Displays the Clone Virtual Machine workflow. This enables you to create a clone of the VM, based on the selected snapshot.
-
Settings. Available for the Current State snapshot only. Displays the Settings window for the VM, enabling you to make configuration changes.
-
Discard. For a running VM, discards the saved state for the VM and closes it down.
-
Start. Start the VM. This operation is available for the Current State item.
Taking, Restoring, and Deleting Snapshots
There are three operations related to snapshots, as follows:
-
Take a snapshot. This makes a copy of the machine's current state, to which you can go back at any given time later.
-
If your VM is running:
In the VM window, select Take Snapshot from the Machine menu.
The VM is paused while the snapshot is being created. After snapshot creation, the VM continues to run as normal.
-
In VirtualBox Manager, if your VM is in either the Saved or the Powered Off state, as displayed next to the VM name in the Machines list:
Click Snapshots and do one of the following:
-
Click Take in the Snapshots toolbar.
-
Right-click the Current State item in the snapshots list and select Take.
-
A dialog is displayed, prompting you for a snapshot name. This name is purely for reference purposes, to help you remember the state of the snapshot. For example, a useful name would be Fresh installation from scratch, no Guest Additions, or Service Pack 3 just installed. You can also add a longer text description in the Snapshot Description field.
Your new snapshot will then appear in the snapshots list. Underneath your new snapshot, you will see an item called Current State, signifying that the current state of your VM is a variation based on the snapshot you took earlier. If you later take another snapshot, you will see that they are displayed in sequence, and that each subsequent snapshot is derived from an earlier one.
Oracle VirtualBox imposes no limits on the number of snapshots you can take. The only practical limitation is disk space on your host. Each snapshot stores the state of the virtual machine and thus occupies some disk space. See Snapshot Contents for details on what is stored in a snapshot.
-
-
Restore a snapshot. In the Snapshots tab, select the snapshot you have taken and click Restore in the toolbar. By restoring a snapshot, you go back or forward in time. The current state of the machine is lost, and the machine is restored to the exact state it was in when the snapshot was taken.
Note:
Restoring a snapshot will affect the virtual hard drives that are connected to your VM, as the entire state of the virtual hard drive will be reverted as well. This means also that all files that have been created since the snapshot and all other file changes will be lost. In order to prevent such data loss while still making use of the snapshot feature, it is possible to add a second hard drive in write-through mode using the VBoxManage interface and use it to store your data. As write-through hard drives are not included in snapshots, they remain unaltered when a machine is reverted. See Special Image Write Modes.
To avoid losing the current state when restoring a snapshot, you can create a new snapshot before the restore operation.
By restoring an earlier snapshot and taking more snapshots from there, it is even possible to create a kind of alternate reality and to switch between these different histories of the virtual machine. This can result in a whole tree of virtual machine snapshots.
-
Delete a snapshot. This does not affect the state of the virtual machine, but only releases the files on disk that Oracle VirtualBox used to store the snapshot data, thus freeing disk space. To delete a snapshot, select the snapshot name in the Snapshots tab and click Delete in the toolbar. Snapshots can be deleted even while a machine is running.
Note:
Whereas taking and restoring snapshots are fairly quick operations, deleting a snapshot can take a considerable amount of time since large amounts of data may need to be copied between several disk image files. Temporary disk files may also need large amounts of disk space while the operation is in progress.
There are some situations that cannot be handled while a VM is running, and you will get an appropriate message that you need to perform this snapshot deletion when the VM is shut down.
Snapshot Contents
Think of a snapshot as a point in time that you have preserved. More formally, a snapshot consists of the following:
-
The snapshot contains a complete copy of the VM settings, including the hardware configuration, so that when you restore a snapshot, the VM settings are restored as well. For example, if you changed the hard disk configuration or the VM's system settings, that change is undone when you restore the snapshot.
The copy of the settings is stored in the machine configuration, an XML text file, and thus occupies very little space.
-
The complete state of all the virtual disks attached to the machine is preserved. Going back to a snapshot means that all changes that had been made to the machine's disks, file by file and bit by bit, will be undone. Files that were since created will disappear, files that were deleted will be restored, changes to files will be reverted.
Strictly speaking, this is only true for virtual hard disks in "normal" mode. You can configure disks to behave differently with snapshots, see Special Image Write Modes. In technical terms, it is not the virtual disk itself that is restored when a snapshot is restored. Instead, when a snapshot is taken, Oracle VirtualBox creates differencing images which contain only the changes since the snapshot were taken. When the snapshot is restored, Oracle VirtualBox throws away that differencing image, thus going back to the previous state. This is both faster and uses less disk space. For the details, which can be complex, see Differencing Images.
Creating the differencing image as such does not occupy much space on the host disk initially, since the differencing image will initially be empty and grow dynamically later with each write operation to the disk. The longer you use the machine after having created the snapshot, however, the more the differencing image will grow in size.
-
If you took a snapshot while the machine was running, the memory state of the machine is also saved in the snapshot. This is in the same way that memory can be saved when you close a VM window. When you restore such a snapshot, execution resumes at exactly the point when the snapshot was taken.
The memory state file can be as large as the memory size of the VM and will therefore occupy considerable disk space.
Emulated Hardware
Oracle VirtualBox virtualizes nearly all of the host's hardware. Depending on a VM's configuration, the guest will see the following virtual hardware:
-
Input devices. Oracle VirtualBox can emulate a standard PS/2 keyboard and mouse. These devices are supported by most guest OSes.
In addition, Oracle VirtualBox can provide virtual USB input devices to avoid having to capture mouse and keyboard, as described in Capturing and Releasing Keyboard and Mouse.
-
Graphics. The default Oracle VirtualBox graphics device for Windows guests is an SVGA device. For Linux guests, the default graphics device emulates a VMware SVGA graphics device. See Screen Tab.
For legacy guest OSes, a VGA-compatible graphics device is available.
-
Storage. Oracle VirtualBox emulates the most common types of hard disk controllers. See Hard Disk Controllers. Whereas supporting only one of these controllers would be enough for Oracle VirtualBox by itself, this multitude of storage adapters is required for compatibility with other hypervisors. Windows is very selective about its boot devices, and migrating VMs between hypervisors is very difficult or impossible if the storage controllers are different.
-
Networking. See Virtual Networking Hardware.
-
USB. Oracle VirtualBox emulates the most common USB host controllers. See USB Support.
The emulated USB controllers do not communicate directly with devices on the host. Instead they communicate with a virtual USB layer that abstracts the USB protocol and enables the use of remote USB devices.
-
Audio. See Audio Settings.
Paravirtualization Providers
Oracle VirtualBox enables the exposure of a paravirtualization interface, to facilitate accurate and efficient execution of software within a virtual machine. These interfaces require the guest operating system to recognize their presence and make use of them in order to leverage the benefits of communicating with the Oracle VirtualBox hypervisor.
Most modern, mainstream guest operating systems, including Windows and Linux, ship with support for one or more paravirtualization interfaces. Hence, there is typically no need to install additional software in the guest to take advantage of this feature.
Exposing a paravirtualization provider to the guest operating system does not rely on the choice of host platforms. For example, the Hyper-V paravirtualization provider can be used for VMs to run on any host platform supported by Oracle VirtualBox and not just Windows.
Oracle VirtualBox provides the following interfaces:
-
Minimal: Announces the presence of a virtualized environment. Additionally, reports the TSC and APIC frequency to the guest operating system. This provider is mandatory for running any Mac OS X guests.
-
KVM: Presents a Linux KVM hypervisor interface which is recognized by Linux kernels version 2.6.25 or later. Oracle VirtualBox's implementation currently supports paravirtualized clocks and SMP spinlocks. This provider is recommended for Linux guests.
-
Hyper-V: Presents a Microsoft Hyper-V hypervisor interface which is recognized by Windows 7 and newer operating systems. Oracle VirtualBox's implementation currently supports paravirtualized clocks, APIC frequency reporting, guest debugging, guest crash reporting and relaxed timer checks. This provider is recommended for Windows guests.
Nested Paging and VPIDs
In addition to normal hardware virtualization, your processor may also support the following additional sophisticated techniques:
-
Nested paging implements some memory management in hardware, which can greatly accelerate hardware virtualization since these tasks no longer need to be performed by the virtualization software.
With nested paging, the hardware provides another level of indirection when translating linear to physical addresses. Page tables function as before, but linear addresses are now translated to "guest physical" addresses first and not physical addresses directly. A new set of paging registers now exists under the traditional paging mechanism and translates from guest physical addresses to host physical addresses, which are used to access memory.
Nested paging eliminates the overhead caused by VM exits and page table accesses. In essence, with nested page tables the guest can handle paging without intervention from the hypervisor. Nested paging thus significantly improves virtualization performance.
On AMD processors, nested paging has been available starting with the Barcelona (K10) architecture. They now call it rapid virtualization indexing (RVI). Intel added support for nested paging, which they call extended page tables (EPT), with their Core i7 (Nehalem) processors.
If nested paging is enabled, the Oracle VirtualBox hypervisor can also use large pages to reduce TLB usage and overhead. This can yield a performance improvement of up to 5%. To enable this feature for a VM, you use the VBoxManage modifyvm --large-pages command. See VBoxManage modifyvm.
If you have an Intel CPU with EPT, please consult CVE-2018-3646 for security concerns regarding EPT.
-
On Intel CPUs, a hardware feature called Virtual Processor Identifiers (VPIDs) can greatly accelerate context switching by reducing the need for expensive flushing of the processor's Translation Lookaside Buffers (TLBs).
To enable these features for a VM, you use the VBoxManage modifyvm --vtx-vpid and VBoxManage modifyvm --large-pages commands. See VBoxManage modifyvm.
Virtual Machine Settings
Settings for a virtual machine are configured using the Settings window.
To display the Settings window, do either of the following:
-
In the Machines list, right-click the virtual machine name, and click Settings....
-
In the Machines list, click the virtual machine name, and then click Settings on the toolbar.
Note:
The available settings depend on the selected experience level. To display all available settings, ensure the experience level is set to Expert.
General Settings
In the Settings window, under General, you can configure the most fundamental aspects of the virtual machine such as memory and essential hardware. The following tabs are available.
Identity Tab
On the Identity tab of the General settings category, you can find these settings:
-
VM Name: The name of the the VM, as shown in the list of VMs in the main VirtualBox Manager window. Using this name, Oracle VirtualBox also saves the VM's configuration files. If you change the name, Oracle VirtualBox renames these files as well. As a result, you can only use characters which are allowed for file names on your host OS.
Note that internally, Oracle VirtualBox uses unique identifiers (UUIDs) to identify virtual machines. You can display these using the VBoxManage commands.
-
OS: The type of guest OS for the VM. Additionally, set the OS Distribution or OS Edition, and OS Version. For example, if the OS is Linux, the OS Distribution might be Oracle Linux and the OS Version might be Oracle Linux 8.x (64-bit).
These are the same settings that are specified in the New Virtual Machine workflow. See Creating a New Virtual Machine.
Whereas the default settings of a newly created VM depend on the selected OS, changing the OS later has no effect on VM settings.
Features Tab
The following settings are available in the Features tab:
-
Snapshot Folder: By default, Oracle VirtualBox saves snapshot data together with your other Oracle VirtualBox configuration data. See Where Oracle VirtualBox Stores its Files. With this setting, you can specify any other folder for each VM.
-
Shared Clipboard: You can select here whether the clipboard of the guest OS should be shared with that of your host. If you select Bidirectional, then Oracle VirtualBox will always make sure that both clipboards contain the same data. If you select Host to Guest or Guest to Host, then Oracle VirtualBox will only ever copy clipboard data in one direction.
Clipboard sharing requires the Oracle VirtualBox Guest Additions.
For security reasons, the shared clipboard is disabled by default. This setting can be changed at any time using the Shared Clipboard menu item in the Devices menu of the virtual machine.
-
Drag and Drop: You can select multiple drag and drop modes for a VM to enable or restrict access in either direction.
For drag and drop to work, the Guest Additions need to be installed on the guest.
Note:
Drag and drop is disabled by default. This setting can be changed at any time using the Drag and Drop menu item in the Devices menu of the virtual machine.
See Drag and Drop.
Description Tab
On the Description tab you can enter a description for your virtual machine. This has no effect on the functionality of the machine, but you may find this space useful to note down things such as the configuration of a virtual machine and the software that has been installed into it.
To insert a line break into the Description text field, press Shift+Enter.
Disk Encryption Tab
The Disk Encryption tab enables you to encrypt disks that are attached to the virtual machine.
To enable disk encryption, select the Encrypt Disks check box.
Settings are available to configure the cipher used for encryption and the encryption password.
Note:
All files related to the virtual machine except disk images are stored unencrypted. To encrypt these files, use the VBoxManage encryptvm command as described in Encryption of VMs.
System Settings
The System category groups various settings that are related to the basic hardware that is presented to the virtual machine.
Note:
As the activation mechanism of Windows is sensitive to hardware changes, if you are changing hardware settings for a Windows guest, some of these changes may trigger a request for another activation with Microsoft.
The following tabs are available.
Motherboard Tab
On the Motherboard tab, you can configure virtual hardware that would normally be on the motherboard of a real computer.
-
Base Memory: Sets the amount of RAM that is allocated and given to the VM when it is running. The specified amount of memory will be requested from the host OS, so it must be available or made available as free memory on the host when attempting to start the VM and will not be available to the host while the VM is running. This is the same setting that was specified when Creating a New Virtual Machine.
Generally, it is possible to change the memory size after installing the guest OS. But you must not reduce the memory to an amount where the OS would no longer boot.
-
Boot Device Order (BIOS only): Determines the order in which the guest OS will attempt to boot from the various virtual boot devices. Analogous to a real PC's BIOS setting, Oracle VirtualBox can tell a guest OS to start from the virtual floppy, the virtual CD/DVD drive, the virtual hard drive (each of these as defined by the other VM settings), the network, or none of these.
If you select Network, the VM will attempt to boot from a network using the PXE mechanism. This needs to be configured in detail on the command line. See VBoxManage modifyvm.
-
Chipset: You can select which chipset will be presented to the virtual machine. This can't be changed on VMs with an Arm architecture. PIIX3 is the default chipset for most guests. For some guest OSs, the PIIX3 chipset is not well supported. As a result, Oracle VirtualBox provides an emulation of the ICH9 chipset, which supports PCI express, three PCI buses, PCI-to-PCI bridges and Message Signaled Interrupts (MSI). This enables modern OSs to address more PCI devices and no longer requires IRQ sharing. Using the ICH9 chipset it is also possible to configure up to 36 network cards, compared to a maximum of eight network adapters with PIIX3.
-
TPM Version: Enables support for a Trusted Platform Module (TPM) security processor. Choose from the available TPM versions. This can't be changed on VMs with an Arm architecture.
-
Pointing Device: The default virtual pointing device for some guest OSs is the traditional PS/2 mouse. If set to USB Tablet, Oracle VirtualBox reports to the virtual machine that a USB tablet device is present and communicates mouse events to the virtual machine through this device. Another setting is USB Multi-Touch Tablet, which is suitable for guests running Windows 8 or later.
Using the virtual USB tablet has the advantage that movements are reported in absolute coordinates, instead of as relative position changes. This enables Oracle VirtualBox to translate mouse events over the VM window into tablet events without having to capture the mouse in the guest as described in Capturing and Releasing Keyboard and Mouse. This makes using the VM less tedious even if Guest Additions are not installed.
-
I/O APIC: Advanced Programmable Interrupt Controllers (APICs) are an x86 hardware feature that have replaced Programmable Interrupt Controllers (PICs). With an I/O APIC, OSs can use more than 16 interrupt requests (IRQs) and therefore avoid IRQ sharing for improved reliability. Can't be changed on VMs with an Arm architecture.
Note:
Enabling the I/O APIC is required for 64-bit Windows guest OSs. It is also required if you want to use more than one virtual CPU in a virtual machine.
However, software support for I/O APICs has been unreliable with some OSs other than Windows. Also, the use of an I/O APIC slightly increases the overhead of virtualization and therefore slows down the guest OS a little.
Note:
All Windows OSs install different kernels, depending on whether an I/O APIC is available. As with ACPI, the I/O APIC therefore must not be turned off after installation of a Windows guest OS. Turning it on after installation will have no effect however.
-
Hardware Clock in UTC: If selected, Oracle VirtualBox will report the system time in UTC format to the guest instead of the local (host) time. This affects how the virtual real-time clock (RTC) operates and may be useful for UNIX-like guest OSs, which typically expect the hardware clock to be set to UTC.
-
UEFI Enables Extensible Firmware Interface (EFI), which replaces the legacy BIOS and may be useful for certain advanced use cases. See Alternative Firmware (UEFI). Can't be changed on VMs with an Arm architecture.
-
Secure Boot: Enables Secure Boot, to provide a secure environment for starting the guest OS.
In addition, you can turn off the Advanced Configuration and Power Interface (ACPI) which Oracle VirtualBox presents to the guest OS by default.
ACPI is the current industry standard to allow OSs to recognize hardware, configure motherboards and other devices and manage power. As most computers contain this feature and Windows and Linux support ACPI, it is also enabled by default in Oracle VirtualBox. However, no ACPI information, such as battery status or power source, is reported to Oracle Solaris guests.
ACPI can only be turned off using the command line. See VBoxManage modifyvm.
Note:
All Windows OSs install different kernels, depending on whether ACPI is available. This means that ACPI must not be turned off after installation of a Windows guest OS. However, turning it on after installation will have no effect.
Processor Tab
On the Processor tab, you can configure settings for the CPU used by the virtual machine.
-
Number of CPUs: Sets the number of virtual CPU cores the guest OSes can see. Oracle VirtualBox supports symmetrical multiprocessing (SMP) and can present up to 32 virtual CPU cores to each virtual machine.
You should not configure virtual machines to use more CPU cores than are available physically. This includes real cores, with no hyperthreads.
-
Processing Cap: Configures the CPU processing cap. This limits the amount of time a host CPU spends to emulate a virtual CPU. The default setting is 100%, meaning that there is no limitation. A setting of 50% implies a single virtual CPU can use up to 50% of a single host CPU. Note that limiting the execution time of the virtual CPUs may cause guest timing problems.
A warning is displayed at the bottom of the Processor tab if a Processing Cap setting is made that may affect system performance.
-
PAE/NX: Determines whether the PAE (Physical Address Extension) and NX capabilities of the host CPU will be exposed to the virtual machine. Can't be changed on VMs with an Arm architecture.
Normally, if enabled and supported by the OS, then even a 32-bit x86 CPU can access more than 4 GB of RAM. This is made possible by adding another 4 bits to memory addresses, so that with 36 bits, up to 64 GB can be addressed. Some OSs, such as Ubuntu Server, require PAE support from the CPU and cannot be run in a virtual machine without it.
-
Nested VT-x/AMD-V: Enables nested virtualization, with passthrough of hardware virtualization functions to the guest VM. Can't be changed on VMs with an Arm architecture.
With virtual machines running modern server OSs, Oracle VirtualBox also supports CPU hot-plugging. For details, see CPU Hot-Plugging.
Acceleration Tab
On this tab, you can configure Oracle VirtualBox to use hardware virtualization extensions that your host CPU supports.
-
Paravirtualization Interface: Oracle VirtualBox provides paravirtualization interfaces to improve time-keeping accuracy and performance of guest OSs. The options available are documented under the
--paravirt-provideroption in VBoxManage modifyvm. For further details on the paravirtualization providers, see Paravirtualization Providers. -
Hardware Virtualization:
-
Nested Paging: If the host CPU supports the nested paging (AMD-V) or EPT (Intel VT-x) features, then you can expect a significant performance increase by enabling nested paging in addition to hardware virtualization. For technical details, see Nested Paging and VPIDs. For Intel EPT security recommendations, see CVE-2018-3646.
-
Display Settings
The following tabs are available for configuring the display for a virtual machine.
Screen Tab
-
Video Memory: Sets the size of the memory provided by the virtual graphics card available to the guest, in megabytes. As with the main memory, the specified amount will be allocated from the host's resident memory. Based on the amount of video memory, higher resolutions and color depths may be available.
VirtualBox Manager will show a warning if the amount of video memory is too small to be able to switch the VM into full screen mode. The minimum value depends on the number of virtual monitors, the screen resolution and the color depth of the host display as well as on the use of 3D acceleration. A rough estimate is (color depth / 8) x vertical pixels x horizontal pixels x number of screens = number of bytes. Extra memory may be required if display acceleration is used.
-
Number of Virtual Monitors: With this setting, Oracle VirtualBox can provide more than one virtual monitor to a virtual machine. If a guest OS supports multiple attached monitors, Oracle VirtualBox can pretend that multiple virtual monitors are present. Up to eight such virtual monitors are supported.
The output of the multiple monitors are displayed on the host in multiple VM windows which are running side by side. However, in full screen and seamless mode, they use the available physical monitors attached to the host. As a result, for full screen and seamless modes to work with multiple monitors, you will need at least as many physical monitors as you have virtual monitors configured, or Oracle VirtualBox will report an error.
You can configure the relationship between guest and host monitors using the View menu by pressing Host key + Home when you are in full screen or seamless mode.
See also Known Issues.
-
Scale Factor: Enables scaling of the display size. For multiple monitor displays, you can set the scale factor for individual monitors, or globally for all of the monitors. Use the slider to select a scaling factor up to 200%.
You can set a default scale factor for all VMs. Use the Display tab in the Preferences window.
-
Graphics Controller: Specifies the graphics adapter type used by the guest VM. Note that you must install the Guest Additions on the guest VM to specify the VBoxSVGA or VMSVGA graphics controller. The following options are available:
-
VBoxSVGA: The default graphics controller for new VMs that use Windows 7 or later.
This graphics controller improves performance and 3D support when compared to the legacy VBoxVGA option.
-
VBoxVGA: Use this graphics controller for legacy guest OSes. This is the default graphics controller for Windows versions before Windows 7 and for Oracle Solaris.
3D acceleration is not supported for this graphics controller.
-
VMSVGA: Use this graphics controller to emulate a VMware SVGA graphics device. This is the default graphics controller for Linux guests.
-
None: Does not emulate a graphics adapter type.
-
-
3D Acceleration: If a virtual machine has Guest Additions installed, you can enable accelerated 3D graphics on the VM. With 3D acceleration enabled, the VM also uses video decoding acceleration if the host also supports video decoding acceleration. See Hardware-Accelerated Graphics.
Remote Display Tab
On the Remote Display tab, if the VirtualBox Remote Display Extension (VRDE) is installed, you can enable the VRDP server that is built into Oracle VirtualBox. This enables you to connect to the console of the virtual machine remotely with any standard RDP viewer, such as mstsc.exe that comes with Microsoft Windows. On Linux and Oracle Solaris systems you can use the standard open source rdesktop program. These features are described in Remote Display (VRDP Support).
-
Enable Server: Select this check box and configure settings for the remote display connection.
Recording Tab
On the Recording tab you can enable video and audio recording for a virtual machine and change related settings. Note that these features can be enabled and disabled while a VM is running. Settings apply to all selected screens.
-
Enable Recording: Select this check box and select a Recording Mode option.
-
Recording Mode: You can choose to record video, audio, or both video and audio.
Some settings on the Recording tab may be grayed out, depending on the Recording Mode setting.
-
File Path: The file where the recording is saved.
-
Frame Size: The video resolution of the recorded video, in pixels. The drop-down list enables you to select from common frame sizes.
-
Frame Rate: Use the slider to set the maximum number of video frames per second (FPS) to record. Frames that have a higher frequency are skipped. Increasing this value reduces the number of skipped frames and increases the file size.
-
Video Quality: Use the slider to set the bit rate of the video in kilobits per second. Increasing this value improves the appearance of the video at the cost of an increased file size.
-
Audio Quality: Use the slider to set the quality of the audio recording. Increasing this value improves the audio quality at the cost of an increased file size.
-
Screens: For a multiple monitor display, you can select which screens to record video from.
As you adjust the video and audio recording settings, the approximate output file size for a five minute video is shown.
Storage Settings
The Storage category in the VM settings enables you to connect virtual hard disk and CD/DVD images and drives to your virtual machine.
In a real computer, so-called storage controllers connect physical disk drives to the rest of the computer. Similarly, Oracle VirtualBox presents virtual storage controllers to a virtual machine. Under each controller, the virtual devices, such as hard disks and CD/DVD drives, attached to the controller are shown.
Note:
This section gives a quick introduction to the Oracle VirtualBox storage settings. See Virtual Storage for a full description of the available storage settings in Oracle VirtualBox.
Depending on the guest OS type that you selected when you created the VM, a new VM includes the following storage devices:
-
IDE controller. A virtual CD/DVD drive is attached to device 0 on the secondary channel of the IDE controller.
-
SATA controller. This is a modern type of storage controller for higher hard disk data throughput, to which the virtual hard disks are attached. Initially you will normally have one such virtual disk, but as shown in the previous screenshot, you can have more than one. Each is represented by a disk image file, such as a VDI file in this example.
VMs with an Arm architecture have VirtIO SCSI only.
If you created your VM with an older version of Oracle VirtualBox, the default storage layout may differ. You might then only have an IDE controller to which both the CD/DVD drive and the hard disks have been attached. This might also apply if you selected an older OS type when you created the VM. Since older OSes do not support SATA without additional drivers, Oracle VirtualBox will make sure that no such devices are present initially. See Hard Disk Controllers.
Oracle VirtualBox also provides a floppy controller. You cannot add devices other than floppy drives to this controller. Virtual floppy drives, like virtual CD/DVD drives, can be connected to either a host floppy drive, if you have one, or a disk image, which in this case must be in RAW format.
You can modify these media attachments freely. For example, if you want to copy some files from another virtual disk that you created, you can connect that disk as a second hard disk, as in the above screenshot. You could also add a second virtual CD/DVD drive, or change where these items are attached. The following options are available:
-
To add another virtual hard disk, or a CD/DVD or floppy drive, select the storage controller to which it should be added (such as IDE, SATA, SCSI, SAS, floppy controller) and then click the Add Disk button below the tree. You can then either select Optical Drive or Hard Disk. If you clicked on a floppy controller, you can add a floppy drive instead. Alternatively, right-click the storage controller and select a menu item there.
A dialog is displayed, enabling you to select an existing disk image file or to create a new disk image file. Depending on the type of disk image, the dialog is called Hard Disk Selector, Optical Disk Selector, or Floppy Disk Selector.
See Disk Image Files (VDI, VMDK, VHD, HDD) for information on the image file types that are supported by Oracle VirtualBox.
For virtual CD/DVD drives, the image files will typically be in the standard ISO format instead. Most commonly, you will select this option when installing an OS from an ISO file that you have obtained from the Internet. For example, most Linux distributions are available in this way.
Depending on the type of disk image, you can set the following Attributes for the disk image in the right part of the Storage settings page:
-
The device slot of the controller that the virtual disk is connected to. IDE controllers have four slots: primary device 0, primary device 1, secondary device 0, and secondary device 1. By contrast, SATA and SCSI controllers offer you up to 30 slots for attaching virtual devices.
- Solid-state Drive presents a virtual disk to the guest as a solid-state device.
- Hot-pluggable presents a virtual disk to the guest as a hot-pluggable device.
-
For virtual CD/DVD drives, you can select Live CD/DVD. This means that the virtual optical disk is not removed from when the guest system ejects it.
-
-
To remove an attachment, either select it and click the Remove icon at the bottom, or right-click the attachment and select the menu item.
Removable media, such as CD/DVDs and floppies, can be changed while the guest is running. Since the Settings window is not available at that time, you can also access these settings from the Devices menu of your virtual machine window.
Audio Settings
The Audio section in a virtual machine's Settings window determines whether the VM will detect a connected sound card, and if the audio output should be played on the host system.
To enable audio for a guest, select the Enable Audio check box. The following settings are available:
-
Host Audio Driver: The audio driver that Oracle VirtualBox uses on the host.
The Default option is enabled by default for all new VMs. This option selects the best audio driver for the host platform automatically. This enables you to move VMs between different platforms without having to change the audio driver.
On a Linux host, depending on your host configuration, you can select between the OSS, ALSA, or the PulseAudio subsystem. On newer Linux distributions, the PulseAudio subsystem is preferred.
Only OSS is supported on Oracle Solaris hosts. The Oracle Solaris Audio audio backend is no longer supported on Oracle Solaris hosts.
-
Audio Controller: You can choose between the emulation of an Intel AC'97 controller, an Intel HD Audio controller, or a SoundBlaster 16 card.
-
Audio Output: Enables audio output only for the VM.
-
Audio Input: Enables audio input only for the VM.
Network Settings
The Network section in a virtual machine's Settings window enables you to configure how Oracle VirtualBox presents virtual network cards to your VM, and how they operate.
When you first create a virtual machine, Oracle VirtualBox by default enables one virtual network card and selects the Network Address Translation (NAT) mode for it. This way the guest can connect to the outside world using the host's networking and the outside world can connect to services on the guest which you choose to make visible outside of the virtual machine.
This default setup is good for the majority of Oracle VirtualBox users. However, Oracle VirtualBox is extremely flexible in how it can virtualize networking. It supports many virtual network cards per virtual machine. The first four virtual network cards can be configured in detail in VirtualBox Manager. Additional network cards can be configured using the VBoxManage command.
Many networking options are available. See Virtual Networking for more information.
Serial Ports
Oracle VirtualBox supports the use of virtual serial ports in a virtual machine with an x86 architecture. Serial ports are not available on Arm VMs.
Ever since the original IBM PC, personal computers have been equipped with one or two serial ports, also called COM ports by DOS and Windows. Serial ports were commonly used with modems, and some computer mice used to be connected to serial ports before USB became commonplace.
While serial ports are no longer as common as they used to be, there are still some important uses left for them. For example, serial ports can be used to set up a primitive network over a null-modem cable, in case Ethernet is not available. Also, serial ports are indispensable for system programmers needing to do kernel debugging, since kernel debugging software usually interacts with developers over a serial port. With virtual serial ports, system programmers can do kernel debugging on a virtual machine instead of needing a real computer to connect to.
If a virtual serial port is enabled, the guest OS sees a standard 16550A compatible UART device. Other UART types can be configured using the VBoxManage modifyvm command. Both receiving and transmitting data is supported. How this virtual serial port is then connected to the host is configurable, and the details depend on your host OS.
You can use either the Settings tabs or the VBoxManage command to set up virtual serial ports. For the latter, see VBoxManage modifyvm for information on the --uart, --uart-mode and --uart-type options.
You can configure up to four virtual serial ports per virtual machine. For each device, you must set the following:
-
Port Number: This determines the serial port that the virtual machine should see. For best results, use the traditional values as follows:
-
COM1: I/O base 0x3F8, IRQ 4
-
COM2: I/O base 0x2F8, IRQ 3
-
COM3: I/O base 0x3E8, IRQ 4
-
COM4: I/O base 0x2E8, IRQ 3
You can also configure a user-defined serial port. Enter an I/O base address and interrupt (IRQ).
-
-
Port Mode: What the virtual port is connected to. For each virtual serial port, you have the following options:
-
Disconnected: The guest will see the device, but it will behave as if no cable had been connected to it.
-
Host Device: Connects the virtual serial port to a physical serial port on your host. On a Windows host, this will be a name like
COM1. On Linux or Oracle Solaris hosts, it will be a device node like /dev/ttyS0. Oracle VirtualBox will then simply redirect all data received from and sent to the virtual serial port to the physical device. -
Host Pipe: Configure Oracle VirtualBox to connect the virtual serial port to a software pipe on the host. This depends on your host OS, as follows:
-
On a Windows host, data will be sent and received through a named pipe. The pipe name must be in the format \\.\pipe\name where name should identify the virtual machine but may be freely chosen.
-
On a Mac OS, Linux, or Oracle Solaris host, a local domain socket is used instead. The socket filename must be chosen such that the user running Oracle VirtualBox has sufficient privileges to create and write to it. The /tmp directory is often a good candidate.
On Linux there are various tools which can connect to a local domain socket or create one in server mode. The most flexible tool is socat and is available as part of many distributions.
In this case, you can configure whether Oracle VirtualBox should create the named pipe, or the local domain socket on non-Windows hosts, itself or whether Oracle VirtualBox should assume that the pipe or socket exists already. With the VBoxManage command-line options, this is referred to as server mode or client mode, respectively.
For a direct connection between two virtual machines, corresponding to a null-modem cable, simply configure one VM to create a pipe or socket and another to attach to it.
-
-
Raw File: Send the virtual serial port output to a file. This option is very useful for capturing diagnostic output from a guest. Any file may be used for this purpose, as long as the user running Oracle VirtualBox has sufficient privileges to create and write to the file.
-
TCP: Useful for forwarding serial traffic over TCP/IP, acting as a server, or it can act as a TCP client connecting to other servers. This option enables a remote machine to directly connect to the guest's serial port using TCP.
-
TCP Server: Deselect the Connect to Existing Pipe/Socket check box and specify the port number in the Path/Address field. This is typically 23 or 2023. Note that on UNIX-like systems you will have to use a port a number greater than 1024 for regular users.
The client can use software such as PuTTY or the telnet command line tool to access the TCP Server.
-
TCP Client: To create a virtual null-modem cable over the Internet or LAN, the other side can connect using TCP by specifying
hostname:portin the Path/Address field. The TCP socket will act in client mode if you select the Connect to Existing Pipe/Socket check box.
-
-
Up to four serial ports can be configured per virtual machine, but you can pick any port numbers out of the above. However, serial ports cannot reliably share interrupts. If both ports are to be used at the same time, they must use different interrupt levels, for example COM1 and COM2, but not COM1 and COM3.
USB Support
USB Settings
The USB section in a virtual machine's Settings window enables you to configure Oracle VirtualBox's sophisticated USB support.
Oracle VirtualBox can enable virtual machines to access the USB devices on your host directly. To achieve this, Oracle VirtualBox presents the guest OS with a virtual USB controller.
CAUTION:
As soon as the guest system starts using a USB device, it will be disconnected from the host without a proper shutdown. This may cause data loss.
Note:
USB support on Oracle Solaris hosts requires Oracle Solaris 11 FCS or later. Webcams and other isochronous devices are known to have poor performance.
Oracle VirtualBox also enables your guests to connect to remote USB devices by use of the VirtualBox Remote Desktop Extension (VRDE). See Remote USB.
Enable USB for a VM
- Ensure the VM is not running.
- Select the VM in the machine list, and then click Settings.
- On the USB tab, select Enable USB Controller and choose the
USB Controller you need for your guest OS. In most cases this will be xHCI. Only use OHCI or
EHCI if your guest OS does not support xHCI. For some legacy Windows guests you'll need to
install third party drivers for xHCI support.
- OHCI supports USB 1.1
- EHCI supports USB 2.0. This also enables OHCI.
- xHCI supports all USB speeds up to USB 3.0
- Specify which devices can be attached to the guest by adding USB Device Filters. USB devices with a matching filter will be automatically passed to the guest once they are attached to the host. USB devices without a matching filter can be passed manually to the guest, for example by using the Devices, USB menu.
- Click the USB filter button to create a new filter with blank fields, and then complete the fields.
- Or, click the Add USB filter button to create a filter with the fields completed for the selected USB device.
Give the filter a name, for later reference, and specify the filter criteria. The more criteria you specify, the more precisely devices will be selected. For instance, if you specify only a vendor ID of 046d, all devices produced by Logitech will be available to the guest. If you fill in all fields, on the other hand, the filter will only apply to a particular device model from a particular vendor, and not even to other devices of the same type with a different revision and serial number.
The following criteria are available:
-
Vendor and Product ID. With USB, each vendor of USB products carries an identification number that is unique world-wide, called the vendor ID. Similarly, each line of products is assigned a product ID number. Both numbers are commonly written in hexadecimal, and a colon separates the vendor from the product ID. For example,
046d:c016stands for Logitech as a vendor, and the M-UV69a Optical Wheel Mouse product.Alternatively, you can also specify Manufacturer and Product by name.
To list all the USB devices that are connected to your host machine with their respective vendor IDs and product IDs, use the following command:
VBoxManage list usbhost
On Windows, you can also see all USB devices that are attached to your system in the Device Manager. On Linux, you can use the lsusb command.
-
Serial Number. While vendor ID and product ID are quite specific to identify USB devices, if you have two identical devices of the same brand and product line, you will also need their serial numbers to filter them out correctly.
-
Remote. This setting specifies whether the device will be local only, remote only, such as over VRDP, or either.
As an example, you could create a new USB filter and specify a vendor ID of 046d for Logitech, Inc, a manufacturer index of 1, and not remote. Then any USB devices on the host system produced by Logitech, Inc with a manufacturer index of 1 will be visible to the guest system.
Several filters can select a single device. For example, a filter which selects all Logitech devices, and one which selects a particular webcam.
-
On a Windows host, you will need to unplug and reconnect a USB device to use it after creating a filter for it.
-
Ensure the filters you need immediately are selected in the list. Selected filters will be attached automatically when the VM starts.
Implementation Notes for Windows and Linux Hosts
On Windows hosts, a kernel mode device driver provides USB proxy support. It implements both a USB monitor, which enables Oracle VirtualBox to capture devices when they are plugged in, and a USB device driver to claim USB devices for a particular virtual machine. System reboots are not necessary after installing the driver. Also, you do not need to replug devices for Oracle VirtualBox to claim them.
On supported Linux hosts, Oracle VirtualBox accesses USB devices through special files in the file system. When Oracle VirtualBox is installed, these are made available to all users in the vboxusers system group. In order to be able to access USB from guest systems, make sure that you are a member of this group.
User Interface
The User Interface section enables you to change certain aspects of the user interface of the selected VM.
-
Menu Bar: This widget enables you to disable a complete menu, by clicking on the menu name to deselect it. Menu entries can be disabled, by deselecting the check box next to the entry. On Windows and Linux hosts, the complete menu bar can be disabled by deselecting the check box on the right, after the menus.
-
Mini ToolBar: In full screen or seamless mode, Oracle VirtualBox can display a small toolbar that contains some of the items that are normally available from the virtual machine's menu bar. This toolbar reduces itself to a small gray line unless you move the mouse over it. With the toolbar, you can return from full screen or seamless mode, control machine execution, or enable certain devices. If you do not want to see the toolbar, disable the Show in Full Screen/Seamless setting.
The Show at Top of Screen setting enables you to show the toolbar at the top of the screen, instead of showing it at the bottom.
The Mini Toolbar is not available on macOS hosts.
-
Status Bar: This widget enables you to disable and reorder icons on the status bar. Deselect the check box of an icon to disable it, or rearrange icons by dragging and dropping the icon. To disable the complete status bar deselect the check box on the left, before the icons.
Alternative Firmware (UEFI)
Oracle VirtualBox includes support for the Unified Extensible Firmware Interface (UEFI), which is an industry standard intended to replace the legacy BIOS as the primary interface for bootstrapping computers and certain system services later.
By default, Oracle VirtualBox uses the BIOS firmware for virtual machines. To use UEFI for a given virtual machine, you can enable EFI in the machine's Settings. See Motherboard Tab. Alternatively, use the VBoxManage command line interface as follows:
VBoxManage modifyvm "VM name" --firmware efi
To switch back to using the BIOS:
VBoxManage modifyvm "VM name" --firmware bios
Most modern macOS and Windows releases require UEFI. All Arm VMs require UEFI.
Another possible use of UEFI in Oracle VirtualBox is development and testing of UEFI applications, without booting any OS.
Video Modes in EFI
EFI provides two distinct video interfaces: GOP (Graphics Output Protocol) and UGA (Universal Graphics Adapter). Modern OSes, such as Mac OS X, generally use GOP, while some older ones still use UGA. Oracle VirtualBox provides a configuration option to control the graphics resolution for both interfaces, making the difference mostly irrelevant for users.
The default resolution is 1024x768. To select a graphics resolution for EFI, use the following VBoxManage command:
VBoxManage setextradata "VM name" VBoxInternal2/EfiGraphicsResolution HxV
Find the horizontal resolution H and the vertical resolution V from the following list of default resolutions:
| Display Type | Default Horizontal Resolution (px) | Default Vertical Resolution (px) | Color Depth (BPP) | Display Aspect Ratio |
|---|---|---|---|---|
| VGA | 640 | 480 | 32 | 4:3 |
| SVGA | 800 | 600 | 32 | 4:3 |
| XGA | 1024 | 768 | 32 | 4:3 |
| XGA+ | 1152 | 864 | 32 | 4:3 |
| HD | 1280 | 720 | 32 | 16:9 |
| WXGA | 1280 | 800 | 32 | 16:10 |
| SXGA | 1280 | 1024 | 32 | 5:4 |
| SXGA+ | 1400 | 1050 | 32 | 4:3 |
| WXGA+ | 1440 | 900 | 32 | 16:10 |
| HD+ | 1600 | 900 | 32 | 16:9 |
| UXGA | 1600 | 1200 | 32 | 4:3 |
| WSXGA+ | 1680 | 1050 | 32 | 16:10 |
| Full HD | 1920 | 1080 | 32 | 16:9 |
| WUXGA | 1920 | 1200 | 32 | 16:10 |
| DCI 2K | 2048 | 1080 | 32 | 19:10 |
| Full HD+ | 2160 | 1440 | 32 | 3:2 |
| Unnamed | 2304 | 1440 | 32 | 16:10 |
| QHD | 2560 | 1440 | 32 | 16:9 |
| WQXGA | 2560 | 1600 | 32 | 16:10 |
| QWXGA+ | 2880 | 1800 | 32 | 16:10 |
| QHD+ | 3200 | 1800 | 32 | 16:9 |
| WQSXGA | 3200 | 2048 | 32 | 16:10 |
| 4K UHD | 3840 | 2160 | 32 | 16:9 |
| WQUXGA | 3840 | 2400 | 32 | 16:10 |
| DCI 4K | 4096 | 2160 | 32 | 19:10 |
| HXGA | 4096 | 3072 | 32 | 4:3 |
| UHD+ | 5120 | 2880 | 32 | 16:9 |
| WHXGA | 5120 | 3200 | 32 | 16:10 |
| WHSXGA | 6400 | 4096 | 32 | 16:10 |
| HUXGA | 6400 | 4800 | 32 | 4:3 |
| 8K UHD2 | 7680 | 4320 | 32 | 16:9 |
If this list of default resolutions does not cover your needs, see Custom VESA Resolutions. Note that the color depth value specified in a custom video mode must be specified. Color depths of 8, 16, 24, and 32 are accepted. EFI assumes a color depth of 32 by default.
The EFI default video resolution settings can only be changed when the VM is powered off.
Specifying Boot Arguments
It is currently not possible to manipulate EFI variables from within a running guest. For example, setting the
boot-args variable by running the nvram tool in a Mac OS X guest will
not work. As an alternative method, VBoxInternal2/EfiBootArgs extradata can be passed to a VM in
order to set the boot-args variable. To change the boot-args EFI variable, use
the following command:
VBoxManage setextradata "VM name" VBoxInternal2/EfiBootArgs <value>
Monitoring of Virtual Machines
VirtualBox Manager includes the following tools for viewing runtime information, configuration details, and performance metrics of virtual machines and cloud VM instances.
Note:
To monitor a cloud VM, the Compute Instance Monitoring plugin must be enabled and running on the Oracle Cloud Infrastructure instance. See the Oracle Cloud Infrastructure documentation for more details.
-
Resources. Displays an overview of performance metrics for all running virtual machines and cloud VM instances.
See Resources.
-
Session Information Dialog. Displays configuration and runtime information for the selected VM.
Resources
The Resources tool displays several performance metrics for all running virtual machines and cloud VM instances, and for the host system. This provides an overview of system resources used by individual virtual machines and the host system.
To display the Resources, in VirtualBox Manager click Resources.
- To show metrics for all virtual machines, including those that are not running, right-click the list of virtual machines and select List All Virtual Machines.
- To show metrics for cloud VMs, right-click the list of virtual machines and select Show Cloud Virtual Machines.
- To configure the set of metrics to be shown, click Columns in the toolbar. You can then sort the list of virtual machines by a particular metric.
- To see more performance information for a virtual machine, select the VM name and click Resource Use in the toolbar. The Resource Use tab of the Session Information dialog is shown, see Session Information Dialog.
Session Information Dialog
The Session Information dialog includes multiple tabs that show important configuration and runtime information for the guest system. The tabs are as follows:
-
Configuration Details. Displays the system configuration of the virtual machine in a tabular format. The displayed information includes details such as storage configuration and audio settings.
-
Runtime Information. Displays runtime information for the guest session in a tabular format similar to the Configuration Details tab.
-
Resource Use. Includes several time series charts which monitor guest resource usage including CPU, RAM, Disk I/O, and Network. Note that the RAM chart requires the Guest Additions to be running on the guest system. The Resource Use tab can also be accessed directly from the Resources. See Resources.
-
Guest Control. Details of processes used by the Guest Control File Manager. See Guest Control File Manager.
Note:
For cloud VMs, only the Resource Use tab is shown.
To display session information for a guest VM or a cloud VM, select the VM name in the Machines list and click the Resource Use tab.
The Log Viewer
Every time you start up a VM, Oracle VirtualBox creates a log file that records system configuration and events. The Log Viewer is a VirtualBox Manager tool that enables you to view and analyze system logs.
To display the Log Viewer, do either of the following:
-
Click the VM name in the machine list and select Logs from the machine tools menu.
-
In the VM, select Machine, Show Log.
Log messages for the VM are displayed in tabs in the Log Viewer window. See Collecting Debugging Information for details of the various log files generated by Oracle VirtualBox.
If you select multiple VMs in the machine list, logs are listed for each VM.
The toolbar of the Log Viewer includes the following options:
-
Save: Exports the contents of the selected log file to a text file. Specify the destination filename and location in the displayed dialog.
-
Find: Searches for a text string in the log file.
-
Filter: Uses filter terms to display specific types of log messages. Common log message terms used by Oracle VirtualBox, such as Audio and NAT, are included by default. Select one or more terms from the drop-down list. To add your own filter term, enter the text string in the text box field.
-
Bookmark: Saves the location of a log message, enabling you to find it quickly. To create a bookmark, either click the line number, or select some text and then click Bookmark.
-
Preferences: Configures the text display used in the log message window.
-
Refresh: Refreshes the log file you are currently viewing. Only log messages in the current tab are updated.
-
Reload: Refreshes all log files. Log messages in every tab are updated.
-
Settings: Displays the Settings window for the VM, enabling you to make configuration changes.
-
Discard: For a running VM, discards the saved state for the VM and closes it down.
-
Show/Start: For a running VM, Show displays the VM window. For a stopped VM, Start displays options for powering up the VM.
Integrating with Oracle Cloud Infrastructure
Oracle VirtualBox can integrate with Oracle Cloud Infrastructure. For example you can create cloud VMs, or import Compute instances to Oracle VirtualBox.
Using Oracle VirtualBox With Oracle Cloud Infrastructure describes how you can use Oracle VirtualBox with Oracle Cloud Infrastructure.
Before using Oracle VirtualBox with Oracle Cloud Infrastructure there are some initial configuration steps you may need to do. See Preparing for Oracle Cloud Infrastructure Integration.
Preparing for Oracle Cloud Infrastructure Integration
Perform the following configuration steps before using Oracle VirtualBox to integrate with your Oracle Cloud Infrastructure account.
-
Install the Extension Pack. Cloud integration features are only available when you install the Oracle VirtualBox Extension Pack. See Install the Oracle VirtualBox Extension Pack.
-
Create a key pair. Generate an API signing key pair that is used for API requests to Oracle Cloud Infrastructure. See Creating an API Signing Key Pair.
Upload the public key of the key pair from your client device to the cloud service. See Uploading the Public Key to Oracle Cloud Infrastructure.
-
Create a cloud profile. The cloud profile contains resource identifiers for your cloud account, such as your user OCID, and details of your key pair. See Creating a Cloud Profile.
Creating an API Signing Key Pair
To use the cloud integration features of Oracle VirtualBox, you must generate an API signing key pair that is used for API requests to Oracle Cloud Infrastructure.
Your API requests are signed with your private key, and Oracle Cloud Infrastructure uses the public key to verify the authenticity of the request. You must upload the public key to the Oracle Cloud Infrastructure Console.
Note:
This key pair is not the same SSH key that you use to access compute instances on Oracle Cloud Infrastructure.
-
(Optional) Create a .oci directory to store the key pair.
$ mkdir ~/.oci
The key pair is usually installed in the .oci folder in your home directory. For example, ~/.oci on a Linux system.
-
Generate the private key.
Use the
opensslcommand.-
To generate a private key with a passphrase (prompt for passphrase):
$ openssl genrsa -out ~/.oci/oci_api_key.pem -aes256 2048
-
To generate a private key with a passphrase entered on the command line as an argument:
$ openssl genrsa -aes256 -passout pass:user_passphrase -out ~/.oci/oci_api_key.pem 2048
-
To generate a private key without a passphrase:
$ openssl genrsa -out ~/.oci/oci_api_key.pem 2048
-
-
Change permissions for the private key.
$ chmod 600 ~/.oci/oci_api_key.pem
Generate the public key.
$ openssl rsa -pubout -in ~/.oci/oci_api_key.pem -out ~/.oci/oci_api_key_public.pem
Enter the passphrase when prompted, if you set one.
Uploading the Public Key to Oracle Cloud Infrastructure
Use the following steps to upload your public key to Oracle Cloud Infrastructure.
-
Log in to the Oracle Cloud Console.
-
Click Profile, User settings.
-
Display your current API signing keys.
Click Resources, API Keys.
-
Upload the public key.
Click Add Public Key.
The Add Public Key dialog is displayed.
-
Select one of the following options:
-
Choose Public Key File. This option enables you to browse to the public key file on your local hard disk.
-
Paste Public Keys. This option enables you to paste the contents of the public key file into the window in the dialog box.
-
-
Click Add to upload the public key.
Creating a Cloud Profile
Oracle VirtualBox uses a cloud profile to connect to Oracle Cloud Infrastructure. A cloud profile is a text file that contains details of your key files and Oracle Cloud Identifier (OCID) resource identifiers for your cloud account, such as the following:
-
Fingerprint of the public key. To obtain the fingerprint, you can use the openssl command:
$ openssl rsa -pubout -outform DER -in ~/.oci/oci_api_key.pem | openssl md5 -c
-
Location of the private key on the client device. Specify the full path to the private key.
-
(Optional) Passphrase for the private key. This is only required if the key is encrypted.
-
Region. Shown on the Oracle Cloud Infrastructure Console. Click Administration, Tenancy Details.
-
Tenancy OCID. Shown on the Oracle Cloud Infrastructure Console. Click Administration, Tenancy Details.
A link enables you to copy the Tenancy OCID.
-
Compartment OCID. Shown on the Oracle Cloud Infrastructure Console. Click Identity, Compartments.
A link enables you to copy the Compartment OCID.
-
User OCID. Shown on the Oracle Cloud Infrastructure Console. Click Profile, User Settings.
A link enables you to copy the User OCID.
You can create a cloud profile in the following ways:
-
Automatically, by using the Cloud Profile Manager. See Using the Cloud Profile Manager.
The Cloud Profile Manager is a VirtualBox Manager tool that enables you to create, edit, and manage cloud profiles for your cloud service accounts.
-
Automatically, by using the VBoxManage cloudprofile command. See VBoxManage cloudprofile.
-
Manually, by creating an oci_config file in your Oracle VirtualBox global configuration directory. For example, this is $HOME/.config/VirtualBox/oci_config on a Linux host.
-
Manually, by creating a config file in your Oracle Cloud Infrastructure configuration directory. For example, this is $HOME/.oci/config on a Linux host.
This is the same file that is used by the Oracle Cloud Infrastructure command line interface.
Oracle VirtualBox automatically uses the config file if no cloud profile file is present in your global configuration directory. Alternatively, you can import this file manually into the Cloud Profile Manager.
Using the Cloud Profile Manager
To open the Cloud Profile Manager click Cloud in VirtualBox Manager.
You can use the Cloud Profile Manager in the following ways:
-
To create a new cloud profile automatically.
-
To create a cloud profile by importing settings from your Oracle Cloud Infrastructure configuration file.
Creating a New Cloud Profile
-
Click Add and specify a Name for the profile.
-
Select the new profile, and then click Properties. Specify the following property values for the profile:
-
Compartment OCID
-
Fingerprint of the public key
-
Location of the private key on the client device
-
Region OCID
-
Tenancy OCID
-
User OCID
Some of these are settings for your Oracle Cloud Infrastructure account, which you can view from the Oracle Cloud Console.
-
-
(Optional) If you are using the cloud profile to connect to cloud virtual machines, select the Show VMs check box.
This creates a new subgroup of the OCI group in VirtualBox Manager. See About the OCI VM Group.
-
Click Apply to save your changes.
The cloud profile settings are saved to the oci_config file in your Oracle VirtualBox global settings directory.
You can also use VBoxManage cloudprofile to create a cloud profile. See Using VBoxManage Commands With Oracle Cloud Infrastructure.
Importing a Cloud Profile
Follow these steps to import an existing Oracle Cloud Infrastructure configuration file into the Cloud Profile Manager:
-
Ensure that a config file is present in your Oracle Cloud Infrastructure configuration directory. For example, this is $HOME/.oci/config on a Linux host.
-
Click the Import icon to open a dialog that prompts you to import cloud profiles from external files.
Note:
This action overwrites any cloud profiles that are in your Oracle VirtualBox global settings directory.
-
Click Import.
Your cloud profile settings are saved to the oci_config file in your Oracle VirtualBox global settings directory.
-
Click Properties to show the cloud profile settings.
Double-click the appropriate field to change the value.
-
Click Apply to save your changes.
Using Oracle VirtualBox With Oracle Cloud Infrastructure
This section describes how you can use Oracle VirtualBox with Oracle Cloud Infrastructure to do the following tasks:
-
Create, add, and manage Oracle Cloud Infrastructure cloud instances using VirtualBox Manager. See Using Cloud Virtual Machines.
-
Export an Oracle VirtualBox VM to Oracle Cloud Infrastructure. See Exporting an Appliance to Oracle Cloud Infrastructure.
-
Import a cloud instance into Oracle VirtualBox. See Importing an Instance from Oracle Cloud Infrastructure.
-
Connect from a local VM to an Oracle Cloud Infrastructure cloud subnet. See Using a Cloud Network.
-
Use the VBoxManage commands to integrate with Oracle Cloud Infrastructure and perform cloud operations. See Using VBoxManage Commands With Oracle Cloud Infrastructure.
Using Cloud Virtual Machines
A cloud virtual machine (cloud VM) is a type of VM that represents an instance on a cloud service. Cloud VMs are shown in the Machines list in VirtualBox Manager, in the same way as local VMs are.
By using cloud VMs you can create, manage, and control your Oracle Cloud Infrastructure instances from VirtualBox Manager.
Note:
Cloud VMs do not install, export, or import instances to the Oracle VirtualBox host. All operations are done remotely on the cloud service.
Cloud VMs can be used to do the following tasks in Oracle Cloud Infrastructure:
-
Create a new Oracle Cloud Infrastructure instance. See Creating a New Cloud VM.
-
Use an existing Oracle Cloud Infrastructure instance. See Adding a Cloud VM.
-
Copy an existing Oracle Cloud Infrastructure instance. See Cloning a Cloud VM.
-
Configure an Oracle Cloud Infrastructure instance. You can change settings for the instance, such as display name. See Changing Settings for a Cloud VM.
-
Control an Oracle Cloud Infrastructure instance. Stop, start, and terminate the instance. See Controlling a Cloud VM.
-
Create a console connection to an Oracle Cloud Infrastructure instance. See Creating an Instance Console Connection for a Cloud VM.
About the OCI VM Group
All cloud VMs are shown in the Machines list in VirtualBox Manager, in a special VM group called OCI.
Cloud VMs are further grouped according to the cloud profile used to connect to them. The cloud profile identifies the user and compartment for the cloud VM and includes details of the key pair used to connect to cloud instances. See Creating a Cloud Profile.
All cloud profiles registered with Oracle VirtualBox are listed automatically in the OCI group.
To enable or disable listing of cloud VMs in VirtualBox Manager for a specific cloud profile, follow these steps.
- Display the Cloud Profile Manager.
- Select or clear the List VMs check box for each cloud profile.
Creating a New Cloud VM
When you create a new cloud VM, a new Oracle Cloud Infrastructure instance is created and associated with the cloud VM.
Perform the following steps to create a new cloud VM:
-
Click a cloud profile in the OCI group.
The cloud VMs for the selected cloud profile are displayed.
-
Select Group, New Machine.
-
Configure the following settings for the new cloud VM:
-
Location: The cloud service provider that will host the new instance. Select Oracle Cloud Infrastructure.
-
Profile: The cloud profile used to connect to the new instance. Select from the available cloud profiles.
-
Source: The image that the new instance is based on. Choose from the available images and boot volumes.
-
-
Change the Cloud Virtual Machine Settings as required. You will likely need to change the display name, shape, and networking configuration.
To add an SSH key to the instance, click the SSH Authorised Keys field and paste the public key into the displayed dialog.
-
Click Finish to create a new Oracle Cloud Infrastructure instance using the selected image or boot volume. The new instance is started automatically.
The new cloud VM is shown in the OCI group in VirtualBox Manager.
Adding a Cloud VM
When you add a cloud VM, an existing Oracle Cloud Infrastructure instance is associated with the cloud VM. You can only add one cloud VM for each instance.
Perform the following steps to add a cloud VM:
-
Click a cloud profile in the OCI group.
The cloud VMs for the selected cloud profile are displayed.
-
Select Group, Add Machine.
-
Configure the following settings:
-
Source: The cloud service provider that hosts the instance used for the cloud VM. Select Oracle Cloud Infrastructure.
-
Profile: The cloud profile used to connect to the running instance. Select from the available cloud profiles.
-
Instances: The instance to use for the cloud VM. Choose from the available instances on your cloud service.
-
-
Click Finish to add a cloud VM based on the selected instance.
A cloud VM with the same name as the instance is added to the OCI group in VirtualBox Manager.
-
(Optional) To change the display name for the instance, click Settings and edit the Display Name field.
The cloud VM name in VirtualBox Manager is updated automatically.
Cloning a Cloud VM
When you clone a cloud VM, a copy of the Oracle Cloud Infrastructure instance for the cloud VM is created and associated with the new cloud VM.
Perform the following steps to clone a cloud VM:
-
Click a cloud profile in the OCI group.
The cloud VMs for the selected cloud profile are displayed.
-
Right-click the cloud VM you want to clone and select Clone.
The Clone Name dialog is displayed.
Enter a name for the clone.
The name you enter is also used as the display name for the related Oracle Cloud Infrastructure instance. The default name for the clone consists of the
_clonesuffix appended to the original name. For example,ol9-dev_clone. -
Click OK to create the clone and the related Oracle Cloud Infrastructure instance. The new instance is started automatically.
The new cloud VM is shown in the OCI group in Machines in VirtualBox Manager.
Changing Settings for a Cloud VM
Select the cloud VM in VirtualBox Manager and click Settings.
-
For a new cloud VM, you can change many settings for the Oracle Cloud Infrastructure instance, such as the display name, shape, and disk size.
-
When you add a cloud VM based on an existing Oracle Cloud Infrastructure instance you can only change the display name.
Controlling a Cloud VM
You can use VirtualBox Manager to control a cloud VM as follows:
-
Start. Use the Start button in the Machines toolbar.
-
Stop. Click the cloud VM name and select Machine, Stop. Menu options to shut down and power off the cloud VM are available.
-
Reset. Click the cloud VM name and select Machine, Reset. The cloud VM is stopped, then restarted automatically.
-
Terminate. Use the Terminate button in the VirtualBox Manager toolbar.
CAUTION:
This action deletes the instance from Oracle Cloud Infrastructure.
When you control a cloud VM in VirtualBox Manager the machine list is updated automatically with the current instance state, such as Stopped or Running.
When you control an instance using the Oracle Cloud Infrastructure console, VirtualBox Manager updates the status for the corresponding cloud VM automatically.
Monitoring Cloud VM Performance
You can monitor the performance of cloud VM instances in the following ways:
Use the virtual machine monitoring tools in VirtualBox Manager.
To show detailed performance data for a cloud VM:
Click the cloud VM name in the Machines list and click Resource Use.
Several time series charts are displayed, showing resource usage and performance data. To save the data to file, click Export.
To show a performance summary for all cloud VMs:
Click Resources to see a summary of performance metrics for all running cloud VMs and for the host system.
See also Monitoring of Virtual Machines.
-
Use the VBoxManage cloud instance command, as follows:
VBoxManage cloud instance metriclist shows the available metrics for an instance.
VBoxManage cloud instance metricdata shows metrics data for an instance.
See also VBoxManage cloud.
Note:
To monitor a cloud VM, the Compute Instance Monitoring plugin must be enabled and running on the Oracle Cloud Infrastructure instance. See the Oracle Cloud Infrastructure documentation for more details.
Removing a Cloud VM
You can use VirtualBox Manager to remove a cloud VM as follows:
Right-click the cloud VM name and select Remove.
-
Click Remove Only to remove the cloud VM from the Machines list in VirtualBox Manager.
-
Click Delete Everything to remove the cloud VM from VirtualBox Manager and also to delete the Oracle Cloud Infrastructure instance and any associated boot volumes.
Creating an Instance Console Connection for a Cloud VM
To create a instance console connection, the cloud VM must be in Running state.
- Right-click the cloud VM name and select Console, Create Connection.
-
The Public Key dialog is displayed. Paste the public key used for the instance connection into the dialog and click OK.
By default, either the first entry in your SSH keys folder or the public key used for your previous instance console connection is used.
-
Click Connect to connect to the instance. An instance console is displayed automatically on the host.
-
(Optional) Click Show Log to display log messages for the instance console connection.
See the Oracle Cloud Infrastructure documentation for details about how you can use an instance console connection to troubleshoot instance problems.
Exporting an Appliance to Oracle Cloud Infrastructure
Oracle VirtualBox supports the export of VMs to an Oracle Cloud Infrastructure service. The exported VM is stored on Oracle Cloud Infrastructure as a custom Linux image. You can configure whether a cloud instance is created and started after the export process has completed.
Note:
Before you export a VM to Oracle Cloud Infrastructure, you must prepare the VM as described in Preparing a VM for Export to Oracle Cloud Infrastructure.
Use the following steps to export a VM to Oracle Cloud Infrastructure:
-
Select File, Export Appliance.
-
Select a VM to export, and then click Next to display the Format Settings page.
-
From the Format drop-down list, select Oracle Cloud Infrastructure.
-
In the Profile drop-down list, select the cloud profile used for your Oracle Cloud Infrastructure account.
-
In the Machine Creation field, select an option to configure settings for the cloud instance created when you export to Oracle Cloud Infrastructure. The options enable you to do one of the following:
-
Configure settings for the cloud instance after you have finished exporting the VM.
-
Configure settings for the cloud instance before you start to export the VM.
-
Do not create a cloud instance when you export the VM.
Click Next to make an API request to the Oracle Cloud Infrastructure service and open the Appliance Settings page.
-
-
(Optional) Edit storage settings used for the exported virtual machine in Oracle Cloud Infrastructure. You can change the following settings:
-
The name of the bucket used to store the exported files.
-
Whether to store the custom image in Oracle Cloud Infrastructure.
-
The display name for the custom image in Oracle Cloud Infrastructure.
-
The launch mode for the cloud instance.
Paravirtualized mode gives improved performance and is suitable for most Oracle VirtualBox VMs.
Emulated mode is suitable for legacy OS images.
Click Finish to continue.
-
-
(Optional) Depending on the selection in the Machine Creation field, the Appliance Settings page may be displayed before or after export. This screen enables you to configure settings for the cloud instance, such as Shape and Disk Size.
Click Finish. The VM is exported to Oracle Cloud Infrastructure.
Depending on the Machine Creation setting, a cloud instance may be started after upload to Oracle Cloud Infrastructure is completed.
-
Monitor the export process by using the Oracle Cloud Console.
You can also use the VBoxManage export command to export a VM to Oracle Cloud Infrastructure. See VBoxManage export.
Preparing a VM for Export to Oracle Cloud Infrastructure
Oracle Cloud Infrastructure provides the option to import a custom Linux image. Before an Oracle VirtualBox image can be exported to Oracle Cloud Infrastructure, the custom image needs to be prepared to ensure that instances launched from the custom image can boot correctly and that network connections will work. This section provides advice on how to prepare a Linux image for export from Oracle VirtualBox.
The following list shows some tasks to consider when preparing an Oracle Linux VM for export:
-
Use DHCP for network addresses. Configure the VM to use a DHCP server to allocate network addresses, rather than using a static IP address. The Oracle Cloud Infrastructure instance will then be allocated an IP address automatically.
-
Do not specify a MAC address. The network interface configuration for the VM must not specify the MAC address.
Remove the HWADDR setting from the /etc/sysconfig/ifcfg-devicename network script.
-
Disable persistent network device naming rules. This means that the Oracle Cloud Infrastructure instance will use the same network device names as the VM.
-
Change the GRUB kernel parameters.
Add
net.ifnames=0andbiosdevname=0as kernel parameter values to theGRUB_CMDLINE_LINUXvariable. -
Update the GRUB configuration.
# grub2-mkconfig -o /boot/grub2/grub.cfg
-
Disable any
udevrules for network device naming.For example, if an automated
udevrule exists fornet-persistence:# cd /etc/udev/rules.d # rm -f 70-persistent-net.rules # ln -s /dev/null /etc/udev/rules.d/70-persistent-net.rules
-
-
Enable the serial console. This enables you to troubleshoot the instance when it is running on Oracle Cloud Infrastructure.
-
Edit the /etc/default/grub file, as follows:
-
Remove the
resumesetting from the kernel parameters. This setting slows down boot time significantly. -
Replace
GRUB_TERMINAL="gfxterm"withGRUB_TERMINAL="console serial". This configures use of the serial console instead of a graphical terminal. -
Add
GRUB_SERIAL_COMMAND="serial --unit=0 --speed=115200". This configures the serial connection. -
Add
console=tty0 console=ttyS0,115200to theGRUB_CMDLINE_LINUXvariable. This adds the serial console to the Linux kernel boot parameters.
-
-
Regenerate the GRUB configuration.
# grub2-mkconfig -o /boot/grub2/grub.cfg
-
To verify the changes, reboot the machine and run the dmesg command to look for the updated kernel parameters.
# dmesg |grep console=ttyS0
-
-
Enable paravirtualized device support. You do this by adding the
virtiodrivers to theinitrdfor the VM.-
This procedure works only on machines with a Linux kernel of version 3.4 or later. Check that the VM is running a supported kernel:
# uname -a
-
Use the
dracuttool to rebuildinitrd. Add theqemumodule, as follows:# dracut –-logfile /var/log/Dracut.log --force --add qemu
-
Verify that the
virtiodrivers are now present ininitrd.# lsinitrd |grep virtio
-
For more information about importing a custom Linux image into Oracle Cloud Infrastructure, see also:
Importing an Instance from Oracle Cloud Infrastructure
Perform the following steps to import a cloud instance from Oracle Cloud Infrastructure into Oracle VirtualBox:
-
Select File, Import Appliance.
In the Source drop-down list, select Oracle Cloud Infrastructure.
In the Profile drop-down list, select the cloud profile for your Oracle Cloud Infrastructure account.
Choose the required cloud instance from the list in the Machines field.
Click Next to make an API request to the Oracle Cloud Infrastructure service and display the Appliance Settings page.
-
(Optional) Edit settings for the new local virtual machine.
For example, you can edit the Name and Description that will be used for the VM.
Click Finish to import the instance from Oracle Cloud Infrastructure.
-
Monitor the import process by using the Oracle Cloud Console.
You can also use the VBoxManage import command to import an instance from Oracle Cloud Infrastructure. See VBoxManage import.
Importing an Instance: Overview of Events
The following describes the sequence of events when you import an instance from Oracle Cloud Infrastructure.
-
A custom image is created from the boot volume of the instance.
-
The custom image is exported to an Oracle Cloud Infrastructure object and is stored using Object Storage in the bucket specified by the user.
-
The Oracle Cloud Infrastructure object is downloaded to the local host. The object is a TAR archive which contains a boot volume of the instance in QCOW2 format and a JSON file containing metadata related to the instance.
-
The boot volume of the instance is extracted from the archive and a new VMDK image is created by converting the boot volume into the VMDK format. The VMDK image is registered with Oracle VirtualBox.
-
A new VM is created using the VMDK image for the cloud instance.
By default, the new VM is not started after import from Oracle Cloud Infrastructure.
-
The downloaded TAR archive is deleted after a successful import.
Using a Cloud Network
A cloud network is a type of network that can be used for connections from a local VM to a remote Oracle Cloud Infrastructure cloud instance.
To create and use a cloud network, do the following:
-
Set up a virtual cloud network on Oracle Cloud Infrastructure.
The following steps create and configure a virtual cloud network (VCN) on Oracle Cloud Infrastructure. The VCN is used to tunnel network traffic across the cloud.
-
Ensure that you have a cloud profile for connecting to Oracle Cloud Infrastructure. See Creating a Cloud Profile.
-
Run the following VBoxManage cloud command:
VBoxManage cloud --provider="OCI" --profile="vbox-oci" network setup
where
vbox-ociis the name of your cloud profile.Other options are available for the VBoxManage cloud network setup command, to enable you to configure details for the VCN. For example, you can configure the operating system used for the cloud gateway instance and the IP address range used by the tunneling network. See VBoxManage cloud.
-
-
Register the new cloud network with Oracle VirtualBox.
Use the Network tool. See Configure Networking.
-
Add cloud network adaptors to the local VMs that will use the cloud network. See Cloud Networks.
Using VBoxManage Commands With Oracle Cloud Infrastructure
This section includes some examples of how VBoxManage commands can be used to integrate with Oracle Cloud Infrastructure and perform common cloud operations.
Creating a Cloud Profile
To create a cloud profile called vbox-oci for Oracle Cloud Infrastructure as the cloud provider:
VBoxManage cloudprofile --provider "OCI" --profile="vbox-oci" add \
--clouduser="ocid1.user.oc1..."  --keyfile="/home/username/.oci/oci_api_key.pem" \
--tenancy="ocid1.tenancy.oc1..."  --compartment="ocid1.compartment.oc1..."  --region="us-ashburn-1"
The new cloud profile is added to the oci_config file in your Oracle VirtualBox global configuration directory. For example, this is $HOME/.VirtualBox/oci_config on a Windows host.
Listing Cloud Instances
To list the instances in your Oracle Cloud Infrastructure compartment:
VBoxManage cloud --provider="OCI" --profile="vbox-oci" list instances
Exporting an Oracle VirtualBox VM to the Cloud
To export a VM called myVM and create a cloud instance called myVM_Cloud:
VBoxManage export myVM --output OCI:// --cloud 0 --vmname myVM_Cloud \
--cloudprofile "vbox-oci" --cloudbucket myBucket \
--cloudshape VM.Standard2.1 --clouddomain US-ASHBURN-AD-1 --clouddisksize 50  \
--cloudocivcn ocid1.vcn.oc1... --cloudocisubnet ocid1.subnet.oc1... \
--cloudkeepobject true --cloudlaunchinstance true --cloudpublicip true
Importing a Cloud Instance Into Oracle VirtualBox
To import a cloud instance and create an Oracle VirtualBox VM called
oci_Import:
VBoxManage import OCI:// --cloud --vmname oci_Import --memory 4000
--cpus 3 --ostype FreeBSD_64 --cloudprofile "vbox-oci"
--cloudinstanceid ocid1.instance.oc1... --cloudbucket myBucket
Creating a New Cloud Instance From a Custom Image
To create a new cloud instance from a custom image on Oracle Cloud Infrastructure:
VBoxManage cloud --provider="OCI" --profile="vbox-oci" instance create \
--domain-name="oraclecloud.com" --image-id="ocid1.image.oc1..." --display-name="myInstance" \
--shape="VM.Standard2.1" --subnet="ocid1.subnet.oc1..."
Terminating a Cloud Instance
To terminate an instance in your compartment on Oracle Cloud Infrastructure:
VBoxManage cloud --provider="OCI" --profile="vbox-oci" instance terminate \
--id="ocid1.instance.oc1..."
Showing Cloud Instance Performance Metrics
To show CPU usage metrics for a cloud instance:
VBoxManage cloud --provider="OCI" --profile="vbox-oci" instance metricdata \
--id="ocid1.instance.oc1..." --metric-name="CpuUtilization"
For more details about the available commands for cloud operations, see VBoxManage cloud.
Guest Additions
The Guest Additions are designed to be installed inside a virtual machine after the guest operating system has been installed. They consist of device drivers and system applications that optimize the guest operating system for better performance and usability. See Guest Operating Systems for details on the guest operating systems that Oracle provides premier support for.
The available Oracle VirtualBox Guest Additions are provided as a single CD-ROM image file called VBoxGuestAdditions.iso. This image file is located in the installation directory of Oracle VirtualBox. To install the Guest Additions for a particular OS, you mount this ISO file in your VM as a virtual CD-ROM and install from there.
You can also configure unattended installation of the Oracle VirtualBox Guest Additions when you create a new VM. See Configure Unattended Installation of Guest OS.
Introduction to Guest Additions
The Guest Additions offer the following features:
-
Mouse pointer integration. To overcome the limitations for mouse support described in Capturing and Releasing Keyboard and Mouse, this feature provides you with seamless mouse support. You will only have one mouse pointer and pressing the Host key is no longer required to free the mouse from being captured by the guest OS. To make this work, a special mouse driver is installed in the guest that communicates with the physical mouse driver on your host and moves the guest mouse pointer accordingly.
-
Shared folders. These provide an easy way to exchange files between the host and the guest. Much like ordinary Windows network shares, you can tell Oracle VirtualBox to treat a certain host directory as a shared folder, and Oracle VirtualBox will make it available to the guest operating system as a network share, irrespective of whether the guest actually has a network. See Shared Folders.
-
Better video support. While the virtual graphics card which Oracle VirtualBox emulates for any guest operating system provides all the basic features, the custom video drivers that are installed with the Guest Additions provide you with extra high and nonstandard video modes, as well as accelerated video performance.
In addition, with Windows, Linux, and Oracle Solaris guests, you can resize the virtual machine's window if the Guest Additions are installed. The video resolution in the guest will be automatically adjusted, as if you had manually entered an arbitrary resolution in the guest's Display settings. See Resizing the VM's Window.
If the Guest Additions are installed, 3D graphics for guest applications can be accelerated. See Hardware-Accelerated Graphics.
-
Seamless windows. With this feature, the individual windows that are displayed on the desktop of the virtual machine can be mapped on the host's desktop, as if the underlying application was actually running on the host. See Seamless Windows.
-
Generic host/guest communication channels. The Guest Additions enable you to control and monitor guest execution. The guest properties provide a generic string-based mechanism to exchange data bits between a guest and a host, some of which have special meanings for controlling and monitoring the guest. See Guest Properties.
Additionally, applications can be started in a guest from the host. See Guest Control of Applications.
-
Time synchronization. With the Guest Additions installed, Oracle VirtualBox can ensure that the guest's system time is better synchronized with that of the host.
For various reasons, the time in the guest might run at a slightly different rate than the time on the host. The host could be receiving updates through NTP and its own time might not run linearly. A VM could also be paused, which stops the flow of time in the guest for a shorter or longer period of time. When the wall clock time between the guest and host only differs slightly, the time synchronization service attempts to gradually and smoothly adjust the guest time in small increments to either catch up or lose time. When the difference is too great, for example if a VM paused for hours or restored from saved state, the guest time is changed immediately, without a gradual adjustment.
The Guest Additions will resynchronize the time regularly. See Tuning the Guest Additions Time Synchronization Parameters for how to configure the parameters of the time synchronization mechanism.
-
Shared clipboard. With the Guest Additions installed, the clipboard of the guest operating system can optionally be shared with your host operating system. See General Settings.
-
Drag and Drop. Guest Additions enable you to select an object, such as a file, from the host or guest and directly copy or open it on the guest or host. See General Settings.
-
Automated logins. Also called credentials passing. See Automated Guest Logins.
Each version of Oracle VirtualBox, even minor releases, include their own version of the Guest Additions. While the interfaces through which the Oracle VirtualBox core communicates with the Guest Additions are kept stable so that Guest Additions already installed in a VM should continue to work when Oracle VirtualBox is upgraded on the host, for best results you should keep the Guest Additions at the same version.
The Windows and Linux Guest Additions therefore check automatically whether they have to be updated. If the host is running a newer Oracle VirtualBox version than the Guest Additions, a notification with further instructions is displayed in the guest.
To disable this update check for the Guest Additions of a given virtual machine, set the value of its /VirtualBox/GuestAdd/CheckHostVersion guest property to 0. See Guest Properties.
Installing Guest Additions
These instructions apply to all OSs. For additional information, see Guest Additions for Windows, Guest Additions for Linux, Guest Additions for Oracle Solaris, or Guest Additions for OS/2.
Mount the Guest Additions ISO
-
Start the virtual machine. The OS must be installed.
-
From the Devices menu, choose Insert Guest Additions CD Image, which mounts the Guest Additions ISO file inside your VM.
-
If this option is not available, or if you prefer to mount the ISO manually:
-
From the Devices menu, choose Optical Drives, and then Choose/Create a Disk Image. This displays The Virtual Media Manager.
-
In the Virtual Media Manager, click Add and browse your host file system for the VBoxGuestAdditions.iso file.
- On a Windows host, this file is in the Oracle VirtualBox installation directory, usually in C:\Program files\Oracle\VirtualBox.
-
On a Linux host, this file is in the additions folder where you installed Oracle VirtualBox, usually /opt/VirtualBox/.
-
On Oracle Solaris hosts, this file is in the additions folder where you installed Oracle VirtualBox, usually /opt/VirtualBox.
-
In the Virtual Media Manager, select the ISO file and click Add. This mounts the ISO file and presents it to your guest OS as a CD-ROM.
-
Run the Guest Additions Installer
-
Mount the ISO as described in the previous task.
-
Unless you have the Autostart feature disabled, or it is not supported, the OS will now autostart the Oracle VirtualBox Guest Additions installer from the Guest Additions ISO.
If the Autostart feature has been turned off, choose VBox<OS>Additions.exe from the CD/DVD drive inside the guest to start the installer, where <OS> is Windows, Linux, OS2 or Solaris.
-
Follow the instructions in the installer.
-
Reboot the guest OS.
Guest Additions for Windows
The Oracle VirtualBox Windows Guest Additions are designed to be installed in a virtual machine running a Windows operating system. The Windows Guest Additions will run on VMs running these versions of Windows. See also Host and Guest Combinations.
Arm64 VMs
-
Microsoft Windows 11
x86 and x86_64 VMs
-
Microsoft Windows 11
-
Microsoft Windows Server 2022
-
Microsoft Windows 10 (all builds)
-
Microsoft Windows Server 2019
-
Microsoft Windows Server 2016
-
Microsoft Windows 8.1 (all editions)
-
Microsoft Windows Server 2012R2
-
Microsoft Windows 8 (all editions)
-
Microsoft Windows Server 2012
-
Microsoft Windows 7 (all editions)
-
Microsoft Windows Server 2008R2
-
Microsoft Windows Vista (all editions)
-
Microsoft Windows Server 2008
-
Microsoft Windows XP (any service pack)
-
Microsoft Windows Server 2003 (any service pack)
-
Microsoft Windows 2000 (any service pack)
-
Microsoft Windows NT 4.0 (any service pack)
Installing the Windows Guest Additions
Follow the steps in Installing Guest Additions.
Note:
For the basic Direct3D acceleration to work in a Windows guest, you have to install the WDDM video driver available for Windows Vista or later.
For Windows 8 and later, only the WDDM Direct3D video driver is available.
For completely unattended guest installations, you can specify a command line parameter to the install launcher:
VBoxWindowsAdditions.exe /S
This automatically installs the right files and drivers for the corresponding platform, either 32-bit or 64-bit.
Note:
For Windows Aero to run correctly on a guest, the guest's VRAM size needs to be configured to at least 128 MB.
For more options regarding unattended guest installations, consult the command line help by using the command:
VBoxWindowsAdditions.exe /?
Updating the Windows Guest Additions
Windows Guest Additions can be updated by running the installation program again, or by selecting Devices, and then Upgrade Guest Additions... This replaces the previous Additions drivers with updated versions.
Alternatively, you can also open the Windows Device Manager and select Update Driver... for the following devices:
-
Oracle VirtualBox Graphics Adapter
-
Oracle VirtualBox System Device
For each, choose the option to provide your own driver, click Have Disk and navigate to the CD-ROM drive with the Guest Additions.
Installing Code Signing Certificates
To avoid popups when performing an unattended installation of the Oracle VirtualBox Guest Additions, the code signing certificates used to sign the drivers needs to be installed in the correct certificate stores on the guest operating system. If you do not do this, the installation will prompt you before the installation of each driver.
The certificates are stored for you if installing Guest Additions as part of the Windows unattended installation when creating a new VM. If you are automating the installation of Guest Additions yourself, you first need to install the code signing certificates on the VM.
Use the VBoxCertUtil.exe utility from the cert folder on the Guest Additions installation CD.
Note:
On some legacy Windows versions, such as Windows 2000 and Windows XP, the user intervention popups mentioned above are always displayed, even after importing the Oracle certificates.
-
Log in as Administrator on the guest.
-
Mount the Oracle VirtualBox Guest Additions ISO.
-
Open a command line window on the guest and change to the cert folder on the Oracle VirtualBox Guest Additions CD.
-
Run the following command:
VBoxCertUtil.exe add-trusted-publisher vbox*.cer --root vbox*.cer
This command installs the certificates to the certificate store. When installing the same certificate more than once, an appropriate error will be displayed.
Automated Windows System Preparation
Microsoft offers a system preparation tool called Sysprep, to prepare a Windows system for deployment or redistribution. For most Windows versions, Sysprep is included in a default installation. Sysprep mainly consists of an executable called sysprep.exe which is invoked by the user to put the Windows installation into preparation mode.
The Guest Additions offer a way to launch a system preparation on the guest operating system in an automated way,
controlled from the host system. See Guest Control of Applications
for details of how to use this feature with the special identifier sysprep as the program to
execute, along with the user name sysprep and password sysprep for the
credentials. Sysprep is then started with the required system rights.
Note:
Specifying the location of sysprep.exe is not possible. Instead the following paths are used, based on the Windows release:
-
C:\sysprep\sysprep.exe for Windows XP and earlier
-
%WINDIR%\System32\sysprep\sysprep.exe for Windows Vista and later
The Guest Additions will automatically use the appropriate path to execute the system preparation tool.
Guest Additions for Linux
The Oracle VirtualBox Guest Additions for Linux are a set of device drivers and system applications that may be installed in the guest operating system. The Linux Guest Additions will run on VMs running these versions of Linux. See also Host and Guest Combinations.
Arm64 VMs
-
Oracle Linux 8 and later, including UEK kernels
x86 and x86_64 VMs
-
Oracle Linux 5 and later, including UEK kernels
-
Fedora Core 4 and later
-
Red Hat Enterprise Linux version 3 and later
-
SUSE and openSUSE Linux version 9 and later
-
Ubuntu version 5.10 and later
The guest additions may also work on other distributions.
Installing the Linux Guest Additions
To install the guest additions:
-
Prepare your guest system for building external kernel modules. Follow the steps in The Oracle VirtualBox Kernel Modules, on your Linux VM instead of on a Linux host system.
-
Insert the VBoxGuestAdditions.iso CD file into your Linux guest's virtual CD-ROM drive. See Installing Guest Additions.
-
Change to the directory where your CD-ROM drive is mounted and run the following command as root:
sh ./VBoxLinuxAdditions.run
-
If you suspect that something has gone wrong, check that your VM is set up correctly and run the following command as root:
rcvboxadd setup
To check if drivers were loaded, and the versions of the loaded drivers match the installation version of the Guest Additions, run the following command as root:
rcvboxadd status-kernel
To check if the VBoxService is running, run the following command as root:
rcvboxadd status-user
Manual Setup of Selected Guest Services on Linux
The Oracle VirtualBox Guest Additions contain several different drivers. If you do not want to configure them all, use the following command to install the Guest Additions:
$ sh ./VBoxLinuxAdditions.run no_setup
After running this script, run the rcvboxadd setup command as root to compile the kernel modules.
On some 64-bit guests, you must replace lib with lib64. On older guests that do not run the udev service, you must add the vboxadd service to the default runlevel to ensure that the modules are loaded.
To set up the time synchronization service, add the vboxadd-service service to the default runlevel. To set up the X11 and OpenGL part of the Guest Additions, run the rcvboxadd-x11 setup command. Note that you do not need to enable additional services.
Use the rcvboxadd setup to recompile the guest kernel modules.
If the VM is using VBoxVGA or VBoxSVGA graphics and the vboxvideo driver, reboot the VM to ensure that the new modules are loaded.
If not rebooting, log out and back in to restart the VBoxClient session service with the guest additions.
Linux Guest Screen Resizing
Linux guest screen resizing functionality for guests running VMSVGA graphics configuration uses a standalone daemon called VBoxDRMClient and its Desktop Environment helper counterpart.
VBoxDRMClient runs as a root process and is a bridge between the host and the guest's vmwgfx driver. This means that VBoxDRMClient listens to screen resize hints from the host and forwards them to the vmwgfx driver. This enables guest screen resize functionality to be available before the user has logged in using a GUI.
In order to perform Desktop Environment specific actions, such as setting the primary screen in a multimonitor setup, a Desktop Environment helper is used. Once the user has performed a graphical login operation, the helper daemon starts with user session scope and attempts to connect to VBoxDRMClient using an IPC connection. When VBoxDRMClient has received a corresponding command from the host, it is forwarded to the helper daemon over IPC and the action is then performed.
By default, VBoxDRMClient allows any process to connect to its IPC socket. This can be restricted by using the following steps:
-
The Guest Additions Linux installer creates a
vboxdrmipcuser group. A corresponding user needs to be added to this group. -
You must set the
DRMIpcRestrictedguest property, as follows:VBoxManage guestproperty set "VM name" /VirtualBox/GuestAdd/DRMIpcRestricted 1 \ --flags RDONLYGUEST
It is important to set only the
RDONLYGUESTflag for the property, so that it cannot be changed from inside the guest.
Note:
Both steps are required. If one of them is missing, all processes will have access to the IPC socket.
Restricted mode can be disabled by unsetting the guest property, as follows:
VBoxManage guestproperty unset "VM name" /VirtualBox/GuestAdd/DRMIpcRestricted
Updating the Linux Guest Additions
The Guest Additions can simply be updated by going through the installation procedure again with an updated CD-ROM image. This will replace the drivers with updated versions. There is no need to reboot unless the VM is using VBoxVGA or VBoxSVGA graphics.
Some Linux distributions already come with all or part of the Oracle VirtualBox Guest Additions. You may choose to keep the distribution's version of the Guest Additions but these are often out of date and limited in functionality, so we recommend replacing them with the Guest Additions that come with Oracle VirtualBox.
The Oracle VirtualBox Linux Guest Additions installer tries to detect an existing installation and replace them but depending on how the distribution integrates the Guest Additions, this may require some manual interaction. Take a snapshot of the virtual machine before replacing preinstalled Guest Additions.
Uninstalling the Linux Guest Additions
If you have a version of the Guest Additions installed on your virtual machine and want to remove it without installing new ones, you can do so by inserting the Guest Additions CD image into the virtual CD-ROM drive as described in Installing Guest Additions. Then run the installer for the current Guest Additions with the uninstall parameter from the path that the CD image is mounted on in the guest, as follows:
sh ./VBoxLinuxAdditions.run uninstall
While this will normally work without issues, you may need to do some manual cleanup of the guest in some cases, especially of the XFree86Config or xorg.conf file. In particular, if the Additions version installed or the guest operating system were very old, or if you made your own changes to the Guest Additions setup after you installed them.
You can uninstall the Additions as follows:
/opt/VBoxGuestAdditions-version/uninstall.sh
Where /opt/VBoxGuestAdditions-version is the Guest Additions installation directory.
Guest Additions for Oracle Solaris
The Oracle VirtualBox Guest Additions for Oracle Solaris take the form of a set of device drivers and system applications which may be installed in the guest operating system.
The Solaris Guest Additions will run on VMs running these versions of Solaris. See also Host and Guest Combinations.
-
Oracle Solaris 11, including Oracle Solaris 11 Express
-
Oracle Solaris 10 4/08 and later
The Guest Additions may work with other distributions that are based on comparable software releases.
Installing the Oracle Solaris Guest Additions
Follow the steps in Installing Guest Additions.
If the CD-ROM drive on the guest does not get mounted, as seen with some versions of Oracle Solaris 10, run the following command as root:
svcadm restart volfs
Change to the directory where your CD-ROM drive is mounted and run the following command as root:
pkgadd -G -d ./VBoxSolarisAdditions.pkg
Choose 1 and confirm installation of the Guest Additions package. After the installation is complete, log out and log in to X server on your guest, to activate the X11 Guest Additions.
Uninstalling the Oracle Solaris Guest Additions
The Oracle Solaris Guest Additions can be safely removed by removing the package from the guest. Open a root terminal session and run the following command:
pkgrm SUNWvboxguest
Updating the Oracle Solaris Guest Additions
The Guest Additions should be updated by first uninstalling the existing Guest Additions and then installing the new ones. Attempting to install new Guest Additions without removing the existing ones is not possible.
Guest Additions for OS/2
Oracle VirtualBox also includes a set of drivers that improve running OS/2 in a virtual machine. Due to restrictions of OS/2 itself, this variant of the Guest Additions has a limited feature set. Specifically, seamless windows and automatic guest resizing are not implemented in Guest Additions for OS/2 because of inherent limitations of the OS/2 graphics system.
The OS/2 Guest Additions are provided on the same ISO CD-ROM as those for the other platforms. Mount the ISO in OS/2 as described in Installing Guest Additions. The OS/2 Guest Additions are located in the directory \OS2.
We do not provide an automatic installer. See the readme.txt file in the CD-ROM directory, which describes how to install the OS/2 Guest Additions manually.
Clipboard
Oracle VirtualBox enables you to copy text, image and html content from the GUI on the host to the GUI on a VM, and vice versa. You can also copy content between VMs, with other VMs treated as other host applications when configuring the options. For this to work the latest version of the Guest Additions must be installed on the VM.
For security reasons, clipboard access can be configured at runtime on a per-VM basis either using the Shared Clipboard menu item in the Devices menu of the VM or the VBoxManage command.
The following shared clipboard settings are available:
-
Disabled. Disables the copy feature entirely. This is the default when creating a new VM.
-
Host To Guest. Enables copying from the host to the guest only.
-
Guest To Host. Enables copying from the guest to the host only.
-
Bidirectional. Enables copying in both directions: from the host to the guest, and from the guest to the host.
- Enable Clipboard File Transfers. Allows files (in addition to text, images and html) to be copied to or from the VM.
-
On Linux hosts and guests, Shared Clipboard file transfers are limited to files only, one file per transfer. Transferring symbolic links is not supported.
-
Shared Clipboard file transfers are only tested and supported with the official default file managers of the guest and host operating systems.
-
To use the VBoxManage command to control the current clipboard mode, see VBoxManage. The modifyvm and controlvm commands enable setting of a VM's current clipboard mode from the command line.
Drag and Drop
Oracle VirtualBox enables you to drag and drop content from the host to the guest, and vice versa. For this to work the latest version of the Guest Additions must be installed on the guest.
Drag and drop transparently allows copying or opening files, directories, and even certain clipboard formats from one end to the other. For example, from the host to the guest or from the guest to the host. You then can perform drag and drop operations between the host and a VM, as it would be a native drag and drop operation on the host OS.
At the moment drag and drop is implemented for Windows-based and X Window-based systems, both on the host and guest side. As X Window supports many different drag and drop protocols only the most common one, XDND, is supported for now. Applications using other protocols, such as Motif or OffiX, will not be recognized by Oracle VirtualBox.
In the context of using drag and drop, the origin of the data is called the source. That is, where the actual data comes from and is specified. The destination specifies where the data from the source should go to. Transferring data from the source to the destination can be done in various ways, such as copying, moving, or linking.
Note:
At the moment only copying of data is supported. Moving or linking is not yet implemented.
When transferring data from the host to the guest OS, the host in this case is the source, whereas the guest OS is the destination. However, when transferring data from the guest OS to the host, the guest OS this time became the source and the host is the destination.
For security reasons drag and drop can be configured at runtime on a per-VM basis either using the Drag and Drop menu item in the Devices menu of the virtual machine, or the VBoxManage command.
On Windows hosts, dragging content between UAC-elevated (User Account Control) programs and non UAC-elevated programs isn't allowed. For example, if you start Oracle VirtualBox with Administrator privileges then dragging to or from Windows Explorer, which runs with regular user privileges by default, is not possible.
The following drag and drop modes are available:
-
Disabled. Disables the drag and drop feature entirely. This is the default when creating a new VM.
-
Host To Guest. Enables drag and drop operations from the host to the guest only.
-
Guest To Host. Enables drag and drop operations from the guest to the host only.
-
Bidirectional. Enables drag and drop operations in both directions: from the host to the guest, and from the guest to the host.
Note:
Drag and drop support depends on the frontend being used. At the moment, only the VirtualBox Manager frontend provides this functionality.
To use the VBoxManage command to control the current drag and drop mode, see VBoxManage. The modifyvm and controlvm commands enable setting of a VM's current drag and drop mode from the command line.
Supported Formats
As Oracle VirtualBox can run on a variety of host operating systems and also supports a wide range of guests, certain data formats must be translated after transfer. This is so that the destination operating system, which receives the data, is able to handle them in an appropriate manner.
Note:
When dragging files no data conversion is done in any way. For example, when transferring a file from a Linux guest to a Windows host the Linux-specific line endings are not converted to Windows line endings.
The following formats are handled by the Oracle VirtualBox drag and drop service:
-
Plain text: From applications such as text editors, internet browsers and terminal windows.
-
Files: From file managers such as Windows Explorer, Nautilus, and Finder.
-
Directories: For directories, the same formats apply as for files.
Hardware-Accelerated Graphics
The Oracle VirtualBox Guest Additions contain hardware 3D support for Windows, Linux, and Oracle Solaris guests. Video decoding acceleration is also used if the host can use it.
With this feature, if an application inside your virtual machine uses 3D features through the OpenGL or Direct3D programming interfaces, instead of emulating them in software, which would be slow, Oracle VirtualBox will attempt to use your host's 3D hardware. This works for all supported host platforms, provided that your host operating system can make use of your accelerated 3D hardware in the first place. The Guest Additions must be installed on your VM.
The 3D acceleration feature is only available for certain Windows, Linux, and Oracle Solaris guests:
-
3D acceleration with Windows guests requires Windows Vista or later. Vista and Windows 7 guests have Direct3D 9, Windows 8 and newer guests have Direct3D 11.0 or 11.1 depending on the host capabilities. Windows guests also have OpenGL 4.1 support.
-
Linux guests have OpenGL 4.1 support with Mesa3D drivers. OpenGL on Linux requires kernel 2.6.27 or later, as well as X.org server version 1.5 or later. Ubuntu 10.10 and Fedora 14 have been tested and confirmed as working.
-
OpenGL on Oracle Solaris guests requires X.org server version 1.5 or later.
The video decoding feature is available if the host is x86_64 running Windows or Linux, and the VM is x86_64 running Windows 10 or Windows 11. The VM can use video decoding of all media formats that are supported by the host, and CPU load is reduced during playback of these media formats.
On Linux hosts, you must have one of the following graphics drivers, with Vulkan 1.3 or later, to use video decoding:
- NVIDIA Linux Graphics Driver
- Mesa 3D Driver, for AMD and Intel graphics hardware
Video decoding capabilities are disabled by default in Mesa 3D drivers (AMD and Intel), so you must set the following environment variables on the host:
Intel: export ANV_VIDEO_DECODE=1
AMD: export RADV_PERFTEST=video_decode
Seamless Windows
With seamless windows enabled, Oracle VirtualBox enlarges the size of the VM's display to the size of the host desktop, and masks out the guest OS's background, so the windows of the guest appear seamlessly next to the windows of the host.
In Figure 2 you can see two calculator applications side by side, one running on the host and the other running on the VM.
Figure 2. Seamless Windows on a Host Desktop
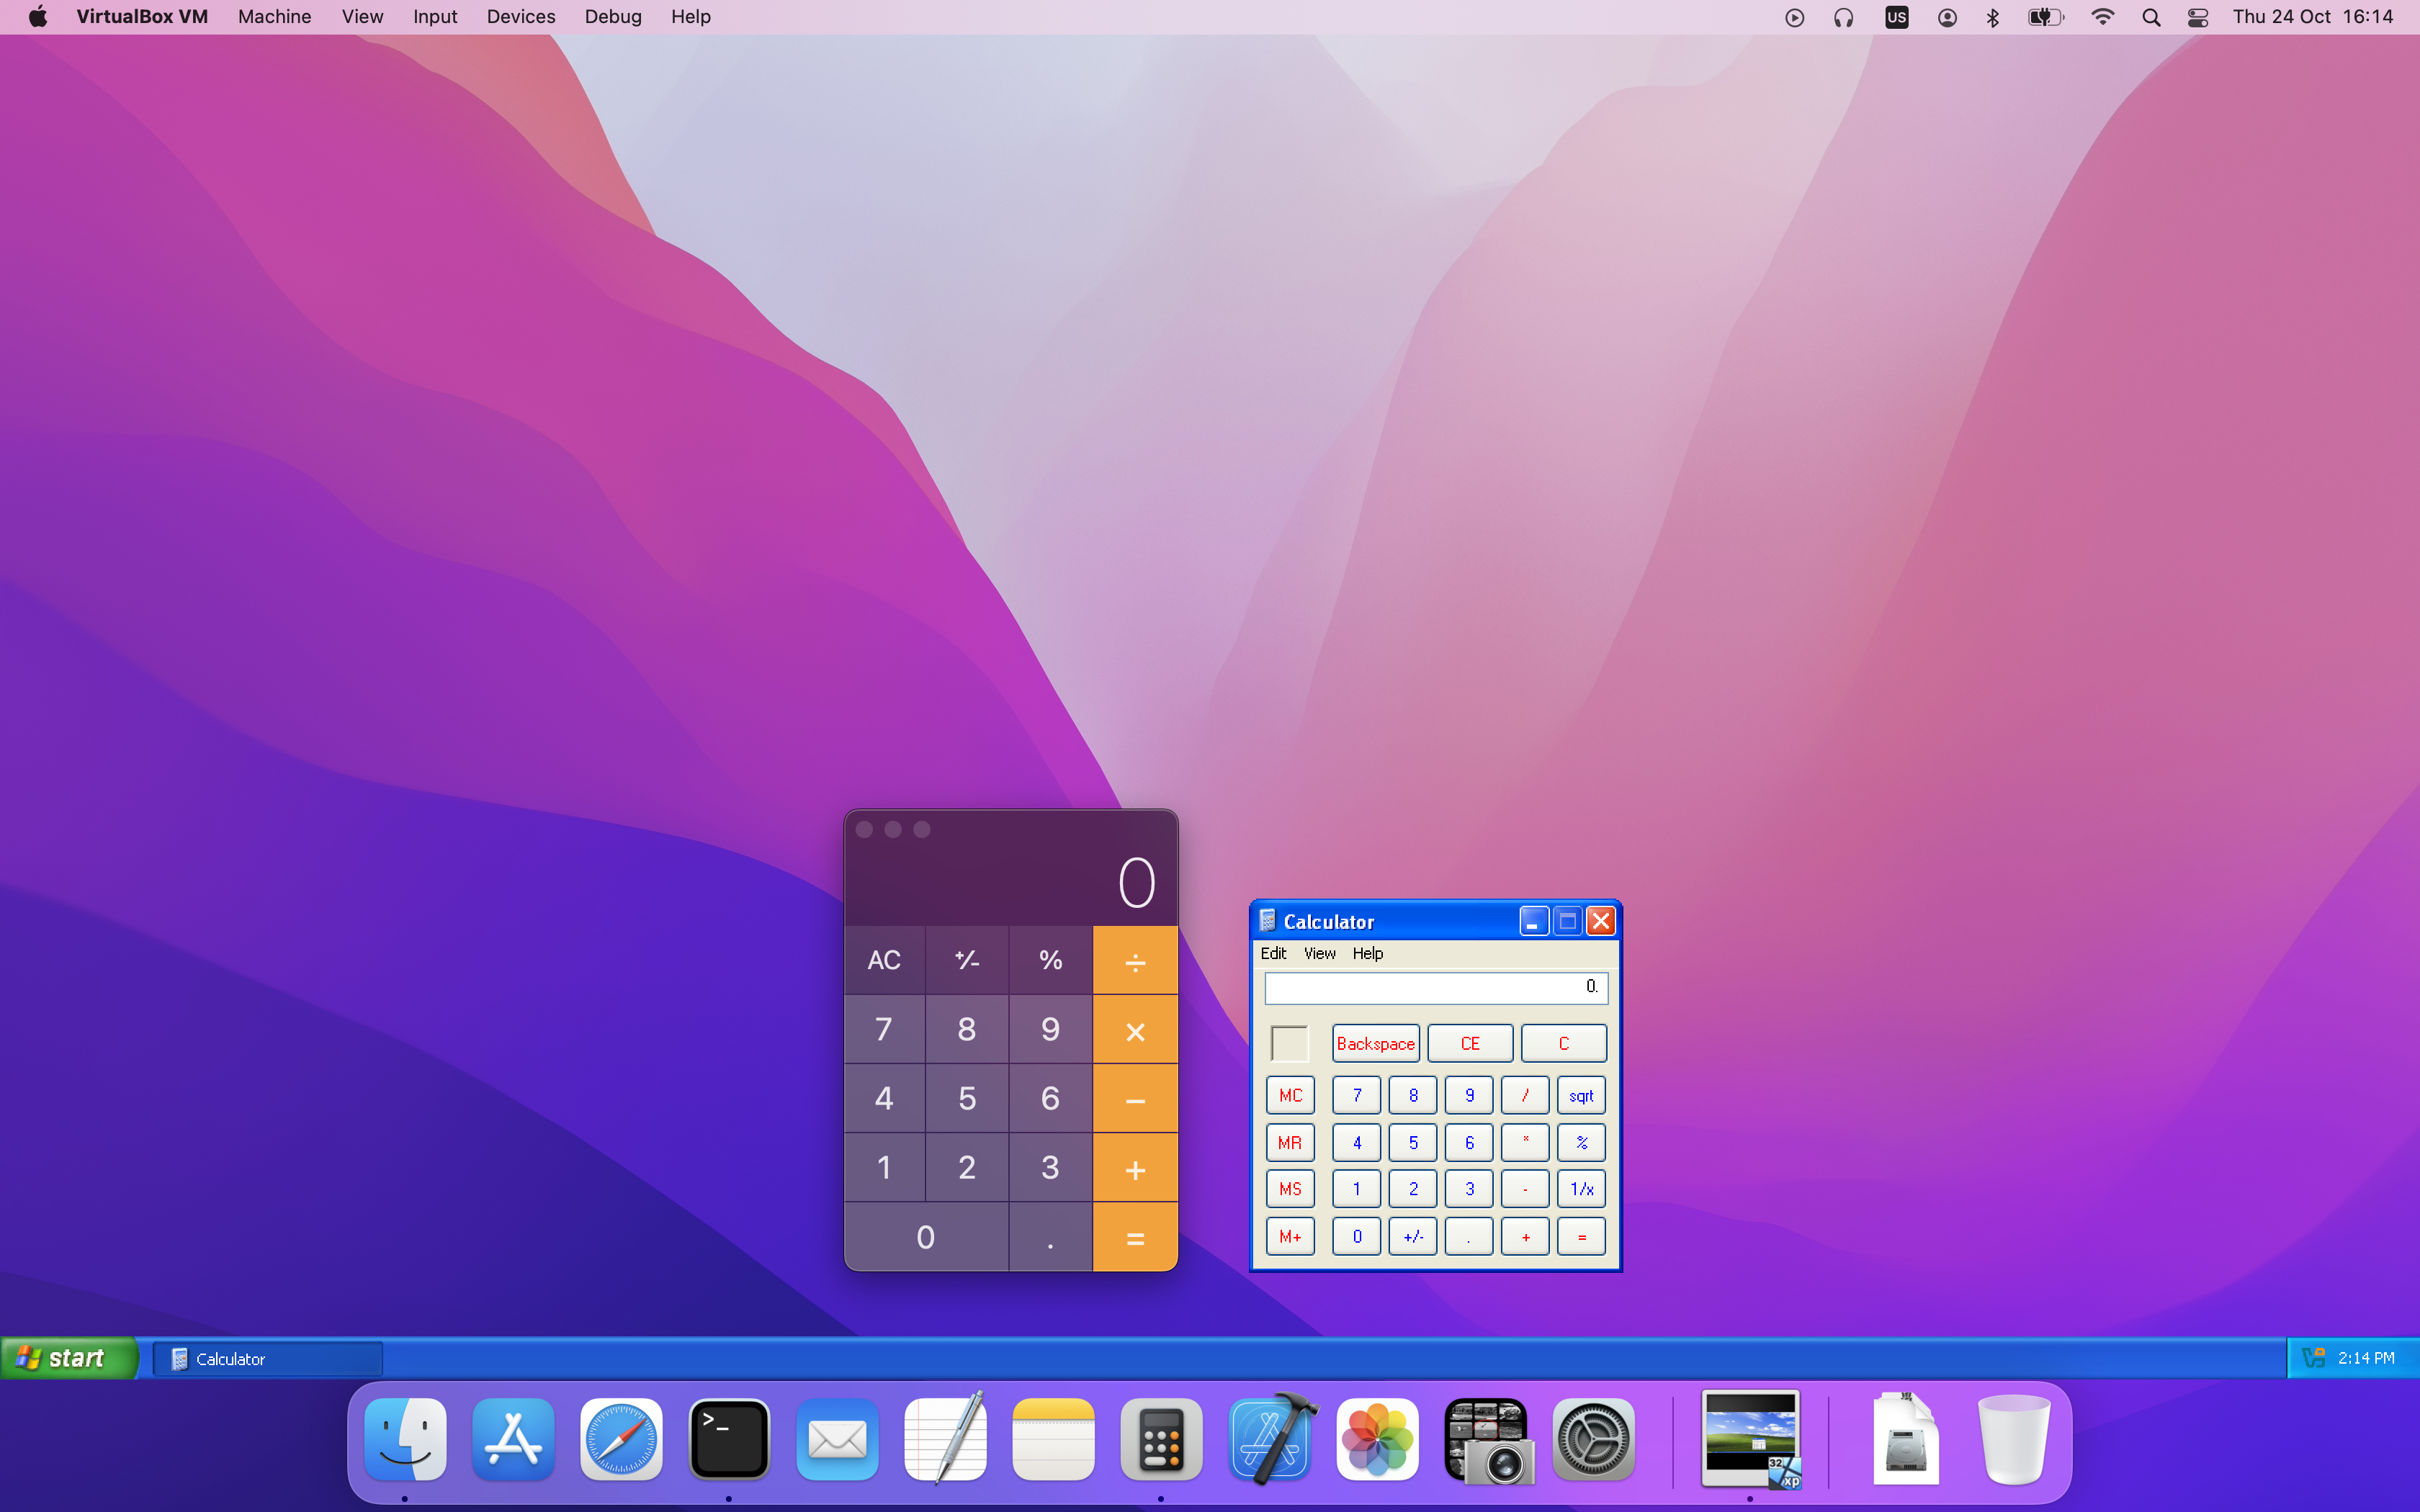
To enable seamless windows, on the virtual machine, press the Host key + L. The Host key is displayed on the taskbar and is normally the right control key.
To disable seamless windows and go back to the normal VM display, press the Host key + L again.
Guest Properties
Oracle VirtualBox enables requests of some properties from a running guest, provided that the Oracle VirtualBox Guest Additions are installed and the VM is running. This provides the following advantages:
-
A number of predefined VM characteristics are automatically maintained by Oracle VirtualBox and can be retrieved on the host. For example, to monitor VM performance and statistics.
-
Arbitrary string data can be exchanged between guest and host. This works in both directions.
To accomplish this, Oracle VirtualBox establishes a private communication channel between the Oracle VirtualBox Guest Additions and the host, and software on both sides can use this channel to exchange string data for arbitrary purposes. Guest properties are simply string keys to which a value is attached. They can be set, or written to, by either the host and the guest. They can also be read from both sides.
In addition to establishing the general mechanism of reading and
writing values, a set of predefined guest properties is
automatically maintained by the Oracle VirtualBox Guest Additions to
allow for retrieving interesting guest data such as the guest's
exact operating system and service pack level, the installed
version of the Guest Additions, users that are currently logged
into the guest OS, network statistics and more. These predefined
properties are all prefixed with /VirtualBox/
and organized into a hierarchical tree of keys.
Some of this runtime information is shown when you select Session Information Dialog from a virtual machine's Machine menu.
A more flexible way to use this channel is with the VBoxManage guestproperty command. See VBoxManage guestproperty. For example, to have all the available guest properties for a given running VM listed with their respective values, use this command:
$ VBoxManage guestproperty enumerate "Windows Vista III"
Name: /VirtualBox/GuestInfo/OS/Product, value: Windows Vista Business Edition,
    timestamp: 1229098278843087000, flags:
Name: /VirtualBox/GuestInfo/OS/Release, value: 6.0.6001,
    timestamp: 1229098278950553000, flags:
Name: /VirtualBox/GuestInfo/OS/ServicePack, value: 1,
    timestamp: 1229098279122627000, flags:
Name: /VirtualBox/GuestAdd/InstallDir,
    value: C:/Program Files/Oracle/VirtualBox
    Guest Additions, timestamp: 1229098279269739000, flags:
Name: /VirtualBox/GuestAdd/Revision, value: 40720,
    timestamp: 1229098279345664000, flags:
Name: /VirtualBox/GuestAdd/Version, value: version-number,
    timestamp: 1229098279479515000, flags:
Name: /VirtualBox/GuestAdd/Components/VBoxControl.exe, value: version-numberr40720,
    timestamp: 1229098279651731000, flags:
Name: /VirtualBox/GuestAdd/Components/VBoxHook.dll, value: version-numberr40720,
    timestamp: 1229098279804835000, flags:
Name: /VirtualBox/GuestAdd/Components/VBoxDisp.dll, value: version-numberr40720,
    timestamp: 1229098279880611000, flags:
Name: /VirtualBox/GuestAdd/Components/VBoxMRXNP.dll, value: version-numberr40720,
    timestamp: 1229098279882618000, flags:
Name: /VirtualBox/GuestAdd/Components/VBoxService.exe, value: version-numberr40720,
    timestamp: 1229098279883195000, flags:
Name: /VirtualBox/GuestAdd/Components/VBoxTray.exe, value: version-numberr40720,
    timestamp: 1229098279885027000, flags:
Name: /VirtualBox/GuestAdd/Components/VBoxGuest.sys, value: version-numberr40720,
    timestamp: 1229098279886838000, flags:
Name: /VirtualBox/GuestAdd/Components/VBoxMouse.sys, value: version-numberr40720,
    timestamp: 1229098279890600000, flags:
Name: /VirtualBox/GuestAdd/Components/VBoxSF.sys, value: version-numberr40720,
    timestamp: 1229098279893056000, flags:
Name: /VirtualBox/GuestAdd/Components/VBoxVideo.sys, value: version-numberr40720,
    timestamp: 1229098279895767000, flags:
Name: /VirtualBox/GuestInfo/OS/LoggedInUsers, value: 1,
    timestamp: 1229099826317660000, flags:
Name: /VirtualBox/GuestInfo/OS/NoLoggedInUsers, value: false,
    timestamp: 1229098455580553000, flags:
Name: /VirtualBox/GuestInfo/Net/Count, value: 1,
    timestamp: 1229099826299785000, flags:
Name: /VirtualBox/HostInfo/GUI/LanguageID, value: C,
    timestamp: 1229098151272771000, flags:
Name: /VirtualBox/GuestInfo/Net/0/V4/IP, value: 192.168.2.102,
    timestamp: 1229099826300088000, flags:
Name: /VirtualBox/GuestInfo/Net/0/V4/Broadcast, value: 255.255.255.255,
    timestamp: 1229099826300220000, flags:
Name: /VirtualBox/GuestInfo/Net/0/V4/Netmask, value: 255.255.255.0,
    timestamp: 1229099826300350000, flags:
Name: /VirtualBox/GuestInfo/Net/0/Status, value: Up,
    timestamp: 1229099826300524000, flags:
Name: /VirtualBox/GuestInfo/OS/LoggedInUsersList, value: username,
    timestamp: 1229099826317386000, flags:
To query the value of a single property, use the get subcommand as follows:
$ VBoxManage guestproperty get "Windows Vista III" "/VirtualBox/GuestInfo/OS/Product"
Value: Windows Vista Business Edition
To add or change guest properties from the guest, use the tool VBoxControl. This tool is included in the Guest Additions. When started from a Linux guest, this tool requires root privileges for security reasons.
$ sudo VBoxControl guestproperty enumerate
Oracle VirtualBox Guest Additions Command Line Management Interface Version version-number
Copyright (C) 2005-2025 Oracle and/or its affiliates
Name: /VirtualBox/GuestInfo/OS/Release, value: 2.6.28-18-generic,
    timestamp: 1265813265835667000, flags: <NULL>
Name: /VirtualBox/GuestInfo/OS/Version, value: #59-Ubuntu SMP Thu Jan 28 01:23:03 UTC 2010,
    timestamp: 1265813265836305000, flags: <NULL>
      ...
For more complex needs, you can use the Oracle VirtualBox programming interfaces. See Oracle VirtualBox Programming Interfaces.
Using Guest Properties to Wait on VM Events
The properties /VirtualBox/HostInfo/VBoxVer,
/VirtualBox/HostInfo/VBoxVerExt or
/VirtualBox/HostInfo/VBoxRev can be waited on
to detect that the VM state was restored from saved state or
snapshot:
$ VBoxControl guestproperty wait /VirtualBox/HostInfo/VBoxVer
Similarly the
/VirtualBox/HostInfo/ResumeCounter can be
used to detect that a VM was resumed from the paused state or
saved state.
Guest Control File Manager
If you have Guest Additions installed, you can use the Guest Control File Manager to copy files between a virtual machine (VM) and the host system. You can also create new folders, rename files and delete files.
This feature is useful when the VM window of a guest is not visible. For example, when the guest is running in headless mode.
Note:
To use the Guest Control File Manager, the guest must be running. For powered-off guests, it is disabled automatically.
Transferring Files
To use the Guest Control File Manager to transfer files, follow these steps.
- Ensure you have the username and password for an account on the guest system, with appropriate permissions on the files you need to access.
-
Open the Guest Control File Manager. Do either of the following:
-
In the guest VM, select Machine, File Manager.
-
In VirtualBox Manager, Machines list, click the machine name, and then select File Manager.
The Host File System pane shows the files on the host system.
-
-
In the Guest File System pane, enter the User Name and Password for the user you want to log in as.
Click Open Session.
The VM file system appears in the Guest File System pane.
-
To transfer from the VM to the host, select the file(s) and click Copy From Guest to Host.
To transfer from the host to the VM, select the file(s) and click Copy From Host to Guest.
- Check the progress of the transfer in the Operations pane.
-
Click Close to end the guest session and the Guest Control File Manager.
Guest Control of Applications
The Guest Additions enable starting of applications inside a guest VM from the host system. This feature can be used to automate deployment of software within the guest.
For this to work, the application needs to be installed on the guest. No additional software needs to be installed on the host. Additionally, text mode output to stdout and stderr can be shown on the host for further processing. There are options to specify user credentials and a timeout value, in milliseconds, to limit the time the application is able to run.
The Guest Additions for Windows allow for automatic updating. This applies for already installed Guest Additions versions. Also, copying files from host to the guest as well as remotely creating guest directories is available.
To use these features, use the Oracle VirtualBox command line. See VBoxManage guestcontrol.
Memory Overcommitment
In server environments with many VMs, the Guest Additions can be used to share physical host memory between several VMs. This reduces the total amount of memory in use by the VMs. If memory usage is the limiting factor and CPU resources are still available, this can help with running more VMs on each host.
Memory Ballooning
The Guest Additions can change the amount of host memory that a VM uses, while the machine is running. Because of how this is implemented, this feature is called memory ballooning.
Note:
-
Oracle VirtualBox supports memory ballooning only on 64-bit hosts. It is not supported on macOS hosts.
-
Memory ballooning does not work well with large pages enabled. To turn off large pages support for a VM, run VBoxManage modifyvm vmname --large-pages off
Normally, to change the amount of memory allocated to a virtual machine, you have to shut down the virtual machine entirely and modify its settings. With memory ballooning, memory that was allocated for a virtual machine can be given to another virtual machine without having to shut the machine down.
When memory ballooning is requested, the Oracle VirtualBox Guest Additions, which run inside the guest, allocate physical memory from the guest operating system on the kernel level and lock this memory down in the guest. This ensures that the guest will not use that memory any longer. No guest applications can allocate it, and the guest kernel will not use it either. Oracle VirtualBox can then reuse this memory and give it to another virtual machine.
The memory made available through the ballooning mechanism is only available for reuse by Oracle VirtualBox. It is not returned as free memory to the host. Requesting balloon memory from a running guest will therefore not increase the amount of free, unallocated memory on the host. Effectively, memory ballooning is therefore a memory overcommitment mechanism for multiple virtual machines while they are running. This can be useful to temporarily start another machine, or in more complicated environments, for sophisticated memory management of many virtual machines that may be running in parallel depending on how memory is used by the guests.
At this time, memory ballooning is only supported through VBoxManage. Use the following command to increase or decrease the size of the memory balloon within a running virtual machine that has Guest Additions installed:
VBoxManage controlvm "VM name" guestmemoryballoon n
where VM name is the name or UUID of the virtual machine in question and n is the amount of memory to allocate from the guest in megabytes. See VBoxManage controlvm.
You can also set a default balloon that will automatically be requested from the VM every time after it has started up with the following command:
VBoxManage modifyvm "VM name" --guest-memory-balloon n
By default, no balloon memory is allocated. This is a VM setting, like other modifyvm settings, and therefore can only be set while the machine is shut down. See VBoxManage modifyvm.
Page Fusion
Whereas memory ballooning simply reduces the amount of RAM that is available to a VM, Page Fusion works differently. It avoids memory duplication between several similar running VMs.
In a server environment running several similar VMs on the same host, lots of memory pages are identical. For example, if the VMs are using identical operating systems. Oracle VirtualBox's Page Fusion technology can efficiently identify these identical memory pages and share them between multiple VMs.
Note:
Oracle VirtualBox supports Page Fusion only on 64-bit hosts, and it is not supported on macOS hosts. Page Fusion currently works only with Windows 2000 and later guests.
The more similar the VMs on a given host are, the more efficiently Page Fusion can reduce the amount of host memory that is in use. It therefore works best if all VMs on a host run identical operating systems. Instead of having a complete copy of each operating system in each VM, Page Fusion identifies the identical memory pages in use by these operating systems and eliminates the duplicates, sharing host memory between several machines. This is called deduplication. If a VM tries to modify a page that has been shared with other VMs, a new page is allocated again for that VM with a copy of the shared page. This is called copy on write. All this is fully transparent to the virtual machine.
You may be familiar with this kind of memory overcommitment from other hypervisor products, which call this feature page sharing or same page merging. However, Page Fusion differs significantly from those other solutions, whose approaches have several drawbacks:
-
Traditional hypervisors scan all guest memory and compute checksums, also called hashes, for every single memory page. Then, they look for pages with identical hashes and compare the entire content of those pages. If two pages produce the same hash, it is very likely that the pages are identical in content. This process can take rather long, especially if the system is not idling. As a result, the additional memory only becomes available after a significant amount of time, such as hours or sometimes days. Even worse, this kind of page sharing algorithm generally consumes significant CPU resources and increases the virtualization overhead by 10 to 20%.
Page Fusion in Oracle VirtualBox uses logic in the Oracle VirtualBox Guest Additions to quickly identify memory cells that are most likely identical across VMs. It can therefore achieve most of the possible savings of page sharing almost immediately and with almost no overhead.
-
Page Fusion is also much less likely to be confused by identical memory that it will eliminate, just to learn seconds later that the memory will now change and having to perform a highly expensive and often service-disrupting reallocation.
At this time, Page Fusion can only be controlled with VBoxManage, and only while a VM is shut down. To enable Page Fusion for a VM, use the following command:
VBoxManage modifyvm "VM name" --page-fusion on
You can observe Page Fusion operation using some metrics. RAM/VMM/Shared shows the total amount of fused pages, whereas the per-VM metric Guest/RAM/Usage/Shared will return the amount of fused memory for a given VM. See VBoxManage metrics for information on how to query metrics.
Note:
Enabling Page Fusion might indirectly increase the chances for malicious guests to successfully attack other VMs running on the same host. See Potentially Insecure Operations.
Controlling Virtual Monitor Topology
X11/XWayland Desktop Environments
The Guest Additions provide services for controlling the guest system's monitor topology. Monitor topology means the resolution of each virtual monitor and its state (disabled/enabled). The resolution of a virtual monitor can be modified on the VM by using the View menu, or from the host side by resizing the window that hosts the virtual monitor, or the VBoxManage controlvm vmname setscreenlayout command. See Specify the Screen Layout for a Display on the Guest VM. Screens enabled must be contiguous or the command will have no effect.
On guest operating systems with X11/XWayland desktops this is put into effect by any of the following services:
VBoxClient --vmsvga
VBoxClient --vmsvga-session
VBoxDRMClient
On X11/XWayland desktops the resizing service is started during desktop session initialization, that is desktop login. On X11 desktops VBoxClient --vmsvga handles screen topology through the RandR extension. On XWayland clients VBoxDRMClient is used. The decision is made automatically at each desktop session start.
On 32-bit guest operating systems VBoxDRMClient is always used, in order to work around bugs.
Virtual Storage
As the virtual machine will most probably expect to see a hard disk built into its virtual computer, Oracle VirtualBox must be able to present real storage to the guest as a virtual hard disk. There are presently three methods by which to achieve this:
-
Oracle VirtualBox can use large image files on a real hard disk and present them to a guest as a virtual hard disk. This is the most common method, described in Disk Image Files (VDI, VMDK, VHD, HDD).
-
iSCSI storage servers can be attached to Oracle VirtualBox. This is described in iSCSI Servers.
-
You can allow a virtual machine to access one of your host disks directly. This is an advanced feature, described in Using a Raw Host Hard Disk From a Guest.
Each such virtual storage device, such as an image file, iSCSI target, or physical hard disk, needs to be connected to the virtual hard disk controller that Oracle VirtualBox presents to a virtual machine. This is explained in the next section.
Hard Disk Controllers
In a computing device, hard disks and CD/DVD drives are connected to a device called a hard disk controller, which drives hard disk operation and data transfers. Oracle VirtualBox can emulate the most common types of hard disk controllers typically found in computing devices: IDE, SATA (AHCI), SCSI, SAS, USB-based, and NVMe mass storage devices.
-
IDE (ATA) controllers are a backward-compatible yet very advanced extension of the disk controller in the IBM PC/AT (1984). Initially, this interface worked only with hard disks, but was later extended to also support CD-ROM drives and other types of removable media. In physical PCs, this standard uses flat ribbon parallel cables with 40 or 80 wires. Each such cable can connect two devices, called device 0 and device 1, to a controller. Typical PCs had two connectors for such cables. As a result, support for up to four IDE devices was most common: primary device 0, primary device 1, secondary device 0, and secondary device 1.
In Oracle VirtualBox, each virtual machine may have one IDE controller enabled, which gives you up to four virtual storage devices that you can attach to the machine. By default, one of these virtual storage devices, device 0 on the secondary channel, is preconfigured to be the virtual machine's virtual CD/DVD drive. However, you can change the default setting.
Even if your guest OS has no support for SCSI or SATA devices, it should always be able to see an IDE controller.
You can also select which exact type of IDE controller hardware Oracle VirtualBox should present to the virtual machine: PIIX3, PIIX4, or ICH6. This makes no difference in terms of performance, but if you import a virtual machine from another virtualization product, the OS in that machine may expect a particular controller type and crash if it is not found.
After you have created a new virtual machine in VirtualBox Manager, you will typically see one IDE controller in the machine's Storage settings. The virtual CD/DVD drive will be attached to one of the four ports of this controller.
-
Serial ATA (SATA) is a more recent standard than IDE. Compared to IDE, it supports both much higher speeds and more devices per controller. Also, with physical hardware, devices can be added and removed while the system is running. The standard interface for SATA controllers is called Advanced Host Controller Interface (AHCI).
Like a real SATA controller, Oracle VirtualBox's virtual SATA controller operates faster and also consumes fewer CPU resources than the virtual IDE controller. Also, this enables you to connect up to 30 virtual hard disks to one machine instead of just three, when compared to the Oracle VirtualBox IDE controller with a DVD drive attached.
For this reason, depending on the selected guest OS, Oracle VirtualBox uses SATA as the default for newly created virtual machines. One virtual SATA controller is created by default, and the default disk that is created with a new VM is attached to this controller.
Note:
The entire SATA controller and the virtual disks attached to it, including those in IDE compatibility mode, will not be seen by OSes that do not have device support for AHCI. In particular, there is no support for AHCI in Windows versions before Windows Vista. Legacy Windows versions such as Windows XP, even with SP3 installed, will not see such disks unless you install additional drivers. It is possible to switch from IDE to SATA after installation by installing the SATA drivers and changing the controller type in the VM Settings window.
Oracle VirtualBox recommends the Intel Matrix Storage drivers, which can be downloaded from http://downloadcenter.intel.com/Product_Filter.aspx?ProductID=2101.
To add a SATA controller to a machine for which it has not been enabled by default, either because it was created by an earlier version of Oracle VirtualBox, or because SATA is not supported by default by the selected guest OS, do the following. Go to the Storage page of the machine's Settings window, click Add Controller under the Storage Tree box and then select Add SATA Controller. The new controller appears as a separate PCI device in the virtual machine, and you can add virtual disks to it.
To change the IDE compatibility mode settings for the SATA controller, see VBoxManage storagectl.
-
SCSI is another established industry standard, standing for Small Computer System Interface. SCSI is as a generic interface for data transfer between all kinds of devices, including storage devices. SCSI is still used for connecting some hard disks and tape devices, but it has mostly been displaced in commodity hardware. It is still in common use in high-performance workstations and servers.
Primarily for compatibility with other virtualization software, Oracle VirtualBox optionally supports LSI Logic and BusLogic SCSI controllers, to each of which up to fifteen virtual hard disks can be attached.
To enable a SCSI controller, on the Storage page of a virtual machine's Settings window, click Add Controller under the Storage Tree box and then select Add SCSI Controller. The new controller appears as a separate PCI device in the virtual machine.
Note:
As with the other controller types, a SCSI controller will only be seen by OSes with device support for it. Windows 2003 and later ships with drivers for the LSI Logic controller, while Windows NT 4.0 and Windows 2000 ships with drivers for the BusLogic controller. Windows XP ships with drivers for neither.
-
Serial Attached SCSI (SAS) is another bus standard which uses the SCSI command set. As opposed to SCSI physical devices, serial cables are used instead of parallel cables. This simplifies physical device connections. In some ways, therefore, SAS is to SCSI what SATA is to IDE: it enables more reliable and faster connections.
To support high-end guests which require SAS controllers, Oracle VirtualBox emulates a LSI Logic SAS controller, which can be enabled much the same way as a SCSI controller. At this time, up to 255 devices can be connected to the SAS controller.
Note:
As with SATA, the SAS controller will only be seen by OSes with device support for it. In particular, there is no support for SAS in Windows before Windows Vista. So Windows XP, even SP3, will not see such disks unless you install additional drivers.
-
The USB mass storage device class is a standard to connect external storage devices like hard disks or flash drives to a host through USB. All major OSes support these devices and ship generic drivers making third-party drivers superfluous. In particular, legacy OSes without support for SATA controllers may benefit from USB mass storage devices.
The virtual USB storage controller offered by Oracle VirtualBox works differently to the other storage controller types. While most storage controllers appear as a single PCI device to the guest with multiple disks attached to it, the USB-based storage controller does not appear as virtual storage controller. Each disk attached to the controller appears as a dedicated USB device to the guest.
Note:
Booting from drives attached using USB is only supported when EFI is used as the BIOS lacks USB support.
-
Non volatile memory express (NVMe) is a standard for connecting non volatile memory (NVM) directly over PCI Express to lift the bandwidth limitation of the previously used SATA protocol for solid-state devices. Unlike other standards the command set is very simple in order to achieve maximum throughput and is not compatible with ATA or SCSI. OSes need to support NVMe devices to make use of them. For example, Windows 8.1 added native NVMe support. For Windows 7, native support was added with an update.
Note:
Booting from drives attached using NVMe is only supported when EFI is used as the BIOS lacks the appropriate driver.
In summary, Oracle VirtualBox gives you the following categories of virtual storage slots:
-
Four slots attached to the traditional IDE controller, which are always present. One of these is typically a virtual CD/DVD drive.
-
30 slots attached to the SATA controller, if enabled and supported by the guest OS.
-
15 slots attached to the SCSI controller, if enabled and supported by the guest OS.
-
Up to 255 slots attached to the SAS controller, if enabled and supported by the guest OS.
-
Eight slots attached to the virtual USB controller, if enabled and supported by the guest OS.
-
Up to 255 slots attached to the NVMe controller, if enabled and supported by the guest OS.
Given this large choice of storage controllers, you may not know which one to choose. In general, you should avoid IDE unless it is the only controller supported by your guest. Whether you use SATA, SCSI, or SAS does not make any real difference. The variety of controllers is only supplied by Oracle VirtualBox for compatibility with existing hardware and other hypervisors.
Disk Image Files (VDI, VMDK, VHD, HDD)
Disk image files reside on the host system and are seen by the guest systems as hard disks of a certain geometry. When a guest OS reads from or writes to a hard disk, Oracle VirtualBox redirects the request to the image file.
Like a physical disk, a virtual disk has a size, or capacity, which must be specified when the image file is created. As opposed to a physical disk however, Oracle VirtualBox enables you to expand an image file after creation, even if it has data already. See VBoxManage modifymedium.
Oracle VirtualBox supports the following types of disk image files:
-
VDI. Normally, Oracle VirtualBox uses its own container format for guest hard disks. This is called a Virtual Disk Image (VDI) file. This format is used when you create a new virtual machine with a new disk.
-
VMDK. Oracle VirtualBox also fully supports the popular and open VMDK container format that is used by many other virtualization products, such as VMware.
-
VHD. Oracle VirtualBox also fully supports the VHD format used by Microsoft.
-
HDD. Image files of Parallels version 2 (HDD format) are also supported.
Due to lack of documentation of the format, newer versions such as 3 and 4 are not supported. You can however convert such image files to version 2 format using tools provided by Parallels.
Irrespective of the disk capacity and format, as mentioned in Creating a New Virtual Machine, there are two options for creating a disk image: fixed-size or dynamically allocated.
-
Fixed-size. If you create a fixed-size image, an image file will be created on your host system which has roughly the same size as the virtual disk's capacity. So, for a 10 GB disk, you will have a 10 GB file. Note that the creation of a fixed-size image can take a long time depending on the size of the image and the write performance of your hard disk.
-
Dynamically allocated. For more flexible storage management, use a dynamically allocated image. This will initially be very small and not occupy any space for unused virtual disk sectors, but will grow every time a disk sector is written to for the first time, until the drive reaches the maximum capacity chosen when the drive was created. While this format takes less space initially, the fact that Oracle VirtualBox needs to expand the image file consumes additional computing resources, so until the disk file size has stabilized, write operations may be slower than with fixed size disks. However, after a time the rate of growth will slow and the average penalty for write operations will be negligible.
Special Image Write Modes
For each virtual disk image supported by Oracle VirtualBox, you can determine separately how it should be affected by write operations from a virtual machine and snapshot operations. This applies to all of the aforementioned image formats (VDI, VMDK, VHD, or HDD) and irrespective of whether an image is fixed-size or dynamically allocated.
By default, images are in normal mode. To mark an existing image with one of the nonstandard modes listed below, use VBoxManage modifymedium. See VBoxManage modifymedium. Alternatively, use VBoxManage storageattach to attach the image to a VM and specify the --mtype argument. See VBoxManage storageattach.
The available virtual disk image modes are as follows:
-
Normal images have no restrictions on how guests can read from and write to the disk. This is the default image mode.
When you take a snapshot of your virtual machine as described in Snapshots, the state of a normal hard disk is recorded together with the snapshot, and when reverting to the snapshot, its state will be fully reset.
The image file itself is not reset. Instead, when a snapshot is taken, Oracle VirtualBox freezes the image file and no longer writes to it. For the write operations from the VM, a second, differencing image file is created which receives only the changes to the original image. See Differencing Images.
While you can attach the same normal image to more than one virtual machine, only one of these virtual machines attached to the same image file can be executed simultaneously, as otherwise there would be conflicts if several machines write to the same image file.
-
Write-through hard disks are completely unaffected by snapshots. Their state is not saved when a snapshot is taken, and not restored when a snapshot is restored.
-
Shareable hard disks are a variant of write-through hard disks. In principle they behave exactly the same. Their state is not saved when a snapshot is taken, and not restored when a snapshot is restored. The difference only shows if you attach such disks to several VMs. Shareable disks may be attached to several VMs which may run concurrently. This makes them suitable for use by cluster filesystems between VMs and similar applications which are explicitly prepared to access a disk concurrently. Only fixed size images can be used in this way, and dynamically allocated images are rejected.
CAUTION:
This is an expert feature, and misuse can lead to data loss, as regular filesystems are not prepared to handle simultaneous changes by several parties.
-
Immutable images only remember write accesses temporarily while the virtual machine is running. All changes are lost when the virtual machine is powered on the next time. As a result, as opposed to Normal images, the same immutable image can be used with several virtual machines without restrictions.
Creating an immutable image makes little sense since it would be initially empty and lose its contents with every machine restart. You would have a disk that is always unformatted when the machine starts up. Instead, you can first create a normal image and then later mark it as immutable when you decide that the contents are useful.
If you take a snapshot of a machine with immutable images, then on every machine power-up, those images are reset to the state of the last (current) snapshot, instead of the state of the original immutable image.
Note:
As a special exception, immutable images are not reset if they are attached to a machine in a saved state or whose last snapshot was taken while the machine was running. This is called an online snapshot. As a result, if the machine's current snapshot is an online snapshot, its immutable images behave exactly like the a normal image. To reenable the automatic resetting of such images, delete the current snapshot of the machine.
Oracle VirtualBox never writes to an immutable image directly at all. All write operations from the machine are directed to a differencing image. The next time the VM is powered on, the differencing image is reset so that every time the VM starts, its immutable images have exactly the same content.
The differencing image is only reset when the machine is powered on from within Oracle VirtualBox, not when you reboot by requesting a reboot from within the machine. This is also why immutable images behave as described above when snapshots are also present, which use differencing images as well.
If the automatic discarding of the differencing image on VM startup does not fit your needs, you can turn it off using the
autoresetparameter of VBoxManage modifymedium. See VBoxManage modifymedium. -
Multiattach mode images can be attached to more than one virtual machine at the same time, even if these machines are running simultaneously. For each virtual machine to which such an image is attached, a differencing image is created. As a result, data that is written to such a virtual disk by one machine is not seen by the other machines to which the image is attached. Each machine creates its own write history of the multiattach image.
Technically, a multiattach image behaves identically to an immutable image except the differencing image is not reset every time the machine starts.
This mode is useful for sharing files which are almost never written, for instance picture galleries, where every guest changes only a small amount of data and t