
Manuscript Prep Checklist
This guide will help you format your Microsoft Word document properly for the book design process. Following these guidelines ensures a smooth transition of your manuscript from Microsoft Word into a beautifully designed book, reducing the need for editorial revisions after your book has gone into layout.
Congratulations on finishing your manuscript! That’s the hardest part. Now, before we transform your words into a professionally designed book, we need to make sure your Word document is clean and consistent. This guide keeps things simple, and if you follow along with these steps and suggestions to clean up any inconsistencies and common mistakes, it will save a lot of time and headache after your book has going into production. Screen shots are included periodically to show examples and Microsoft Word’s formatting tools as a reference.
Text Hierarchy & Heading Structure
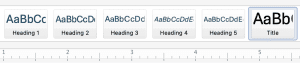
Use Word’s built‑in styles (shown above) to style the various heading levels within your manuscript. For example:
- Title → Book title / Part titles
- Heading 1 → Chapter titles
- Heading 2 → Chapter sub headings
- Heading 3 → Chapter sub sub headings
- Heading 4 → Chapter sub sub sub headings (and so on)
We will see these styles applied when we bring your manuscript into our layout program so we can be sure to clearly understand the hierarchy of information in your book and within each chapter.
Body Text Formatting
Standard Body Text
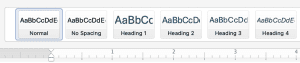
Your main manuscript content should use the default “Normal” style in Microsoft Word (shown above). This creates consistent formatting throughout your document for the main body text of your story.
Other Guidelines:
- Use only one space after periods
- Let Microsoft Word handle paragraph spacing automatically
- Avoid manual line breaks within paragraphs (also called “soft returns”)
- Use Microsoft Word’s built-in Styles rather than manual formatting (described above)
Paragraph Indentation Options
Standard Indented Paragraphs (Recommended)
Most books use indented first lines for new paragraphs. Set your paragraph style to automatically indent the first line by 0.5 inches.
Block Paragraphs (Alternative)
Some authors prefer no indentation with extra space between paragraphs. This style is called “block paragraphs.” If you choose this style, be consistent throughout your entire manuscript.
Special Spacing for Interactive Elements
When creating workbooks or journals where readers will write in the book, use increased line spacing to provide adequate room for handwriting. Typically, visual lines for writing are used only for younger audiences and blank spaces are preferred for an adult audience.
Quotations and Special Text Elements
Chapter Epigraphs
“The best time to plant a tree was 20 years ago. The second best time is now.”
— Chinese Proverb
Place meaningful quotes at the beginning of chapters using the block quote format. These typically relate to your chapter’s theme and inspire or orient your reader as the chapter gets underway.
In-Text Examples and Stories
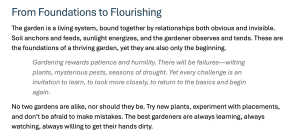
When including examples, case studies, or brief stories within your chapters, format them as indented text (indented both left and right) to distinguish them from your main narrative voice while maintaining reading flow.
This formatting works well for:
- Brief case studies
- Example scenarios
- Referenced material
- Short testimonials
Pull Quotes and Callouts
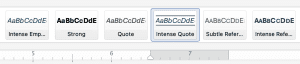
Important concepts or memorable phrases from your text can be highlighted as pulled quotes to break up long sections and emphasize key points.
Use this formatting sparingly for your most impactful statements or essential takeaways.
Lists and Structured Content
Bulleted Lists
Use bullet points for items that don’t require specific order:
- Primary benefit or feature
- Secondary consideration
- Supporting detail
- Additional context
- Specific example or clarification
Numbered Lists
Use numbered lists for processes, steps, or ranked items:
- First step in your process
- Second sequential action
a. Detailed substep
b. Alternative approach
c. Specific implementation detail
Checklists
For actionable items readers should complete:
☐ Task for reader to complete
☐ Another actionable item
☐ Final checklist element
Tables and Data Presentation
Table Structure
| Category | Description | Example Usage |
|---|---|---|
| Primary Data | Main information column | Statistical information, research findings |
| Supporting Details | Explanatory content that may wrap to multiple lines | Extended descriptions, methodology notes, detailed explanations |
| Reference Information | Quick lookup data | Page numbers, dates, source citations |
Table Caption: Always provide descriptive captions for tables, placed directly above the table. Include table numbers if you have multiple tables (Table 1, Table 2, etc.).
Graphics, Images, and Visual Elements
Insert placeholders where images belong, and send the actual image files separately (JPG/PNG/PDF files are common). Name files clearly and consistent with the names in your placement instructions (e.g., Figure01_Map.jpg, Figure02_Chart.png).
[INSERT FIGURE: Description of image, figure, or graphic]
Use short, descriptive captions and place captions in your manuscript, directly after the callout for placement of each image:
Figure 2.1 Seen here are all key contributors to the organization.
Punctuation: Em Dashes, En Dashes, Hyphens & Ellipses
Em Dash — interruption or emphasis
- No spaces on either side:
example—continuing - Use for an interruption or sharp emphasis
- Type it: Windows
Alt+0151; MacOption+Shift+-
En Dash – ranges & connections
- No spaces for ranges:
10–15,June–August,pp. 45–62 - Also for connections, e.g., New York–London flight
- Type it: Windows
Alt+0150; MacOption+-
Hyphen – compound words
- Use for compound modifiers: well‑known author, part‑time work
- Single hyphen (
-), no spaces
Ellipsis … pauses & trailing off
- Use the single ellipsis character (
…), not three typed periods (...) - Mid‑sentence pause: use normal word spacing around it: “If we can just … stay focused.”
- Trailing off: end with the ellipsis: “I thought I might …”
- Type it: Windows
Alt+0133; MacOption+;
Design Notes in the Manuscript (Red, Bracketed)
Use red, bracketed notes inside the manuscript to give clear instructions to the designer without affecting the text flow. Place notes on their own line and keep them concise.
Examples
[DESIGN NOTE: Set the following paragraph as a pulled quote] [INSERT FIGURE: Author photo left; caption below]
How to format them in Word
- Create a Character Style named Design Note: color red; not bold/italic (Home → Styles → Create a Style → Modify → Format → Font).
- Apply it to the entire bracketed note (including brackets).
- Keep notes out of running text when possible — use a separate line.
- Or, just style red and we will see your note
- TIP: Do not use the yellow highlighter. That formatting does not translate to our layout program and may get lost.
Formatting Best Practices
✅ Do This
- Use Microsoft Word’s styles consistently
- Apply formatting through Word’s Styles Pane (not manual changes)
- Use page breaks for new chapters (Insert → Page Break)
- Use one space after punctuation
- Save often and keep backups
❌ Don’t Do This
- Use the Tab key for indents
- Add multiple hard returns for spacing
- Insert manual font changes everywhere
- Use text boxes for body content
- Underline text (use italics or bold instead)
- Insert manual page numbers (the designer will paginate)
File Preparation Checklist
- Styles applied consistently
- Headings correctly formatted
- Image placeholders included
- Image files provided separately with clear names
- Saved as .docx format
- Spellcheck/grammar check complete
- Send to Mayfly for review prior to your kickoff meeting
📩 Questions? info@mayflybookdesign.com
Version 1.1 | Created for Mayfly clients
