
Web and native apps
August 17, 2026 at 2:19 PM by Dr. Drang
This is sacrilegious among some parts of Apple fandom, but I like using web apps. Oh, sure, I can imagine a world in which there’s a carefully crafted Mac app that has all the functions of a website I use but has all the Mac-like interface features I love and isn’t hobbled by a web UI. But I don’t live in that world and don’t expect I ever will.
For example, will the Python Software Foundation ever make a Mac app that includes all the documentation I regularly use? And even if they do, is it likely they’ll put in the effort to make better than just visiting the Python Docs web page? Would that be in keeping with their mission? So instead of waiting around for something that will never happen, I used Unite Pro to make a Python Docs site-specific browser.
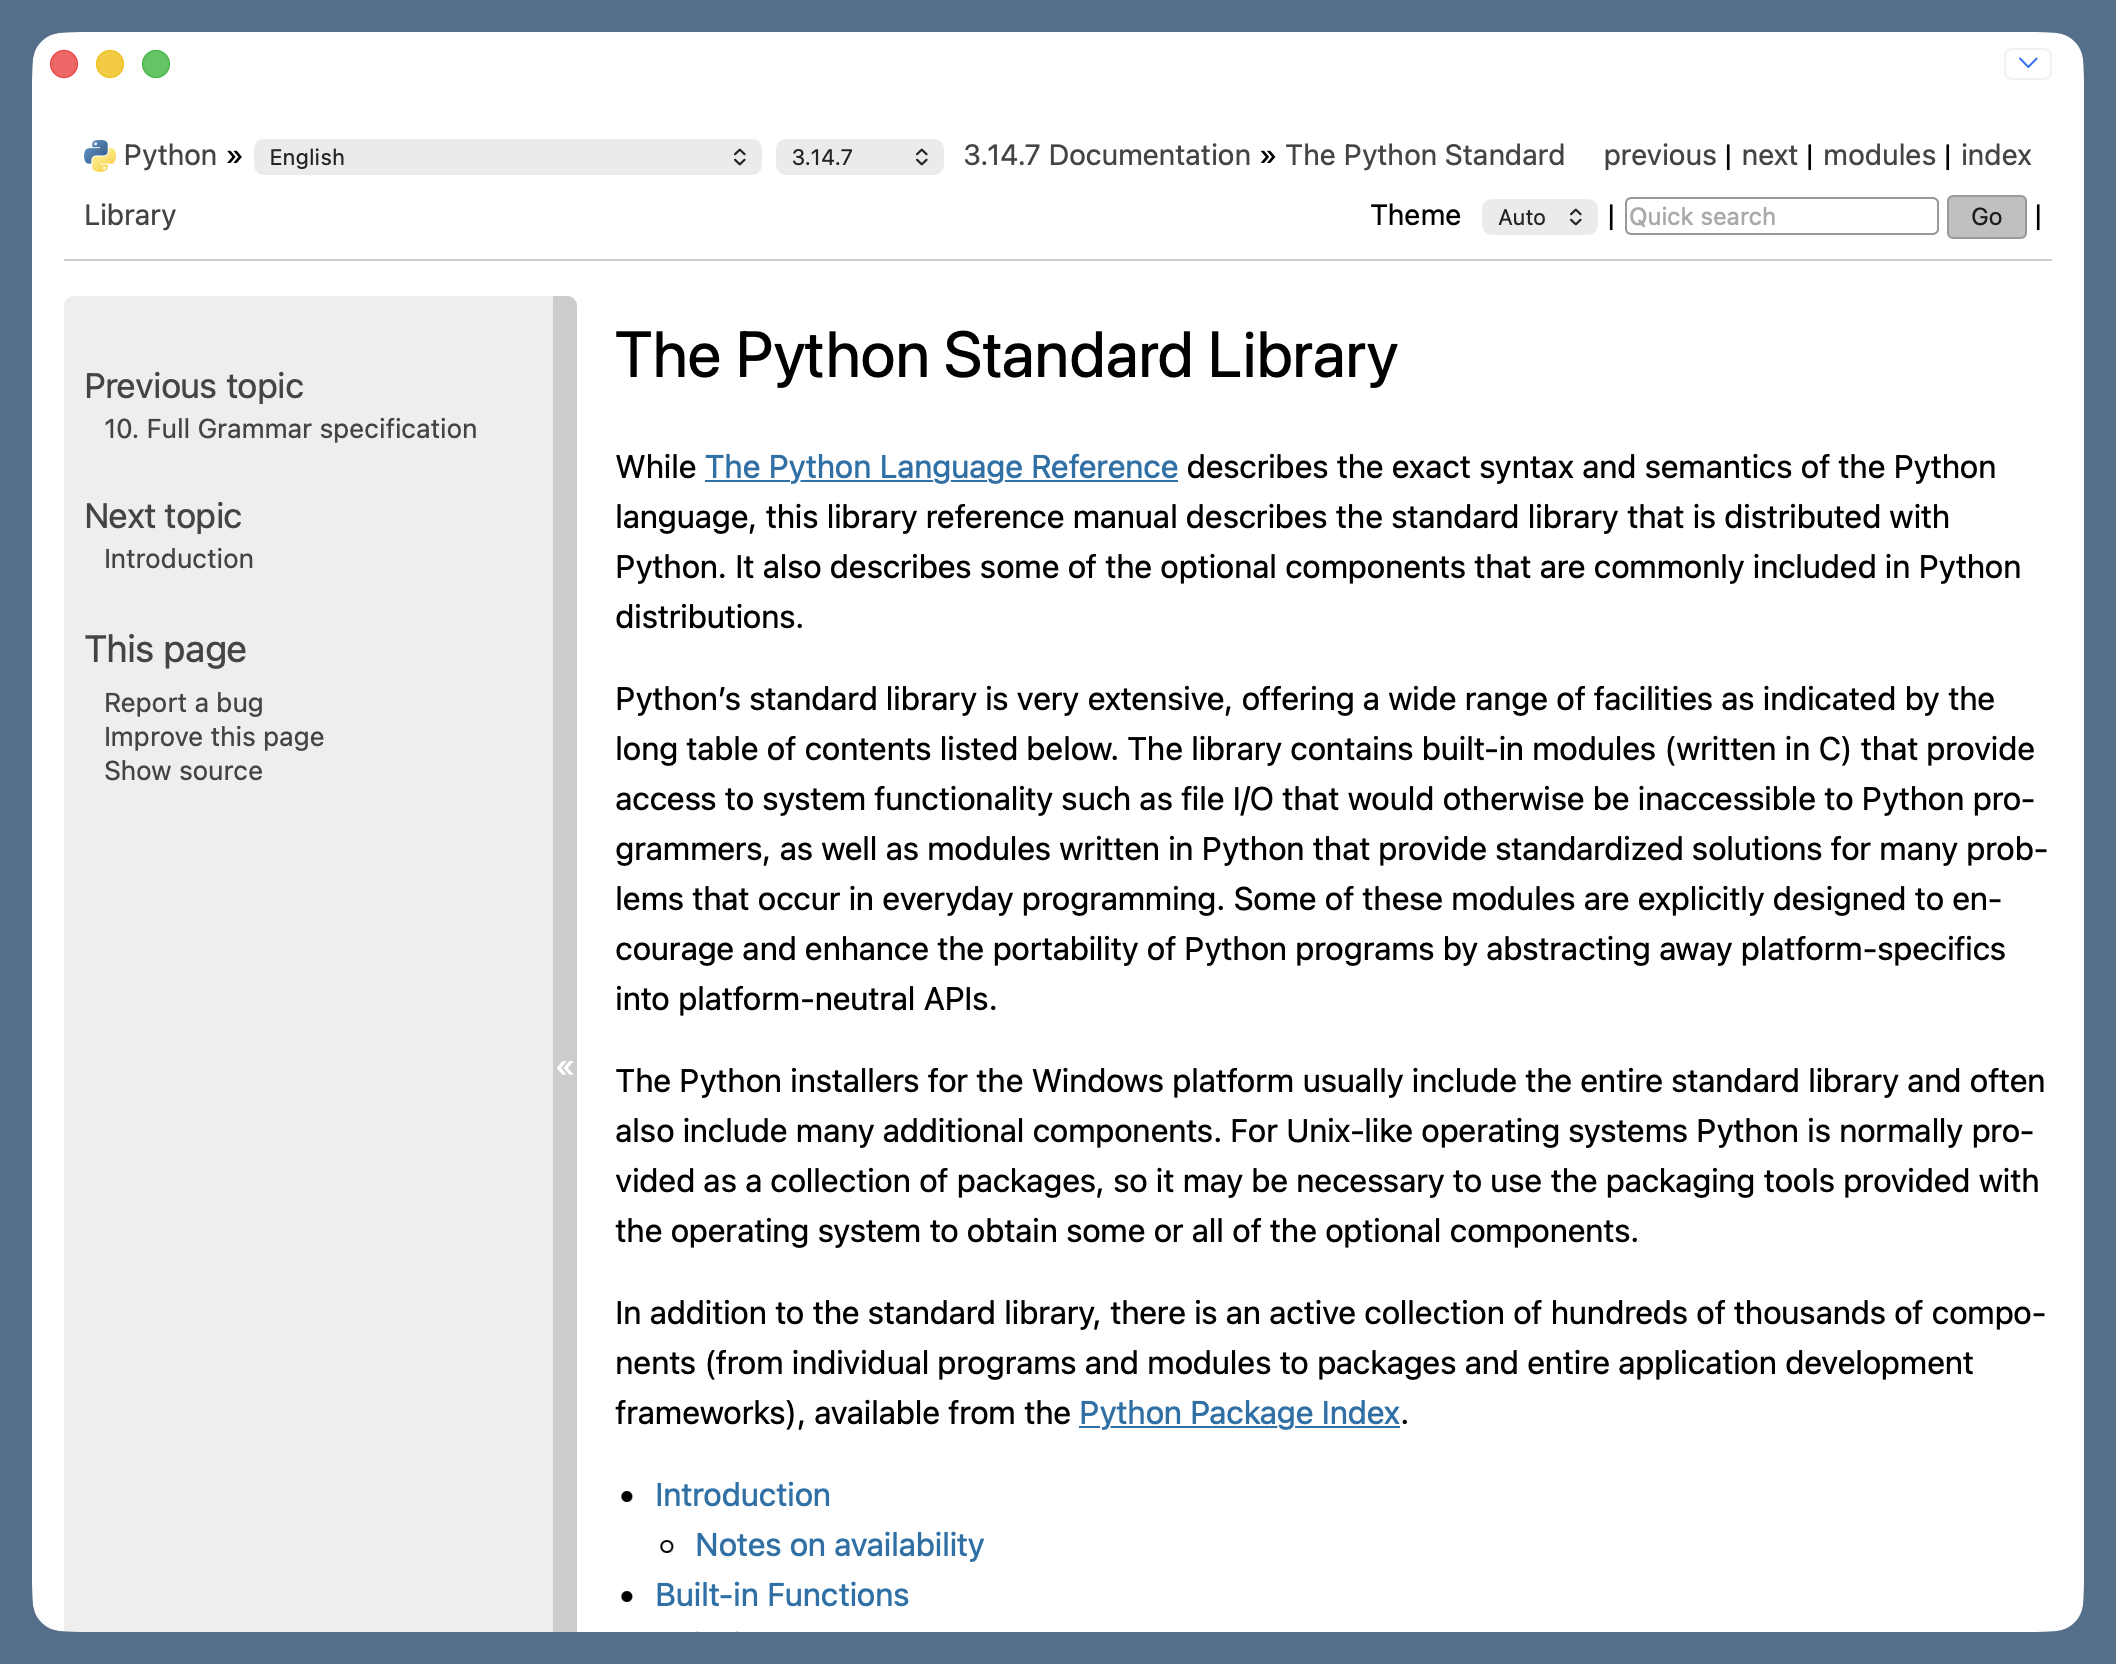
Launching it takes me straight to the standard library home page, from which I can quickly jump to the docs of whichever module I’m invoking in my current script. I have similar SSBs for the Matplotlib and Pandas documentation.
You might argue that these SSBs aren’t really web apps, that they’re basically a set of static web pages connected by links. That’s nearly true, but while they don’t have the kind of interaction that you see in, say, Google Sheets, they do have search features that make them more interactive than just a list of links. Regardless of how interactive they are, they serve my needs.
You might also suggest I use Dash, an actual app, instead of an SSB for browsing documentation. It incorporates many many sets of documentation and uses local copies so you don’t have to be online to use it. These are all good points and are why I tried Dash several years ago. It just didn’t fit me, probably because searches in Dash returned too many results across too many libraries. There are probably ways to get it to serve up more focused results, but I didn’t want to become a Dash expert (I’m not Brett Terpstra). I just wanted to see documentation relevant to what I was working on at the time. Initially that meant going to the appropriate website; now it means launching the appropriate SSB.
But I’m not a web app absolutist. I recently ended a web app experiment that’s brought me back to a native app. This was with Mastodon and Mona. When Mona 7 came out at the end of last year, I decided to hold off on buying its Ultra in-app purchase. After all, I thought, Mastodon exists on the web. Does it really need an app?
So I made an SSB with Unite Pro for the Mac and used the free versions of Mona on iOS and iPadOS. Eventually, I felt guilty about using an app without paying the developer, so I did the Add to Home Screen thing on my iPhone and iPad a couple of weeks ago to even things out and use the web on all three platforms. It was terrible.
The biggest problem was the lack of timeline syncing and updating. In theory, this problem should have started when I was using Mona on two devices and an SSB on the third. In practice, it wasn’t so bad because I do almost all of my Mastodon reading and posting on my phone. It was when I started using “web Mastodon” on my phone that I noticed how poorly Mastodon updates the timeline.
On the web, Mastodon puts a link at the top of the page saying there are new posts to load into your timeline. When you tap the link, the new posts load, but your position in the timeline can jump around wildly, and then you have to scroll to get back to where you were. A small annoyance, perhaps, but one that happens again and again every day.
And there’s no syncing between platforms with web Mastodon. This is, as I said, less of a problem for me because I’m mainly reading and posting on my phone, but the scrolling necessary on one device to get to where I had been on another just reminded me of all the scrolling described in the previous paragraph, and it seemed worse.
So I subscribed to Mona Ultra and switched to it on all three platforms. The Mastodon web Home Screen icons are gone from my iPhone and iPad, and the SSB is gone from my Mac. Ultra’s extended settings are nice, and I’m happy to pay for them, but the main advantage is the smoother experience I get with a real app written to use the features of the platform(s) it runs on. In this case, one of those features is iCloud syncing.
(By the way, if you feel tempted to tell me about another Mastodon app, like Ivory, don’t. I know about them—I’m happy with Mona.)
In summary, I don’t have any magic tricks for choosing between web apps and native apps. I just know that it’s worth a little time to try out both and see what fits. Every app and every person is different, and you have to decide from direct experience.
Apple Music weirdness
August 15, 2026 at 5:18 PM by Dr. Drang
I was out on a walk yesterday, listening to the ’70s Hits Radio Station on Apple Music, when “Don’t Leave Me This Way” came on. I pulled my phone out of my pocket to look at a text while the song was playing and was surprised at what the Music app told me about the song.
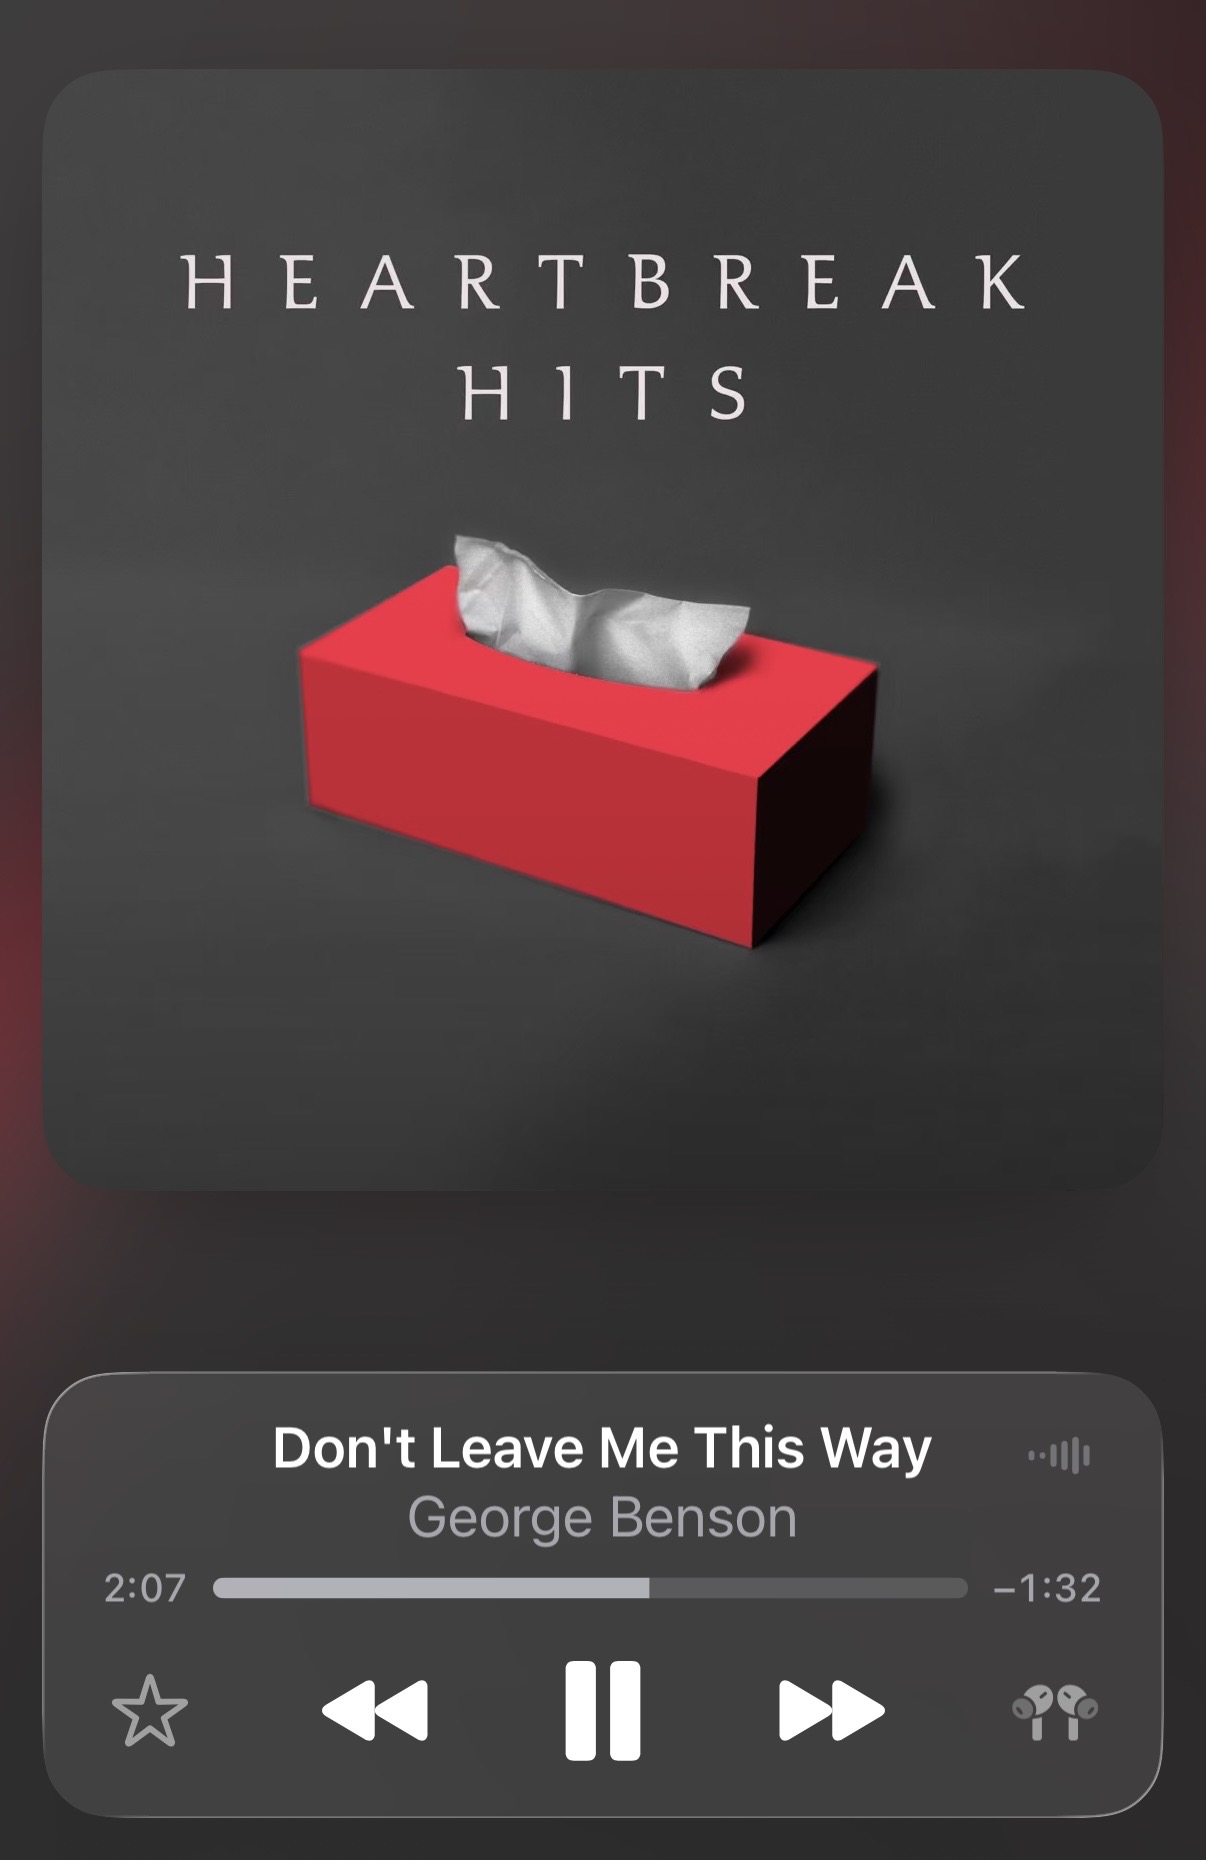
I’m pretty sure George Benson never covered “Don’t Leave Me This Way,” but even if he did, that’s not the version I was listening to. It was the version everybody knows by Thelma Houston, with her incredible voice and that fun bass part during the chorus. I’ve been listening to it for 50 years, and it’s unmistakable.
So how did Apple Music get the artist wrong? Is the info provided with the album wrong and Apple is just repeating someone else’s mistake? When I got home, I checked this Heartbreak Hits compilation album on other services. Amazon Music, Spotify, and Tidal all had the album, and they all had the artist listed correctly as Thelma Houston. Only Apple got it wrong.
I don’t think I’ve ever seen mistaken artist attribution like this before, but Apple’s weird choice of album to pluck the song from is very familiar. I listen to a lot of Apple’s Radio Stations and its Essentials and Deep Cuts playlists, and it’s common for a song to be assigned to a compilation album instead of the original source. Even when Apple has the original album in its library. As you might have guessed, I find this annoying.
It’s not exactly wrong to show a song as being on a compilation album; most hit songs have been put on “best of” and other sorts of compilations. But it’s bad scholarship. Yes, if the song was released as a standalone single—as many Beatle songs were—the only album you can assign it to is a compilation, but that’s fairly rare.
If, for example, you look at the Prince Essentials playlist—which you should; it’s fantastic—you’ll see that both “Gett Off” and “1999” are shown as being from his The Hits/The B-Sides album. That’s certainly a fun album to listen to, but neither of those songs “belong” to that album. “Gett Off” is from Diamonds and Pearls, and if I have to tell you where “1999” is from, I don’t know why you’ve read this far.
Apple likes to say that music is part of its DNA. I suggest they schedule some genetic counseling.
A planet position widget
August 12, 2026 at 12:16 PM by Dr. Drang
After I learned how to make a Mac widget with TerminalWidget and how to determine the locations of celestial objects with Astropy, the natural thing for me to do was combine the two into a widget that tracks the planets.
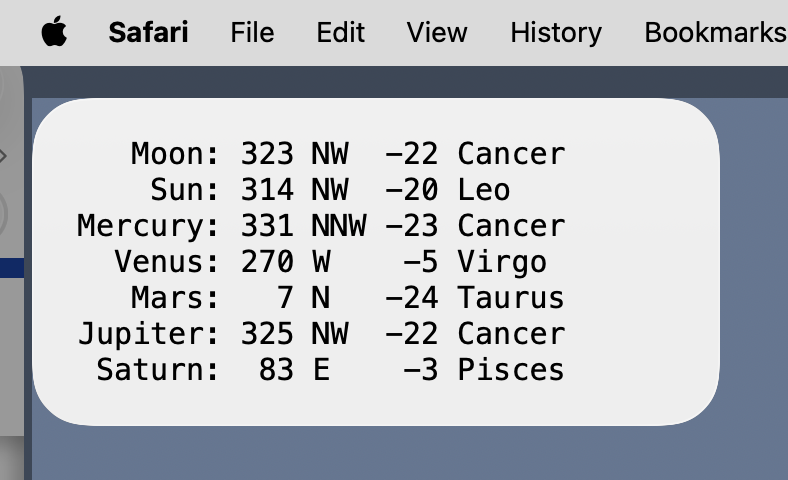
I’m using the ancient definition of planet, which includes the Sun and Moon but not anything past Saturn. The numbers are the azimuth and altitude, in that order, and are given to the nearest degree. The idea is to tell me what may be visible and where it is. This particular screenshot was taken just after 10:00 last night; there was no reason to go outside because everything was below the horizon.
I was torn on whether to include the Sun. Few of us need help finding the Sun in the sky, and you can’t see anything other than the Moon when the Sun is up. But I decided to include it anyway, partly for completeness, and partly because the visibility of some bodies depends on their separation from the Sun.
Let’s start with the code that generates the widget’s text. It’s a Python script called planets:
python:
 1:  import astropy.units as u
 2:  from astropy.time import Time
 3:  from astropy.coordinates import get_body, AltAz, EarthLocation
 4:  from subprocess import run
 5:
 6:  def direction(az):
 7:    'Return a string indication of the azimuth (given in degrees).'
 8:
 9:    dirs = 'N NNE NE ENE E ESE SE SSE S SSW SW WSW W WNW NW NNW'.split()
10:    i = int(((az + 11.25) % 360) / 22.5)
11:    return dirs[i]
12:
13:  # Current time in UTC.
14:  ut = Time.now()
15:
16:  # Observation location.
17:  home = EarthLocation(lat=41.81433*u.deg, lon=-88.07093*u.deg, height=208*u.m)
18:
19:  # Bodies of interest.
20:  planets = 'Moon Sun Mercury Venus Mars Jupiter Saturn'.split()
21:
22:  # Current positions of all the bodies.
23:  pos = {}
24:  const = {}
25:  for p in planets:
26:      pos[p] = get_body(p, ut).transform_to(AltAz(obstime=ut, location=home))
27:      const[p] = pos[p].get_constellation()
28:
29:  # Assemble the results.
30:  output = []
31:  for p in planets:
32:      output.append(f'{p:>8s}: {pos[p].az.value:3.0f} \
33:  {direction(pos[p].az.value):3s} {pos[p].alt.value:3.0f} {const[p]}')
34:
35:  # Pipe the results through TerminalWidget.
36:  tw = '/Applications/TerminalWidget.app/Contents/MacOS/TerminalWidget\
37:   --target planets --font Menlo --bg eeeeee --fg 000000 --text -'.split()
38:  run(tw, input='\n'.join(output).encode())
39:
40:  # print('\n'.join(output))
There’s no shebang line because of how it gets called by launchd, which we’ll get to later.
After planets imports the necessary modules, Lines 6–11 define the direction function, which takes the azimuth and returns a string with the corresponding point of the compass. I have this because 223°, which is how Astropy reports the azimuth, doesn’t immediately say “southwest” to me. The function assumes a 16-point compass, like this one:
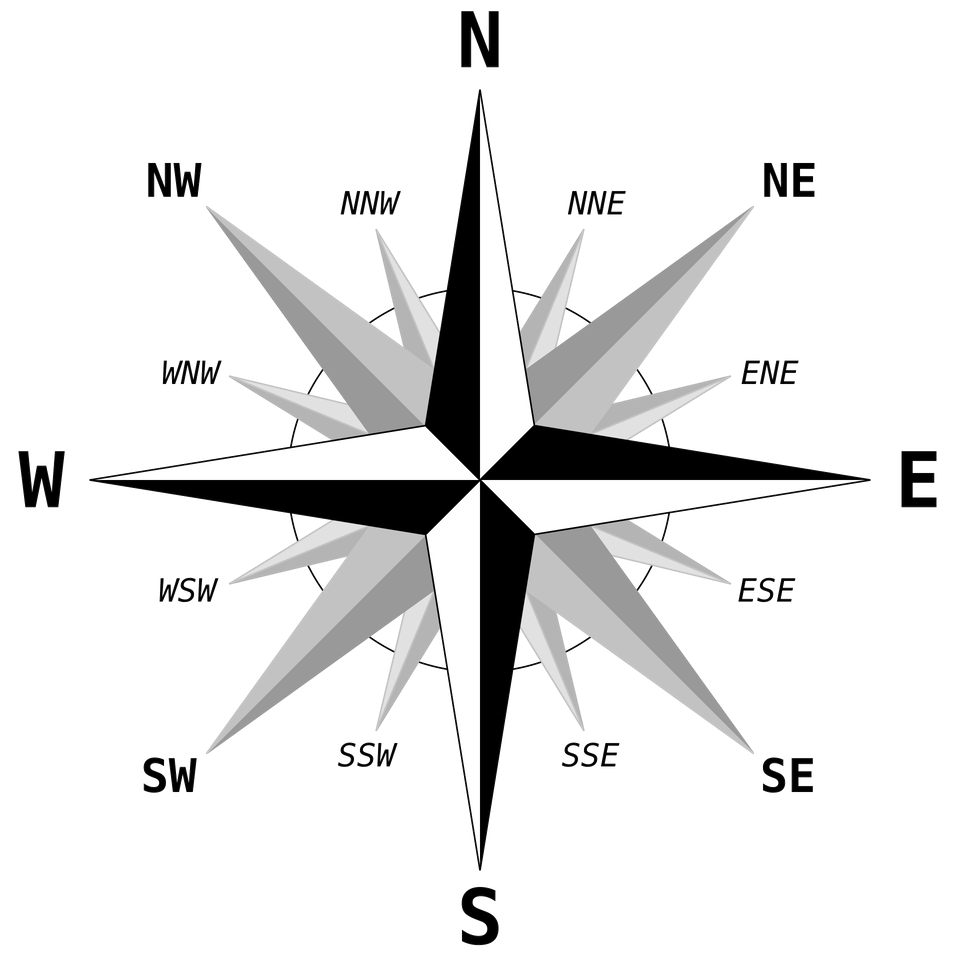
Image from Wikipedia.
The points are separated by 22.5°, which is why there’s a division by 22.5 in Line 10. The other parts of Line 10 adjust for the fact that North starts at 348.75° (-11.25°), the azimuth resets at 360°, and the index of a list must be an integer. Astropy may already have a function that does what direction does, but I thought it would be easier (and more fun) to write the function myself than to search through the documentation.
Lines 14 and 17 define the time and place of observation. planets will be run every half hour to update the widget, so what’s being displayed is never more than 30 minutes out of date. The home location you see above is actually the Morton Arboretum; my version of the script uses the latitude and longitude of my house.
Line 20 defines the planets list, and Lines 23–27 create a pair of dictionaries, pos and const, which contain the AltAz position and constellation of each planet. The get_body function (Line 26) gets the position, and the get_constellation function (Line 27) uses that position to figure out the constellation the body is in.
Lines 30–33 create the list of output lines, and Lines 36–38 use the run function of the subprocess module to send the output lines to TerminalWidget. The tw list contains both the full path to the TerminalWidget executable and all the options passed to it. The input parameter to run is the previously defined output, converted to a single string separated by linefeeds and encoded as bytes.
Line 40 is basically a debugging line that I’ve left in for future development. While writing planets, I had Lines 36–38 commented out and Line 40 uncommented so I could see the results immediately in the Terminal.
planets is run by launchd every 30 minutes, on the hour and half-hour, via this launch agent, com.leancrew.planets.plist:
xml:
 1:  <?xml version="1.0" encoding="UTF-8"?>
 2:  <!DOCTYPE plist PUBLIC "-//Apple//DTD PLIST 1.0//EN" "http://www.apple.com/DTDs/PropertyList-1.0.dtd">
 3:  <plist version="1.0">
 4:  <dict>
 5:    <key>Label</key>
 6:    <string>com.leancrew.planets</string>
 7:    <key>ProgramArguments</key>
 8:    <array>
 9:      <string>/path/to/python</string>
10:      <string>/path/to/planets</string>
11:    </array>
12:    <key>StartCalendarInterval</key>
13:    <array>
14:      <dict>
15:        <key>Minute</key>
16:        <integer>0</integer>
17:      </dict>
18:      <dict>
19:        <key>Minute</key>
20:        <integer>30</integer>
21:      </dict>
22:    </array>
23:  </dict>
24:  </plist>
The first item in the ProgramArguments array is the full path to the Python executable (this is why planets doesn’t need a shebang line), and the second item is the full path to the planets script itself. The schedule for running planets is in the StartCalendarInterval array—whenever the minute is 0 or 30, the script is run.
As I write this, a solar eclipse is nearly underway. Here in the Chicago area, it’s going to be a very partial eclipse—only 1% of the Sun will be blocked. Since 100% of the Sun is being blocked by clouds, I won’t be able to see any of the eclipse. But my planets widget is showing me, more or less, that it’s happening above the clouds.
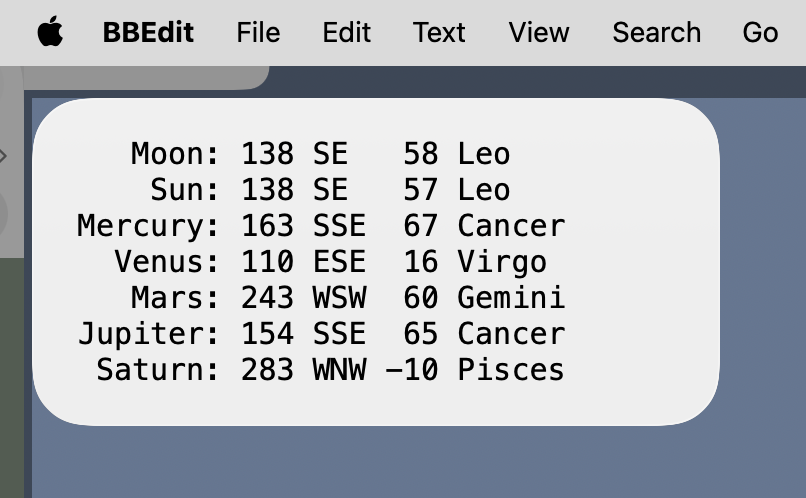
Rounding the Sun and Moon’s positions to the nearest degree isn’t precise enough to determine an eclipse, but it’s a decent hint.
I’ll follow the Sun
August 10, 2026 at 10:49 PM by Dr. Drang
Through an odd coincidence, I started writing this post when the Sun was in Cancer, but by the time I’m done and get it published, the Sun will be in Leo. Don’t worry, this isn’t an astrology post—I don’t want to anger John Gruber—but it is a further coincidence that I’ve been puttering around with observational astronomy calculations at a time when there’s been some controversy in the Apple world about astronomy vs. astrology.
I’m often out walking at night, and a few months ago—when Mercury, Venus, and Jupiter were near each other and close to Castor and Pollux, the Gemini twins—I started thinking it would be nice to be able to write little scripts that would tell me where the planets were and when they’d be easily visible. One of the fun features would be including information on which constellation the planets were in.
This led me on a fun journey of discovery, the sort of thing AI companies want us to forget how to do. I learned that official boundaries for the Western constellations were defined only about a century ago and that although they were defined in a very simple way, corresponding to lines of right ascension and declination, precession of the equinoxes has since made those boundaries more complicated. They still look pretty well aligned, but they aren’t. Here’s the IAU image of Aries:

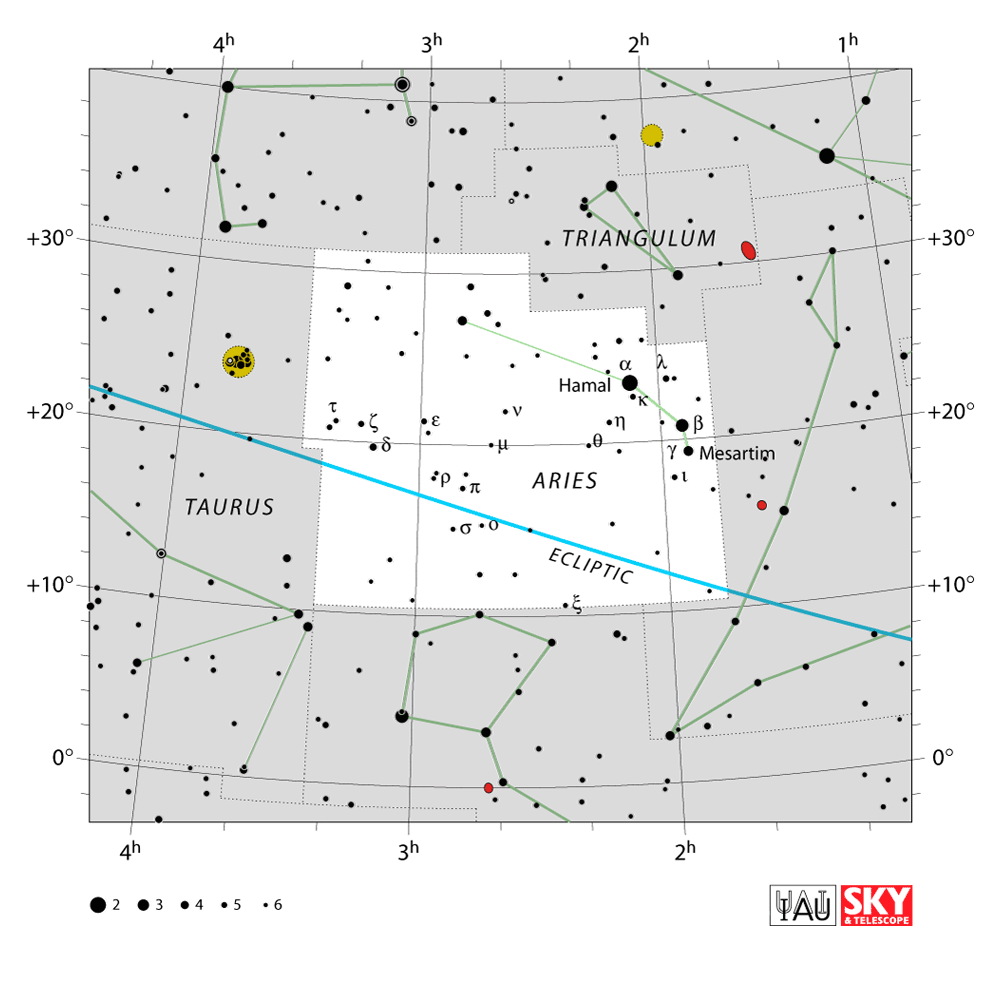
If you look at the right ascension and declination coordinates of the points on its boundary, you’ll see that successive points don’t have the same RA or Dec values. Close, but not the same.
02 06 39.6594| 10.5143948|ARI
01 46 37.3761| 10.5432396|ARI
01 46 58.7219| 25.6263351|ARI
02 02 03.2907| 25.6050701|ARI
02 02 07.3479| 27.8550186|ARI
02 32 16.8357| 27.8047638|ARI
02 32 24.7665| 31.2213154|ARI
02 50 30.8112| 31.1865025|ARI
03 29 42.4003| 31.1003609|ARI
03 29 09.7494| 19.4343338|ARI
03 24 08.9363| 19.4461136|ARI
03 23 47.1387| 10.3632069|ARI
I also learned that there are a crapload of reference frames, and you had better know which one is being used for the data you’re accessing.
This is one of the things that led me to abandon Mathematica and the Wolfram Language for these calculations. Despite Wolfram’s promises of great solutions for astronomy, my test notebook showed that the RA and Dec for the Sun, for example, aren’t reported in the same frame as the RA and Dec of stars. This isn’t necessarily bad—it could be more natural to use one frame for one sort of object and another frame for another sort—but the documentation needs to tell you what frames are being used and how to convert between them. I never found that explanation, so I started exploring Python solutions.
There are two main Python modules for doing the kind of calculation I’m interested in: Astropy and Skyfield. Astropy is the standard Python module (or set of modules) for doing all sorts of astronomical calculations; Skyfield seems to be more focused on observational astronomy. That would suggest I should use Skyfield, but after looking through the documentation, I decided to get my feet wet with Astropy because it looked simpler. I can always switch to Skyfield if I find myself bumping up against some limitations in Astropy.
(I should also mention SPICE, which is NASA’s software toolkit for working with the positions of planets and other objects in space. It has a Python wrapper for its C version, and having the imprimatur of NASA certainly made it attractive. But it doesn’t have actual Python documentation; it wants users to refer to the C documentation to figure out how the Python functions work, and I’m not interested in that.)
Having settled on Astropy, I wrote up a little script this afternoon to see if my brief review of the documentation was enough to do some of the calculations I was interested in. The script calculates the position of the Sun today at 2:00 PM CDT, and converts the result into a form that I can compare with the NOAA Solar Calculator page.
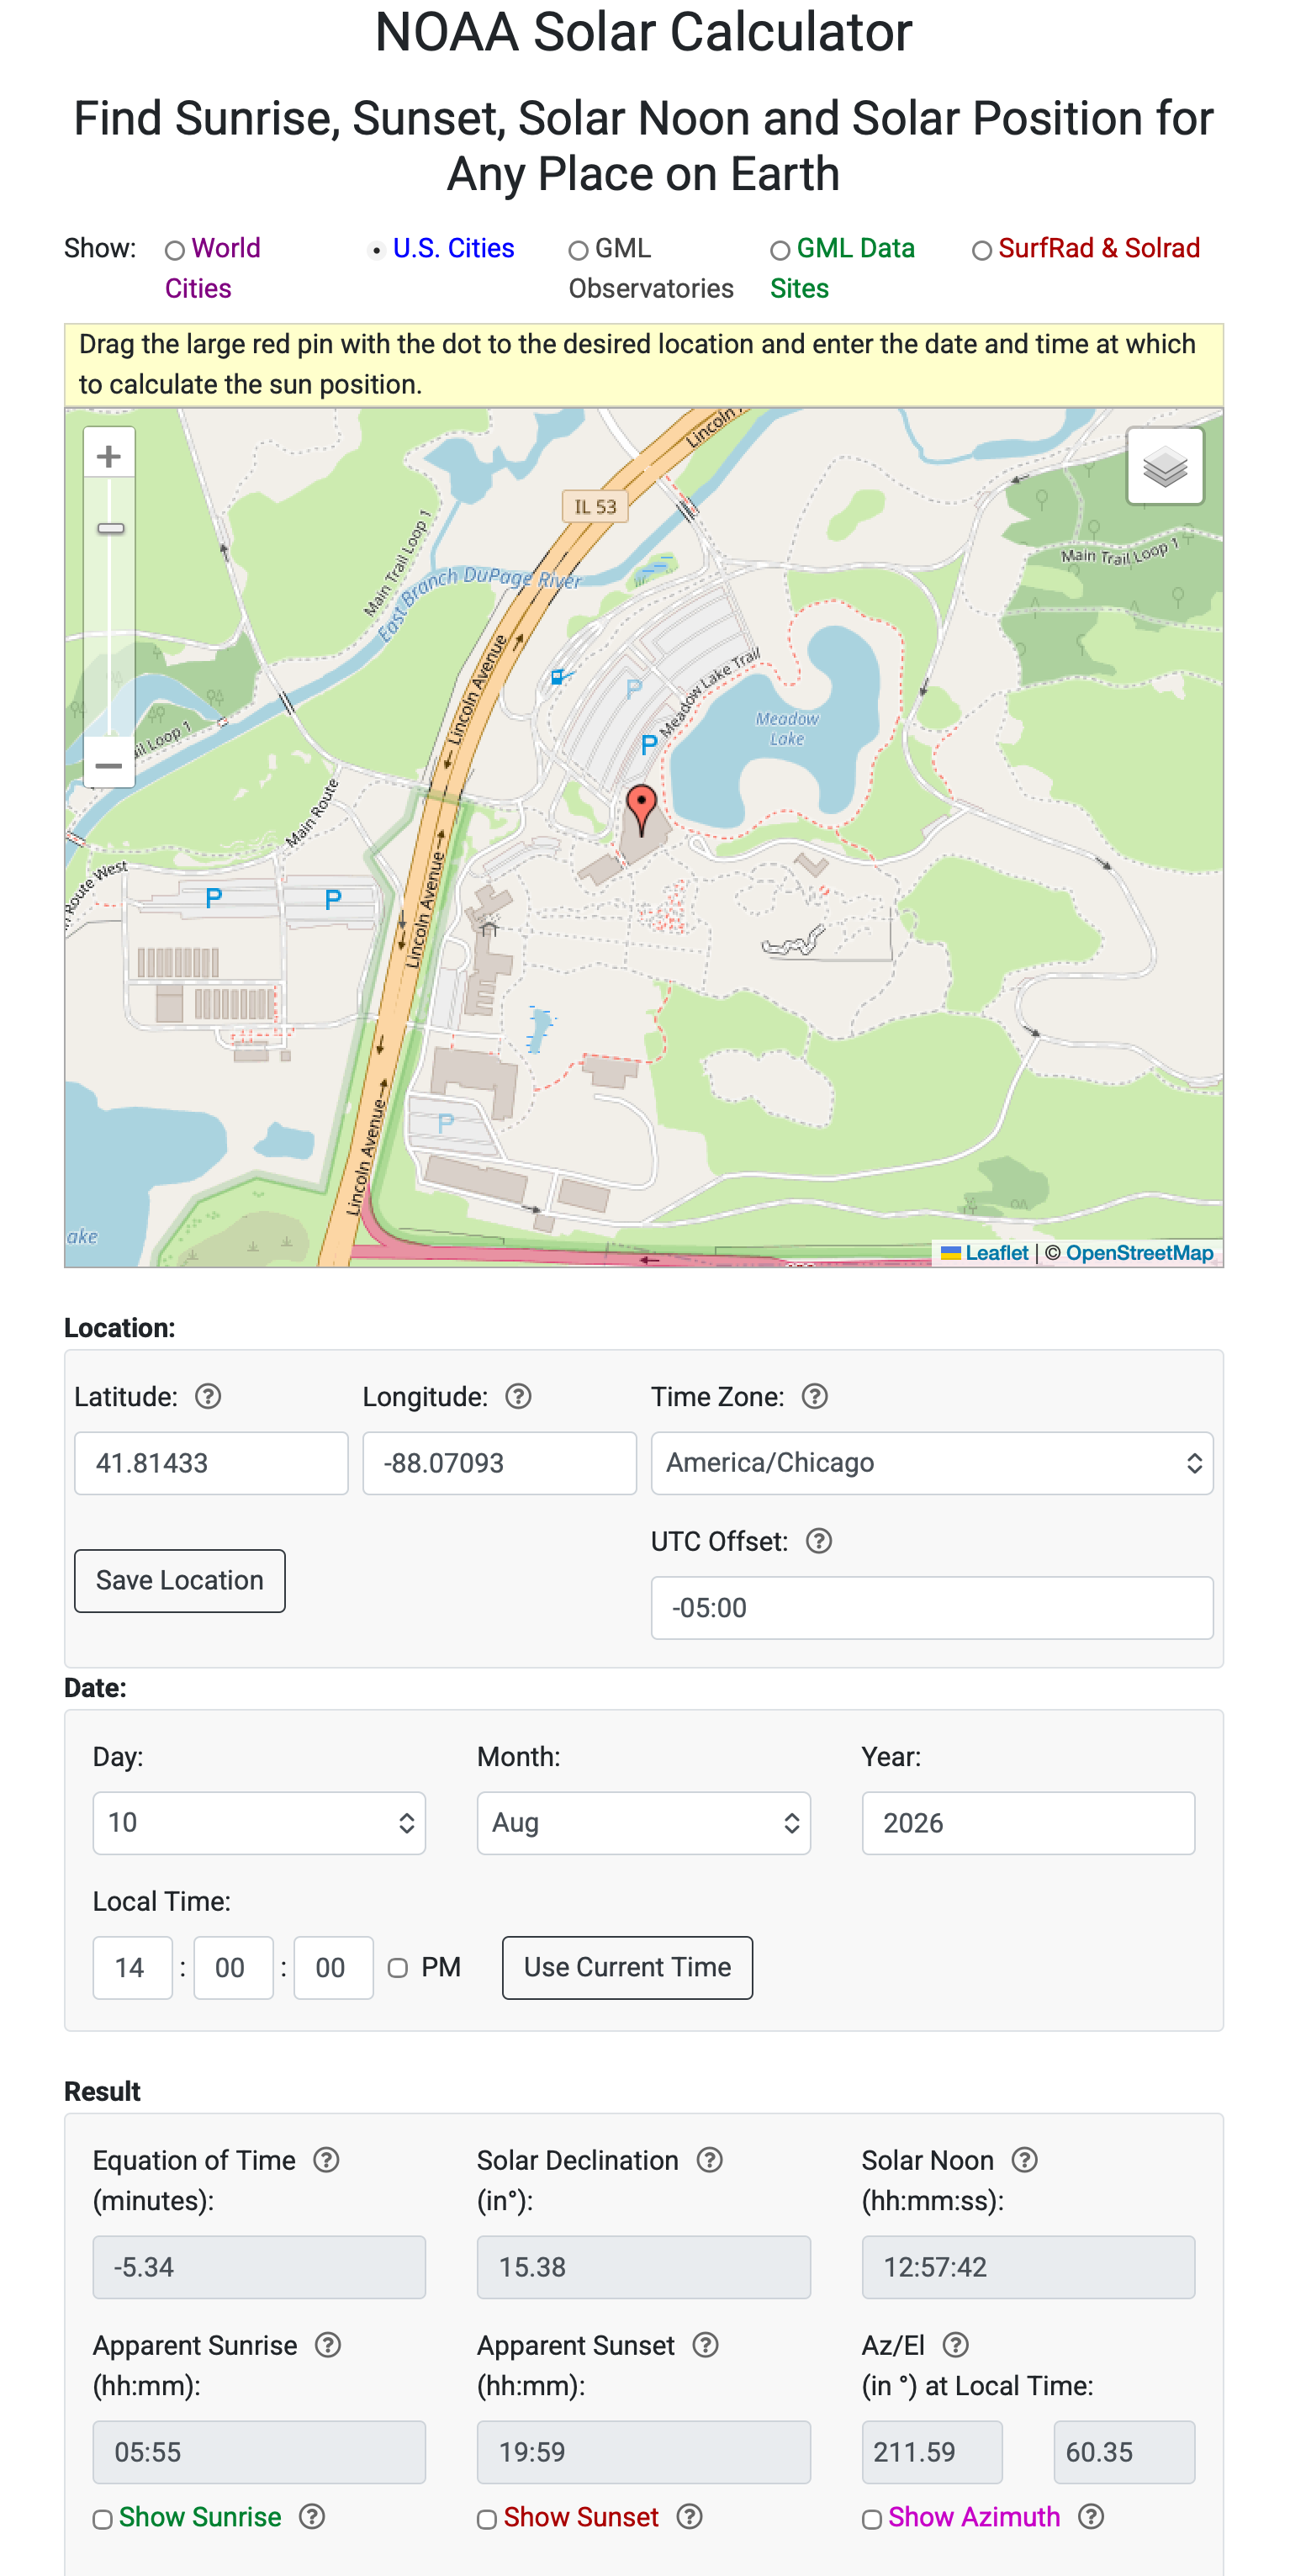
I’ve set the observation point to the visitor center at the Morton Arboretum. The results of interest are the azimuth and altitude (or elevation) of the Sun at the appointed date and time. Here’s a zoomed-in view of the lower right corner:
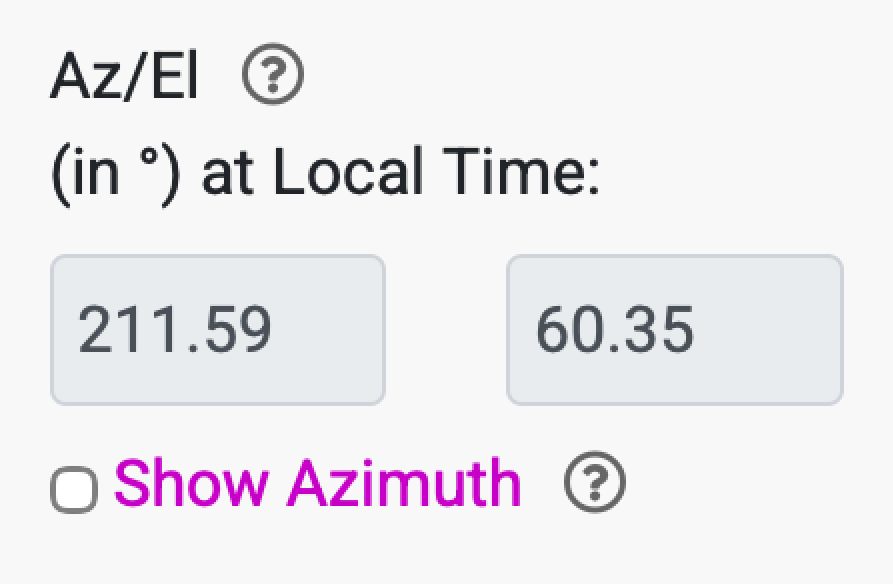
So a person at the Arboretum at 2:00 would see the Sun in the southwest, 211.59° from north, at 60.35° up from the horizon. NOAA’s altitude calculation includes an atmospheric correction, the formula for which is given on a linked page.
Here’s my little script:
python:
 1:  #!/usr/bin/env python3
 2:
 3:  from astropy.coordinates import ICRS, AltAz, EarthLocation, get_sun
 4:  from astropy.time import Time
 5:  import astropy.units as u
 6:  from trigd import *
 7:
 8:  # 2:00 PM Central Daylight Time on August 10, 2026.
 9:  utcoffset = -5*u.hour
10:  time = Time('2026-8-10 14:00:00') - utcoffset
11:
12:  # Location of Morton Arboretum visitor center.
13:  morton = EarthLocation(lat=41.81433*u.deg, lon=-88.07093*u.deg, height=208*u.m)
14:
15:  # Sun position in GCRS (default).
16:  sun = get_sun(time)
17:
18:  # The constellation it's in.
19:  constellation = sun.get_constellation()
20:
21:  # Sun position as azimuth and altitude
22:  sun_altaz = sun.transform_to(AltAz(obstime=time, location=morton))
23:
24:  # The default transformation to AltAz makes no adjustment for refraction.
25:  # Use the NOAA refraction formula to adjust altitude for comparison
26:  # with the NOAA value.
27:  def noaa_refraction(alt):
28:    t = tand(alt)
29:    return (58.1/t - .007/t**3 + .000086/t**5)/3600
30:
31:  # Print the results.
32:  az = sun_altaz.az.value
33:  alt = sun_altaz.alt.value
34:  alt_adj = alt + noaa_refraction(alt)
35:  print(f'      Azimuth: {az:-6.2f}°')
36:  print(f'     Altitude: {alt:-6.2f}° (without refraction)')
37:  print(f'     Altitude: {alt_adj:-6.2f}° (with NOAA refraction)')
38:  print(f'Constellation: {constellation}')
The script starts by importing various Astropy submodules and my trigd module, which calculates trigonometric functions for degrees instead of radians. We’ll use that to match NOAA’s atmospheric correction formula.
Lines 9 and 10 set the date and time as an Astropy Time object. Line 13 sets the location to the visitor center. Line 16 gets the position of the Sun at that time in the Geocentric Celestial Reference System (GCRS) frame. Line 22 then transforms the position to azimuth and altitude as viewed from the visitor center.
Because I didn’t include any atmospheric information in the AltAz specification, it assumes a vacuum and does no refraction adjustment. I did it that way so I could use NOAA’s refraction formula instead of whatever Astropy does. That formula is defined in Lines 27–29 (which uses the tand function to calculate the tangent of an angle given in degrees), and the adjusted altitude is calculated in Line 34.
Lines 35–38 print out the results, which look like this:
      Azimuth: 211.59°
     Altitude:  60.34° (without refraction)
     Altitude:  60.35° (with NOAA refraction)
Constellation: Cancer
We’ll return to the constellation part later. As you can see, the azimuth and adjusted altitude match the NOAA values to two decimal places, which made me feel pretty good.
As for the constellation the Sun was in at the specified time, that’s calculated by the aptly named get_constellation function on Line 19. The great thing about get_constellation is that it understands the reference frame of the object it’s called from and does whatever transformations are needed (in this case to ICRS) to figure out which constellation that object is in. The answer was printed out by Line 38.
To check on the constellation answer, I went to Heavens Above, a site I’ve been using since the late 90s. I entered the Arboretum location and 2:00 PM today as the time, and HA told me the Sun was in Cancer, just like Astropy. It also showed me this sky chart:
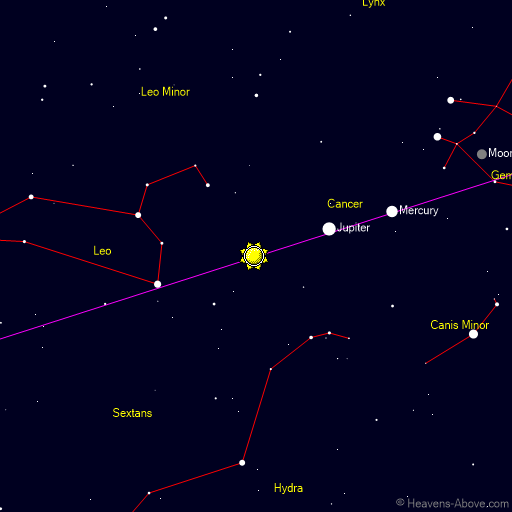
The Sun was clearly near the end of its time in Cancer and would soon be in Leo. So I began a trial-and-error search at Heavens Above and with Astropy in an interactive Python session to find out when the Sun would move from Cancer to Leo.
Heavens Above told me that the Sun would enter Leo at 8:00:15 PM today. Astropy said it would happen at 8:07:23 PM. I suspect Heavens Above is giving the better answer, as I’ve been using Astropy in its most basic configuration. There are ways to set up Astropy to use ephemerides data, which should give more accurate positions. That’ll be my next step.
By the way, a 7-minute difference isn’t much. The Sun moves along the ecliptic at a rate of about 1° per day (roughly 360° in 365 days), and 7 minutes is about 0.005 of a day (7/1440). That means the difference between the Heavens Above Sun position and the Astropy Sun position is about 0.005°. Do I need the position of the Sun (or any of the planets) to a greater precision than that? No, but that won’t stop me from exploring ways to do so.