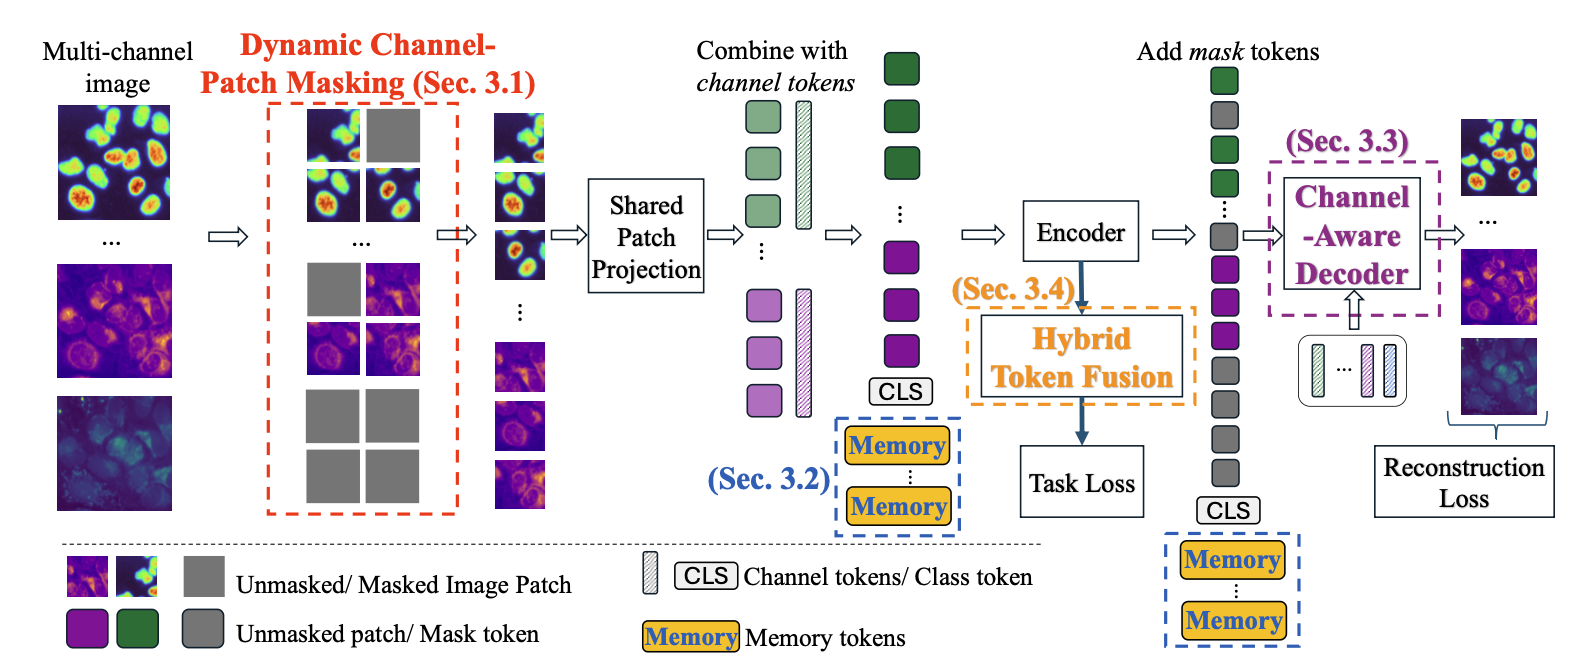
A Pytorch implementation for Channel-Aware Masked Autoencoders ViT (ChA-MAEViT) in our paper. This code was tested using Pytorch 2.6.0+cu124 and Python 3.12.
If you find our work useful, please consider citing:
@InProceedings{PhamChaMAE2025,
author = {Chau Pham and Juan C. Caicedo and Bryan A. Plummer},
title = {ChA-MAEViT: Unifying Channel-Aware Masked Autoencoders and Multi-Channel Vision Transformers for Improved Cross-Channel Learning},
booktitle = {Advances in Neural Information Processing Systems (NeurIPS)},
year = {2025}}
Installation
1. Create and activate environment
conda create -n chamaevit python=3.12 -y
conda activate chamaevit
2. Install dependencies via pip
pip install -r requirements.txt
3. Extra packages
Some packages are not available via pip, so we install them via conda
3.1. Install faiss-gpu for CHAMMI's evaluation benchmark
conda install -c pytorch -c nvidia -c rapidsai -c conda-forge libnvjitlink faiss-gpu-cuvs=1.11.0 -y
Code Structure
├── main.py                   # Entry point (loads config, calls `train.py`)
├── train.py                  # Training loop & evaluation logic
├── models/                   # Model definitions
│   └── cha_mae_vit.py        # ChA-MAEViT's implementation
├── configs/                  # Hydra configs
├── requirements.txt          # Python dependencies
└── README.md                 # This file
Dataset
After downloading the following datasets, you need to update the paths in the config files configs/data/train_data.yaml.
1. CHAMMI
CHAMMI consists of varying-channel images from three sources: WTC-11 hiPSC dataset (WTC-11, 3 channels), Human Protein Atlas (HPA, 4 channels), and Cell Painting datasets (CP, 5 channels). We evaluate representation learning performance on the CHAMMI benchmark using nearest neighbor protocols based on feature sets from the paper.
The dataset can be downloaded from https://doi.org/10.5281/zenodo.7988357
Metadata file is stored at assets/morphem70k_v2.csv.
You can find more details about the CHAMMI benchmark here.
2. JUMP-CP
Here's a quick overview to help you get started.
The processed data is stored in an S3 bucket as follows:
s3://insitro-research-2023-context-vit
└── jumpcp/
    ├──  platemap_and_metadata/
    ├──  BR00116991/
    │    ├── BR00116991_A01_1_12.npy
    │    ├── BR00116991_A01_1_13.npy
    │    └── ...
    ├──  BR00116993/
    ├──  BR00117000/
    ├──  BR00116991.pq
    ├──  BR00116993.pq
    └──  BR00117000.pq
We conduct experiments on the BR00116991 dataset, which requires downloading platemap_and_metadata/, BR00116991/ folders, and BR00116991.pq.
First, you need to install AWS CLI, then run these commands in the Terminal:
aws s3 cp s3://insitro-research-2023-context-vit/jumpcp/platemap_and_metadata jumpcp/platemap_and_metadata --recursive --no-sign-request
aws s3 cp s3://insitro-research-2023-context-vit/jumpcp/BR00116991 jumpcp/BR00116991 --recursive --no-sign-request
aws s3 cp s3://insitro-research-2023-context-vit/jumpcp/BR00116991.pq jumpcp/BR00116991.pq --no-sign-request
We evaluate classification performance on this dataset, which has 161 classes (160 perturbations and a control treatment). You can refer to insitro's dataset repo for further details.
3. So2Sat
We use the city split (version 2) of the So2Sat dataset. The dataset can be downloaded by running
wget --no-check-certificate https://dataserv.ub.tum.de/s/m1454690/download?path=%2F&files=validation.h5&downloadStartSecret=p5bjok57fil
The dataset consists of 17 classes, each representing a distinct climate zone. We evaluate classification performance on this dataset. For more detail, you can refer to So2Sat-LCZ42 repo.
4. 38-Cloud
We use the Cloud Segmentation dataset from here.
It contains 4 channels (R, G, B, NIR) with image size of 384x384.
To train the cloud segmentation task, a ViT Segmentation head (models/segmentation.py) is added and trained with the BCE-Dice loss (models/loss_func.py -> DiceBCELoss()). Our experiments use the 38-Cloud_training folder, with metadata provided in assets/cloud38_split.csv.
Training
Quick start with training examples
- Train with a single GPU
python main.py \ ++logging.use_wandb=false ++data.training_dataset=chammiv1 \ ++train.batch_size=64 ++train.num_workers=3 - To train with more than 1 GPU, replace
pythonwithaccelerate launch --num_processes=NUM_GPUs.
We use Hydra to handle configuration.
All settings are in config/ folder.
We can override the default configuration in the YAML file via the command line.
For example, to set batch_size in configs/train/train.yaml to 128, run:
python main.py ++train.batch_size=128
To reproduce our results in Table 1, please refer to train_scripts.sh. We tested this repo and provided the training logs in the training_logs folder for your reference.
Logging & Monitoring
- Experiment tracking through Weights & Biases:
configs/logging/wandb.yaml. If you want to disable it, setuse_wandbtoFalse.
TroubleShooting
-
Numpy: AttributeError: module 'numpy._core' has no attribute 'multiarray'
- It's likely there are 2 different versions of numpy. To fix this, uninstall numpy, then reinstall it again:
pip uninstall numpy (make sure no numpy is installed)
pip install numpy==1.26.4
- It's likely there are 2 different versions of numpy. To fix this, uninstall numpy, then reinstall it again:
-
Failed to build simsimd:
- Try to install lower version of
albumentations
pip install albumentations==1.4.20
- Try to install lower version of
-
Too old GCC for xformers:
- If you get this error, try to install
gccvia conda:
pip install xformers==0.0.27
- If you get this error, try to install