Use workflows when you want to take work off your plate, such as welcoming new customers, sending summary emails, syncing data between tools, or running multi-step processes that wait, check conditions, and react automatically. When building an app in Base44, workflows run backend work for you automatically. A workflow can start on a schedule, when your data changes, when an app user talks to an in-app agent, or when a connected integration sends an event. You create and manage workflows using the AI chat in your app’s dashboard.
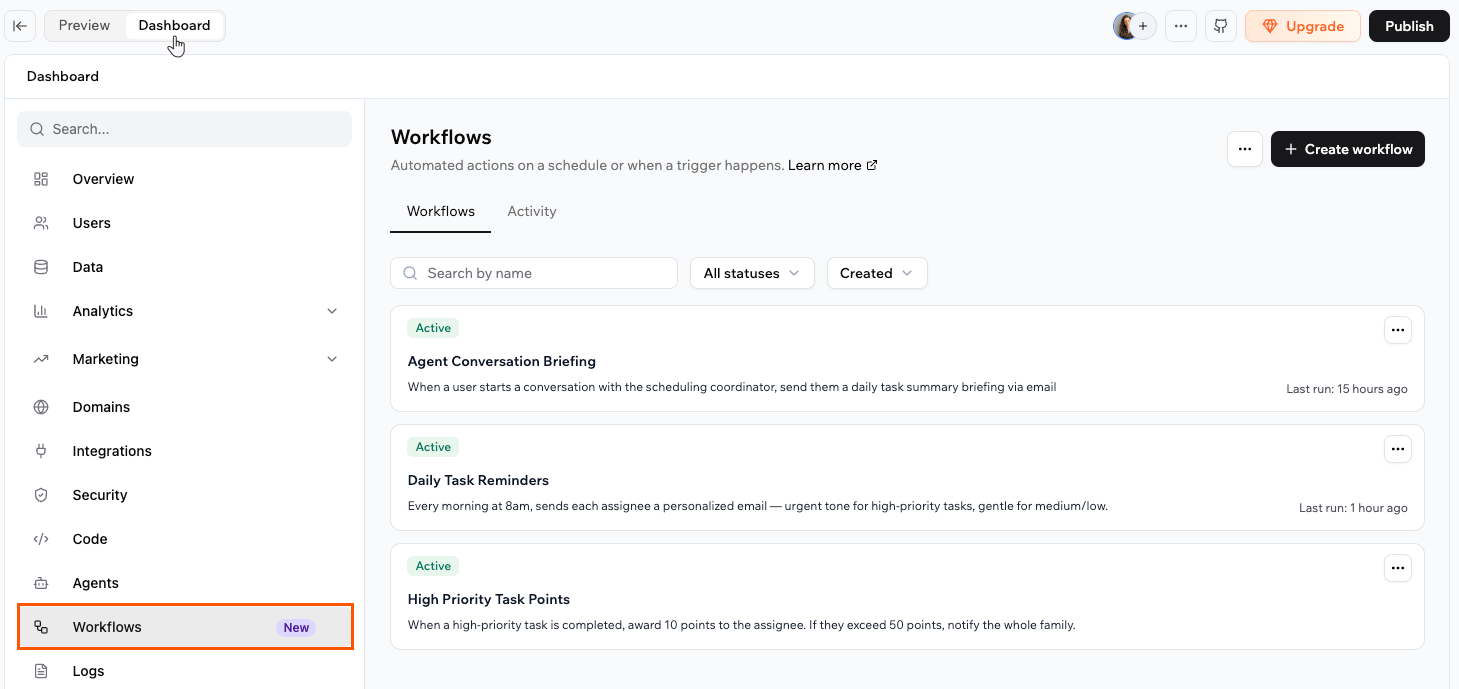
The Workflows dashboard, where you create and manage workflows.
How workflows work
A workflow is made of a trigger and one or more steps. The trigger decides when the workflow starts. The steps decide what happens, in order, each time it runs: a step can run a backend function (code the AI writes for you), wait for a set amount of time, or take a different path based on a condition. When you describe what you want in the AI chat, Base44 builds the workflow for you. It appears in two places: your app’s file tree and the Workflows dashboard. Opening it shows a visual diagram that flows from the trigger through each step. Each run is recorded, so you can review what happened and fix any issues quickly.
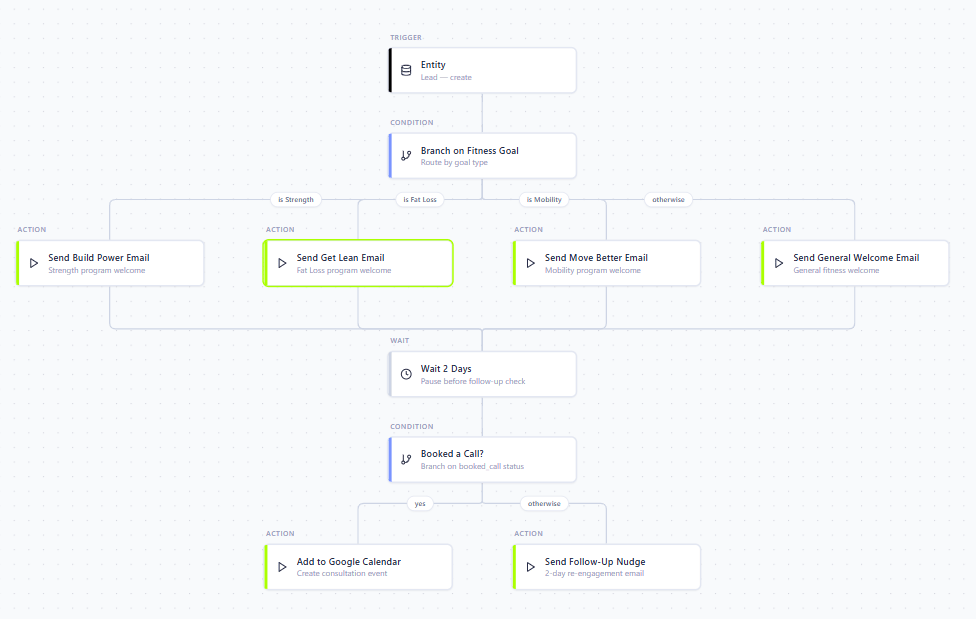
A workflow shown as a diagram, from the trigger through each step.
Example: welcoming a new lead. When a lead is created, the workflow sends a welcome email matched to their fitness goal, waits 2 days, then checks whether they booked a call. If they did, it adds the call to your calendar; if not, it sends a follow-up nudge.
Choosing a trigger
There are 4 ways a workflow can start. When describing what you want to the AI chat, it helps to know which trigger fits your use case. Read more about each one below.
| Trigger | Best for | Keep in mind |
|---|---|---|
| Scheduled | Recurring jobs, or a one-time job at a set time | Recurring runs happen at most once every 5 minutes |
| Entity | Reacting to changes in your app’s data | Add a condition so it does not run on every change |
| In-app agent | Reacting when someone starts an agent conversation | Runs once per new conversation, not per message |
| Connector | Reacting to events from a connected tool | The tool must support workflow triggers |
Scheduled
Scheduled workflows run at a time you define in your timezone. You can run one time, on a recurring schedule, or on an interval, for example every 30 minutes. Use these for recurring tasks like daily digests and weekly reports, or for a one-time job at a specific date and time. Example prompts:
Send me a daily summary of all new orders to my email every morning at 8:00.Archive trip records that have been completed for more than 30 days, every Sunday at midnight.
Entity
Entity workflows run in response to changes in your app’s data, such as a record being created, updated, or deleted. Use these to react to activity in real time. Example prompts:
Send a push notification whenever I add a new WishlistPlace and write any needed backend function for me.Send the admin an email whenever a new booking is created.
In-app agent
In-app agent workflows run once when an app user starts a new conversation with an in-app agent, not on every message they send. Use these to stay on top of who is reaching out, for example to get notified when a customer starts a chat, add them to your contacts, or send yourself a summary at the end of the day. Example prompts:
Email me whenever someone starts a new conversation with my agent.Add the person to my Contacts list when they start a chat with my agent.
Connector
Connector workflows run when a connected tool sends an event, such as a new email arriving in Gmail or a calendar event being updated in Google Calendar. The tool must be connected first, and it must support workflow triggers, such as Gmail, Google Calendar, Google Drive, Microsoft Outlook, Microsoft OneDrive, and Slack. You can add a condition so a workflow only runs for the events you care about. This matters most for busy tools like Slack, where you might want to run only for messages in a certain channel or from a certain person. Example prompts:
When a new email arrives in Gmail with the subject "Book appointment", parse it and add a new booking to my app.When a Google Calendar event is cancelled, update the booking in my app and post a message in the #salon-general Slack channel.
Creating a workflow
To create a workflow, click Create workflow in your app dashboard. Base44 opens a Create a new workflow canvas, where you either start from a trigger or pick one of the suggestions based on your app. From there, you describe what you want in the AI chat and it creates the workflow, asking any questions it needs. You keep refining it in the chat until it works the way you need.
Starting from a trigger
Start from a trigger when you already know how the workflow should begin. To create a workflow from a trigger:
- Click Dashboard in your app editor.
- Click Workflows.
- Click Create workflow.
- On the canvas, click Add trigger, then choose how the workflow starts: a scheduled trigger (One time, Recurring, or On an interval), a connector, an in-app agent, or an entity.
- In the AI chat, describe what the workflow should do, and answer any follow-up questions the AI asks.
- The AI creates the workflow and adds it to your Workflows list.
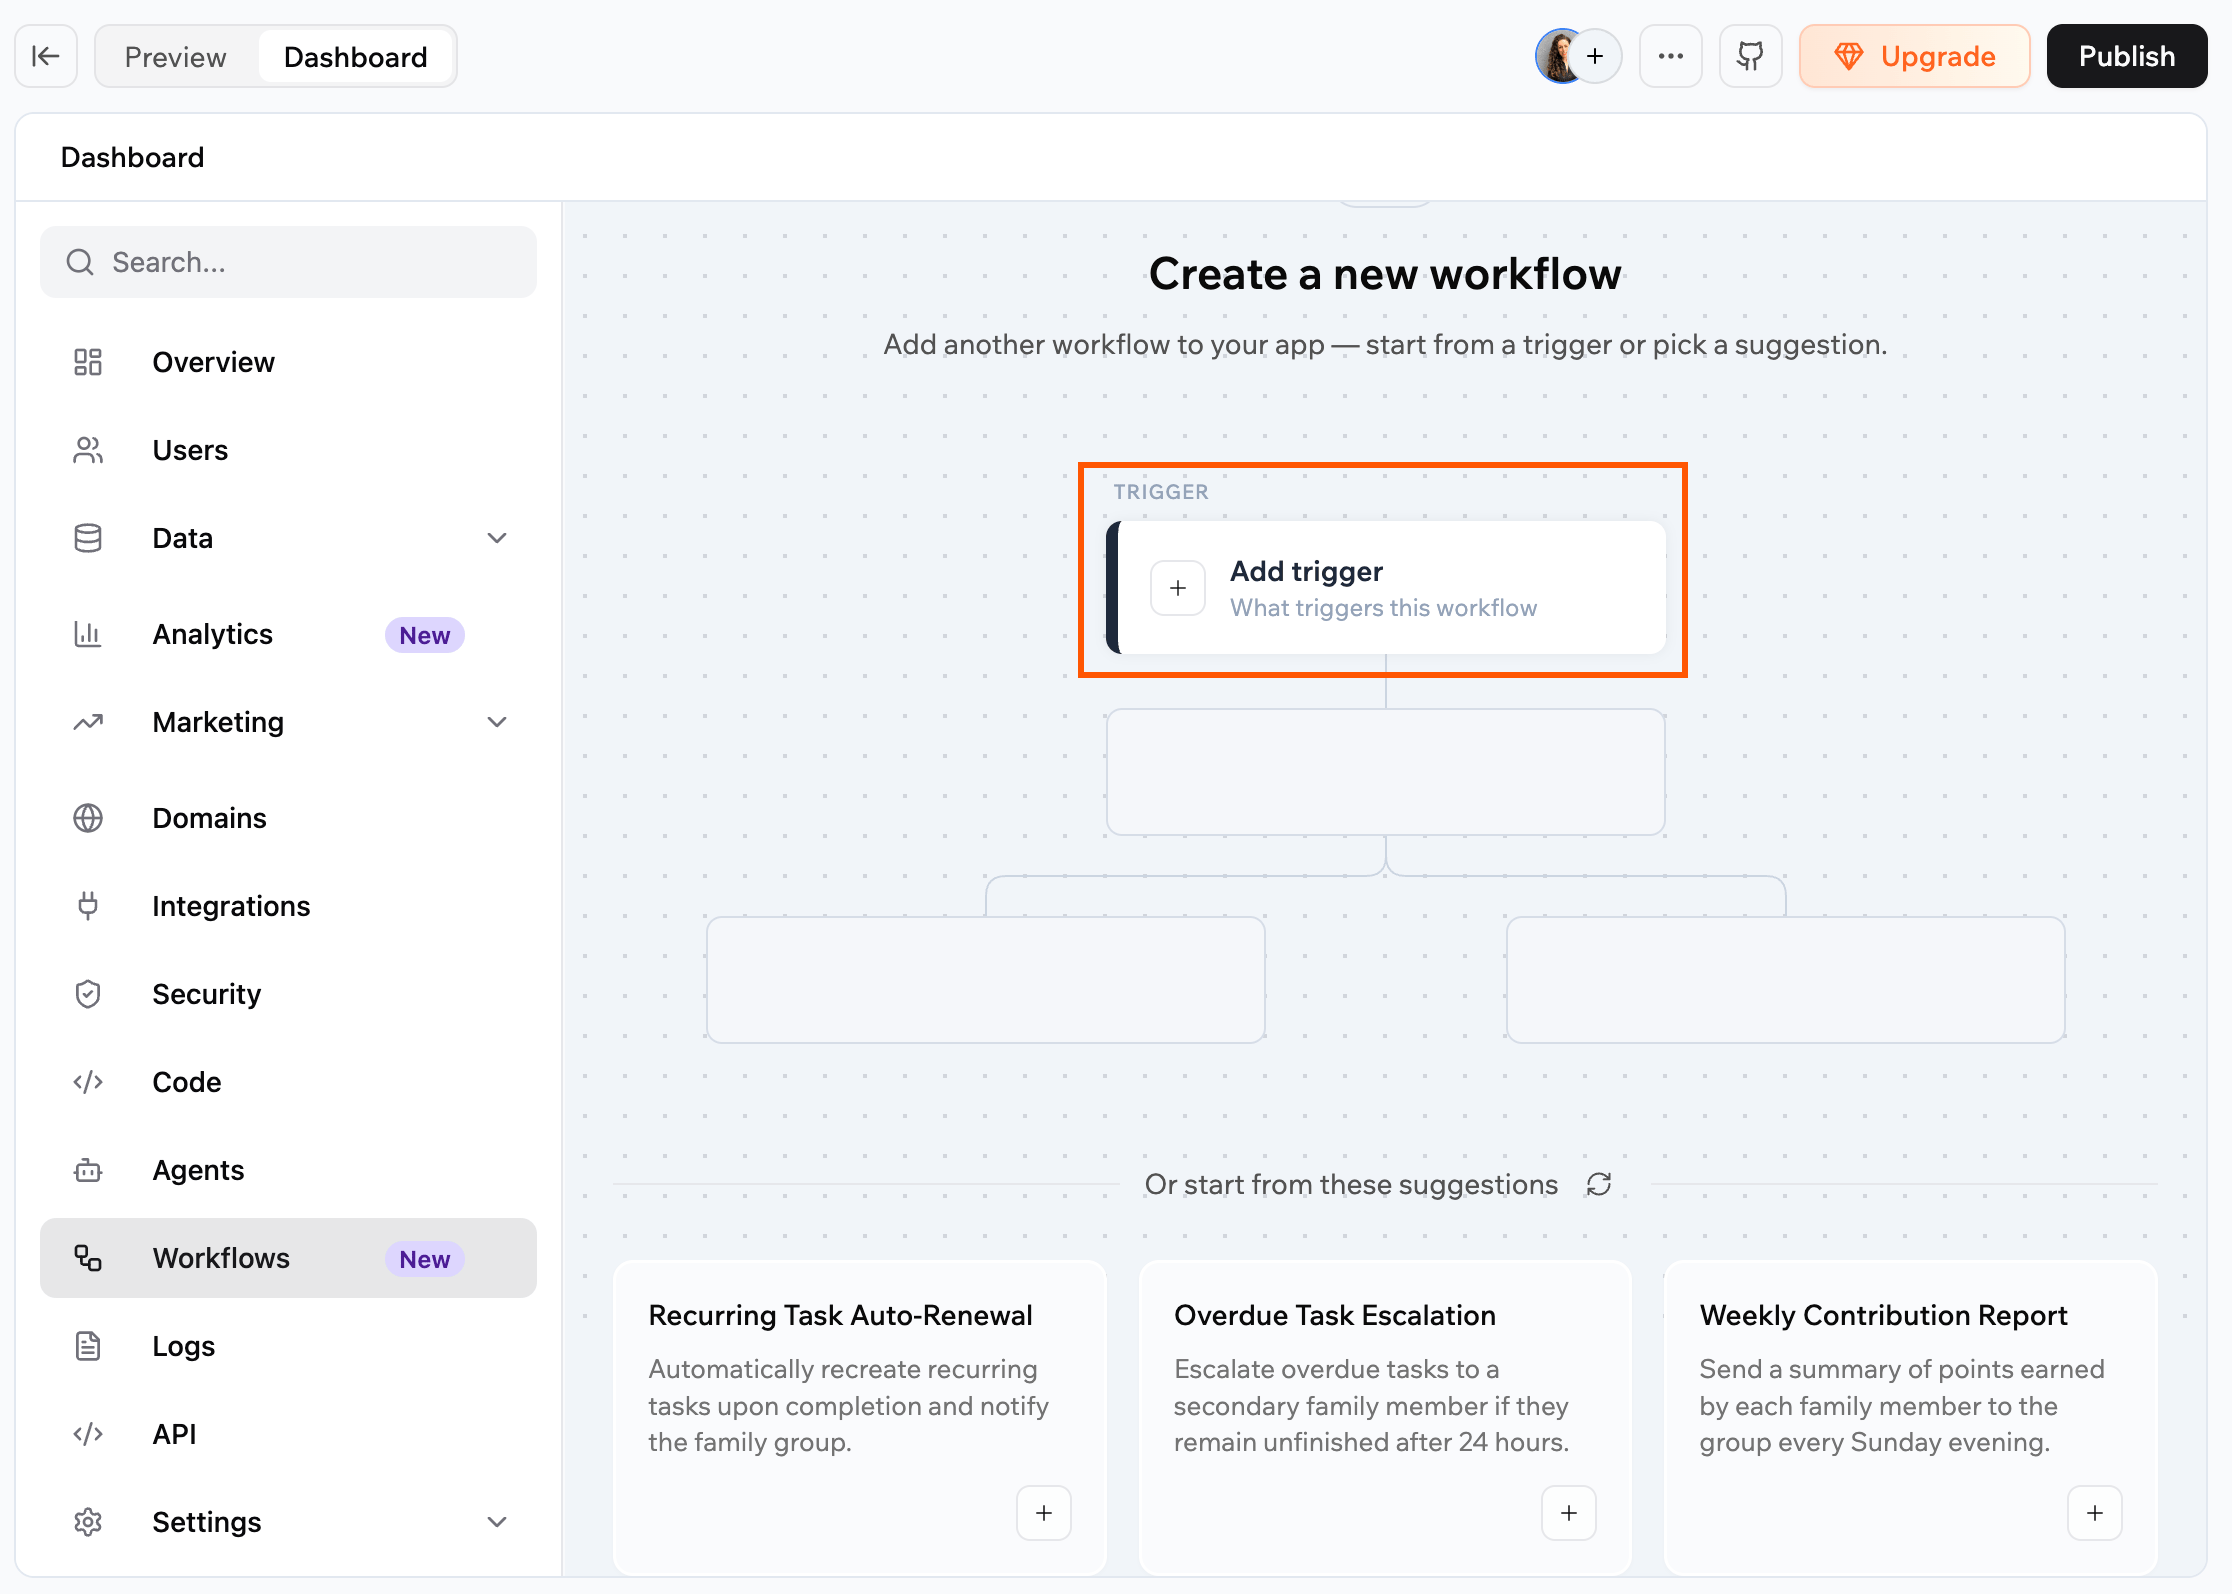
The Create a new workflow canvas, where you add a trigger to start.
Starting from a suggestion
Start from a suggestion when you want a ready-made idea tailored to your app. To create a workflow from a suggestion:
- Click Dashboard in your app editor.
- Click Workflows.
- Click Create workflow.
- Under Or start from these suggestions, choose a suggestion.
- Review the pre-filled prompt in the AI chat, adjust it if needed, and send it.
- The AI creates the workflow and adds it to your Workflows list.
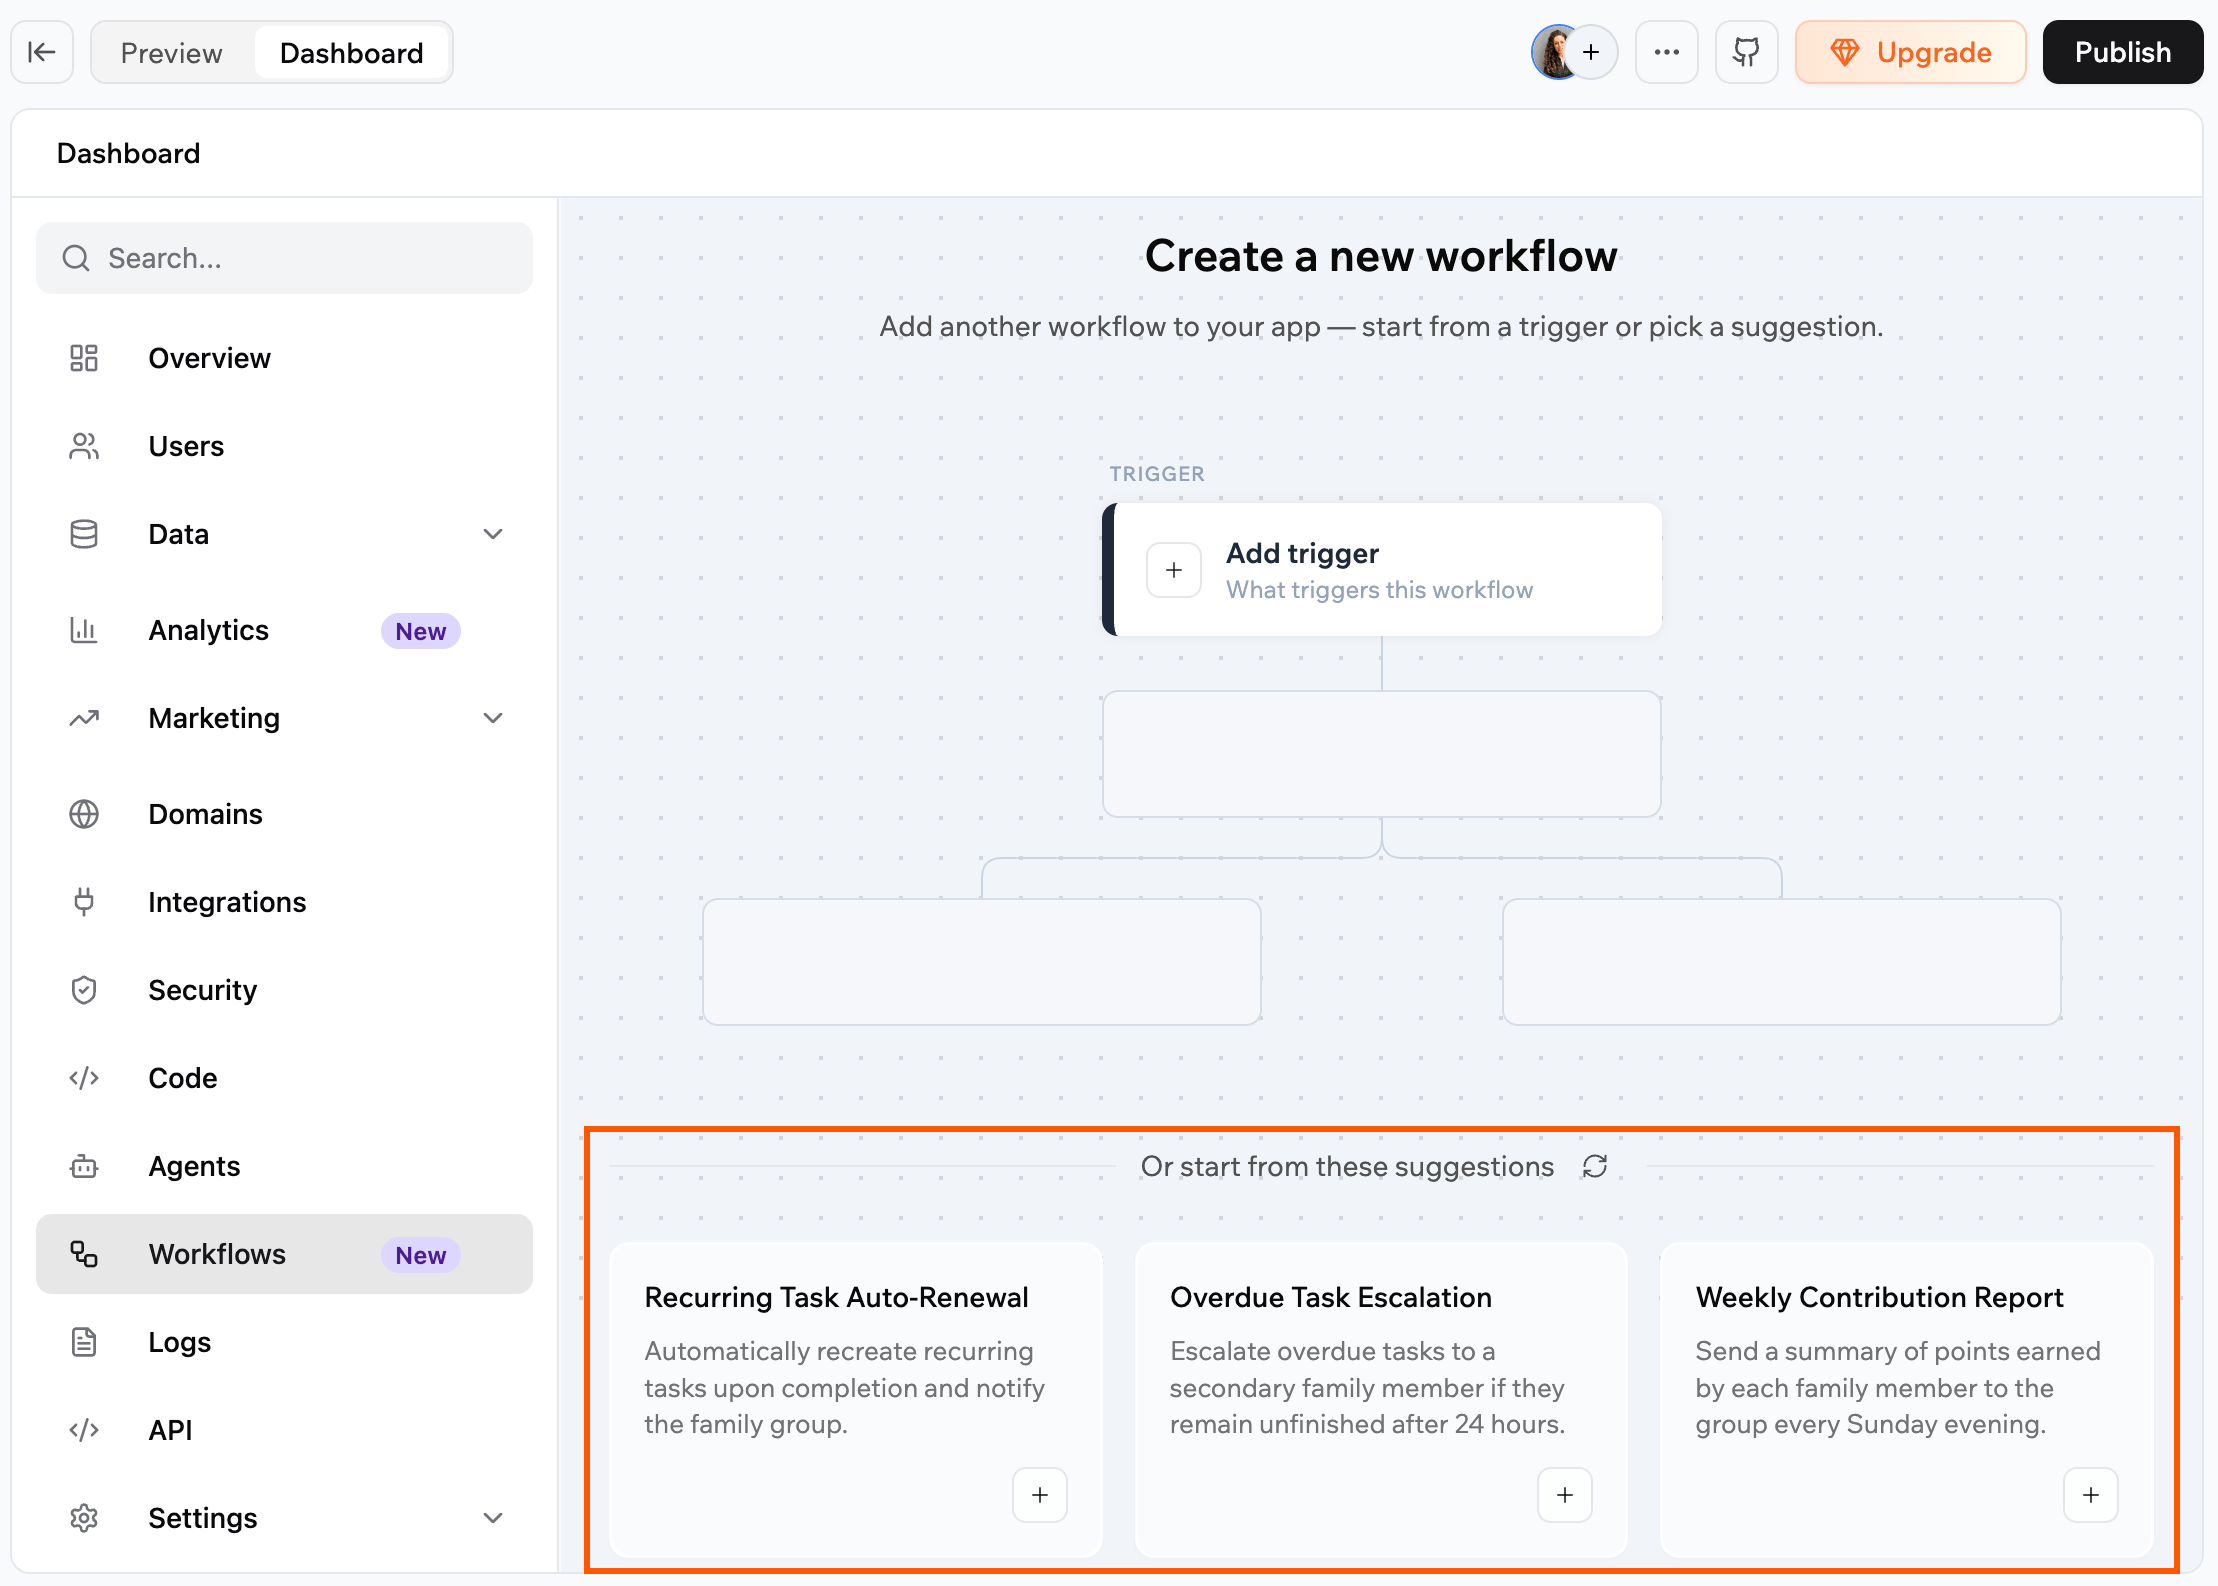
Starting a workflow from a suggestion.
Switching automations to workflows
If your app still uses automations, you can move all of them to workflows in one step. Base44 recreates each automation as a workflow, so you do not have to rebuild anything.
To switch from automations to workflows:
- Click Dashboard in your app editor.
- Click Automations.
- Click Switch to Workflows.
- Review what happens when you switch, then click Start now.
Managing workflows
After you start using workflows, you can control when they run, change what they do, rename them, trigger them on demand, or clean up workflows you no longer need. Each workflow shows an Active or Inactive status, and you can deactivate one to pause it and reactivate it whenever you need it.
Turning a workflow on or off
Deactivate a workflow when you want to stop it running, and activate it again when you need it. Deactivating stops new runs from starting, but the run history stays available. To turn a workflow on or off:
- Click Dashboard in your app editor.
- Click Workflows.
- Click the More Actions icon on the workflow.
- Click Deactivate or Activate.
You can also open a workflow and use the Active toggle in the details panel.
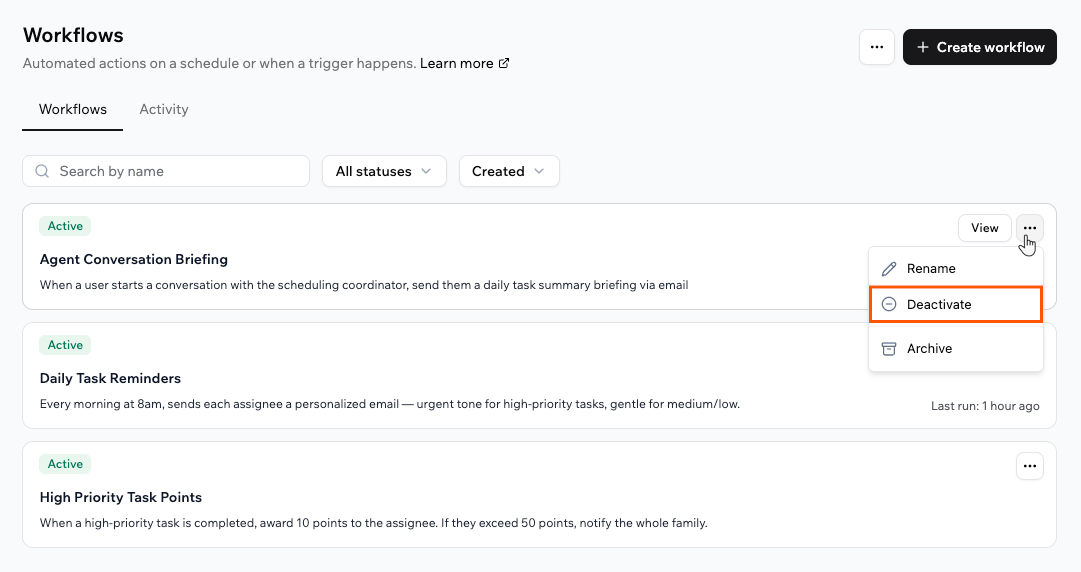
Deactivating a workflow from the More Actions menu.
Editing a workflow
To change what a workflow does, edit it from its diagram or just describe the change in the AI chat. Every edit option opens the AI chat with a pre-filled prompt and the AI makes the change for you, so there is nothing to edit by hand.
Renaming a workflow
Give a workflow a clearer name at any time. Renaming does not create a new version. To rename a workflow:
- Click Dashboard in your app editor.
- Click Workflows.
- Click the More Actions icon on the workflow.
- Click Rename and enter the new name.
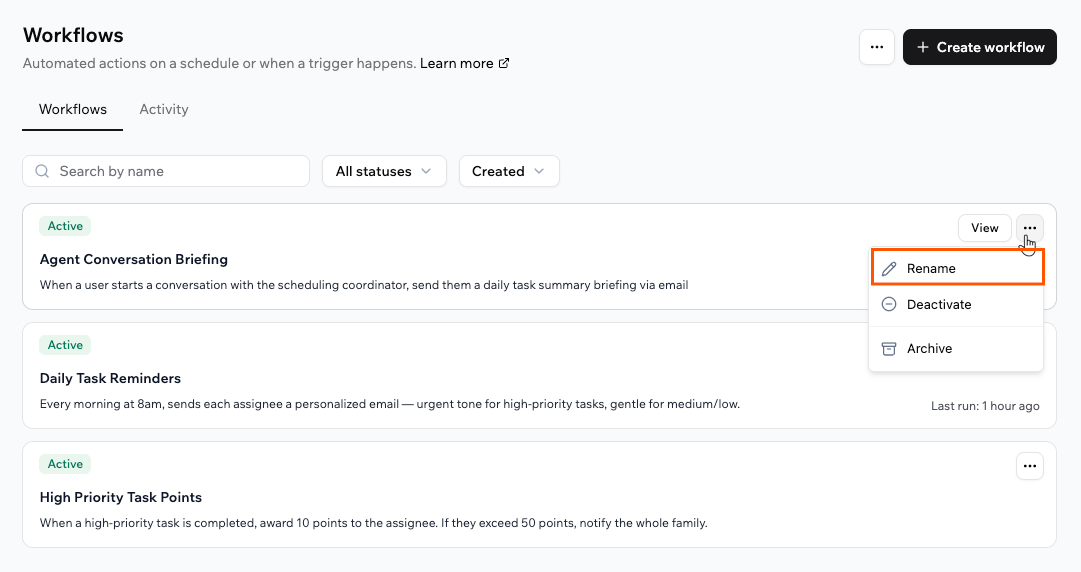
Renaming a workflow from the More Actions menu.
Running a workflow immediately
Run a workflow right away when you want to start it on demand. This helps you test changes, confirm that your configuration works, or handle something urgent between scheduled runs.
To run a workflow:
- Click Dashboard in your app editor.
- Click Workflows.
- Click the workflow to open it.
- Click Run now in the details panel.
- In the confirmation dialog, click Run now again.
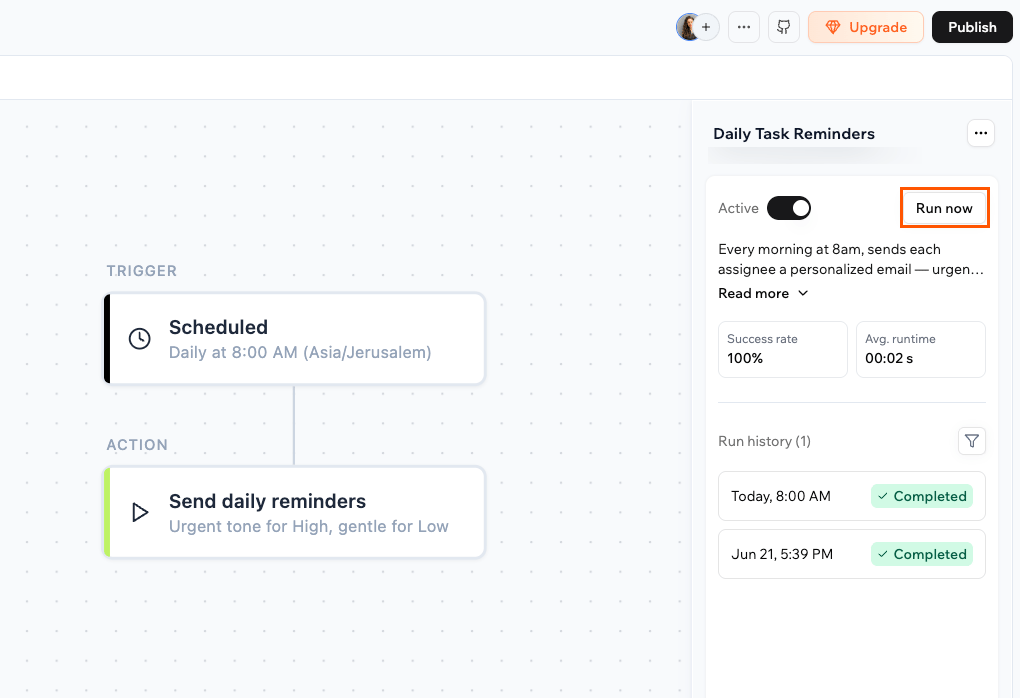
Running a workflow on demand with Run now.
Cancelling a run
If a workflow is running and you need to stop it, you can cancel the run while it is still in progress. The cancelled run shows as Cancelled in the run history. To cancel a run:
- Click Dashboard in your app editor.
- Click Workflows.
- Click the workflow to open it.
- Click the run that is in progress, then click Cancel run.
Archiving a workflow
If you do not need a workflow anymore, you can archive it to keep your active list clean. To archive a workflow:
- Click Dashboard in your app editor.
- Click Workflows.
- Click the More Actions icon on the workflow.
- Click Archive.
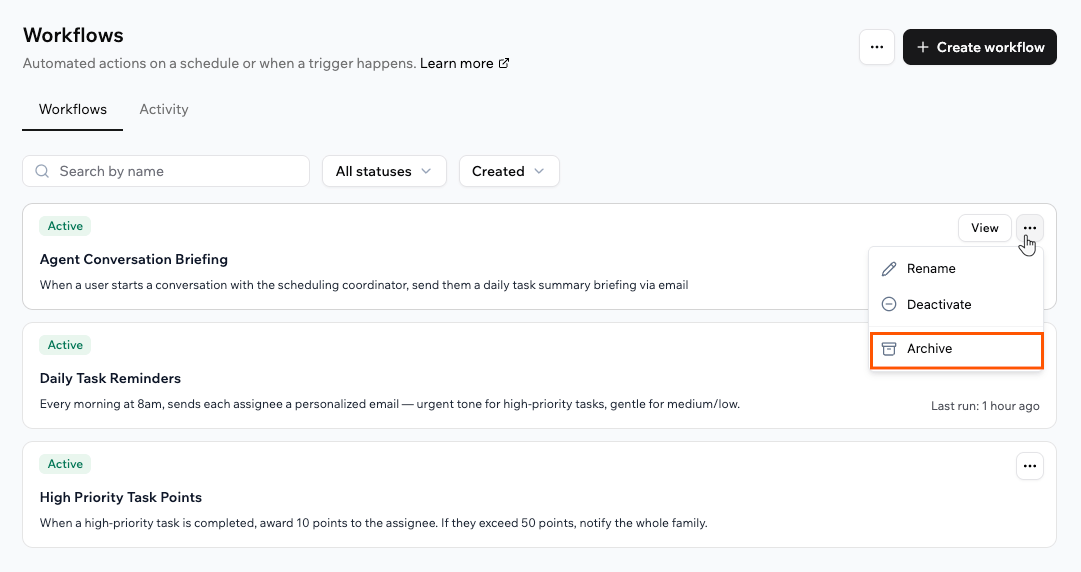
Archiving a workflow from the More Actions menu.
Monitoring runs
Every workflow records each run so you can watch it happen in real time and review it afterward. Review a single workflow’s runs from its details panel, or see runs across all your workflows on the Activity tab.
Viewing a workflow’s runs
When you open a workflow, the details panel shows its Success rate, Avg. runtime, and a Run history of every run. When something goes wrong, the run shows the exact step that failed and the error, so you know where to look without guessing. To view a workflow’s runs:
- Click Dashboard in your app editor.
- Click Workflows.
- Click the workflow you want to inspect.
- In the details panel, review Run history, where each run shows its time and status, such as Completed.
- Click a run to open its Run log, including the start time, end time, and runtime.
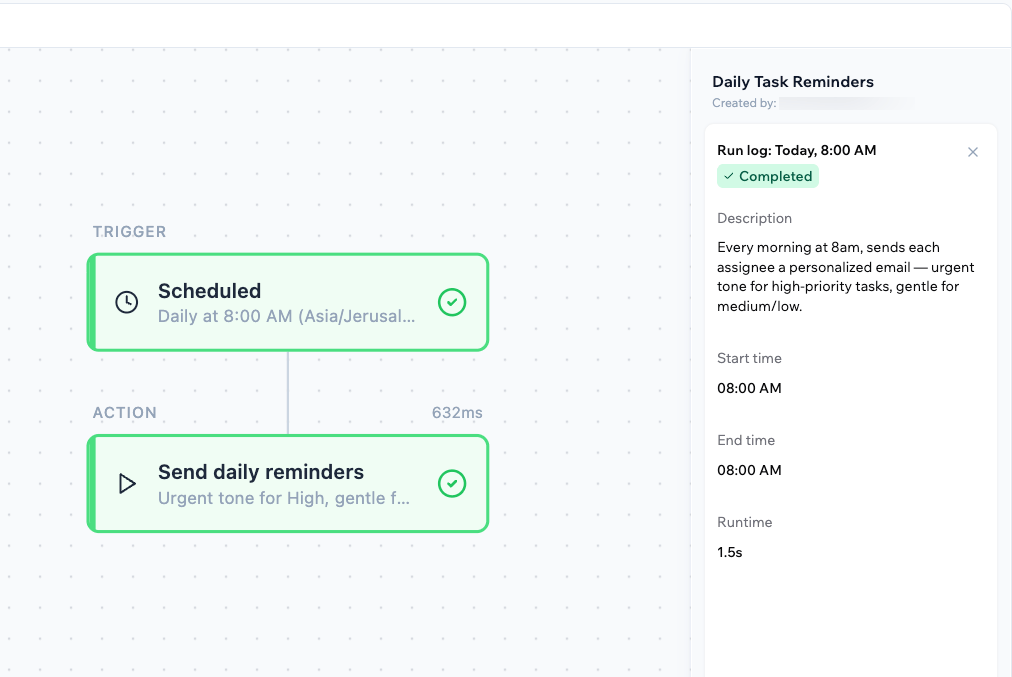
A workflow's details panel with its run history.
Using the Activity tab
The Activity tab under Workflows in your app dashboard brings together runs from all your workflows in one place.
To view activity across workflows:
- Click Dashboard in your app editor.
- Click Workflows.
- Click the Activity tab.
- Review the list of runs, where each one shows its workflow, status, start time, and run time. Filter by status (Running, Completed, Failed, or Cancelled) or by time range.
- Click View on a run to open it in the workflow’s diagram alongside its run log.
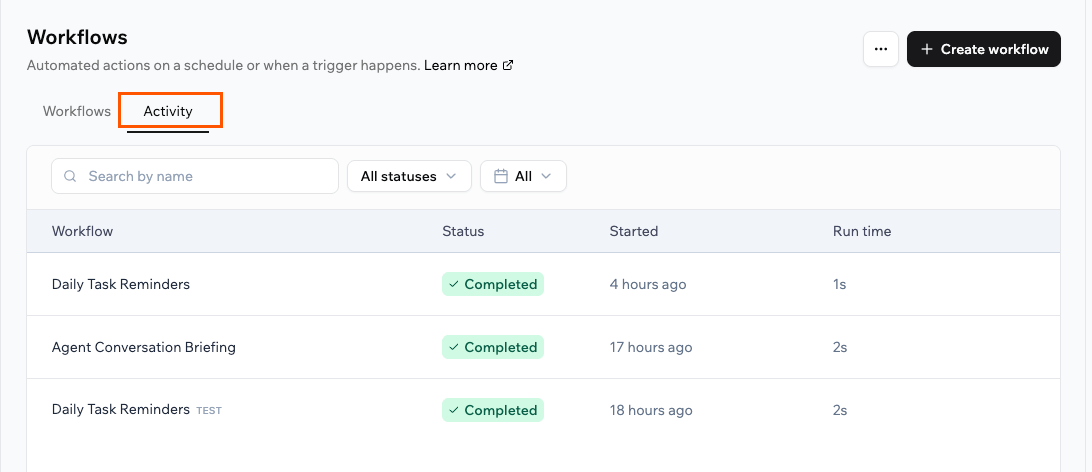
The Activity tab, showing runs across all your workflows.
Workflows and integration credits
Workflows are billed by the steps that run. Each step that runs a backend function uses a fraction of an integration credit, and the charges add up across all the steps in a single run. Built-in integrations that a step uses, such as sending an email or calling an AI model, can use credits too, as they do elsewhere in your app. A workflow with several steps therefore costs more per run than a single-step one, so keep an eye on how often your workflows run and what each step does. If you run out of integration credits while a run is in progress, that run is cancelled. Learn more about credits.
FAQs
Click a question below to learn more.