Visual Studio Code is an editor first and foremost, and includes the features you need for highly productive source code editing. This topic takes you through the basics of the editor and helps you get moving with your code.
Keyboard shortcuts
Being able to keep your hands on the keyboard when writing code is crucial for high productivity. VS Code has a rich set of default keyboard shortcuts as well as allowing you to customize them.
- Keyboard Shortcuts Reference - Learn the most commonly used and popular keyboard shortcuts by downloading the reference sheet.
- Install a Keymap extension - Use the keyboard shortcuts of your old editor (such as Sublime Text, Atom, and Vim) in VS Code by installing a Keymap extension.
- Customize Keyboard Shortcuts - Change the default keyboard shortcuts to fit your style.
Multiple selections (multi-cursor)
VS Code supports multiple cursors for fast, simultaneous edits. You can add secondary cursors (rendered thinner) with Alt+Click. Each cursor operates independently based on the context it sits in. A common way to add more cursors is with ⌥⌘↓ (Windows Ctrl+Alt+Down, Linux Shift+Alt+Down) or ⌥⌘↑ (Windows Ctrl+Alt+Up, Linux Shift+Alt+Up) that insert cursors below or above.
Note
Your graphics card driver (for example NVIDIA) might overwrite these default shortcuts.
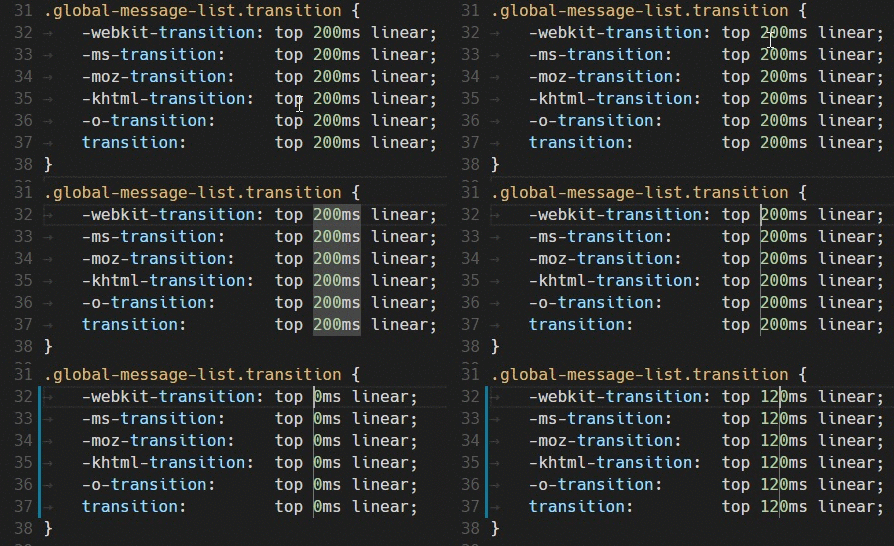
⌘D (Windows, Linux Ctrl+D) selects the word at the cursor, or the next occurrence of the current selection.
Tip
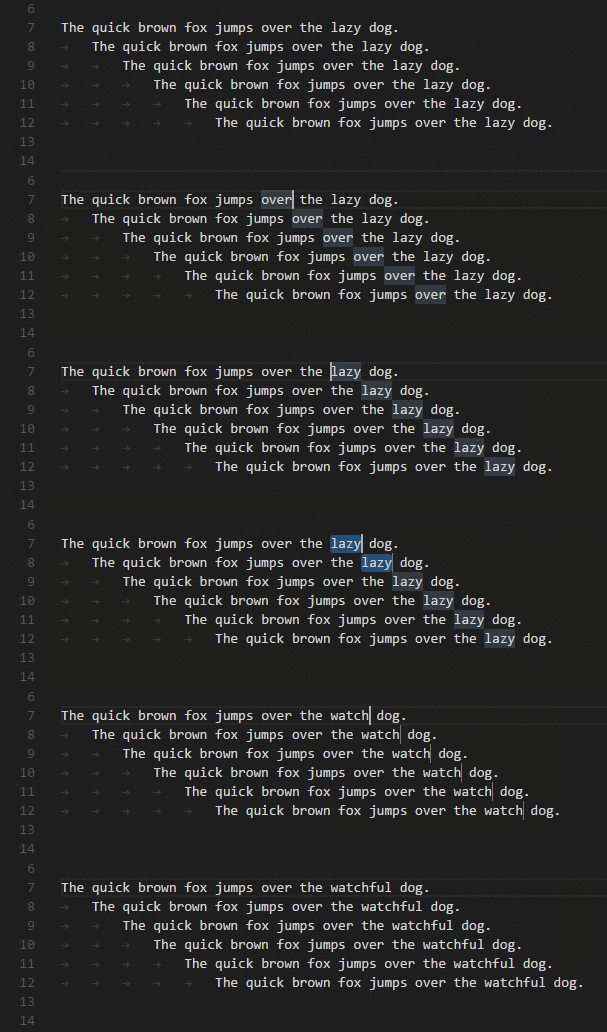
You can skip the next matching occurrence while using multi-cursor find by running ⌘K ⌘D (Windows, Linux Ctrl+K Ctrl+D). This helps you avoid adding unwanted selections when editing repeated text.
Tip
You can also add more cursors with ⇧⌘L (Windows, Linux Ctrl+Shift+L), which will add a selection at each occurrence of the current selected text.
Multi-cursor modifier
If you'd like to change the modifier key for applying multiple cursors to Cmd+Click on macOS and Ctrl+Click on Windows and Linux, you can do so with the editor.multiCursorModifier setting. This lets users coming from other editors such as Sublime Text or Atom continue to use the keyboard modifier they are familiar with.
The setting can be set to:
ctrlCmd- Maps to Ctrl on Windows and Cmd on macOS.alt- The existing default Alt.
There's also a menu item Selection > Switch to Ctrl+Click for Multi-Cursor or Selection > Switch to Alt+Click for Multi-Cursor to quickly toggle this setting.
The Go to Definition and Open Link gestures will also respect this setting and adapt such that they do not conflict. For example, when the setting is ctrlCmd, multiple cursors can be added with Ctrl/Cmd+Click, and opening links or going to definition can be invoked with Alt+Click.
Shrink/expand selection
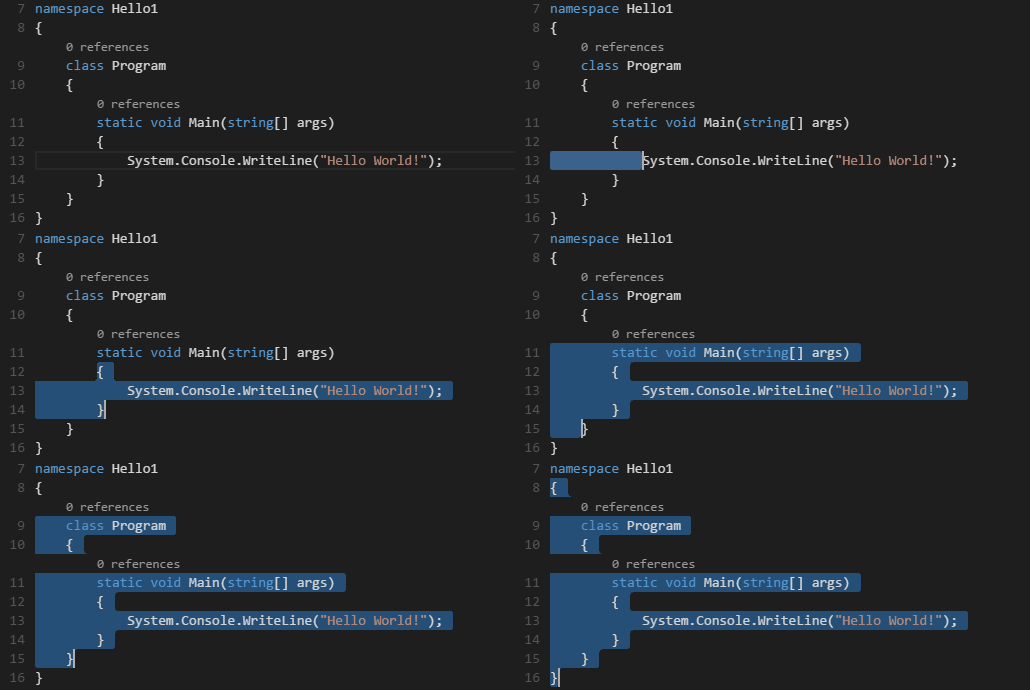
Quickly shrink or expand the current selection. Trigger it with ⌃⇧⌘← (Windows, Linux Shift+Alt+Left) and ⌃⇧⌘→ (Windows, Linux Shift+Alt+Right).
Here's an example of expanding the selection with ⌃⇧⌘→ (Windows, Linux Shift+Alt+Right):
Column (box) selection
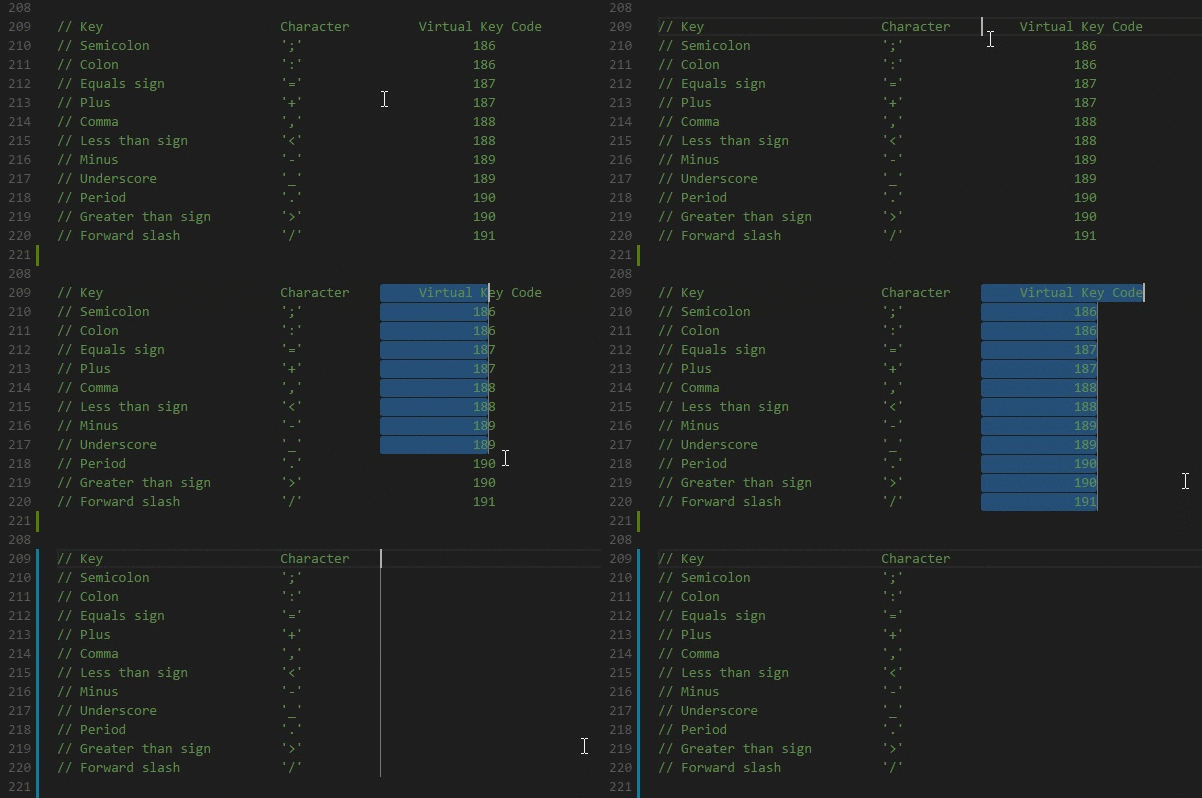
Place the cursor in one corner and then hold Shift+Alt while dragging to the opposite corner:
Note
This changes to Shift+Ctrl/Cmd when using Ctrl/Cmd as multi-cursor modifier.
There are also default keyboard shortcuts for column selection on macOS and Windows, but not on Linux.
| Key | Command | Command ID |
|---|---|---|
| ⇧↓ (Windows, Linux Shift+Down) | Column Select Down | cursorColumnSelectDown |
| ⇧↑ (Windows, Linux Shift+Up) | Column Select Up | cursorColumnSelectUp |
| ⇧← (Windows, Linux Shift+Left) | Column Select Left | cursorColumnSelectLeft |
| ⇧→ (Windows, Linux Shift+Right) | Column Select Right | cursorColumnSelectRight |
| ⇧PageDown (Windows, Linux Shift+PageDown) | Column Select Page Down | cursorColumnSelectPageDown |
| ⇧PageUp (Windows, Linux Shift+PageUp) | Column Select Page Up | cursorColumnSelectPageUp |
You can edit your keybindings.json to bind them to something more familiar if you want.
Column Selection mode
The user setting Editor: Column Selection controls this feature. Once this mode is entered, as indicated in the Status bar, the mouse gestures and the arrow keys will create a column selection by default. This global toggle is also accessible via the Selection > Column Selection Mode menu item. In addition, one can also disable Column Selection mode from the Status bar.
Save / Auto Save
By default, VS Code requires an explicit action to save your changes to disk, ⌘S (Windows, Linux Ctrl+S).
When an editor has unsaved changes, a dot indicator is displayed in the editor tab, and the Explorer view shows a badge indicating the number of unsaved files. These changes are not yet saved to disk, but VS Code automatically backs them up so they can be restored if the application closes unexpectedly (see Hot Exit).
However, it's easy to turn on Auto Save, which will save your changes after a configured delay or when focus leaves the editor. With this option turned on, there is no need to explicitly save the file. The easiest way to turn on Auto Save is with the File > Auto Save toggle that turns on and off save after a delay.
For more control over Auto Save, open User or Workspace settings and find the associated settings:
-
files.autoSave
: Can have the values:
off- to disable auto save.afterDelay- to save files after a configured delay (default 1000 ms).onFocusChange- to save files when focus moves out of the editor of the dirty file.onWindowChange- to save files when the focus moves out of the VS Code window.
-
files.autoSaveDelay
: Configures the delay in milliseconds when
files.autoSave
is configured to
afterDelay. The default is 1000 ms.
If you want to customize the Auto Save functionality for specific languages or file types, you can do so from the settings.json file by adding language-specific rules.
For example, to disable Auto Save for LaTeX files:
{
  "key": "ctrl+o",
  "command": "search.action.openNewEditor",
  "args": { "query": "VS Code", "triggerSearch": true, "focusResults": false }
}
Search Editor context default
The search.searchEditor.defaultNumberOfContextLines setting has a default value of 1, meaning one context line will be shown before and after each result line in the Search Editor.
Reuse last Search Editor configuration
The
search.searchEditor.reusePriorSearchConfiguration
setting (default is false) lets you reuse the last active Search Editor's configuration when creating a new Search Editor.
IntelliSense
We'll always offer word completion, but for the rich languages, such as JavaScript, JSON, HTML, CSS, SCSS, Less, C# and TypeScript, we offer a true IntelliSense experience. If a language service knows possible completions, the IntelliSense suggestions will pop up as you type. You can always manually trigger it with ⌃Space (Windows, Linux Ctrl+Space). By default, Tab or Enter are the accept keyboard triggers but you can also customize these keyboard shortcuts.
Tip
The suggestions filtering supports CamelCase, so you can type the letters which are upper cased in a method name to limit the suggestions. For example, "cra" will quickly bring up "createApplication".
Tip
IntelliSense suggestions can be configured via the editor.quickSuggestions and editor.suggestOnTriggerCharacters settings.
JavaScript and TypeScript developers can take advantage of the npmjs type declaration (typings) file repository to get IntelliSense for common JavaScript libraries (Node.js, React, Angular). You can find a good explanation on using type declaration files in the JavaScript language topic and the Node.js tutorial.
Learn more in the IntelliSense document.
Formatting
VS Code has great support for source code formatting. The editor has two explicit format actions:
- Format Document (⇧⌥F (Windows Shift+Alt+F, Linux Ctrl+Shift+I)) - Format the entire active file.
- Format Selection (⌘K ⌘F (Windows, Linux Ctrl+K Ctrl+F)) - Format the selected text.
You can invoke these from the Command Palette (⇧⌘P (Windows, Linux Ctrl+Shift+P)) or the editor context menu.
VS Code has default formatters for JavaScript, TypeScript, JSON, HTML, and CSS. Each language has specific formatting options (for example, html.format.indentInnerHtml ) which you can tune to your preference in your user or workspace settings. You can also disable the default language formatter if you have another extension installed that provides formatting for the same language.
  "[html]": {
    "editor.foldingStrategy": "indentation"
  },
Regions can also be defined by markers defined by each language. The following languages currently have markers defined:
| Language | Start region | End region |
|---|---|---|
| Bat | ::#region or REM #region |
::#endregion or REM #endregion |
| C# | #region |
#endregion |
| C/C++ | #pragma region |
#pragma endregion |
| CSS/Less/SCSS | /*#region*/ |
/*#endregion*/ |
| Coffeescript | #region |
#endregion |
| F# | //#region or (#_region) |
//#endregion or (#_endregion) |
| Java | //#region or //<editor-fold> |
//#endregion or //</editor-fold> |
| Markdown | <!-- #region --> |
<!-- #endregion --> |
| Perl5 | #region or =pod |
#endregion or =cut |
| PHP | #region |
#endregion |
| PowerShell | #region |
#endregion |
| Python | #region or # region |
#endregion or # endregion |
| TypeScript/JavaScript | //#region |
//#endregion |
| Visual Basic | #Region |
#End Region |
To fold and unfold only the regions defined by markers use:
- Fold Marker Regions (⌘K ⌘8 (Windows, Linux Ctrl+K Ctrl+8)) folds all marker regions.
- Unfold Marker Regions (⌘K ⌘9 (Windows, Linux Ctrl+K Ctrl+9)) unfolds all marker regions.
Fold selection
The command Create Manual Folding Ranges from Selection (⌘K ⌘, (Windows, Linux Ctrl+K Ctrl+,)) creates a folding range from the currently selected lines and collapses it. That range is called a manual folding range that goes on top of the ranges computed by folding providers.
Manual folding ranges can be removed with the command Remove Manual Folding Ranges (⌘K ⌘. (Windows, Linux Ctrl+K Ctrl+.)).
Manual folding ranges are especially useful for cases when there isn't programming language support for folding.
Indentation
VS Code lets you control text indentation and whether you'd like to use spaces or tab stops. By default, VS Code inserts spaces and uses 4 spaces per Tab key. If you'd like to use another default, you can modify the editor.insertSpaces and editor.tabSize settings.
    "editor.detectIndentation": false,
    "editor.tabSize": 3,
File encoding support
Set the file encoding globally or per workspace by using the files.encoding setting in User Settings or Workspace Settings.

You can view the file encoding in the status bar.

Click on the encoding button in the status bar to reopen or save the active file with a different encoding.
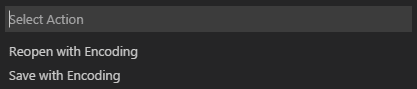
Then choose an encoding.
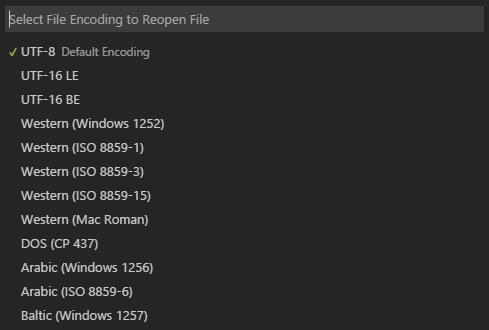
Overtype mode
Prior to release 1.96, VS Code only supported insert mode, where characters are inserted at the cursor position, unless you installed the Vim keymap extension.
As of release 1.96, VS Code supports overtype mode, which lets you overwrite existing characters instead of inserting characters at the cursor position. By default, overtype mode is off.
To switch between insert and overtype mode, run the Toggle Overtype/Insert Mode command in the Command Palette or press (⌥⌘O (Windows, Linux Insert)). When you're in overtype mode, a Status Bar indicator shows OVR.
You can change the cursor style for overtype mode by configuring the editor.overtypeCursorStyle setting.
Use the editor.overtypeOnPaste setting to overwrite text when pasting. You need to be in overtype mode for this setting to take effect.
Compare files
VS Code supports several ways to compare the content of the current file or of any two files.
When you have an active file open in the editor, you have the following compare options:
- Compare with a workspace file: in the Command Palette, select File: Compare Active File With..., and then choose another file to compare with.
- Compare with clipboard: in the Command Palette, select File: Compare Active File with Clipboard (⌘K C (Windows, Linux Ctrl+K C)) to compare the current file with the clipboard content.
- Compare with saved: in the Command Palette, select File: Compare Active File with Saved (⌘K D (Windows, Linux Ctrl+K D)) to compare the current file with the last saved version.
To compare any two files:
- Right-click on a file in the Explorer view and select Select for Compare. Then, right-click on a second file and select Compare with Selected.
- To start a comparison between two empty editor windows, select File: Compare New Untitled Text Files from the Command Palette.
Next steps
You've covered the basic user interface - there is a lot more to VS Code. Read on to find out about:
- Intro Video - Setup and Basics - Watch a tutorial on the basics of VS Code.
- User/Workspace Settings - Learn how to configure VS Code to your preferences through user and workspace settings.
- Code Navigation - Peek and Goto Definition, and more.
- Integrated Terminal - Learn about the integrated terminal for quickly performing command-line tasks from within VS Code.
- IntelliSense - VS Code brings smart code completions.
- Debugging - This is where VS Code really shines.
Common questions
Is it possible to globally search and replace?
Yes, expand the Search view text box to include a replace text field. You can search and replace across all the files in your workspace. Note that if you did not open VS Code on a folder, the search will only run on the currently open files.
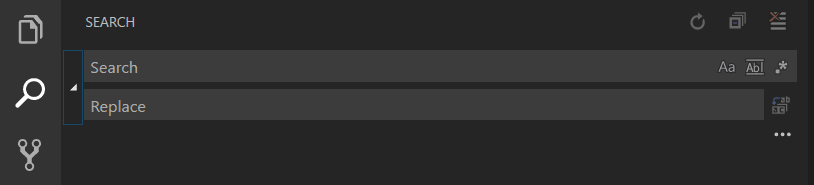
How do I turn on word wrap?
You can control word wrap through the
editor.wordWrap
setting. By default,
editor.wordWrap
is off but if you set to it to on, text will wrap on the editor's viewport width.
{
  "key": "shift+alt+down",
  "command": "editor.action.insertCursorBelow",
  "when": "textInputFocus",
  "args": { "logicalLine": true },
},
{
  "key": "shift+alt+up",
  "command": "editor.action.insertCursorAbove",
  "when": "textInputFocus",
  "args": { "logicalLine": true },
},
8/12/2026