Linux From Scratch
Recently, I crafted my own GNU/Linux system from the ground up, entirely from source, by following the very informative Linux From Scratch project. I implemented the 12.1-systemd version of LFS documenting my progress along the way.
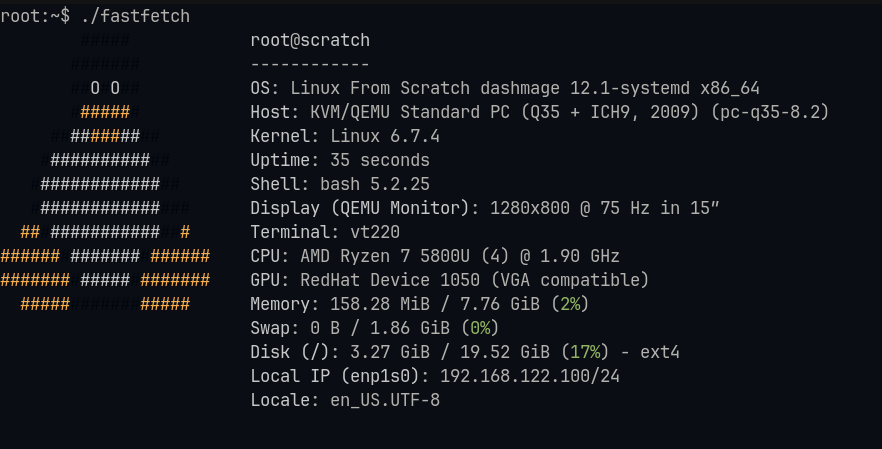
Most of the steps presented are concise and straightforward but I did face occasional challenges where the guide assumes the reader to know certain details or to make specific decisions for their build. Here are the notes I made while going along.
In order to get started, you'll need to set up a host system where the build will be performed. To avoid messing around with my laptop and breaking things, I did the whole build in a QEMU/KVM virtual machine. This seemed like the best way to get going since if I screw up something, I can easily go back to a previous snapshot (provided you take one in advance).
Virtual Machine Setup
First, install qemu and virt-manager, a nice GUI-based frontend for managing the VMs.
sudo apt install qemu-system virt-manager
sudo usermod -aG libvirt "$USER"
# reboot/logout or instead run
newgrp libvirt
In case you're facing an error saying "virt-manager can't connect to libvirt", it means that your user hasn't been added to the libvirt group.
Download the Debian 12 ISO (which was the distribution I planned on using) and create the QEMU/KVM VM with it via virt-manager.
I created the LFS host machine as per the recommended requirements,
- Memory: 8GB
- CPU: 4
- Disk: 20GB
During the installation process, skip the installation of a desktop-environment or other additional software except for OpenSSH.
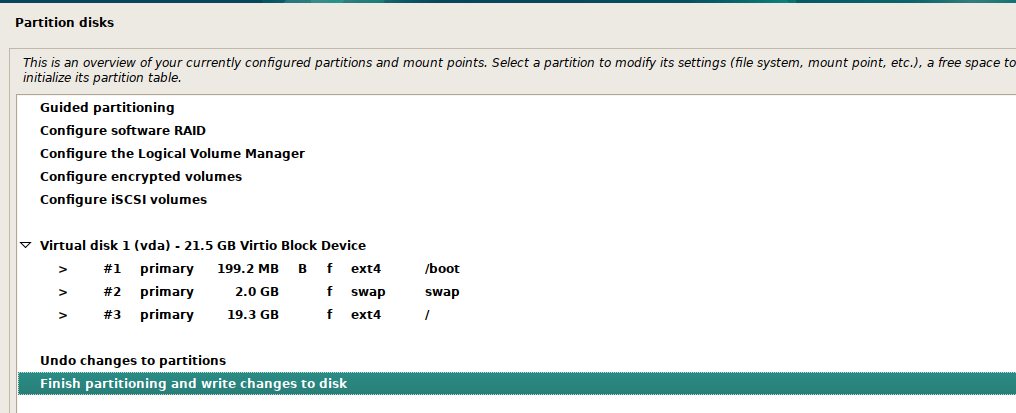
I was confused initially upon reading the requirements for the partition structure of the host. After reading the material a couple of times and doing some research, I ended up making manual partitions for /boot (200MB), swap(2GB) and /. A dedicated /boot partition stores the kernel images and other boot files in one location keeping everything organized for both the host and LFS systems.
With the default bridge network configuration, you'll be able to SSH into the LFS host VM from your terminal. The IP will be present under the NIC entry when checking the virtual hardware details.
Create a new non-root user and set up SSH key access.
mkdir ~/.ssh
chmod -R 700 ~/.ssh
wget -O - https://github.com/dashmage.keys >> /home/dashmage/.ssh/authorized_keys
chmod 600 .ssh/authorized_keys
To speed up your workflow and avoid having to open up virt-manager to start the VM each time after a reboot, you can use virsh.
# replace with your VM name
sudo virsh start debian12
LFS Partition
LFS needs to be installed on a new partition. So, create a new VirtIO disk from virt-manager with a size of 20GB. Once added, this will be visible with lsblk as /dev/vdb. The swap space of the host is re-used for the LFS system.
Initialize the newly created disk with the GPT label and add a single Linux filesystem type partition which will serve as the root for LFS. This can be done with the cfdisk command by running sudo cfdisk /dev/vdb. cfdisk is a friendly TUI wrapper around fdisk providing basic partitioning functionality.
Format the partition with the ext4 filesystem.
mkfs -v -t ext4 /dev/vdb1
Here's what the partitions end up looking like.
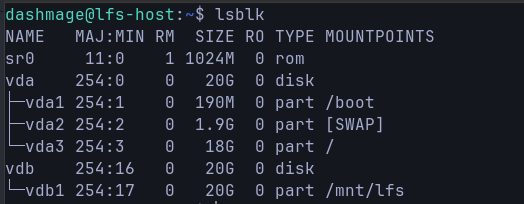
Don't forget to set the LFS environment variable to /mnt/lfs and verify whether it's set (echo $LFS) at various points. This is the location where the partition will be mounted and all the build commands will refer to this variable. Add export LFS=/mnt/lfs to both your user and root user's .bashrc file to make sure it's always available. Ensure to place it before the if condition for the non-interactive bash invocation.
export LFS=/mnt/lfs
# If not running interactively, don't do anything
case $- in
    *i*) ;;
      *) return;;
esac
LFS Cross Toolchain Madness
The most difficult section to understand throughout the build process (for me atleast) has to be the details surrounding the cross-compilation procedure. This is the main idea behind how we build software on the host system to eventually run on the LFS one.
Let's see an excerpt from the guide talking about cross-compilation.
This build process is based on cross-compilation. Cross-compilation is normally used to build a compiler and its associated toolchain for a machine different from the one that is used for the build. This is not strictly necessary for LFS, since the machine where the new system will run is the same as the one used for the build. But cross-compilation has one great advantage: anything that is cross-compiled cannot depend on the host environment.
Essentially, we use the cross-compilation process not to produce software for another platform but as a mechanism to create a toolchain (bunch of software tools that are used to build other software, think gcc, binutils, glibc etc.) that doesn't depend on the host system at all.
We initially build and compile a temporary set of tools (including the cross-compiler) in the $LFS/tools directory using the host's native compiler toolchain. Then we chroot into the final LFS environment, using these temporary tools to build the final version of tools and packages that will run on the LFS system.
This info took me a while to comprehend and I hope my terse explanation doesn't add any further confusion. The big picture becomes clearer when you perform the actual build and re-read the material to get a better idea of what's going on.
Booting with GRUB
After building out the rest of the system software for LFS, we turn to making it bootable. I deviated from the main guide in the section where we boot with GRUB to simplify my debugging workflow.
Instead of wiping the /boot/grub/grub.cfg of the host system completely, I opted to add a new GRUB menuentry for LFS to /etc/grub.d/40_custom. This makes it easier to fix issues when booting LFS, where I can quickly reboot into the host system for troubleshooting and making changes. This configuration adds a new entry at the end of the GRUB menu list, which you can select from the virt-manager console when starting the VM.
# /etc/grub.d/40_custom
# make sure to run update-grub afterwards

menuentry "GNU/Linux, Linux 6.7.4-lfs-12.1-systemd" {
        insmod part_gpt
        insmod ext2
        search --fs-uuid --set=root <boot-uuid-value>
        linux /vmlinuz-6.7.4-lfs-12.1-systemd root=/dev/vdb1 ro console=ttyS0,115200
}
Running sudo update-grub merges the contents from the 40_custom file with the main boot.cfg.
The search --fs-uuid --set=root command searches for a filesystem based on its UUID and sets the root variable to that partition. This needs to point to the boot partition where the GRUB config files and the kernel image will be located. A static assignment like set root=(hd0,msdos1) (grub device naming is very weird) is avoided as best-practice in the very low chance that the underlying device or partition order changes.
Also note that the linux command above specifies the kernel image at /vmlinuz-... instead of /boot/vmlinuz-... since it's relative to the /boot partition. Note that the root partition mentioned here is a kernel parameter specifying the location of the root filesystem the kernel should mount after it takes over from GRUB. This will be the $LFS partition.
To access the serial console for the VM directly from the laptop terminal without having to setup the OpenSSH utilities on the LFS system, we add the extra option, console=ttyS0,115200 to the kernel parameters. This allows you to access the console from your terminal with the command,
sudo virsh console debian12
# Append --force if you get the error
# "error: operation failed: Active console session exists for this domain"
Double-check that you're setting the /boot partition (/dev/vda1) and root partition (/dev/vdb1) values in the right spots. I had accidentally configured the kernel parameter in the linux command with the boot partition to use as the root filesystem. This simple mistake caused the kernel to panic during boot which took me many hours to debug and fix.
Post LFS
After your very own LFS system is up and running, you can do pretty much anything you want with it. I'd recommend installing wget first (present in the BLFS guide) so you can install other packages and files from the internet. Since there's no wget to download the required packages for wget itself, this needs to be done from the host system after which you can chroot into LFS.
I've listed the order for package installation I followed before finally installing wget, libunistring-1.1 -> libidn2-2.3.7 -> libtasn1-4.19.0 -> p11-kit-0.25.3 -> make-ca-1.13 -> libpsl-0.21.5 -> wget-1.21.4
Now I plan to convert this tiny OS into a QEMU image that I can use to spin up a lightweight VM for playing around and testing with various software.
The guide has some good reasons to not install a package manager by default. But you might be interested in setting one up if you plan to install and manage many more packages.
Final Thoughts
The LFS project is a fun exercise for anyone curious about how a Linux distribution comes together from source code. I enjoyed the slow and deliberate process of building all the fundmental tools we take for granted on basically every GNU/Linux system. I also liked perusing through the numerous kernel options before compiling and installing the generated kernel image.
Even though I spent a bunch of time debugging my grub misconfiguration, it was a great learning experience. Navigating the grub command line and modifying kernel parameters before boot to figure out where things were going wrong was very insightful.
A big disclaimer that I'd like to add is that many of the sections just share the commands you need to run at each stage. So the whole process becomes pointless if you don't exactly understand what you're copy-pasting and executing. Be prepared to frequently look up and learn anything that you don't quite understand.
Some of the more confusing parts include:
- Cross-compiling as mentioned before
- Static vs shared libraries, static vs dynamic linking (read about
ldthe standard linker frombinutilsvsld.so/ld-linux.so*which is the platforms's dynamic linker vslddwhich just prints shared object dependencies to get a feeling for what I'm talking about). - Virtual Kernel File Systems
Reference
Here are a bunch of supplementary links to high quality content I referred to constantly during the build process.
- Unix and Internet Fundamentals, TLDP
- From Power Up To Bash Prompt, TLDP
- Beginners guide to installing from source
- Building and Installing Software Packages For Linux, TLDP
- Compiling, assembling, linking - YouTube
- Partitioning for LFS, LFS Hints
- Partitioning, ArchWiki
- Arch Boot Process, ArchWiki
- Remote Serial Console, TLDP
- Linux Filesystem Hierarchy Standard