
This is the third article in a series for AI Dev Tools Zoomcamp, the free course we run at DataTalks.Club.
All articles in the series:
Part 1: AI-Native Development: Specifications, Loop and Graph Engineering
Part 2: Build and Ship a Full-Stack App with AI Coding Assistants
Part 3: Deploy a Full-Stack App with AI Coding Assistants (this article)
Part 5: TBA
In this article, I want to take a web application and make it accessible for everyone on the internet.
We will:
Take the application that’s already working locally
Containerize the application
Switch from SQLite to Postgres
Add integration tests
Deploy to AWS
Set up CI/CD via GitHub Actions
It’s based on the second half of the full-day workshop I did for AI Shipping Labs: Build and Deploy a Full-Stack App with AI Coding Assistants.
In the previous article, we started building an application for system-design interviews. An interviewer creates a session and shares a link with a candidate. When the candidate updates something on the canvas, the interviewer sees the updates in real time.
First, we created the frontend only with React
Then we created an OpenAPI specification for defining the frontend-backend API
Next, we created the backend from this specification
We added database support with SQLite and SQLAlchemy
You can find the code in the interview-canvas-share repository.
When we run the application locally, we need to execute two commands: one for the frontend and one for the backend.
Let’s run them in two separate terminals:
# first terminal
cd frontend
npm run dev
# second terminal
make run
So, we have two services, and we need to deploy them to production. We may think that we need two containers: one for the frontend and one for the backend.
During development, we run the frontend as a separate service because we use Vite. Vite watches the frontend code and refreshes the page when we make changes. It’s very convenient because we can see our changes immediately.
In production, the frontend code doesn’t change while the application is running. We build it once and get a set of static HTML, CSS, and JavaScript files.
This means we don’t need a separate container for the frontend: the backend can serve these files. So, we need only one container.
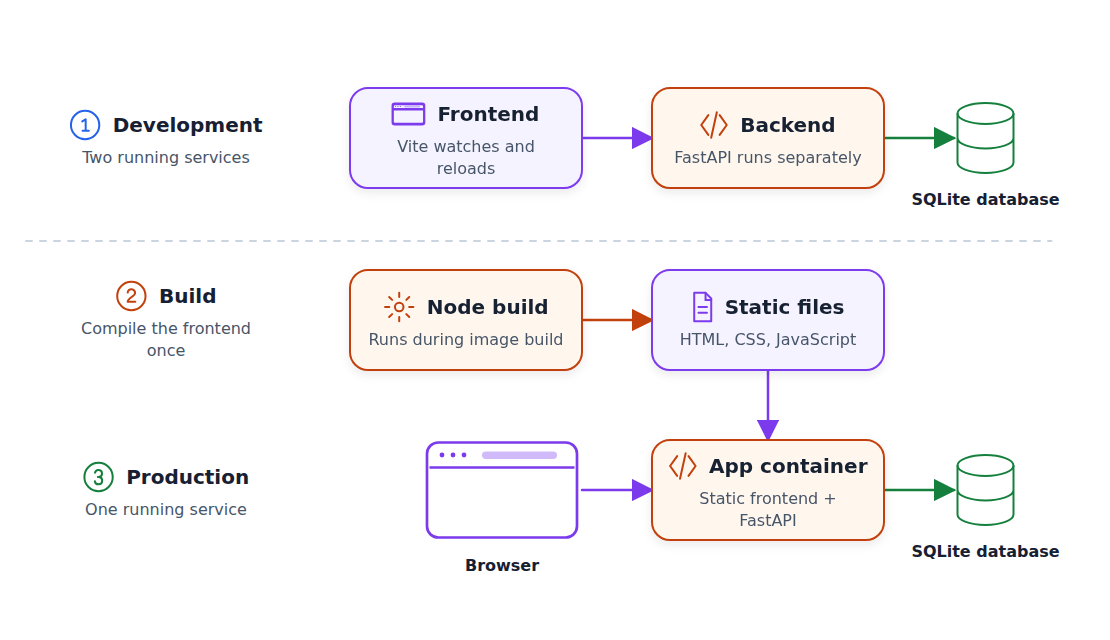
Ask the coding assistant to create it:
Create a Dockerfile that builds the frontend with Node, then builds a Python image with the backend and the frontend static files.
Backend should serve the frontend.
We get a two-stage Docker build:
First, we use a Node.js image to compile the frontend
Then we build the backend and copy only the frontend files without the Node.js dependencies
You can see the Dockerfile here.
Build and run the image from the repository root:
docker build -t sdip:latest .
docker run --rm -p 8000:8000 \
  -v sdip-data:/data \
  -e SDIP_DATABASE_URL=sqlite:////data/sdip.db \
  --name sdip sdip:latest
Here we specify a named Docker volume sdip-data that will keep the SQLite database between container runs.
Open the application at localhost:8000 and test it:
Create an interview session
Open the join link in a different browser window
Move an element in the candidate window
Check that the interviewer sees the change
We’ll repeat this test again. I’ll refer to it as the two-session test.
SQLite is very convenient for local development. It keeps the data in a single file and doesn’t need a separate database server.
But for production, we typically use Postgres or a similar database.
When we set up the foundation in the previous article, we asked the coding agent to use SQLAlchemy.
I did this on purpose because I knew that later I’d switch to Postgres.
Start Postgres locally:
docker run -d \
  --name interview-canvas-db \
  -e POSTGRES_USER=sdip \
  -e POSTGRES_PASSWORD=sdip \
  -e POSTGRES_DB=sdip \
  -p 5432:5432 \
  -v interview-canvas-pgdata:/var/lib/postgresql/data \
  postgres:16-alpine
Now we can ask the assistant to use it:
Add Postgres support to the backend.Run the backend against Postgres from the repository root:
export SDIP_DATABASE_URL=postgresql://sdip:sdip@localhost:5432/sdip
make run
When it’s done, repeat the two-session test.
Previously, I started a Postgres container with a separate command. But now let’s put all the services our application needs inside one Docker Compose file.
With this file, we can run our entire application with a single command docker compose up.
Ask the assistant to implement it:
Create docker-compose.yaml with two services: Postgres and the app.The file defines the database and adds a health check, so our application waits until Postgres is ready to accept connections.
Start it:
docker compose up --buildIn our case, it runs the application at localhost:8100.
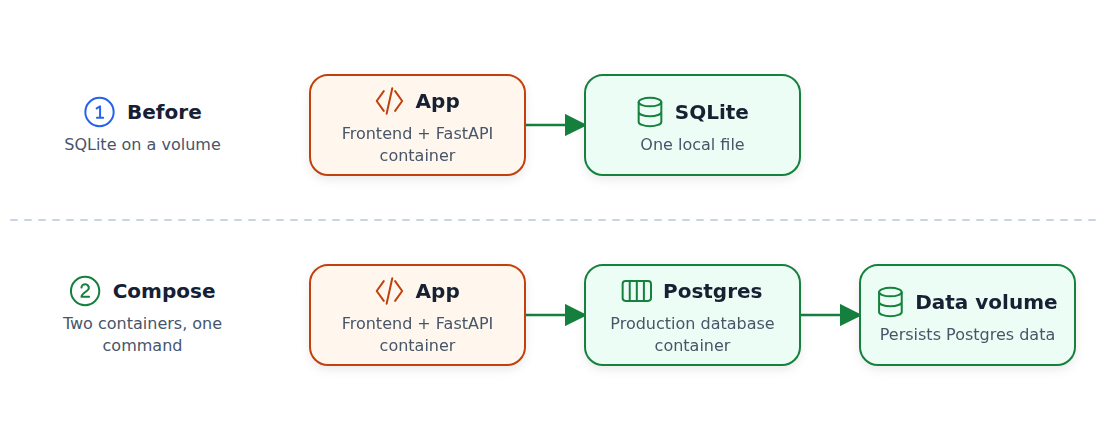
The AI assistant might have created some backend tests.
If it didn’t, ask it to create integration tests:
Create integration tests that run against docker-compose.yaml. What scenarios should we test?We added two things that can potentially break, so let’s test them too. We’ll verify that:
The frontend compiles correctly
The backend can communicate with Postgres
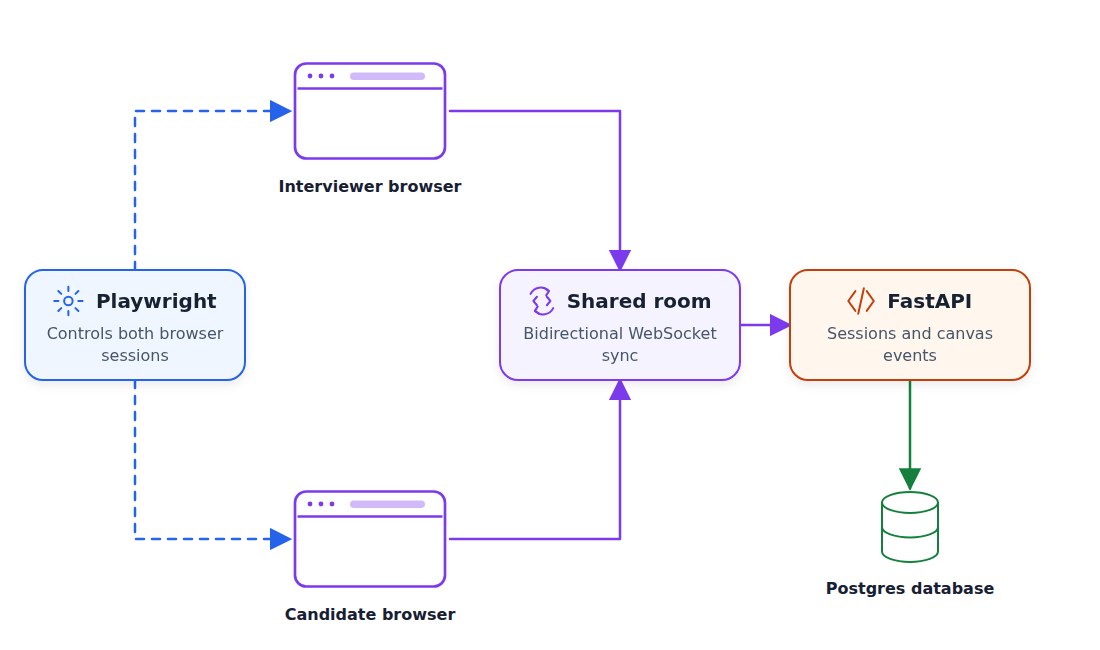
Ask the AI assistant to implement a test:
Add an end-to-end test that runs against docker-compose.yaml.
Use Playwright to:
1. Log in as the interviewer (session 1).
2. Create an interview session.
3. Share the join link.
4. Join from a separate client as the candidate (session 2).
5. Change the canvas as the candidate (session 2).
6. Verify that the interviewer sees the change (session 1).
Put the tests in the e2e/ folder in the repository root.
After it finishes, we can run the tests with a single make command:
make e2eWe’re now certain that the application works well. We can deploy it.
Our application runs in a container and only needs Postgres, so we have a lot of options for deploying it. We can use Render, Railway, Fly.io, or any other managed container system.
Last year we deployed to Render, but this year I want to deploy to AWS. You don’t have to use AWS, and instead you can ask the coding assistant to recommend an environment for your application.
Ask your assistant to deploy it:
Deploy this application to AWS. Use AWS CloudFormation.For that to work, you need to have an AWS user. I typically create a temporary user with admin permissions and watch every step of what the coding agents are doing.
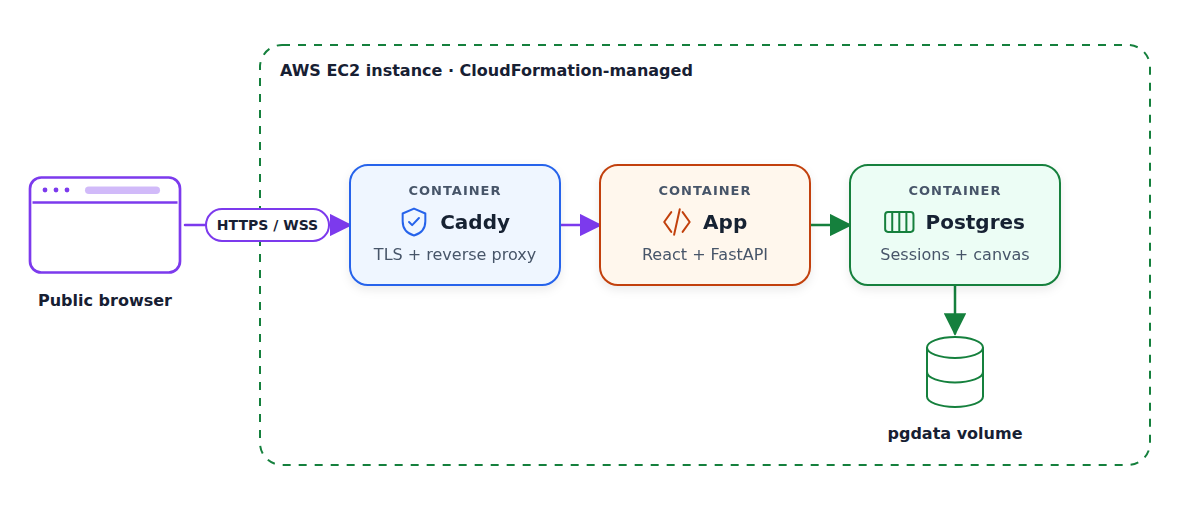
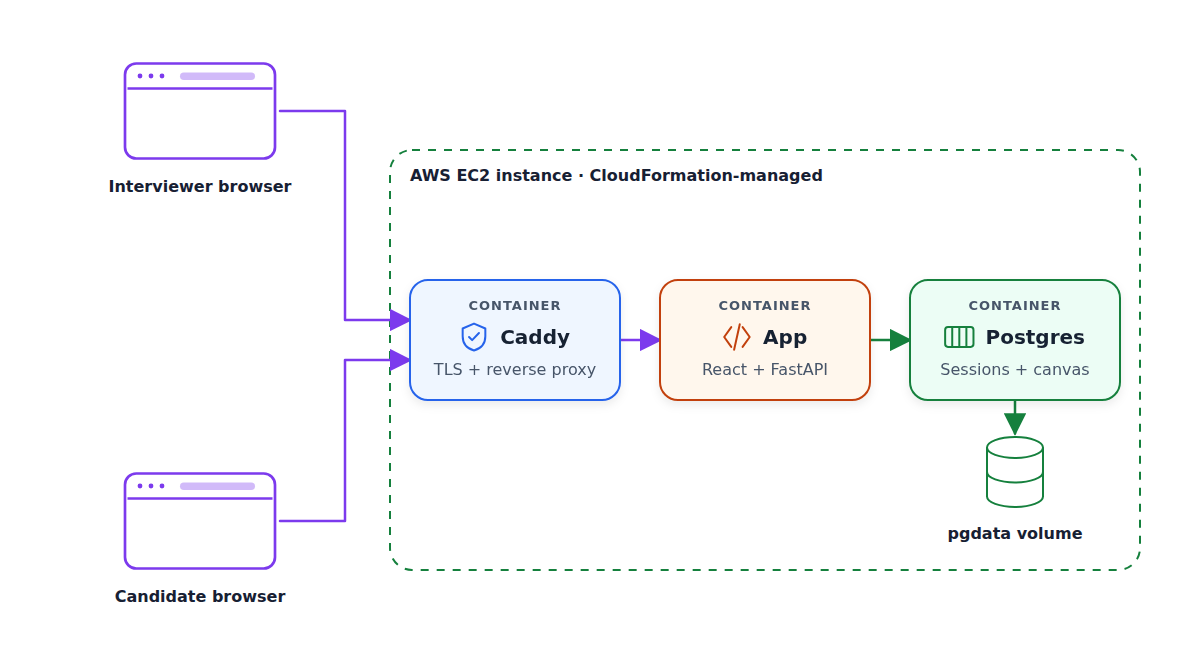
You can see what I got here. It runs the app, Postgres, and Caddy (adds HTTPS and WSS support for our app) on one EC2 instance.
It’s fine for a proof-of-concept, but using managed database services (such as RDS) is better. We will not do it here.
We used a user with the admin permissions to deploy the application. It’s okay for the first deployment, but only when we carefully watch it. The next step is to configure CI/CD and remove that access.
Continuous integration (CI) means that every time we make a change and push it to GitHub, we automatically run all the tests to make sure we didn’t break anything.
Continuous deployment (CD) is about deploying this change automatically.
In GitHub, we use GitHub Actions for that.
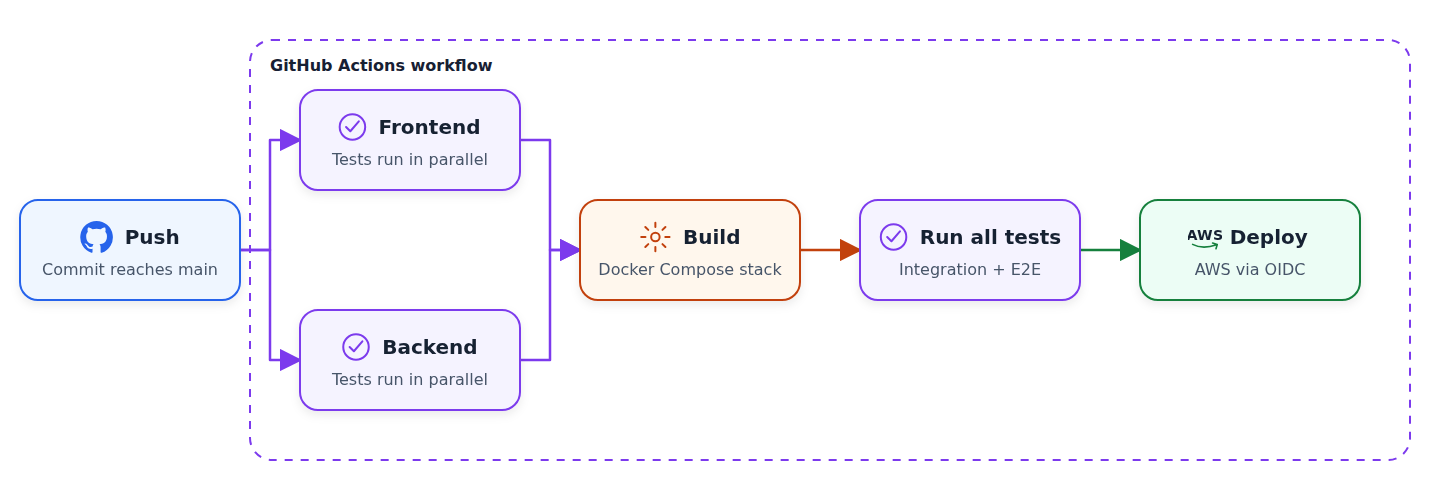
Let’s configure it. Every time we make a push to main, we want to:
run frontend and backend tests
build the containers
run the integration tests
run the end-to-end tests
if all the tests pass, deploy the new version
For the last step, the runner (the process that will deploy the application) will need to be able to access our AWS infrastructure. We will use OpenID Connect (OIDC) for this: the runner will assume a role with the necessary permissions and update the application.
Create the role and the workflow:
Create a CI/CD pipeline that:
- runs backend and frontend tests in parallel
- builds the Docker Compose stack and runs integration and end-to-end tests against it
- deploys to AWS using a GitHub OIDC role
- validates that the deploy is successful by checking the health endpoint
The finished workflow uses a restricted AWS role for deployment.
Change something in the application, commit, and push to see it go live.
When we’re done, we need to delete all the resources created by CloudFormation:
aws cloudformation delete-stack --stack-name sdip
aws cloudformation wait stack-delete-complete --stack-name sdip
Let’s recap what we have done so far:
We created the frontend application with React
Then we defined the frontend-backend API with OpenAPI specs
Based on the specs, we created the backend
Next, we added database support with SQLite and SQLAlchemy to the backend
To make it easier to deploy the application, we put both frontend and backend inside one container. The backend serves the frontend.
To go to production, we replaced SQLite with Postgres.
Next, we simplified running everything locally with Docker Compose
Once everything was in Compose, we created an end-to-end test
We took the application that worked locally and deployed it to AWS using CloudFormation
Finally, we created a CI/CD deployment pipeline to deploy every change automatically.
But we still need to do a lot more for the app to run reliably:
Dev and prod environments
Observability: logs, metrics, alerts
Using AI as the first responder when the application stops working
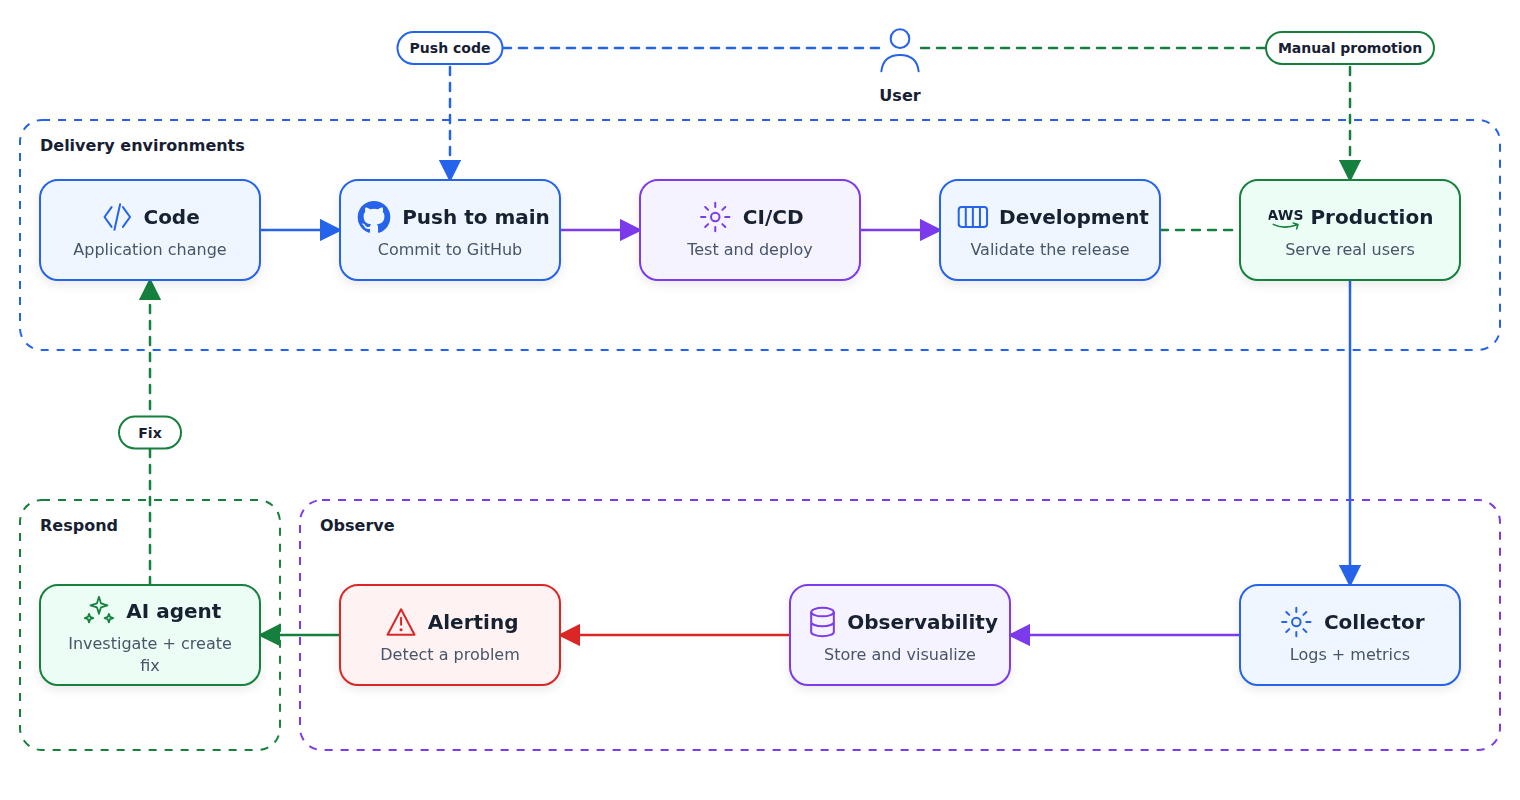
We’ll cover it in the next lesson.
Comments
Nothing yet. Say the first thing.
Sign in to join the conversation.